

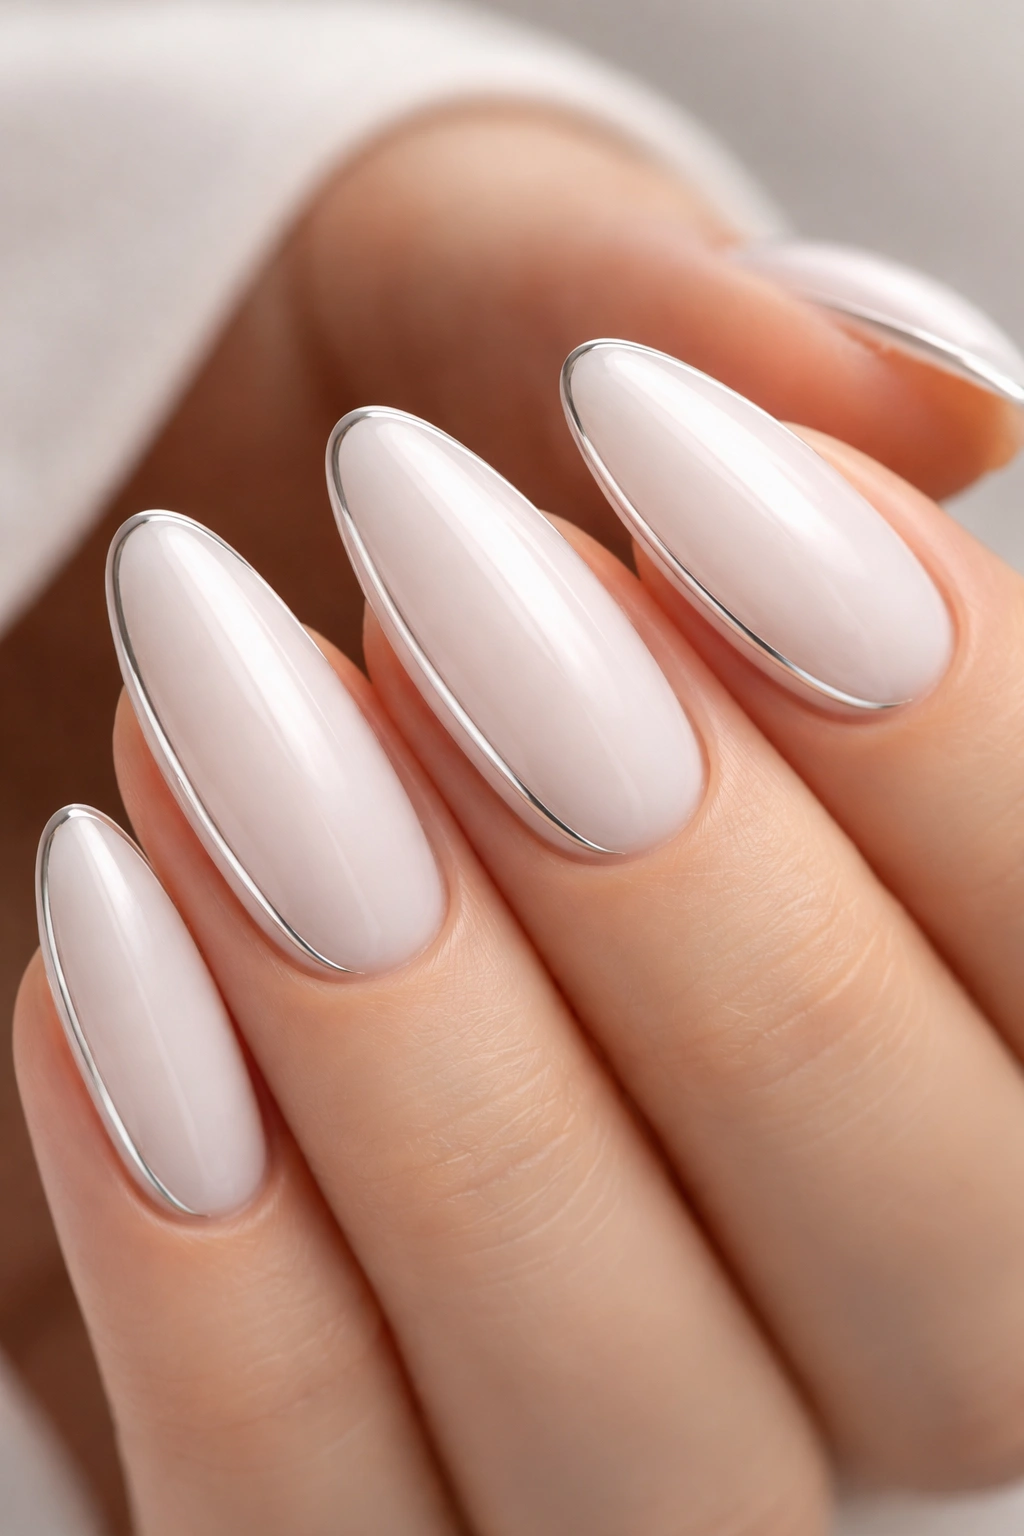
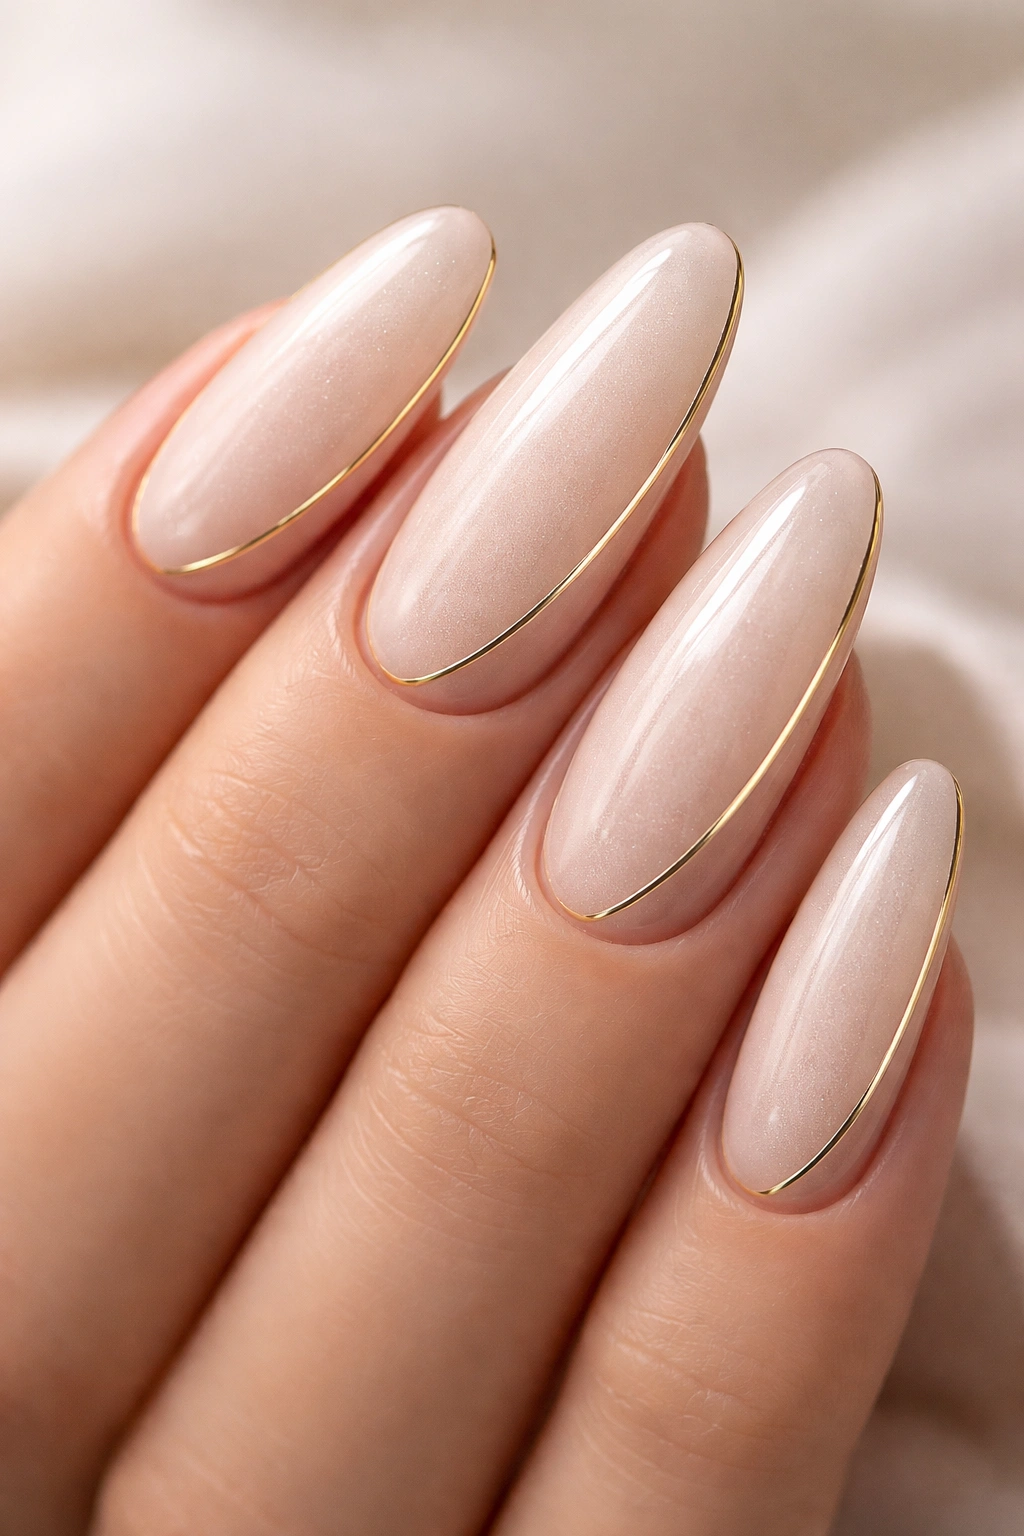
Long oval nails in a side French manicure style have become one of the most elegant and flattering nail shapes for anyone wanting to elongate their fingers while maintaining a refined, sophisticated look. Unlike traditional center-line French manicures that follow a classic horizontal pattern, side French designs move the accent line or color block to the edge of the nail — typically toward the outer corner — creating a modern, directional aesthetic that feels both current and timeless. This simple shift in placement transforms how the eye travels across your nail, creating an optical illusion of added length and a sleeker silhouette than you’d get with conventional design placement.
What makes the side French approach so versatile is that it works beautifully across virtually every color palette, from ultra-minimalist monochromatic combinations to bold color contrasts, metallics, and even intricate accent art. The long oval shape itself is forgiving for daily wear — rounded enough that it won’t catch on everything, yet elongated enough to feel glamorous and intentional. Whether your style leans minimalist, feminine, artistic, or bold, there’s a side French variation that will speak to your aesthetic and feel like an extension of your personal taste rather than a trend you’re forcing.
The designs that follow span everything from whisper-soft neutral combinations perfect for professional settings to more daring color pairings and textured accents for anyone wanting to make a statement. Each design includes exactly what makes it work — the specific color combinations, the technique that brings it to life, and how to wear it with confidence in different settings.
1. Classic Cream and Gold Side French

This is the elevated, timeless version of the french manicure that works whether you’re at a board meeting or a wedding reception. A soft, warm cream base coats the entire nail, providing a clean canvas that feels sophisticated without being stark. The side accent uses a thin but visible gold foil or metallic stripe that runs along the outer edge of the nail, catching light as your hand moves and adding understated luxury to an otherwise minimal design.
Why It’s a Timeless Choice
The magic of this combination lives in the contrast between warmth and simplicity. Cream is subtle enough to feel professional, yet slightly warmer than white, which prevents it from reading as clinical or clinical. Gold — whether applied as a thin metallic stripe, a micro chrome line, or stamped foil — adds just enough shine to keep the design from feeling boring without tipping into costume territory. This pairing works across all skin tones because the warmth in both colors adapts beautifully to cool, warm, and neutral undertones.
Application Techniques and Details
- Use a soft cream polish with excellent opacity — you want full coverage in just two coats to keep the base looking clean and not streaky
- Apply the gold stripe using a thin liner brush and metallic gold gel polish, or use gold foil applied with sticky gel base and sealed with topcoat
- The stripe should be roughly 2-3mm wide, running from the free edge starting near the outer corner and extending toward the base of the nail at a slight diagonal
- Seal everything with a glossy topcoat to make the cream look polished and the gold gleam with subtle movement
- This design is forgiving for natural nail length and works especially well on ovals between 6-12mm past the fingertip
Pro tip: If you’re nervous about drawing a perfectly straight line, use striping tape as a guide or ask your technician to hand-paint it for a slightly softer, more organic edge that still reads as intentional.
2. Minimalist Black Accent Line with Pearl
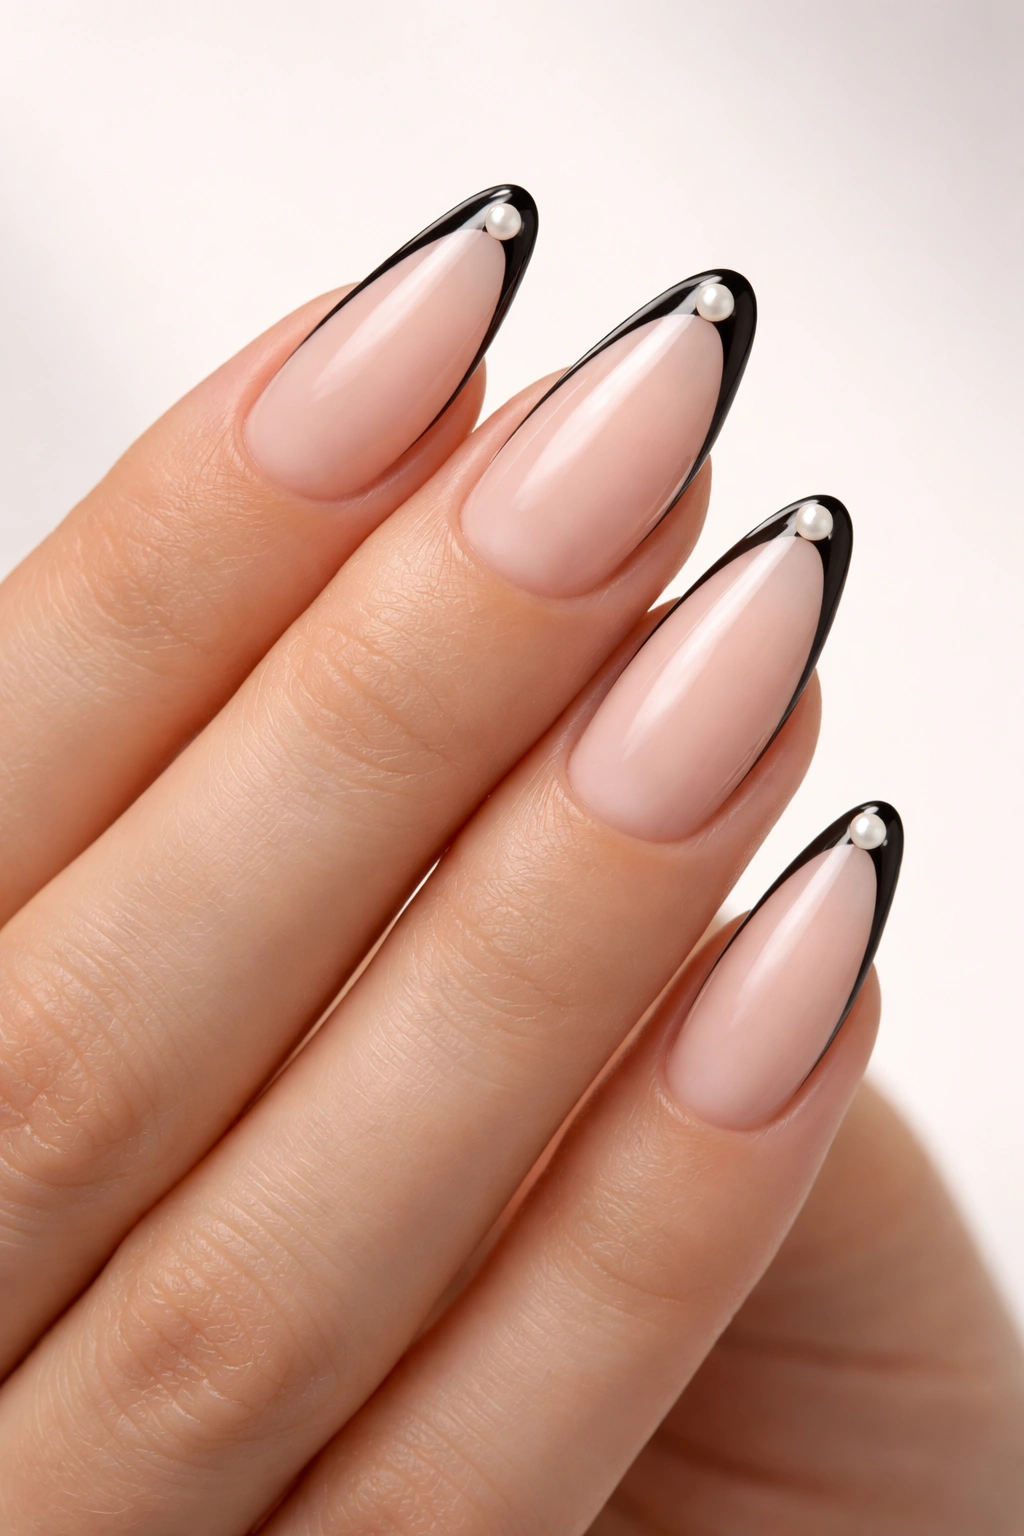
For anyone who wants graphic impact without maximum color, this design pairs a sheer, pale pink base with a thin black accent line running along the outer edge, finished with a dot of pearl or opal at the outer corner where the line terminates. It’s architectural without feeling harsh, and the addition of that single pearl detail lifts it from stark into elegant and refined.
The Appeal of Graphic Simplicity
Black line work on pale pink creates a high-contrast graphic quality that draws the eye and makes the nail look instantly longer due to the directional line. The black stripe is what gives this design its modern edge — it’s unexpected compared to metallic or traditional French accents, yet it remains unmistakably polished. Adding the pearl detail at the terminus point softens the graphic severity while adding dimension and a subtle sparkle that catches light when your hands are at rest.
Color and Finish Combinations
- Base: Sheer pink or pale blush — something translucent enough that you can still see skin tone through it, creating that glazed, almost naked-nail effect
- Accent line: Deep matte black applied with a thin liner brush or striping brush, with a glossy topcoat to make it pop against the matte or satin base
- Pearl detail: Use a single pearl cab (2-3mm), opal dust, or a small pearl stud positioned exactly at the outer corner where the line ends
- Finish: Glossy topcoat over the entire nail unifies the design and lets both the black line and pearl catch light from different angles
Worth knowing: The success of this design depends entirely on having a sharp, clean black line. If you’re doing this at home, invest in a thin striping brush and use black gel polish that cures cleanly without feathering.
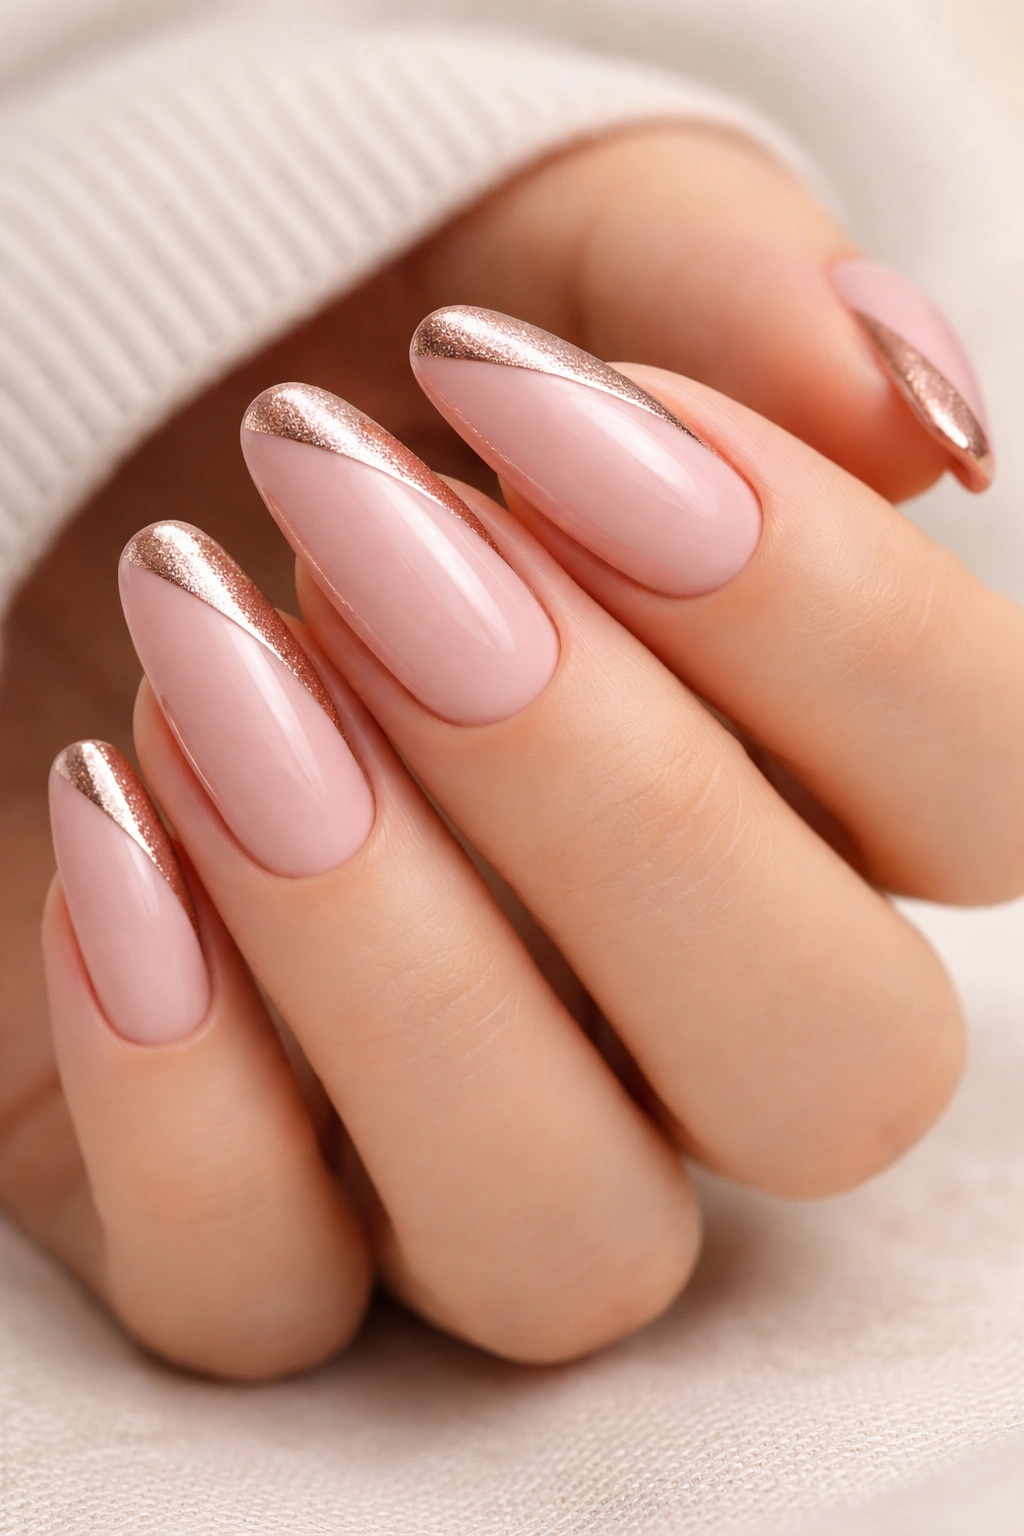
3. Soft Pink with Rose Gold Side Stripe
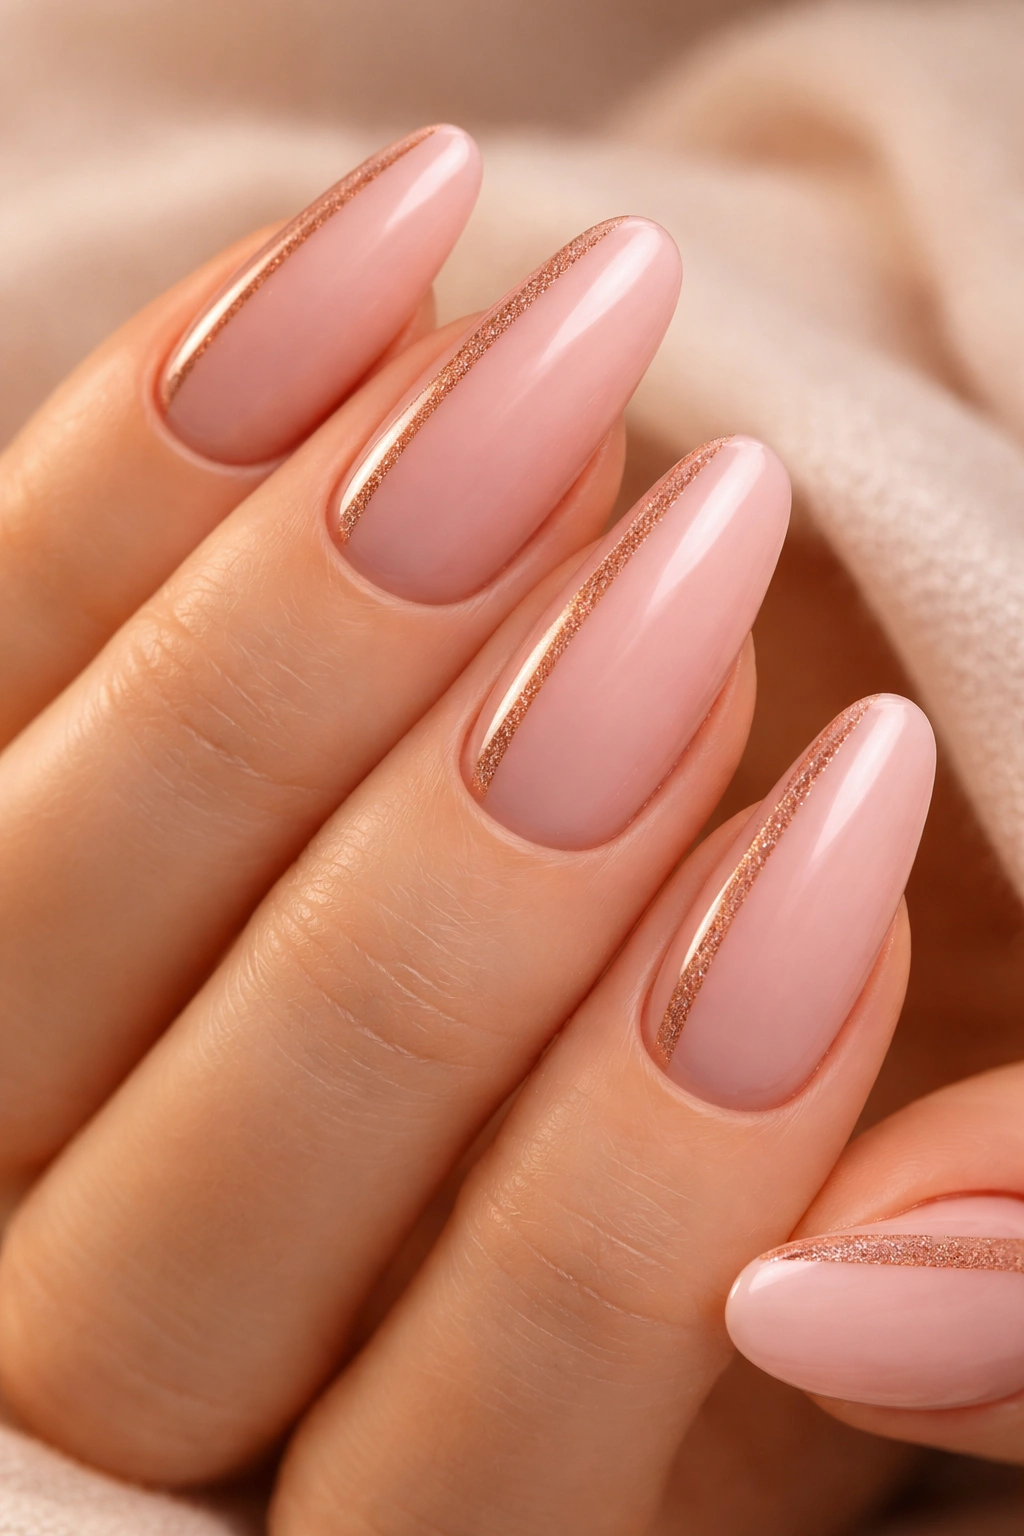
A delicate blush pink base becomes infinitely more interesting when paired with a warm rose gold vertical stripe on the outer edge. This combination feels feminine without being girly, and the rose gold adds dimension and warmth that makes the pale pink appear deeper and more intentional than it would on its own.
How Warm Metallics Change Perception
Rose gold is the perfect bridge between traditional yellow gold and modern chrome — it reads as warm and flattering without the obvious shine of pure gold, while still providing enough light reflection to make the design feel special. Against soft pink, rose gold creates a color harmony that feels cohesive rather than contrasting. The rose gold isn’t fighting the pink for attention; instead, it’s enhancing it and drawing focus to the shape and structure of the nail itself.
Creating the Side Stripe Effect
- Base coat: Two thin coats of soft, warm pink — ensure the color is opaque and even
- Rose gold application: Use either a rose gold chrome powder applied over sticky gel, or a thin stripe of rose gold foil applied with gel adhesive base
- Stripe width and placement: A 3-4mm stripe positioned approximately 2-3mm from the outer edge of the nail, running from the base to the free edge
- Topcoat: A glossy, UV-stable topcoat that won’t yellow and will keep the rose gold gleaming without looking plastic
- This design works beautifully on natural nails and doesn’t require excessive length — even 5-6mm past the fingertip shows off the design
Insider note: If you want the rose gold to feel more integrated rather than striped, you can apply it in a gradient fade from the edge inward, creating a sunset effect that’s softer than a hard-line stripe.
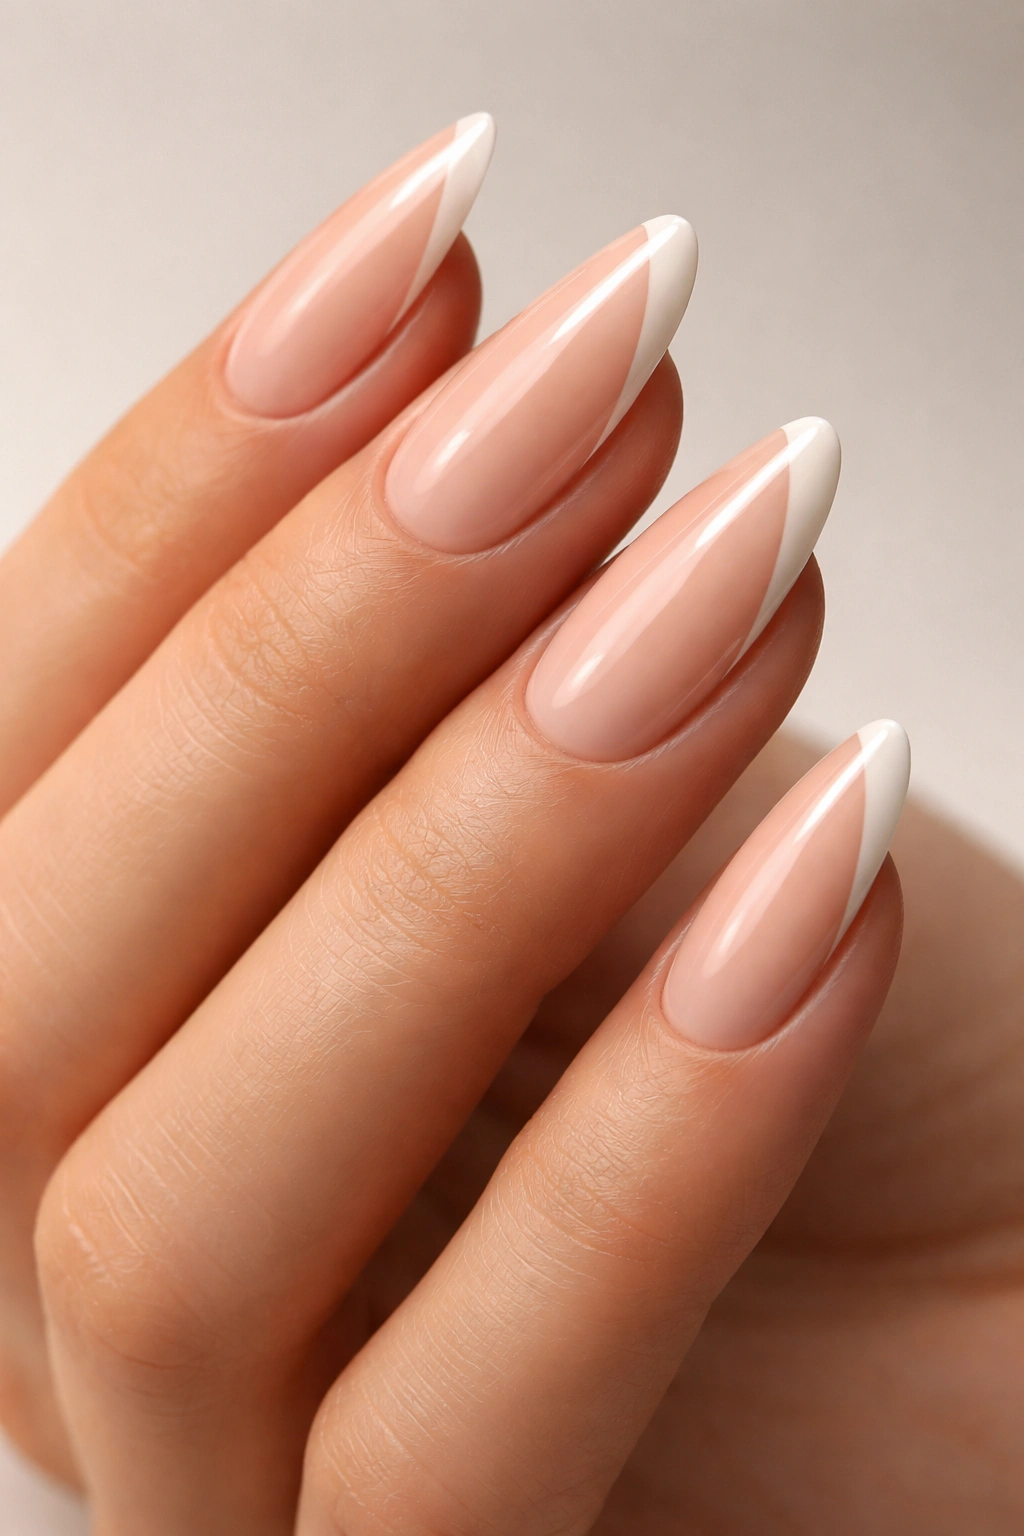
4. White Ombre to Nude Side French
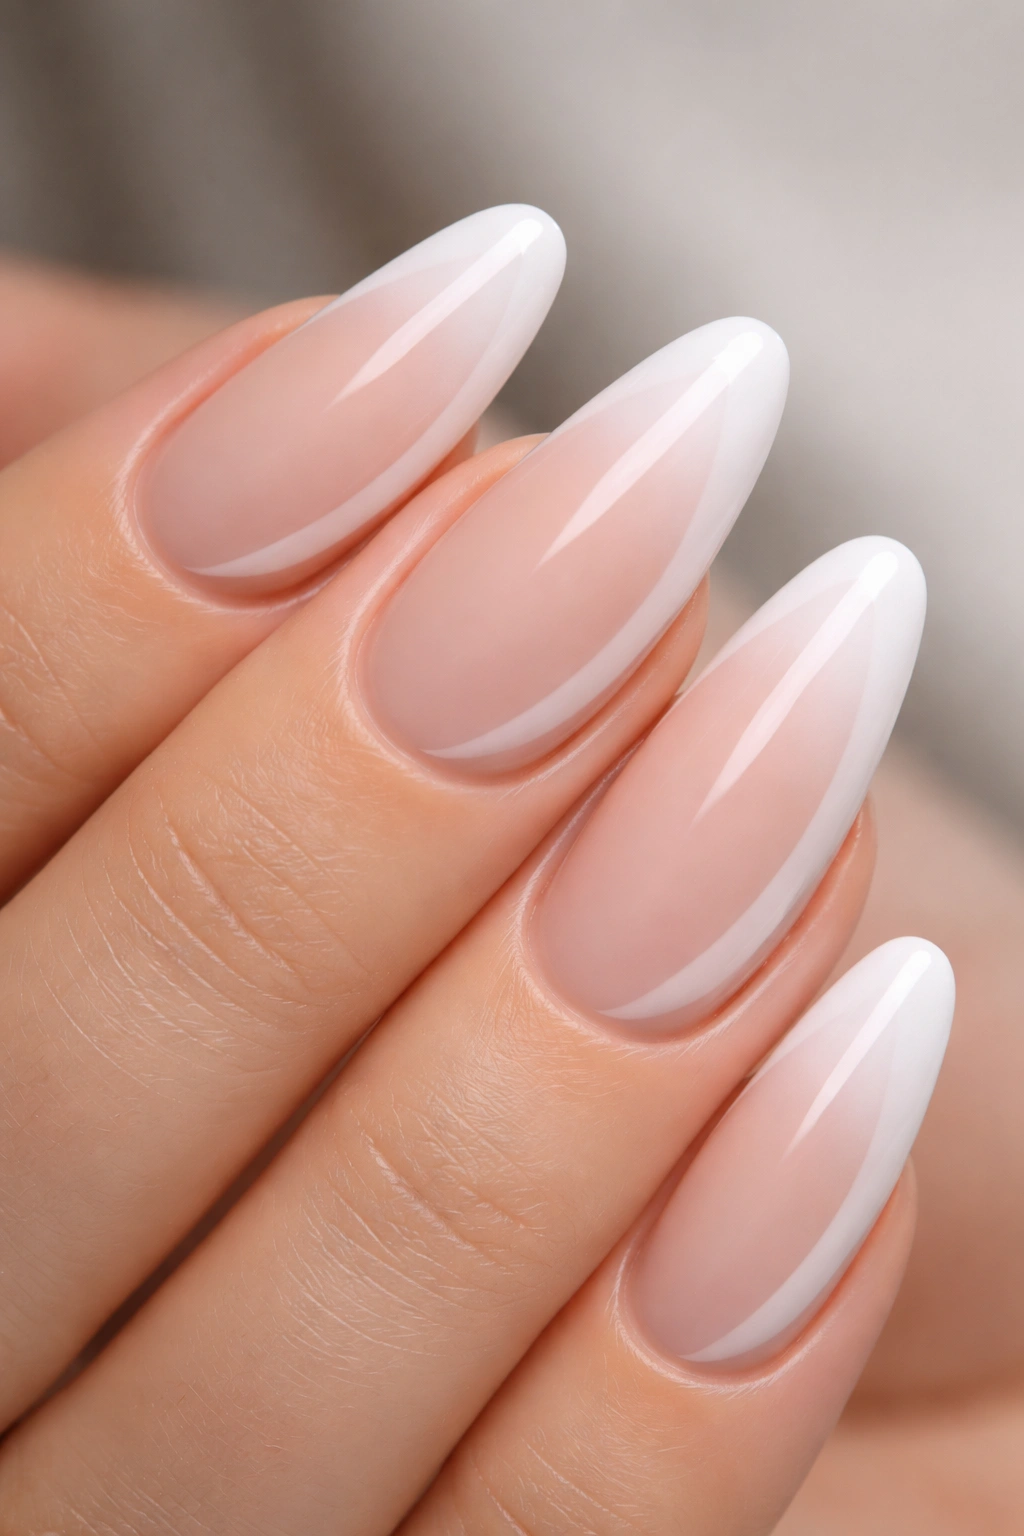
This design uses a gradient technique where white near the inner third of the nail gradually transitions to warm nude as it approaches the side and free edge. The result is a classic French manicure element that’s been repositioned and softened, creating depth and interest without introducing a second bold color.
The Psychology of Gradient Design
Ombré and gradient effects create visual interest through transition rather than contrast. Here, the white-to-nude gradient guides the eye from the base of the nail toward the side edge, making the nail appear longer than it actually is due to the directional flow. The soft nude finish prevents the design from reading as stark or clinical, while the white near the base provides the clean, refined feeling of a traditional French manicure.
Mastering the Ombre Technique
- Start with a clean base: White polish as your brightest shade, applied to approximately the inner third of the nail
- Create the gradient: Using a makeup sponge or gradient sponge, dab a sponge-applied mix of white and nude polish into the space between the white and the pure nude edge, creating a diffused transition zone
- Build the gradient: It takes 2-3 sponge applications to create a smooth transition, so be patient and let each layer set slightly before adding the next
- Apply topcoat: A single thick coat of glossy topcoat locks the gradient in place and blurs any harsh lines, creating a seamless blend
- Alternative method: Soft gel polishes are easier to blend than traditional polish — you can apply white, then nude, then use a soft brush to blend the overlap zone before curing
Pro tip: The best gradients have a transition zone that spans roughly the middle third of the nail. If your gradient is too quick (white directly next to nude with no transition), it reads as two solid colors rather than a true ombré effect.
5. Tortoiseshell Accent Side Design
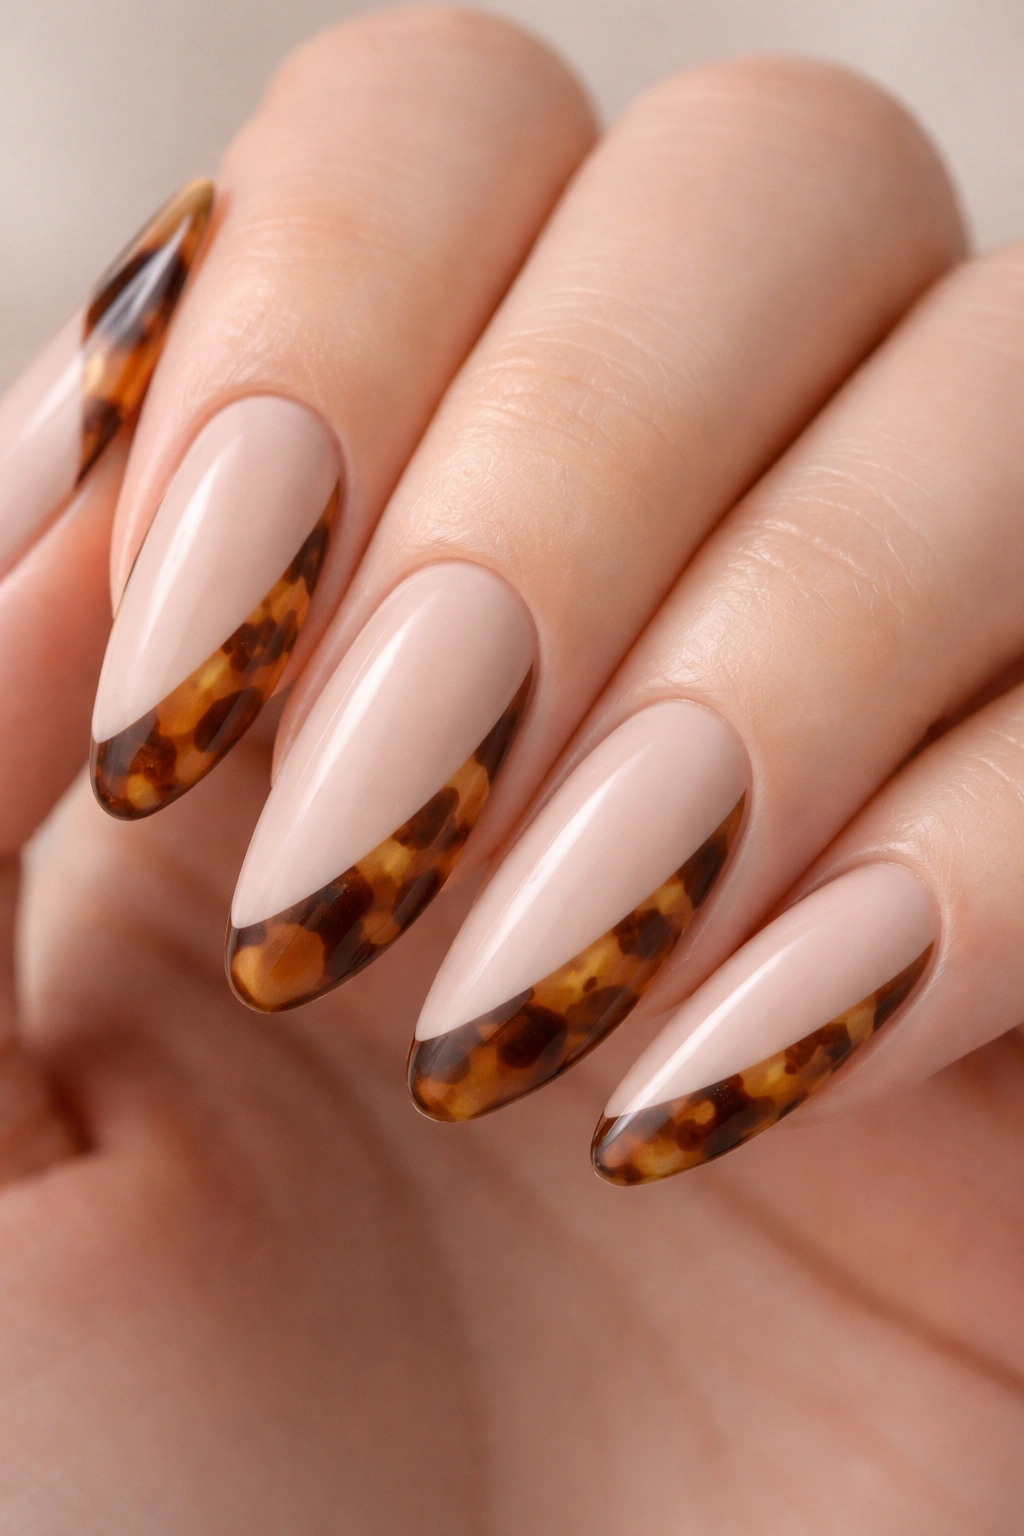
Tortoiseshell patterning brings warmth and texture to the nail, and when concentrated on the side or outer edge as an accent rather than covering the entire nail, it feels more refined than a full tortoiseshell manicure. A cream or nude base provides the backdrop, while warm browns, golds, and subtle blacks create that iconic tortoiseshell pattern concentrated on the outer third of the nail.
Why Tortoiseshell Works as a Side Accent
Tortoiseshell’s natural, organic patterning works beautifully as an accent because it’s complex enough to catch the eye without needing to dominate the entire nail. By placing the pattern on the side rather than the tip, you’re creating a frame of visual interest that enhances the shape of your nail and creates the impression of more length. The warm tones in tortoiseshell — tans, warm browns, golds — also work beautifully across virtually every skin tone, making this a genuinely universal design.
Technique Breakdown for Tortoiseshell Accent
- Base: Cream or soft neutral nude covering the entire nail in two opaque coats
- Tortoiseshell placement: Using a thin brush, apply the tortoiseshell pattern (irregular shapes using warm brown, burnt orange, gold, and black) exclusively to the outer third of the nail, leaving clean space between the pattern and the center of the nail
- Pattern application: Work freehand for organic randomness, or use tortoiseshell stamper plates for consistency — either approach works beautifully on this scale
- Edges: Keep the inner edge of your tortoiseshell pattern soft and diffused rather than rigidly lined, which looks more intentional and artistic
- Seal: Two topcoats create depth and make the pattern look integrated rather than applied on top
Worth knowing: Tortoiseshell is actually easier to execute than you might think because imperfection is part of the aesthetic. Slight unevenness in color or pattern placement actually adds to the organic, handmade appeal.
6. Milky White with Thin Chrome Line
Milky white — that glazed, almost-frosted appearance that’s been popular in recent years — is stunning when paired with a ultra-thin chrome or liquid metallic line down the side. The milky finish is so soft and feminine that the chrome line provides necessary contrast and structure, preventing the design from reading as too minimalist or incomplete.
The Magic of Milky Finishes
Milky white has a specific, intentional look that’s become synonymous with polished, put-together nails. It’s opaque enough to look complete, yet translucent enough that you can still faintly see skin tone beneath it, creating that coveted “your nails but better” effect. A traditional French accent would disappear against milky white, but a thin, high-shine chrome line pops against the soft, diffused surface and creates a modern contrast that feels intentional and specific.
Application Strategy
- Milky white base: Use a true milky white gel or builder polish — not regular white, but something with that specific frosted, glazed quality (brands like Orly, OPI, and Beetles make excellent milky whites)
- Application: Two-three thin coats ensure even coverage and that signature milky look without looking painted-on
- Chrome line: Use chrome powder applied over a sticky topcoat, positioned 1-2mm from the outer edge as a very thin accent stripe
- Alternative: A thin line of chrome gel polish (using a 0000 striping brush) creates a slightly softer chrome effect with more control
- Finish: A thick glossy topcoat creates shine and sets the chrome without making it look separated from the base
Pro tip: The thinner your chrome line, the more modern and refined it reads. Resist the urge to make it thick — a line that’s roughly 1mm wide is actually more striking than a chunky 3-4mm stripe.
7. Nude Base with Negative Space Side Art
Negative space design — where the nail polish is intentionally absent, revealing bare or natural nail beneath — has moved beyond minimalist geometric shapes. A side French interpretation uses a nude base with a deliberate unpainted area on the side or outer edge, creating a clean line where the polish ends and skin tone shows through, almost like a reverse accent line.
The Power of What You Don’t Paint
Negative space designs work because they use the contrast between polish and bare nail as the design element itself. Instead of adding color or shine, you’re creating visual interest through absence. This approach feels modern, artistic, and intentional — it looks nothing like a design mistake, but rather like something carefully planned. The side placement makes the negative space part of the French manicure tradition while feeling contemporary and fresh.
Executing Negative Space Design
- Base color: A warm nude or beige that harmonizes with your natural nail tone, making the transition seamless where it meets negative space
- Outline the design: Use painter’s tape or a stencil to define exactly where your polish ends and negative space begins — the line needs to be clean and intentional
- Avoid the negative space: Apply your nude polish carefully around the taped area, taking care not to paint where you want bare nail to show
- Remove tape while still slightly tacky: This prevents peeling the polish edge and leaves a clean line between polish and bare nail
- Seal only the polish: Apply topcoat only to the polished area to avoid sealing over the negative space (which would look odd)
Worth knowing: Negative space works best when the unpainted area is at least 2-3mm wide. Anything thinner reads as a mistake rather than intentional design.
8. Blush Pink with Metallic Rose Gold
A deeper, warmer blush pink becomes dramatically more interesting when you add a thick metallic rose gold accent along the side. Unlike thin stripe designs, this version uses a bolder rose gold presence — roughly 4-5mm wide — that still maintains the side French placement but with much more visual weight and presence.
Color Harmony and Depth
Blush pink has just enough depth that it can stand up to a strong metallic accent without getting overpowered. The rose gold adds shine and sophistication while the pink keeps the overall effect feminine and wearable. Together, they create a design that’s eye-catching enough for an evening event or special occasion, yet cohesive enough that it doesn’t feel costume-like or over-the-top.
Building the Design
- Base: Blush pink (a medium-toned pink, not too light and not too dark) in two opaque coats
- Rose gold accent: A chunky rose gold stripe on the outer side, created using rose gold gel, metallic Polish, or chrome powder over adhesive base
- Stripe placement: Start the stripe about 4-5mm from the edge and extend it to the free edge, angling very slightly from the edge inward toward the center of the nail
- Width and thickness: A 4-5mm wide stripe is bold enough to be a feature, not just an accent
- Optional detail: Add a thin line of rose gold shimmer along the inner edge of the stripe to define it and add extra dimension
- Finish: Glossy topcoat brings the rose gold to maximum shine
Insider note: This combination is especially stunning on someone with warm or golden undertones in their skin, as the rose gold will harmonize beautifully with your natural coloring.
9. Sheer Pink with Glitter Fade
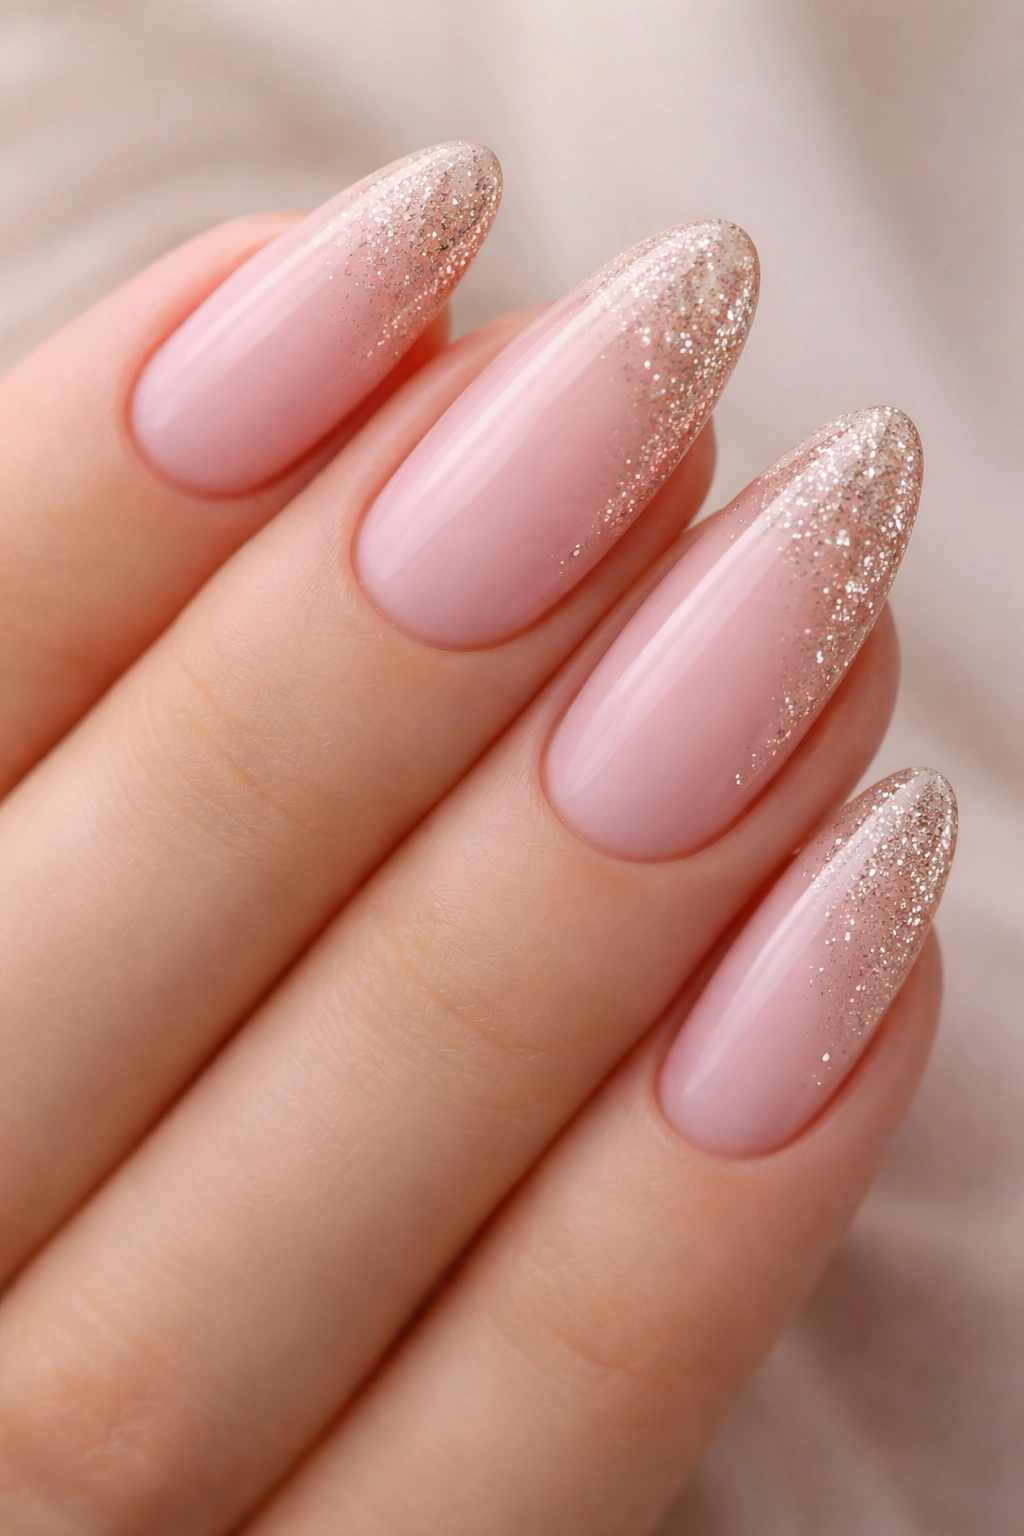
Sheer pink provides an incredibly soft, barely-there base for a side glitter fade that gradually increases in intensity from the center of the nail toward the outer edge. The glitter isn’t concentrated in one stripe; instead, it’s sprinkled sparingly near the nail bed and becomes progressively denser as it approaches the side edge, creating an ombré effect using sparkle rather than color.
Glitter Ombré as Subtle Glamour
This approach to glitter is far more refined than a solid glitter nail, because the gradually increasing sparkle creates visual movement and interest without overwhelming the design. The sheer pink base keeps the overall effect delicate and feminine, while the glitter fade adds just enough shine to catch light and feel special for occasions where you want subtle glamour rather than bold statement nails.
Creating the Glitter Fade
- Sheer pink base: Use a very translucent pink gel or polish that lets your natural nail shine through — this is essential for the sheer effect
- Choose your glitter: Small, iridescent, or rose gold glitter works beautifully; larger chunky glitter tends to read as too heavy over sheer base
- Build the fade: Apply glitter-embedded gel base or topcoat to the nail, placing glitter more densely toward the outer side edge and leaving the area closer to the cuticle nearly glitter-free
- Method 1: Pre-mix glitter into clear topcoat and apply in layers, adding a glitter-heavy topcoat layer last
- Method 2: Use sticky gel base, sprinkle glitter where you want it densest, brush away excess, and build additional layers
- Cure and seal: Multiple thin topcoats blend the glitter layers together and prevent them from looking separated or chunky
Pro tip: The transition from glitter-light to glitter-dense should be gradual and organic, not obviously sectioned. Think of it as a gradient where you’re controlling density rather than using hard lines.
10. Mauve with Silver Geometric Side
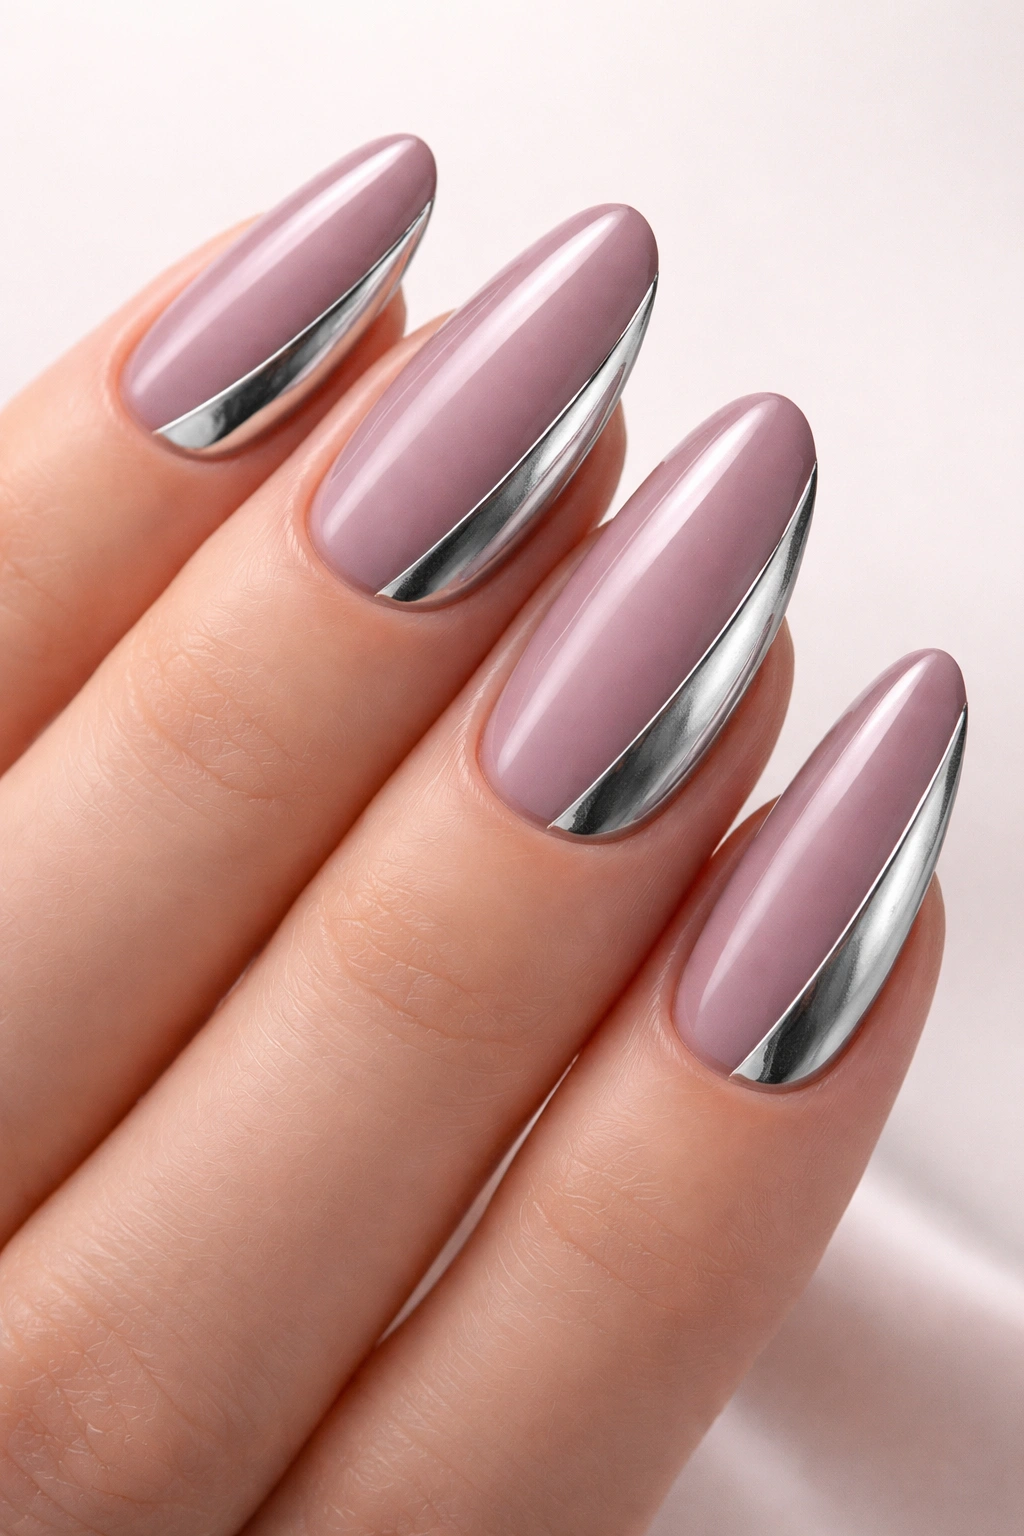
A dusty mauve base becomes modern and architectural when paired with a geometric silver design on the outer side. The geometry could be a series of triangles, a striped pattern, a lightning bolt, or angular shapes — the key is that the pattern is clearly geometric and concentrated on one side of the nail rather than distributed across the entire surface.
Geometric Pattern as Modern Sophistication
Geometry feels more contemporary than organic patterns, and when executed in metallic silver over mauve, it creates a sophisticated, intentional aesthetic that appeals to anyone with a modern or minimalist sensibility. Mauve itself is a neutral that doesn’t feel safe or boring — it’s a color that exists in that space between purple and brown, giving it inherent sophistication. Combined with silver geometry, it reads as art-forward and intentional.
Geometric Design Options and Execution
- Striped side pattern: Thin parallel silver lines running from the base to the free edge, spaced 1-2mm apart, covering the outer third of the nail
- Angular shapes: Silver triangles, diamonds, or abstract angular shapes clustered on the outer side edge
- Color-blocked geometry: Use silver foil or chrome to create clean-edged geometric shapes with high-impact shine
- Application technique: Use stamper plates for consistency, or hand-paint using a thin geometric brush for organic precision
- Placement: Keep the geometry toward the outer side edge, leaving at least half the nail with clean mauve base
- Finish: Glossy topcoat makes the silver geometry gleam against the matte or satin mauve
Worth knowing: Geometric patterns require precision — they read as intentional or sloppy with very little middle ground. If hand-painting makes you nervous, invest in good stamper plates or ask your technician to hand-paint the design.
11. Warm Ivory with Copper Accent
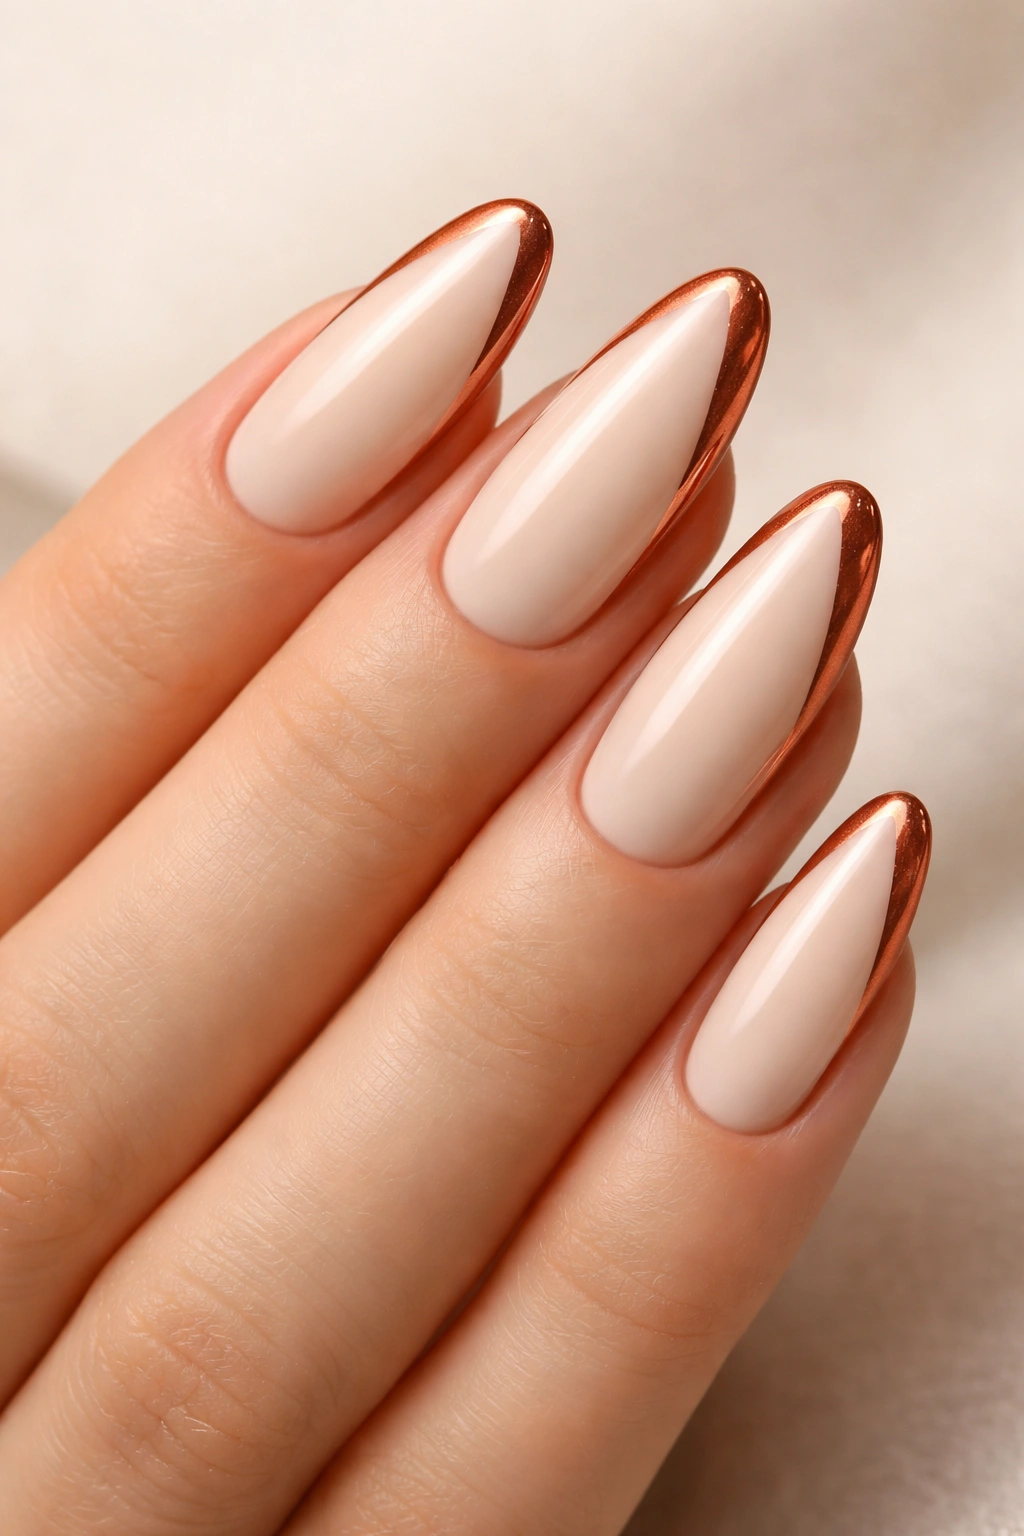
Warm ivory (almost like a soft, pale champagne) paired with a copper metallic side stripe creates a warmth and richness that feels luxurious without being over-the-top. Copper is underrated as a nail accent — it’s warmer and more flattering than gold, yet shinier and more interesting than rose gold, making it a perfect complement to ivory’s understated elegance.
Why Copper Outshines Other Metallics
Copper has a warmth that reads as both sophisticated and slightly unexpected. It’s not the predictable gold; it’s not the trendy rose gold — it’s warm, organic, and genuinely flattering across an incredibly wide range of skin tones. Against ivory, copper creates a subtle but noticeable contrast that draws the eye without feeling loud or overstated.
Building the Copper-and-Ivory Design
- Ivory base: A warm, pale cream with just a hint of champagne tone — not pure white, but not peachy either
- Application: Two coats for full opacity without looking thick or plastic
- Copper accent stripe: A 3-4mm stripe of copper metallic applied to the outer edge, using either copper foil with adhesive base or copper metallic gel polish
- Stripe angle: Slightly diagonal from the outer corner toward the nail bed, following the natural contour of the nail
- Definition: Use a thin line of copper shimmer along the inner edge of the stripe if you want it slightly more defined
- Finish: A single thick topcoat seals everything and lets the copper glow against the soft ivory
Insider note: Copper looks especially stunning on deeper skin tones, where the warmth of the metal creates beautiful contrast and harmony with warm undertones.
12. Glazed Donut Nails with Gold Detail
The glazed donut nail trend — a creamy, translucent nude with a glossy finish that looks like, well, a glazed donut — becomes a perfect canvas for a side French interpretation with a thin gold detail. The inherent warmth and subtle gleam of glazed nails pairs beautifully with gold, creating a design that’s simultaneously trendy and timeless.
What Makes Glazed Donut Nails Special
Glazed donut nails are genius because they look expensive, refined, and intentional while being incredibly forgiving to apply. The translucency means imperfections disappear, and the creamy tone works across virtually every skin tone. The high-shine finish is inherent to the technique, so the nails look polished without additional layers of topcoat.
Applying Glazed Donut with Gold Accent
- Glazed base: Use a specific glazed donut gel polish (brands like Essie, Orly, and Gel-X offer these specifically), or layer a sheer nude base with thick, glossy topcoat that you cure to create that glazed effect
- Multiple thin coats: Apply 2-3 thin coats rather than thick ones — thinness creates that translucent quality
- Gold detail options: A thin gold foil stripe on the side edge, a gold dust ombré fade, or small gold flakes scattered along the outer edge
- Gold placement: Keep it toward the outer side to maintain the side French aesthetic
- Final topcoat: A single thick layer of UV-stable topcoat creates the signature glazed shine and locks in any gold detail
Pro tip: The thicker and glossier your final topcoat, the more pronounced the “glazed” effect. Don’t skimp on topcoat here — it’s what creates the signature look.
13. Nude with Marble Accent Side
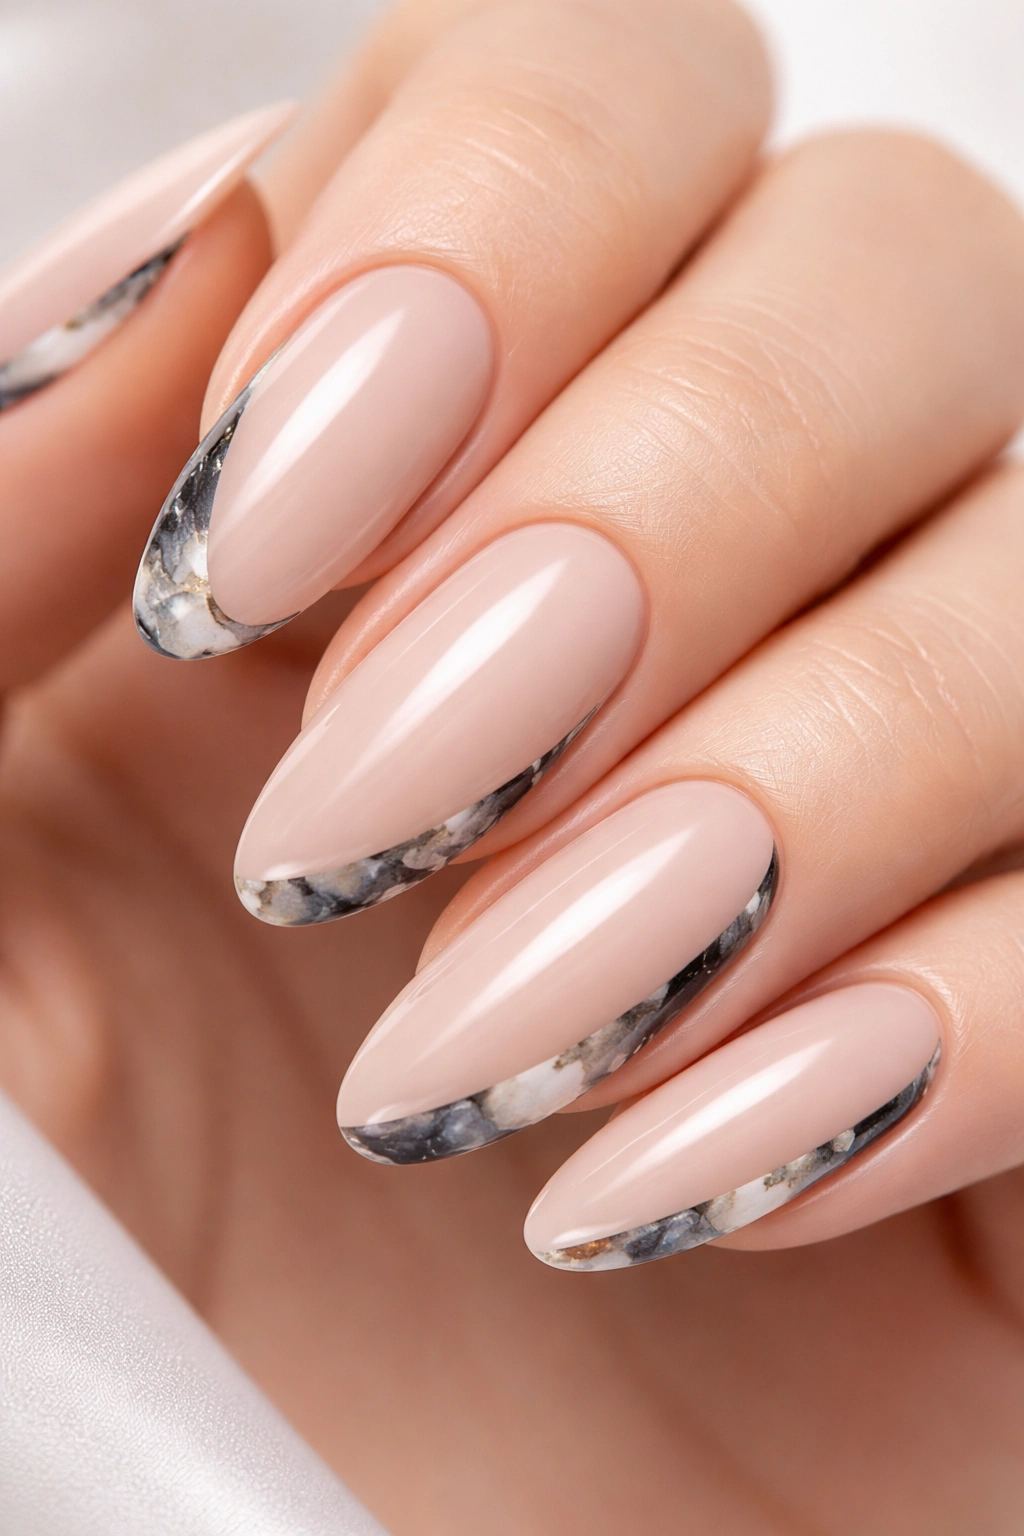
A neutral nude base becomes instantly more interesting when paired with a marble-effect accent on the side or outer corner. Marble patterns — created using veining techniques with black, gray, and white against the nude — feel artistic and intentional, especially when contained to the side rather than covering the entire nail.
Marble as Sophisticated Pattern
Marble has become a classic modern design element because it’s simultaneously artistic and elegant. Unlike random freehand designs, marble patterns read as intentional and professional due to their geometric, vein-like structure. When concentrated on the side of the nail, marble creates a focal point that enhances the shape rather than overwhelming it.
Creating Convincing Marble Effect
- Nude base: A warm, medium-toned nude that will serve as your background for the marble pattern
- Marble colors: Black, dark gray, and white — these create the classic marble look
- Water marble method: Drop the marble colors onto a water surface, drag through them with a toothpick to create veining patterns, then dip your nail to transfer the pattern
- Dry brush method: Use a very thin brush with black and gray polish to hand-paint veining patterns directly onto the nude base, then soften with a damp brush
- Placement: Concentrate the veining on the outer third of the nail, leaving the center relatively clean
- Topcoat: Multiple thin topcoats blend the design together and prevent it from looking painted-on
Worth knowing: Water marble is trickier than it looks — if you’re not confident with that technique, the dry brush method with a practiced hand is actually easier to control and create exactly where you want the pattern.
14. Champagne with Pearl Embellishment
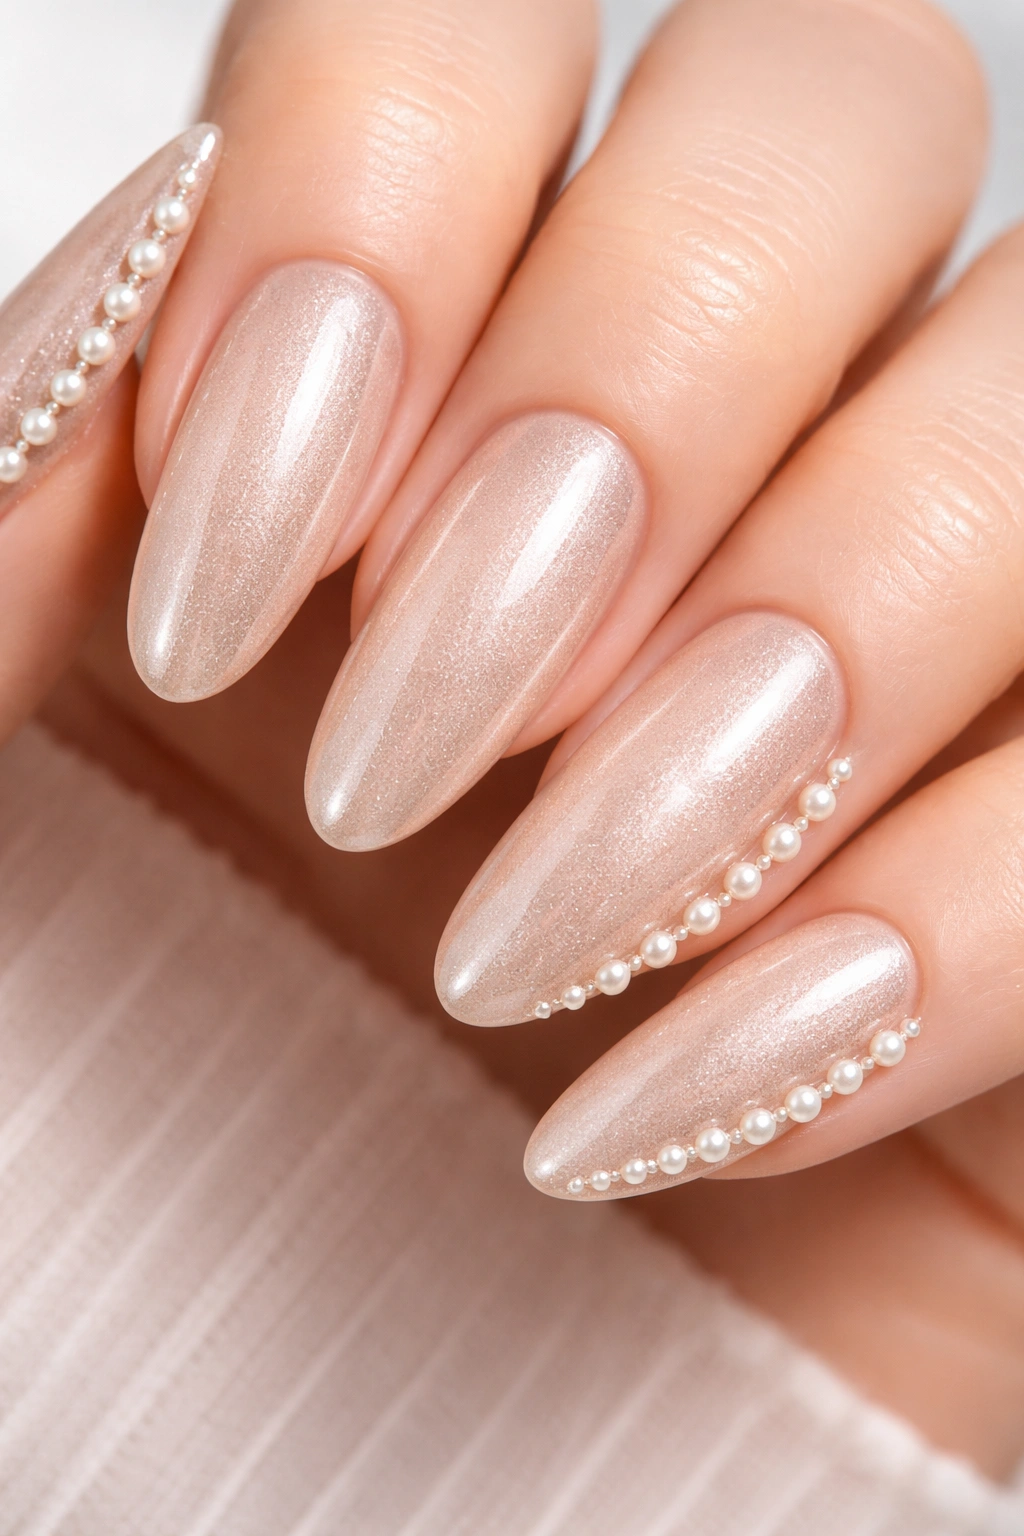
A shimmery champagne or pale gold base becomes genuinely luxurious when topped with small pearl cabs or studs arranged along the outer side edge, creating a design that reads as jewelry for your nails. The champagne shimmer provides color and shine, while the pearls add dimension and craftsmanship.
Elevated Nail Design Through Embellishment
Adding three-dimensional elements like pearls immediately elevates a nail design into high-fashion territory. The combination of shimmer (from the champagne) and dimension (from the pearls) creates visual interest from every angle and catches light as your hands move. This design feels special enough for formal occasions, yet the champagne base keeps it wearable and elegant rather than costume-like.
Building the Champagne and Pearl Design
- Champagne base: A shimmery champagne or pale gold gel polish with good opacity — you want the shimmer visible and beautiful
- Application: Two coats for full coverage with that gorgeous shimmer showing through
- Pearl embellishment: Use 2-3mm pearl cabs placed along a line running down the outer side edge of the nail
- Placement technique: Create a tacky base of top coat or adhesive, place each pearl with tweezers, and press down gently to set
- Pearl arrangement: Space them evenly from the free edge toward the base, creating a line of dimension
- Final topcoat: Cure a topcoat layer (either gel or traditional) that surrounds the pearls without covering them completely — they should remain dimensional and three-dimensional
Insider note: This design is especially beautiful for evening events, weddings, or any occasion where you want nails that feel like jewelry rather than polish alone.
15. Pale Pink with Burgundy Side Line
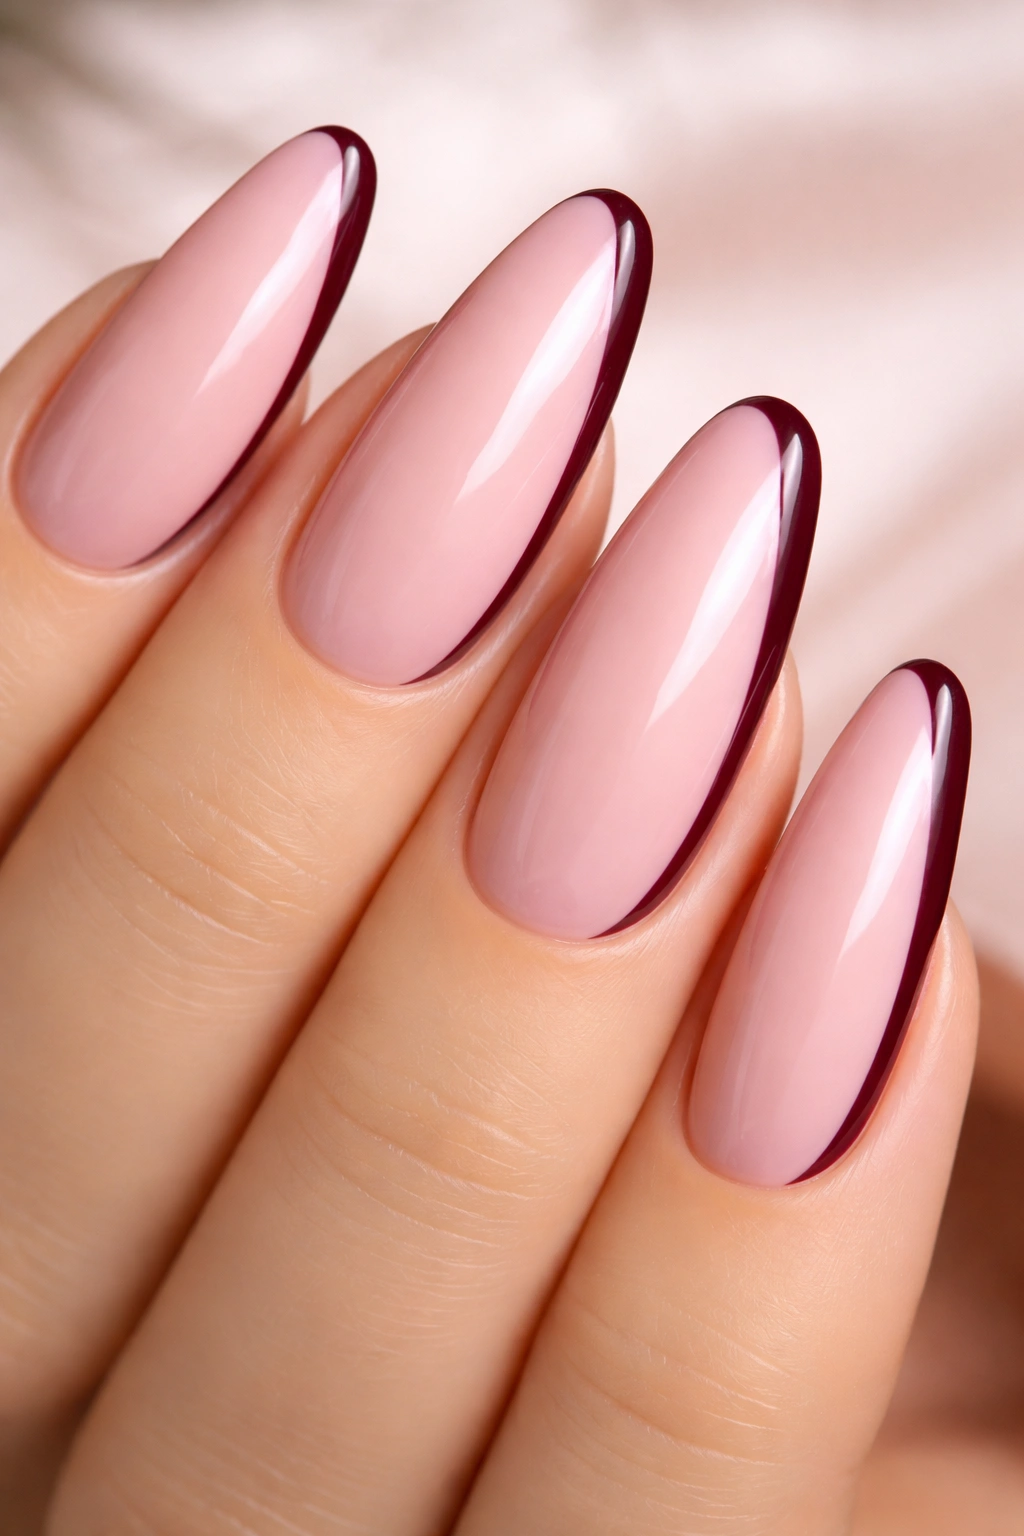
A soft, pale pink provides an incredibly romantic and feminine base for a bold side accent in deep burgundy or wine color. The contrast between the delicate pink and the rich, deep burgundy creates visual impact while the side placement keeps it sophisticated rather than overwhelming.
Color Contrast as Design Statement
This pairing works because the colors, while contrasting, have a tonal relationship — both have depth and richness, which prevents the combination from reading as clashing. The pale pink is soft and romantic, while the burgundy is sophisticated and deep, creating a design that feels both feminine and grown-up simultaneously. The side placement means the impact is contained and elegant.
Executing the Pale Pink and Burgundy Design
- Pale pink base: A very light, soft pink — almost a baby pink or blushing pink tone that reads as romantic and delicate
- Application: Two opaque coats ensure the pink reads as intentional rather than sheer
- Burgundy side line: A 2-3mm stripe of deep burgundy applied to the outer side edge of the nail
- Stripe placement: Run the burgundy line from the free edge, angling very slightly inward toward the nail bed as it extends toward the base
- Precision application: Use a thin liner brush and burgundy gel or traditional polish — precision matters here because you want a clean edge between the soft pink and the bold burgundy
- Topcoat: A single thick glossy topcoat unifies the design and lets both colors gleam
Pro tip: If you want the burgundy line to feel slightly softer and less harsh against the pale pink, apply the burgundy first, then lightly feather the pink edge over it with a dry brush to create a very subtle blend zone.
Final Thoughts

Long oval side French nails give you the perfect framework for experimenting with color, shine, and design without the design overwhelming the beautiful shape you’ve chosen. The key to making any of these 15 designs work is remembering that the side placement itself is the modern twist — it moves away from predictable center-line French placement and transforms these nails into something that feels contemporary and intentional.
What makes these designs work across so many different aesthetic preferences is the versatility of the side French framework itself. Whether you’re drawn to minimalist metallics, rich color combinations, textured effects, or embellished details, the side placement keeps everything grounded and sophisticated. The long oval shape elongates your fingers and provides a generous canvas without requiring extreme length or daily maintenance of sharp, fragile points.
The best design for you ultimately depends on your lifestyle, personal style, and what occasions you’re dressing your nails for. Professional settings call for the cream and gold, minimalist black line, or soft metallics. Special occasions shine with the champagne and pearls, the blush and rose gold, or the burgundy accent. Everyday wear works beautifully with the glazed donut, the soft gradient, or the tortoiseshell accent — designs that feel special but don’t scream for attention.
Start with whichever design speaks to you most immediately, and remember that any of these can be modified slightly to match your personal preferences. Color swaps, different metallic finishes, or adjusted stripe widths mean you can make these designs completely your own while still capturing that sophisticated, elongating side French aesthetic that makes these nails so universally flattering.
