

Long oval nails are the sophisticated canvas that transforms the holiday season into something genuinely special. There’s something about that elegant, elongated shape that makes festive designs feel more refined than their shorter cousins — it gives you real space to work with intricate patterns, layered colors, and dimensional embellishments without overwhelming your fingertips. Whether you’re drawn to classic holiday reds and golds, modern minimalist designs with seasonal meaning, or the kind of glittery, eye-catching manicures that make people stop and ask where you got them done, long oval nails are your blank check for holiday creativity.
The beauty of this nail shape is that it flatters almost every hand type while feeling inherently festive and polished. Oval nails are softer and less aggressive-looking than stilettos, yet they still deliver that satisfying length and drama that makes a statement. During the holiday season, when you’re moving between family gatherings, holiday parties, work celebrations, and intimate dinners, having nails that feel both festive and appropriate for every occasion is genuinely valuable.
What makes a holiday nail design actually work, though, isn’t just slapping red polish on and calling it done. The designs that really turn heads balance color, pattern, and embellishment in ways that feel intentional. Some play with unexpected color combinations that still scream “holiday.” Others lean into classic motifs but execute them with enough sophistication that they don’t feel kitschy. And some take minimalist approaches that let quality materials and subtle details do the heavy lifting.
Below are fifteen different festive long oval nail designs that span the full spectrum — from timeless classics to trends with staying power, from DIY-friendly options to designs worth splurging on at a professional salon.
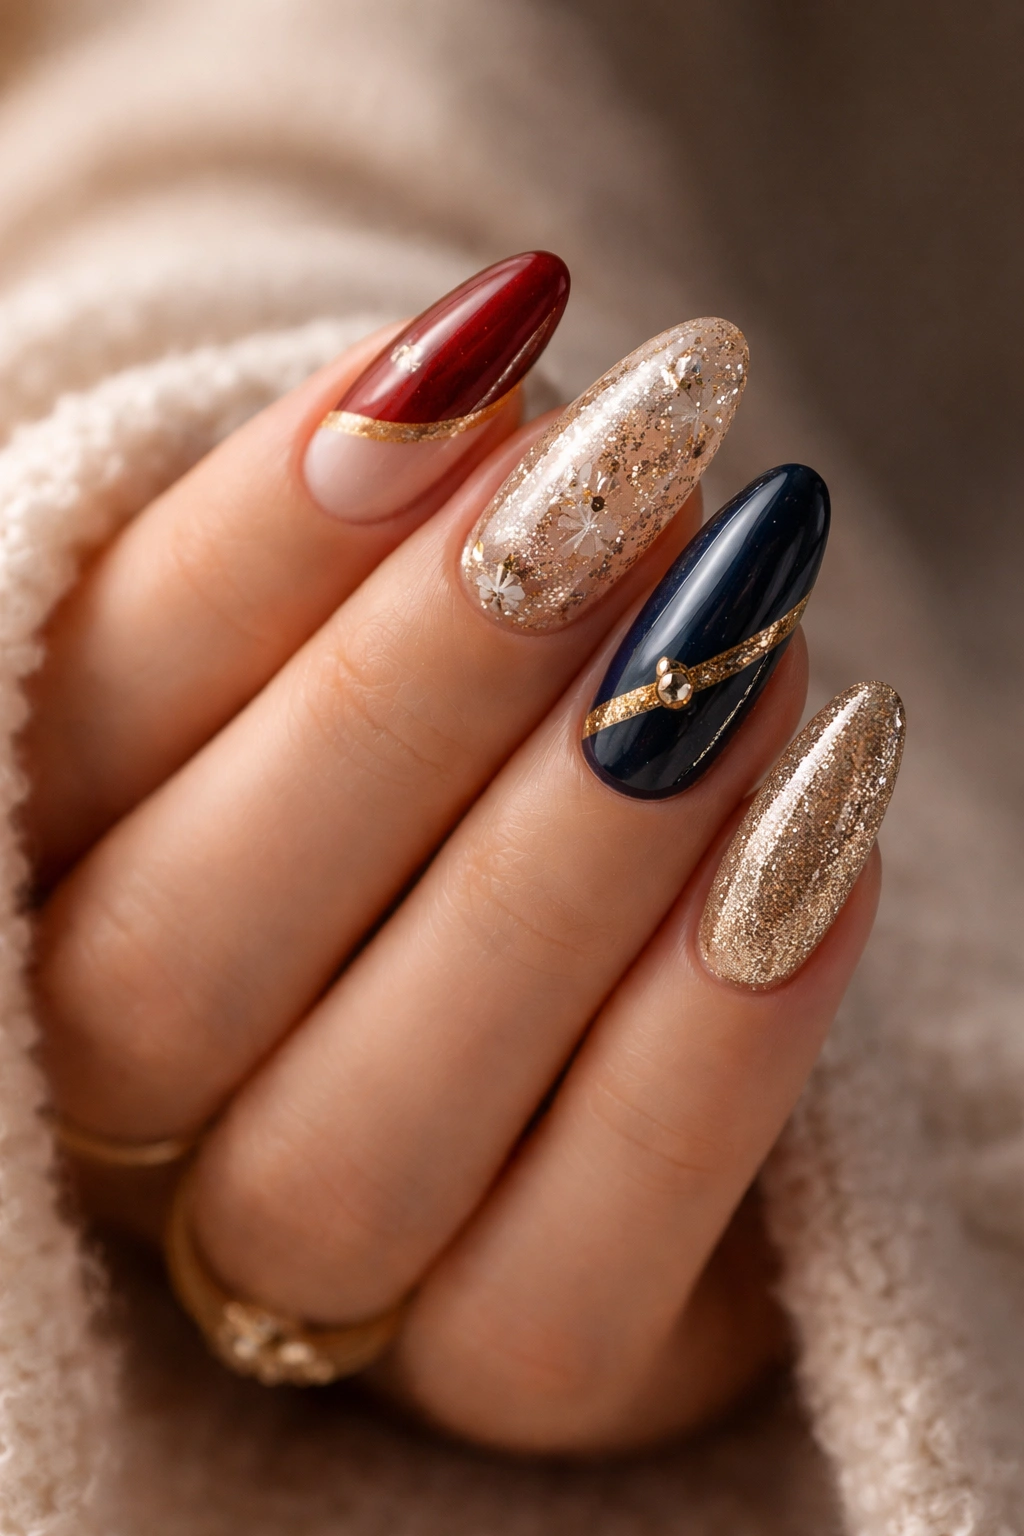
1. Deep Red with Gold Leaf Accents
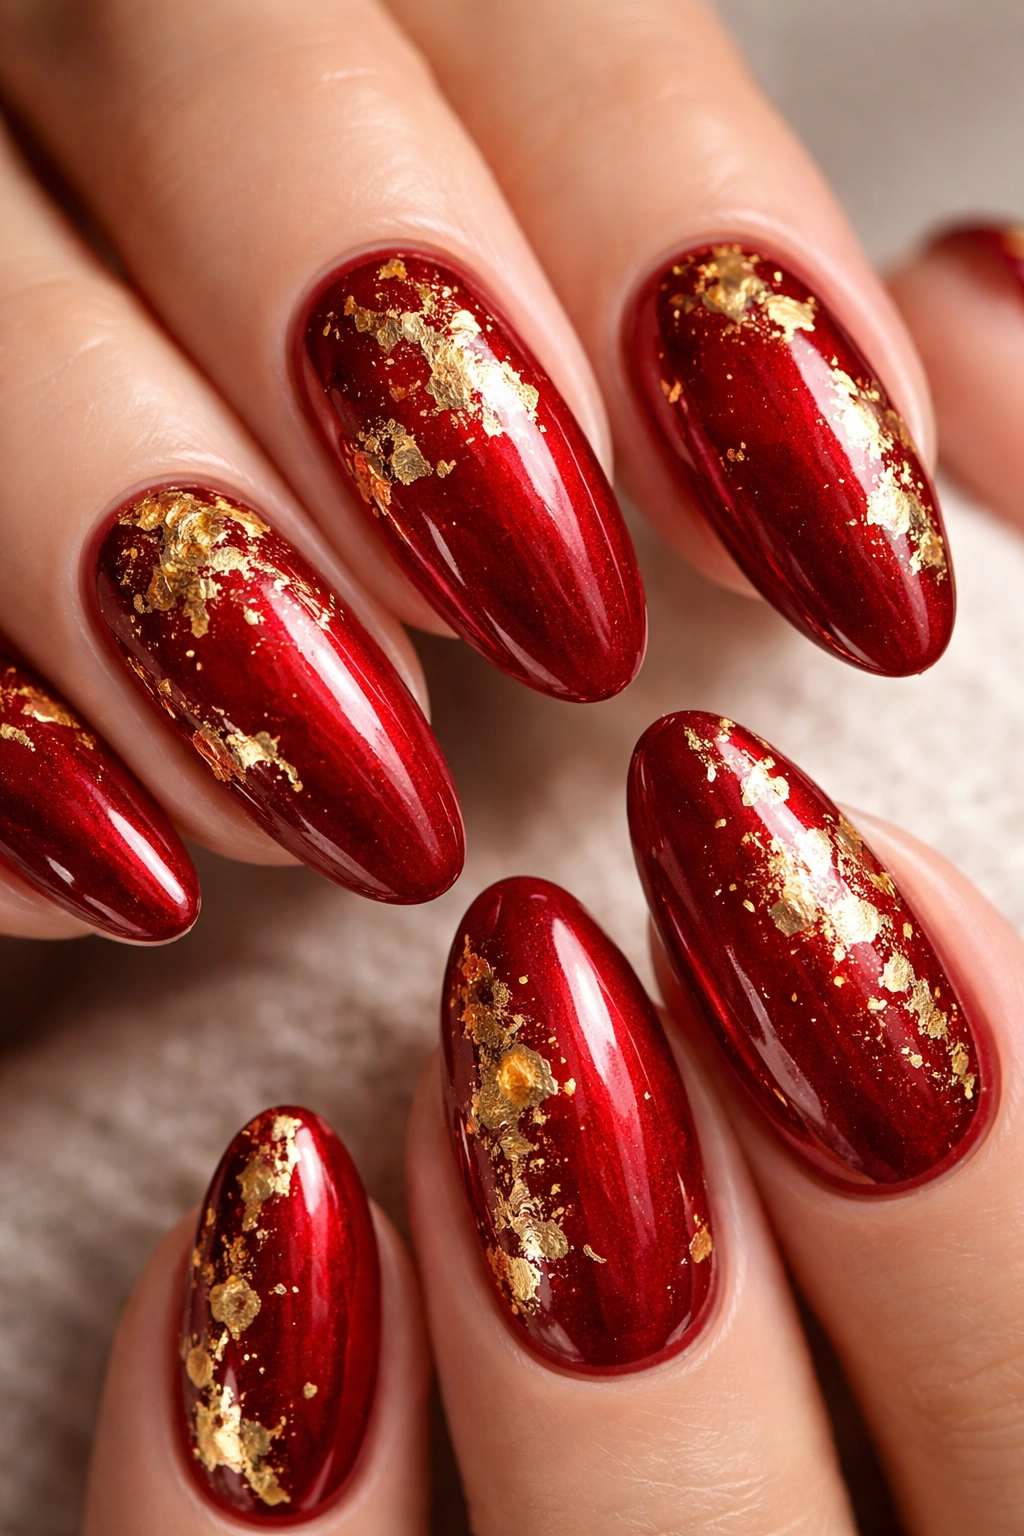
A rich, true red polish creates the foundation for one of the most recognizable holiday colors, but where this design earns its elegance is in the gold foil accents scattered deliberately across each nail. The gold isn’t a full coverage — instead, irregular geometric pieces of gold leaf are layered on top of the red base, creating a sense of movement and luxury that feels intentional rather than random.
Why This Design Works for the Holidays
The deep red-and-gold combination speaks directly to luxury and tradition without needing additional embellishment. This pairing has been associated with premium gift wrapping and high-end holiday aesthetics for decades, so it automatically reads as festive while remaining appropriate for professional settings and formal events. The hand-placed gold leaf technique also means each nail is genuinely unique, giving your manicure a custom, artisanal quality that feels more special than mass-produced designs.
Application Tips and Details
- Use a classic true-red shade (not orange-red or blue-red) as your base color for maximum holiday impact
- Real 24-karat gold leaf creates a warmer, more luxurious appearance than metallic gold paint, though both work
- Seal everything with a quality top coat to keep the gold leaf protected and prevent flaking
- Ask your mailer to vary the placement on each nail so the design feels organic rather than symmetrical
- This design shows beautifully on natural light and photographs exceptionally well for holiday cards or social media
Pro tip: If you’re doing this at home, use tweezers to place gold leaf precisely and press it down gently with your top coat brush — rushing the application is where most DIY gold leaf designs go wrong.
2. Emerald Green with White Snowflake Details
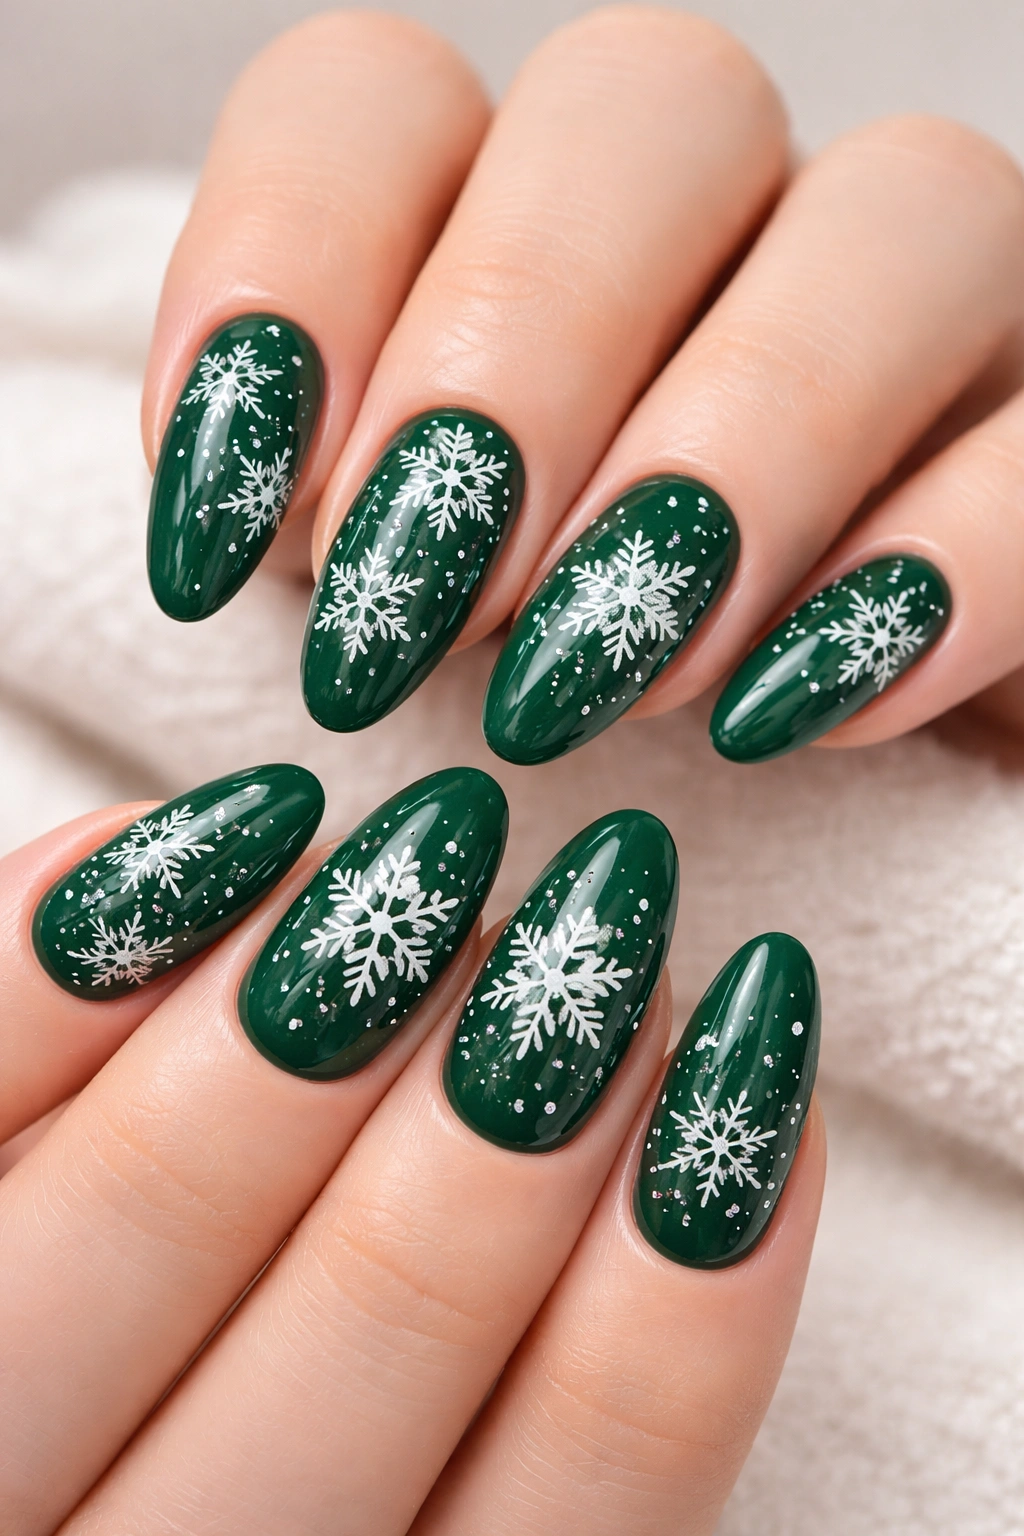
Emerald green is the sophisticated alternative to traditional holiday reds, and when paired with delicate white snowflakes hand-painted across the surface, it delivers instant holiday magic with a modern edge. The key to making this design feel elegant rather than costume-like is keeping the snowflakes detailed but not overwhelming — typically three to five per nail, sized proportionally to the oval shape.
Why Emerald Is the Underrated Holiday Hero
Deep jewel-tone greens have been climbing in popularity for holiday nails because they feel equally at home at a black-tie gala or a casual family brunch. The color evokes luxury without the predictability of red, and it’s flattering against almost every skin tone — deeper skin tones especially glow against the richness of emerald. The addition of white snowflakes keeps the design unmistakably seasonal without relying on glitter or overly cute imagery.
Making the Snowflake Details Look Professional
- Request hand-painted snowflakes rather than nail stickers, which can look cheap and lift at the edges
- Vary the snowflake sizes and designs slightly so they don’t appear template-identical
- White polish works beautifully, but white gel pen details offer more precision if your nail artist uses that technique
- Consider adding a few micro-rhinestones at select snowflake centers for subtle dimension
- The emerald base should be a cream or shimmer finish rather than glitter — this keeps the snowflakes as the visual focal point
Worth knowing: This design actually works beautifully with both cool and warm undertone metals, so you can wear gold or silver jewelry without it clashing.
3. Nude Base with Christmas Tree Silhouette
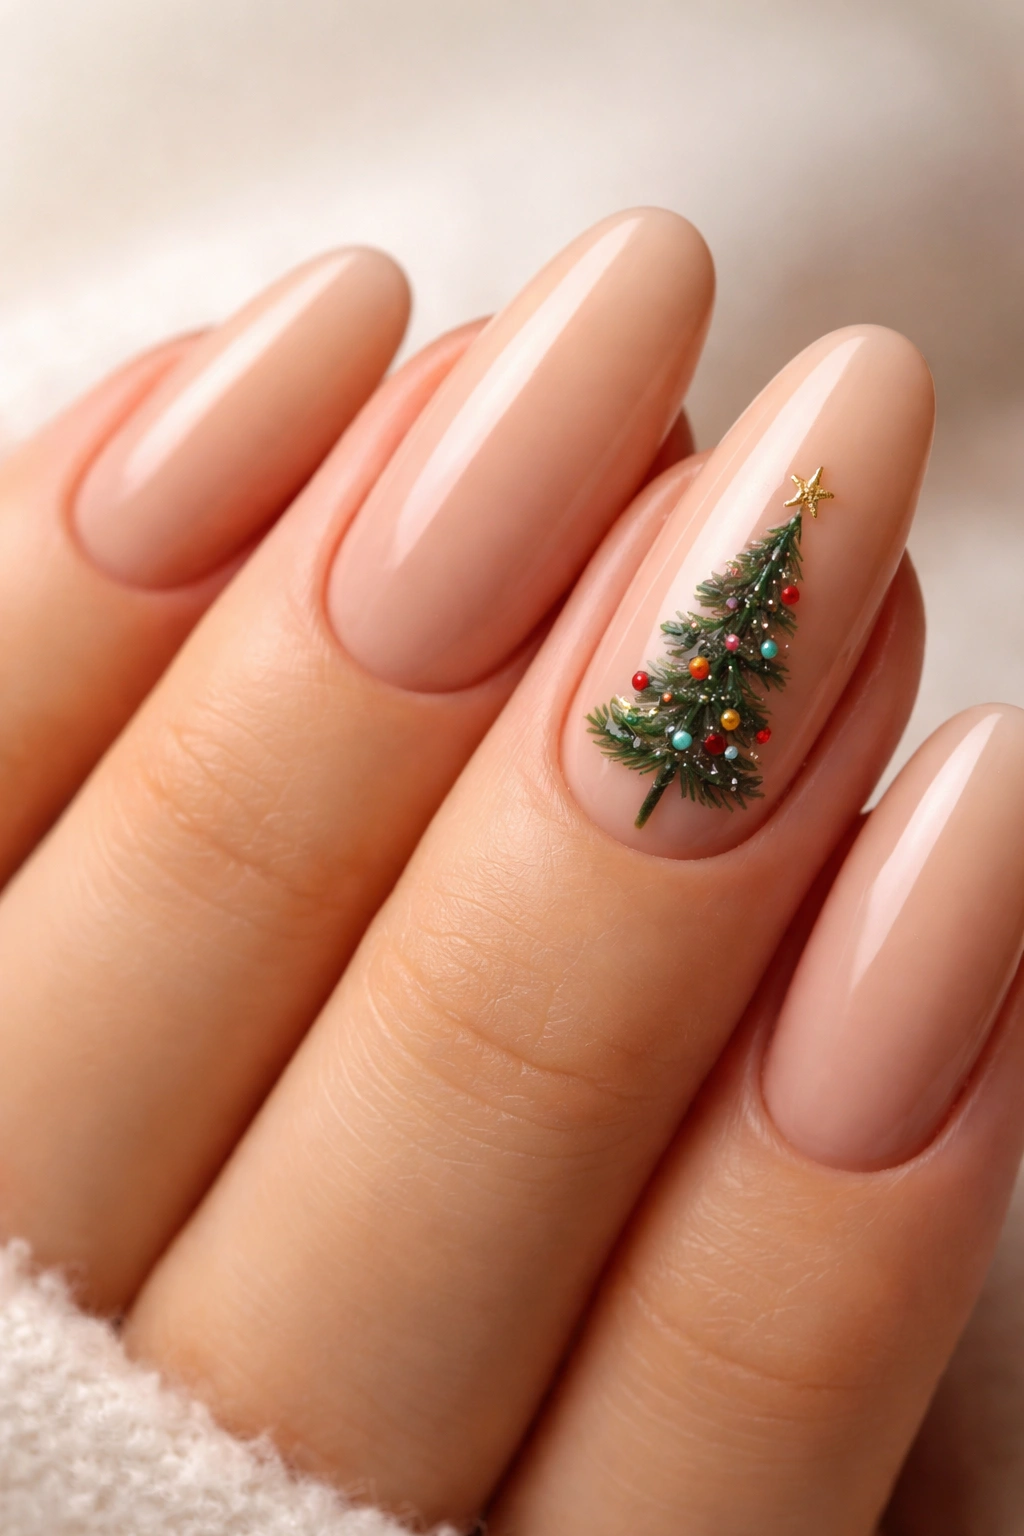
This design uses a nude or skin-tone base as a neutral backdrop, with a single evergreen tree silhouette — either a simple triangle outline or a fully detailed tree with branches — on the accent nail. The minimalist approach means the focus is on the tree itself, which typically features small hand-painted ornaments in red, gold, and green scattered across its branches.
The Art of Holiday Minimalism
Not everyone wants nails that scream “it’s December!” from across the room, and this design respects that preference while remaining unmistakably festive. The nude base reads as professional and elegant, while the singular accent nail with the Christmas tree provides just enough visual interest to feel intentional and seasonal. This is the design to choose when you need nails that work equally well in corporate settings and casual social gatherings.
Execution Details That Matter
- Neutral bases should lean toward warm beiges or soft taupes rather than pure white, which can look clinical
- The Christmas tree silhouette looks most elegant as a relatively simple shape — avoid overly intricate details that get lost on a small canvas
- Ornament dots should be different colors for each, typically in classic red, green, and gold
- A thin gold line outlining the tree adds sophistication without adding visual clutter
- Keep the design to just the accent nail; the other four nails remain solid nude
Pro tip: Seal this design with a matte top coat if you prefer a soft, skin-like finish, or use a high-shine top coat for more dramatic impact depending on your preference.
4. Burgundy with Gold Geometric Patterns
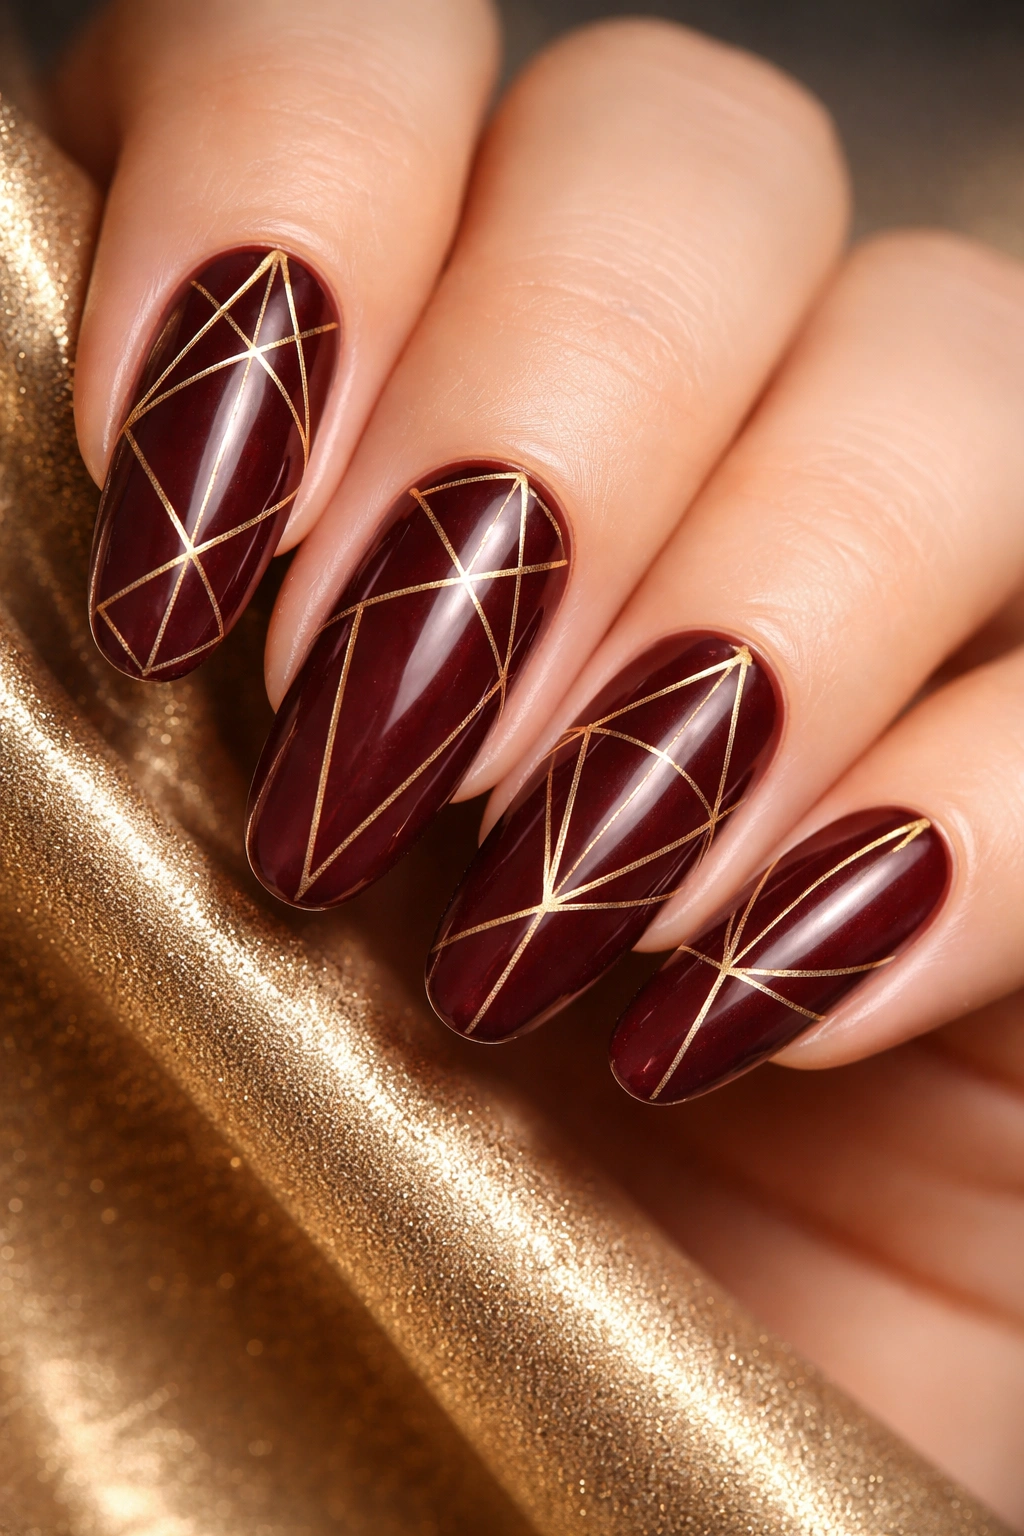
Burgundy is one of the richest, most flattering deep reds available, and when you layer gold geometric patterns across the surface — think thin lines creating triangles, hexagons, or abstract angular shapes — you create a design that feels contemporary rather than traditionally “christmasy.” The geometric approach keeps the holiday vibe sophisticated and fashion-forward.
Why Burgundy Over Basic Red
While classic red is undeniably festive, burgundy offers a level of refinement that works beautifully on long oval nails. The deeper tone creates better contrast with gold accents and feels slightly more elegant than bright red. Burgundy also tends to photograph better in different lighting conditions and photographs beautifully against both fair and deeper skin tones.
Geometric Pattern Application
- Thin gold lines should be consistent in width across all nails for a cohesive, intentional appearance
- Vary the geometric shapes slightly on each nail so the design doesn’t feel too rigid or template-based
- The patterns don’t need to cover the entire nail — often, leaving the bottom third or half solid burgundy creates better visual balance
- Consider leaving one nail with solid burgundy and no pattern to break up the visual rhythm
- These fine lines require either a gold gel pen or an experienced hand with a detail brush — precision is everything
Worth knowing: This design pairs beautifully with gold jewelry and creates a polished, put-together aesthetic that lasts through multiple holiday events without looking dated or tired.
5. White Base with Red and Green Striped Tips
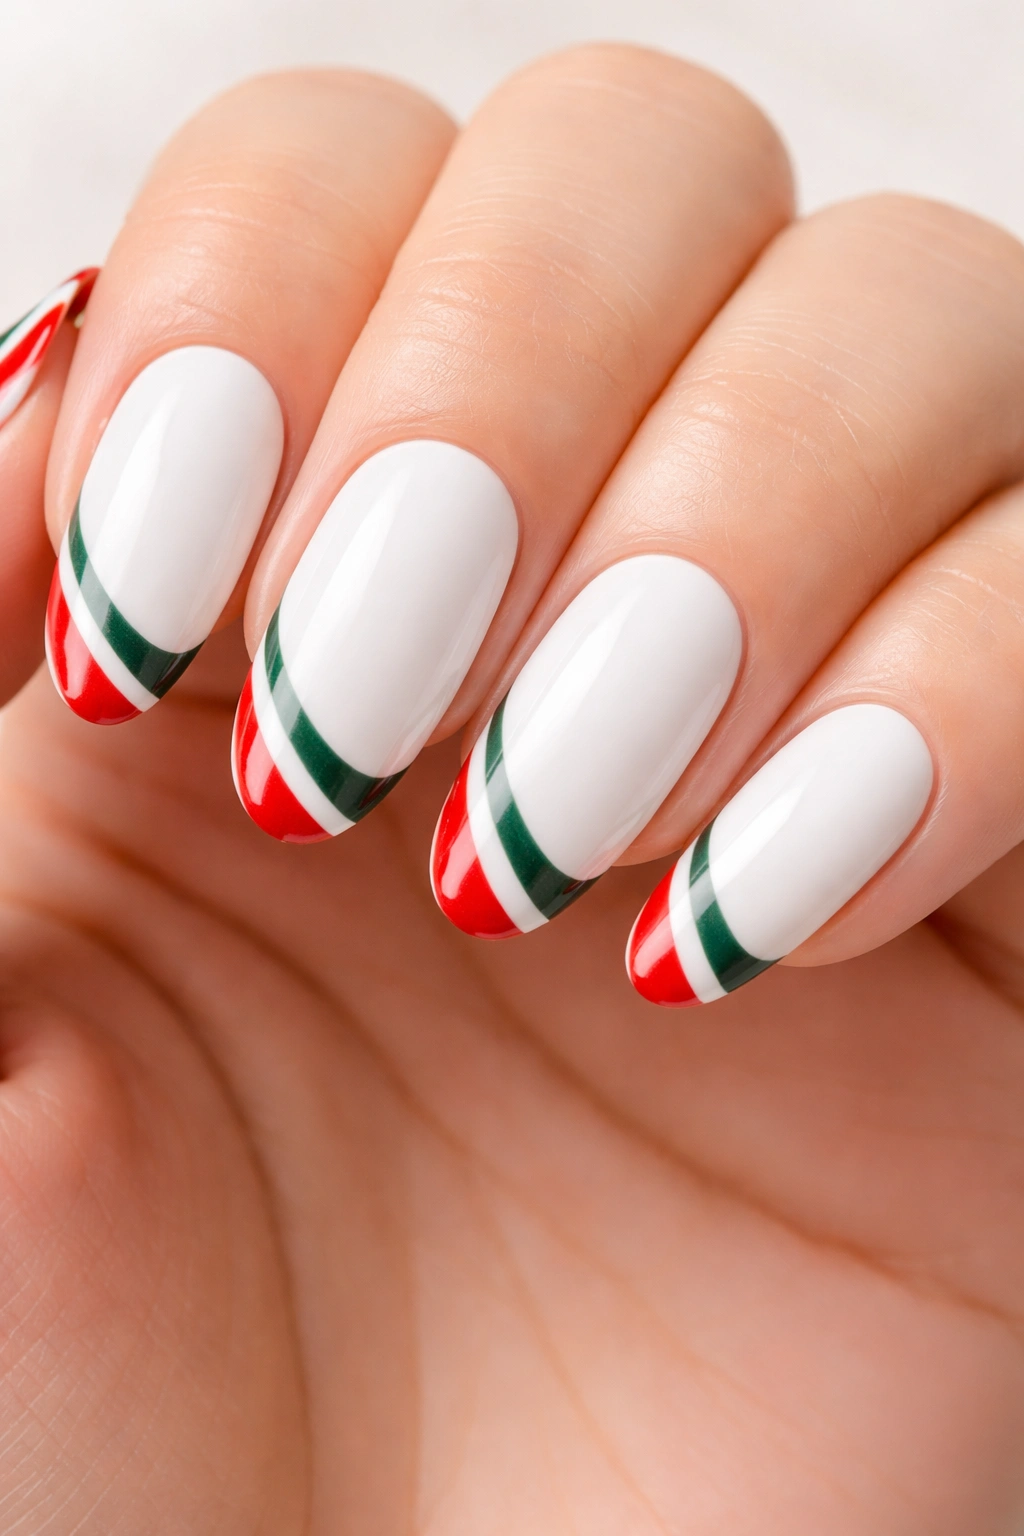
A clean white base extends across most of the nail, with the tips featuring alternating thin stripes of true red and forest green. The stripes create a candy-cane-inspired pattern that reads as fun and festive without being childish, especially when executed with precision and balanced proportions. Long oval nails give you enough space to create multiple distinct stripes that maintain visual interest without feeling chaotic.
Making Stripes Feel Polished Rather Than Playful
The key to elevating this design past “cute candy cane nails” is using the highest-quality red and green polishes available and ensuring the stripes are perfectly parallel and evenly spaced. Precision matters here — uneven stripes feel sloppy, while perfectly executed ones look intentional and modern. This is absolutely a design worth paying for professional application if stripe precision isn’t your strength.
Stripe Specifications
- Red and green stripes should be thin and consistent — typically 2-3mm each, depending on nail width
- Start the stripes approximately 3-4mm from the tip, leaving a small white margin for definition
- Make sure the first and last stripes are the same color so the pattern feels balanced
- Seal with a glossy top coat to make the colors pop and protect the delicate striped design
- Consider slightly angling the stripes rather than going perfectly vertical — this adds movement and keeps the design from feeling too rigid
Pro tip: Use tape guides or a striping brush designed specifically for this technique if you’re attempting this at home — freehand striping requires significant skill.
6. Champagne Gold with Rhinestone Gradient
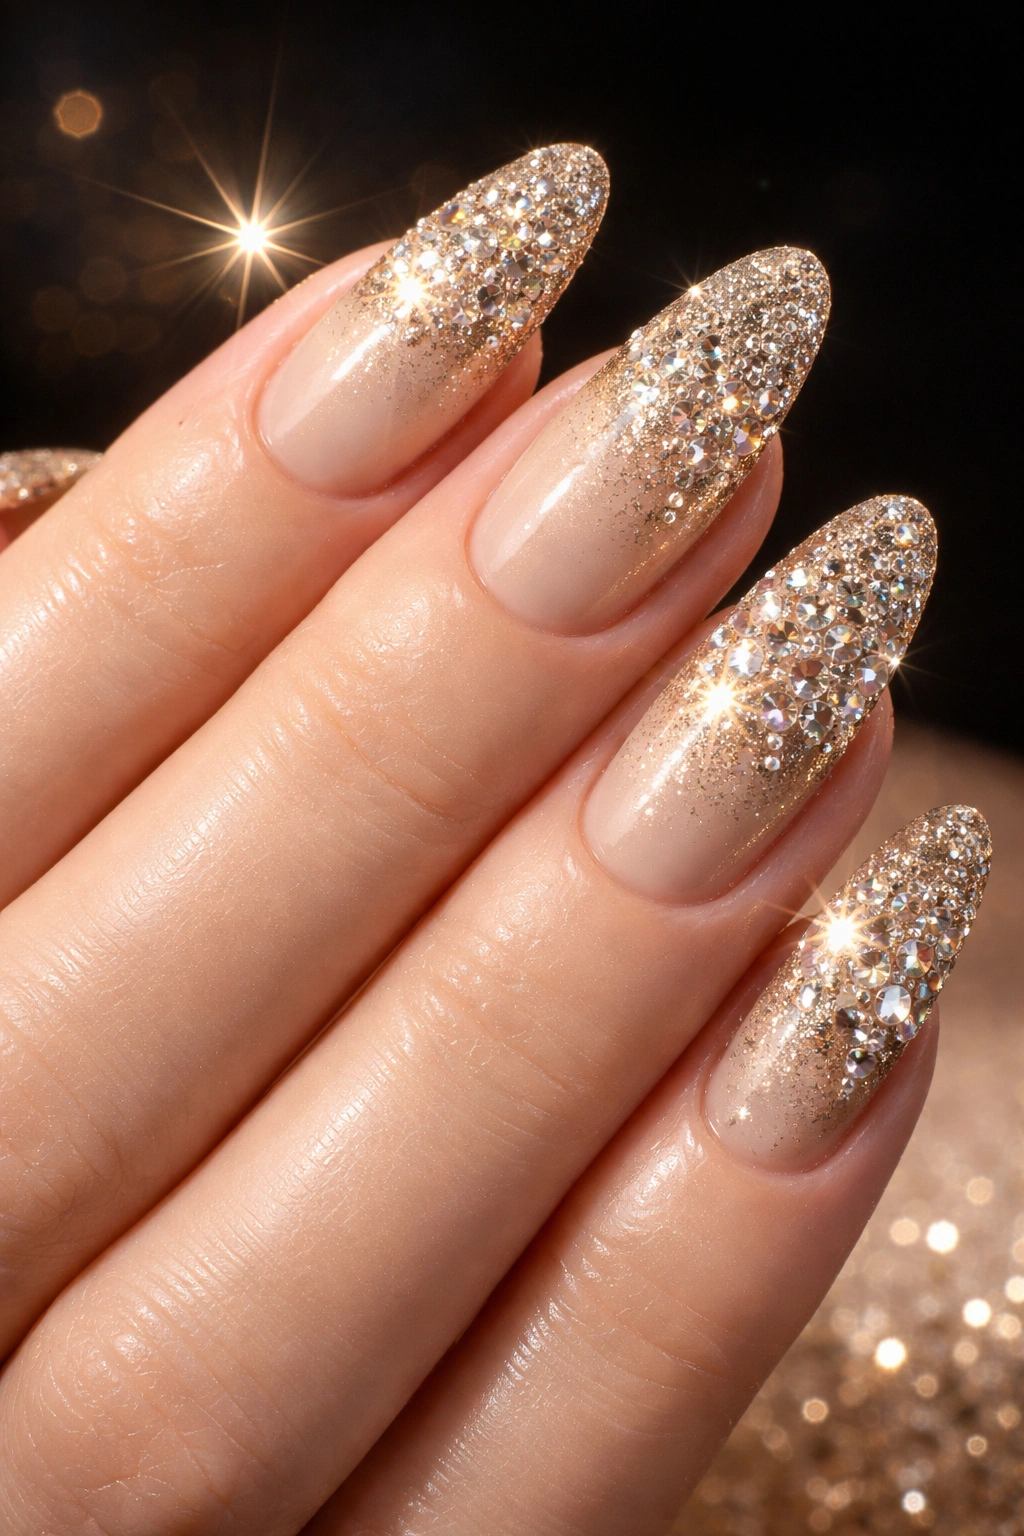
A champagne or pale gold base transitions gradually into deeper gold toward the tips, with rhinestones embedded throughout the gradient in a pattern that becomes denser as the color deepens. This creates a luxurious, almost glamorous effect that catches light beautifully and looks particularly stunning in evening settings or at formal holiday parties.
When to Go Full Glam
This design absolutely reads as “special occasion” rather than everyday wear, so it’s perfect for holiday parties, New Year’s Eve events, or any formal celebration where you want your nails to be noticed. The gradient-meets-rhinestone approach feels expensive and professional while still being distinctly festive through the choice of gold tones and the added sparkle.
Creating the Gradient Effect
- A pale champagne or light gold serves as your starting point, applied across the entire nail
- A deeper gold is gradually layered starting about halfway down the nail, creating an ombré effect
- Rhinestones should be quality pieces (Swarovski or comparable) rather than cheap costume stones, which lose sparkle quickly
- Place larger rhinestones toward the tips and smaller ones in the gradient area for visual hierarchy
- Clear gel or rhinestone adhesive designed specifically for nail art holds stones more securely than regular top coat
Worth knowing: This design requires touching up rhinestones periodically as daily wear causes some to loosen, so budget for maintenance during the holiday season.
7. Deep Plum with Silver Constellation Design
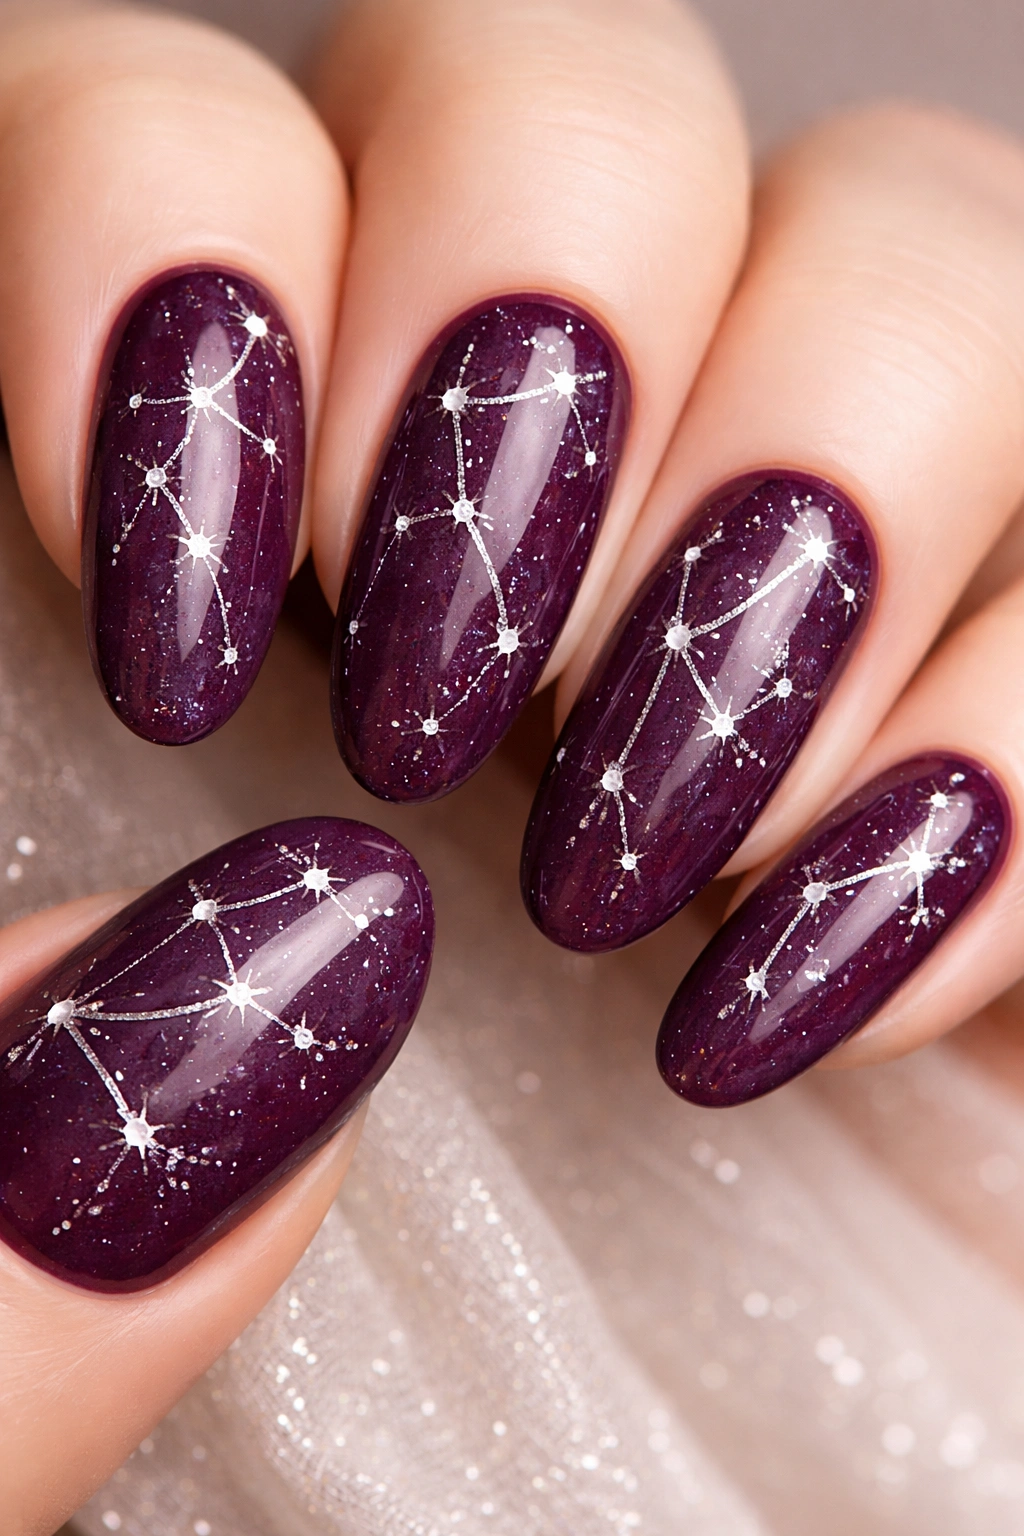
A rich plum or mauve base creates an unexpected holiday color that still feels festive and sophisticated, especially when paired with delicate silver constellation designs — connected dots forming zodiac symbols or celestial patterns across the surface. This design appeals to anyone who wants something distinctly different from traditional holiday colors while maintaining seasonal appeal.
The Unexpected Holiday Color Palette
Plum genuinely works for the holidays, even though it’s not a color people typically think of as seasonal. The rich, jewel-tone depth pairs beautifully with silver accents and feels elegant on long oval nails. This is a design for someone who has strong personal style and wants their nails to reflect that throughout the season rather than conforming to traditional holiday expectations.
Constellation Design Execution
- Silver constellation designs should be delicate and detailed — think thin lines connecting small dots rather than bold geometric shapes
- Each nail can feature a different constellation or zodiac symbol for personalization
- Keep the design to one constellation per nail so it doesn’t feel visually overwhelming
- Silver gel pen or metallic silver polish applied with an ultra-thin detail brush works best
- The contrast between plum and silver should be clean and precise without appearing too stark
Pro tip: Research actual constellation maps to ensure your designs are recognizable — accurate constellation placement adds an intellectual interest that elevates this beyond just a pretty design.
8. Classic French Manicure with Gold Tips

A timeless French manicure never goes out of style, but swapping the traditional white tips for gold creates an instantly festive update without abandoning the elegance of the original design. The nude base extends across most of the nail, with a distinct gold line creating the tip definition. This is sophisticated holiday nailing at its finest.
Why French Manicure Is a Holiday Genius
French manicure works at every occasion because it’s inherently polished and professional while still feeling intentional. By simply shifting the tip color to gold instead of white, you create a design that reads as festive without feeling costume-like. Long oval nails enhance the elongated elegance of French manicure design, making the shape feel especially refined.
Executing Gold Tips Perfectly
- The nude base should be a true skin tone match for your complexion — test before committing to a bottle
- The gold tip line should be crisp and defined, not blurry or feathered
- The transition from nude to gold should happen at approximately the same point on each nail for visual consistency
- Typically, the tip line takes up about 2-3mm at the very edge of the nail
- A high-shine top coat emphasizes the elegance of the design
Worth knowing: This design is surprisingly durable for everyday wear and actually requires less maintenance than many other holiday designs because there are no intricate details to protect.
9. Forest Green with White Holly Leaf Design

A rich forest green base hosts white holly leaf details — each leaf featuring the characteristic pointed edges — distributed across the nails, typically with tiny red berries clustered near the leaves for added authenticity. This botanical approach to holiday nails feels organic and genuinely festive without relying on glitter or overly cute imagery.
Botanical Holiday Design Philosophy
Holly leaves are an actual symbol of the season, so incorporating them into your nail design grounds the aesthetic in real holiday tradition rather than arbitrary festive imagery. The white-on-green color combination creates excellent contrast and reads beautifully in all lighting conditions. This design appeals to people who want nails that feel naturally festive rather than aggressively thematic.
Painting Holly Leaf Details
- Holly leaves require multiple small brush strokes to create the characteristic pointed edges — this is a design best handled by a professional artist
- Leaves should vary in size and direction so the design feels organic rather than template-based
- Tiny red berry dots clustered near three or four leaves complete the botanical accuracy
- Keep the holly details to one or two per nail to maintain a balanced, not-too-busy appearance
- A matte top coat enhances the natural appearance of the botanical design
Pro tip: Reference actual holly leaf photographs when working with your nail artist to ensure the leaf shapes are recognizable and botanically accurate.
10. Clear Base with Red Ombré Tips and Glitter Fade
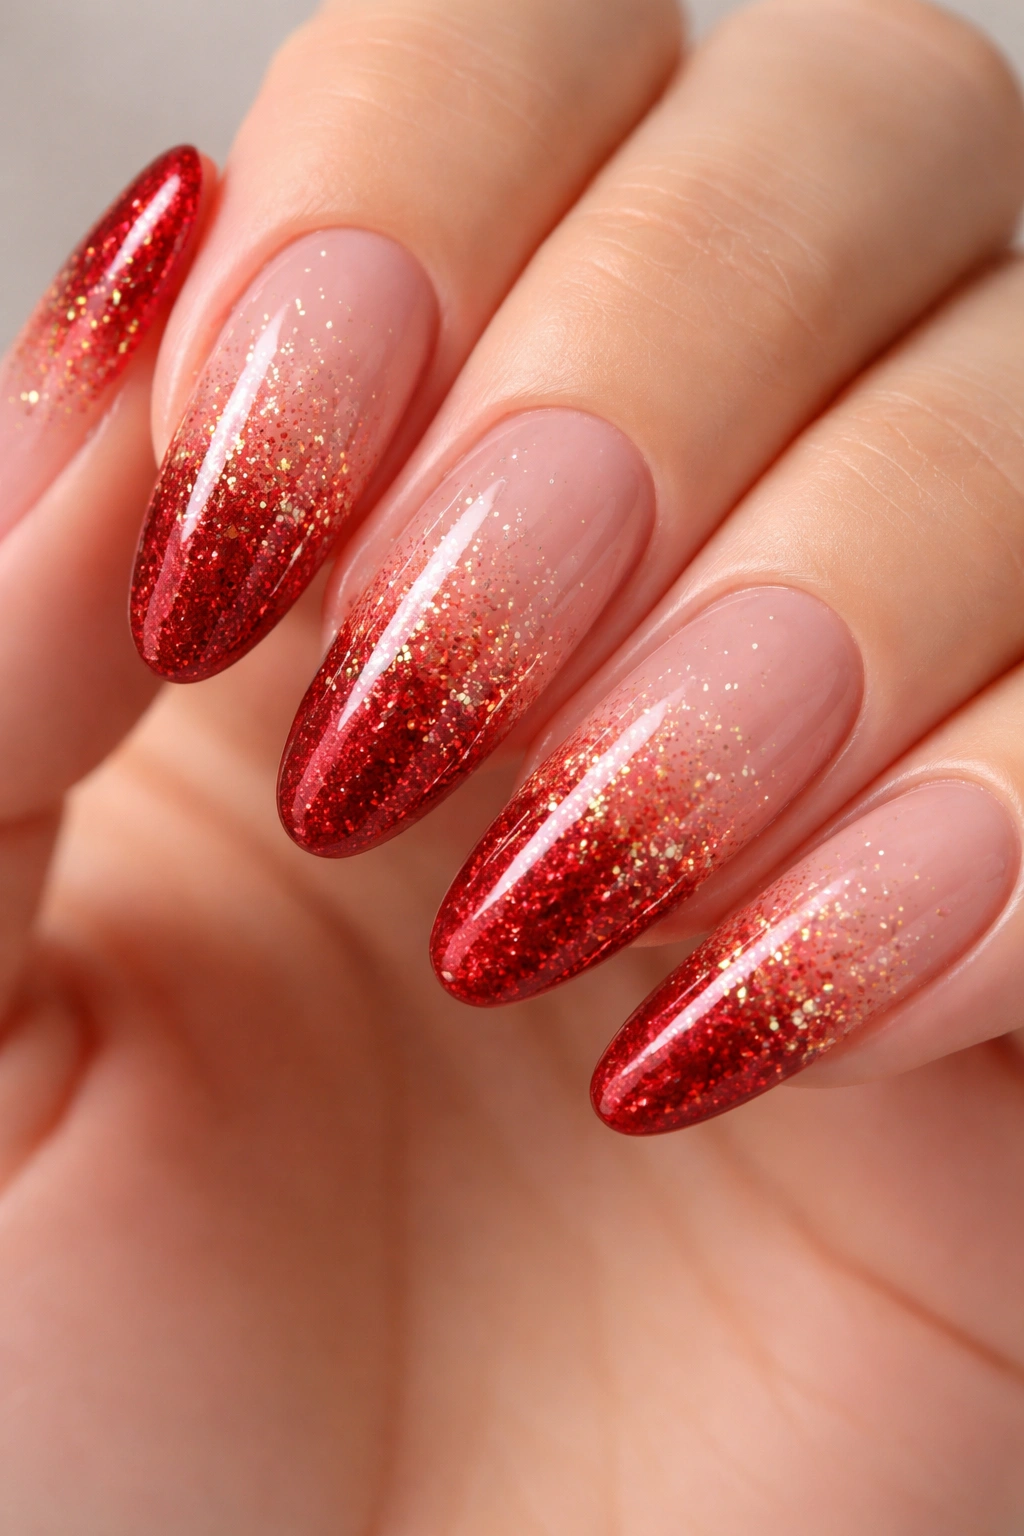
This design builds a sheer, almost translucent base that gradually transitions to deeper red at the tips, with a subtle glitter fade that becomes denser as the color deepens. The overall effect is ethereal and elegant rather than chunky or overdone — the glitter enhance rather than overwhelm the color gradient. This design creates a sense of movement and light-catching sparkle that photographs beautifully.
Creating Depth with Transparency
Using a clear or barely-tinted base rather than an opaque nude allows you to see the nail beneath, which creates a more ethereal, sophisticated appearance than a fully opaque design. The transparent base paired with the ombré effect and glitter fade creates multiple layers of visual interest without feeling chaotic or overwhelming.
Ombré Glitter Application
- Start with a clear gel base for transparency and durability
- Red gel polish should be applied in layers, deepening toward the tips through careful color blending
- Glitter particles should be mixed into the gel itself rather than simply sprinkled on top — this creates a more integrated, cohesive appearance
- The glitter concentration increases gradually, becoming denser as the red deepens
- Seal with a thick, quality top coat to smooth the glitter particles and create an even surface
Worth knowing: This design requires professional gel application to achieve the smooth ombré effect and properly integrated glitter — freehand application tends to look streaky or unpolished.
11. Cream Base with Plaid Pattern in Red, Green, and Gold
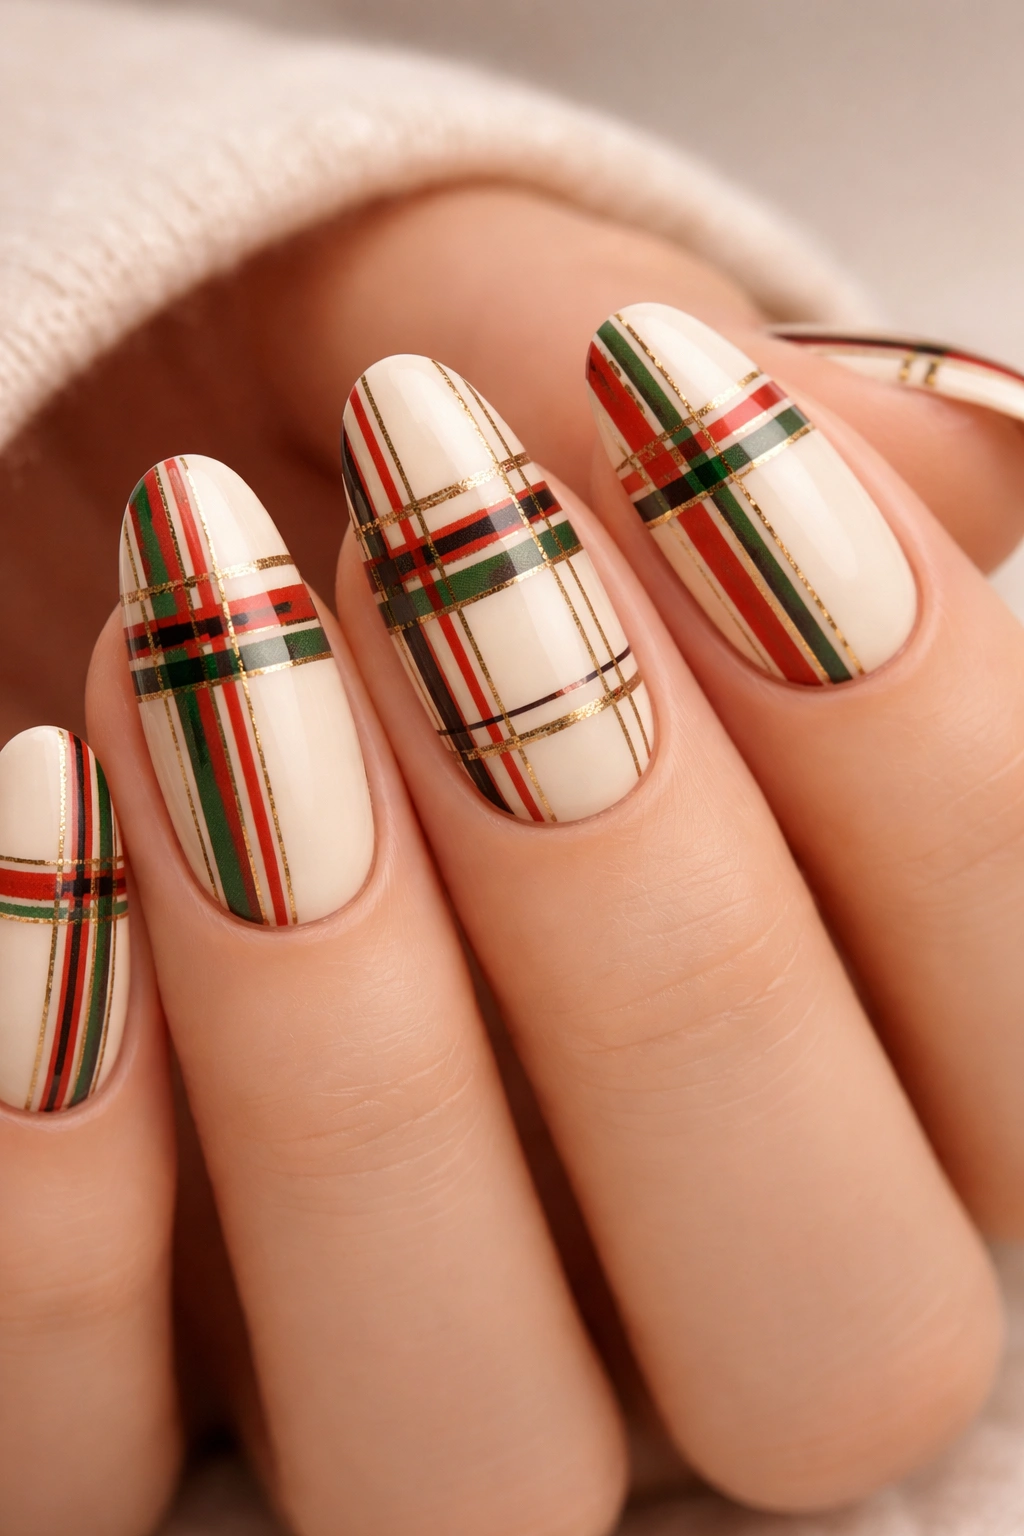
A soft cream or ivory base provides the canvas for a classic plaid pattern rendered in red, green, and thin gold lines that intersect to create the characteristic tartan look. Plaid is inherently festive and refined when executed with precision — imprecise lines destroy the effect, so this design really rewards professional application. Long oval nails provide enough surface area to make the plaid pattern feel intentional rather than cramped.
The Power of Precision in Pattern Designs
Plaid works as a holiday design because it’s traditional and sophisticated while still feeling distinctly seasonal. The pattern has been associated with holiday clothing and décor for generations, so it automatically reads as festive. The key to making plaid look elegant rather than costume-like is crisp, precise lines and balanced color proportions.
Plaid Pattern Execution
- The cream base should be perfectly smooth and opaque — start with quality base coat
- Plaid lines should be created with a striping brush or nail art pen, ensuring even spacing
- Red and green lines should be approximately equal in thickness for visual balance
- Gold accent lines add elegance and break up the red-and-green dominance
- Keep the plaid relatively simple rather than overly intricate — nail canvas limitations mean complicated patterns become muddled
Pro tip: Ask your nail artist to create a simple, readable plaid pattern rather than attempting intricate tartan — clarity always beats complexity on small surfaces.
12. Matte Burgundy with Metallic Gold Snowflake Accents
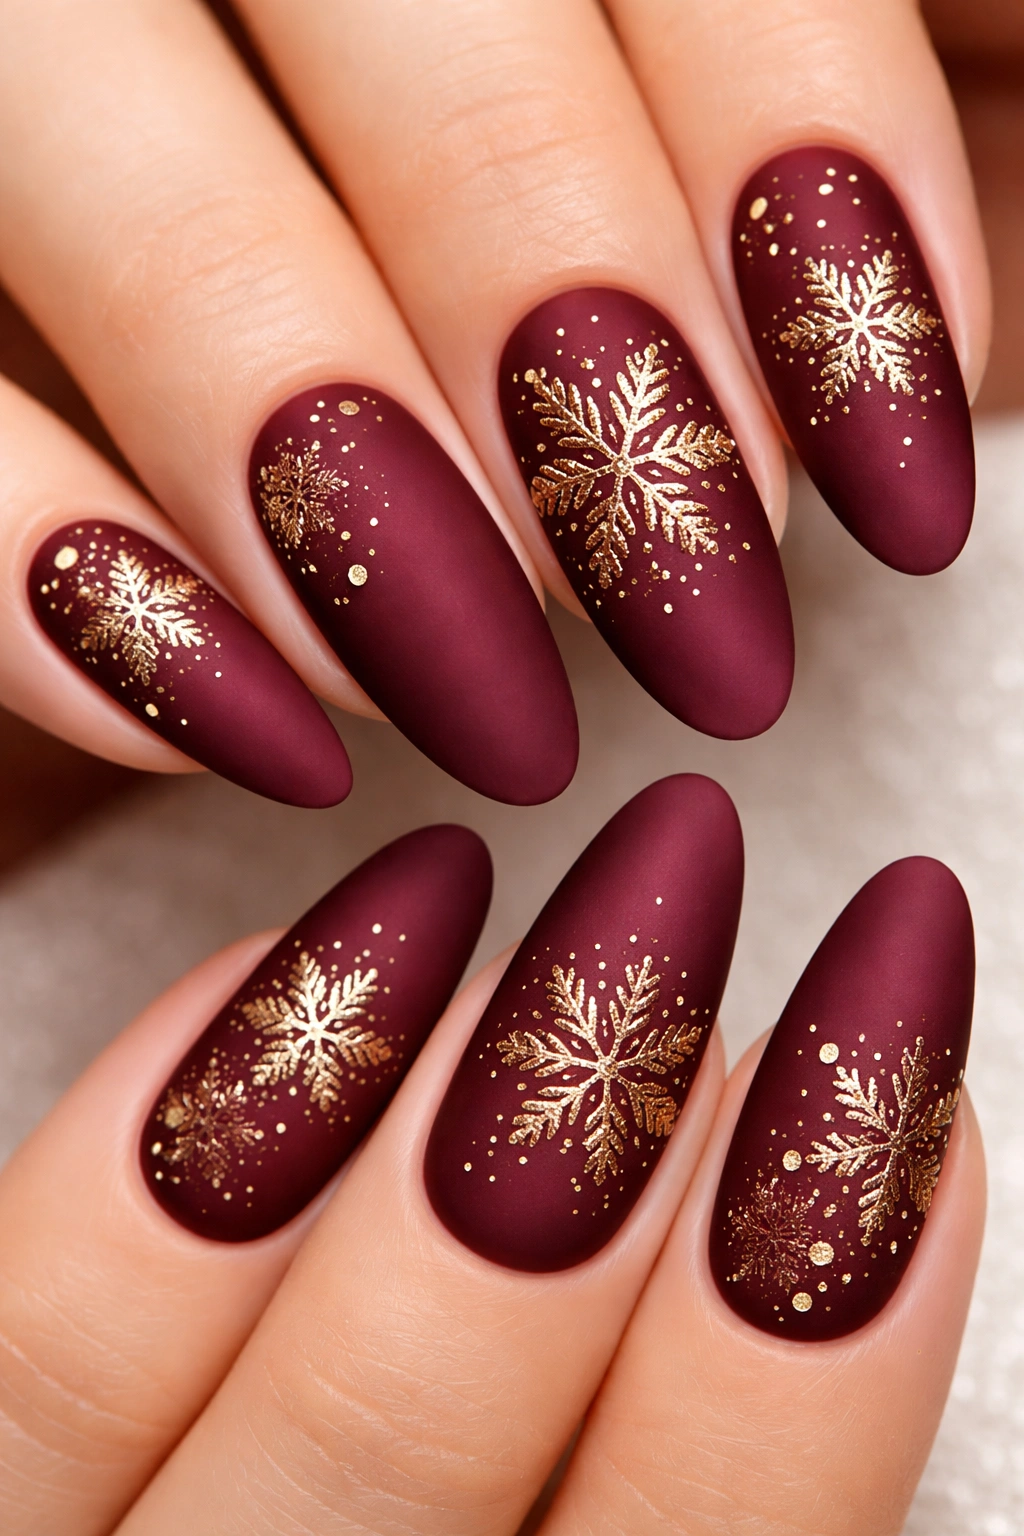
A matte burgundy base creates a sophisticated, velvety appearance, with metallic gold snowflakes hand-painted or detailed across the surface. The matte finish is unexpected and modern while the snowflakes maintain the festive theme. The contrast between the matte base and the shiny metallic gold creates visual interest and prevents the design from feeling flat.
The Drama of Matte Finish
Matte polish creates a completely different aesthetic than the typical glossy finish — it reads as more modern and slightly edgier while still being elegant. For holiday nails, a matte finish on a deep burgundy base feels sophisticated and fashion-forward rather than traditionally festive. The metallic gold snowflakes provide sparkle and shine without contradicting the matte aesthetic.
Balancing Matte and Metallic
- The burgundy base should be a true matte finish, not matte with shimmer — consistency is key
- Metallic gold snowflakes should be detailed and precisely rendered for maximum impact
- The size variation of snowflakes keeps the design from feeling too uniform or template-based
- Consider adding a thin matte top coat over everything rather than a shiny one — this maintains the matte aesthetic while protecting the gold details
- This design reads particularly well in indoor lighting where matte finishes don’t compete with harsh light reflection
Worth knowing: Matte finishes require slightly more careful application and maintenance than glossy finishes, as dust and debris show more readily on the non-reflective surface.
13. Shimmery Silver with Red Velvet Accent Nail
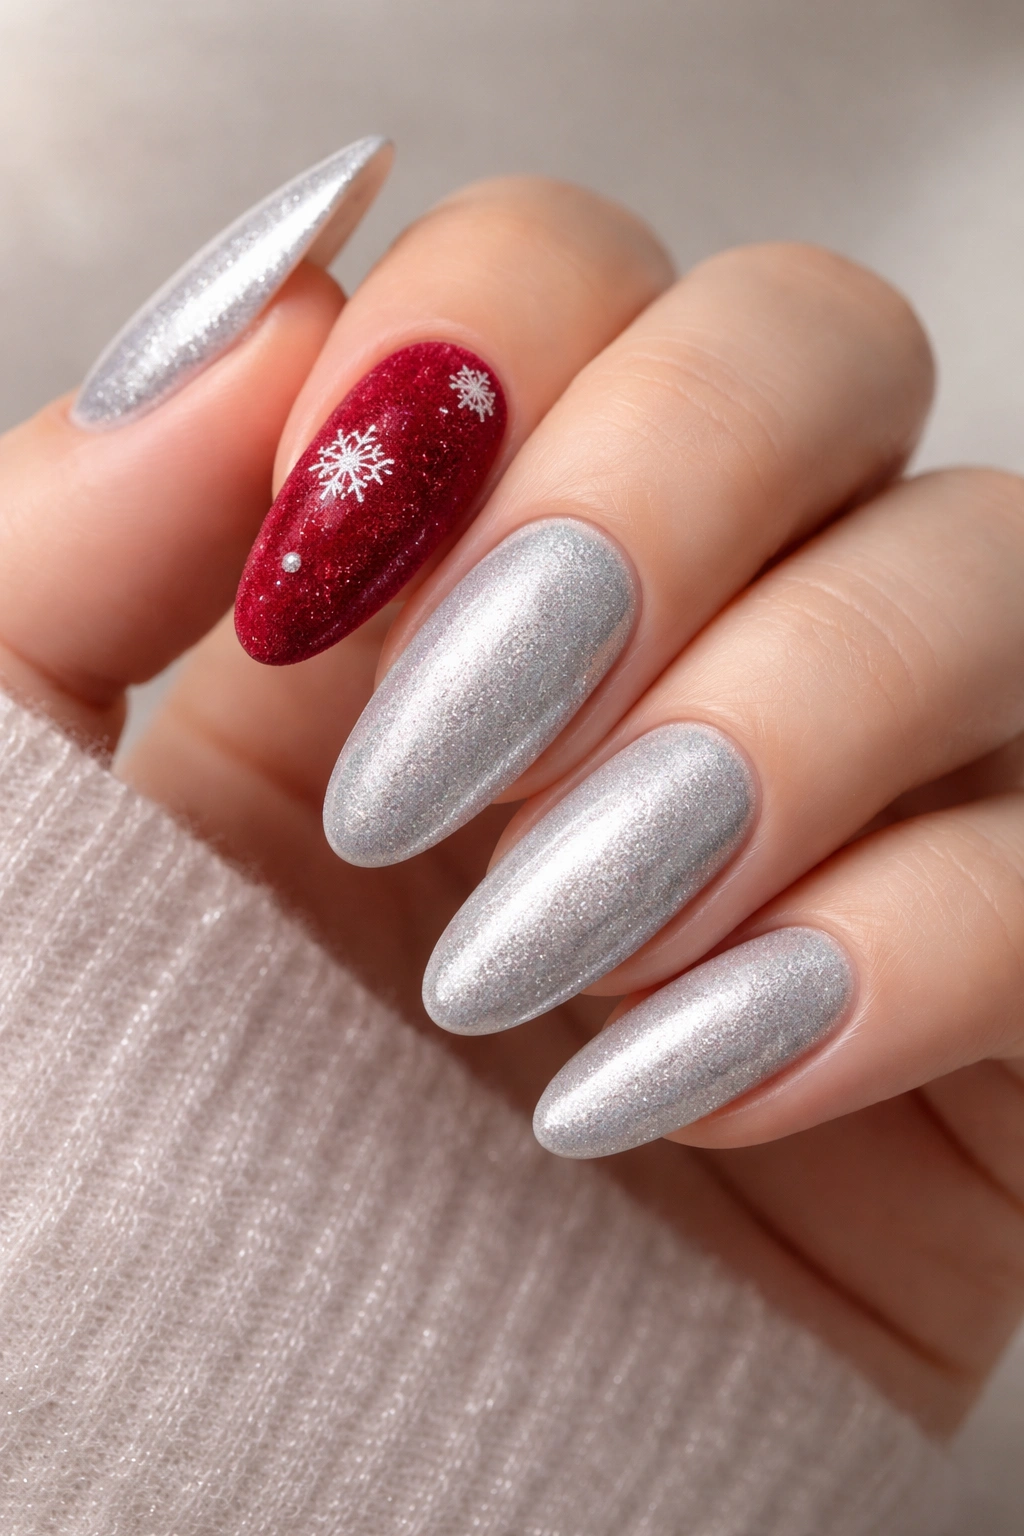
Eleven nails in a shimmery silver that catches light beautifully, with a single accent nail in a velvety, textured red that creates dramatic contrast. The red accent nail might feature additional design details like tiny snowflakes or simply remain solid textured red — the texture itself becomes the design element. This asymmetrical approach feels modern while remaining clearly festive.
The Impact of Texture in Nail Design
Texture adds dimension and visual interest that solid polish alone cannot achieve. A velvety or textured finish creates a tactile quality that makes people want to touch your nails, and the dramatic contrast with the shimmery silver accent makes the design feel intentional and modern. This approach appeals to anyone who wants something distinctly different from traditional holiday nail designs.
Working with Textured Polish
- Shimmery silver should be a quality polish with visible sparkle but not chunky glitter
- The textured red is achieved either through specialty textured polish or through a sand-like additive mixed into the polish
- The textured nail should be your ring finger, index finger, or middle finger rather than a thumb or pinky — placement affects visual impact
- Keep other embellishments minimal since texture is doing the heavy lifting in the design
- A clear or slightly textured top coat maintains the textured appearance rather than flattening it
Pro tip: The textured nail often requires two coats to achieve full color opacity and texture — don’t shortcut this step.
14. Nude with Minimalist Gold Christmas Tree on Accent Nail
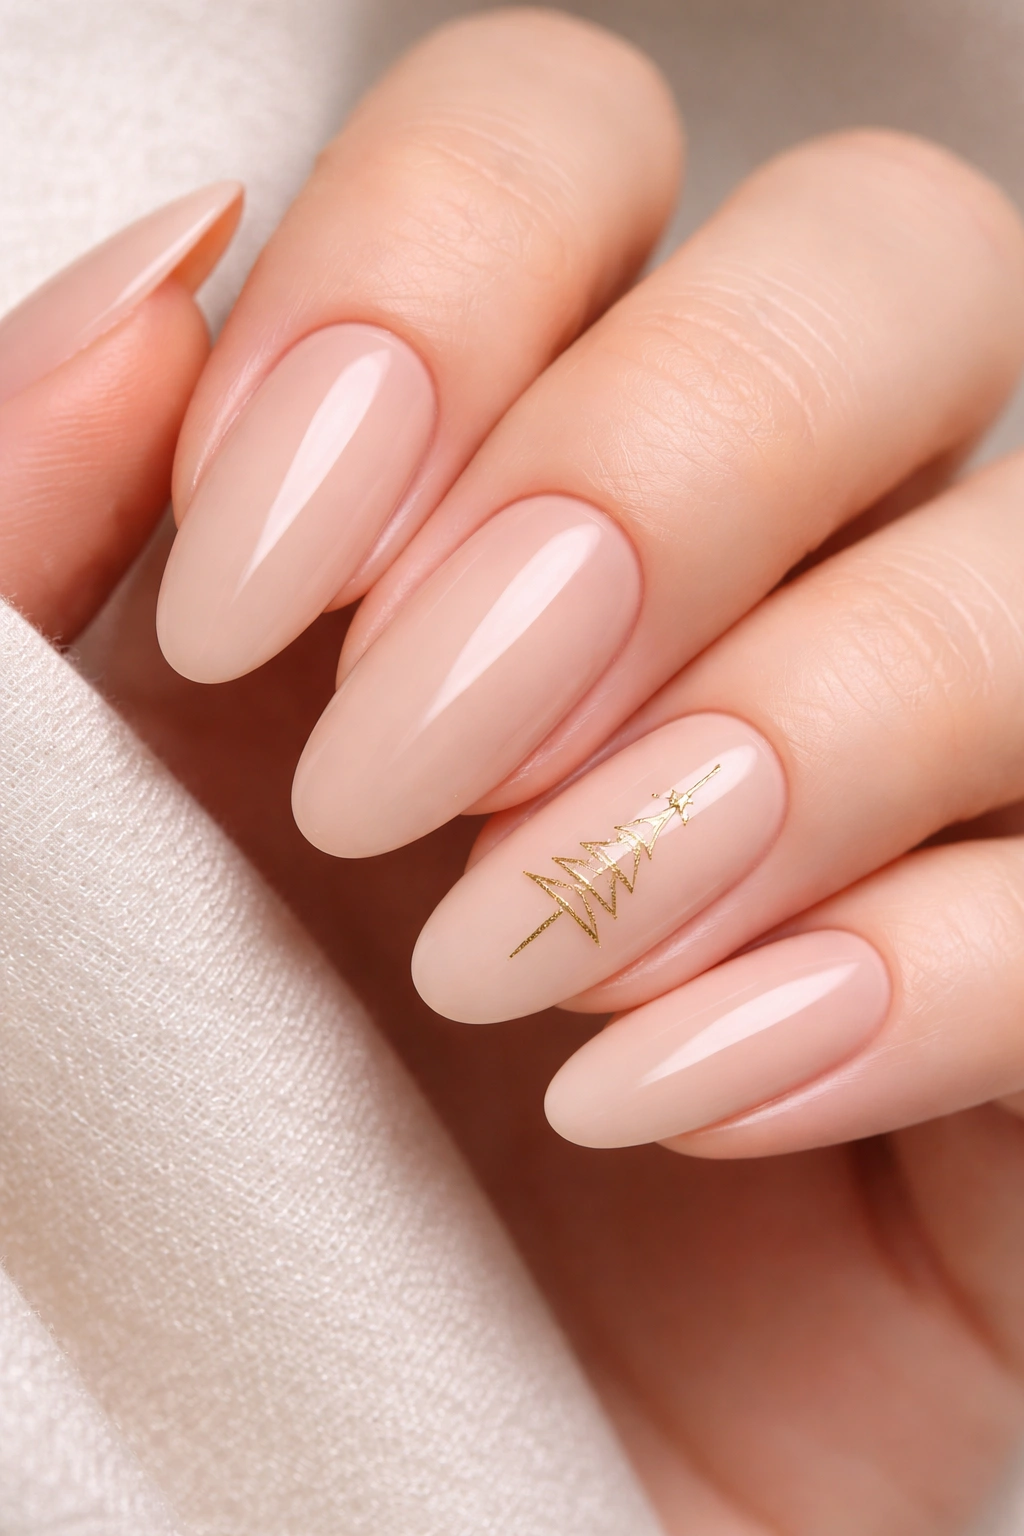
Building on the minimalist aesthetic, this design uses a neutral nude base across most nails with a single accent nail featuring an ultra-simple Christmas tree rendered in thin gold lines. The tree is reduced to its most basic geometric form — essentially a triangle with a small trunk — creating an elegant, almost abstract representation of a Christmas tree. This is sophistication in minimalism.
The Power of Restraint in Holiday Design
Not every holiday design needs to be loaded with details and embellishments. Sometimes the most impactful designs are those that show restraint and let negative space breathe. An ultra-simple tree rendered in a single thin gold line actually says more about your style than an overly complicated design.
Minimalist Tree Execution
- The nude base is more important here than in other designs — it should be a perfect match to your skin tone
- The gold tree should be created with a thin striping brush or nail art pen for precise, delicate lines
- The tree itself should be approximately the size of a dime to maintain proportion on an accent nail
- Consider adding a tiny gold dot at the tip of the tree to represent a tree topper
- Everything else remains blank space — this is what makes the design powerful
Worth knowing: This design works beautifully on accent nails other than the traditional ring finger — try your index finger for a slightly less expected placement.
15. Deep Navy with Gold Star Constellation
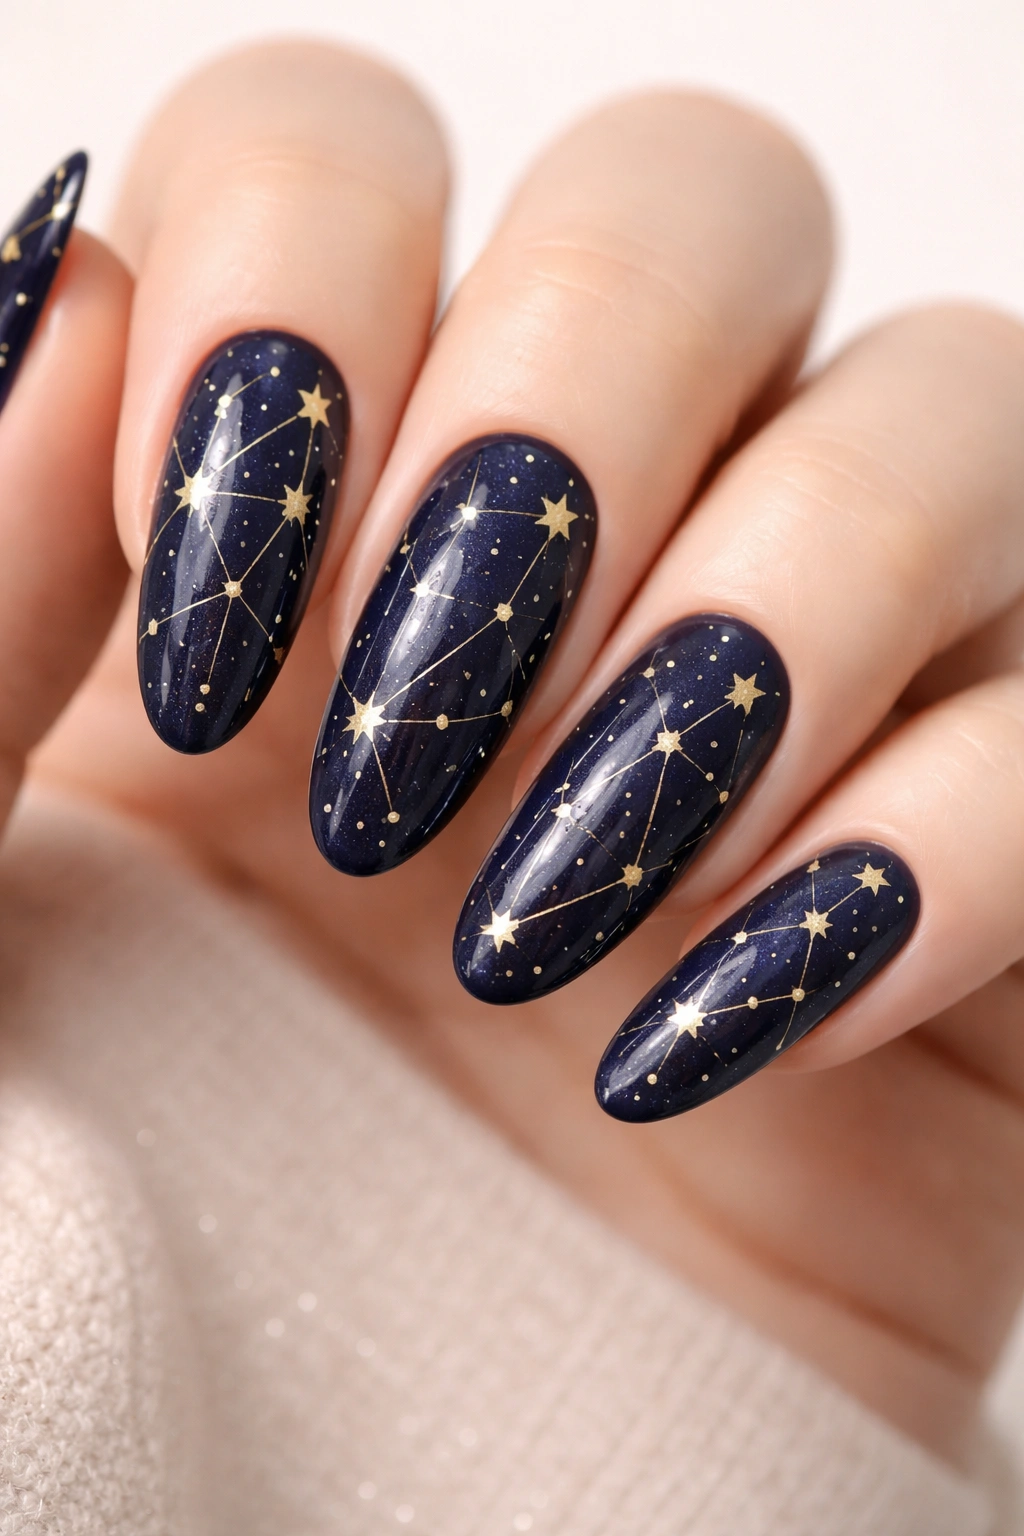
A deep navy blue base creates an unexpected but genuinely effective holiday background, paired with delicate gold stars forming constellation patterns across the surface. The navy reads as nighttime, cool, and sophisticated while the gold stars add warmth and festive sparkle. This design appeals to anyone drawn to astronomy or anyone who wants holiday nails that feel completely unique.
Reimagining Holiday Color Palettes
Navy is almost never discussed as a holiday color, yet it works beautifully when paired with gold accents. The deep blue reads as elegant and modern while the gold stars provide the festive element. This design proves that traditional holiday colors aren’t your only option for creating something unmistakably seasonal.
Creating Constellation Designs
- Research actual constellation maps to ensure your designs are recognizable and accurate
- Gold stars should be small but clearly defined — typically 2-3mm dots connected with thin gold lines
- Each nail can feature a different constellation or repeat the same constellation pattern
- The stars create a sense of movement and sophistication that elevates this beyond random sparkle
- Navy polish should be a true deep blue rather than navy with shimmer — the gold provides all the shine needed
Pro tip: If you love astrology or astronomy, consider creating constellations that correspond to zodiac signs — this adds personal meaning to the design.
Final Thoughts
The holiday season deserves nails that feel special, and long oval nails give you the perfect vehicle for expressing your style within the festive framework. Whether you’re drawn to the classic elegance of red and gold, the unexpected sophistication of deep jewel tones, or the modern restraint of minimalist designs, there’s absolutely a festive nail design here that matches your aesthetic.
The key to holiday nails that don’t feel overdone or exhausting to look at is balance — balancing color and space, pattern and solidity, sparkle and sophistication. Long oval nails actually make this balance easier to achieve because the shape is inherently elegant and the extra length gives you room to work with complexity without the design feeling cramped or juvenile.
Most importantly, the best holiday nail design is one that makes you genuinely happy when you look at your hands. These designs work beautifully in professional settings, casual gatherings, and everything in between because they’ve been designed with both festiveness and wearability in mind. Pick one that resonates with your personal style, commit to the design for a few weeks, and enjoy how something as small as your nails can genuinely impact how you feel throughout the entire holiday season.
