

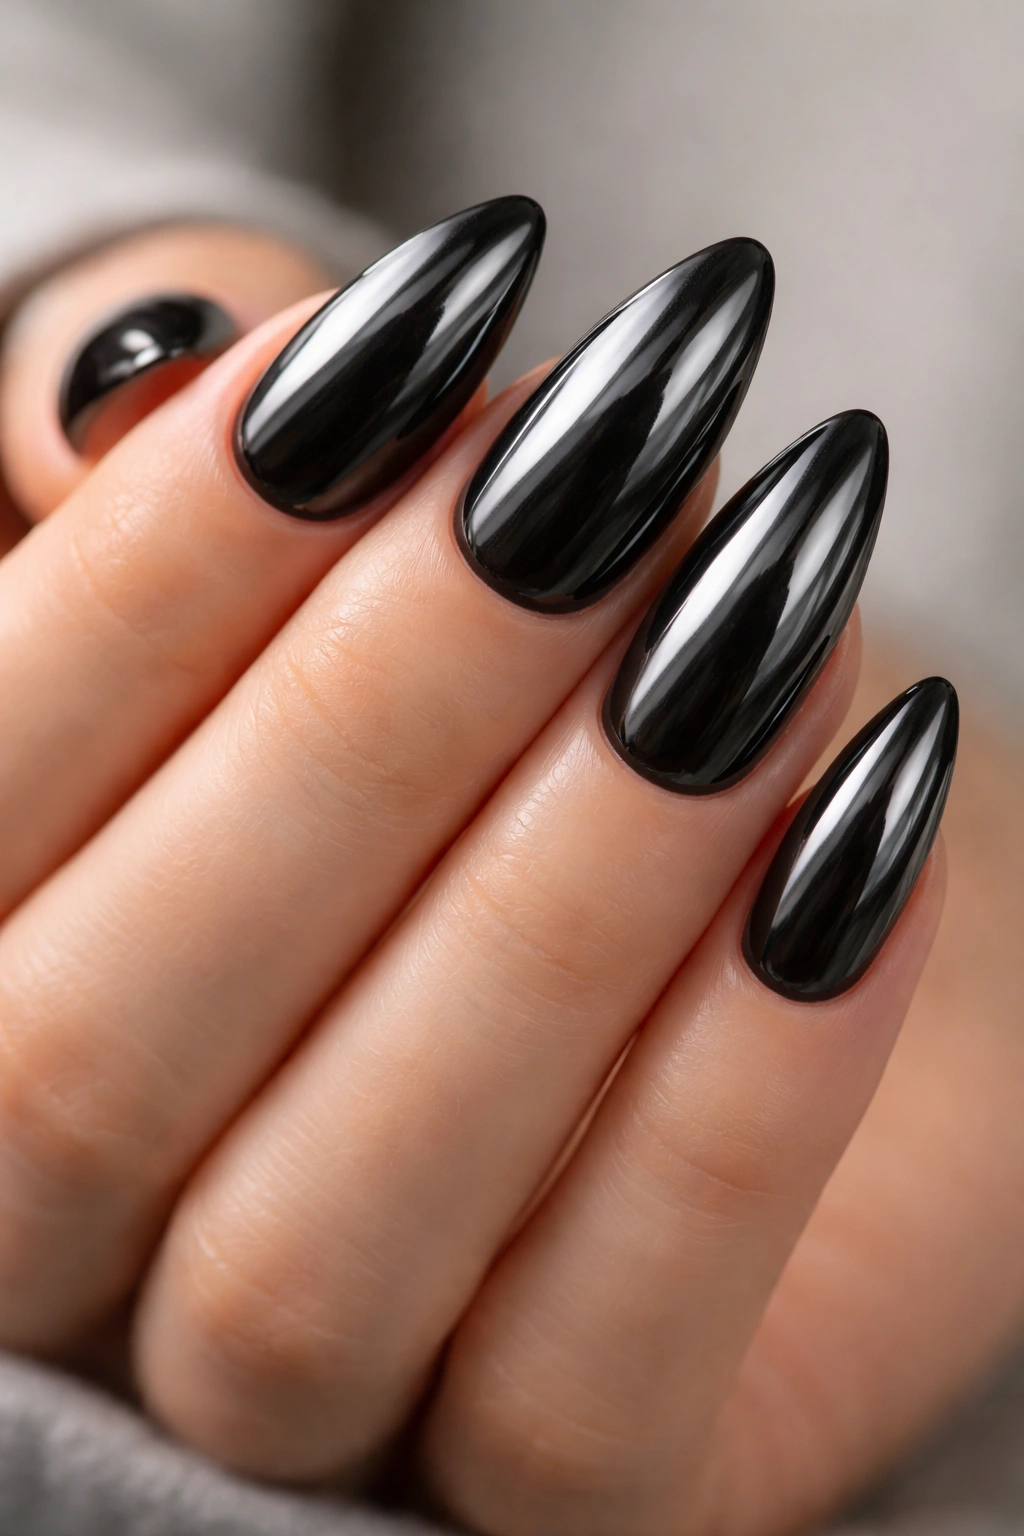
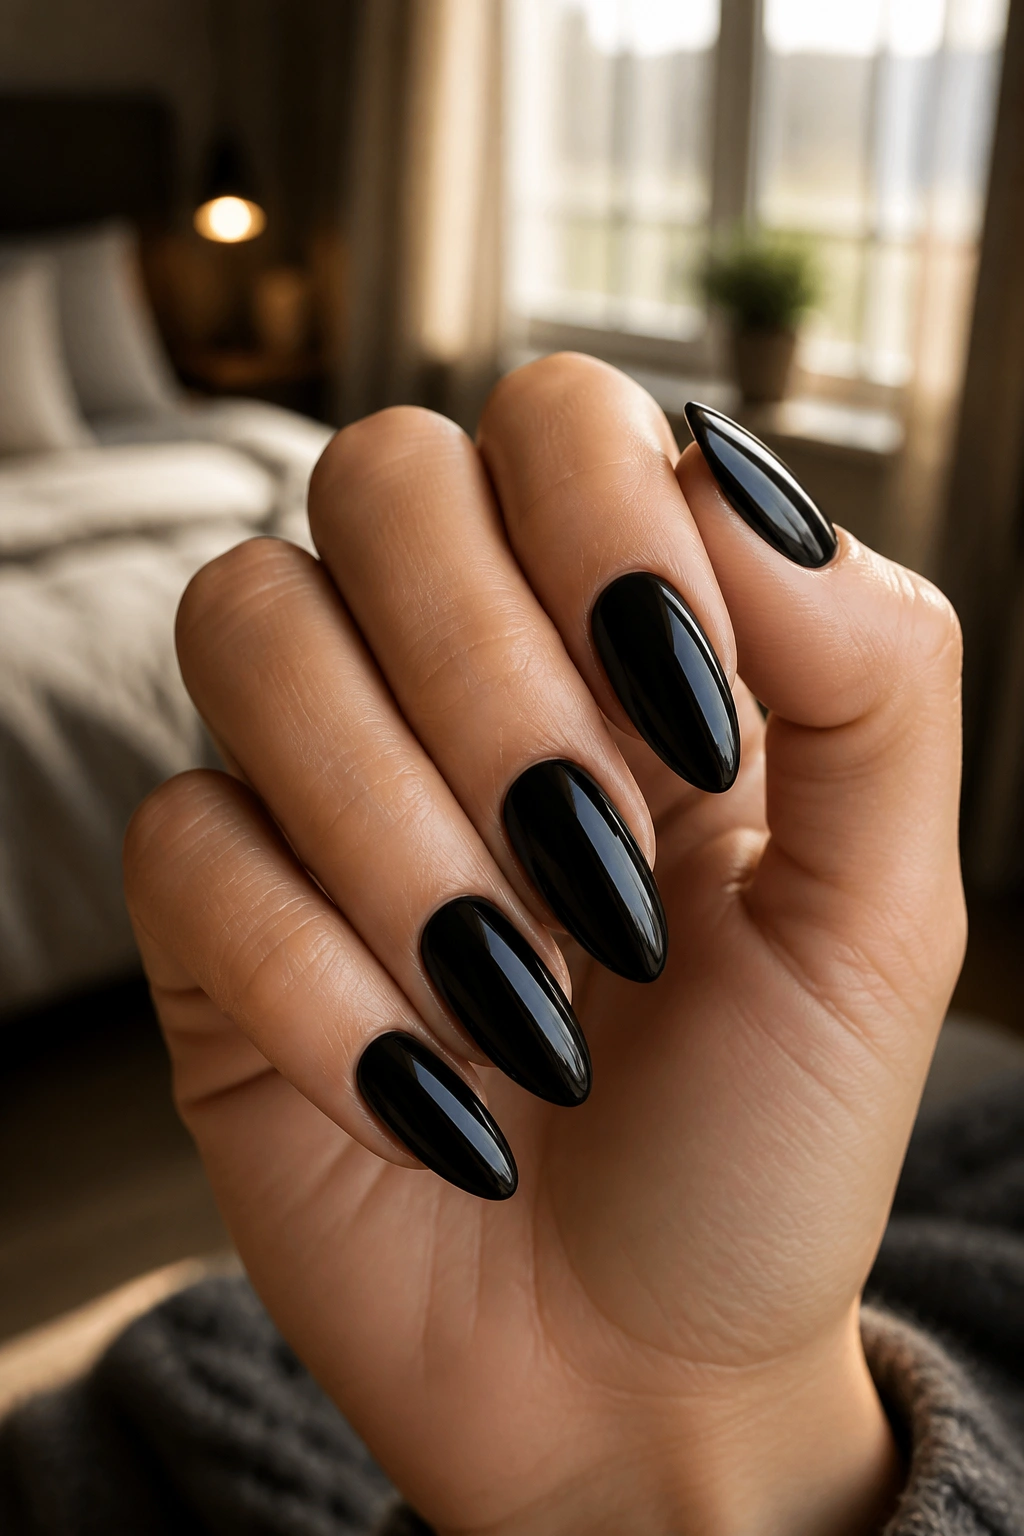
1. Glossy Black Almond Nails
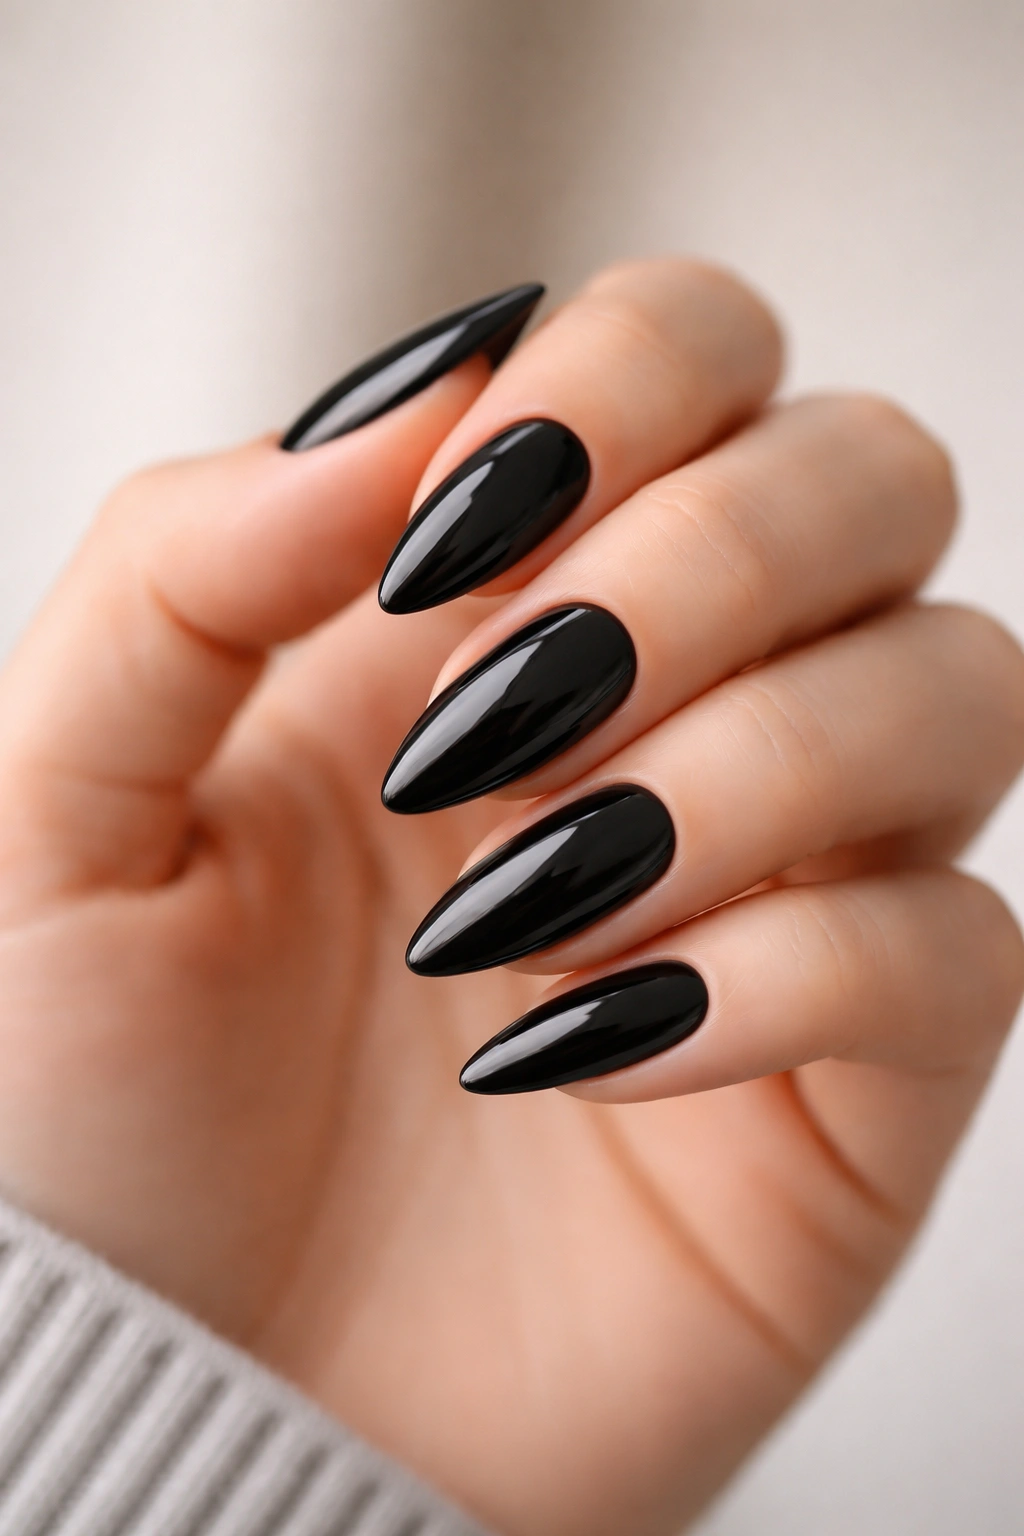
Glossy black almond nails are the kind of manicure that looks expensive even when you did it at home with a bottle of polish and a steady hand. The shape does a lot of the heavy lifting here: almond tips slim the fingers, while the black finish gives the whole look a sharp, clean edge.
What makes this style so easy to wear is the balance. Black can look hard or severe on a square nail, but on almond nails it softens into something smoother and more intentional. The shine matters too. A true high-gloss top coat turns the black from flat to polished, and that little bit of reflection keeps the color from reading as heavy.
Why It Works So Well
The almond shape creates a tapered outline that naturally makes the nail look longer. Black polish then frames that shape like eyeliner around an eye. It’s simple, but it works.
- Best on medium-length nails, where the curve has room to show
- Looks clean with 2 coats of opaque black polish
- Finishes well with a gel top coat or a fast-dry glossy top coat
- Easy to pair with silver rings, denim, leather, or a plain white shirt
Tip: If your black polish streaks, use thinner coats and let each one dry fully before the next.
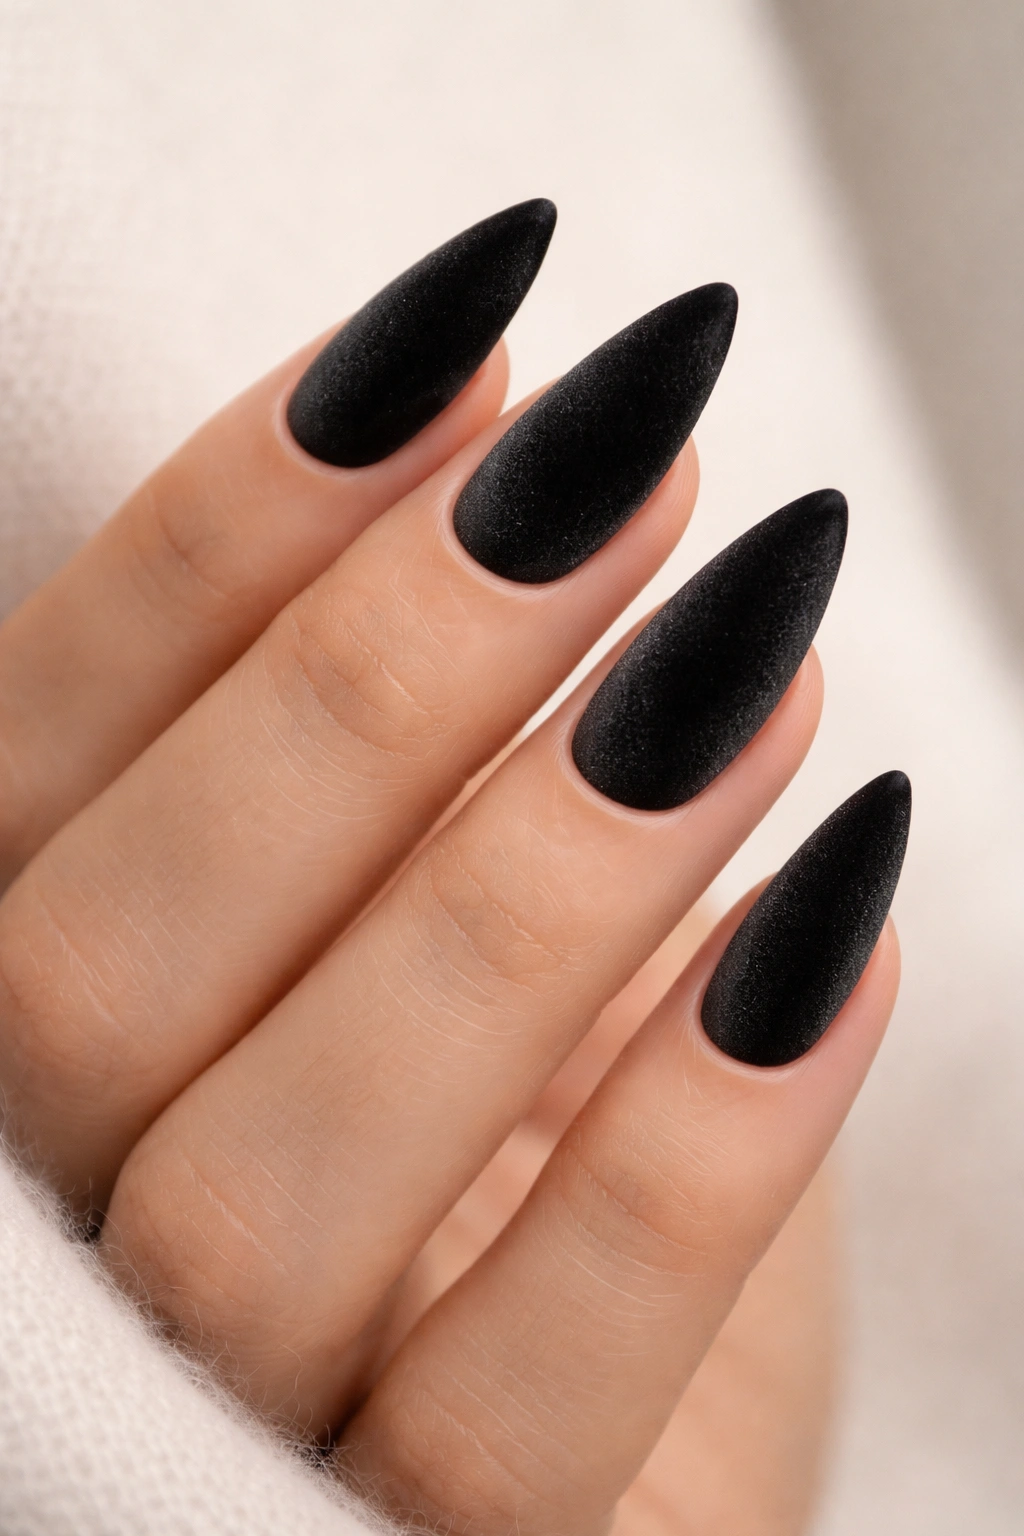
2. Matte Black Almond Nails
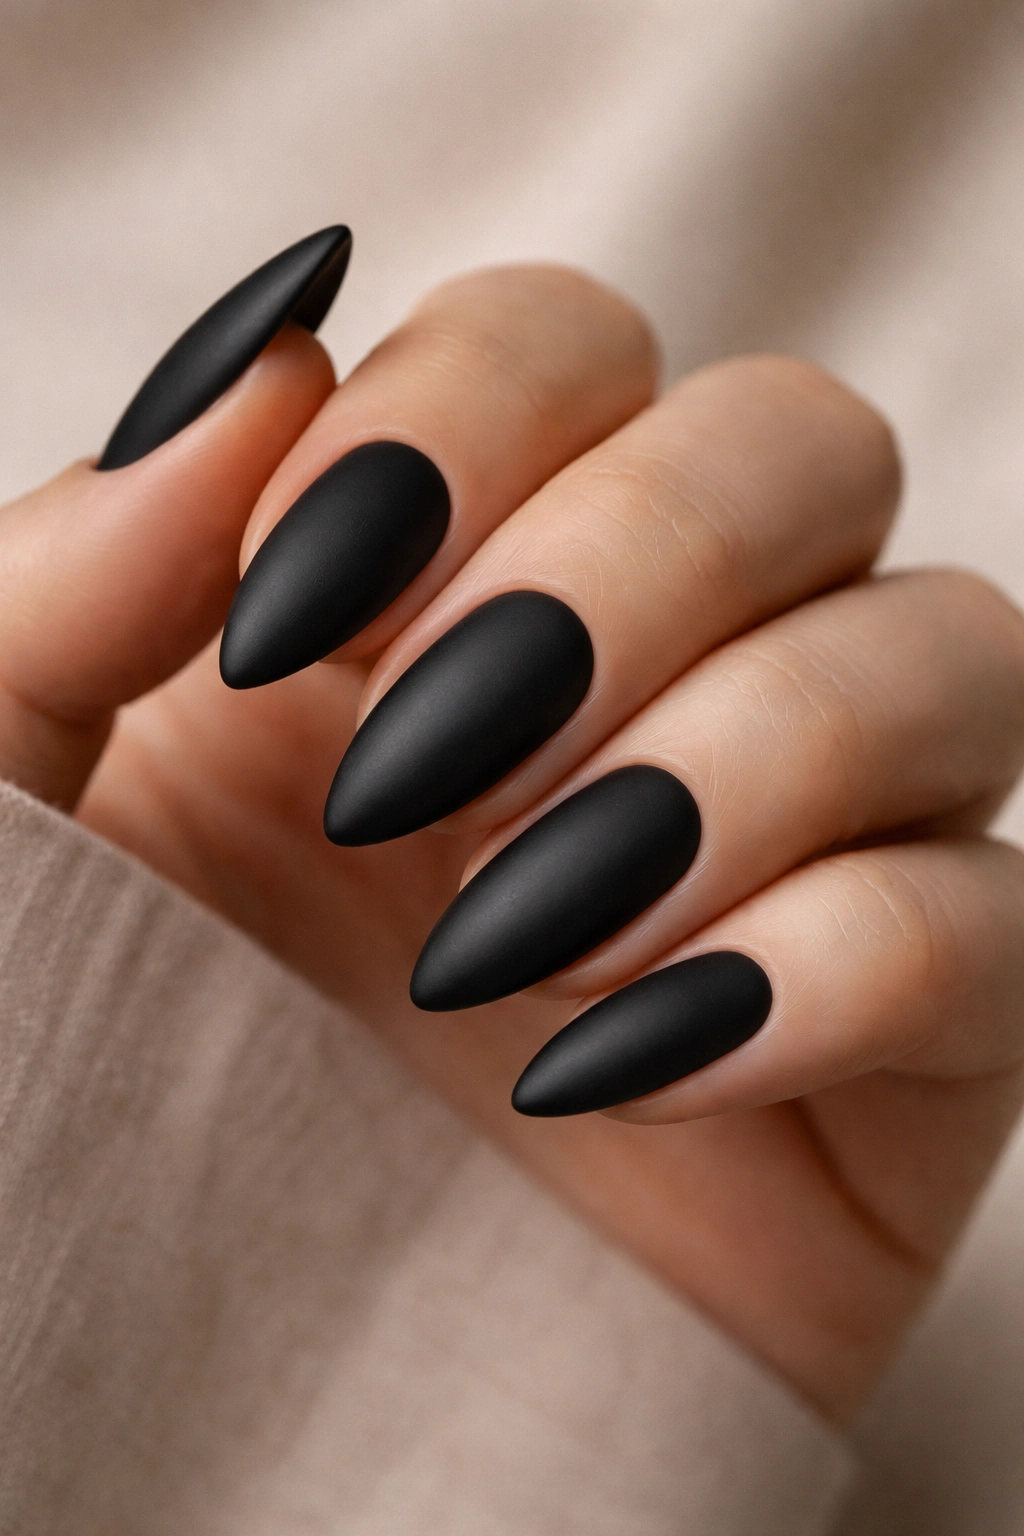
Matte black almond nails have a totally different mood from glossy ones. They feel softer to the eye, almost like velvet, but still keep that strong, dark shape people want from black nails. The finish takes away the shine, which makes the color look deeper and a little more dramatic.
There’s also a practical side to matte. Chips and smudges can show differently than they do on glossy nails, so prep matters. A smooth base coat and careful filing help the look stay crisp. If the nail surface is bumpy, matte polish will show every flaw. That sounds harsh because it is.
What Makes Them Stand Out
The appeal is in the texture. Matte top coat absorbs light instead of reflecting it, and that changes the whole nail from shiny accessory to fashion statement. I like this look with a slightly longer almond nail because the shape keeps it from feeling too flat.
A matte finish also pairs well with minimalist outfits. Black jeans, a black turtleneck, chunky silver jewelry — done. No extra effort needed.
How to Wear It
- Use a smooth ridge-filling base coat first
- Apply 2 thin coats of black polish
- Finish with a matte top coat only after the polish is fully dry
- Avoid heavy hand cream right after, since oils can change the finish
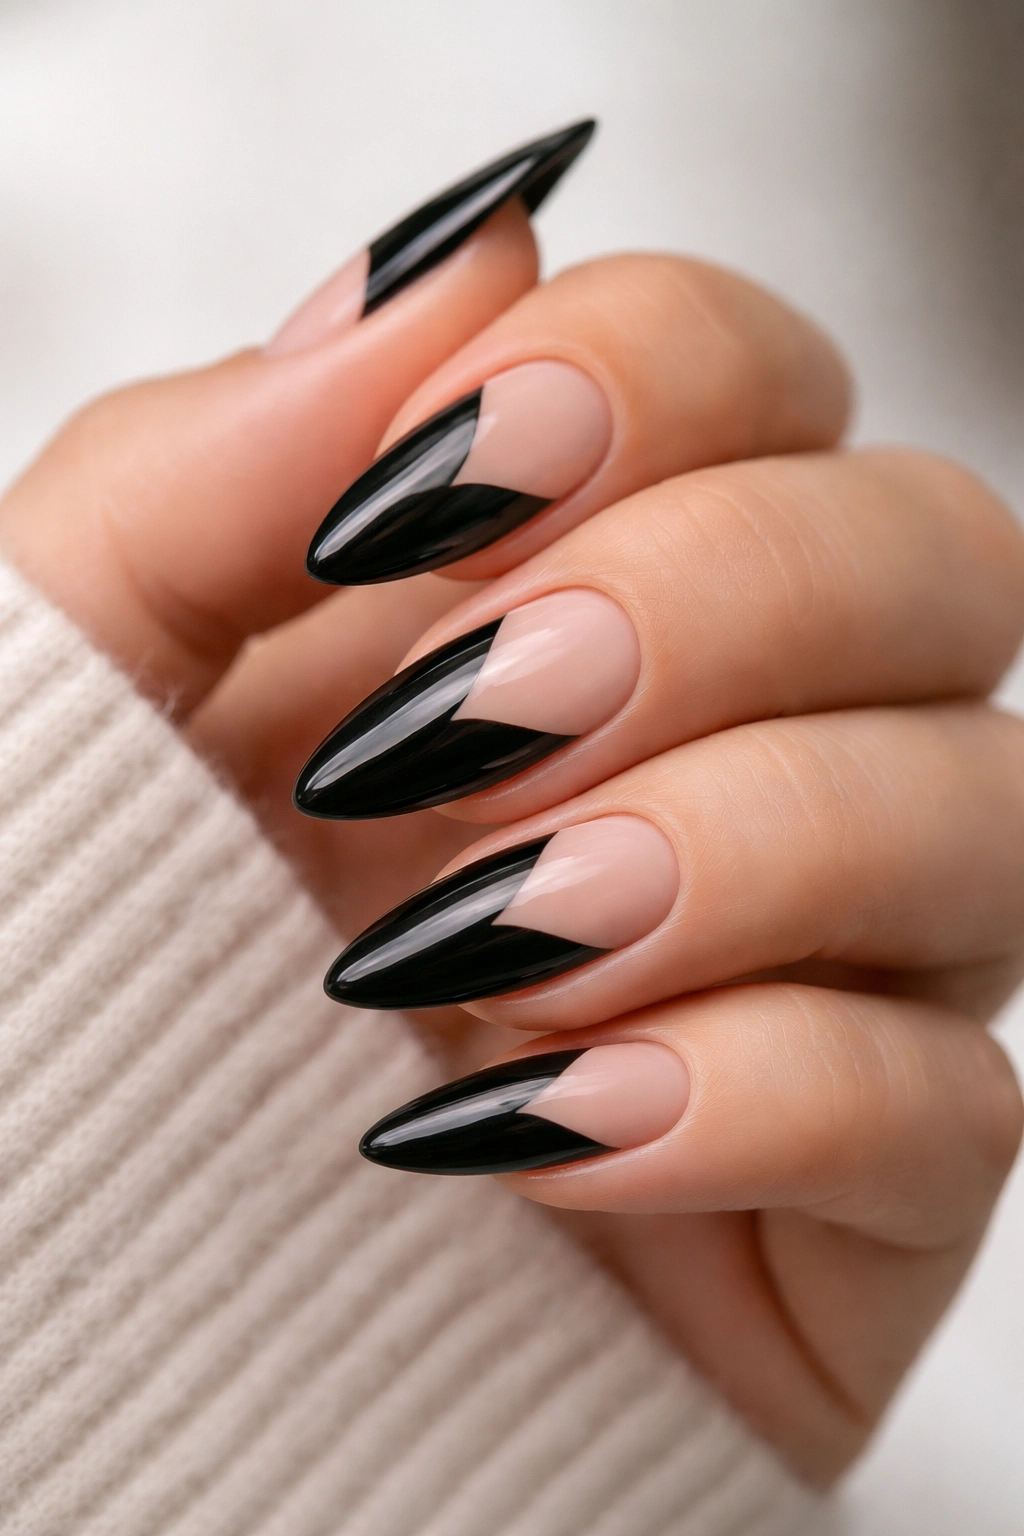
3. Black French Tip Almond Nails
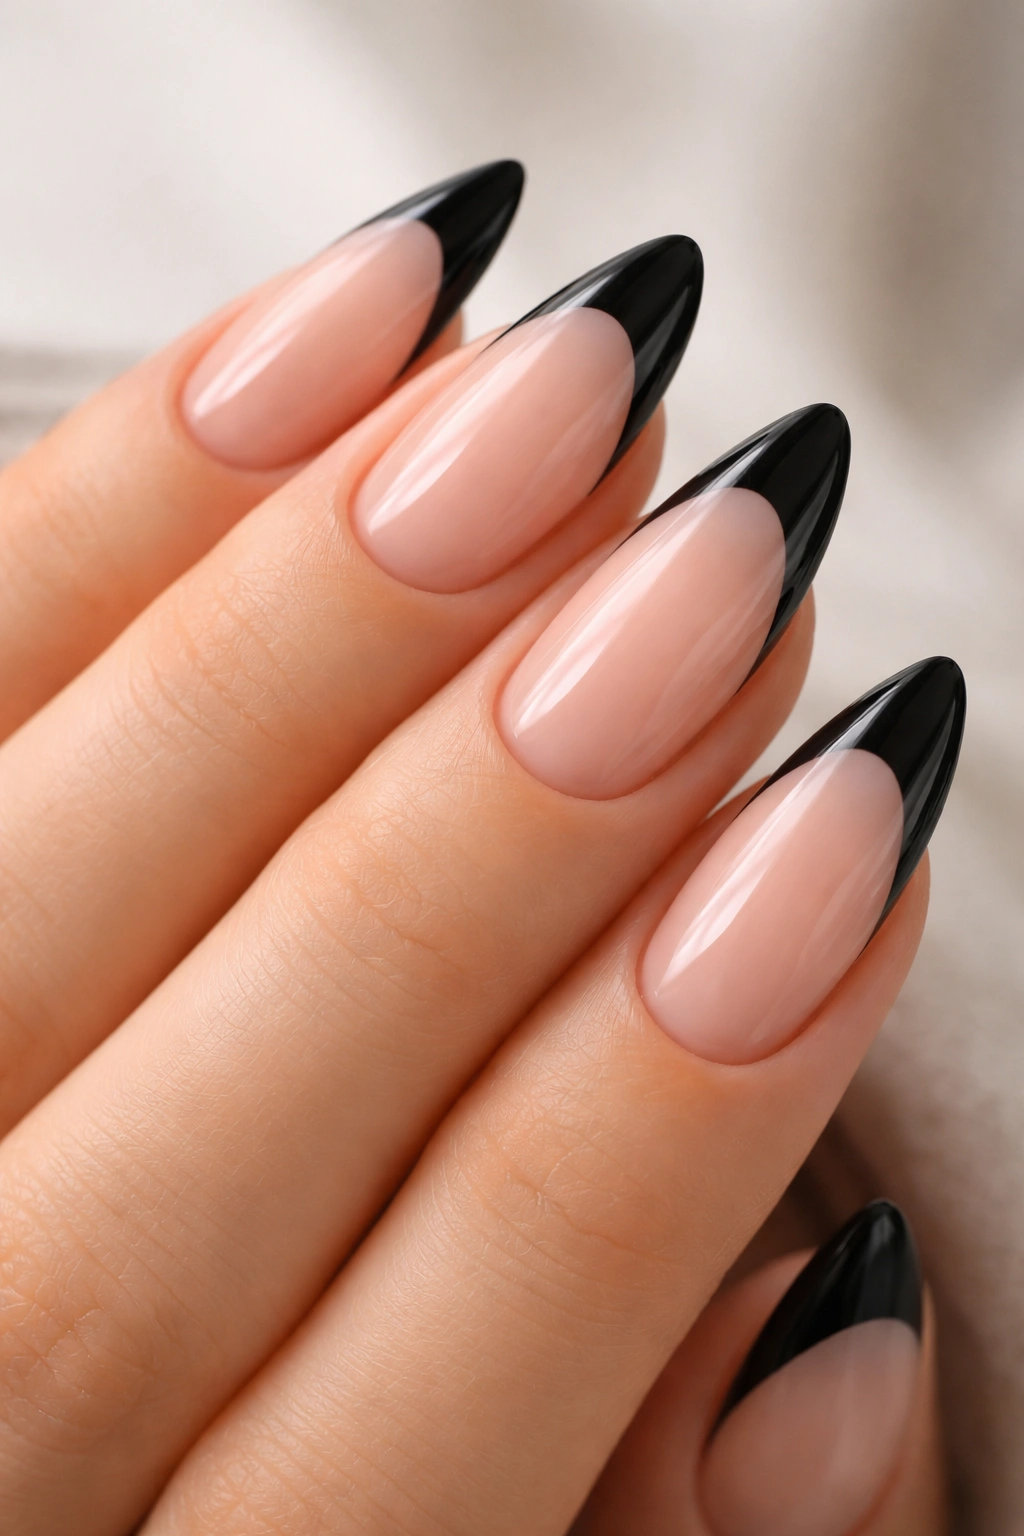
Black French tip almond nails are for people who want something clean but not boring. Instead of coating the whole nail in black, you leave a nude or sheer pink base and paint the tips in black. On almond nails, that curve at the edge looks especially elegant because the tip follows the shape of the nail instead of fighting it.
This version is also more forgiving than a full-black manicure. If your nail grows out fast, the base looks natural for longer. And if you’re nervous about wearing black on every nail, the French tip gives you a softer entry point.
The Shape Makes the Difference
On almond nails, the black tip can be thin and delicate or thick and graphic. A slim tip feels classic. A deeper tip feels fashion-forward and a little bolder. Both work, but they do not give the same effect.
A fine nail art brush helps more than most people realize. You want a smooth arc, not a shaky line that looks traced in a hurry.
Best Way to Recreate It
- Start with a sheer nude, blush, or milky pink base
- Paint the almond tip in black using a thin brush
- Clean the smile line with a tiny angled brush dipped in remover
- Seal with a glossy top coat for a crisp finish
4. Black Almond Nails with Gold Foil
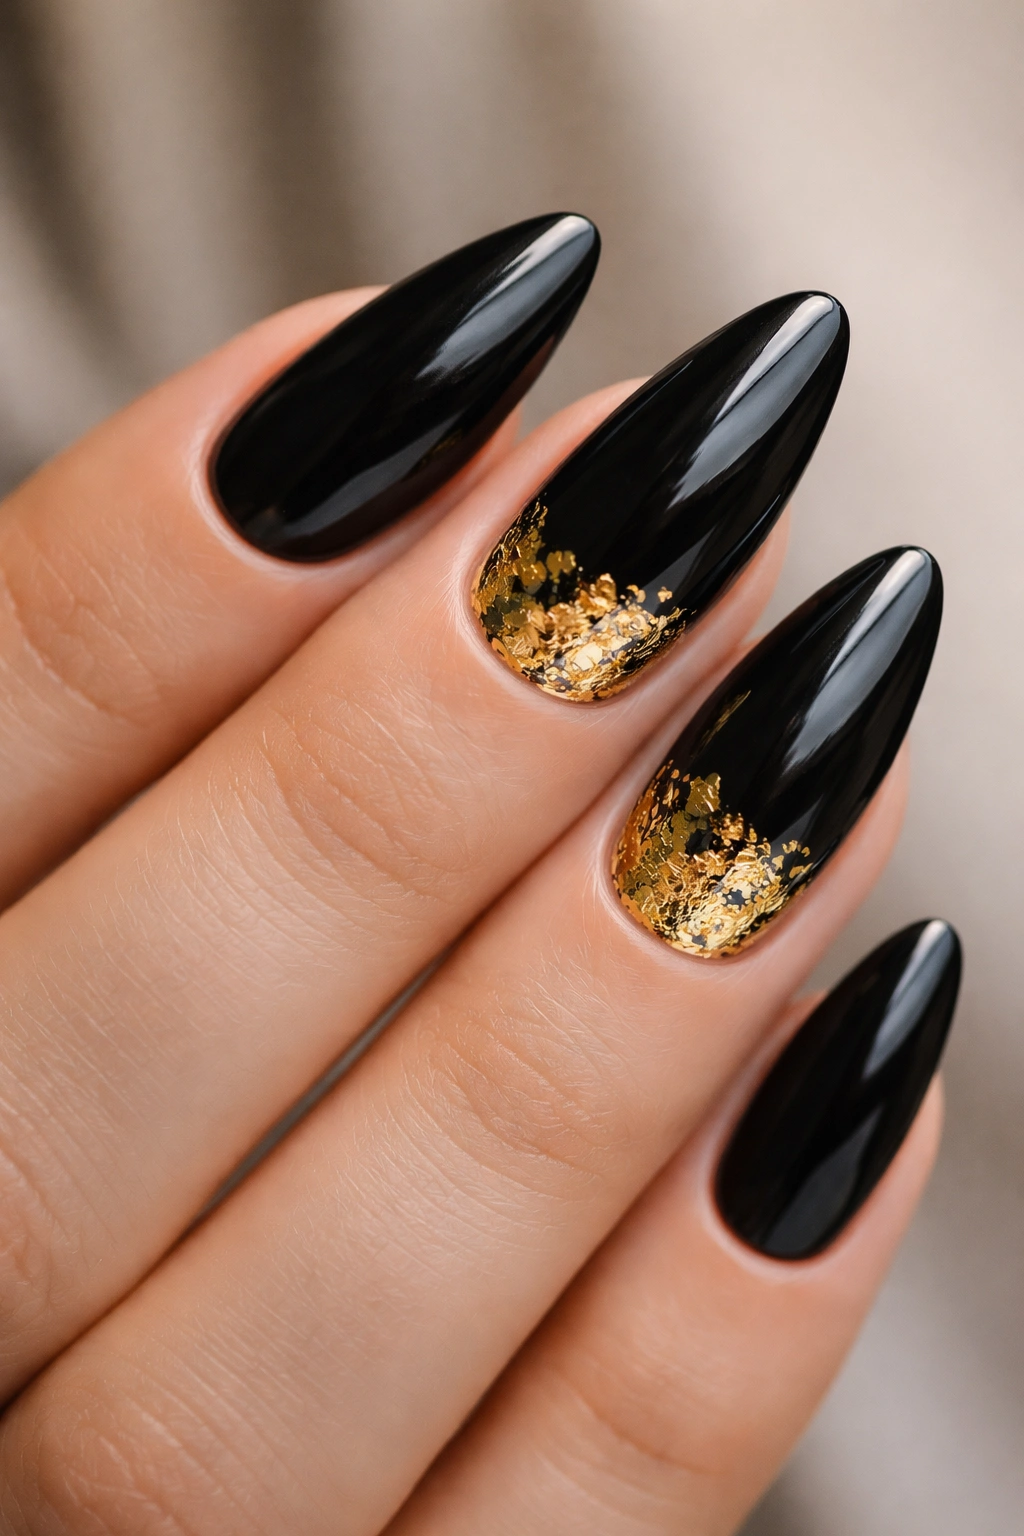
Gold foil on black almond nails is one of those combinations that can look rich without trying too hard. The black gives the foil contrast, and the gold breaks up the darkness in a way that feels deliberate, not busy. A few scattered flecks go a long way.
The key is restraint. If every nail is packed with foil, the manicure can start looking cluttered. But if you place the foil near the cuticle, around the tip, or just on accent nails, it looks sharp and expensive. The almond shape helps because it leaves enough surface for the gold to breathe.
A Good Trick for Application
Foil looks better when it’s irregular. Tiny torn pieces tend to look more natural than neat rectangles. Press them into a slightly tacky layer of polish, then lock everything down with top coat.
This style works especially well for evening wear, holiday dressing, or any outfit that needs one stronger detail. It’s not subtle. That’s the point.
- Use transfer foil glue or a tacky layer of gel
- Apply foil sparingly so the black still shows through
- Focus the gold on 1 to 2 accent nails if you want a cleaner result
- Finish with a thick top coat to smooth the texture
5. Black Almond Nails with Chrome Shine
Chrome on black almond nails gives you that mirror-like finish people keep saving to mood boards. The black underneath deepens the chrome effect, so silver looks colder and more reflective, while gunmetal shades feel moodier and less flashy. It’s a strong look, but not in a loud way.
This style works best on a smooth nail surface. Chrome shows every dent, ridge, and rough patch, which means prep is not optional. Buff lightly, use a leveling base, and don’t rush the curing or drying stage if you’re using gel products.
What to Expect
The first thing people notice is the finish. Chrome catches light differently as you move your hands, so the nails look almost liquid. On almond nails, that effect is even better because the tapered shape gives the shine a clean direction.
If you want something more wearable, choose a soft silver chrome instead of a bright mirrored finish. It keeps the look polished without becoming costume-y.
Application Notes
- Use a black base coat or black gel polish
- Rub chrome powder onto a no-wipe top coat
- Buff until the surface looks even and metallic
- Seal carefully so the chrome does not dull
6. Black Almond Nails with Tiny Rhinestones
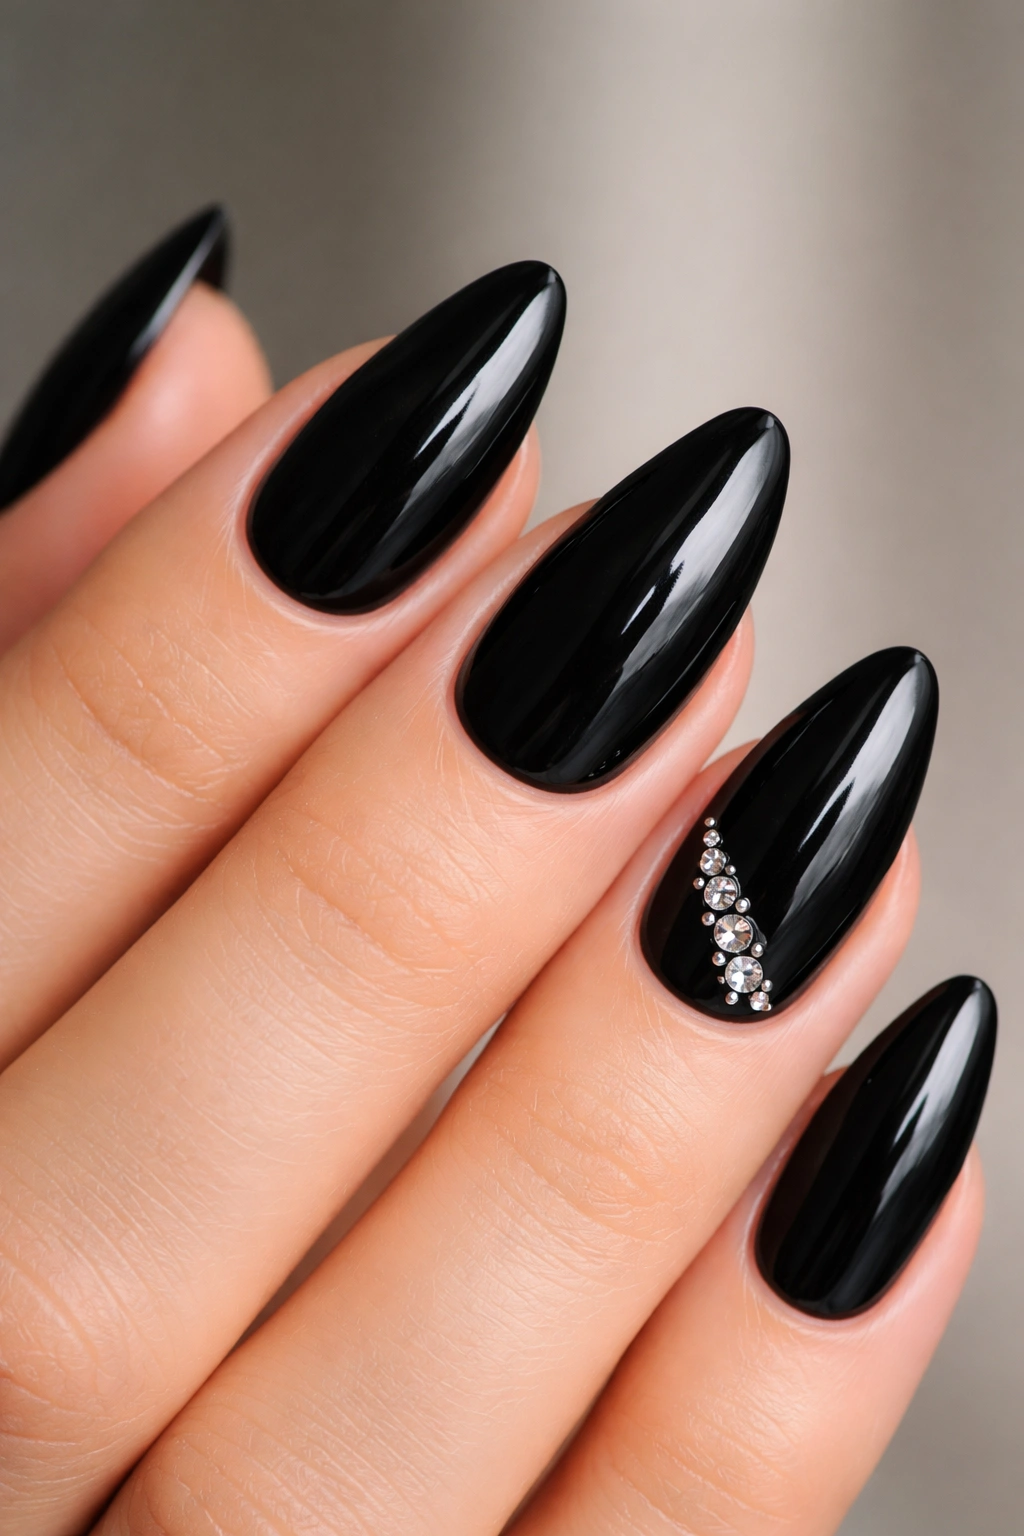
Tiny rhinestones on black almond nails can go from sweet to tacky fast, so spacing matters. One small stone near the cuticle or a slim cluster on one finger usually looks better than piling gems onto every nail. Against black polish, even a single clear stone can catch enough light to matter.
The almond shape helps keep the look balanced. Because the nail already has a soft taper, the rhinestones add a bit of sparkle without fighting the silhouette. I’d avoid oversized gems here unless you want a full glam manicure that’s going to snag on clothes and hair.
Where to Place Them
The cleanest placements are near the base of the nail, along one side, or at the center of an accent nail. That keeps the manicure neat and makes the stones feel intentional instead of scattered.
You can use a dot of nail glue for each stone, but a thick gel top coat often gives a more secure hold if you’re working with smaller crystals.
- Stick to clear or smoky stones for a sleek look
- Use one accent nail if you want less maintenance
- Keep the rest of the manicure plain black
- Press each stone down gently with tweezers or a wax pencil
7. Black Almond Nails with Silver Glitter Fade
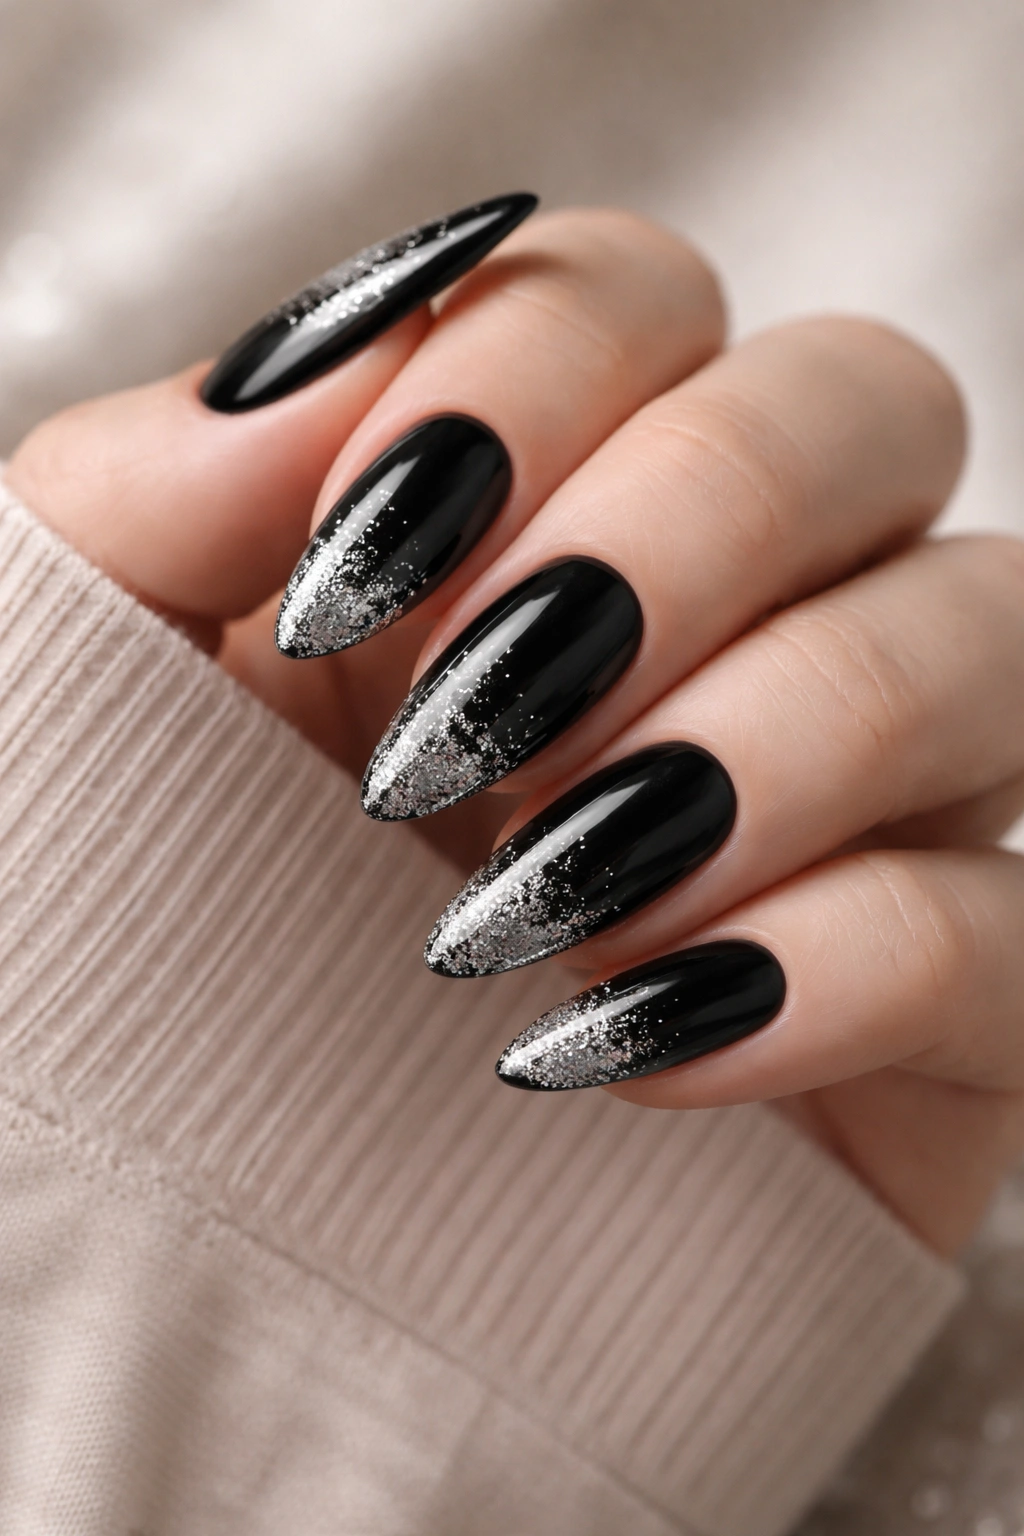
A silver glitter fade on black almond nails is one of the easiest ways to add movement to an all-black manicure. The glitter usually starts dense near the tip or cuticle and gets lighter as it spreads across the nail. That ombré effect keeps the look from feeling flat.
This is one of those styles that photographs well in a way, but more importantly, it looks good in normal light too. The sparkle is subtle from far away and more noticeable up close. That’s the sweet spot.
Why the Fade Works
Black polish gives the glitter a dark backdrop, which makes silver pieces stand out without needing a lot of product. You can use loose glitter, a glitter polish, or a sponge to dab on the fade.
If you want the manicure to feel cleaner, keep the glitter on just the ring fingers. If you want more shine, fade it on every nail but keep the coverage light.
A Simple Way to Build It
- Apply 2 coats of black polish
- Tap silver glitter onto the nail with a sponge or brush
- Build the densest part first, then soften the edge
- Finish with a thick top coat to smooth the texture
8. Black Almond Nails with Negative Space
Negative space black almond nails are a smart choice if you like black polish but don’t want every inch of the nail covered. The unpainted sections can be half-moons, cutout stripes, or thin clear gaps that make the design feel lighter. On almond nails, those open areas look especially clean because the shape already has a graceful line.
I like this style for people who get bored easily. It has contrast without needing extra color. And because part of the nail stays bare, the regrowth is less obvious.
The Cleanest Designs
A diagonal split between black and nude is probably the easiest version to pull off at home. So is a bare crescent near the cuticle. Both look intentional if the edges are sharp.
Use striping tape if freehand lines make you nervous. Peel it off before the polish fully hardens, or you’ll lift the edge and curse at your own mirror.
Keep It Crisp
- Start with a clear base or sheer nude base
- Map the design with striping tape or a fine brush
- Use black polish in thin layers
- Clean up edges before adding top coat
9. Black Almond Nails with White Swirls
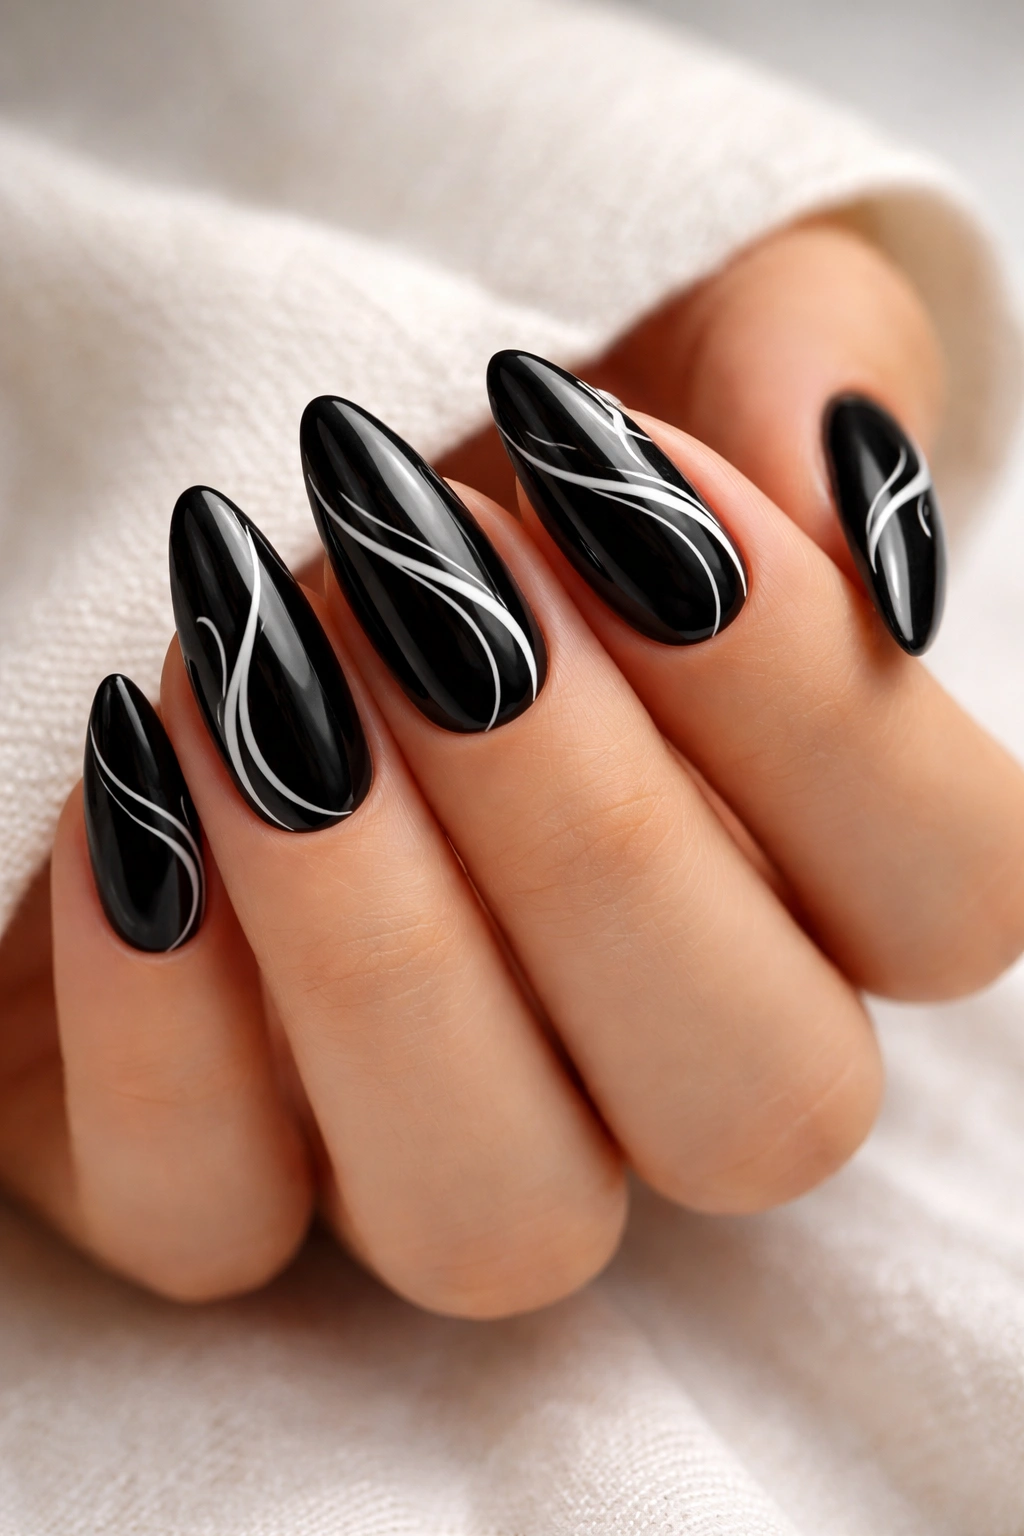
White swirls on black almond nails give you contrast without requiring a full art lesson. The design can be abstract, thin, or a little more graphic depending on your mood. Either way, the white line stands out hard against black, which is exactly why this pairing keeps showing up.
The trick is not to overwork it. Swirls look best when they feel loose and slightly imperfect. If every line is stiff and identical, the design loses its charm.
Making the Swirls Look Intentional
A very thin nail art brush helps more than a thick one here. You want a fluid line, not a chunky stripe that swallows the nail. Some people like a single swirl per nail. I think that’s usually enough.
This design also works well on shorter almond nails, where the curve of the shape gives the swirls a little extra motion.
- Use opaque white polish or gel paint
- Keep the lines thin and slightly varied
- Let the black base dry fully before drawing
- Seal with top coat after the art is dry to the touch
10. Black Almond Nails with Clear Tips
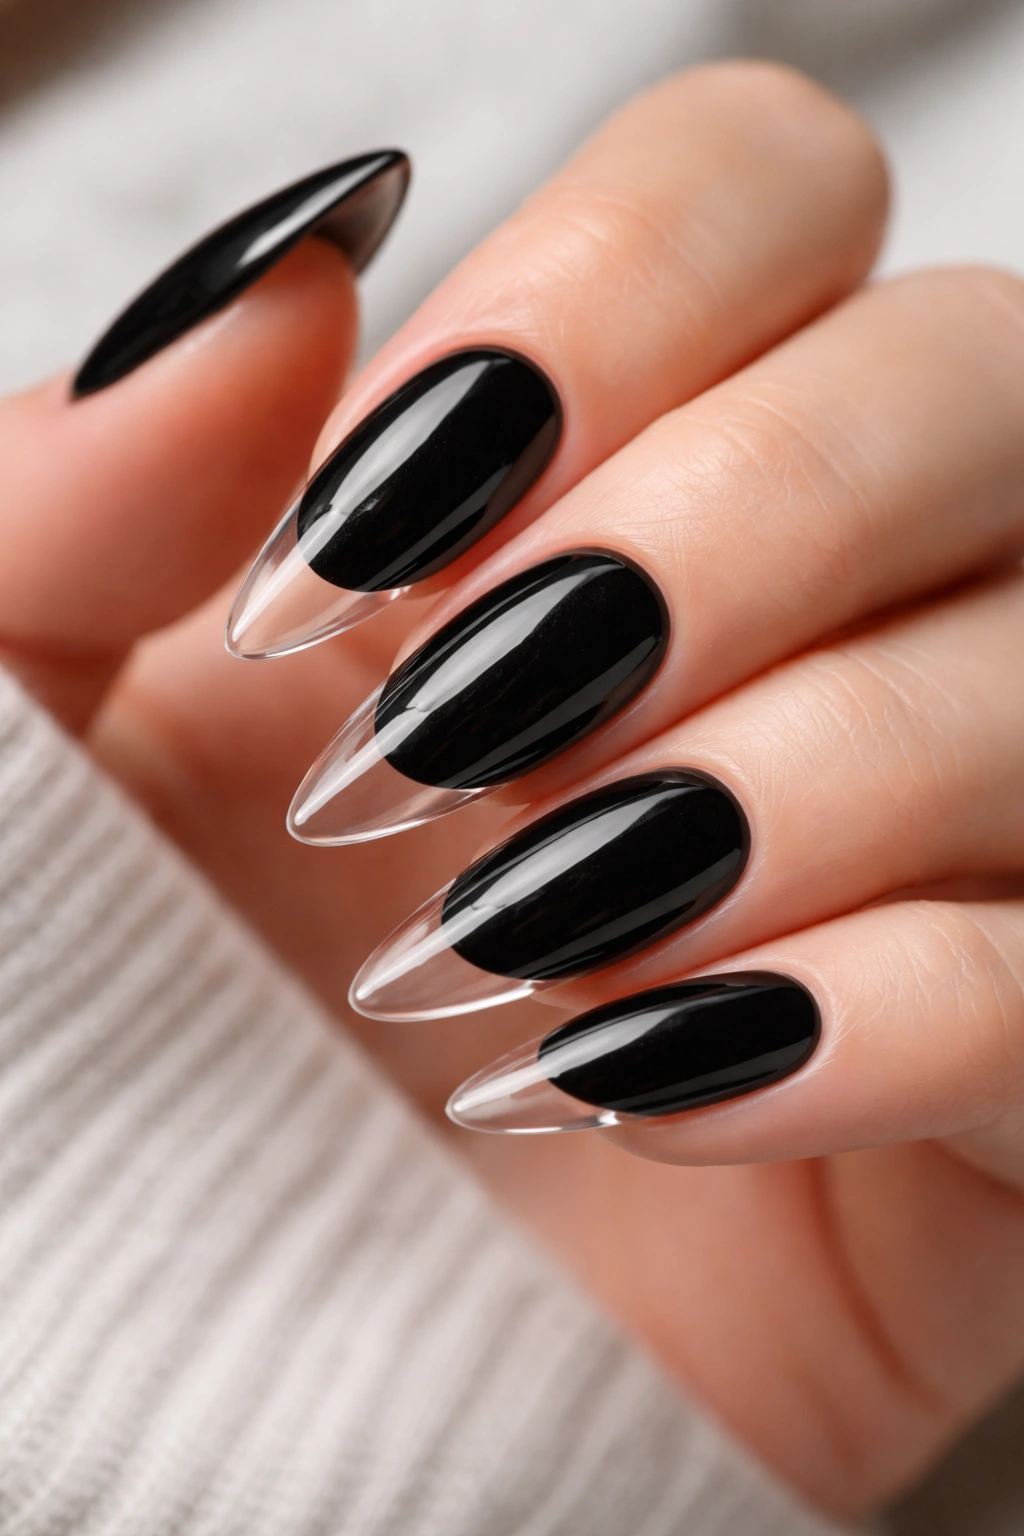
Clear tips on black almond nails create a sharp, glassy effect that feels modern without being fussy. The black base ends before the tip, so the top of the nail looks translucent or fully clear. It’s a clever contrast, and on almond nails it feels sleek rather than harsh.
This manicure does best when the transition line is clean. A sloppy edge ruins the illusion fast. If you’re using gel, take your time with the shape. If you’re using regular polish, work with small brush loads and clean the line before the polish dries.
Why People Like It
The clear tip breaks up the black, which makes the manicure feel lighter on the hand. It’s also a nice choice if you want black nails that still look polished in formal settings.
You can leave the clear tip plain or add a whisper of glitter. Just don’t crowd it. The emptier the tip, the sharper the effect.
Design Notes
- Start with a black base on the lower part of the nail
- Leave the tip fully clear or sheer
- Use a curved guide line to keep the separation even
- Finish with a glossy top coat for a glass-like look
11. Black Almond Nails with Marble Detail
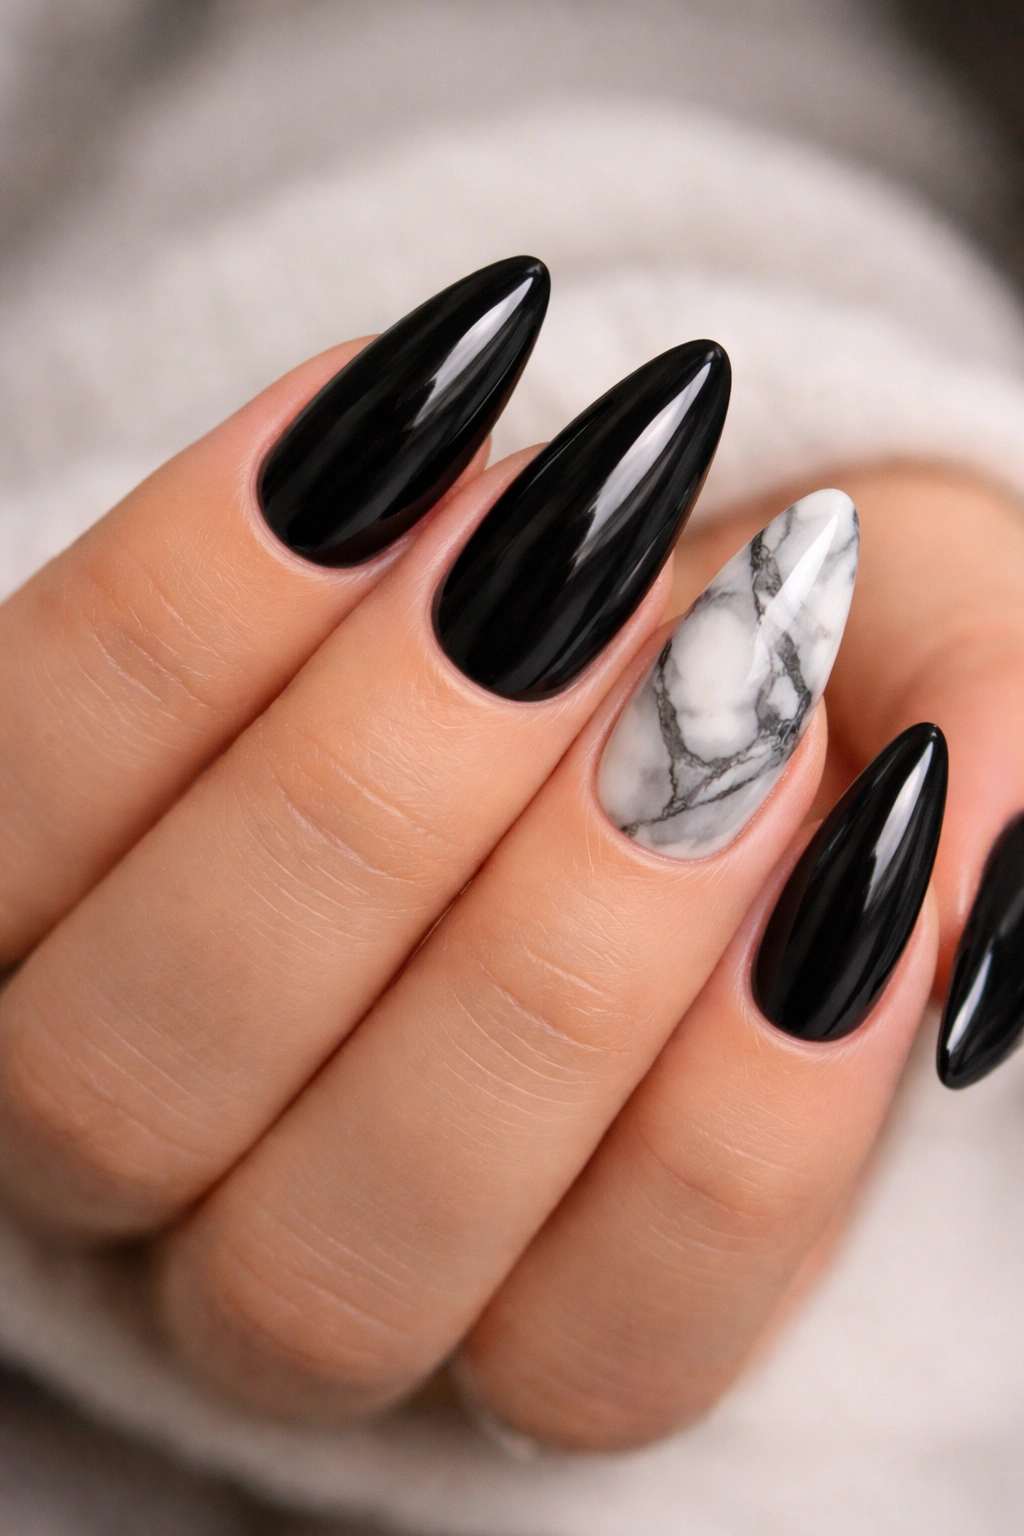
Black marble almond nails have a moody, smoky look that feels more artful than plain polish. The marbling can be white, gray, silver, or even a mix of all three, and because black is such a strong base, the lighter veins stand out without needing much product.
I prefer marble detail on just a couple of nails. Full marble on every finger can become busy fast. One or two accent nails usually give you enough contrast and make the manicure look more considered.
How to Build the Marble Effect
The easiest marble effect comes from a small detail brush or a thin liner brush. Draw irregular wisps, then soften them slightly before they dry. The goal is not to make the nail look like a countertop sample. It should feel organic.
A sheer gray layer can help blur the design if the white looks too stark.
- Use black polish as the base
- Add wisps of white or gray before the layer fully sets
- Blend lightly with a clean brush for a smoky look
- Keep the rest of the nails solid black for balance
12. Black Almond Nails with a Velvet Finish
Velvet black almond nails mimic the look of crushed fabric, and the effect is more interesting than plain matte polish. Light shifts across the surface in a soft way, so the nails seem to move when you tilt your hands. It’s a nice compromise if you want texture but still like a dark manicure.
This finish usually comes from magnetic polish or special powder, depending on the product. Either way, the final look is softer than chrome and more dimensional than matte. That middle ground is what makes it so good.
Why the Texture Matters
Black can flatten out fast. A velvet finish gives it depth without needing any extra color or nail art. On almond nails, the texture follows the taper and makes the shape look more intentional.
The big mistake here is rushing the cure or applying the magnetic effect unevenly. Then the finish looks patchy instead of plush.
Use It Like This
- Apply a black magnetic or velvet-effect polish
- Move the magnet slowly if the formula requires it
- Cure or dry fully before top coat
- Use a glossy or satin top coat depending on how soft you want the result
13. Black Almond Nails with Minimalist Line Art
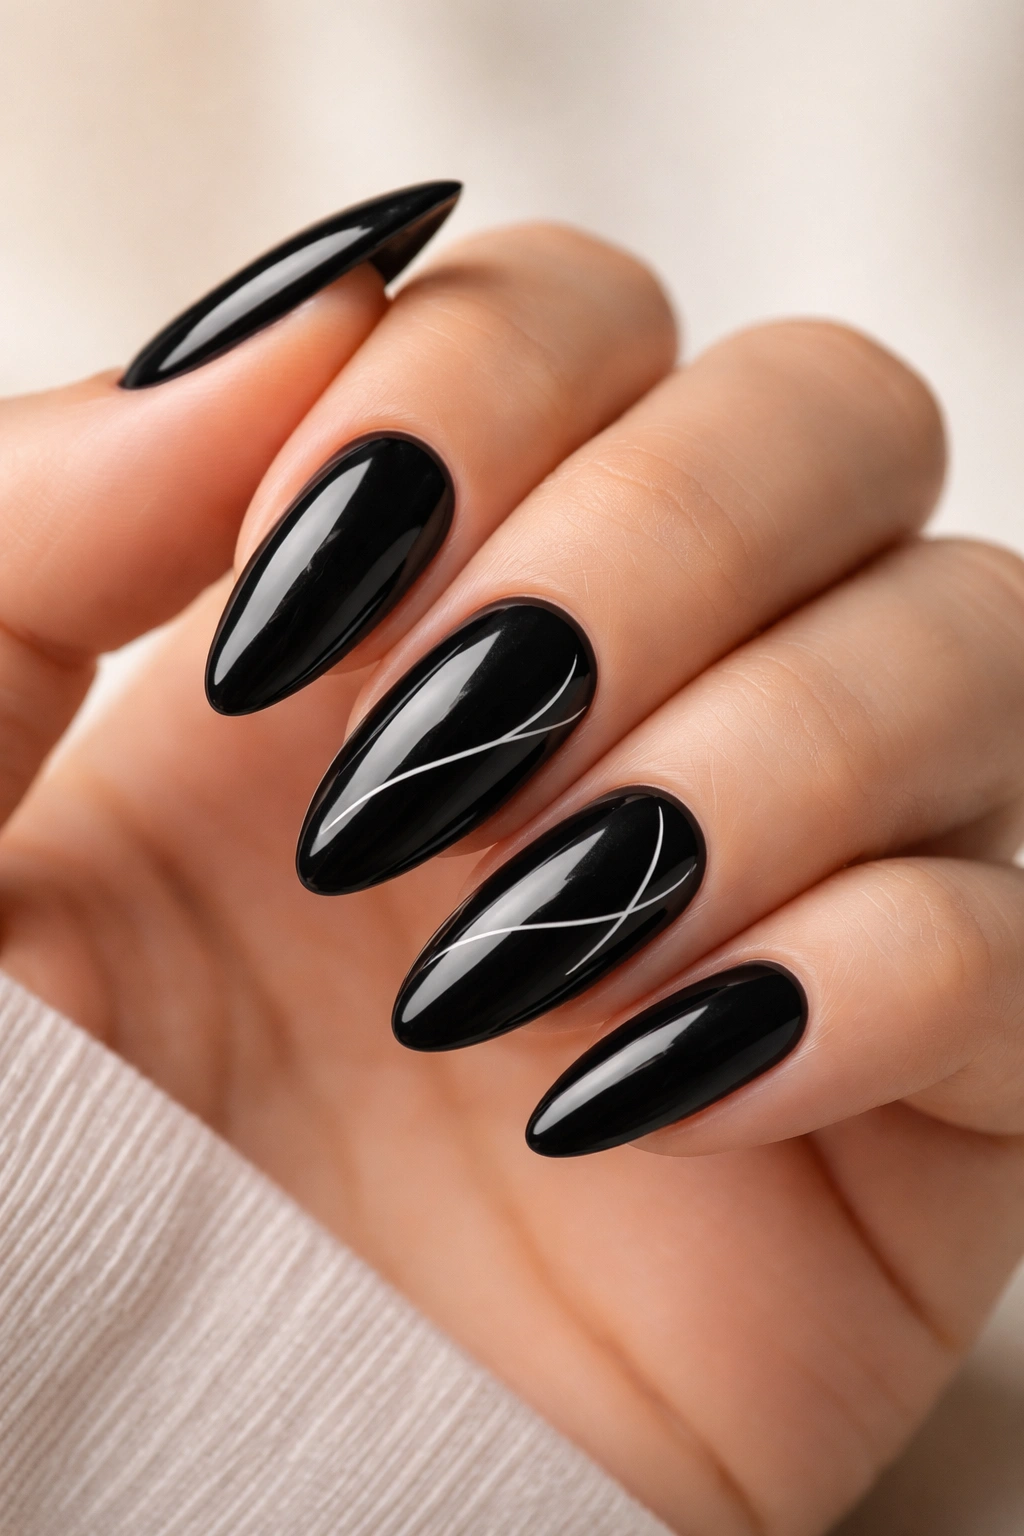
Minimal line art on black almond nails is a good choice if you want the manicure to feel modern without turning it into a full design project. Think tiny white lines, a single gold curve, or a slim abstract shape across one or two nails. The contrast is subtle, but it still gives the black a little life.
The danger with line art is overcomplication. Too many lines, and the nail starts looking messy. One clean stroke often works better than five fussy ones. That applies to almost everything in nail design, honestly.
Best Types of Line Art
A thin vertical line can make the nail look longer. A diagonal line adds movement. A small loop or wave feels more playful. Keep the lines thin enough that the black base still reads as the main event.
This is a good style for short almond nails because the design doesn’t need a lot of space. It still looks deliberate even on smaller nails.
- Use a liner brush with a tiny amount of polish
- Pick one line style and repeat it on a few nails
- Keep the color contrast strong, like white, gold, or silver
- Finish with a glossy top coat to smooth the design
14. Black Almond Nails with a Glitter Accent Nail
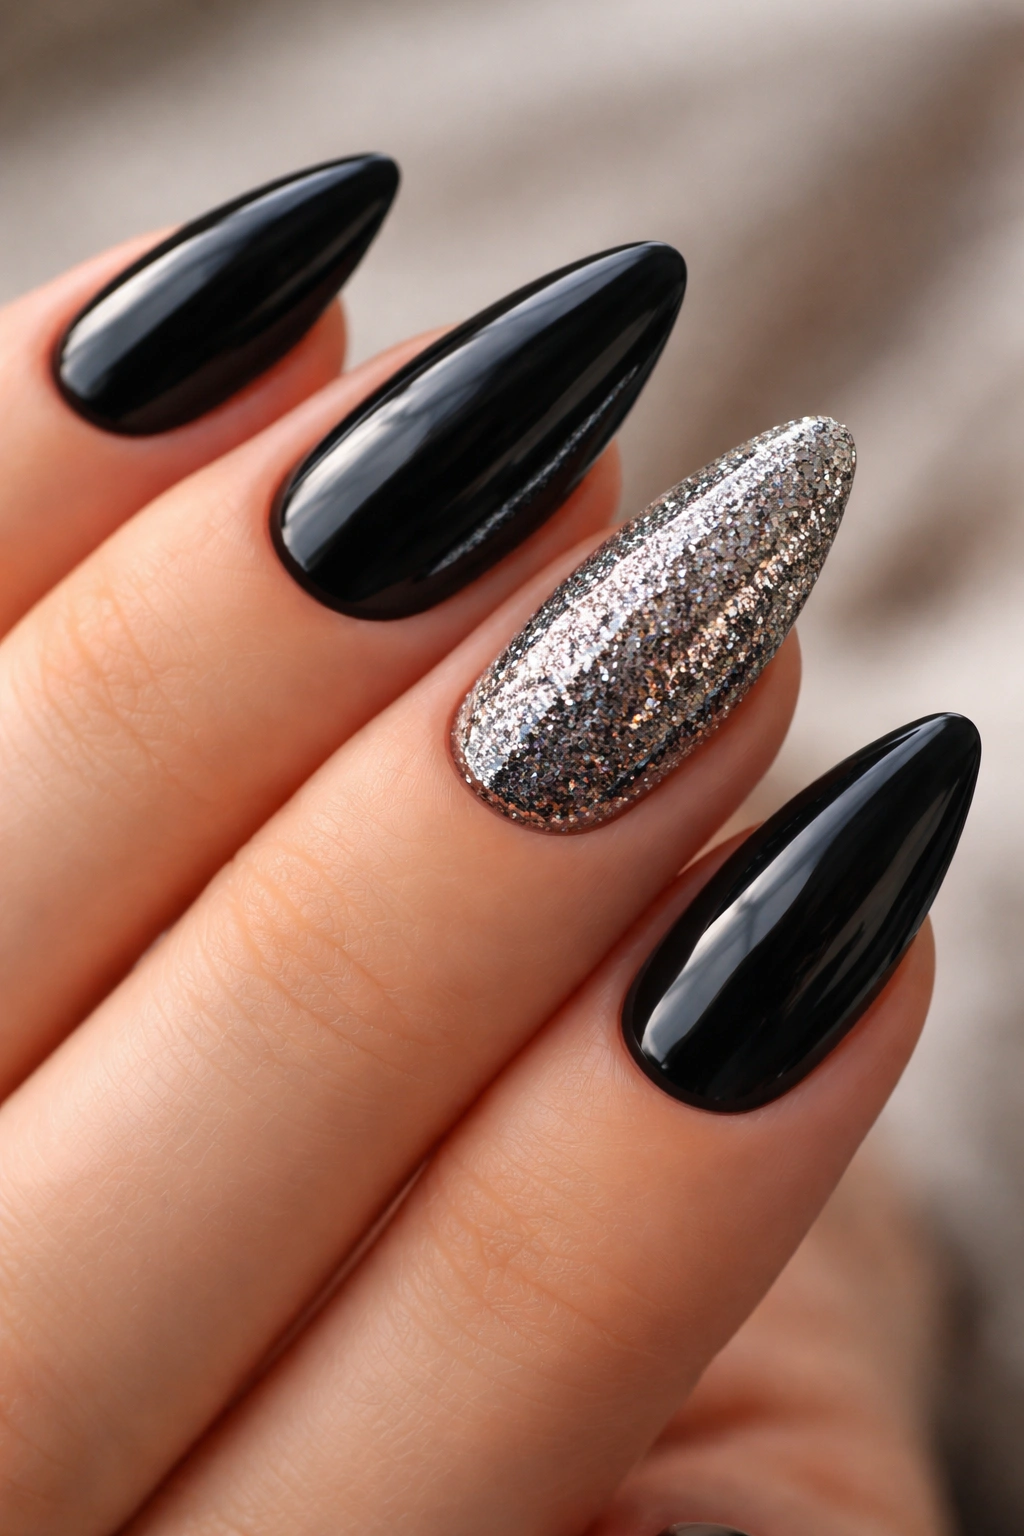
A single glitter accent nail is one of the easiest ways to keep black almond nails from feeling too serious. The trick is choosing one finger — usually the ring finger — and giving it a different texture or finish. That tiny shift makes the whole manicure feel thought-out.
This works especially well when the glitter is dense and sparkly, not chunky and uneven. Fine glitter gives you shine without making the nail feel rough. Chunky glitter can be fun too, but it changes the mood fast.
Why One Accent Nail Is Enough
Black polish already has a strong presence. You do not need glitter on every finger to make it interesting. In fact, too much sparkle can wipe out the clean shape that makes almond nails so flattering.
If you want the look to feel a bit dressier, match the glitter tone to your jewelry. Silver with silver. Gold with gold. That small detail makes a difference.
Easy Recreate List
- Paint four nails solid black
- Apply full glitter polish to one accent nail
- Choose fine glitter for a smoother finish
- Seal with top coat so the accent nail doesn’t feel rough
15. Black Almond Nails with a Gothic Floral Design
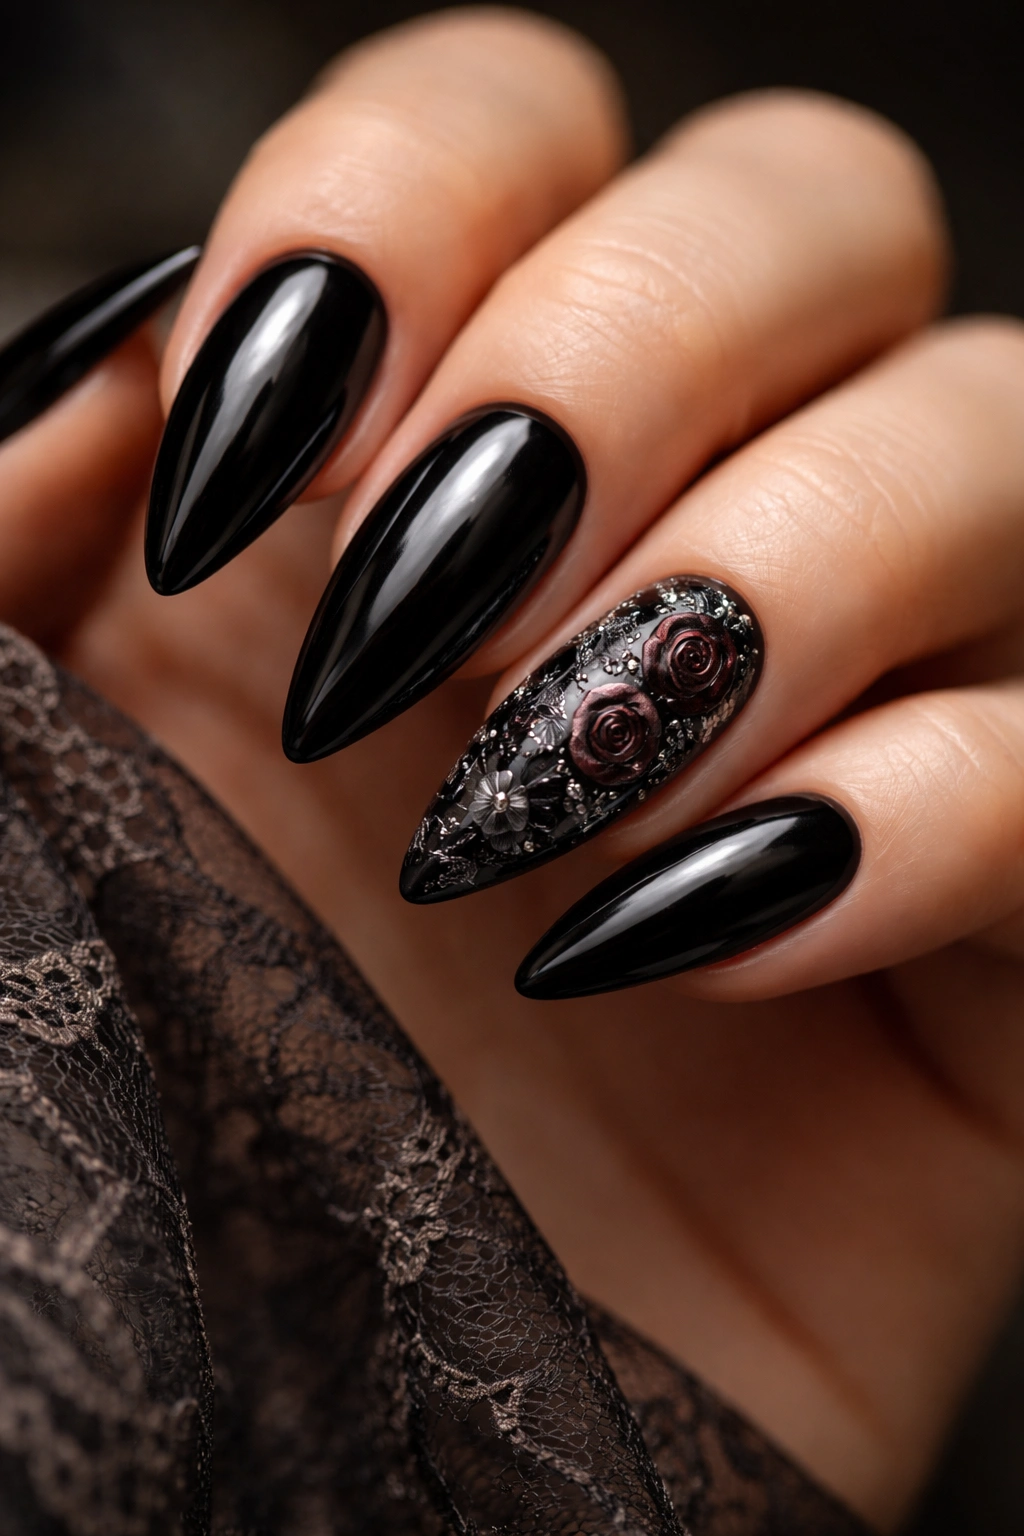
Gothic floral black almond nails have a darker, more ornate mood than the rest of the styles on this list. Think tiny roses, vines, lace-like details, or deep red petals over a black base. It can feel romantic, dramatic, or a little old-world depending on the colors you choose.
This is the style for people who want their nails to say something. Quietly, maybe, but still say it. A single floral accent nail can be enough, or you can carry the design across all ten fingers if you want the full effect.
What Keeps It From Looking Heavy
The floral work needs contrast. Black petals on black polish disappear, so choose a second color with enough presence: deep burgundy, muted plum, silver, or off-white. Thin outlines help the details stay readable.
I like this look best when the flowers are small. Oversized blooms can overwhelm the almond shape and make the nails feel crowded.
Small Design Notes
- Use a fine brush or nail stamp for the floral detail
- Keep the flower placement near the tip or one side of the nail
- Limit the palette to 2 or 3 colors
- Finish with glossy top coat for depth
Matching Black Almond Nails to Your Style
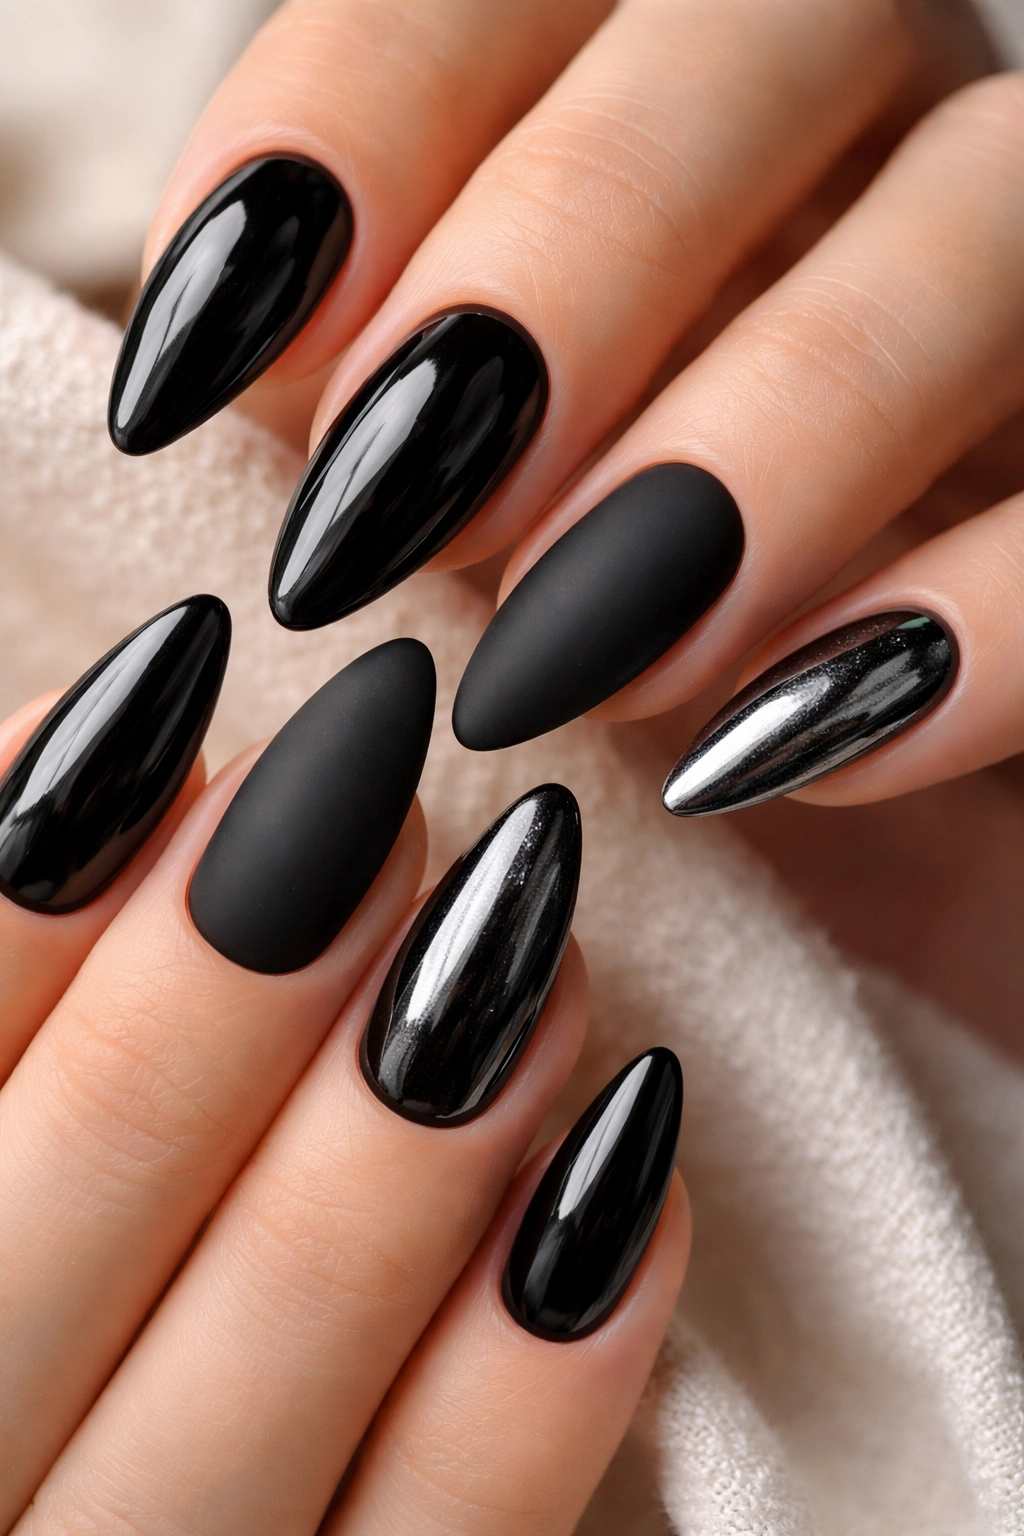
Black almond nails can look polished, edgy, romantic, or minimal depending on what you add to them. The base color stays the same, but the finish changes everything. Glossy black feels classic. Matte black feels quieter. Chrome, foil, glitter, and art push the manicure into more specific territory.
If you want a manicure that goes with everything, plain glossy black is the safest bet. If you like a bit more personality, choose one accent element and stop there. That’s usually the difference between sleek and overloaded.
The Bottom Line
Black almond nails work because the shape softens the color and the color sharpens the shape. That pairing is hard to beat. It gives you room to stay simple or get creative without losing the clean line that makes almond nails flattering in the first place.
Pick one version that fits your life, not just your saved photos. A manicure you can actually maintain will always look better than one that takes constant fixing.
