

Three-dimensional nail art can look elegant on almond nails—or it can look like a craft drawer tipped over at the salon. The difference is scale and placement. Almond tips give raised details somewhere to live, which is why 3D almond nail ideas often look cleaner here than on a blunt square shape.
I like this silhouette because it stretches the hand and gives pearls, bows, flowers, chrome drops, and tiny charms a little breathing room. Put the biggest texture near the cuticle or the center of the nail, and the whole design settles down.
Tiny 3D accents also wear better than people expect. Big blobs of gel are where things go wrong. Small petals, thin ribbons, and low-profile stones let the nail move with your hand instead of fighting it.
These 20 ideas stay on the wearable side of 3D art. Some are soft and bridal, some lean bold, and some are only a little dramatic—the sort of set that still makes sense if you type, cook, or live your life with your hands. Start with the one that matches how much maintenance you want to deal with.
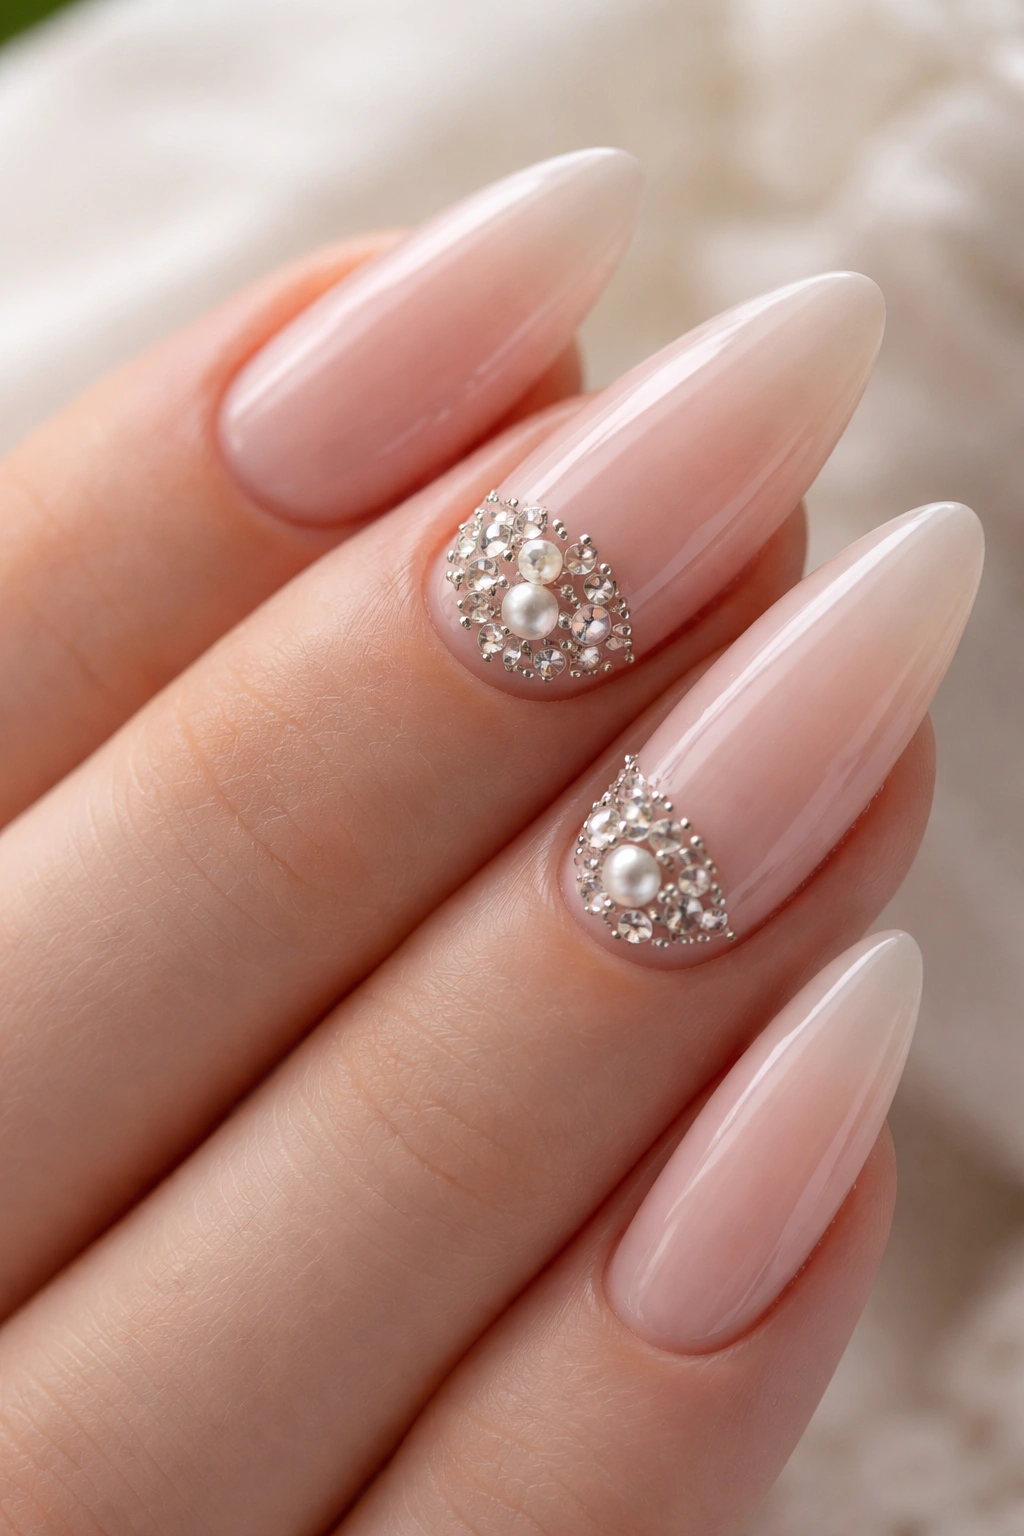
1. Sheer Nude Nails With Pearl Clusters
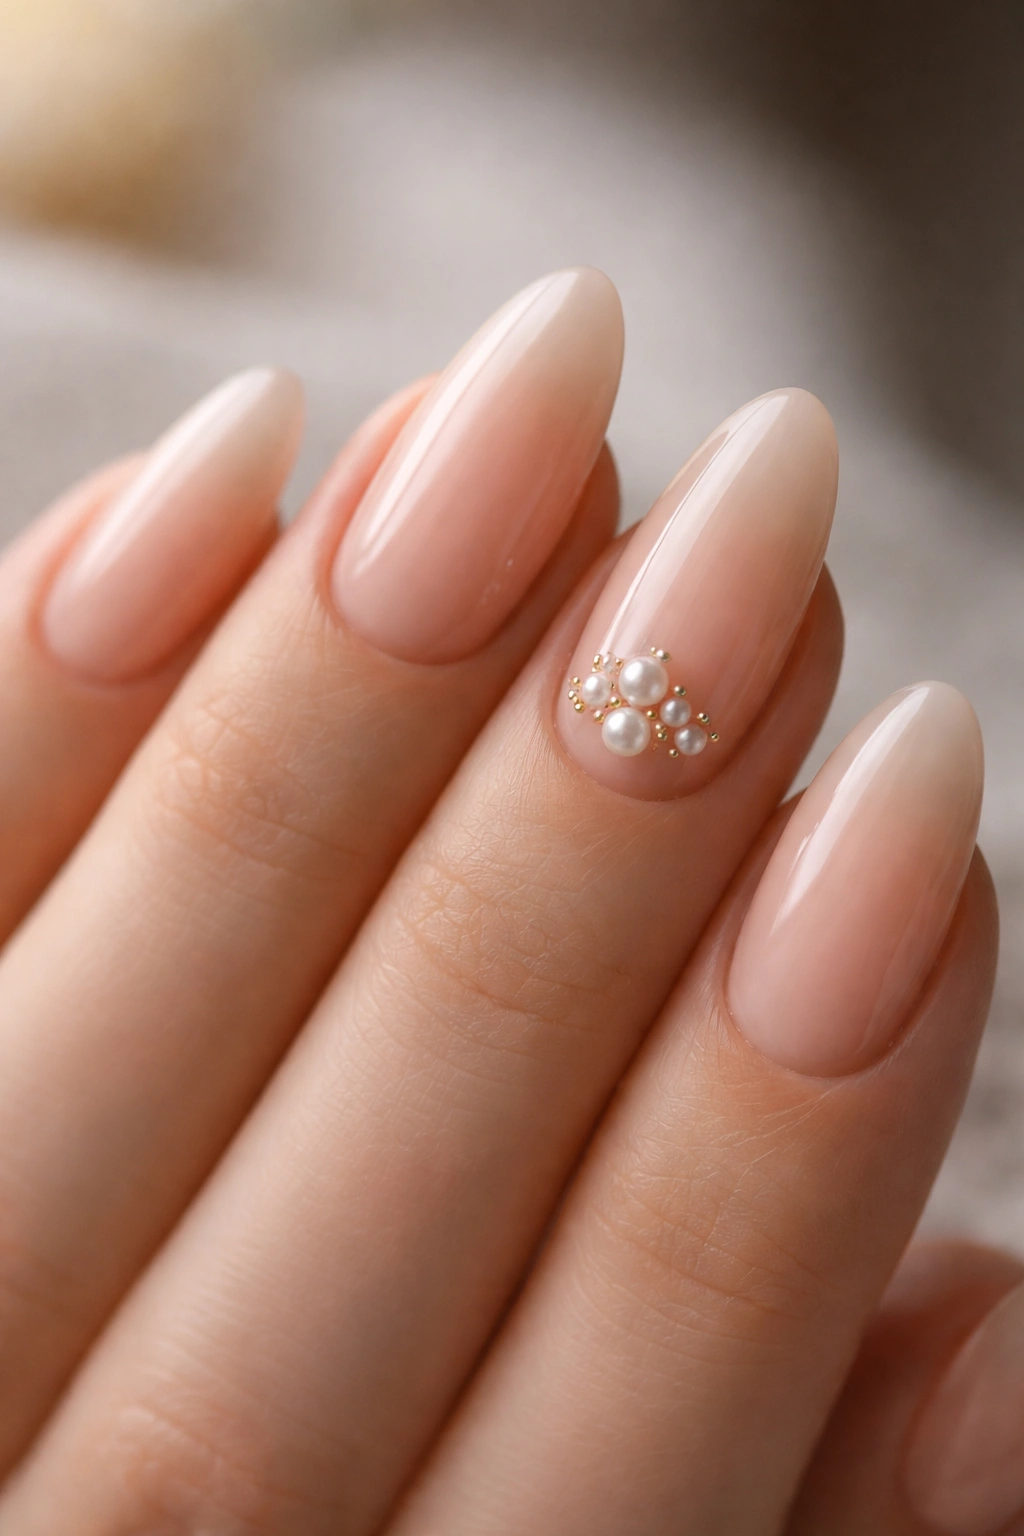
This is the cleanest way to wear 3D detail without making the nails look busy. A sheer nude or blush base keeps everything airy, while a few tiny pearl clusters near the cuticle give the almond shape a soft, lifted look. I’d keep the pearls small—about 1 to 2 mm each—so they read as texture, not hardware.
Why it flatters almond nails
Almond nails already have a gentle taper, so the eye follows the line naturally. That makes a small cluster of pearls feel intentional instead of heavy.
- Place the pearls slightly off-center if you want a softer look.
- Keep the cluster on one or two nails only.
- Use a glossy top coat around the pearls, not over them, so the dome stays crisp.
A thin builder gel base helps the pearls sit flat and last longer. The trick is restraint. Too many pearls on every nail and the whole set loses its quiet charm.
2. Milky White Florals With Raised Petals
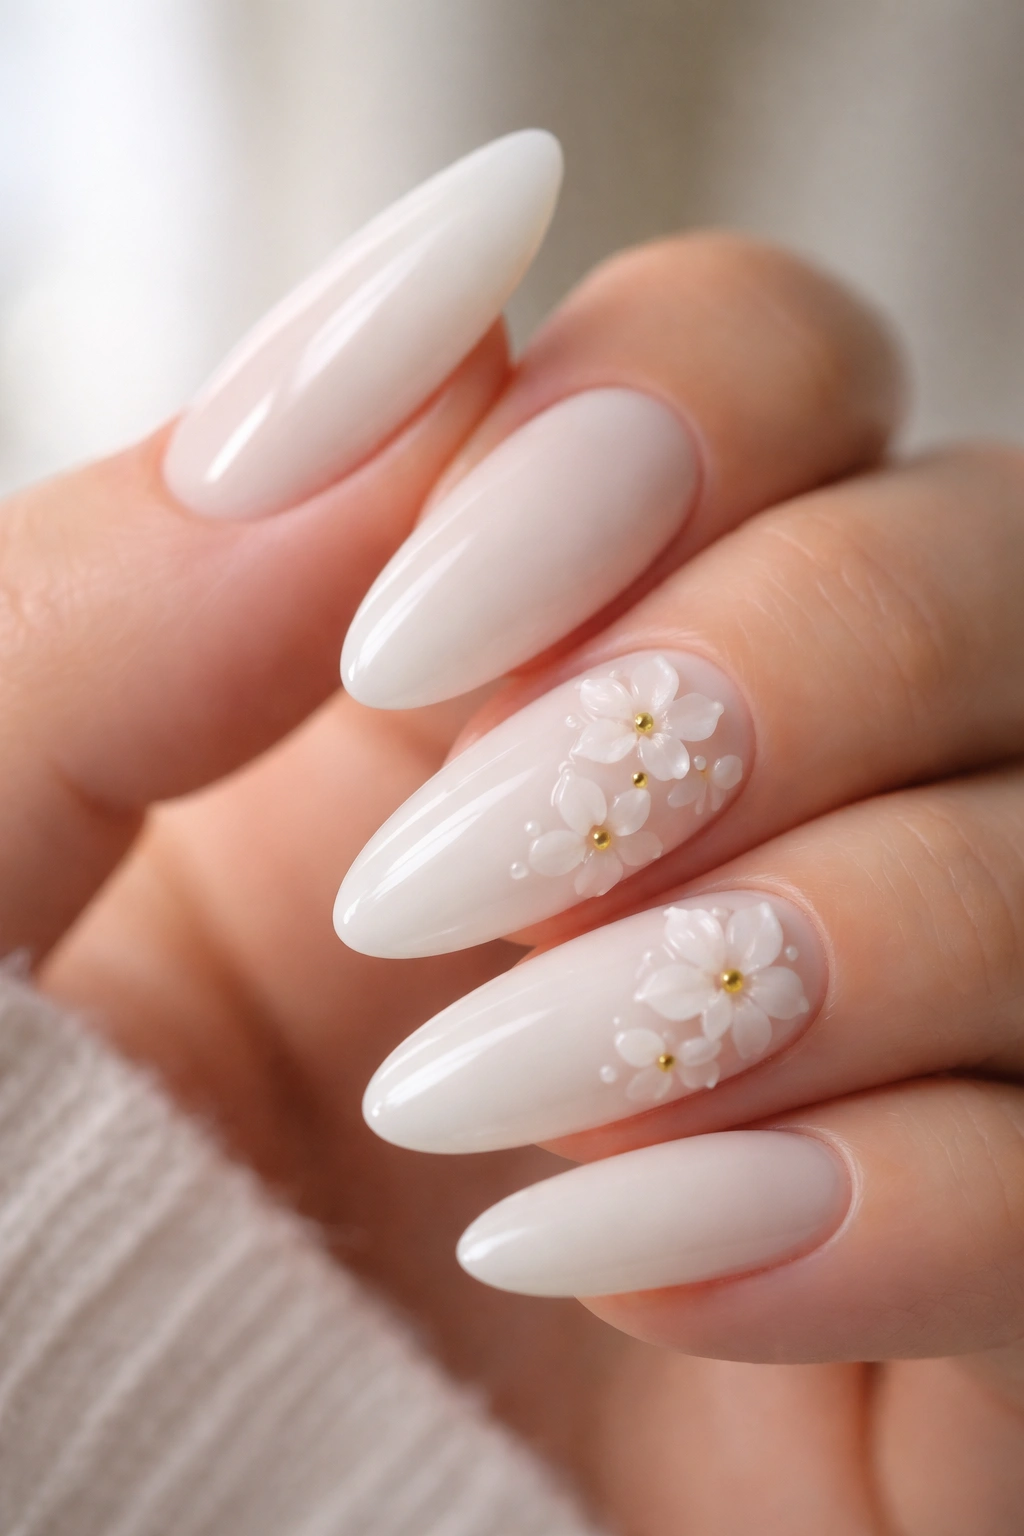
Why do tiny sculpted flowers never look heavy here? Because the almond shape gives the petals a little runway. A milky white base makes the floral detail feel like it’s floating, especially when the petals are built in semi-translucent gel instead of opaque white.
Petal size that feels balanced
Keep each flower small, with 5 to 6 petals and one tiny gold bead or crystal in the center. That size works best on accent nails near the ring finger and middle finger.
A good nail tech will build the petals in thin layers, curing between passes so the flower doesn’t collapse. If the petals look thick from the side, they’ll feel clumsy fast. Thin edges matter here.
I’d skip heavy color in this design. The whole point is that milky, soft-focus finish—the kind that looks clean under daylight and still has depth up close.
3. Chrome Almond Nails With Liquid Drops
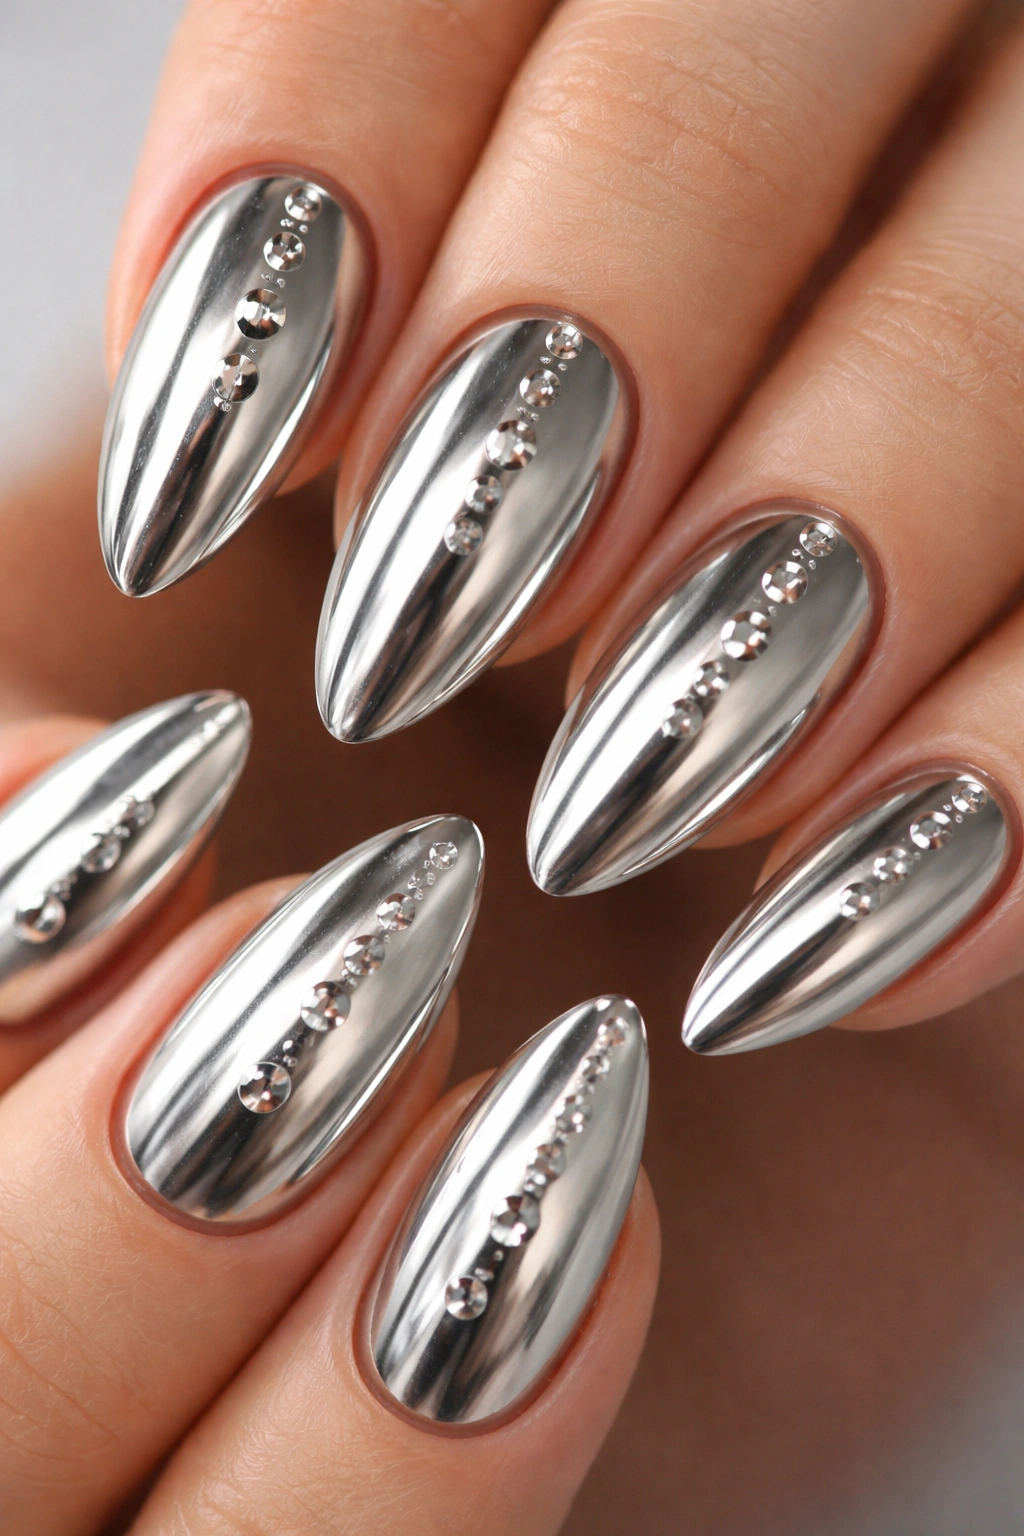
If you want shine that reads from across the room, this is the one. A mirror chrome base gives the almond nail a sleek, almost liquid look, and the raised gel drops on top make it feel wet even when it’s fully cured. The contrast is the magic.
The best version uses silver, pearl, or pale pink chrome with clear builder-gel droplets placed near the center of the nail. That keeps the 3D detail from catching on sleeves and hair. Big drops near the tip tend to snag. Small domes near the midline behave better.
This set looks expensive without trying too hard. It’s also one of the easier ways to wear 3D art if you don’t love charms or flowers. Gloss is doing a lot of the work. The raised drops are just there to keep the eye moving.
4. French Tips With Sculpted Bows
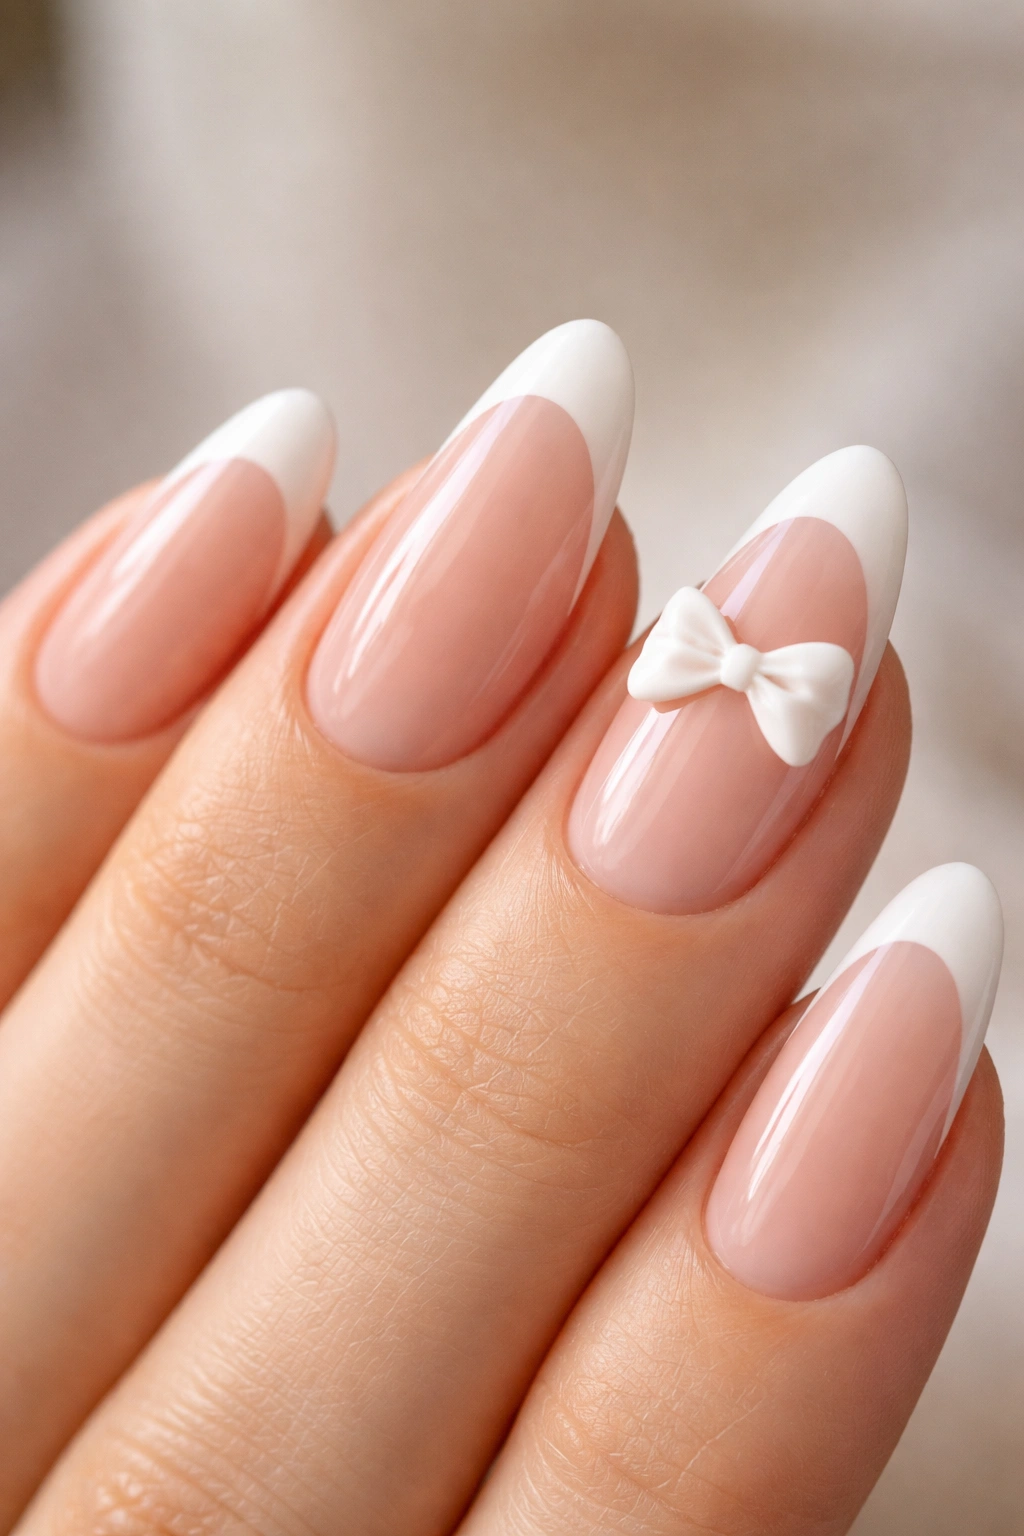
French tips do not have to be plain. A slim white or soft pink tip becomes much more interesting when you add one sculpted bow on the ring finger or thumb. The bow gives the set a little personality, but the French base keeps it from turning sugary.
Where the bow should sit
Put the bow slightly above the cuticle line or just off to the side of center. That placement keeps the nail balanced and lets the almond taper still do its thing.
A few practical notes make a big difference:
- Keep the French line thin, around 2 to 3 mm.
- Choose a bow that sits low, not a tall loop.
- Match the bow color to the tip if you want a cleaner finish.
I’m picky about bows. If they’re too big, the nail starts looking costume-y. If they’re slim and smooth, the set feels polished and a little flirty. That’s the sweet spot.
5. Pink Velvet Nails With Crystal Cuticles

The base looks like crushed satin. That’s the best way to describe it. A pink cat-eye or velvet polish gives the almond nail a soft sheen that changes when your hand moves, and a narrow line of crystals at the cuticle adds just enough sparkle to sharpen the look.
Keep the crystal line thin
A crescent of tiny stones works better than a full ring. Leave a small gap—about half a millimeter—from the skin so the crystals don’t feel crowded.
The polish itself should stay muted: dusty rose, ballet pink, or a cooler blush. Bright pink can fight the velvet effect. You want the surface to look plush, not neon. The shine should shift, not shout.
This is one of those designs that looks different in motion. Under flat light, it reads soft. When the hand turns, the cat-eye beam catches and the crystals flash in tiny bursts. That’s a nice combination, and not nearly as fussy as it sounds.
6. Black Almond Nails With Glossy Hearts
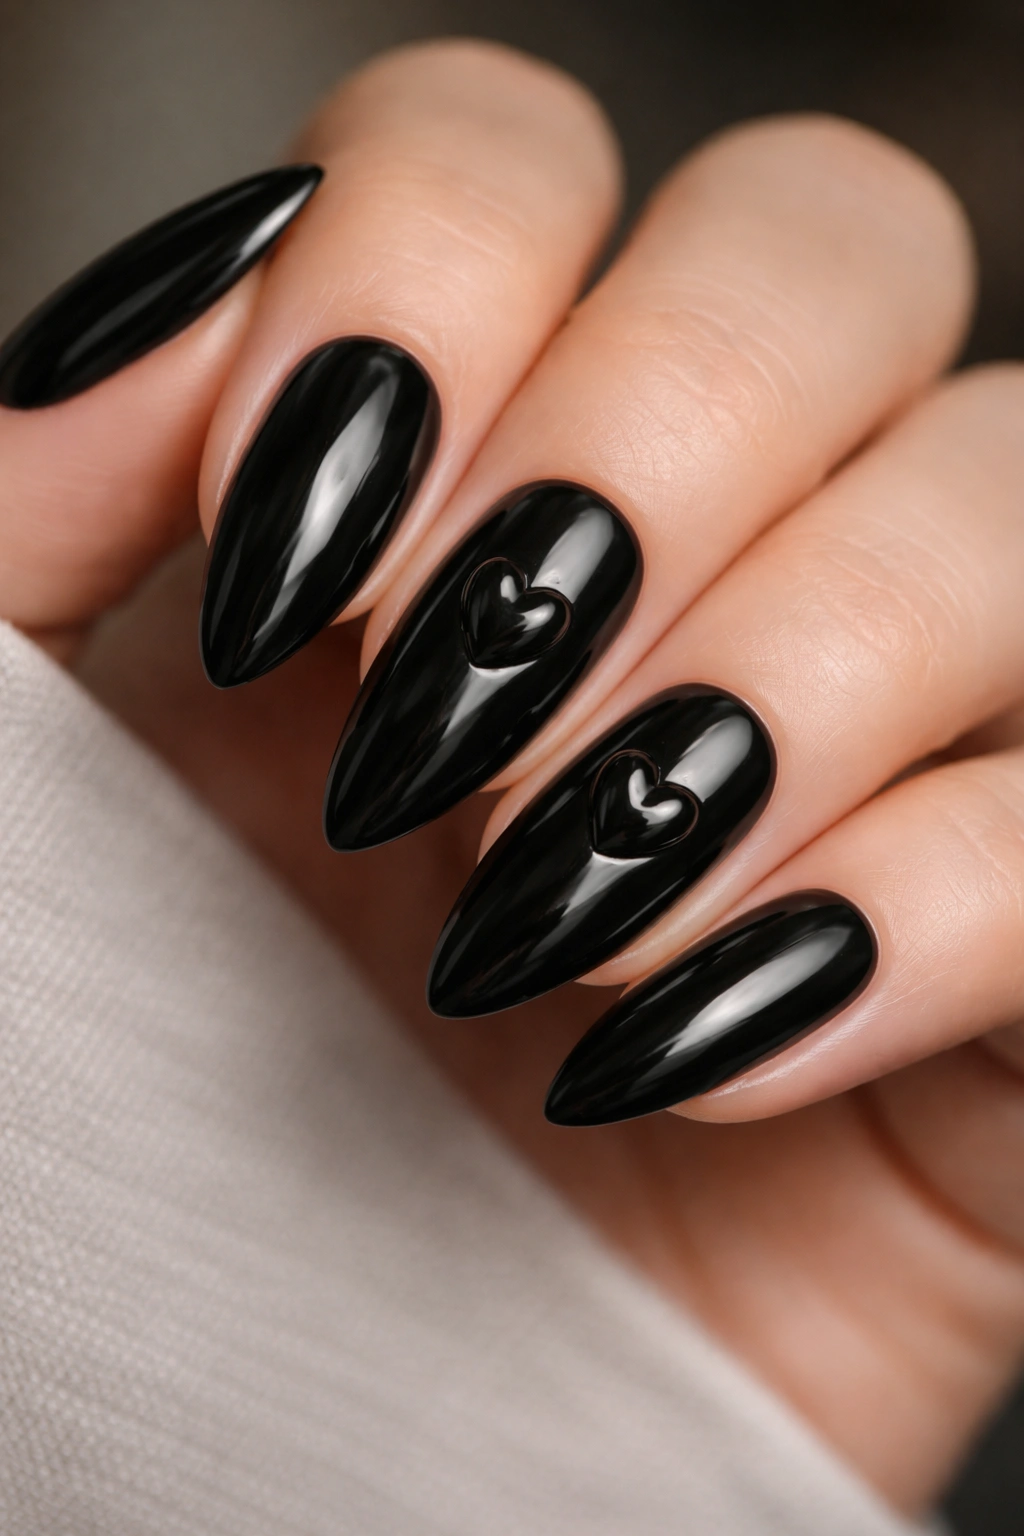
Black can be sweet. It just needs the right shape. A sheer black or full-coverage black base on almond nails gives you a sleek backdrop, and one or two raised hearts turn the set from moody to playful without losing the edge.
I like this look best with a single heart on the ring finger and maybe a tiny matching heart near the tip of another nail. Keep the heart low-profile and smooth, not puffy. The raised detail should feel like a small bead of gel shaped into a heart, not a cartoon sticker.
A matte top coat changes the mood completely, but glossy black is the sharper choice if you want the heart detail to pop. Black polish makes texture easier to see. That’s the whole reason this works so well.
7. Coastal Blue Shell Nails
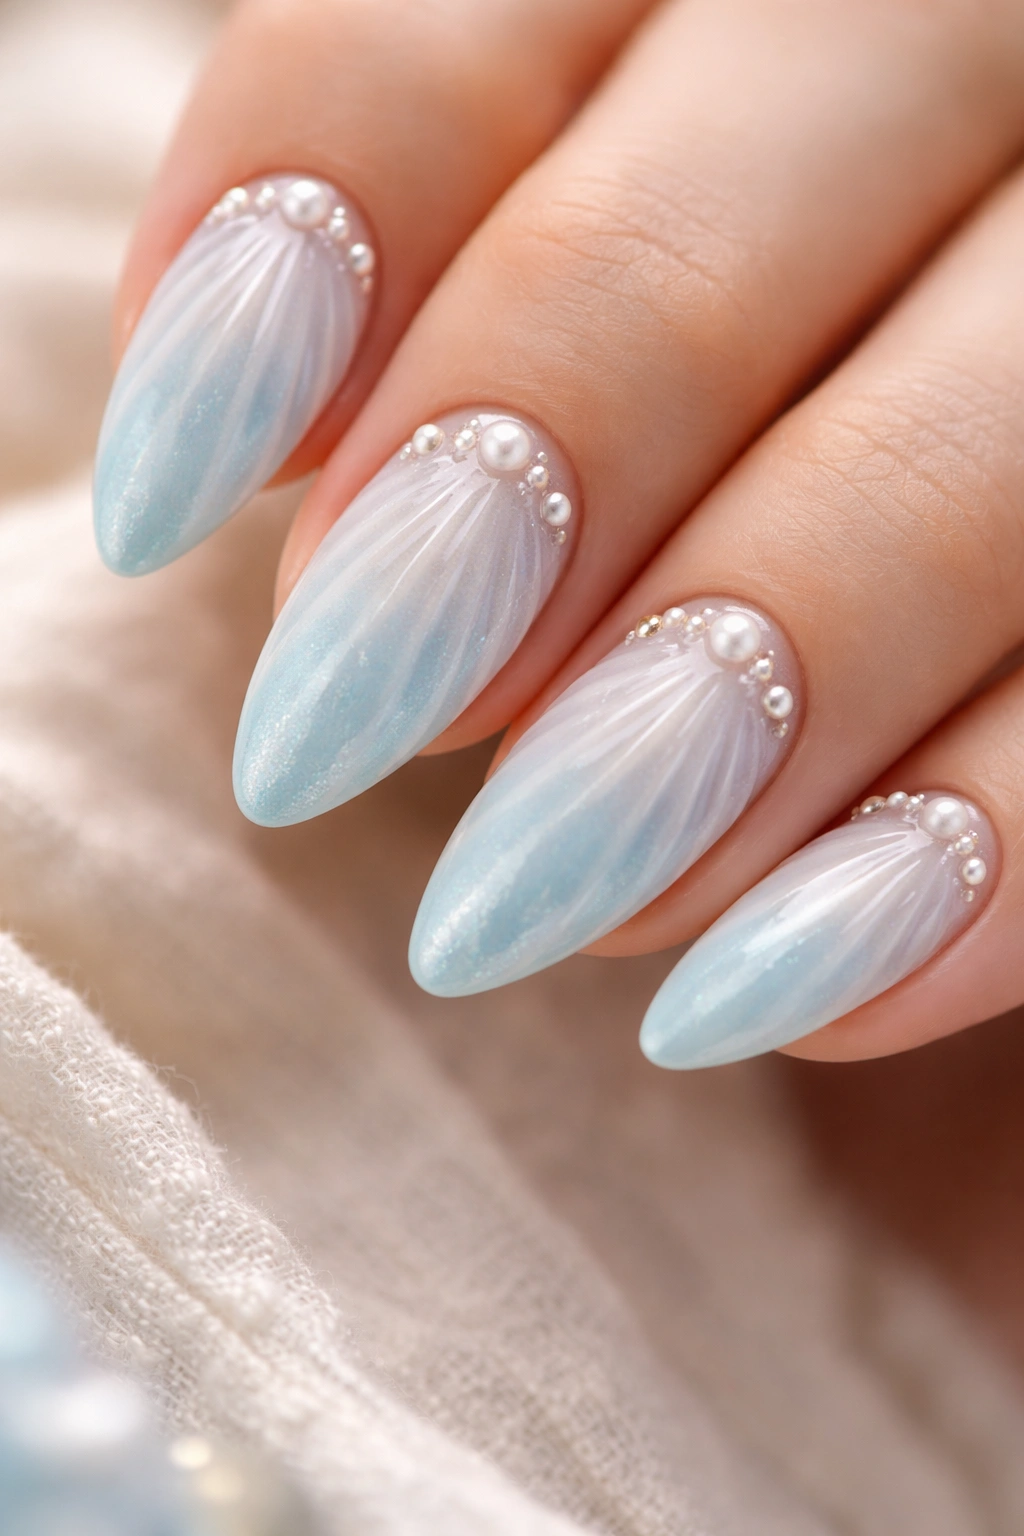
Want a beach-feeling set without seashell overload? This is the one. A soft blue, sea-glass, or pale aqua base gives the almond shape a cool wash of color, and the 3D shell texture brings in just enough dimension to keep it from reading flat.
Ask for these textures
A good version usually combines a few things:
- Fine shell ridges made with thin gel lines.
- A pearly top layer for shimmer.
- One or two tiny pearl accents near the cuticle.
The ridges should fan out gently, not look carved with a knife. If they’re too deep, the nail starts feeling bulky at the tip. The best shell nails look like tide lines, not ridges on a toy.
I also like a tiny amount of white mixed into the blue near the free edge. It softens the whole thing and makes the texture look more natural. Slightly translucent is better than opaque here.
8. Mocha Nails With Foam Swirls
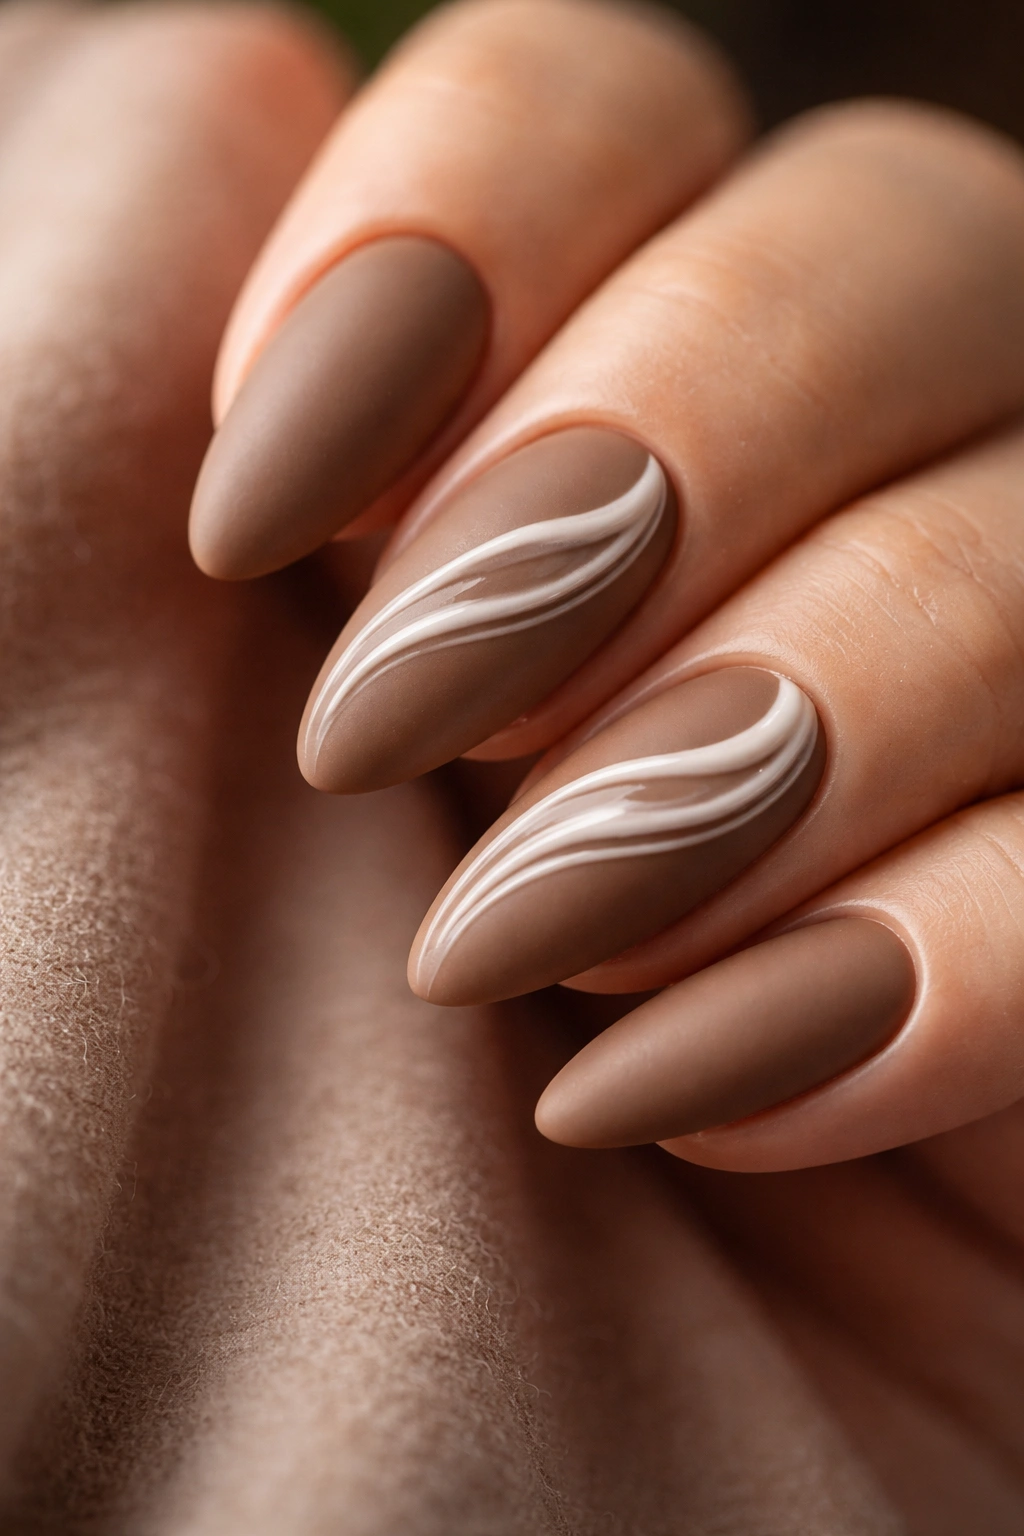
Unlike flat beige, this design has movement. A mocha or latte base on almond nails gives you warmth, and the raised white swirl on top looks like milk foam just after the cup is poured. It’s a small detail, but it changes the whole mood.
The swirl should stay thin and loose, almost like a quick line drawn in cream gel. You do not want it to feel like frosting. One swirl on two accent nails is enough; any more and the pattern starts to look busy.
This is one of my favorite options for people who want texture but don’t want sparkle. The contrast is the appeal: matte coffee tones, glossy swirl lines, and a smooth almond shape that keeps the design elegant. It’s a quiet set, but not a dull one.
9. Nude Nails With Tiny Red Roses
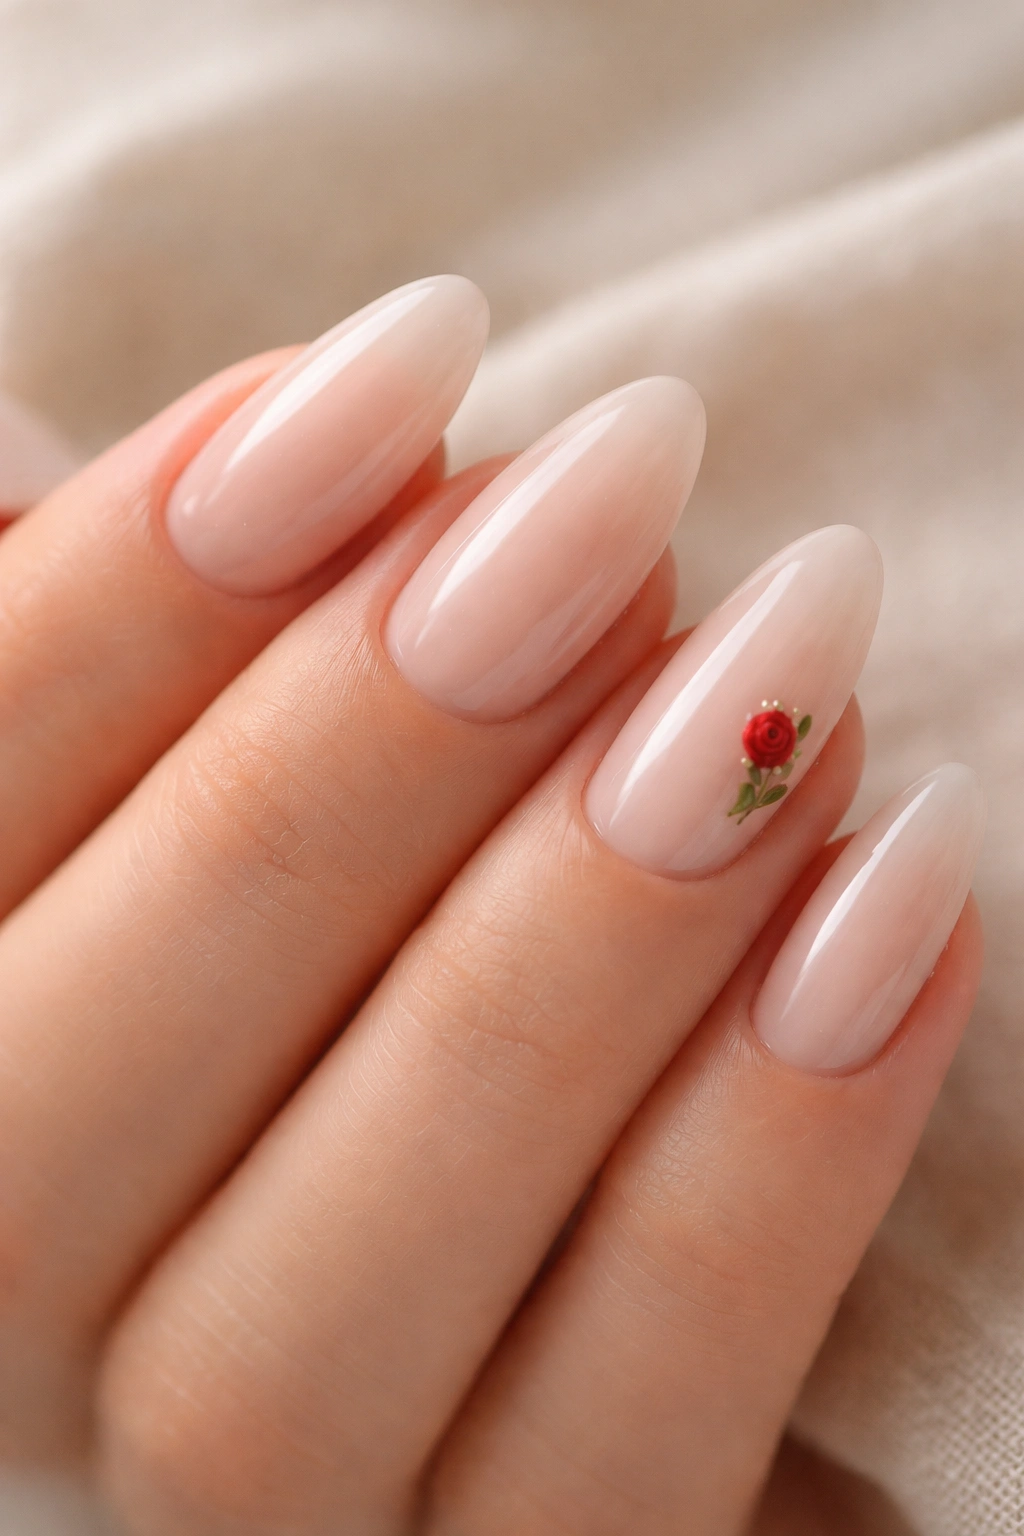
A tiny rose can do more than a big cluster ever could. On a sheer nude base, one hand-sculpted rose near the sidewall or cuticle line gives the nail a soft romantic feel without turning it into a themed set. Keep the rose small—five petals, thin edges, minimal height.
The best version uses a neutral pink or nude background so the red rose stays the only loud thing on the nail. That makes the sculpted detail feel deliberate. If you want a little more depth, add one tiny green leaf, but stop there.
This design works especially well on longer almond nails because the curve gives the rose room to breathe. A single flower can carry the whole nail when the rest of the surface stays calm. That’s the part people get wrong when they pile on too much decoration.
10. White Lace Embossed Nails
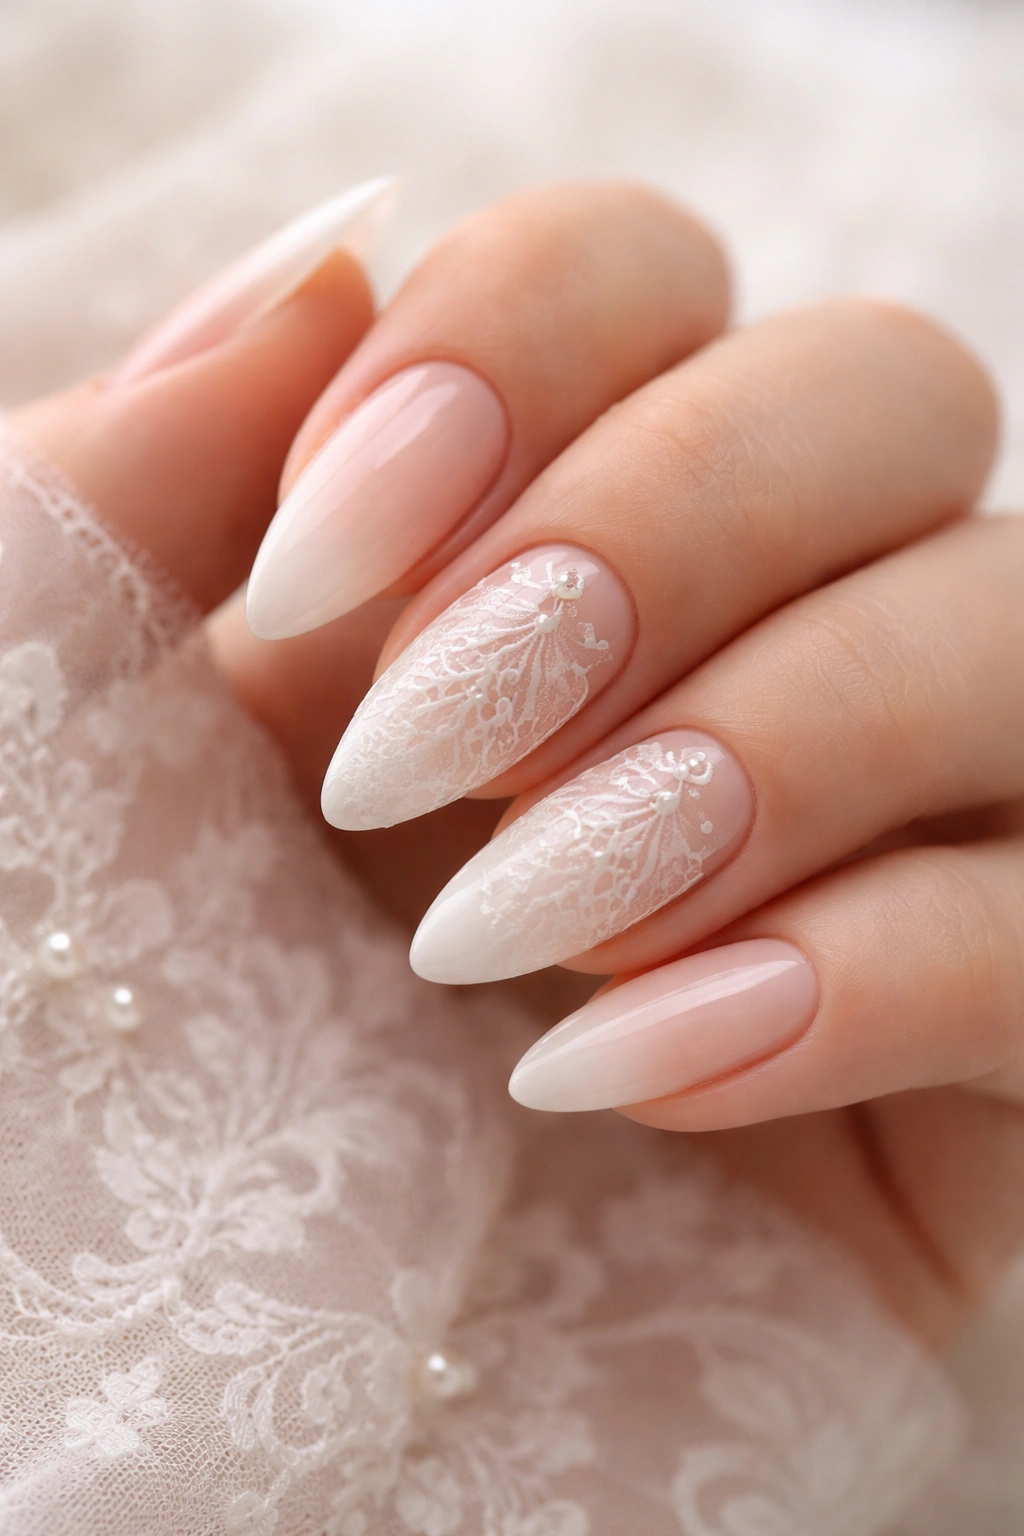
This is the prettiest quiet design on the list. A sheer pink or ivory base with embossed lace patterns gives almond nails a soft, almost fabric-like look. The raised lines should be thin and delicate, like trimmed thread, not thick frosting.
Where lace looks best
I’d put the lace on two or three nails max, usually the ring finger and middle finger. That keeps the set airy and stops the pattern from feeling crowded.
Tiny pearls or micro crystals can work here, but only if they’re sparse. One bead at the center of a lace motif is enough. More than that starts to blur the pattern.
The nice thing about lace texture is that it looks rich even in a pale color. You do not need contrast to get depth. The raised line work does the job on its own, and almond nails give it a graceful frame.
11. Pastel Nails With Mixed Charms
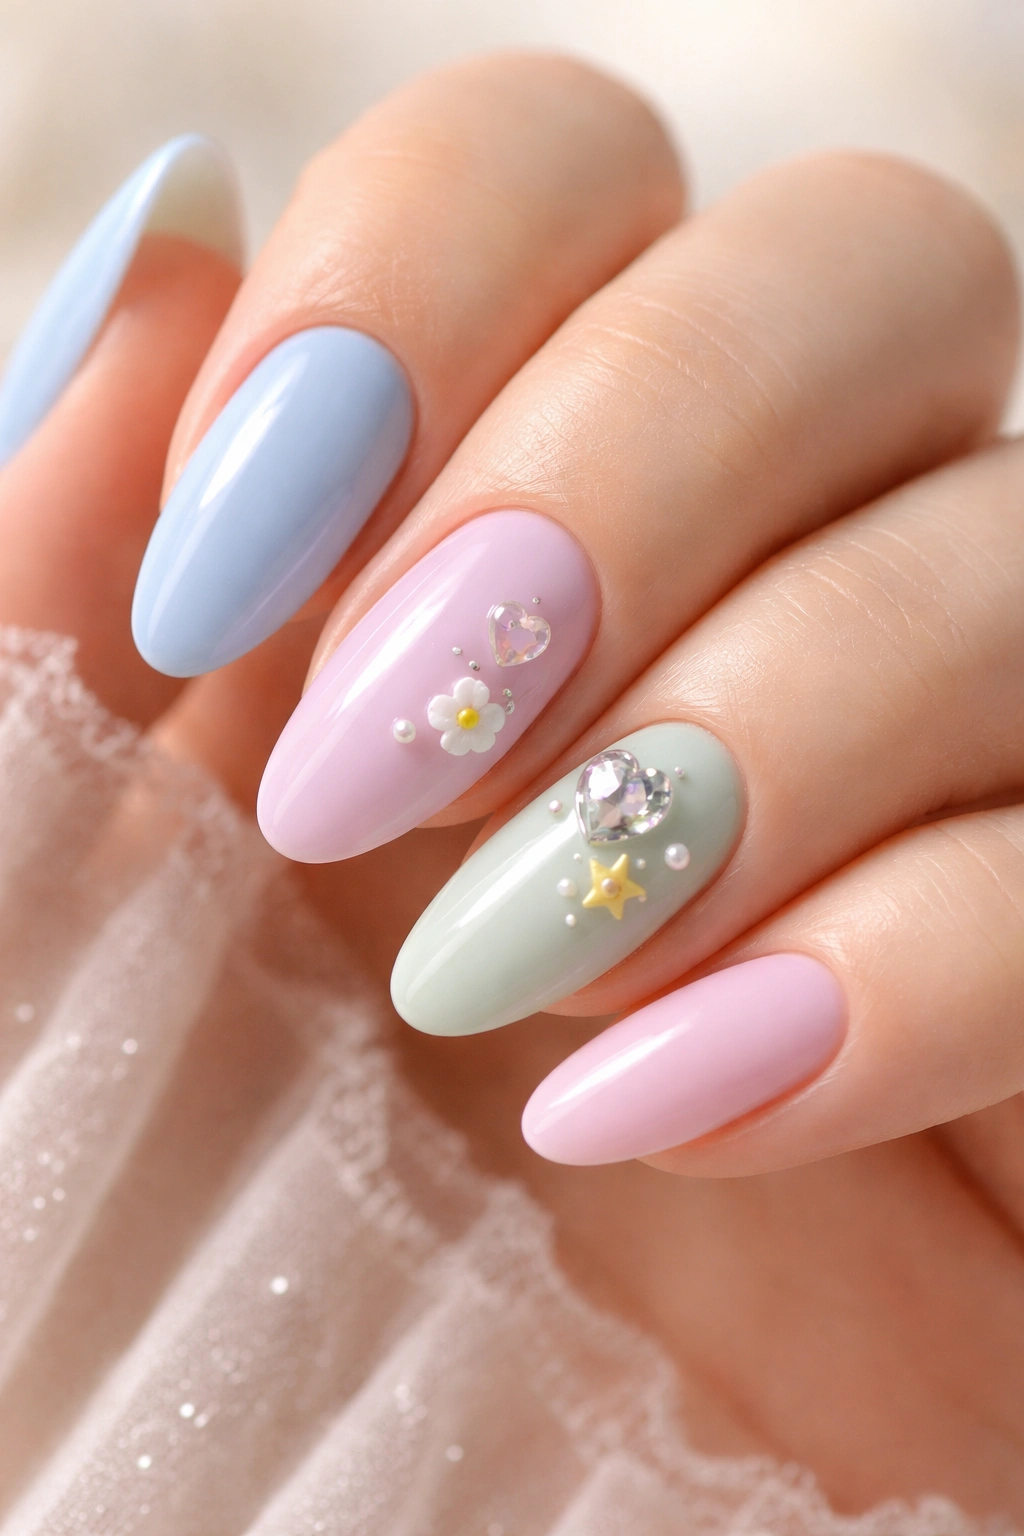
Mixing is fine here. In fact, it’s the point. A pastel almond set with one tiny charm on each accent nail can feel playful without looking random, as long as the base color stays consistent. Think baby blue, soft lilac, muted peach, or pale mint.
The key is keeping the charms low and small. A star, bow, heart, gem, or tiny flower all work, but they should share the same scale. If one charm towers over the others, the set stops feeling edited.
Keep the charm story simple
- Limit bulky pieces to 2 or 3 nails.
- Match the metal tone across the whole set.
- Use one base shade or two closely related shades.
I like this look because it gives you variety without chaos. The charm is the punctuation mark. The almond shape is the sentence.
12. Clear Tips With Floating Confetti
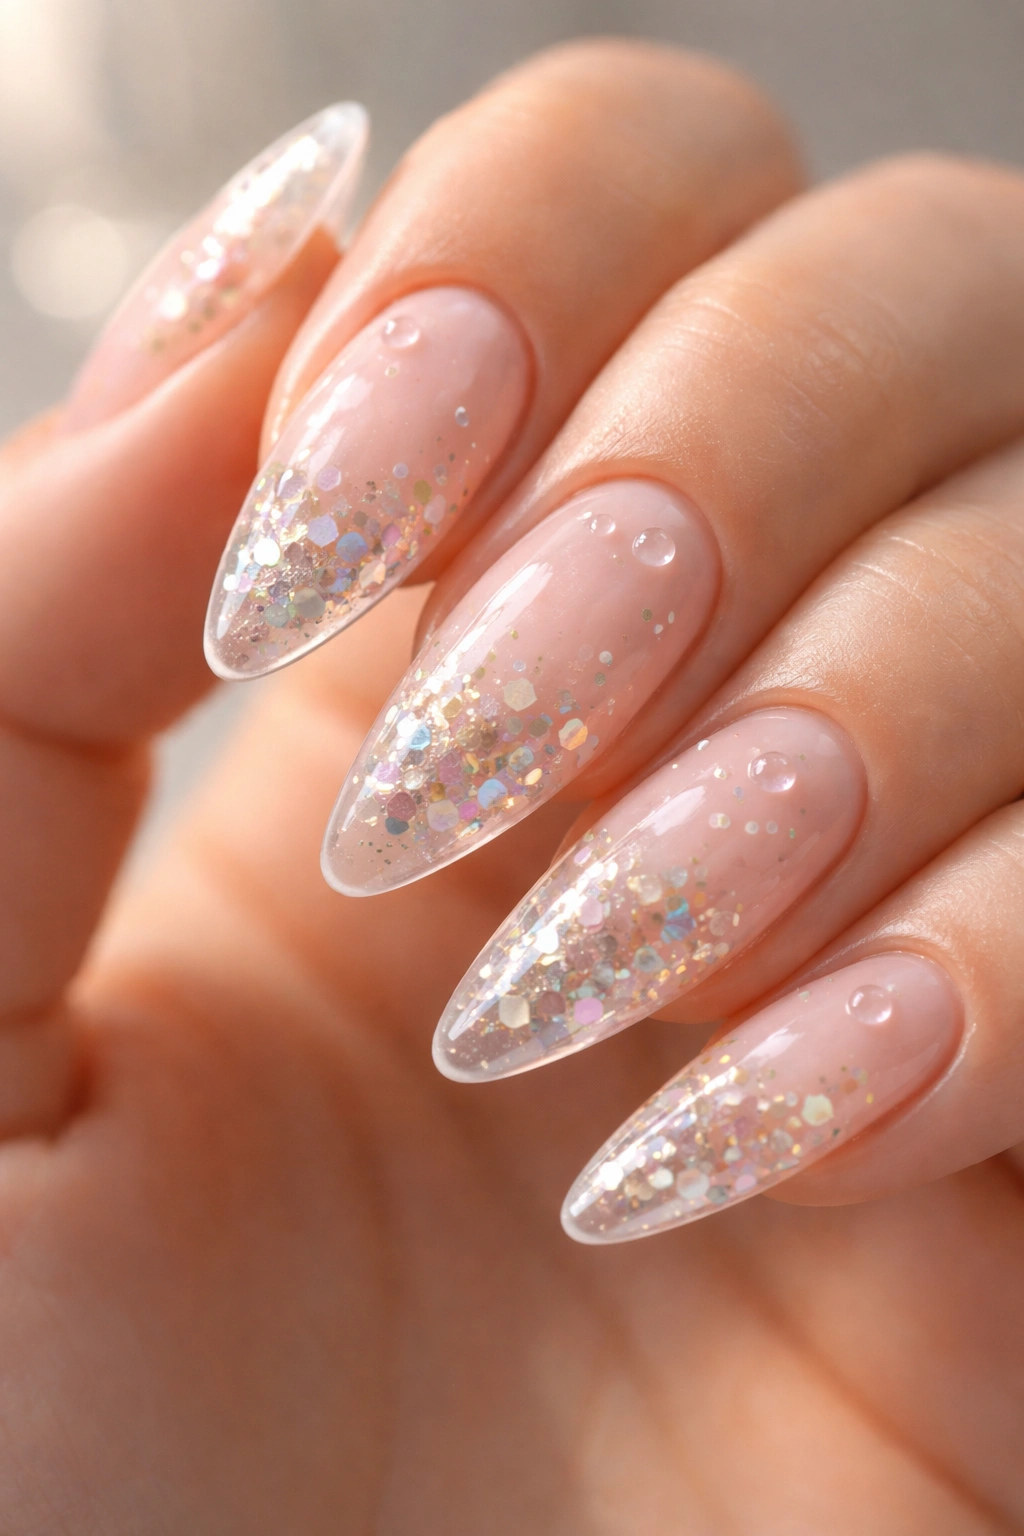
Clear almond nails can look like glass when they’re done well. Add tiny bits of foil, iridescent flakes, or color confetti under a clear or milky builder layer, and the nail starts to feel light instead of empty. A few raised droplets on top make the design feel even more dimensional.
The trick is keeping the confetti sparse. If the pieces are packed too tightly, the set turns muddy. Leave open space between the particles so the eye can move through the nail instead of getting stuck in it.
I’d keep the 3D droplets tiny and scattered. They should read like water beads, not bumps. Clear space is part of the design. That’s what makes the floating effect believable.
13. Olive Green Garden Nails With Leaves
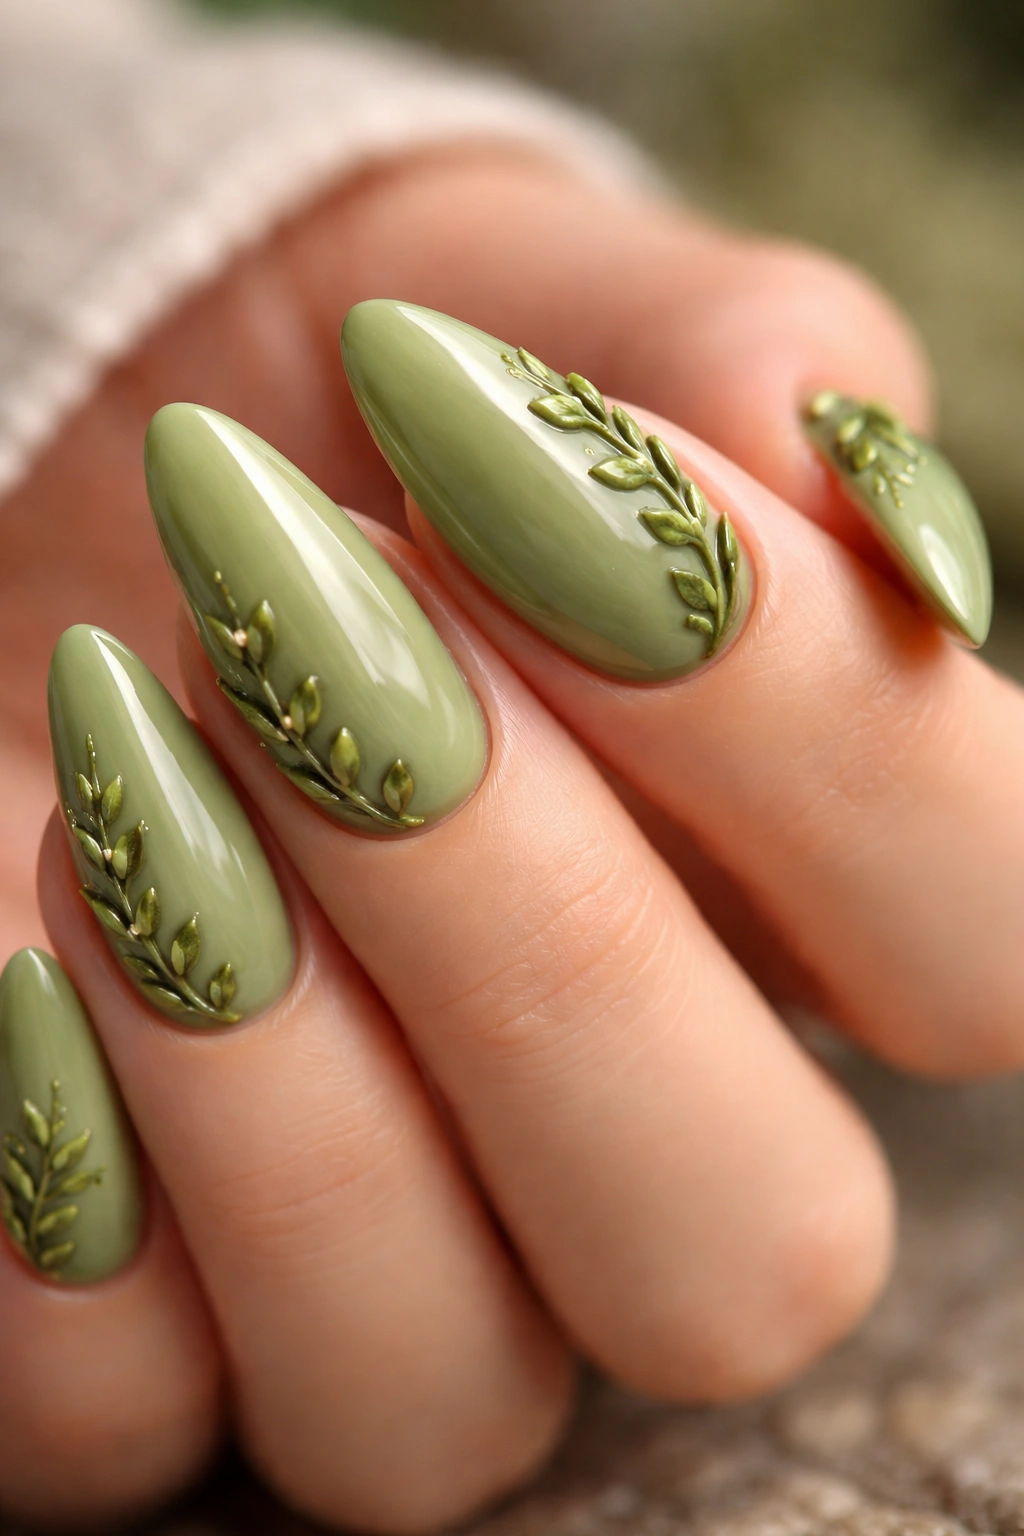
This is the one for people who want texture without sparkle. A soft olive or moss base gives the almond nail an earthy feel, and tiny raised leaves or vines bring in the 3D detail in a way that feels calm instead of flashy.
Build the stems thin
Use slim gel lines for the vines and keep the leaves narrow at the tip. Broad leaves can overwhelm the taper of the nail, while thin ones sit neatly along the side.
A tiny gold dot here and there can help, but I wouldn’t add much more. The appeal of this set is that it looks like a small pressed garden, not a bouquet exploded on the nail.
This design also handles matte top coats well. Matte softens the green and makes the leaf texture easier to see. Glossy olive is nicer if you want a richer, shinier finish. Either way, the ornament should stay close to the nail surface.
14. Sweater Texture Almond Nails
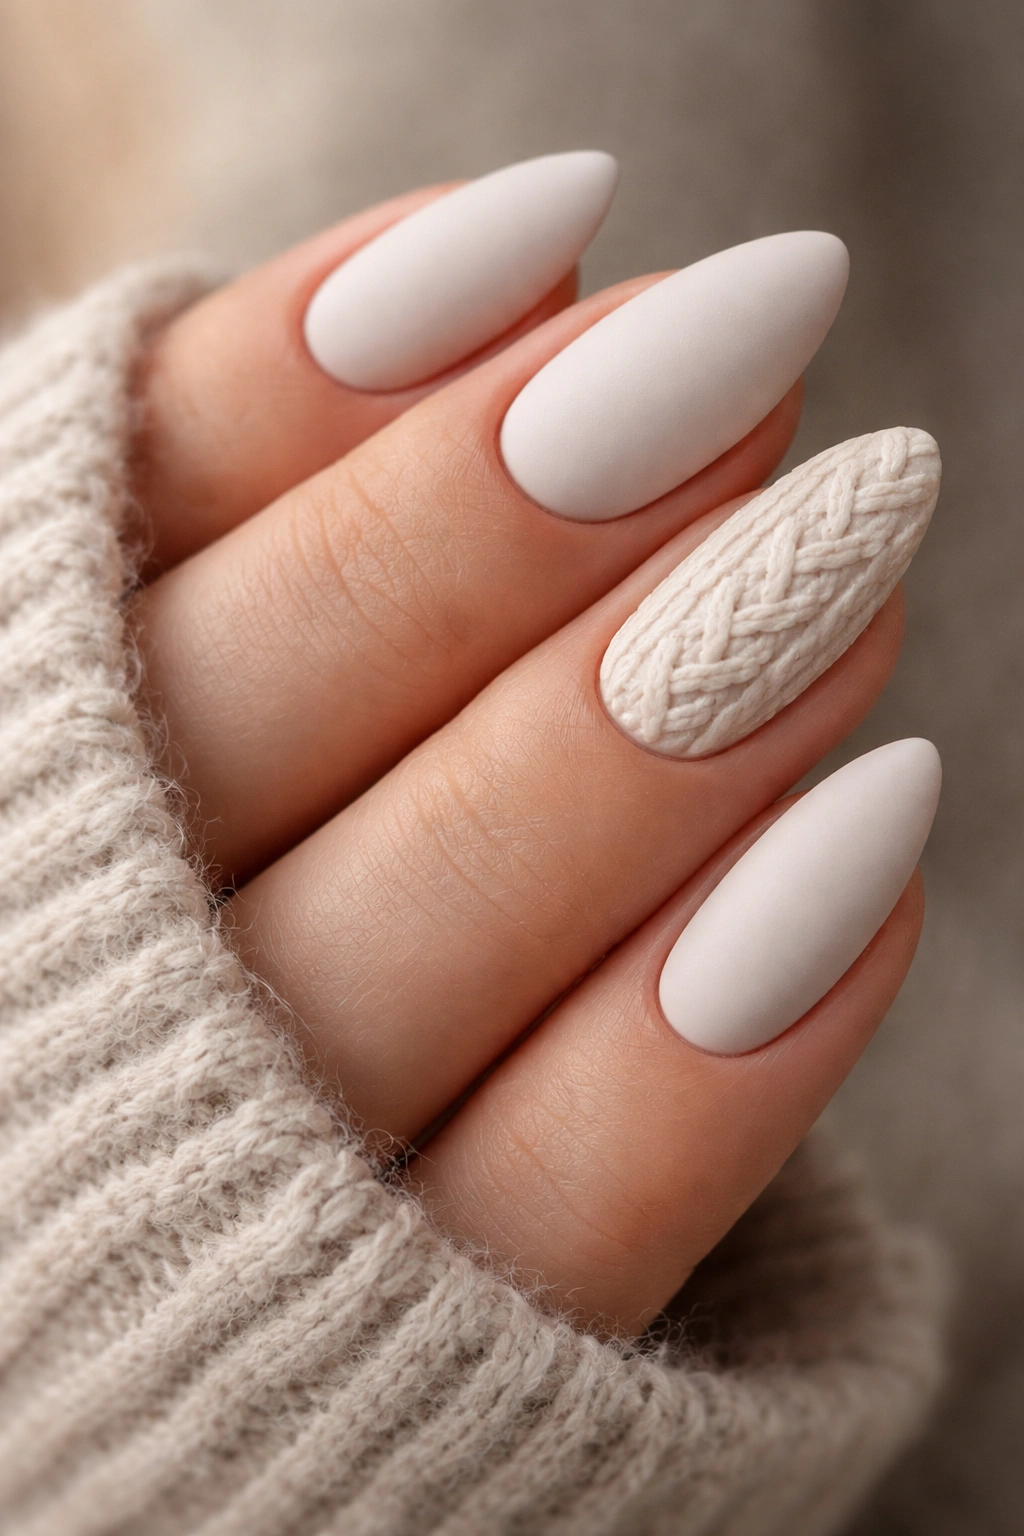
If you like cozy details, cable-knit texture on almond nails is hard to beat. The raised knit pattern gives the surface a tactile feel, and a cream, gray, or dusty taupe base keeps it from reading too seasonal or too heavy. It’s one of the few 3D styles that can feel both soft and structured.
What makes the texture read well
The lines need to be crisp and evenly spaced. If the knit pattern gets lumpy, the whole nail loses that stitched look. A matte top coat usually helps because it cuts the glare and lets the raised ridges stand out.
I’d use the texture on one or two nails, then keep the rest smooth. That contrast matters. If every nail is heavily patterned, the set starts looking busy fast.
This one is surprisingly wearable with longer almond nails because the shape elongates the cable motif. The design feels warm and a little classic, which I honestly prefer over the usual overdone holiday version.
15. Rosy Chrome Nails With Ribbon Swirls
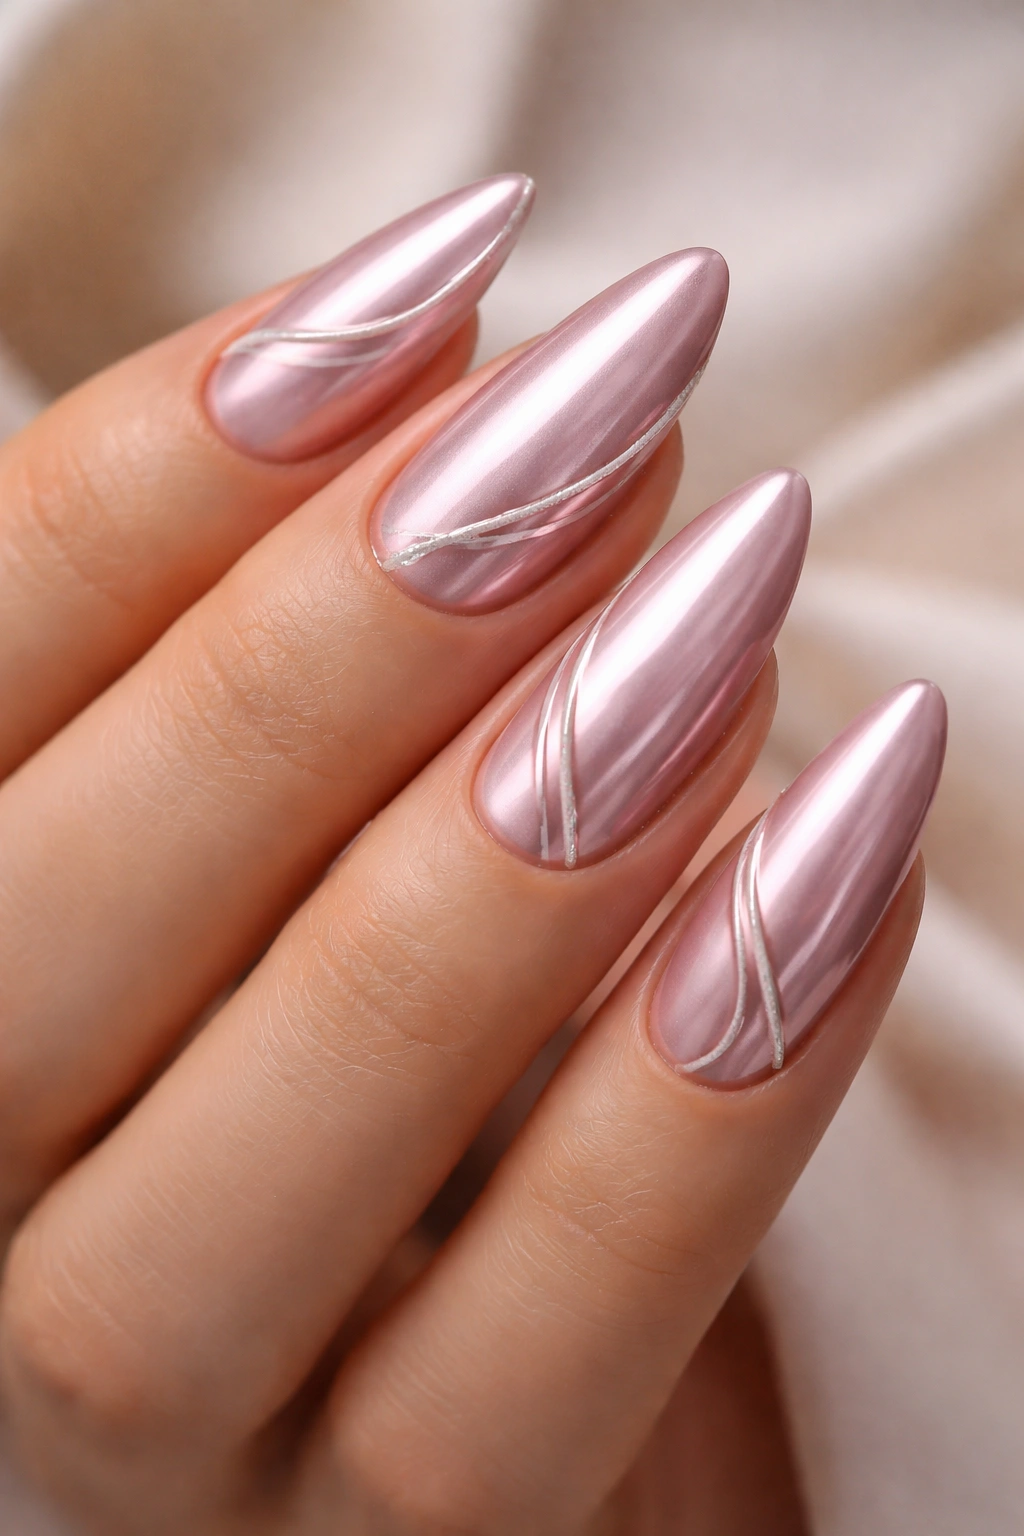
Chrome gives the base its shine. The ribbon swirls give it shape. Put the two together on almond nails and the result feels polished without being plain. A rosy chrome base is especially nice because it reflects light in a softer way than silver, and the ribbon lines add a sculpted finish.
How to keep it from looking crowded
Thin ribbon lines are the move. Thick loops can make the nail feel overworked. I’d keep the swirls to one side of the nail or let them cross only once, then stop.
The 3D line work can match the base for a subtle version, or sit a shade lighter for more contrast. Either choice works. What doesn’t work is piling on extra gems just because the nail already has shine.
This design is about movement. The chrome reflects, the swirls bend, and the almond tip keeps everything feeling long and clean. It’s a good option if you want something dressy that still feels wearable.
16. Marble Nails With Gold Beading
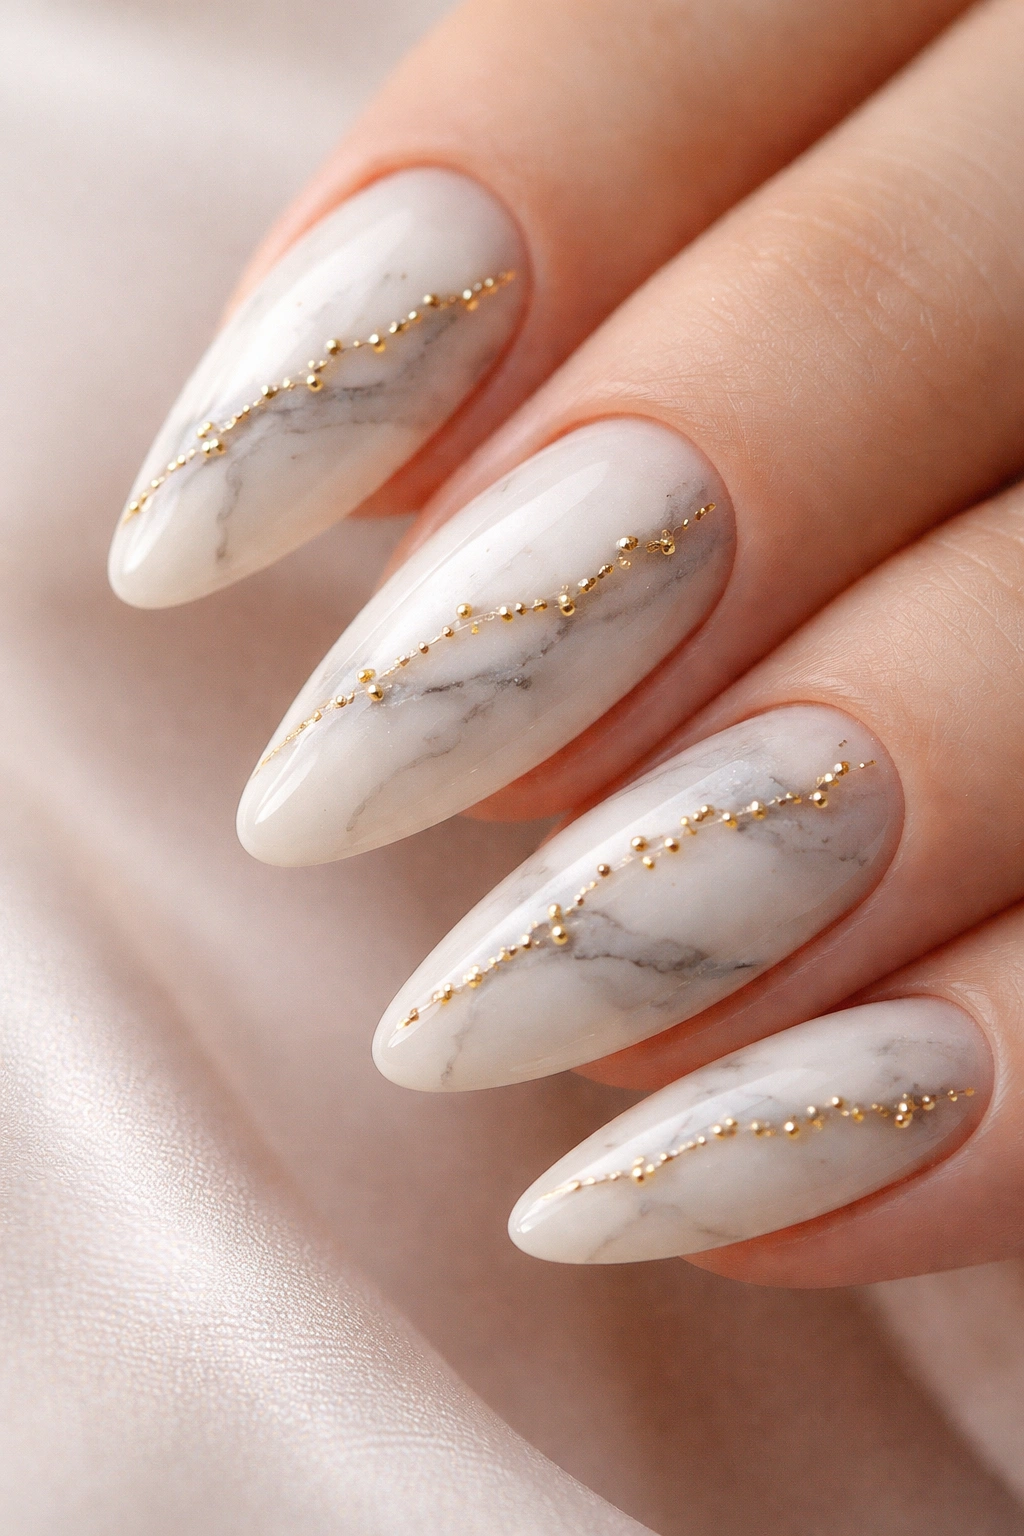
Marble can go muddy fast, so the best version is the simplest one. A milky white, beige, or pale taupe base with thin gray or caramel veins gives almond nails a stone-like surface, and tiny gold beads following the vein lines make the whole thing feel finished.
The vein should lead the eye
Don’t scatter the marble everywhere. Let the swirls travel diagonally or in one curved line so they match the nail’s shape. If the pattern gets chopped into pieces, it loses the stone effect.
The gold beads should be tiny. Think specks, not studs. A few along one vein are enough to catch the eye and add the 3D element without making the nail chunky.
I like this design because it reads calm from a distance and detailed up close. That’s a nice combination. The best marble sets don’t shout marble. They just look like polished stone with a little edge.
17. Lilac Butterfly Wing Nails
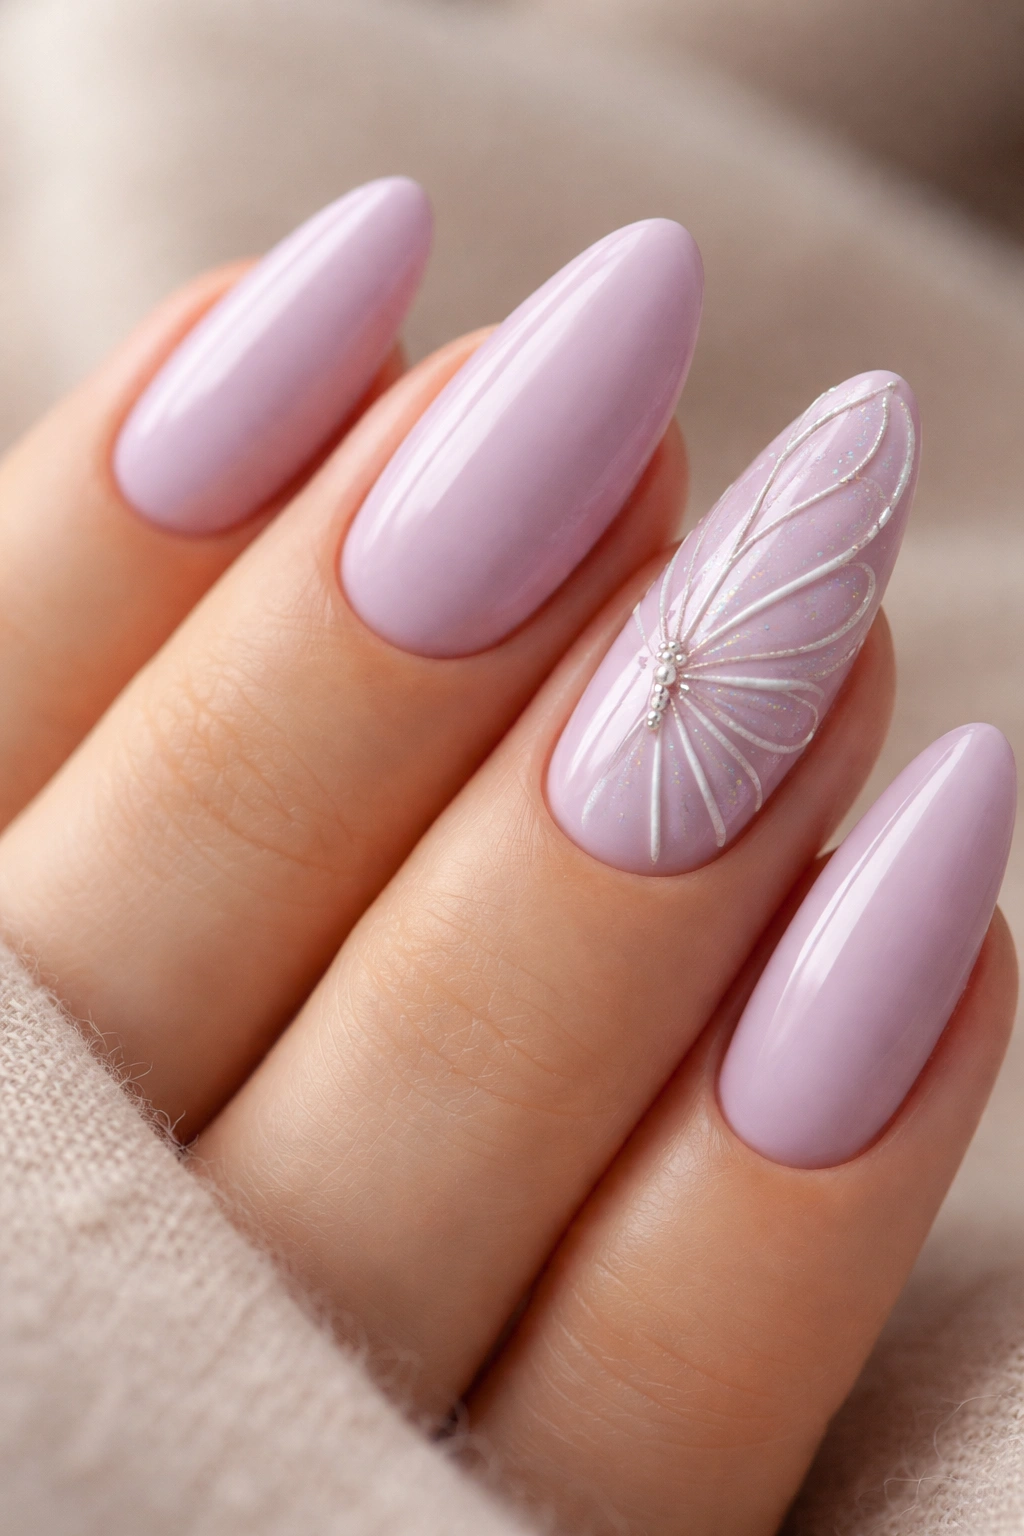
Butterfly wing nails can look sweet or a little too busy, and the difference is usually size. On almond nails, a lilac or soft purple base gives you a gentle backdrop for wing lines, and a tiny raised body or antenna detail turns the nail into something more sculptural.
Best wing placement
Keep the wings on one or two accent nails and let the pattern fan outward toward the tip. That follows the almond curve instead of fighting it.
Tiny line work works better than crowded spots. A few darker purple vein lines, a touch of shimmer, and one 3D body element are enough. If you add too many dots, the wings stop reading clearly.
This is a fun set when you want something whimsical but not childish. The shape helps a lot. Almond nails keep the design narrow and elegant, which is exactly why it doesn’t tip into costume territory.
18. Bridal Crystal Almond Nails
This is the most dressed-up version of the whole list. A sheer nude or milky pink base, a few clear crystals, and maybe one pearl or chrome accent on each hand make the nails feel polished enough for a formal event without turning into a full rhinestone wall.
Scale the crystals to your life
Use one larger crystal near the cuticle and a few tiny stones trailing away from it. That layout looks balanced and keeps the nail from feeling top-heavy.
I’d stay away from covering the entire nail in stones. The better choice is a clean base with concentrated sparkle in one zone. It looks more expensive, and it wears better. Negative space matters here. It gives the crystals room to actually sparkle.
This style is also one of the easiest to customize. More pearls for softness. More chrome for shine. More tiny stones for drama. The almond shape makes all of those options feel smoother than they would on a square tip.
19. Cherry Jelly Drip Nails
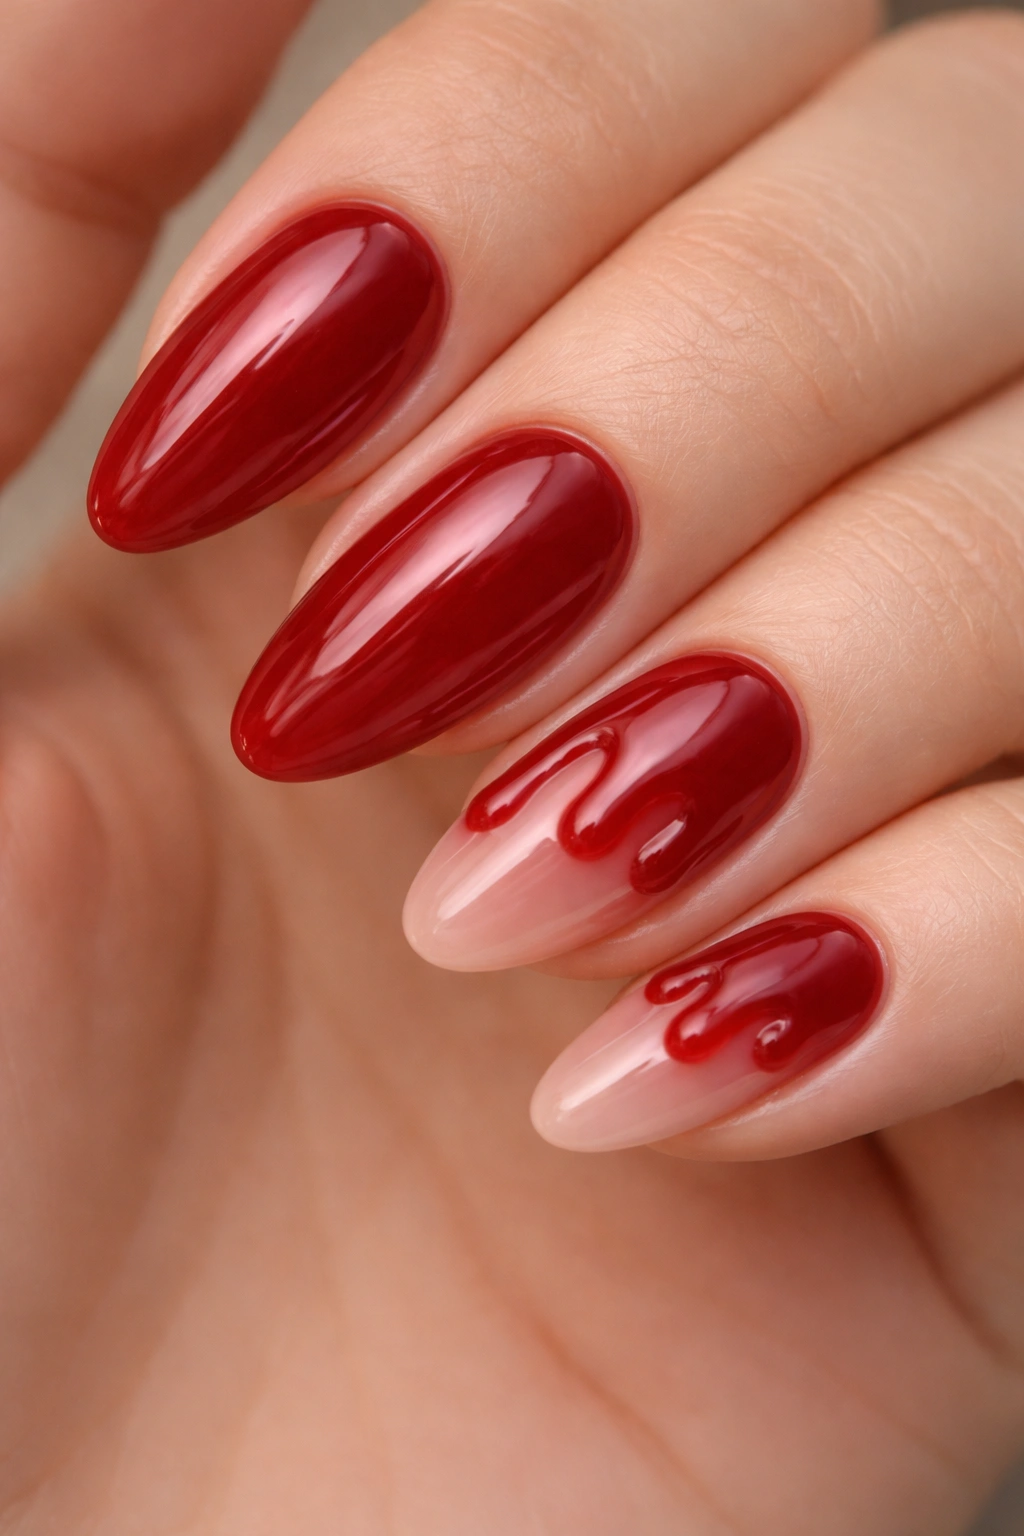
Drips do not have to look messy. On almond nails, a cherry jelly base with a few 3D drip details near the tip can look glossy and intentional, especially if the drips are kept to two accent nails. The translucence of the jelly polish helps a lot.
Keep the drip shallow
The gel should form a low, rounded drip shape, not a long hanging drop. That makes it easier to wear and keeps the silhouette clean.
A red, berry, or coral jelly base works best when the rest of the set stays simple. If you add too many extra details, the drip effect gets lost. I’d leave the other nails plain or add only a tiny heart or gem.
This is one of those sets that has personality without needing extra decoration. The shine does most of the work. A good drip looks fluid, not sticky. That small difference is the whole design.
20. Midnight Star Map Nails
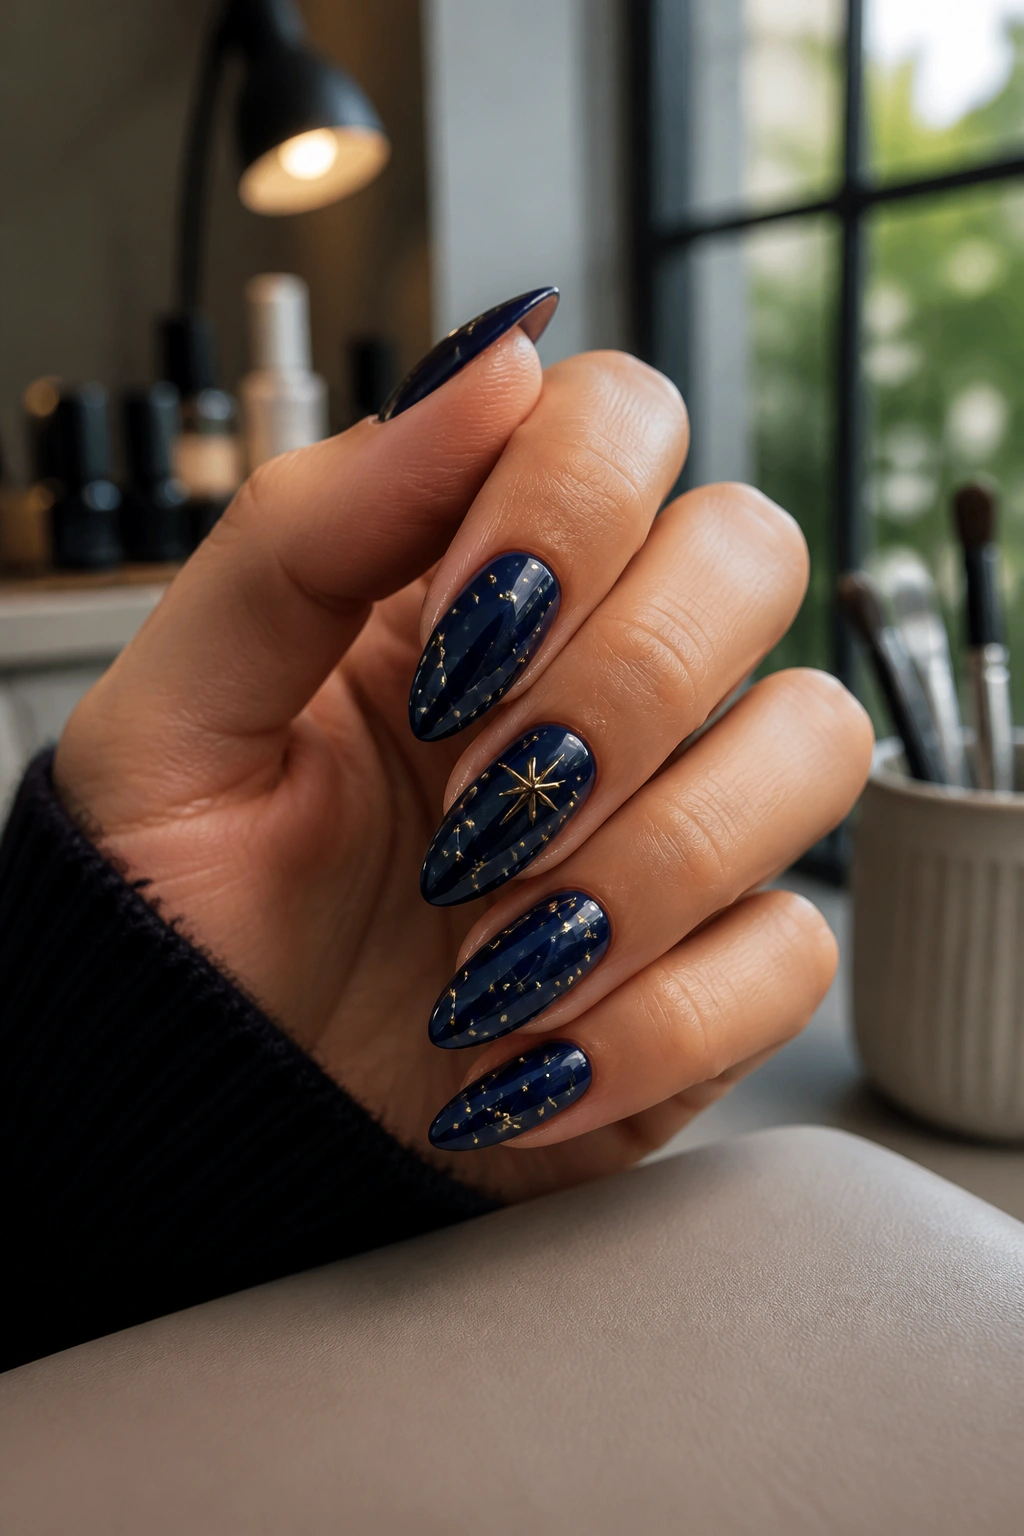
This is the most wearable dramatic set on the list. A deep navy or black base gives the almond nail a night-sky backdrop, and tiny raised stars, dots, and constellation lines turn each finger into a little map. Done well, it feels clean and a bit mysterious, not crowded.
I like the stars kept tiny and placed with breathing room. One larger star near the center, a few smaller dots tracing the line outward, and a glossy top coat to seal it all in—that’s enough. The almond shape makes the pattern feel tall and narrow, which suits the theme.
If you want a stronger look, add a touch of chrome or holographic powder under the stars. If you want something softer, keep the lines silver and the dots sparse. This design works because it trusts empty space. That’s rare, and it’s why it stays elegant instead of turning into a sticker sheet.
