

There’s something undeniably powerful about showing up to date night with nails that signal you’ve put thought into every detail. Long oval nails offer the perfect canvas for romantic designs — they’re elegant without being over-the-top, they complement your hands and jewelry beautifully, and they catch the light in all the right ways when you’re reaching across the table or laughing over drinks. The shape itself whispers sophistication; it’s flattering, timeless, and has become synonymous with polished femininity.
What makes a nail design truly romantic isn’t just the color choice — it’s the intention behind it. A romantic nail design combines rich, warm tones with subtle sparkle, uses depth and dimension to create visual interest, and feels intentional rather than accidental. You’re not just wearing nail polish; you’re wearing a statement that says you care about the impression you make. Whether you’re heading to a classic dinner date, a casual wine bar evening, or a special anniversary celebration, the right nail design can boost your confidence and complement whatever you’re wearing.
The beauty of long oval nails for date night is their versatility. This shape works with minimalist designs and statement looks alike. It’s sophisticated enough for fine dining, playful enough for a more relaxed outing, and romantic enough to make your hands a talking point without demanding attention in an awkward way. The elongated shape naturally draws the eye upward and makes your fingers appear more slender and graceful — which is exactly what you want when you’re trying to feel your absolute best.
Let’s explore twelve romantic long oval nail designs that’ll make your date night manicure absolutely unforgettable.
1. Deep Red with Gold Leaf Accents
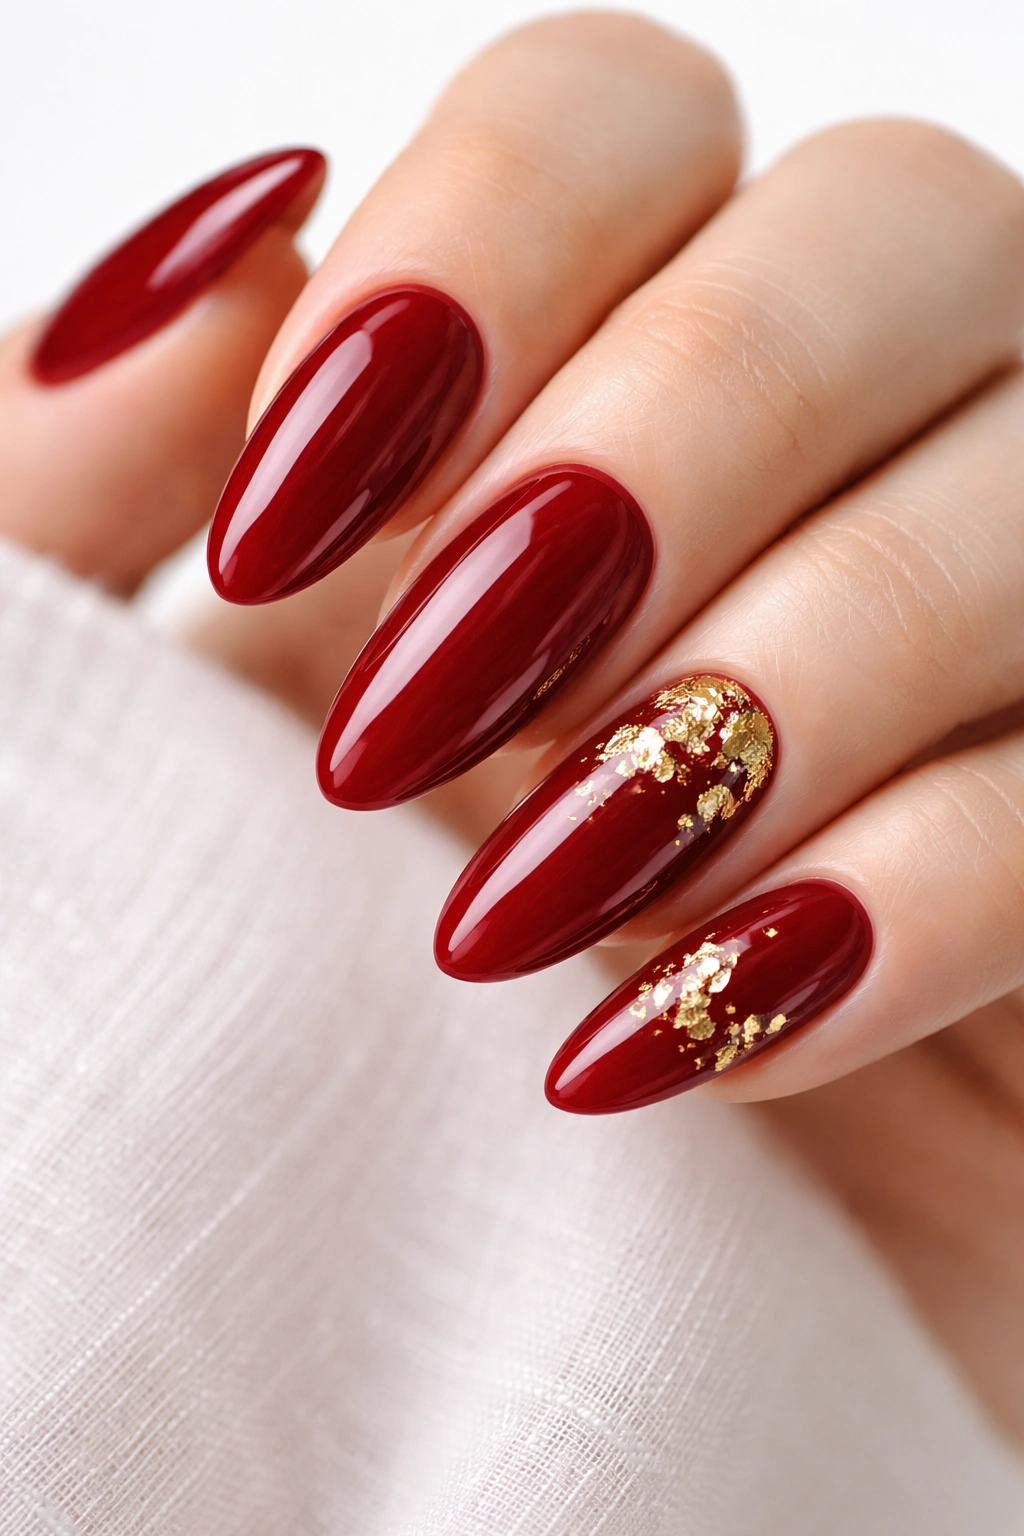
There’s a reason red nails have remained the gold standard for romantic occasions across decades — they communicate confidence, sensuality, and intentional elegance all at once. A deep, true red (think classic fire-engine red rather than blue-undertoned burgundy) on long oval nails is pure date night magic.
Why This Design Works for Romance
Deep red demands attention without being loud. The rich pigment creates a sophisticated backdrop that flatters virtually every skin tone. When paired with delicate gold leaf detailing — perhaps a thin accent line on two nails or scattered gold foil pieces — it transforms from simple polish into luxury. Gold is the metal of romance; it suggests warmth, value, and timelessness. Together, deep red and gold create an elevated look that feels dressy without costume-like qualities.
How to Make It Your Own
- Apply a base coat, then two coats of deep red nail polish for opacity and richness
- Allow the second coat to dry completely (wait at least 3-5 minutes)
- Carefully apply gold leaf or gold foil to select nails — try accenting just your ring fingers, or create a thin accent line along one edge of each nail
- Seal everything with a glossy top coat for shine and longevity
- The look reads romantic when it feels intentional rather than random, so place your gold accents symmetrically across both hands
Pro tip: If you don’t have gold leaf at home, thin gold striping tape (available at any drugstore) creates the same effect with less mess and equal impact.
2. Dusty Rose with Delicate Lace Pattern
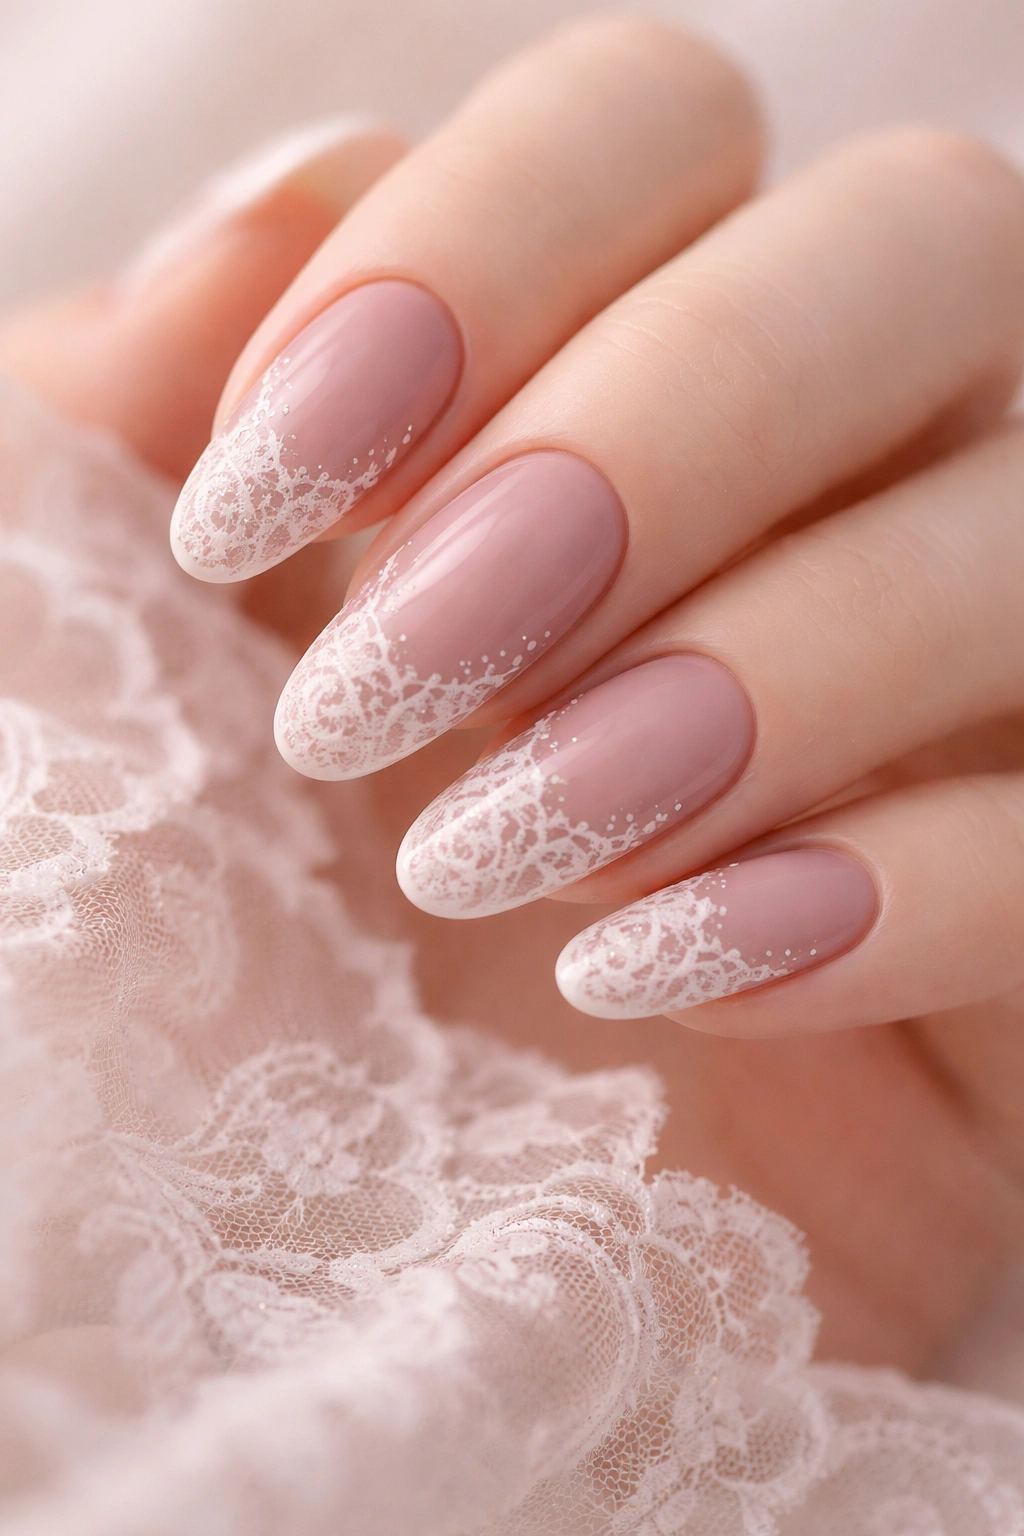
Dusty rose occupies a magical middle ground between pink and mauve — it’s softer than red but far more interesting than pale pink. When you layer a delicate lace pattern on top, the design becomes uniquely romantic without veering into overly feminine territory.
The Romantic Appeal of This Combination
Dusty rose whispers rather than shouts. It’s a color that suggests gentleness and romance without the bold declaration of brighter reds. The addition of lace creates texture and visual interest while keeping the overall effect elegant and refined. Lace patterns evoke vintage romance, delicate femininity, and the kind of thoughtful detail that registers as special rather than costume-like. This combination works beautifully for someone who wants their nails to feel romantic but isn’t looking for maximum drama.
Application Tips for Best Results
- Paint your base with two coats of dusty rose in a creamy or slightly matte finish
- Use white or nude lace decals (available at beauty supply stores), or hand-paint fine lace details using a thin brush and white gel polish
- If hand-painting, start with a simple pattern — perhaps a thin lace border along the tip of each nail rather than covering the entire surface
- Seal with a matte or semi-matte top coat to enhance the delicate aesthetic, or use glossy if you prefer shine
- The design reads most romantic when the lace feels handcrafted rather than cartoonish, so aim for fine, intricate lines rather than bold, chunky patterns
Worth knowing: Dusty rose photographs beautifully under date night lighting, and the muted tone makes your hands appear more relaxed and approachable than very bright colors.
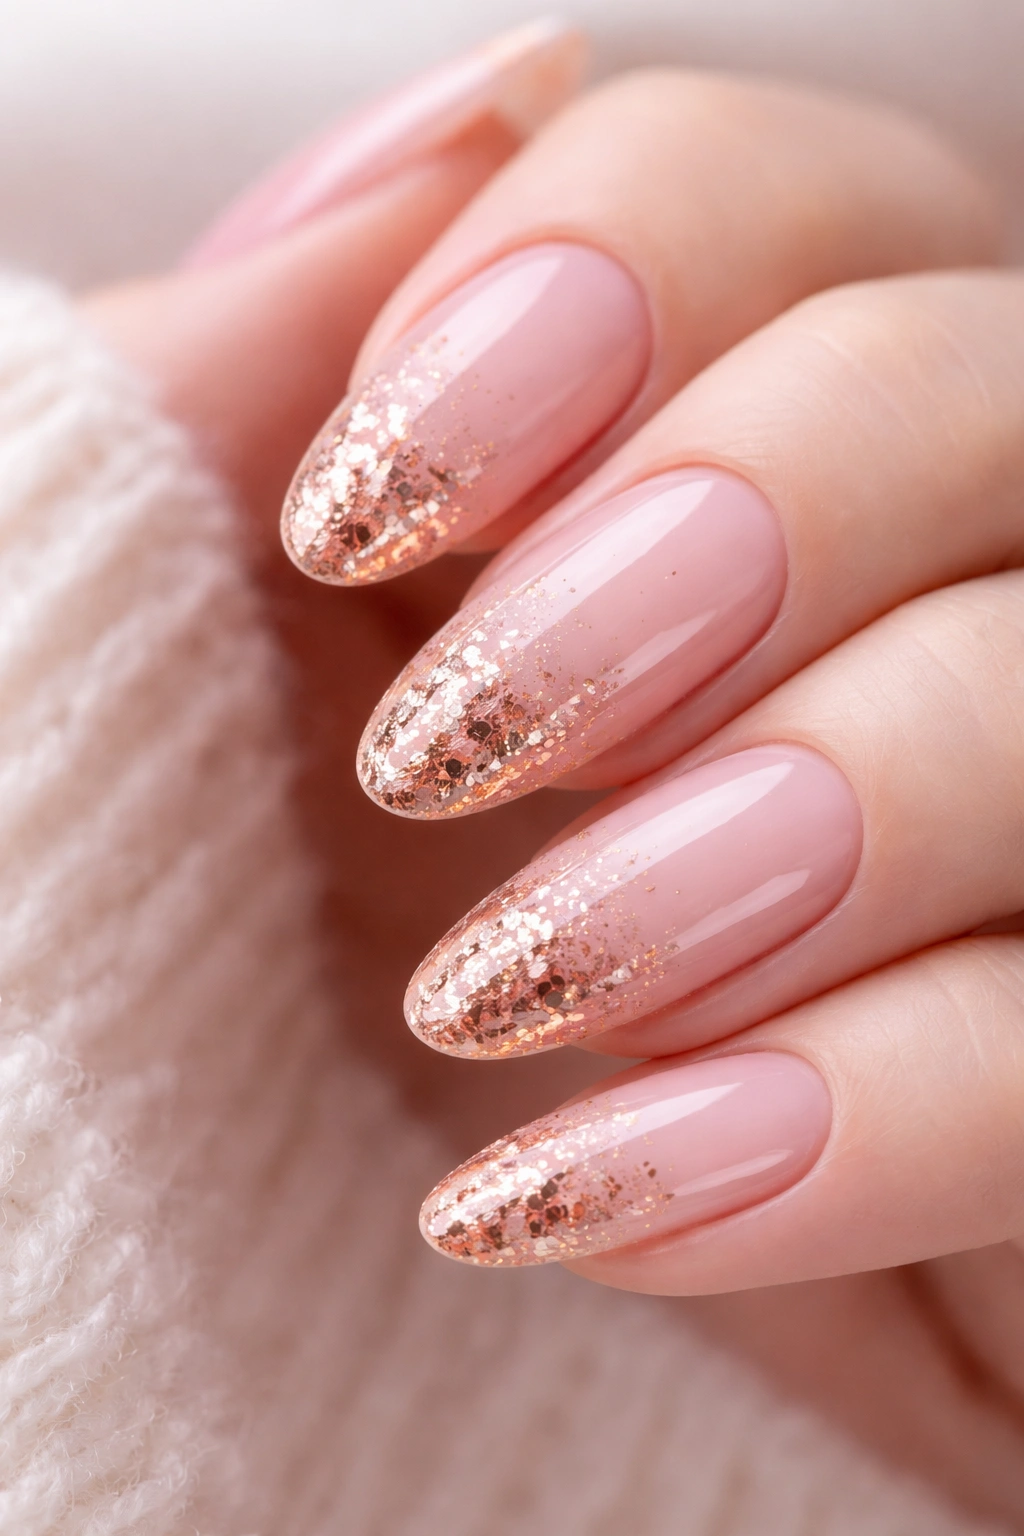
3. Nude with Subtle Glitter Gradient
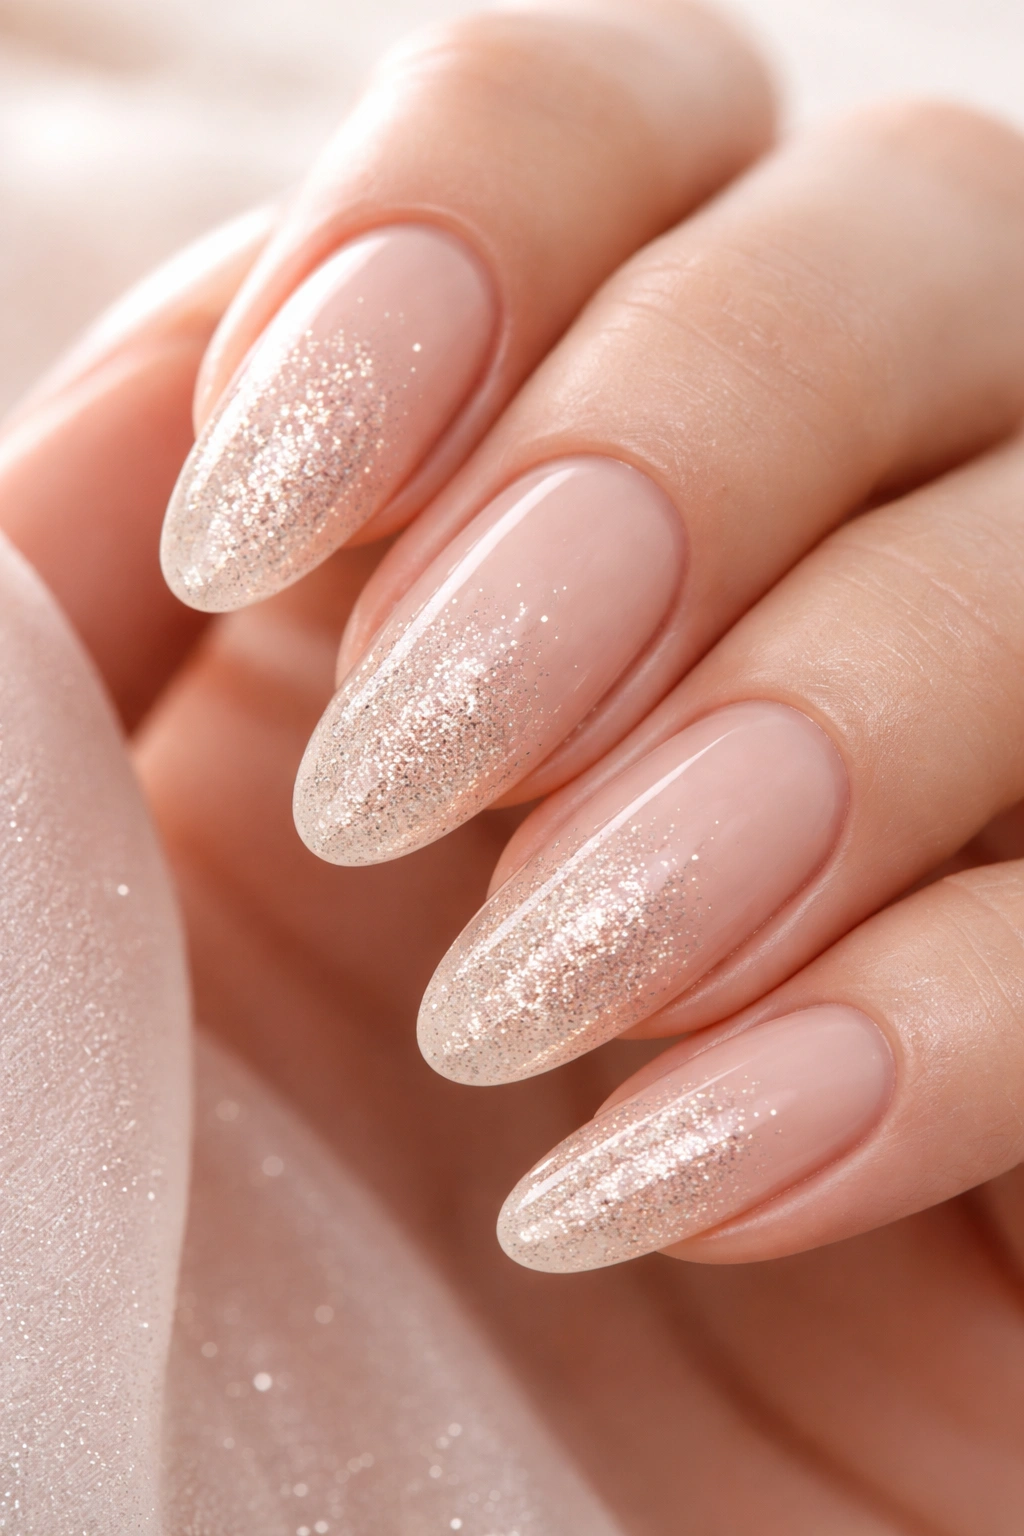
If you’re looking for something that feels romantic without being overtly so — something that suggests understated elegance and lets your hands speak for themselves rather than your nails stealing the show — this is your design. A nude base creates a timeless, elongating effect on long oval nails, and a subtle glitter gradient adds just enough sparkle to catch light and feel special.
Why Neutral Doesn’t Mean Boring
Nude nails have a superpower: they make your hands appear longer, your fingers appear more slender, and your overall presence appear more polished. The color creates a seamless extension of your hand, which is incredibly flattering. By adding a glitter gradient — perhaps starting with just a few flecks at the tips and gradually increasing density toward the edge — you add dimension and romance without breaking the sophisticated line. This design whispers luxury rather than shouting it.
How to Build the Gradient
- Start with a nude base that matches your skin tone (or one shade slightly lighter for dimension)
- Apply two coats for even coverage
- Mix a small amount of clear top coat with fine glitter in gold, champagne, or rose gold
- Using a sponge or a brush, gently apply this glitter mixture to the tips of your nails
- Blend it upward so the density fades gradually — you should have barely any glitter at the cuticle and concentrated shimmer at the tips
- Seal with a glossy top coat
- The effect should feel like a subtle hint of sparkle that only reveals itself when light hits your nails
Insider note: This design is nearly impossible to mess up because subtle is forgiving. Even imperfect application reads as intentional and romantic.
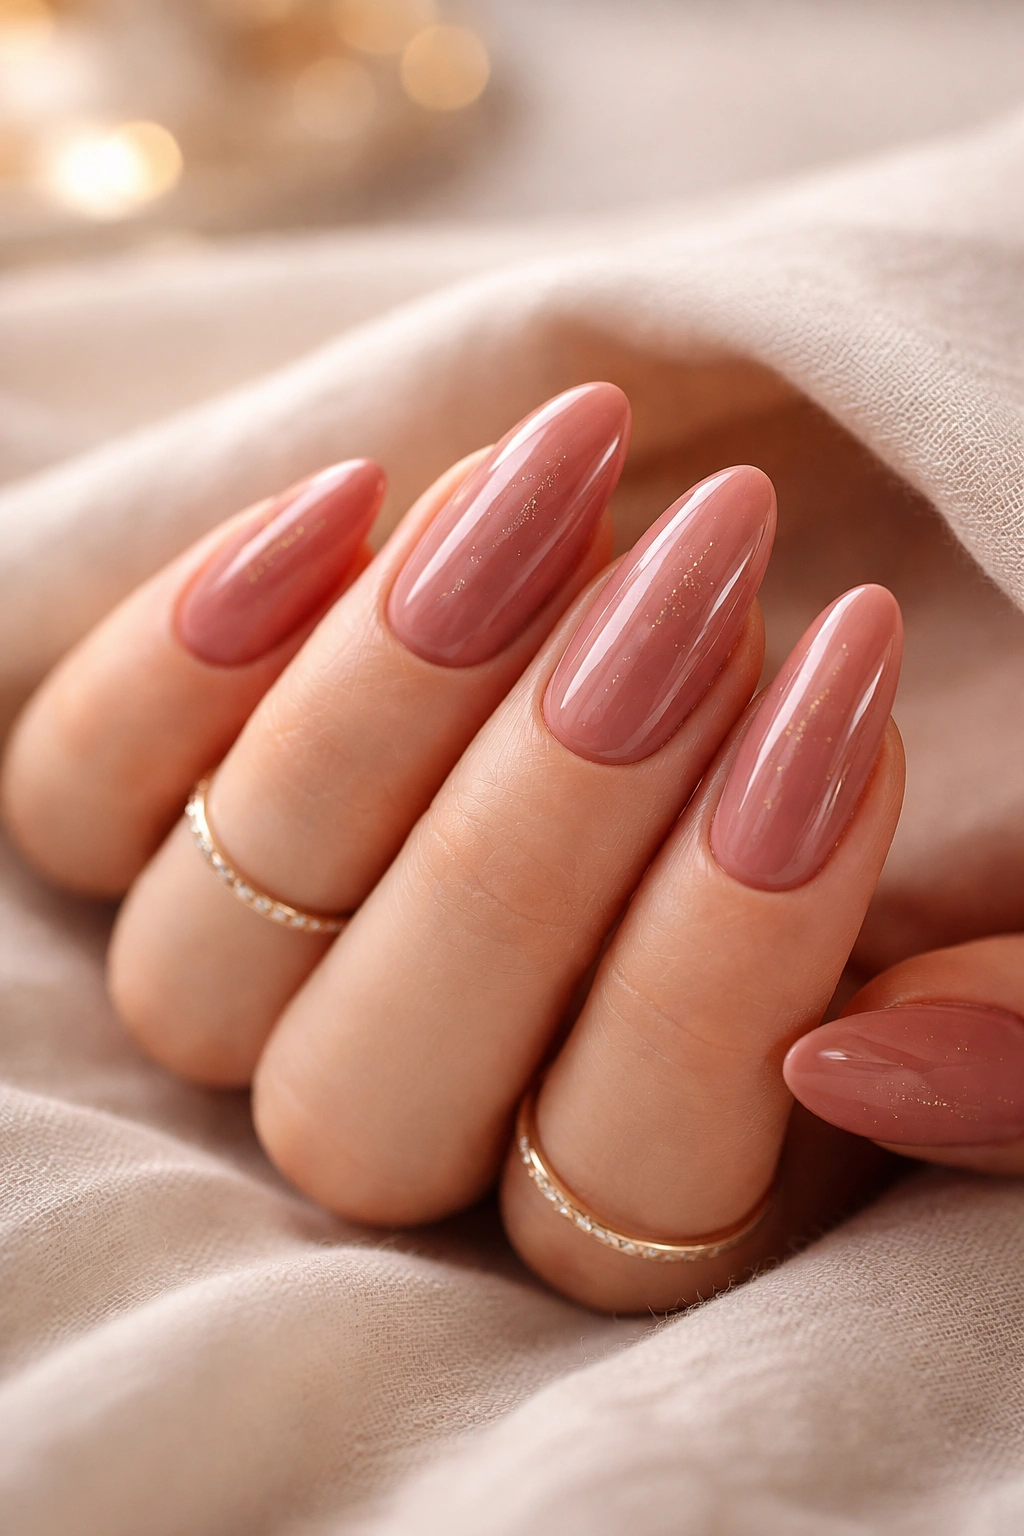
4. Burgundy Ombre That Shifts to Rose Gold
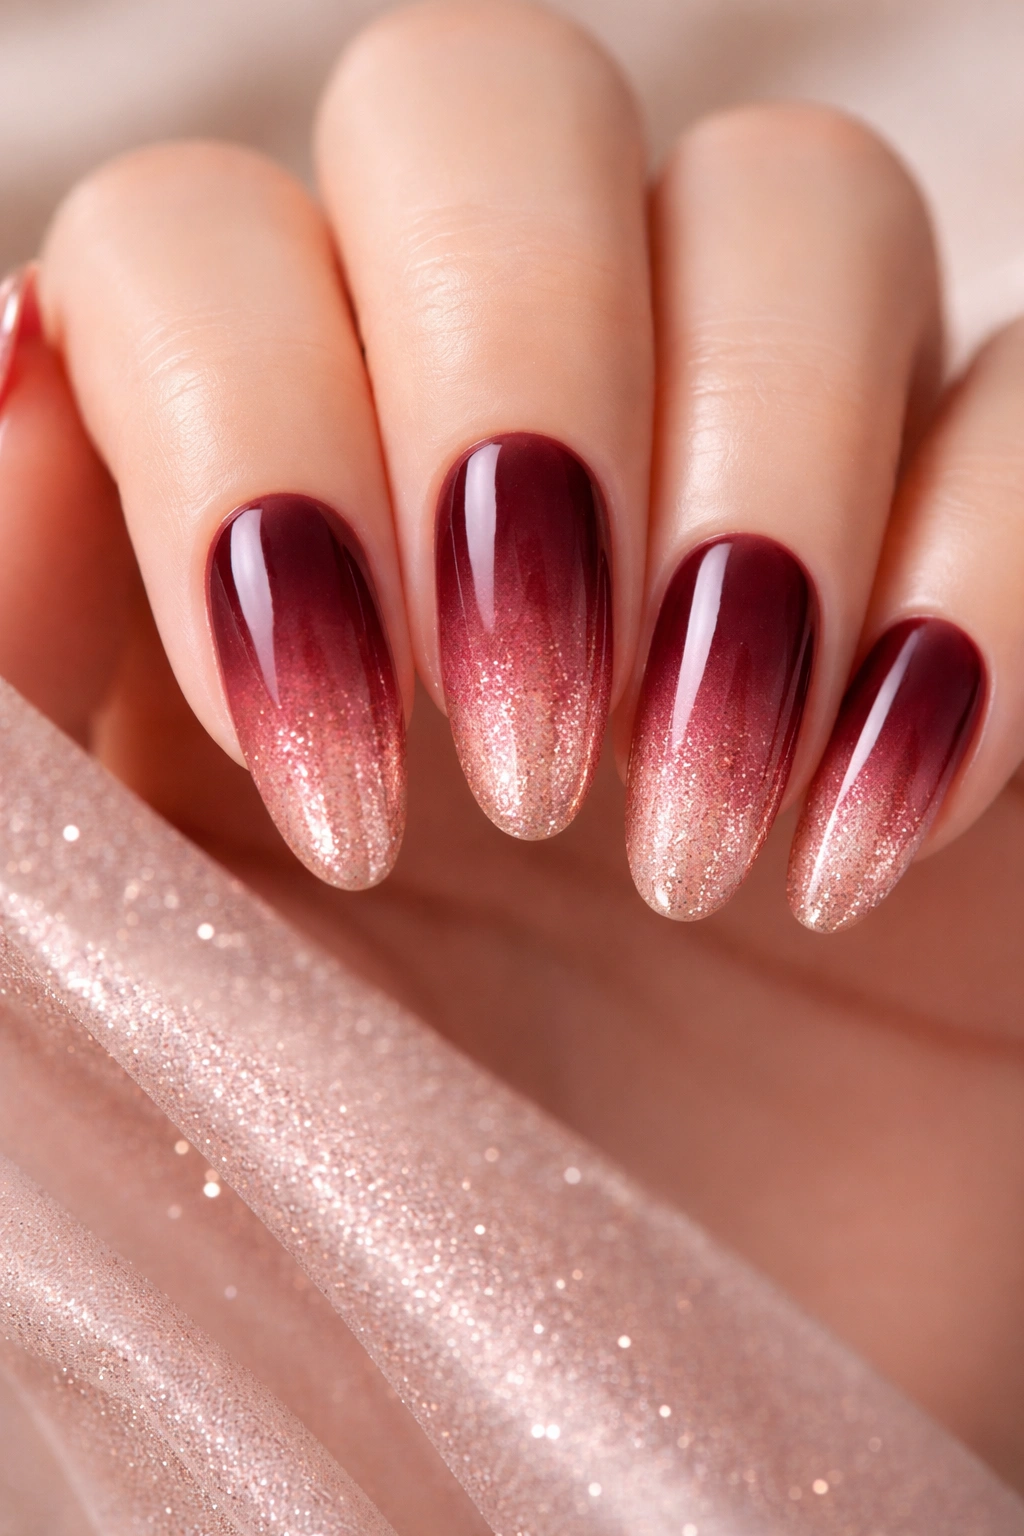
Burgundy is the thinking person’s romantic color — deeper and more complex than simple red, warmer than plum, and perfectly suited to someone who wants their nails to feel sophisticated rather than cutesy. When you blend burgundy into rose gold at the tips, you create a design with real depth and visual interest that works for both casual and formal date scenarios.
The Depth of Burgundy Romance
Burgundy communicates sensuality and mystery in a way that feels grown-up. It’s the color of wine, of velvet, of secrets whispered across a candlelit table. Rose gold (that warm, peachy-pink undertone) adds femininity and light to balance the richness. Together, they create a design that feels both powerful and delicate — which is exactly what romantic confidence looks like.
Creating the Perfect Ombre Blend
- Paint your base coat and apply burgundy polish to the full nail (two coats for opacity)
- Mix rose gold shimmer polish with a touch of clear polish to create a lighter, more blendable version
- Using a makeup sponge, gently dab the rose gold blend onto the tips of your nails
- Work a clean, damp sponge along the line where burgundy meets rose gold to create a gradual transition
- The blend should feel soft, not harsh — it should look like the color naturally fades rather than having two distinct sections
- Seal with a shiny top coat
- Step back and assess; you want a gradient that shifts from deep burgundy at the base to glowing rose gold at the tips
What to watch for: Ombre demands patience with the blending step. Spend time creating a smooth transition rather than rushing to the top coat. The extra minute of careful blending elevates the entire design.
5. Blush Pink with Three-Dimensional Pearl Details
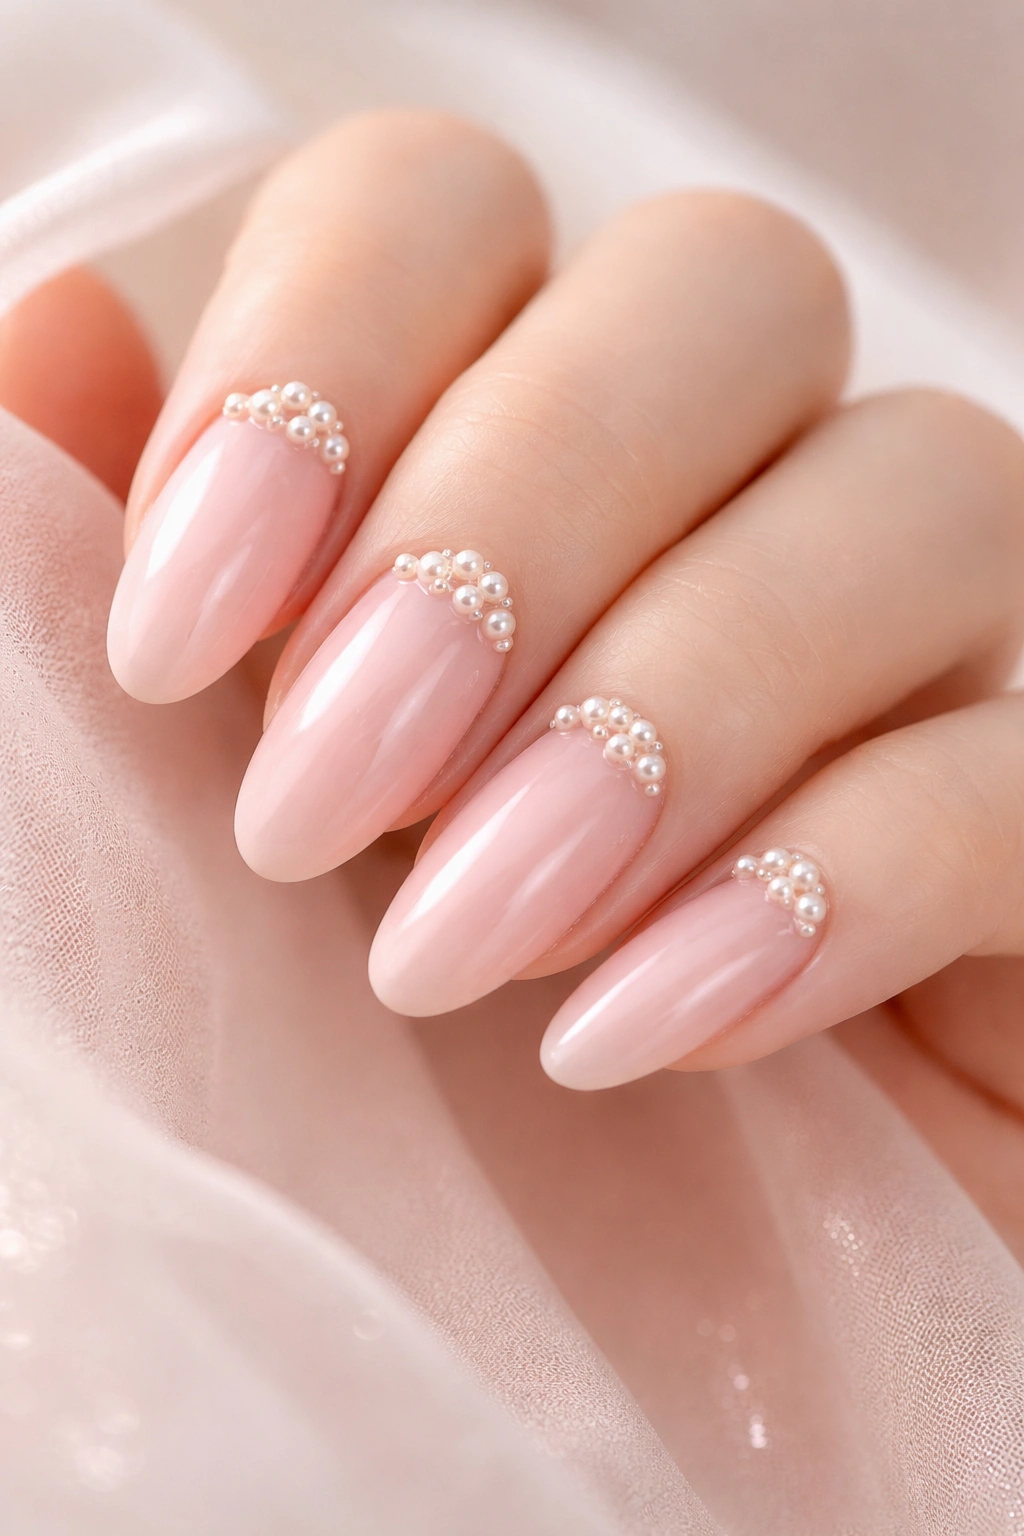
Blush pink is the definition of soft romance — it’s warm, flattering, and feels approachable rather than intimidating. When you add three-dimensional pearl details (not just painted-on dots, but actual small pearls or pearl-textured accents), the design becomes immediately more interesting and special without sacrificing elegance.
Why Blush Pink Feels Universally Romantic
Blush pink works because it feels personal without being obvious. It’s subtle enough to wear to a business dinner but polished enough for a special date. The color sits beautifully against all skin tones, either by echoing warm undertones or by creating appealing contrast. When you add pearl accents, you’re layering in luxury and texture. Pearls suggest timeless elegance, heirloom quality, and intentional beauty — they elevate simple polish into something that feels precious.
Applying Pearl Accents Successfully
- Start with two coats of blush pink polish in a creamy finish
- Before the second coat fully dries (but while it’s still slightly tacky), place small pearls or pearl studs onto select nails — try placing one pearl on each nail near the cuticle, or create a small cluster on your ring fingers
- Press gently to ensure they’re secure; if they don’t stick, use a small dot of clear gel or nail glue underneath
- Allow to dry completely, then seal with a glossy or semi-matte top coat
- The pearls should feel like they’re part of the design rather than stuck on top — go for quality over quantity
- Consider alternating which nails have pearls; a random pattern often feels more intentional than having them on every single nail
Pro tip: If applying actual pearls feels fussy, pearl-finish nail polish or pearl powder mixed into your top coat creates the same effect with zero risk of pearls shifting or falling off.
6. Classic Bright Red with Matte Finish

Sometimes the most romantic choice is also the simplest. A true, bright red in a matte finish (rather than glossy) is an iconic date night nail that never goes out of style. There’s something incredibly confident and sensual about matte red nails — it’s a look that says you know exactly what you’re doing.
The Confidence of Simplicity
Matte finishes add an unexpected modern twist to a classic color. While glossy red feels dressy and traditional, matte red feels artistic and intentional. The lack of shine creates a velvety depth that’s tactile and sophisticated. Bright red specifically (as opposed to burgundy or wine) reads as bold, energetic, and unapologetically romantic. This is a design for someone who wants their nails to make a statement without requiring any additional embellishment.
Achieving Flawless Matte Application
- Use a high-quality bright red polish that offers good opacity in two coats
- Apply your base coat as always
- Apply the first coat of red, then the second coat, allowing adequate drying time between layers
- Don’t use a glossy top coat; instead, use a dedicated matte top coat designed for nail polish
- A matte top coat creates the velvety finish and provides protection for the color underneath
- On long oval nails, this design photographs beautifully and catches light differently depending on the angle
- The length of the nail emphasizes the elegance of the simple design
Worth knowing: Matte finishes show fingerprints and smudges more readily than glossy finishes, so this design works best if you’re comfortable touching up or reapplying your top coat every few days.
7. Champagne Shimmer with Scattered Rhinestones
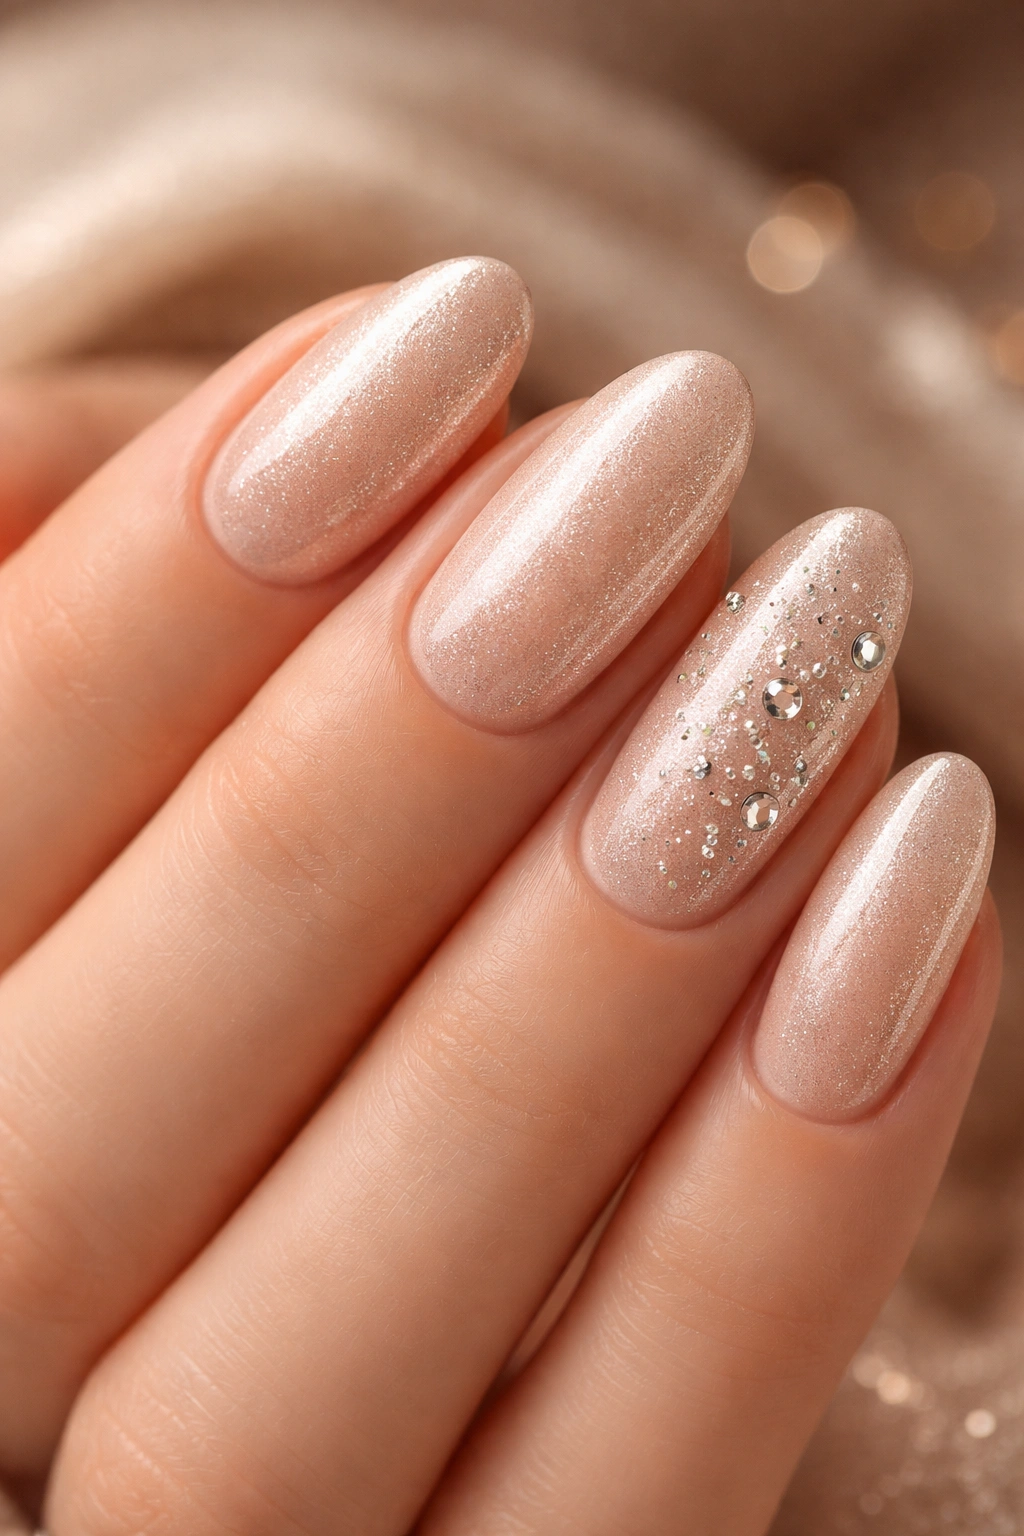
For a date night that feels celebratory and glamorous, champagne shimmer with strategically placed rhinestones brings understated luxury right to your fingertips. This design is dressy enough for an anniversary dinner or Valentine’s Day, but it doesn’t require a tuxedo to pull off.
Building Glamour Without Drama
Champagne is the color of celebration, joy, and special occasions. It’s a neutral that shimmers and catches light, creating movement and visual interest without requiring you to wear a bold color. The addition of rhinestones — in small clusters or scattered sparingly — adds luxury and intentionality. The key is restraint; you want the design to feel curated and elegant rather than costume-like. This works best when rhinestones are applied to specific accent nails rather than every single nail.
Rhinestone Application for Maximum Impact
- Paint your nails with two coats of champagne shimmer polish
- Allow the second coat to dry completely
- Select which nails will feature rhinestones; typically the ring fingers and thumbs work beautifully
- Use a rhinestone picker tool (or a small brush with a tiny dot of adhesive) to place individual rhinestones
- Create small geometric patterns — perhaps a diagonal line of three to five rhinestones — rather than random placement
- Alternatively, create a scattered effect where rhinestones appear organically placed, as if they’ve settled on your nails by chance
- Seal with a glossy top coat that will anchor the rhinestones and create a polished finish
- Avoid matte top coat with this design; glossy amplifies the sparkle and makes the rhinestones truly shine
Pro tip: Use nail-grade rhinestones designed specifically for manicures; they adhere better and stay in place longer than craft rhinestones.
8. Deep Plum with Subtle Gold Brush Strokes

If burgundy feels too red and you want something with more mysterious depth, deep plum is your answer. This jewel tone is inherently romantic because it suggests richness, luxury, and a touch of intrigue. When you add gold brush strokes — thin, artistic lines rather than structured designs — you create something that feels both polished and artfully imperfect.
The Romance of Jewel Tones
Deep plum sits at the intersection of purple and burgundy, giving it a complexity that simple reds can’t quite achieve. It’s a color that suggests sophistication and confidence without the boldness of true red. When paired with gold accents, plum becomes absolutely regal. Gold has historically symbolized value and precious beauty; it’s the perfect complement to the mysterious depth of plum.
Creating Artistic Gold Strokes
- Start with two coats of deep plum polish in a rich, opaque finish
- Using a thin detail brush and gold polish or gold gel, paint freehand strokes on select nails
- These don’t need to be perfect or symmetrical; in fact, slightly imperfect strokes feel more artistic and intentional
- Try a thin diagonal line across one nail, a curved swoosh across another, or scattered shorter strokes
- The goal is to look like you’re adding artistic details rather than attempting a structured design
- Allow the gold to dry completely, then seal with a glossy top coat
- The final effect should feel like wearable art — something beautiful but not overly formal
What makes this romantic: The combination of a rich jewel tone with delicate gold details creates visual sophistication. It’s a design that reads as confident without requiring explanation.
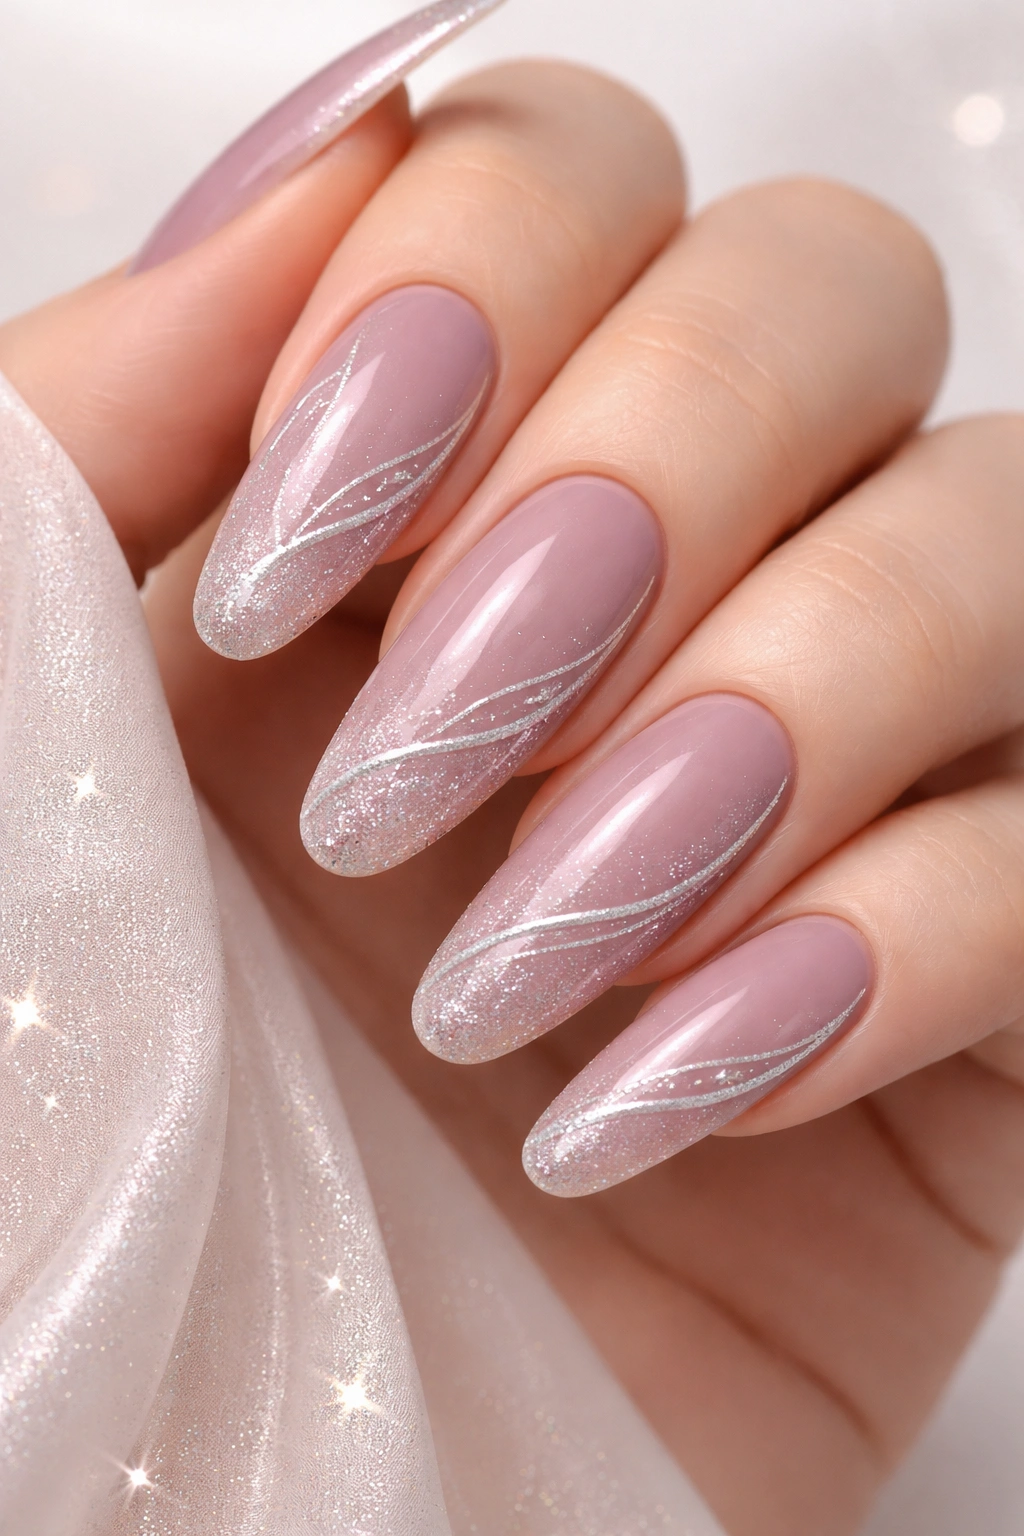
9. Soft Pink with Metallic Pinstripe Details
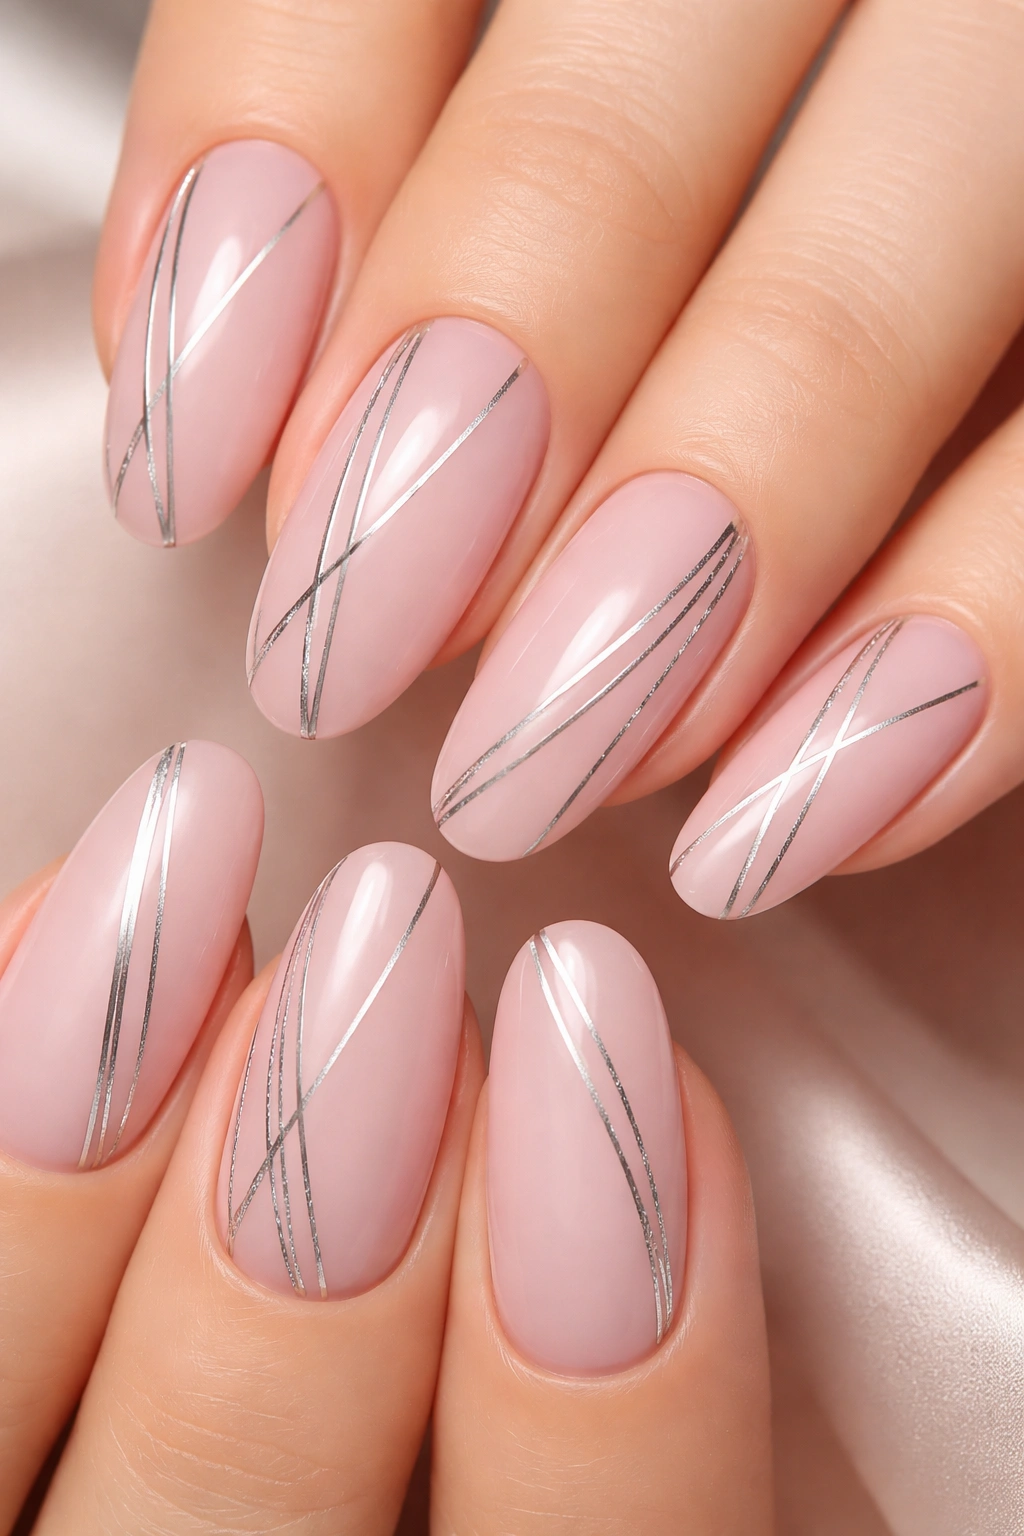
For those who want something romantic but lean toward understated elegance, soft pink with metallic pinstripes is the perfect middle ground. Thin, precise lines in silver or rose gold create geometric interest without overwhelming the soft, romantic base color.
The Appeal of Geometric Romance
Metallic pinstripes introduce modernity and structure to what would otherwise be a purely romantic aesthetic. The contrast between soft and structured creates visual interest while maintaining sophistication. This design works beautifully on long oval nails because the geometric lines emphasize the nail’s length and natural shape. The pinstripes can follow the nail’s contour or be placed at angles for a more playful effect.
Applying Precise Metallic Lines
- Paint your base with two coats of soft, creamy pink
- Using metallic striping tape (available at beauty supply stores) or a thin detail brush with metallic polish, create your line patterns
- If using striping tape, gently apply thin lines in patterns you prefer — perhaps one vertical line down the center of each nail, or thin horizontal lines near the tips
- If hand-painting, use a steady hand and a very thin brush; this is where a detail brush designed for nail art makes all the difference
- Create patterns that feel balanced rather than random; symmetry reads as intentional
- Seal everything with a glossy top coat
- The metallic will catch light beautifully and add a dimension that reads as intentionally designed
Insider note: Striping tape is far easier than hand-painting if you’re not comfortable with detail work, and the results look equally professional.
10. Romantic Red with Negative Space and Modern Geometry
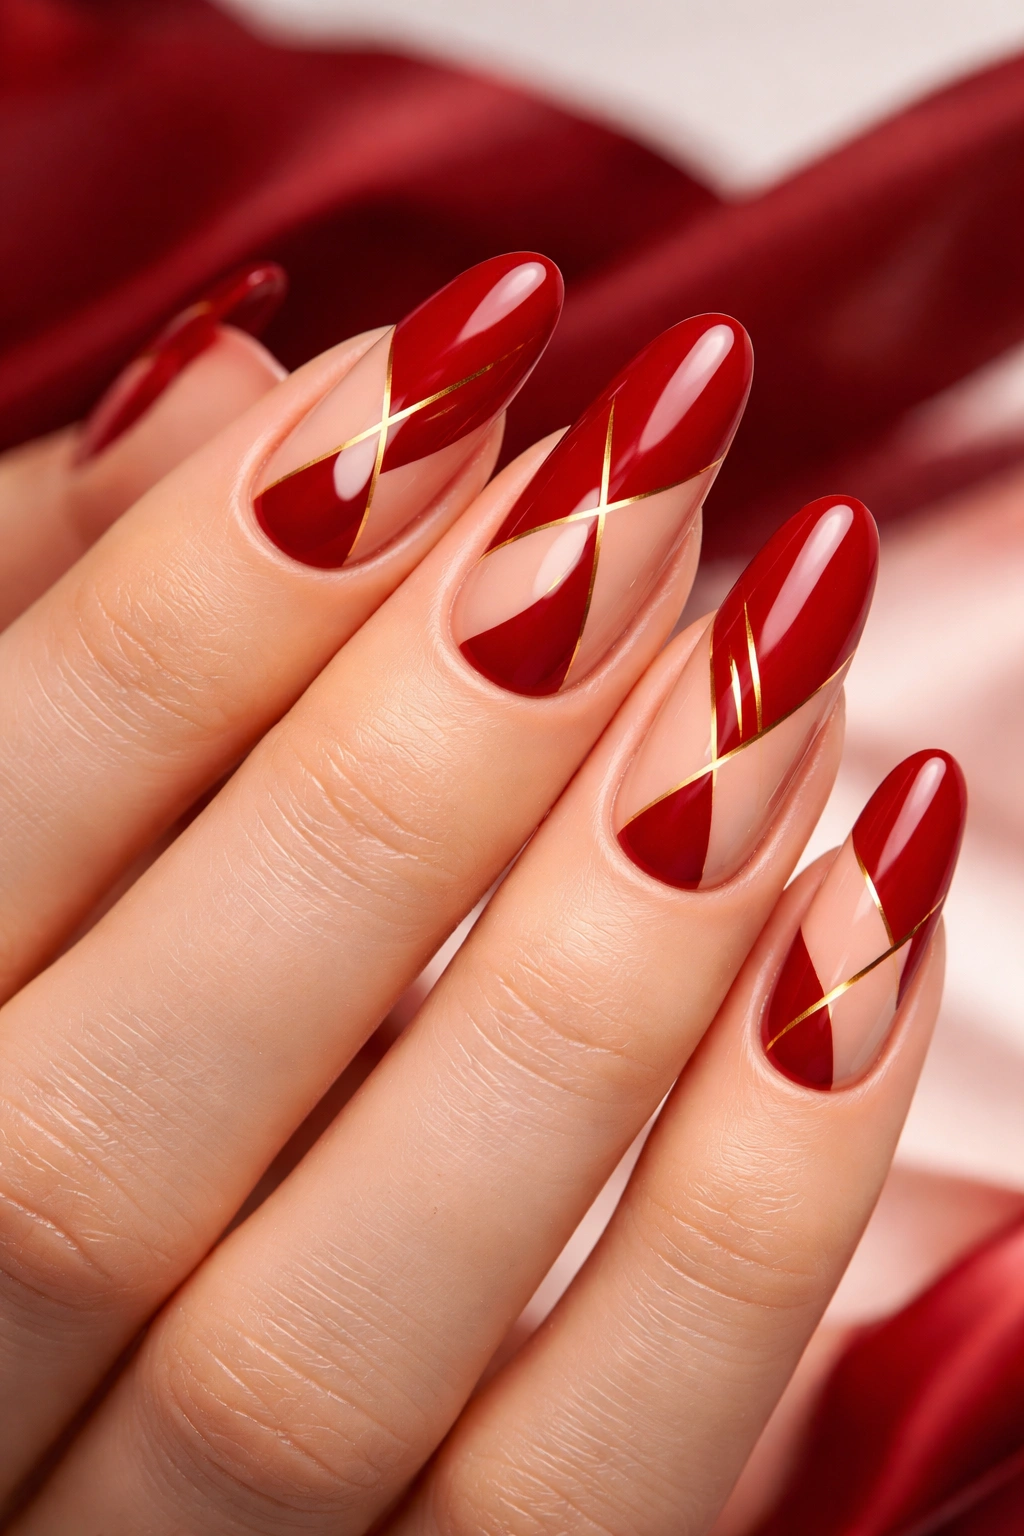
If you want to wear red but make it feel modern and unexpected, try incorporating negative space — deliberately leaving parts of the nail bare to reveal your natural nail or a clear base underneath. Combined with geometric shapes, this creates a design that feels contemporary while maintaining romance.
Negative Space as Design Strategy
Negative space, when executed intentionally, elevates a simple color into something architectural and modern. By leaving portions of the nail unpainted, you create contrast and visual interest. On romantic red, this can feel especially striking — the red becomes more graphic, less expected, and significantly more interesting. This approach works beautifully on long nails because the length gives you room to play with geometric shapes.
Creating Geometric Negative Space Designs
- Paint your base with two coats of romantic red
- Using nail art tape or a thin brush and base coat, create geometric patterns by leaving strategic areas unpainted
- Try a triangular unpainted area at the tip and a geometric shape near the cuticle, or experiment with negative space along one edge of each nail
- The unpainted areas should reveal either your natural nail or a clear base, creating stark contrast against the red
- Seal with a glossy top coat; the contrast between matte natural nail and glossy red polish will enhance the modern feel
- Step back and assess; the design should feel like intentional art rather than accidentally smudged polish
Worth knowing: This design requires planning before you paint; it’s harder to create negative space after full polish coverage.
11. Rose Gold Foil Accent Design
Rose gold is arguably the most romantic of all metallic finishes — it’s warm, flattering, and sits at the perfect intersection of feminine and edgy. When used as a foil accent rather than a full coverage, it becomes a luxurious detail that elevates your entire manicure.
Rose Gold as the Ultimate Romantic Metal
Rose gold has become synonymous with modern romance and luxury. It’s warm in a way that feels personal and intimate, unlike cool silver. When used as foil accents — actual metal foil pressed into gel or adhesive — it creates a dimensional, almost 3D effect that regular polish can’t replicate. This technique is easier than it looks and creates an impression of significant effort.
Applying Foil Accents Successfully
- Paint your nails with a color that complements rose gold well — blush pink, nude, soft peach, or even a light mauve
- Allow the polish to dry completely
- Apply a thin layer of clear gel or a specialized foil adhesive to the areas where you want your rose gold foil to appear
- Press small pieces of rose gold foil onto the adhesive, using a foil pressing tool or even the back of a clean tweezers
- Gently rub to ensure good contact; the foil will stick to the adhesive and stay in place
- Seal everything with a glossy top coat
- The metallic foil will appear to sit on top of your nails, creating a luxurious, high-end appearance
Pro tip: Rose gold foil is more forgiving than you’d think; even imperfect application reads as intentional and adds to the artisanal feel.
12. Mauve with Silver Sparkle and Elegant Curves
Mauve is an underrated romantic color — it’s sophisticated, works with virtually every skin tone, and feels inherently polished. When you add silver sparkle and elegant curved details, you create a design that’s romantic without being saccharine, and elegant without being boring.
Why Mauve Deserves Your Consideration
Mauve occupies a beautiful middle ground between pink, purple, and gray. It’s a color that feels both modern and timeless, making it perfect for someone who wants their nails to feel special without being trendy or dated. Mauve suggests sophistication and understated confidence. When you layer in silver sparkle and curved details, you’re adding femininity and lightness to a naturally sophisticated base.
Building the Mauve and Silver Design
- Paint two coats of mauve polish, choosing a slightly dusty or muted tone rather than a bright mauve
- While the second coat is still slightly tacky, apply silver sparkle (either sparkle polish mixed with clear, or fine glitter mixed into top coat) to the tips of your nails, creating a subtle gradient
- Using a thin detail brush and white or silver gel, create elegant curved lines on select nails — perhaps swooping curves near the cuticle, or delicate waves along the edges
- The curves should feel fluid and artistic rather than rigid or geometric
- Seal everything with a glossy top coat
- The finished design should feel like controlled artistry — romantic but sophisticated, detailed but not fussy
Worth knowing: Mauve photographs beautifully under warm lighting, and the muted tone makes the silver sparkle really shine without competing for attention.
Final Thoughts
The most romantic date night nails aren’t necessarily the most complicated ones — they’re the ones that feel intentional, that complement your overall look and confidence, and that make you feel genuinely beautiful when you catch a glimpse of your hands across the table.
Long oval nails are your romantic canvas because of their inherent elegance. You’re not fighting against an awkward shape or trying to make a short nail look intentional. You’re working with a silhouette that whispers sophistication with every gesture. Whether you choose a bold classic red, a subtle dusty rose, or something unexpected like plum with gold strokes, the length and shape of your nails are already doing the romantic work for you.
The designs above all share one common thread: they feel special without being costume-like. They’re polish applications that suggest you’ve thought about the impression you’re making, that you care about details, and that you understand what actually communicates romance. That level of intention — choosing a color that complements your skin tone, selecting accents that work with your outfit, and taking time to execute the design well — is what actually makes nails romantic. It’s not about having the flashiest design; it’s about showing up with nails that make you feel absolutely confident and beautiful.
Pick whichever design speaks to you, take your time with application, and enjoy the small confidence boost that comes from knowing your nails look absolutely stunning.
