

A good rhinestone manicure can make long oval nails look expensive from three feet away; a bad one makes them look bulky before you’ve even reached for your coffee. The trick with long oval nails with rhinestones is not piling on more sparkle. It’s proportion, placement, and knowing when a tiny crystal does more work than a whole nail covered in stones.
Long oval nails give you a shape that already has movement built into it. That soft taper pulls the eye forward, makes fingers look longer, and gives rhinestones a natural path to follow. I keep coming back to oval for crystal work because the curve does half the styling for you. Square nails can fight with stone placement. Coffin nails can look heavy fast. Oval rarely does.
There’s also a practical side to this. Stone size matters. So does where your nail tech builds the apex, how close the gems sit to the sidewall, and whether the stones are sealed around the base instead of drowned under top coat. If you’ve ever had a crystal pop off in the shower on day two, that was not bad luck. That was structure.
Some designs shout. Some designs flicker when your hand moves and catch attention the second you reach across a table. Those are the ones worth saving.
The Long Oval Shape Gives Rhinestones Room to Breathe
Oval nails make rhinestones look cleaner because the shape already has a built-in line. That sounds small, but it changes the whole manicure. On a long oval nail, the eye travels from cuticle to tip in one smooth arc, so even a simple row of stones feels intentional instead of random.
Square shapes break that line at the corners. Coffin shapes pull width into the tip. Almond can work too, though it gets sharper and more dramatic. Oval sits in a sweet spot: soft enough for pearl, nude, blush, and French looks; strong enough for black gloss, chrome, and deep jewel tones.
Why the curve matters
A curved sidewall gives rhinestones a place to sit without looking jammed onto the nail. Small stones near the cuticle echo the natural half-moon of the nail plate. A diagonal crystal sweep follows the side of the oval without needing extra painted detail.
That is why long oval nails with rhinestones often look more expensive than the exact same stones on a flatter, wider shape. The nail itself helps with composition.
Wear matters too
Long nails carry more visual weight, so the shape needs balance. If you add crystals larger than 2 mm to more than two nails, a builder gel or hard-gel base helps keep the manicure from feeling tip-heavy. I would not skip that step. Long oval nails flex more at the free edge than short rounds do, and flex is what sends stones flying.
One more thing. Flat-back crystals sit flush and last longer than pointed-back craft gems, which are fine for a costume set and awful for daily wear.
Stone Size, Color, and Placement Matter More Than the Base Shade
Pick up two crystal jars—one full of 1.5 mm stones and one full of 3 mm stones—and you’re already making a bigger design choice than your polish color. Big stones read bold, jewelry-like, and high contrast. Tiny stones read finer, sharper, and more polished.
That matters a lot on long oval nails.
A quick size guide that actually helps
- 1 mm to 1.3 mm stones work well for cuticle crescents, side trails, and scattered “constellation” layouts.
- 1.5 mm to 2 mm stones give you enough shine to notice from a distance without turning the nail into texture.
- 3 mm and larger stones belong on accent nails, center placements, or short clusters near the cuticle—not all ten nails unless you enjoy snagging knitwear.
- AB crystals throw a rainbow flash and look strongest on sheer pink, white, lavender, and icy ombré bases.
- Clear or silver-backed stones keep black, burgundy, red, mocha, and French sets looking sharp.
Placement changes the mood
A tight cuticle half-moon looks neat. A diagonal sweep feels dressier. One crystal at the smile line of a French tip gives a cleaner finish than a full border of stones, which can tip into pageant territory fast.
Leave some empty space. Really.
Negative space is what makes rhinestones stand out on oval nails. If every nail is fully loaded, your eye has nowhere to land. The best sets usually feature two statement nails, four quieter nails, and a repeated placement pattern that ties everything together.
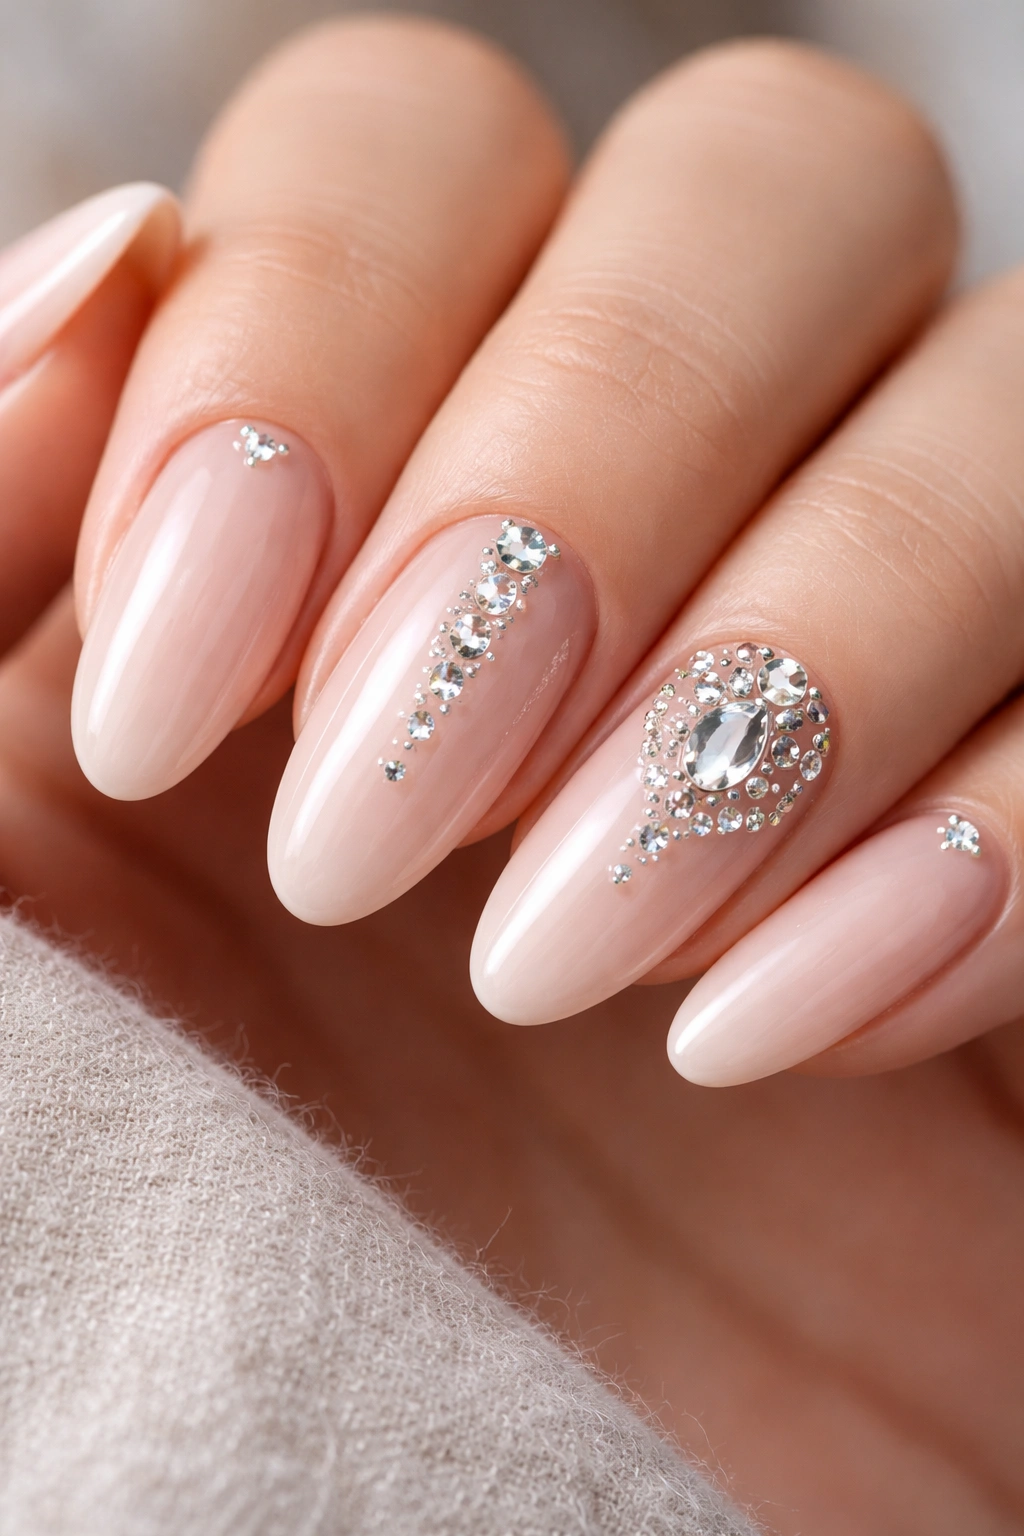
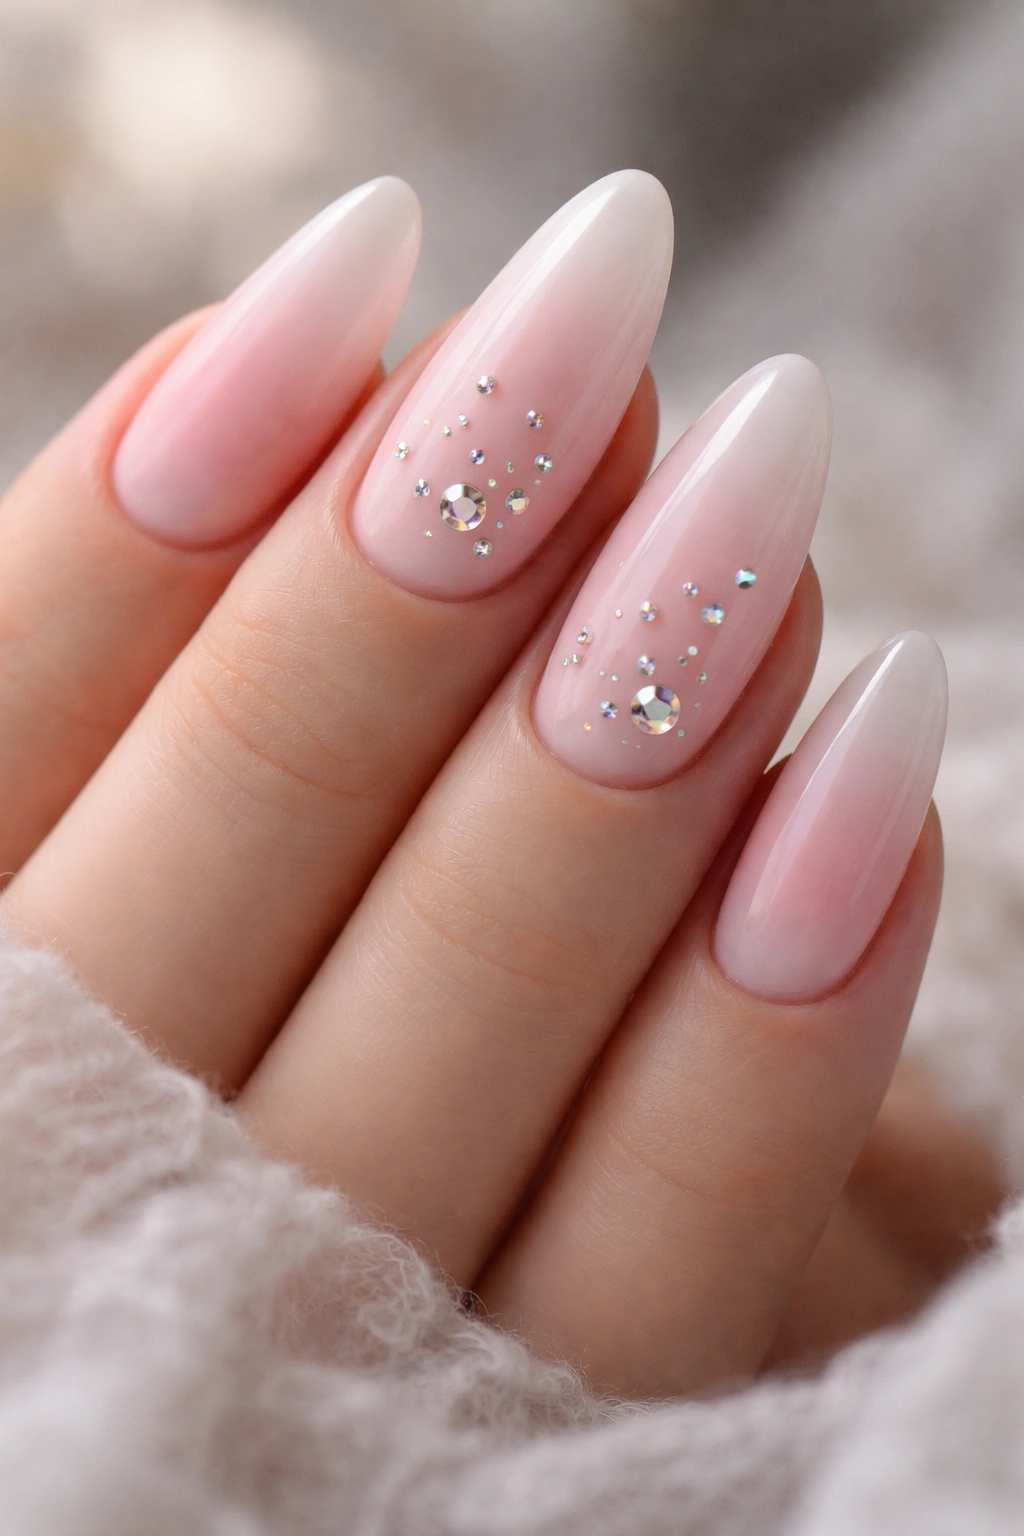
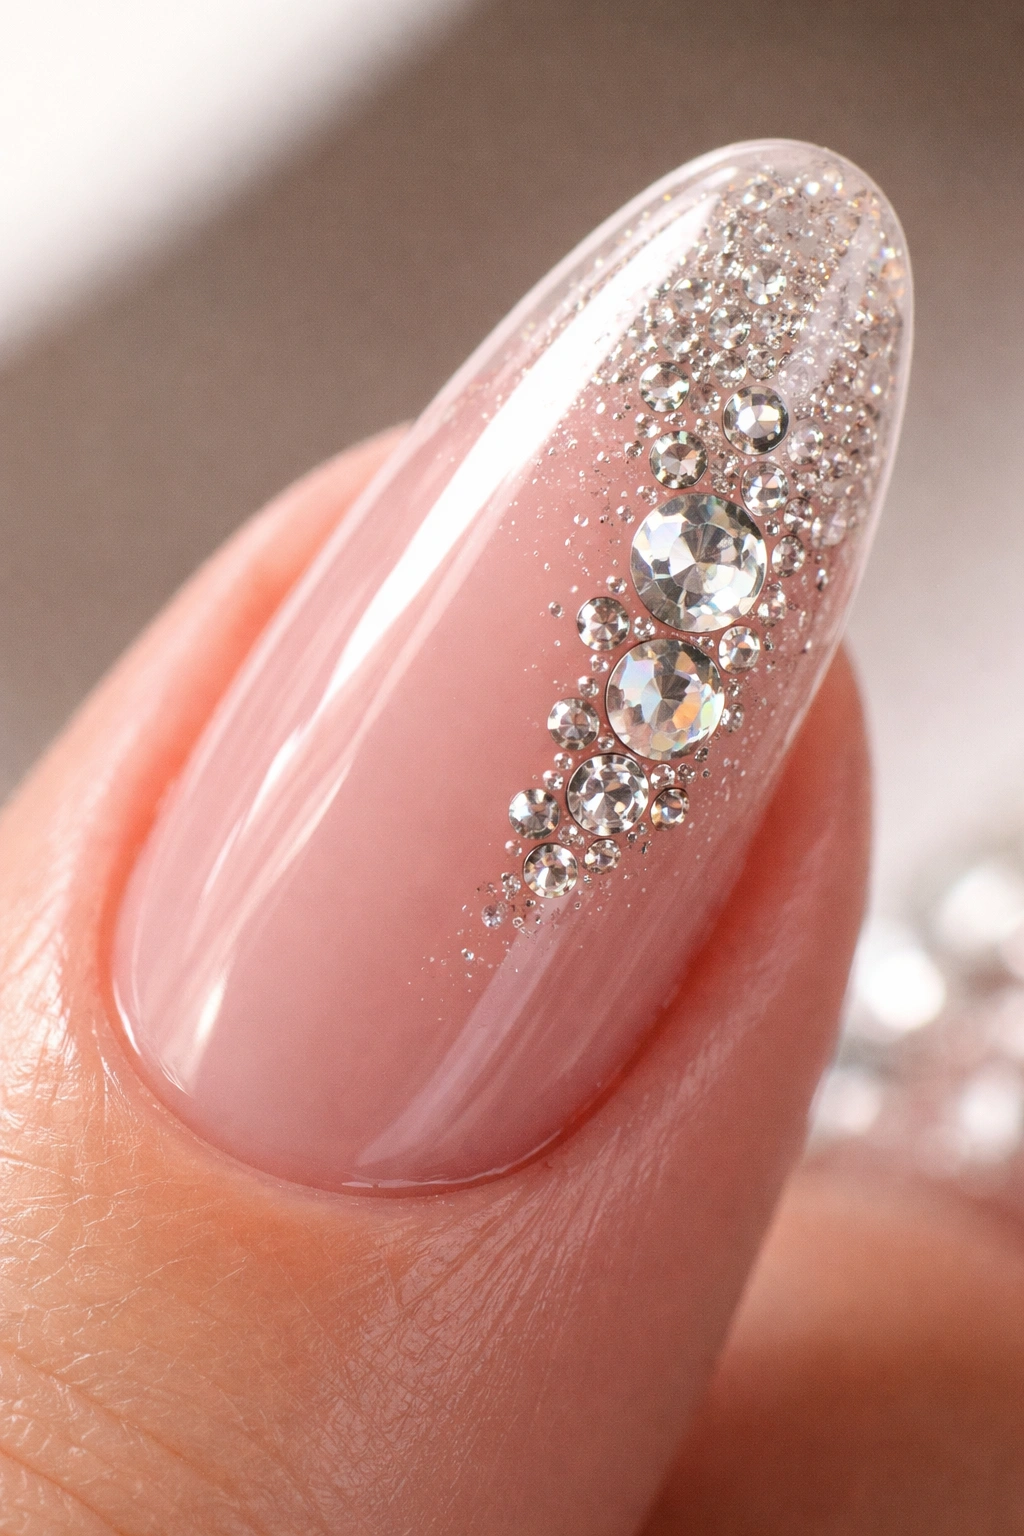
1. Milky Nude Long Oval Nails With a Cuticle Crescent of Clear Stones
Soft milky nude and clear crystals are the pair I’d hand to almost anyone first. The base blurs the free edge, the oval shape keeps the silhouette slim, and the rhinestones sit at the cuticle like jewelry instead of decoration pasted on top.
Why the cuticle crescent works
That curved crystal line mirrors the natural shape of the nail bed. On a long oval, it lengthens the finger without adding weight to the tip, which is where heavy nail art can start to feel clunky. You also get sparkle when your hand moves, not a wall of shine all the time.
Ask for the stones to taper in size. A center stone around 2 mm, flanked by 1.5 mm and then 1 mm crystals, looks tighter and more finished than using one size across the whole arc.
Quick design notes
- Use a milky pink-beige base, not a flat tan nude, so the manicure doesn’t look chalky.
- Keep the crescent on two accent nails if you want a cleaner set, or repeat it on all ten nails with smaller stones.
- A high-gloss gel top coat around the crystals—not over them—keeps the shine crisp.
- This design works well at longer lengths, since the bare body of the nail balances the sparkle.
Best salon note: ask for flat-back clear glass crystals instead of plastic gems. Plastic loses its shine fast.
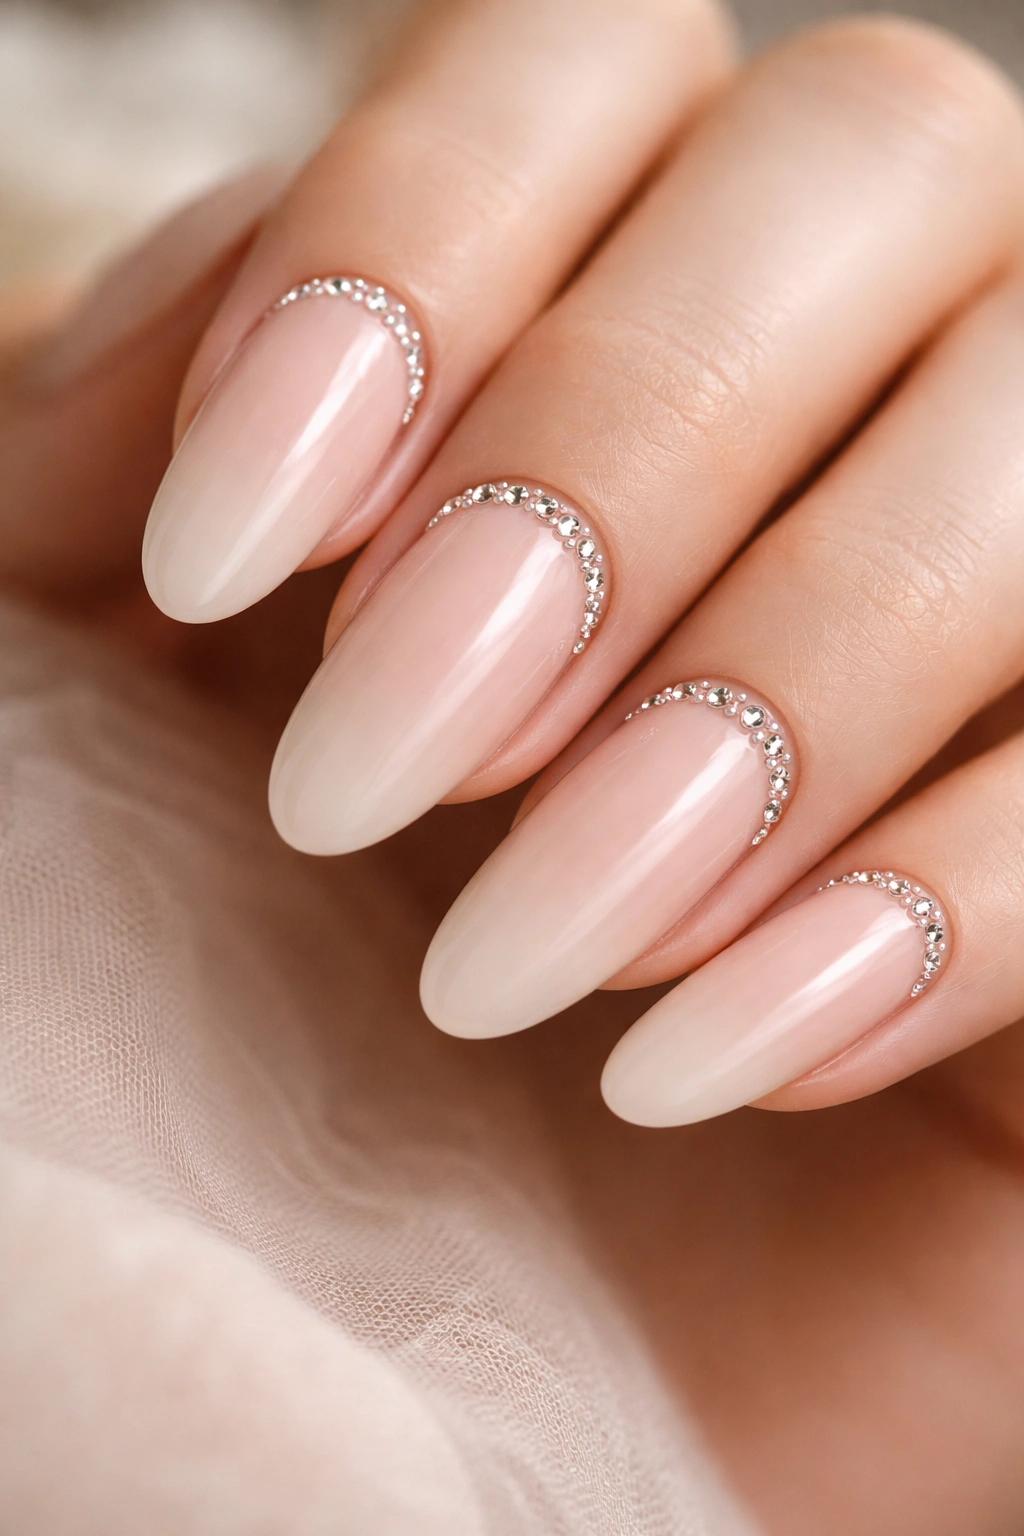
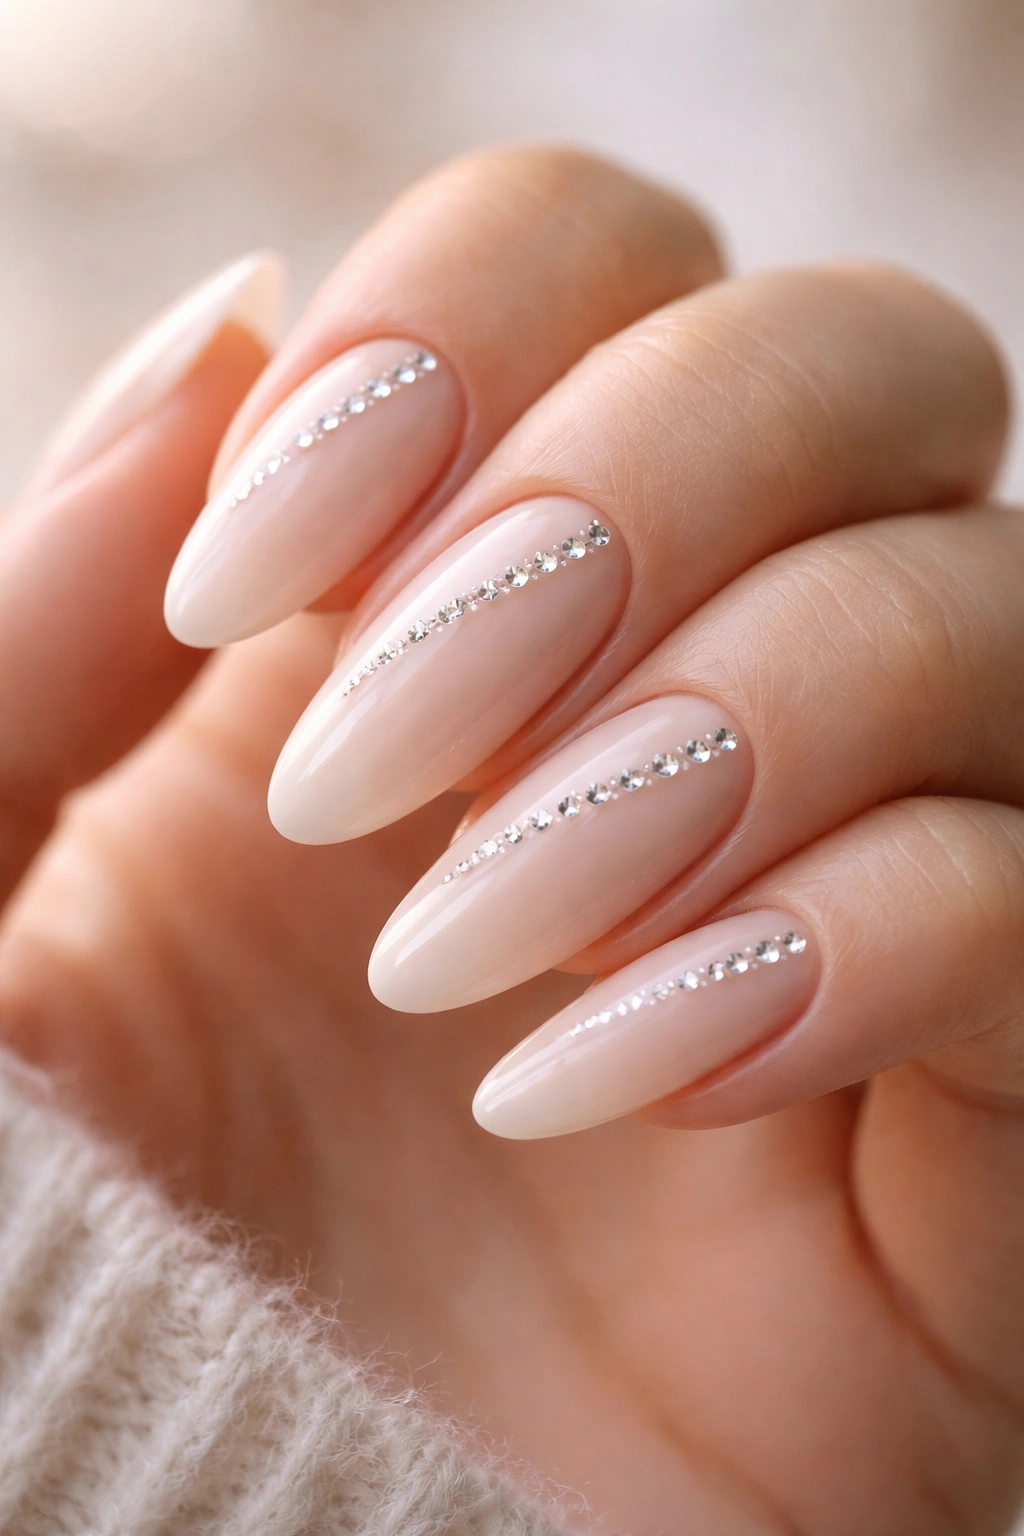
2. French Tip Long Oval Nails With a Single Crystal Trail
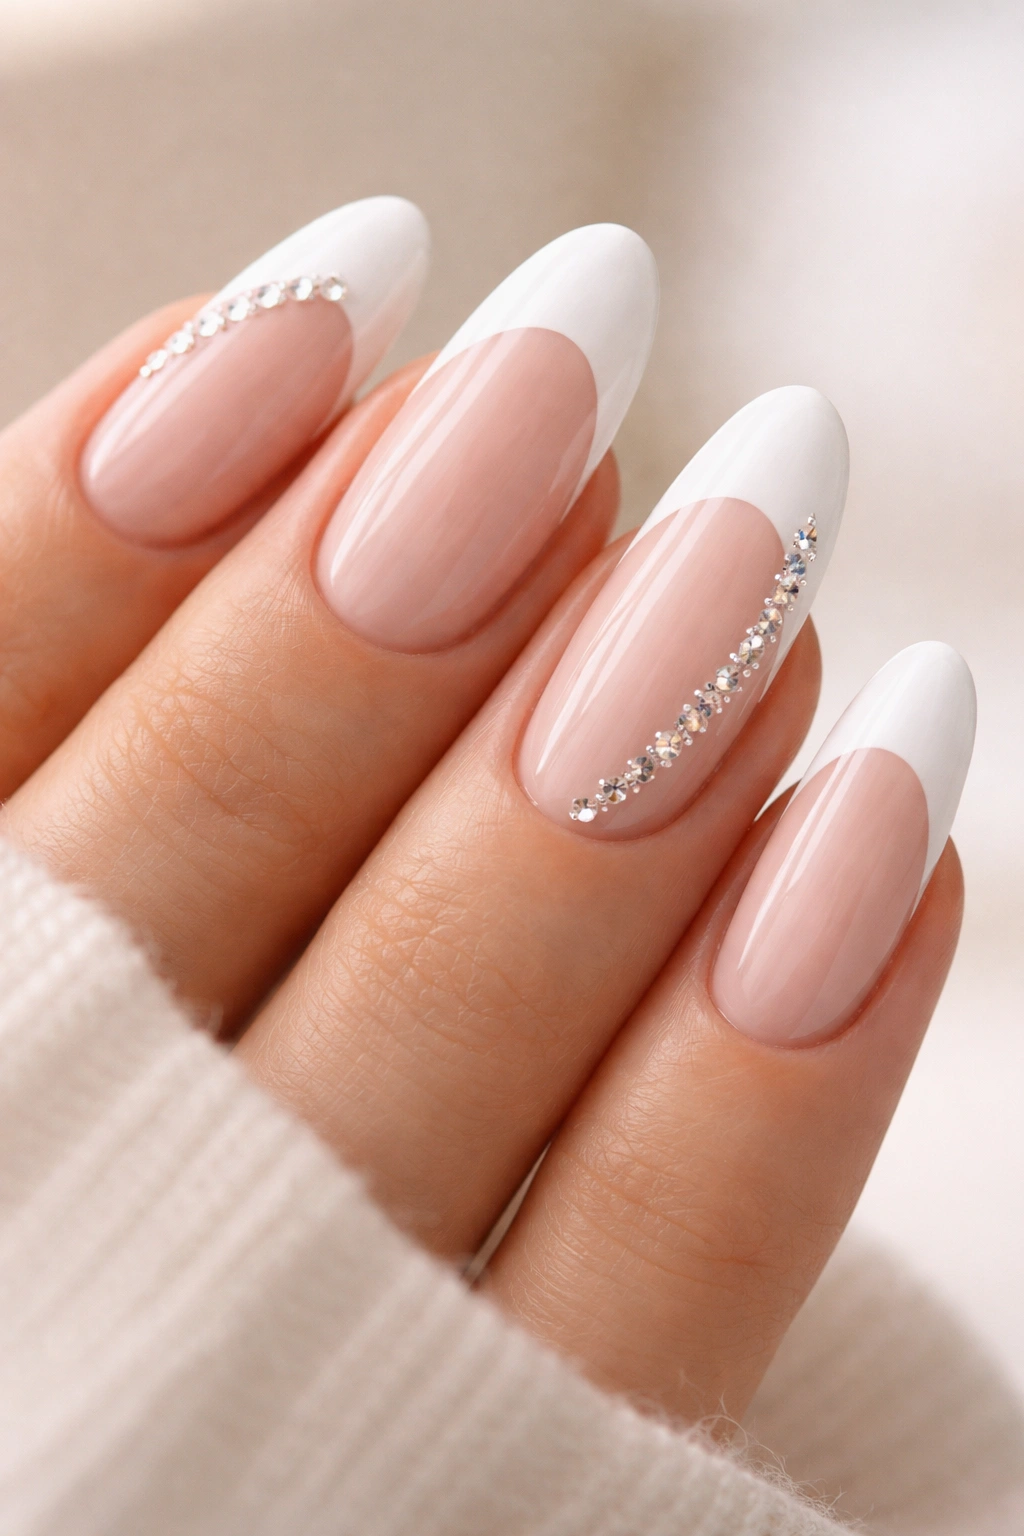
A French set doesn’t need a full row of stones to pop. One slim crystal trail does more, and it looks smarter. I like this design because it keeps the white tip clean, lets the oval shape stay front and center, and adds shine without turning a classic manicure into a costume piece.
Place the stones where the white tip begins, then let them drift diagonally toward one sidewall. Three to five crystals per accent nail is usually enough. More than that, and you start crowding the smile line—the exact place that makes a French manicure look crisp.
Long oval nails help the trail look fluid. On a shorter square nail, the same line can feel abrupt because the corners stop the movement. Oval gives that diagonal path somewhere to go. It looks more like a slash of jewelry and less like scattered craft stones.
You can push this design in different directions with tiny changes. A sharp bright-white tip gives it a clean bridal feel. A softer off-white or milky French reads gentler. Swap clear stones for pale champagne crystals and the set gets warmer right away.
I’d wear this when you want sparkle that doesn’t announce itself from across the room. From a distance, it reads polished. Up close, the detail lands.
3. Black Gloss Long Oval Nails With Silver Rhinestone Constellations
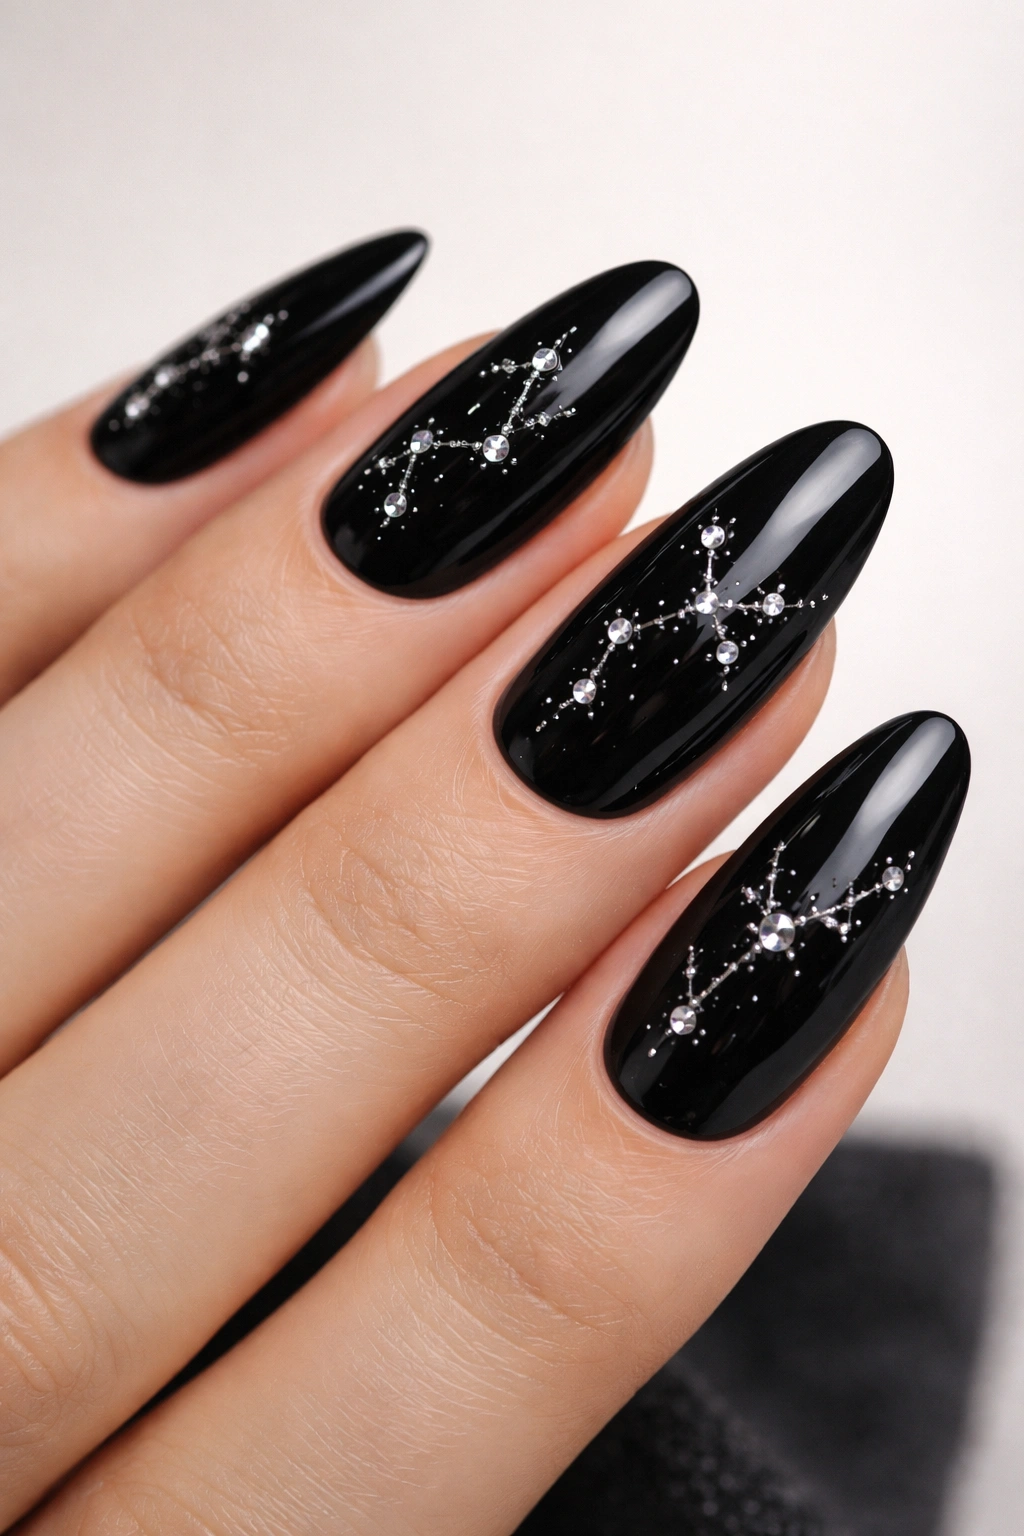
Why does black polish make rhinestones hit harder? Contrast. A glossy black base acts like a mirror behind the stones, so even tiny silver crystals look brighter and more defined.
This is one of my favorite long oval nail ideas with rhinestones when you want drama without thick 3D art. The oval shape keeps black from looking blocky, which can happen on wider square sets. A slim, elongated nail makes the color look sleek.
Scatter the stones in uneven little clusters rather than lining them up. Think three crystals near one side of the cuticle, two floating near the center, maybe one tiny stone toward the upper third of the nail. The slight irregularity is what gives the design that constellation feel.
Placement that keeps it sharp
Keep the clusters small and asymmetrical. If you mirror every nail exactly, the set can feel stiff. I like one full cluster nail on each hand, two nails with a lighter scatter, and the rest in plain black gloss. That contrast matters.
If you want extra depth, use a mix of:
- 1 mm silver crystals
- 1.5 mm clear stones
- micro silver caviar beads in a couple of spots
Skip chunky gems here. They ruin the clean, night-sky look.
A warning, though—black shows growth faster than sheer bases. If you stretch your fills too long, this design starts looking tired before the stones do.
4. Blush Pink Ombré Long Oval Nails With Scattered AB Rhinestones
Picture a soft pink fade that turns almost translucent near the cuticle, then flashes blue, lilac, and pale gold when your hand tilts. That’s the charm of AB stones on a blush ombré base. They don’t sit there flat. They flicker.
I’ve seen this set done badly—too many crystals, all the same size, dropped onto every nail like confetti. On long oval nails, you want scatter, not clutter. Leave room around the stones so the color shift has space to show.
A baby boomer fade works best here: pink at the nail bed, soft white through the middle, sheer finish near the edge or vice versa depending on the look your tech builds. Then place the crystals where the fade changes tone. That little contrast line makes the stones stand out more.
What to ask for
- AB crystals in 1 mm and 1.5 mm sizes
- A blush pink to soft white ombré
- Stones concentrated on two or three nails, not all ten
- One tiny stone floating alone on a plain nail for balance
This set has a lighter mood than black or burgundy crystal nails, though it still needs discipline. Too much AB can turn cloudy under cool lighting. A few stones flash harder than a full blanket of them.
That restraint is what makes it work.
5. Deep Burgundy Long Oval Nails With Gold-Set Rhinestones
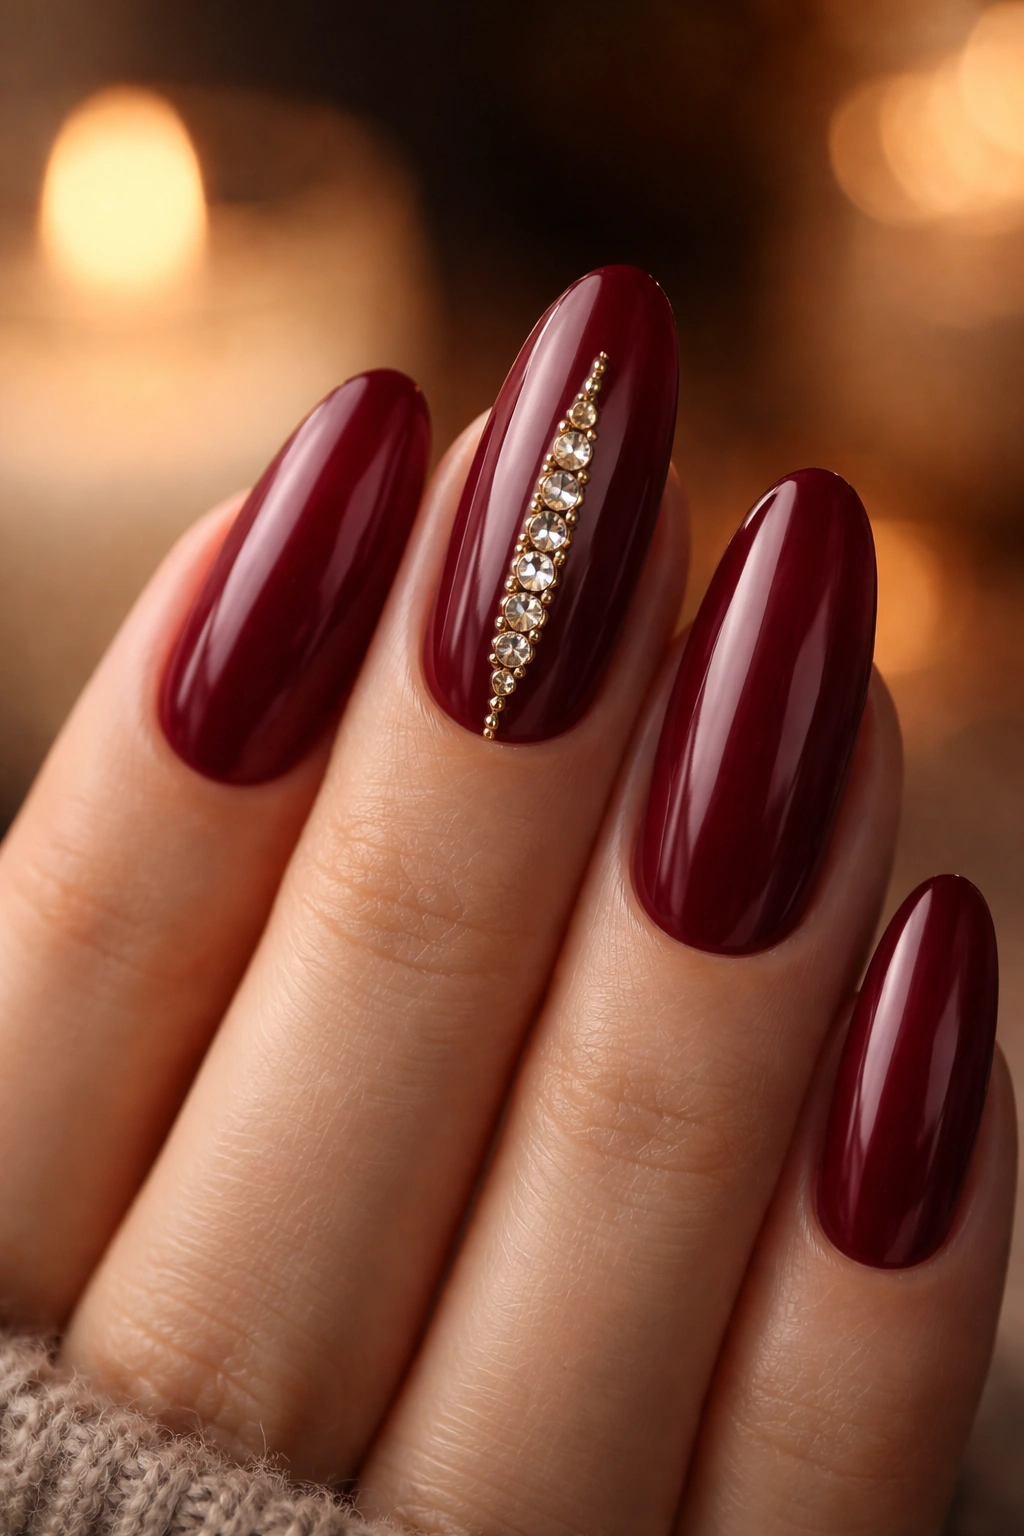
Burgundy has weight to it. It looks richer than bright red, moodier than plum, and on a long oval nail it hugs the shape in a way lighter colors do not. Add gold-backed crystals or amber stones and the whole set leans into that dark-wine, candlelight mood without needing extra art.
I like this design when the goal is warmth. Clear silver stones on burgundy can look a little cold. Gold settings, topaz crystals, or champagne rhinestones soften the contrast and make the color feel deeper. Not louder—deeper.
Placement matters more than color here. A full cuticle crown across every nail gets heavy fast. One vertical line of three stones down the center of the ring finger looks leaner. A pair of tiny gold crystals at the base of the thumb can tie the set together without turning every finger into an accent nail.
This is also one of those shades that benefits from a slightly translucent first coat under the final color. It gives the burgundy more depth than one flat, opaque layer. Nail techs who build color that way usually get a nicer result.
And yes, length matters. On short nails, burgundy with stones can look compressed. On long oval nails, it has room to breathe and room to glow.
6. Icy White Long Oval Nails With Rhinestones on a Full Accent Nail
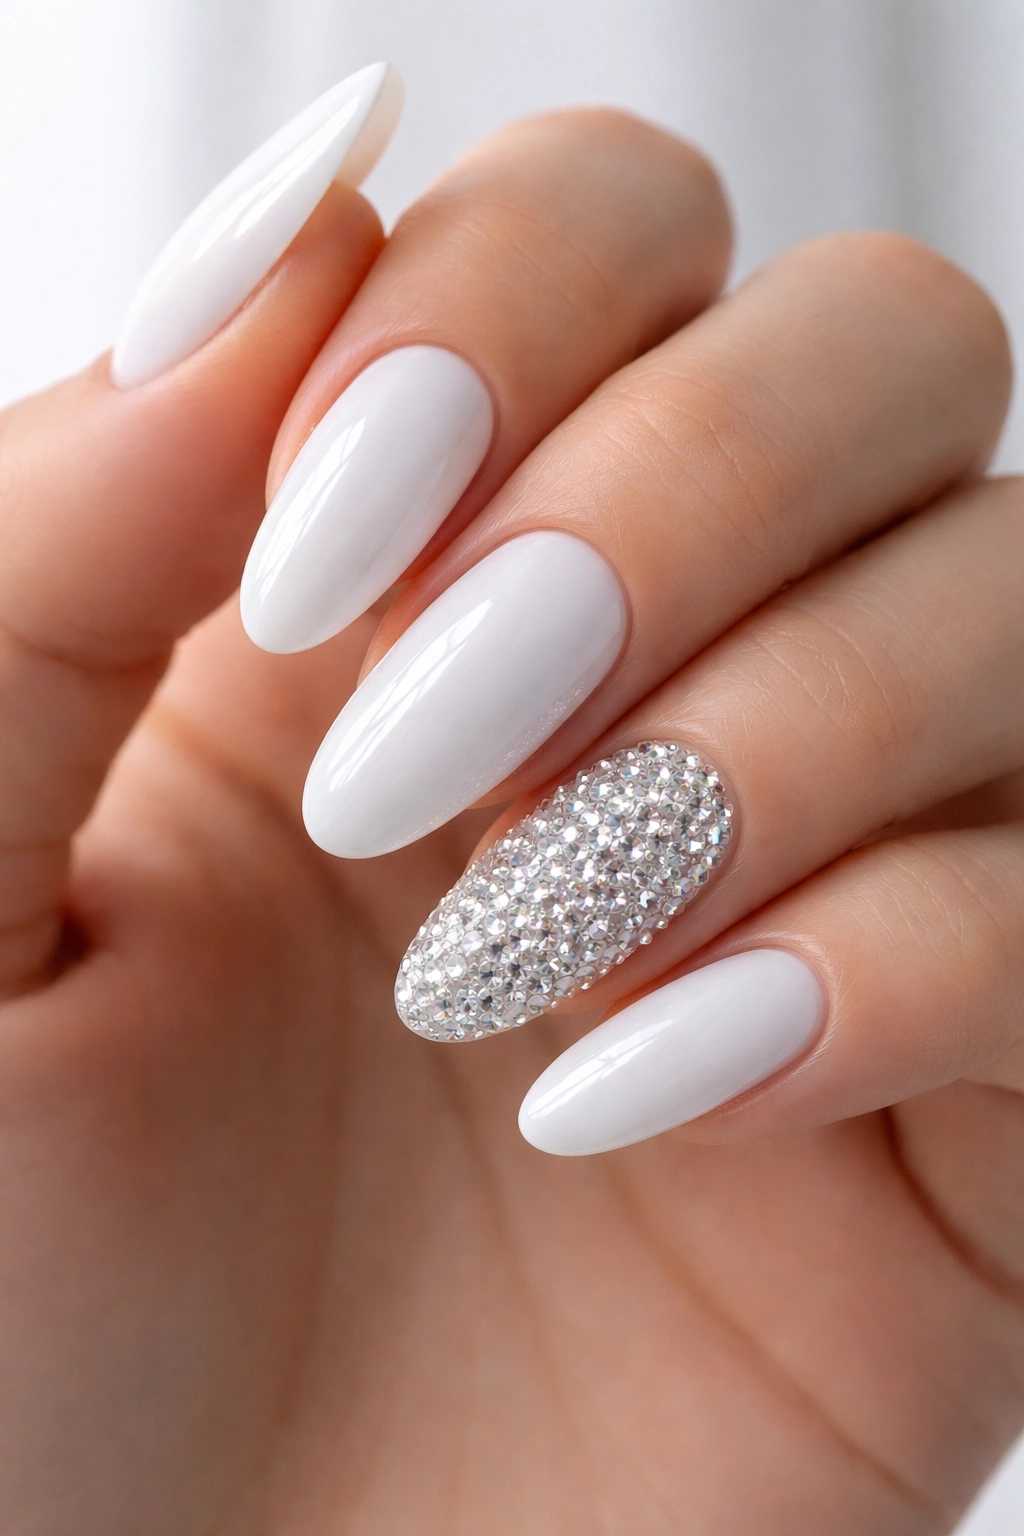
Unlike nude bases, icy white makes every crystal edge show. That’s the whole point. If you want long oval nails with rhinestones that look bright, crisp, and a little frosted, this is the set.
A full accent nail covered in stones can go wrong fast on other shapes. Square nails can look chunky. Coffin nails can start to resemble costume press-ons if the stone sizes aren’t controlled. Oval softens the effect and gives the crystal-covered nail a cleaner outline.
Use the full crystal treatment on one nail per hand, maybe two if the rest stay plain. The other nails should be simple white, white chrome, or a sheer milky wash. You need contrast. A hand full of fully encrusted nails is hard to wear, harder to maintain, and honestly not as striking because nothing stands out.
For the accent, mix 1 mm, 1.5 mm, and 2 mm stones so the surface looks packed without leaving awkward gaps. Bigger than that, and the nail starts snagging on hair, knit sleeves, towels—everything, really.
Who suits this set? Anyone who likes a sharper, brighter manicure and doesn’t mind a little upkeep. Who should skip it? If you type all day on a laptop and hate texture, choose a cuticle cluster instead. Full accent crystals are fun, though they are not subtle.
7. Champagne Chrome Long Oval Nails With a Side-Swept Stone Line
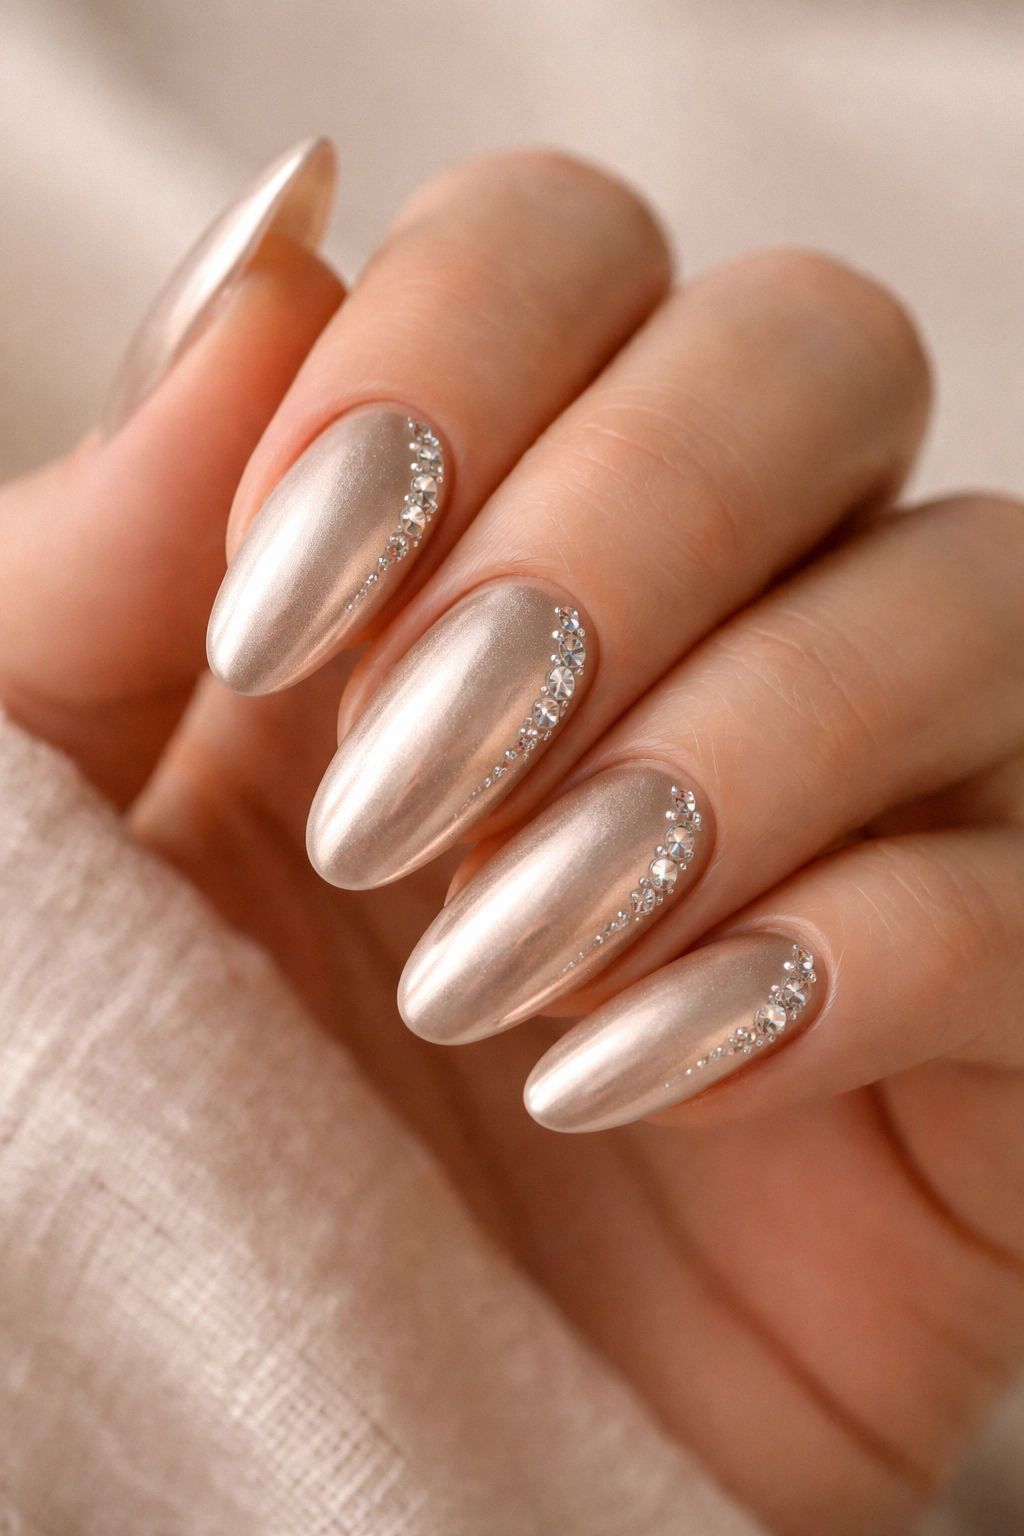
Metallic, but not harsh. That’s why champagne chrome keeps getting my vote over mirror silver for rhinestone work on oval nails. It reflects light, warms the skin, and lets clear crystals blend in rather than sit on top like separate pieces.
The side-swept placement is the key. Start the line near one side of the cuticle, then float it diagonally toward the middle third of the nail. Don’t drag it all the way to the tip. Stopping early keeps the design feeling light.
Why this layout works
A diagonal sweep flatters the oval shape because it follows the natural curve without splitting the nail in half. Straight center lines can look formal. Side placement feels easier on the eye and gives the chrome room to show.
Stone map
- One 2 mm crystal at the base
- Two 1.5 mm stones climbing upward
- Two or three 1 mm stones tapering out
- Optional tiny metallic studs mixed in for texture
Wear note
Chrome shows scratches sooner than a plain cream gel, so this set looks best when the top surface is kept smooth and the stones stay off high-contact zones near the tip. Ask your tech to keep the line in the lower half of the nail. It lasts better there.
Small detail, big difference: champagne chrome looks richer on a warm beige or pink base coat than on a stark white one.
8. Sheer Pink Long Oval Nails With a 3D Bow and Rhinestone Centers
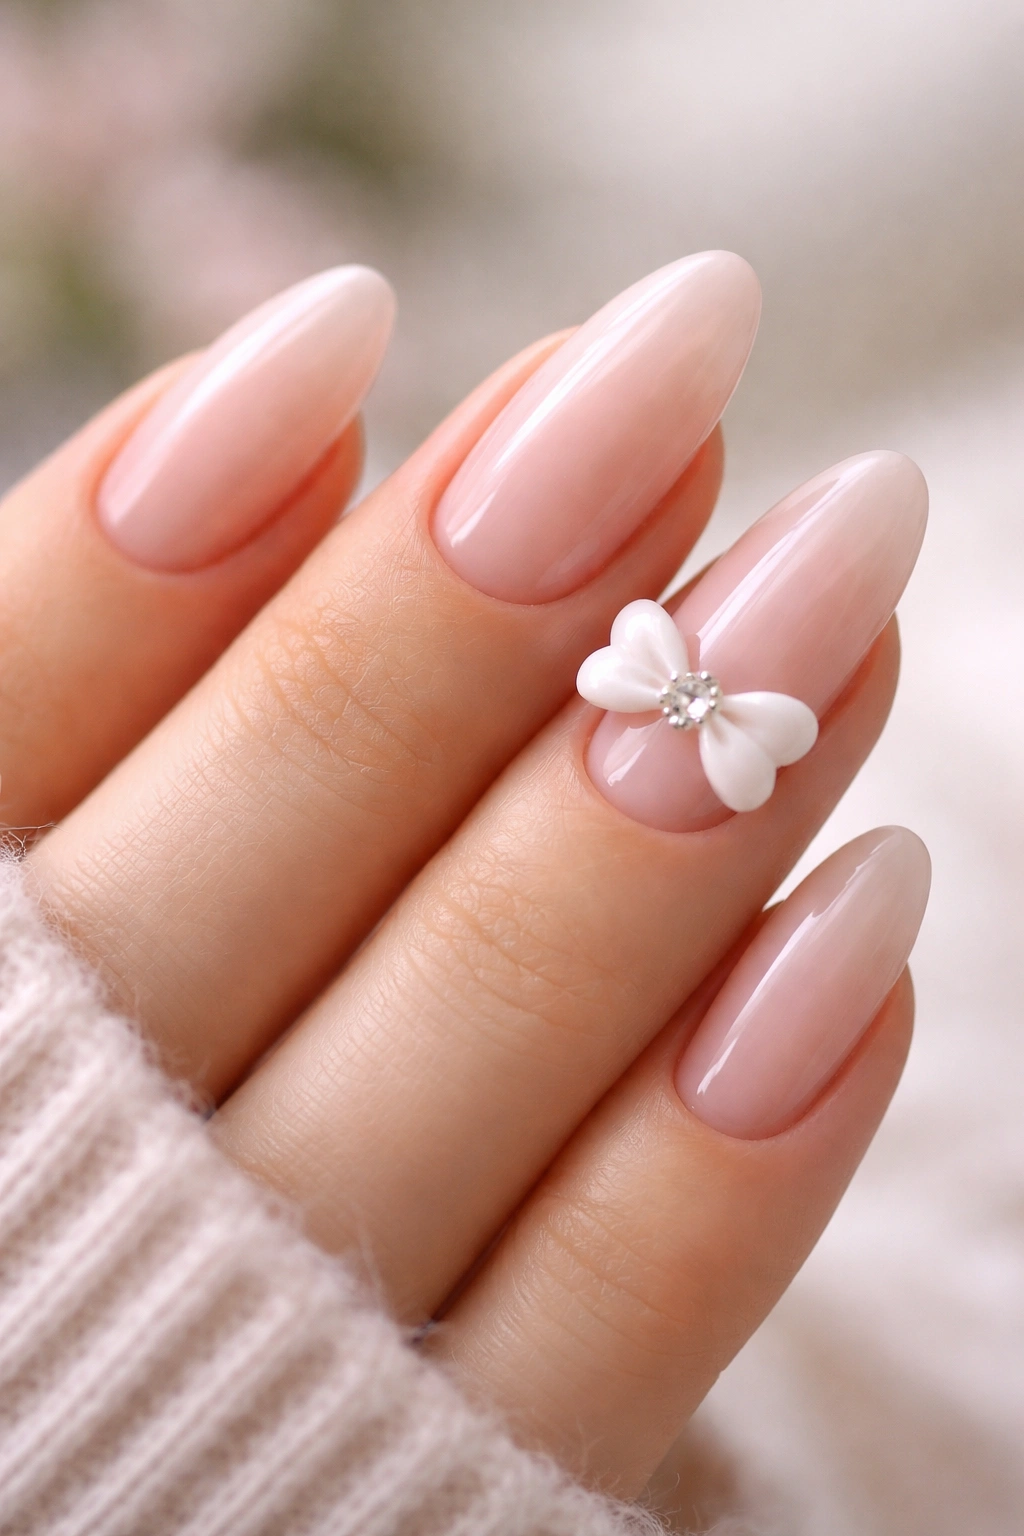
A lot of bow nail sets go sugary in a hurry. Too much pink, too many charms, too many stones, and you end up wearing something that looks better in a photo than in real life. The fix is scale.
On a long oval nail, one small 3D bow placed high on the nail—usually on the ring finger—can look polished if the rest of the set stays quiet. Use a sheer pink base, keep the bow narrow, and place one tiny crystal in the bow center rather than outlining the whole thing in stones. That single point of shine is enough.
I would not put a raised bow on more than two nails. Daily life exists. You still need to pull on jeans, wash your hair, open a bag, and text without tapping a tiny sculpture against the screen all day.
The rest of the manicure can carry the theme with micro crystal dots near the cuticle or a fine line of iridescent glitter under the gel. Keep the color sheer. Opaque bubblegum pink tends to make bows look juvenile. A translucent pink-beige reads cleaner.
This design is fun. There, I said it.
It also asks for discipline, which is not always what bow sets get. If your tech can sculpt small, low-profile bows instead of puffy ones, the set lands much better.
9. Emerald Jelly Long Oval Nails With Minimal Cuticle Gems

Can a dark green jelly base and a few rhinestones feel light on the hand? Yes—if the crystals stay small and the green has transparency. That see-through depth is what saves this design from looking dense.
Emerald jelly on a long oval nail has that glass-candy effect when the light comes through the free edge. Add a tiny two- or three-stone cluster at the cuticle and the gems read like jewelry sitting on colored glass. It is a smart combination because the base does the dramatic part while the stones stay controlled.
How to keep it from going heavy
Stick with clear crystals or pale green stones in 1 mm to 1.5 mm sizes. One cluster on the middle finger, one on the ring finger, maybe a single micro gem on the thumb. That’s enough.
You can deepen the look with a dark green jelly layer over a black or sheer nude undercoat. The choice changes the mood:
- Over black, the green looks moodier and denser.
- Over nude, it looks brighter and more glassy.
I’d choose this when you want color without floral art, marble veining, chrome powder, or extra texture. It does not need help. The jelly finish is already doing a lot, which is exactly why the rhinestones should do less.
10. Lavender Cat-Eye Long Oval Nails With a Starburst Crystal Placement
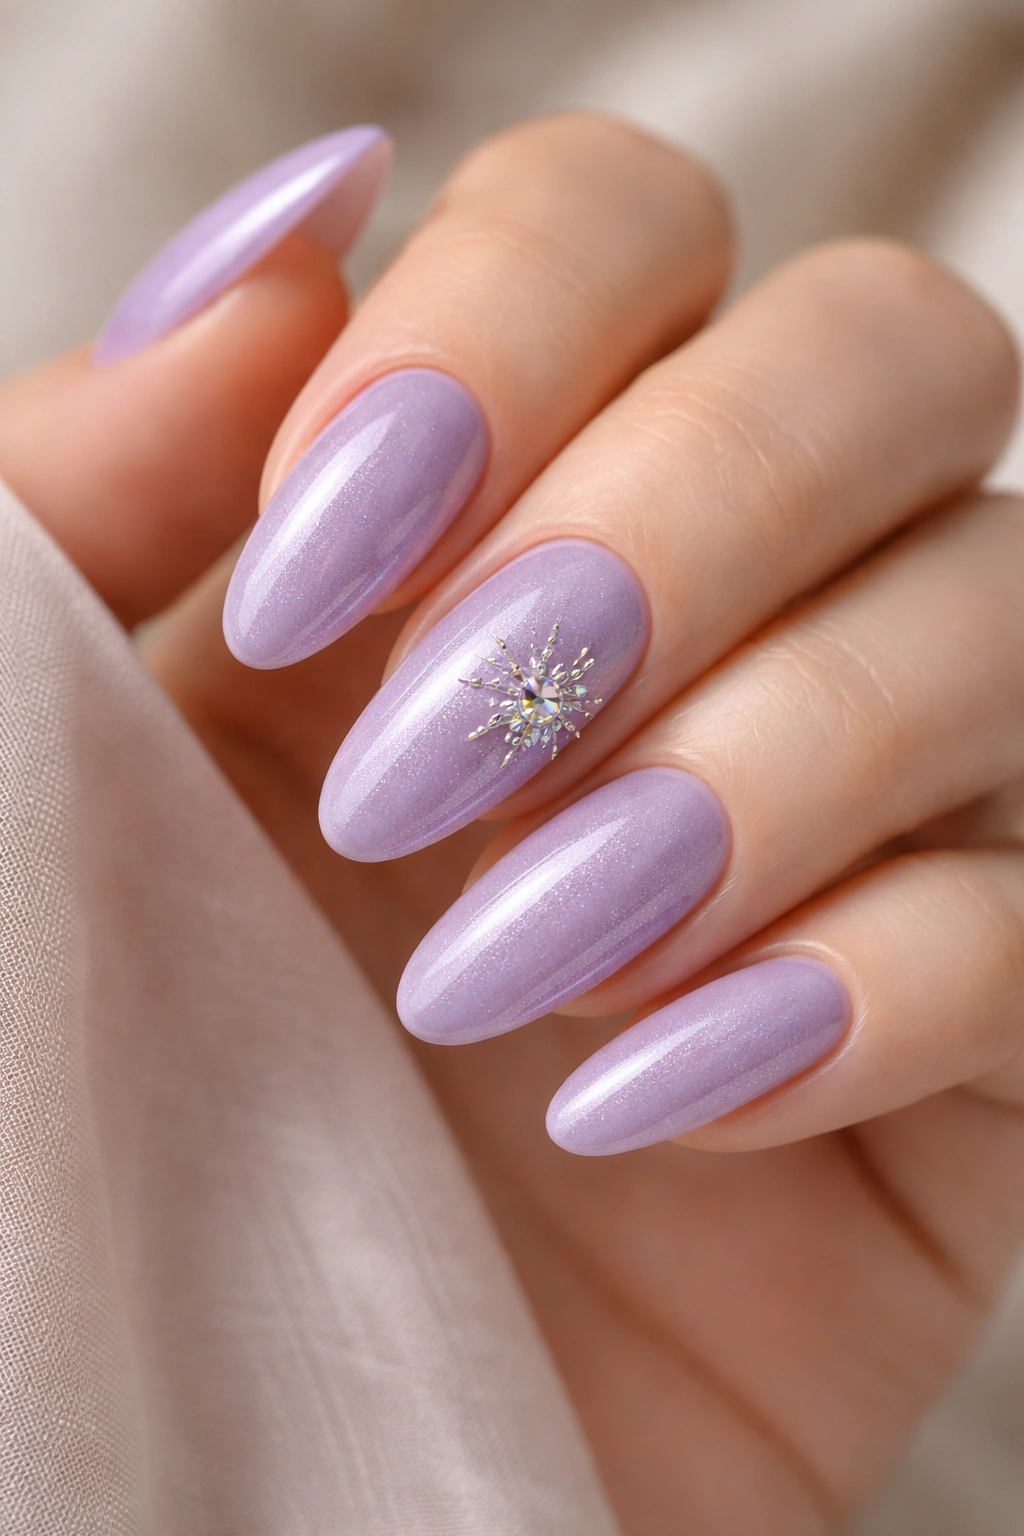
I have a soft spot for cat-eye gel on oval nails because the magnetic line already gives you movement before you add a single stone. Lavender makes it even better. The shade stays gentle, while the shifting stripe gives depth that plain pastel polish cannot match.
For this design, place the rhinestones like a loose starburst near one side of the nail. One center stone, then three or four tiny crystals shooting outward in short lines. Keep it off-center. Dead-center starbursts can look stiff.
A cat-eye base works because the magnetic shimmer creates a visual “glow” behind the crystals. On a flat cream lavender, the stones carry all the drama. On cat-eye gel, the background participates. The effect is richer and more dimensional, though the word I keep coming back to is alive. The nail changes as your hand turns.
What makes the set click
- Use a cool lavender magnetic gel, not a gray-purple that can flatten the skin.
- Magnetize each nail in the same direction so the hand looks cohesive.
- Keep the starburst on one or two nails and leave the rest with plain cat-eye shine.
- Choose clear or pale lilac stones rather than rainbow AB if you want the magnetic stripe to stay visible.
There is one catch worth knowing: cat-eye polish already reflects light hard, so oversized stones can compete with it. Smaller crystals win here.
11. Mocha Marble Long Oval Nails With Rhinestones Tucked Into the Veins
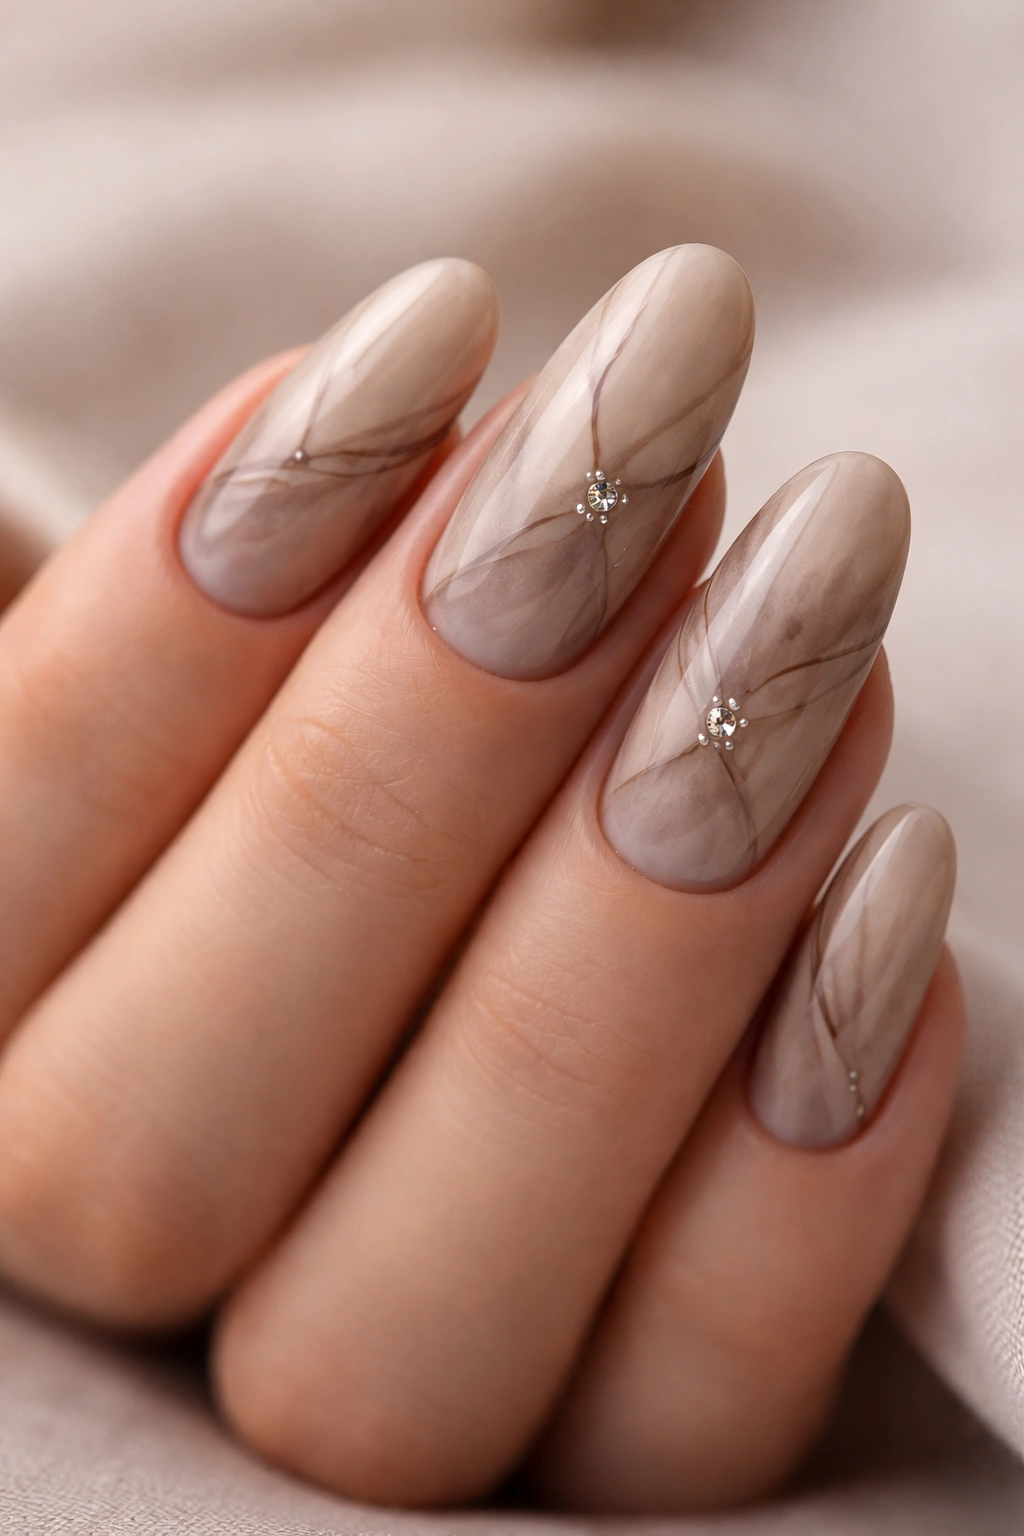
Marble nail art can get muddy. That’s the first thing I’d say about it. Too many swirls, too much white, no clear base color, and the design turns into a blur from arm’s length. Mocha tones fix part of that because brown, cream, and soft caramel naturally separate from each other.
On long oval nails, marble also benefits from the elongated canvas. The veining has space to stretch. You don’t need thick zigzags. Thin dragged lines with a liner brush look more like stone and less like latte foam.
The rhinestones belong inside the veining, not dropped on top wherever there’s room. Tiny crystals set where two marble lines intersect look smarter and more integrated. I like one micro crystal on the ring finger vein, another on the thumb, then maybe a small cluster near the cuticle of one plain mocha nail so the set doesn’t feel too literal.
This is a quieter rhinestone set than red, black, or chrome. It suits neutral wardrobes, gold jewelry, and hands that already move a lot when talking—yes, I notice these things. You get detail without flash every second.
Use a creamy taupe base rather than a flat dark brown. The contrast between the base and the marble lines needs air in it, or the rhinestones disappear.
12. Red Glass Long Oval Nails With Heart-Shaped Rhinestone Clusters
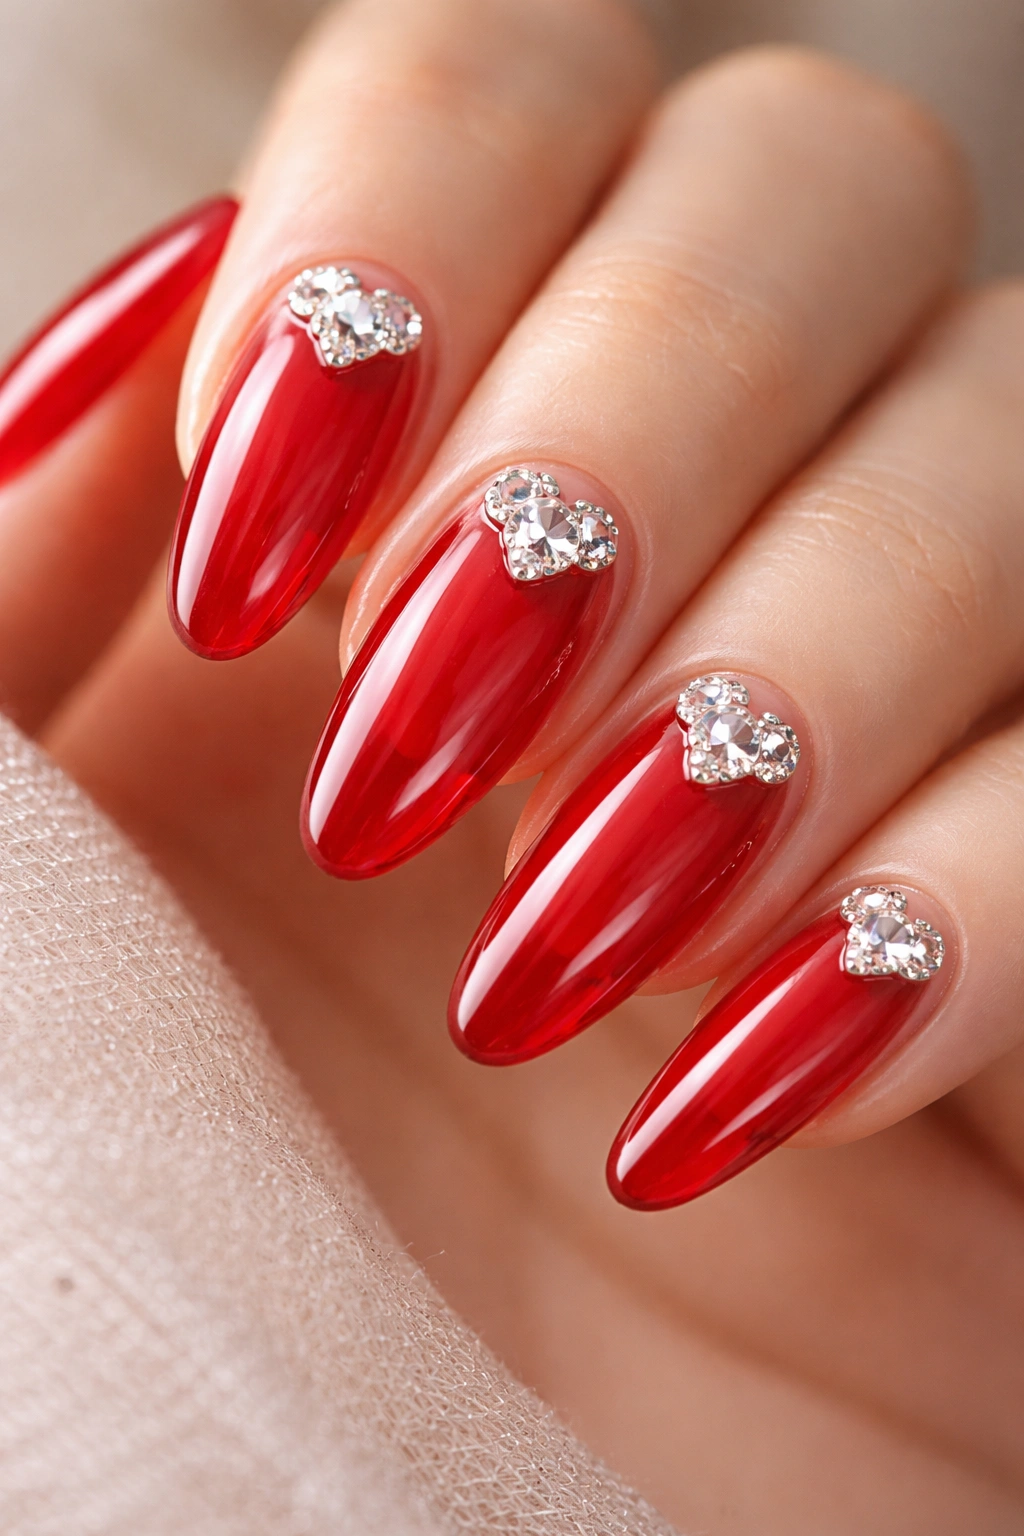
Short version? This one turns heads.
Red glass nails—those translucent cherry or candy-apple reds—already have depth built in, so the trick is choosing rhinestones that feel sharp rather than sugary. A small heart-shaped cluster near the cuticle does that better than a giant gem heart stuck in the middle of the nail.
Build the heart with five or six stones: two at the top curves, one tiny stone in the center dip, then two tapering down to a point. Keep it small. On a long oval, the negative space around the cluster is what makes the shape readable.
A plain cream red won’t give you the same effect. The jelly finish matters because light moves through it, which makes the stones look almost suspended over glass. That depth is what separates this design from standard Valentine-style nails that can look flat.
Who is this for? If you like a manicure that feels a little flirty and a little dramatic, it works. If you hate obvious motifs, skip the heart cluster and use a diagonal stone line instead. Same red base, same long oval shape, cleaner finish.
I’d keep the rest of the nails simple: glossy red, maybe one tiny cuticle crystal on the pinky, done. Anything more and the set stops being chic and starts shouting.
Making Rhinestones Stay Put on Long Oval Nails
If your stones always pop off, the design isn’t the problem. The application is.
Long oval nails move more than short ones, especially if the nail is natural under gel or the extension has a thin free edge. Add rhinestones on top of that movement and weak placement shows up fast. A proper crystal set needs structure under it.
What actually helps with retention
- Ask for a builder gel, hard gel, or structured rubber base under long sets.
- Use flat-back glass crystals rather than lightweight plastic stones.
- Set stones into gem gel or thick crystal adhesive, then cure fully under an LED lamp.
- Seal the base of the crystal, not the top surface. Top coat over the facets kills the shine.
- Keep larger stones away from the sidewalls and tip, where contact happens most.
Apex placement matters too. On a long oval nail, the apex should sit slightly behind the stress point so the nail can absorb pressure. If it’s too flat, the nail flexes. If the nail flexes, the stones lift.
Home care matters more than people want to admit. Wear gloves for dishwashing. Use cuticle oil daily, though keep oil away from fresh stone adhesive for the first day. Don’t use your nails to pry open soda cans or scrape labels. I know. You know. People still do it.
Three weeks of clean wear is realistic with good prep and sane stone placement. A full month with big gems on every nail? I would not bet on that.
Final Thoughts
The long oval shape does something special for crystal nail art: it softens the flash. You still get sparkle, though the manicure keeps a cleaner line than square or coffin sets usually do. That’s why the best designs here aren’t the busiest ones. They’re the sets where the stones have a clear job.
If I had to narrow it down, I’d start with milky nude cuticle crescents, French tips with a slim crystal trail, or black gloss constellation nails. Those three cover a lot of ground and wear well without asking you to baby your hands every hour.
And if you want one rule worth keeping, use this one: leave space. Rhinestones hit harder when they aren’t fighting ten other details for attention.
