

Light blue ombre coffin nails can look airy and polished—or chalky and flat—and the difference usually comes down to the blend. When the fade moves in soft, translucent layers instead of one hard stripe from nude to blue, the whole manicure looks smoother, longer, and far more intentional.
I see the same problem over and over with pale blue sets: the color is right, the shape is right, but the transition is clunky. A good coffin nail ombre needs a clean taper through the sidewalls, a balanced apex, and color built in thin passes. Dump too much pigment on the sponge, or skip the milky buffer shade in the middle, and the effect goes from frosted to blocky in a hurry.
Coffin nails help more than people think. Their straight edges give the eye a path to follow, which makes a fade look longer and calmer than it often does on a short square nail. And if you wear gel or acrylic often, treat removal with respect; dermatologists at the American Academy of Dermatology have long warned that peeling off gel can take layers of the nail plate with it, which is one fast way to ruin the clean surface an ombre set needs.
Some blue ombre sets look best left nearly bare. Others need chrome, marble, glitter, or one small piece of 3D art to stop them from fading into the background. The designs below are the ones I keep coming back to when I want a soft blue manicure that still has shape, polish, and a fade that looks smooth from every angle.
1. Milky Light Blue Ombre Coffin Nails with a Sheer Nude Base
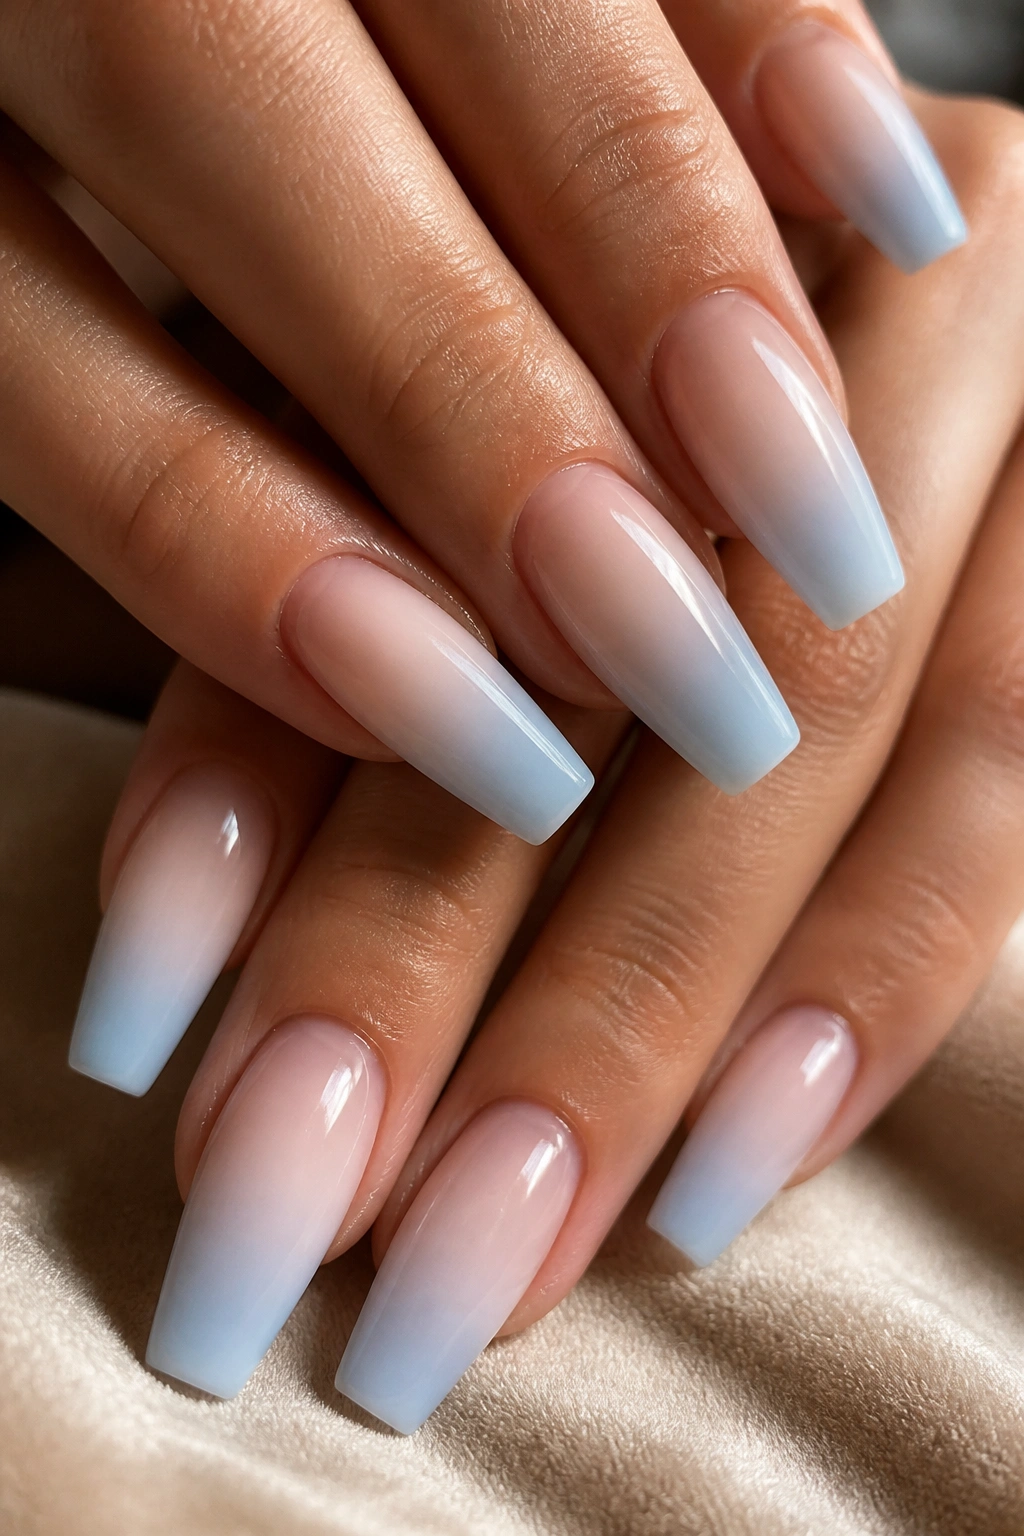
Milkiness is the trick here.
When a nail tech starts with a sheer pink-beige or soft cover nude and floats a cloudy white between that base and the blue, the fade stops looking painted on and starts looking suspended inside the nail. That middle haze matters more than the blue itself. Skip it, and pale blue can look cheap fast.
Why this blend lands so well
The nude base gives your hand a longer line, which is helpful on coffin nails because the shape already narrows toward the tip. Then the milky veil softens the jump into baby blue. On medium or long extensions, that soft middle section usually takes up about one-third of the nail, and that spacing is what keeps the design airy instead of heavy.
This style also grows out better than dense full-color blue. A refill line near the cuticle is less obvious when the base shade already lives in that soft nude family.
Ask your tech for these details
- A cover nude or builder gel base that matches your nail bed, not one that turns orange against your skin.
- A milky white blending layer in the center so the blue melts instead of stopping.
- A pale sky or baby blue pigment concentrated on the last third of the nail.
- A high-gloss top coat if you want that clean glassy finish that makes the fade look deeper.
My take: if you want one light blue ombre coffin set that almost never misses, start here. It suits shortish coffin nails, long acrylics, soft glam looks, workwear, weekend outfits—pretty much the whole spread.
2. Baby Sky Blue Fade on Glossy XL Coffin Tips
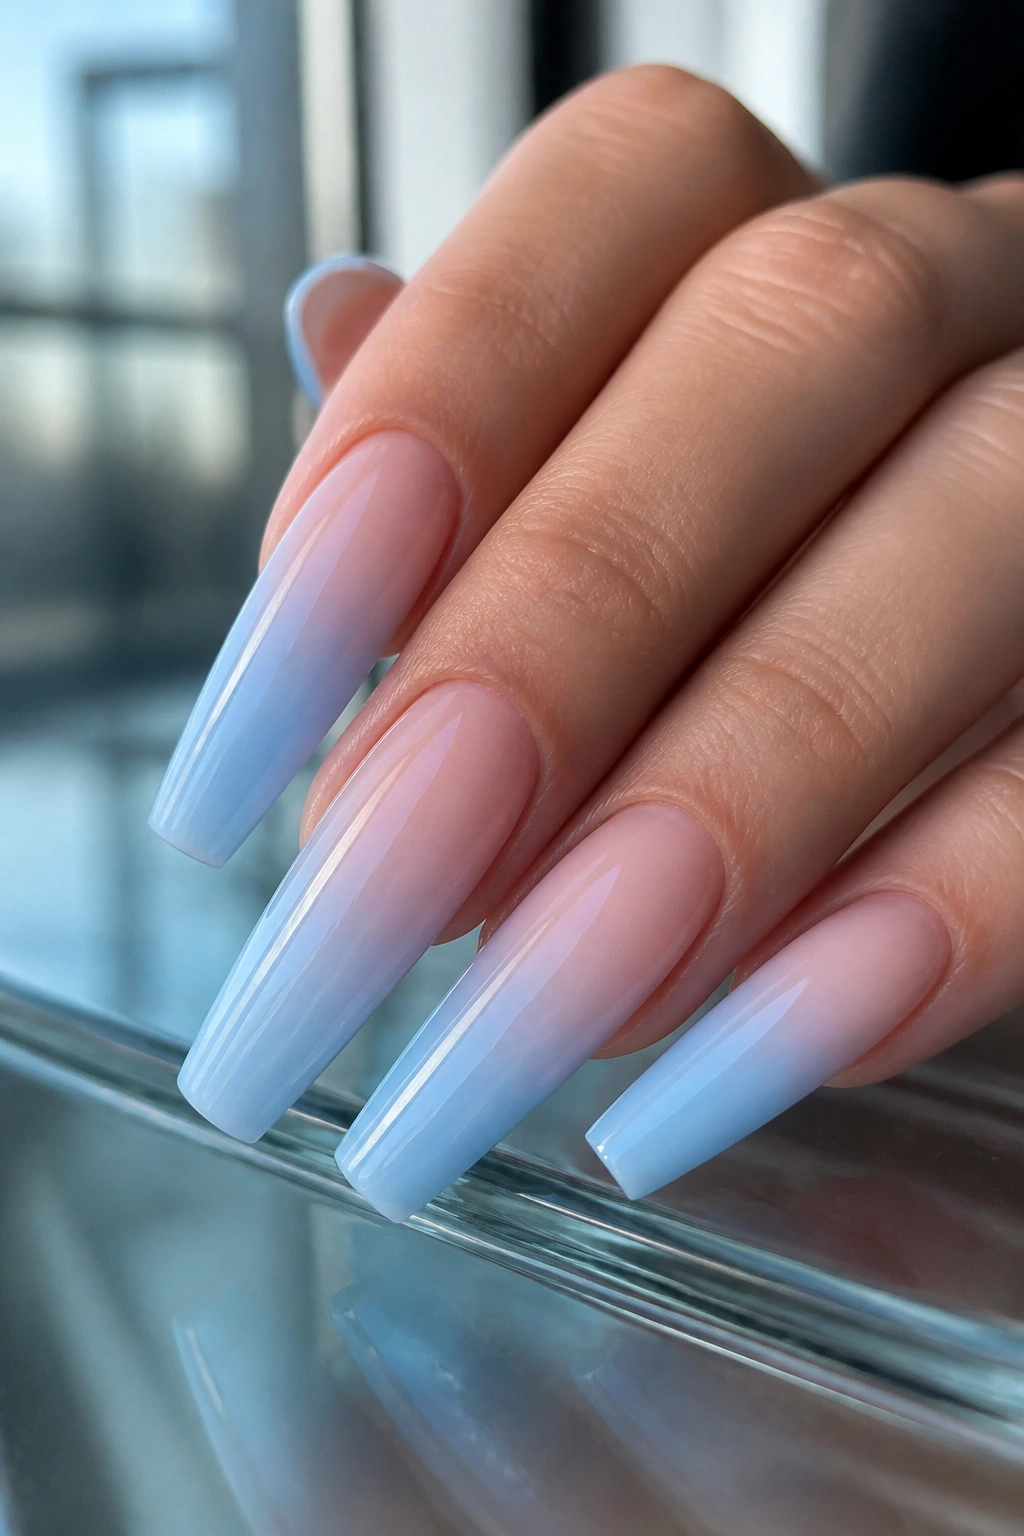
Long coffin tips give pale blue room to breathe. On an XL set, the ombre has distance to travel, which means the fade can stay soft for 8 to 12 millimeters before it reaches the strongest blue at the edge. Short nails do not offer that luxury. The same color mix on a short tip often turns into a blur rather than a fade.
There is also something about a glossy top coat over pale blue on a long coffin shape that makes the nails look colder and cleaner. Think ice, not candy. That difference matters. A light blue manicure can skew playful if the shape is too blunt or the blue is too dense, but a long coffin with a sharp taper pulls it back into grown-up territory.
One caution, though. XL coffin nails ask more from your hands. If you type all day, open cans with your fingertips, or dig around in a tote bag, you will feel the length. I usually tell people to keep the strongest blue on the final third of the extension and avoid covering the whole free edge with opaque polish. That keeps the set lighter to look at and easier to grow into.
Bring a photo if you want, but the better salon language is this: “Long coffin, soft nude base, baby blue ombre at the tips, high shine, no hard line.” Nail techs respond better to construction notes than to vague style words.
3. Soft White-to-Blue French Light Blue Ombre Coffin Nails
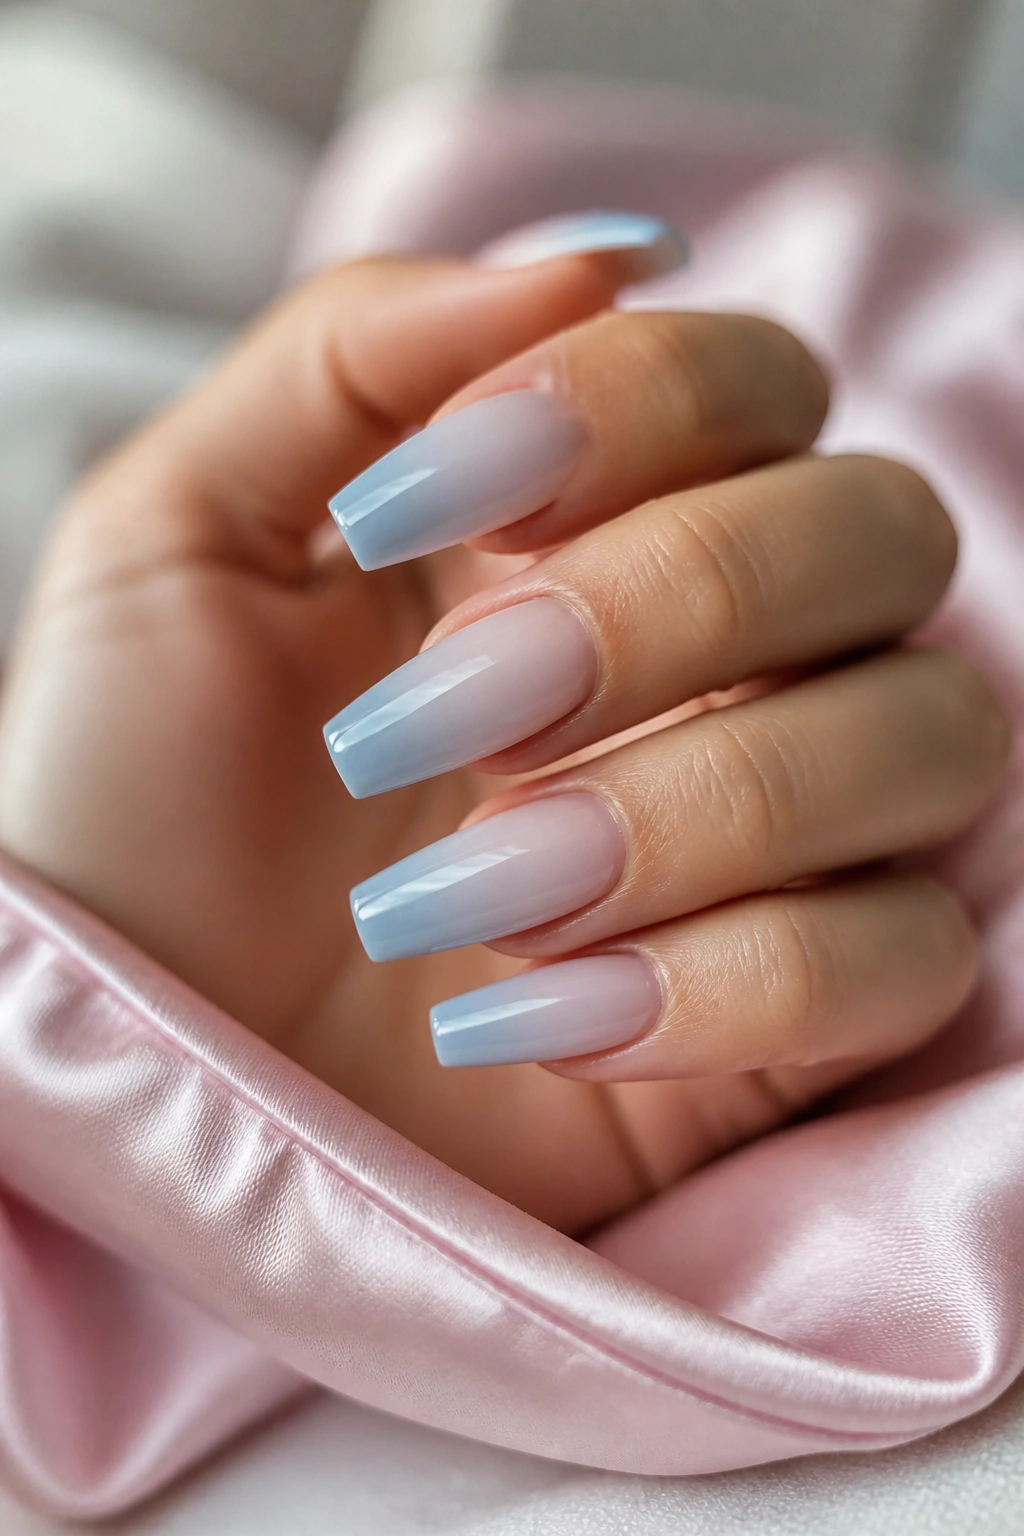
What if you like a French manicure but hate a hard smile line?
That is where a French ombre earns its place. Instead of a crisp white tip, you get a milky base that drifts into pale blue at the free edge. It keeps the clean feel of a French set, though the result is softer and a little colder, which suits coffin nails more than a stark white band sometimes does.
The key is restraint. You do not want a thick stripe of blue slapped over a white ombre base. You want the white and blue to mingle near the tip so there is no sharp border for the eye to catch on.
What to ask for at the salon
Ask for a baby boomer style fade—that is the salon phrase many techs use for a French ombre—with milky white through the midsection and light blue focused on the tip. If your nail bed runs pink, a cover pink base keeps the whole set from turning grey. If your skin has more golden warmth, a soft beige-pink builder gel can balance the cool blue.
This design is one of my favorite choices for people who want coffin nails that still feel polished enough for an event, a meeting, or a stretch of weeks where you do not want to think hard about matching your manicure to your clothes. It stays clean. It grows out well. And it does not need crystals or chrome to look finished.
4. Cloudy Airbrush Light Blue Ombre with Hand-Painted Wisps
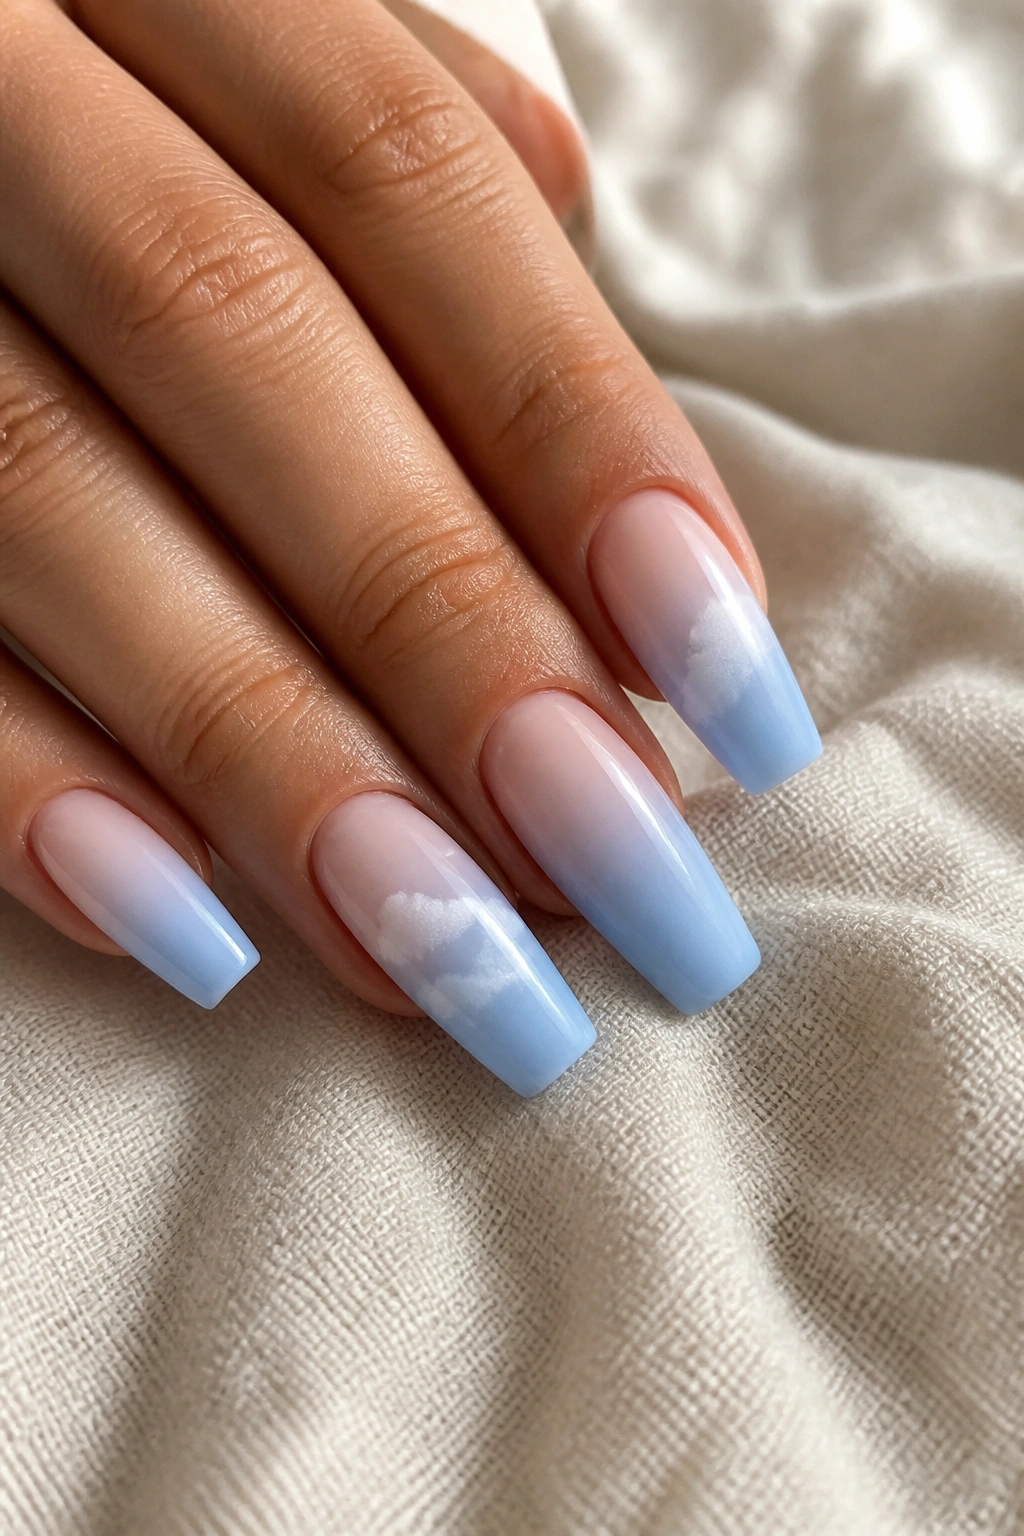
Picture a pale blue fade with one or two whisper-thin white clouds floating across the center. Not cartoon clouds. Soft, blurred wisps with edges that disappear into the ombre.
This is where airbrush application beats a sponge. A sponge can make a pretty gradient, no question, but an airbrush lays down finer mist and softer overlap, which gives pale blue a cleaner transition. That matters when you add any extra art on top, because hand-painted detail looks clumsy faster over a grainy blend.
Cloud nails go wrong when the artist gets heavy-handed. Too much white. Too many clouds. Too many stars. Then the manicure starts leaning costume.
What keeps this version looking sharp:
- Use cloud art on one or two nails, not all ten.
- Keep the cloud white diluted, so it sits like vapor instead of correction fluid.
- Skip chunky glitter. A few tiny silver dots or one thin line is plenty.
- Choose a glossy finish so the artwork melts into the surface.
I like this set most on medium-long coffin nails, where the fade still has space but the art does not have to stretch across a giant canvas. Done well, it looks cool and airy. Done poorly, it looks like nursery wallpaper. There is not much middle ground.
5. Silver Glitter Light Blue Ombre Coffin Nails
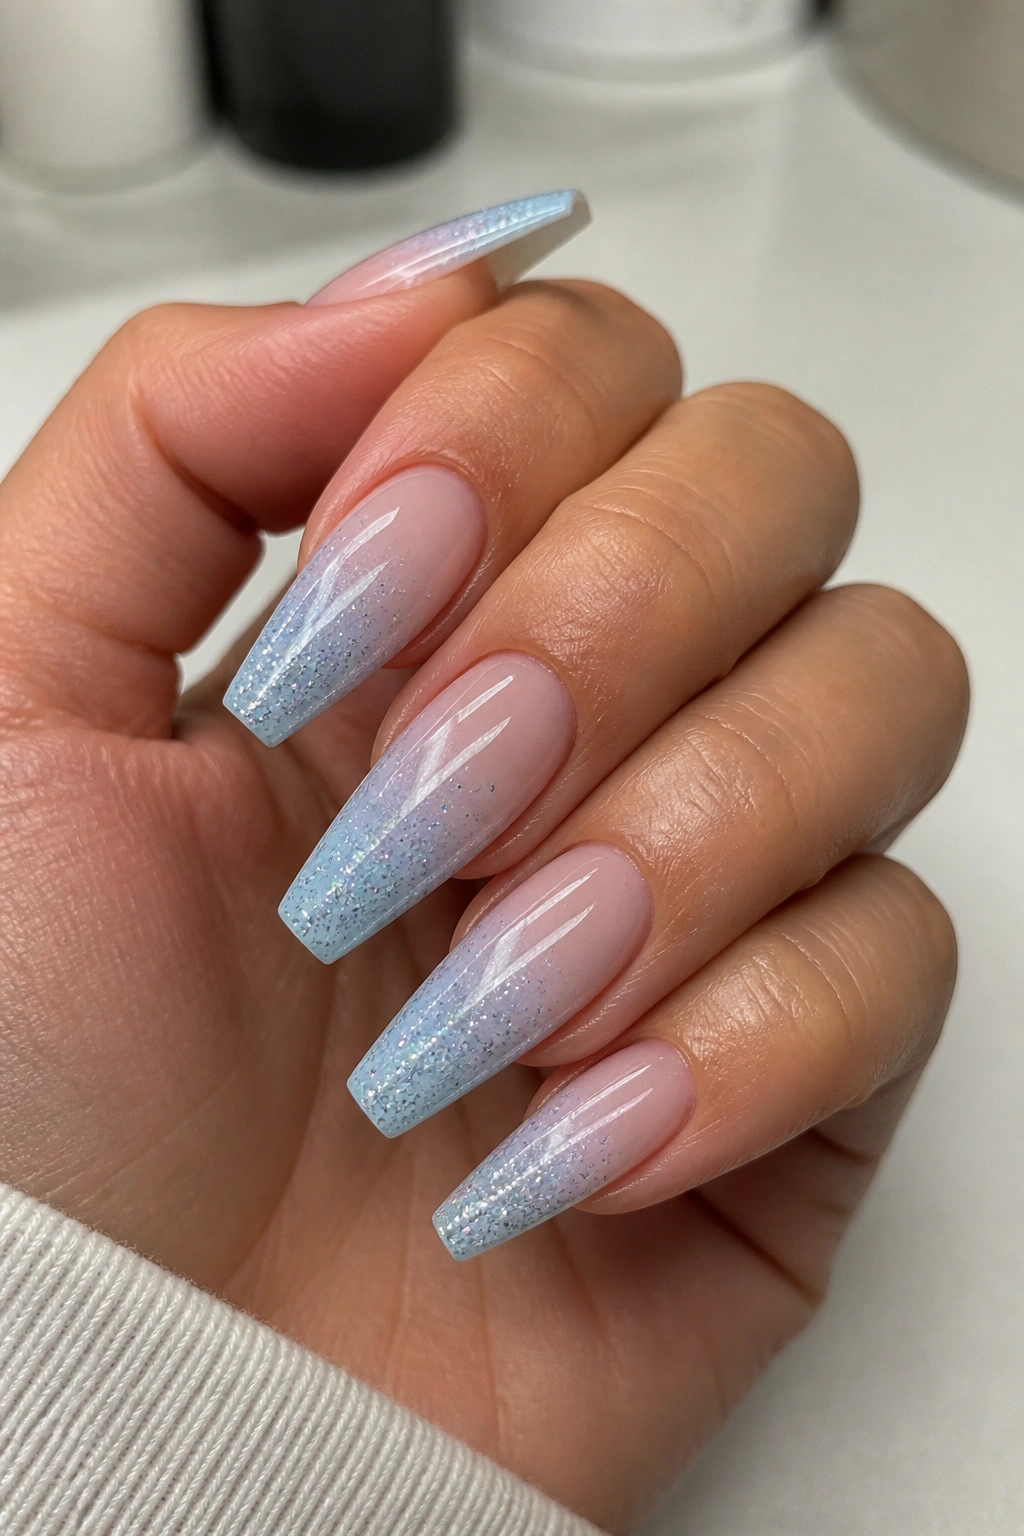
Glitter can save a pale ombre set—or ruin it.
The save happens when the sparkle is fine, cool-toned, and placed with control. I am talking about micro-glitter or sugar-fine silver dust pressed into the tip area so it thickens where the blue is strongest, then thins out before it reaches the middle of the nail. That placement keeps the fade readable. If the glitter sits everywhere, your ombre disappears under it.
Chunky hex glitter is where people get into trouble. The pieces break up the smooth color shift, catch unevenly under top coat, and make a soft baby blue manicure feel much louder than it needs to. If you want a cleaner finish, ask for encapsulated glitter under builder gel or clear acrylic. You get shine, but the surface stays smooth and the set lasts longer.
I also like silver glitter more than iridescent flakes on pale blue. Flakes can turn yellow, pink, or green from one angle to the next, which pulls attention away from the fade. Silver keeps the whole palette colder and more focused.
This is a strong option if you want party nails that still hold onto the ombre idea. Keep the glitter to two accent nails if you wear jewelry on your hands most days. If your rings are already doing enough, all-ten sparkle can start to feel crowded.
6. Pearl Chrome Light Blue Ombre Coffin Nails
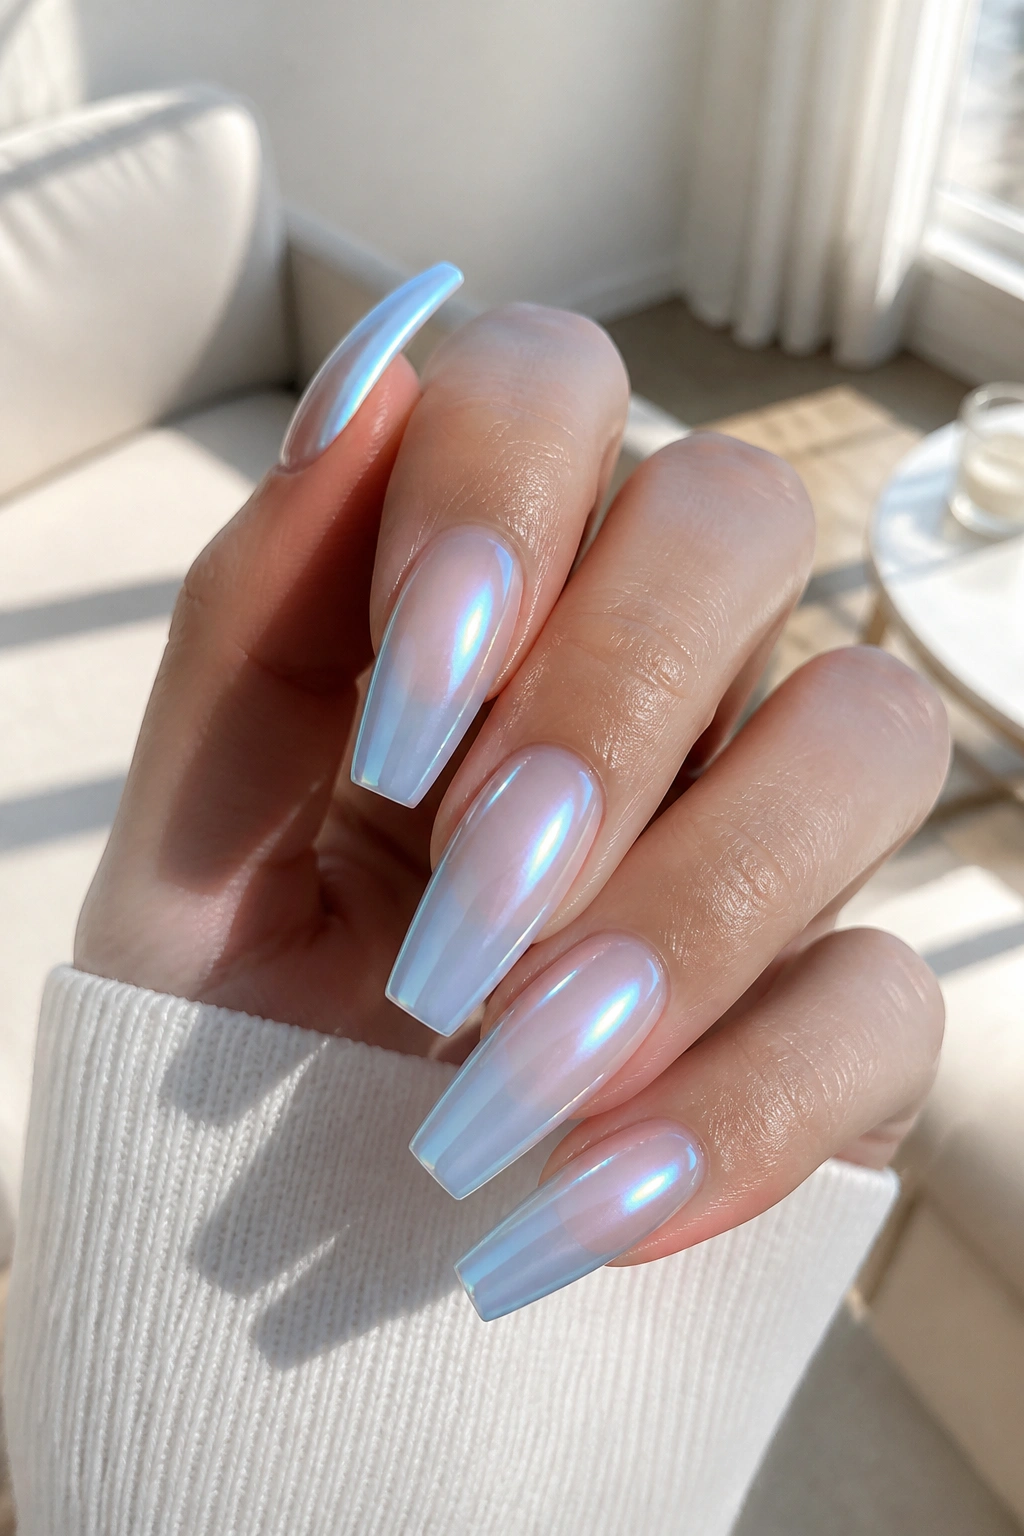
Unlike glitter, pearl chrome changes the surface more than the color. That is why it works so well on light blue ombre coffin nails. You still get the pale fade underneath, though the top layer throws a soft pearl sheen across the whole set and makes the manicure look colder, smoother, and a touch dressier.
The base matters. A pearl or aurora powder needs a pale foundation—milky nude, icy white, soft baby blue—so the chrome stays sheer. Put pearl powder over dense medium-blue polish and the nails can veer metallic. That can be fun, but it is a different manicure.
Who should pick this style
This set suits the person who wants shine but does not want visible texture. There are no glitter bumps, no rhinestone edges, no raised art to snag on knitwear. You still get movement when the hand turns, yet the nails stay sleek.
It is also one of the smartest ways to make a short or medium coffin manicure look more considered. Chrome gives pale shades more presence. On a plain glossy pastel set, the color alone has to do all the work. On a pearl chrome finish, the surface itself helps.
Ask for a white pearl chrome over a no-wipe top coat and keep the blue soft. If your tech suggests a stronger sky blue underlayer, pull it back a notch. Pale chrome ombres look best when the pigment stays a step lighter than you think it should.
7. Matte Powder Blue Ombre on Tapered Coffin Nails
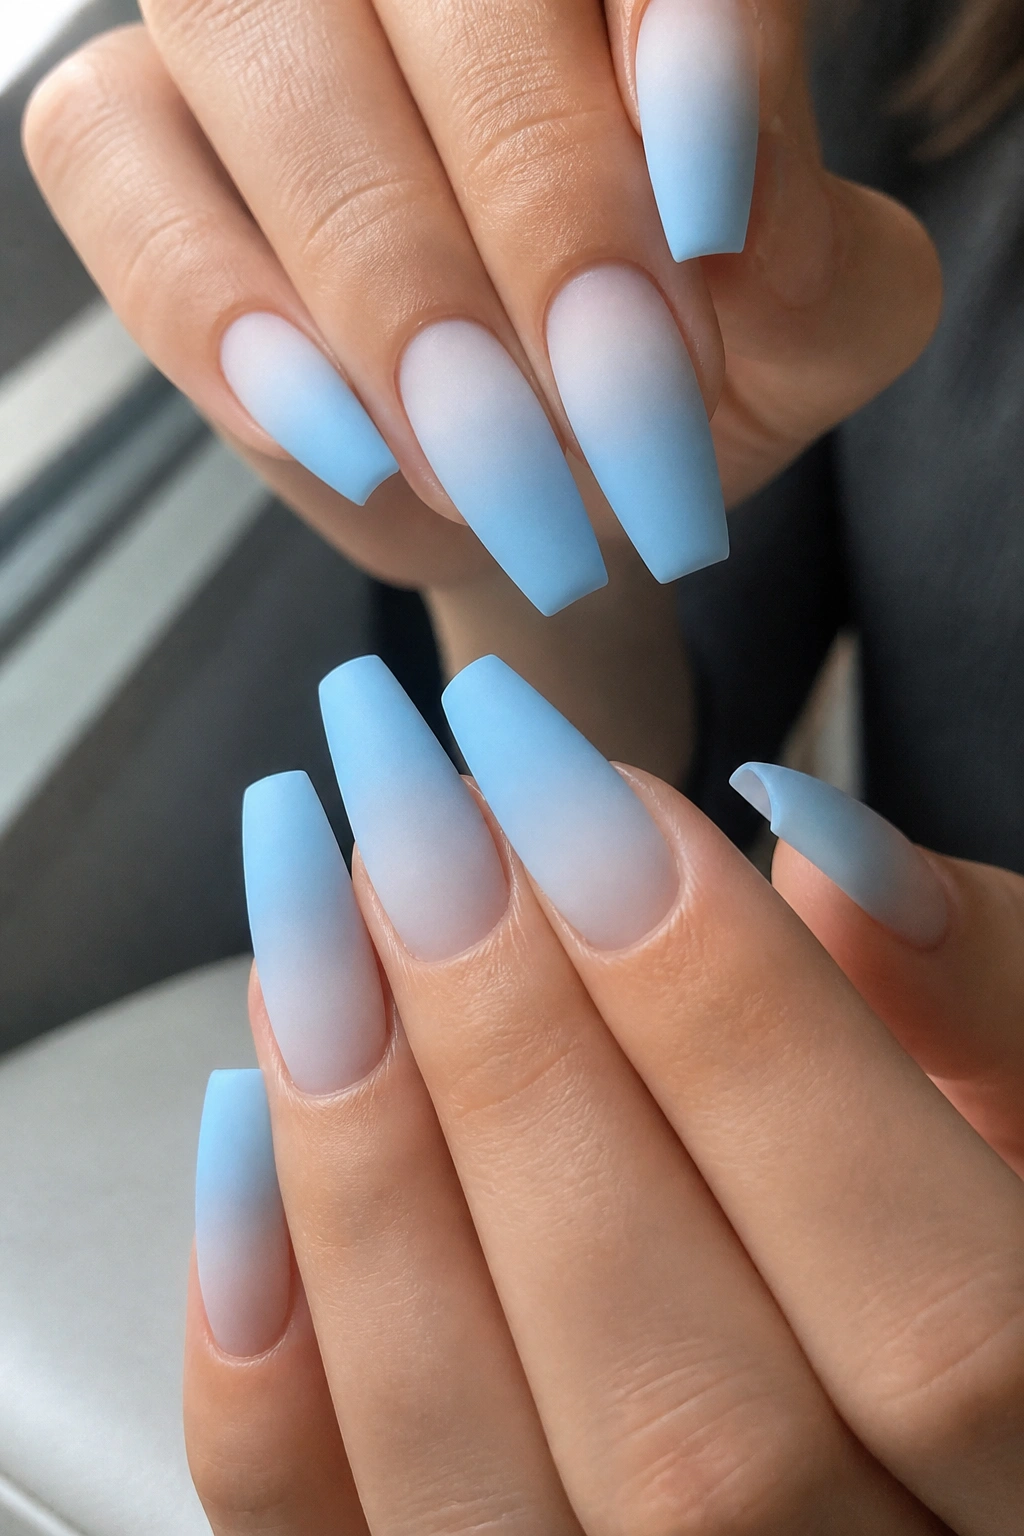
Gloss gets all the attention. Matte is where powder blue proves whether the blend is good or not.
A matte top coat removes the shine that normally hides little flaws, so every patchy area, every rough sponge mark, every uneven fade gets exposed. That sounds harsh. It is. But when the underlying ombre is done well, a matte finish turns light blue into something softer and more editorial than glossy ever could.
This style does best with a slightly deeper powder blue at the tips rather than a watery baby blue. Matte mutes color, and pale shades can vanish if they start out too light. On a medium coffin length, that powdery finish can look almost velvety.
A few details matter more than people expect:
- Ask for a smooth apex and side profile. Matte highlights lumps.
- Choose a velvet-matte top coat instead of a chalky flat one if your salon offers both.
- Use cuticle oil after the set cures. Dry skin makes matte nails look dusty.
- Skip heavy hand cream right before photos, because smears show faster on matte surfaces.
I do not reach for matte on every blue ombre set, though when I want a coffin manicure that looks softer and a bit moodier than the standard glossy version, this is the one. It is less forgiving, yes. That is part of its appeal.
8. Cuticle Crystal Light Blue Ombre Coffin Nails
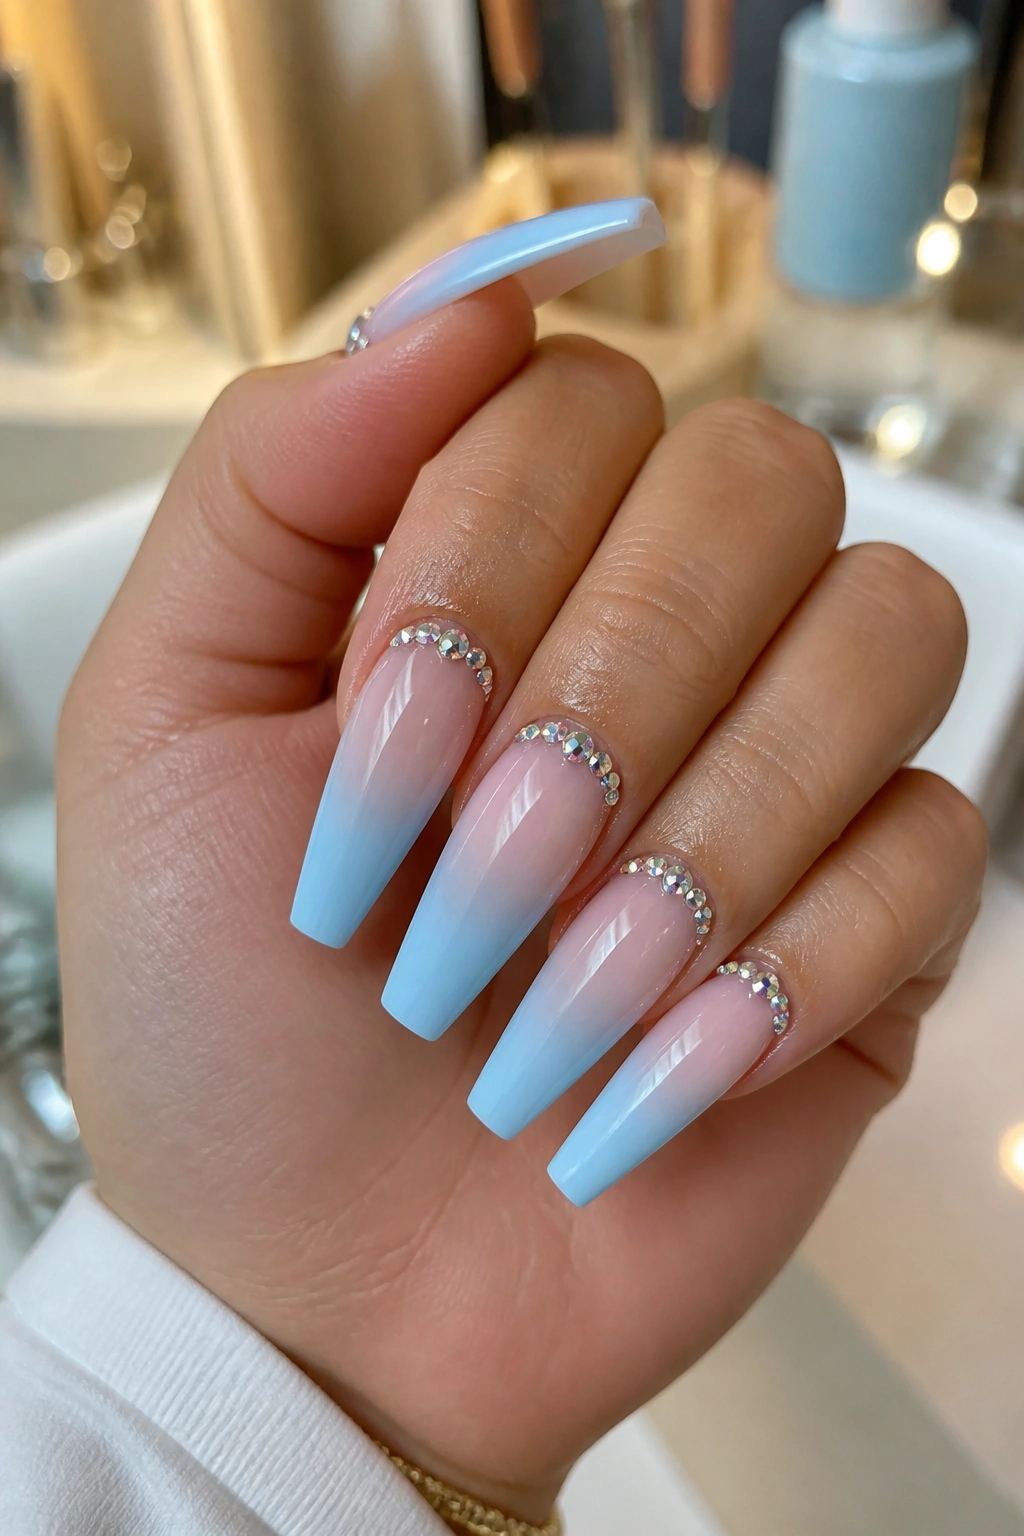
If you want sparkle in one place instead of everywhere, put it at the cuticle and leave the fade alone.
A small crystal crescent or tight cluster near the base of the nail draws the eye upward, which makes coffin nails look longer and keeps the ombre as the main event. This placement also feels cleaner than glitter scattered through the blend. You get a focal point, not visual noise.
Size matters more than people think. Flat-back crystals in the 1.5 mm to 3 mm range usually sit best on a wearable set. Bigger stones can look bulky on pale nails, and they lift sooner if the base is curved too sharply.
Crystal placements that keep the set balanced
You have a few good routes here:
- A single crescent at the cuticle on both ring fingers.
- A three-stone cluster on one accent nail per hand.
- Tiny crystals paired with a thin silver line if you want a cleaner geometric look.
Do not let anyone attach rhinestones with plain top coat and call it done. Use builder gel or gem gel, then cure fully and seal around the base without flooding the facets. If the stones catch your hair on day two, they were not seated right.
I like this design when someone wants light blue ombre coffin nails that still feel dressed for a special dinner, a party, or photographs, though they do not want the upkeep of full bling nails. One accent point is often enough.
9. Blue-to-Lilac Ombre Coffin Nails
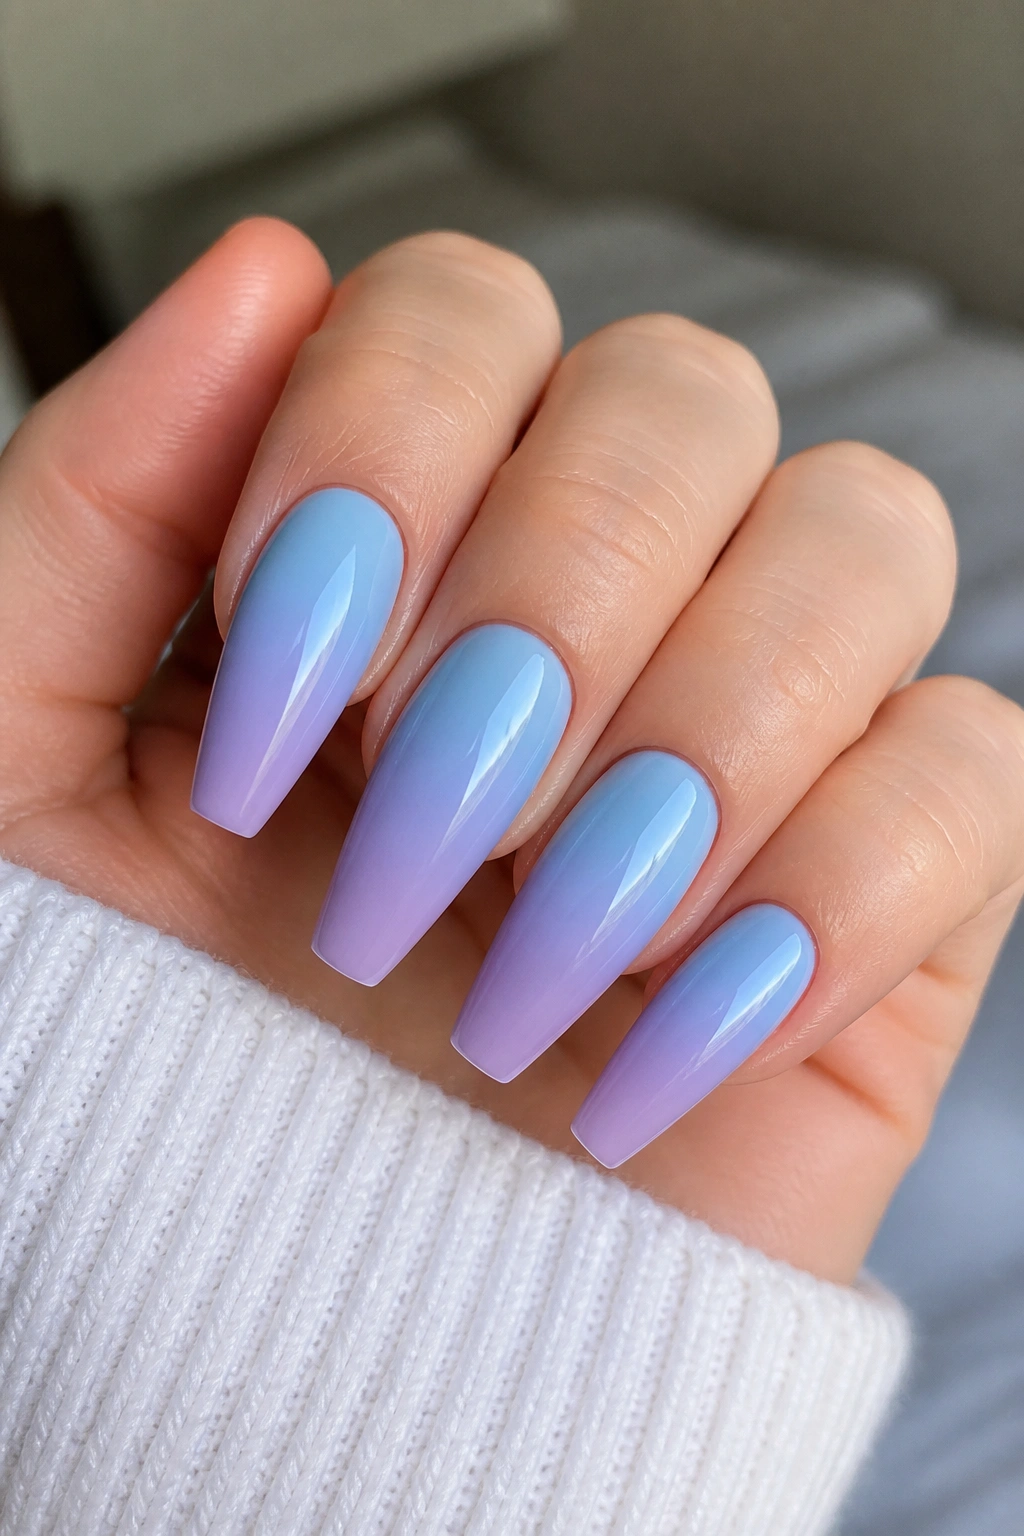
This is the set I suggest when plain baby blue feels too cold on its own.
A blue-to-lilac fade keeps the softness of a pastel manicure but adds more color movement than the usual nude-to-blue blend. On coffin nails, that shift reads especially well because the long side lines stretch the gradient and give each shade space to breathe. The blue can sit near the tip, the lilac can anchor the base or midsection, and the middle melt does the rest.
The middle is the fragile part. If both colors are too opaque, they meet in a muddy stripe. What you want instead are jelly-like layers or at least semi-sheer passes, so the overlap turns misty rather than grey. I prefer this look with a milky veil somewhere in the blend, even if it is only a whisper, because it stops the manicure from getting too candy-like.
This design tends to flatter cooler and neutral undertones first, though warm skin can wear it well too if the lilac has a touch of pink instead of a sharp violet cast. On long coffin nails, it gives more payoff than a single pale blue could on its own. On short nails, use the color shift on only two or three fingers and keep the others in soft blue or sheer pink, or the set can start to look compressed.
No extra art needed. The color story does enough.
10. Reverse Light Blue Ombre with Glassy Clear Tips
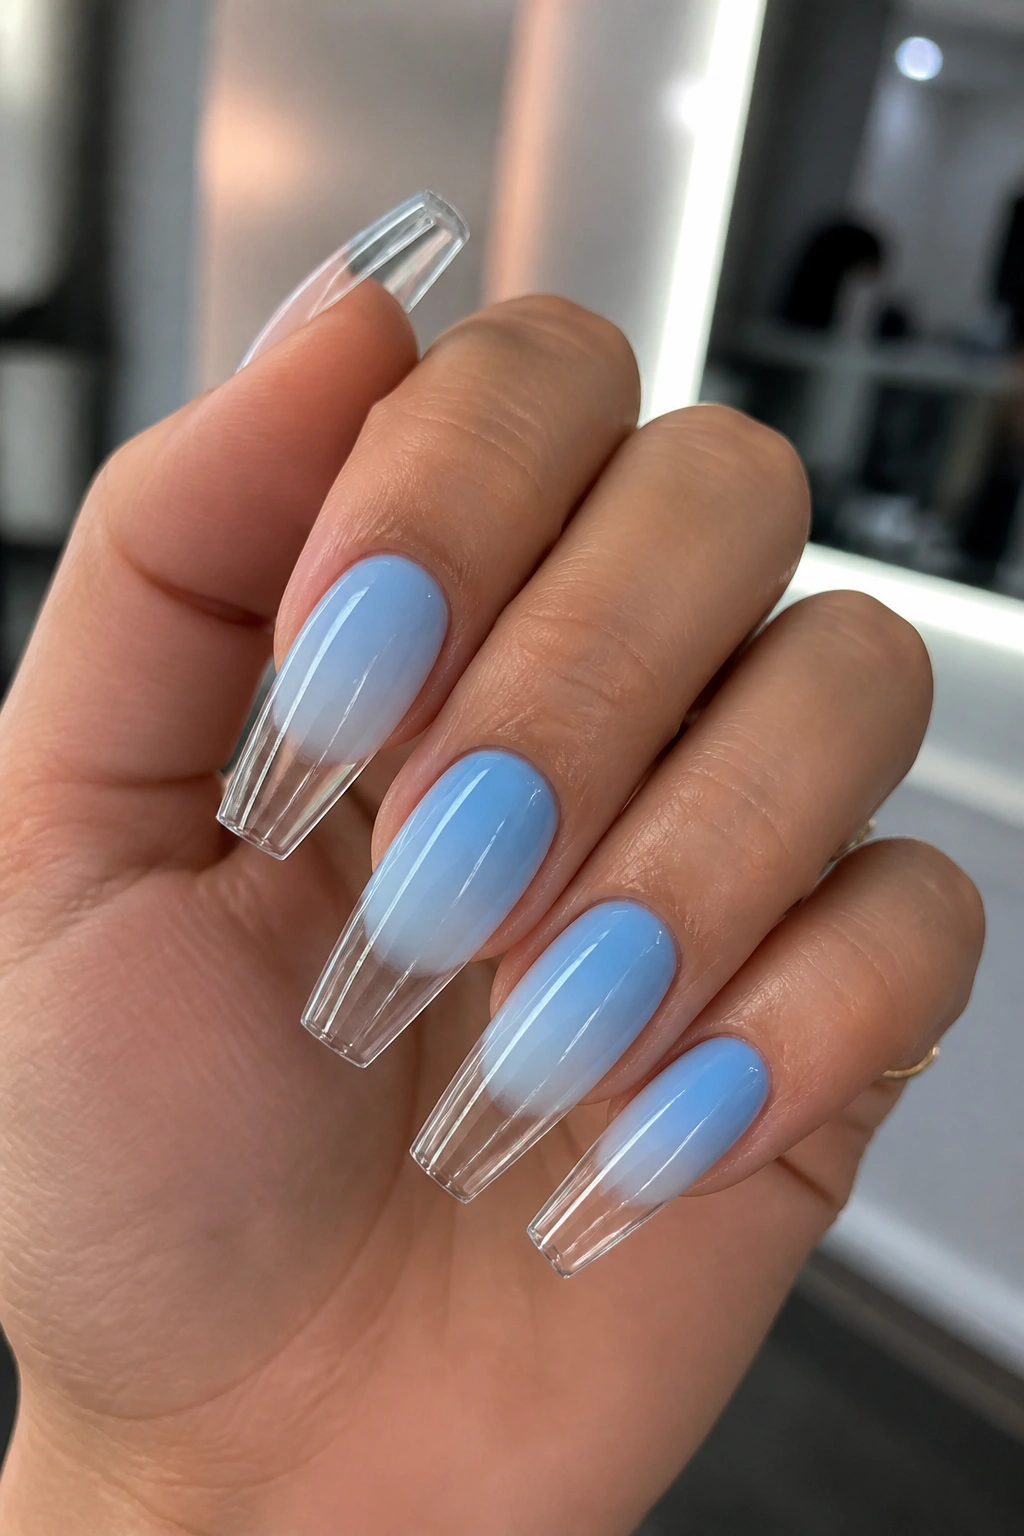
This one feels colder.
Instead of fading from nude into blue at the tip, the color starts near the cuticle and thins out into clear or glassy ends. It is a smart twist when you like the ombre look but want something sharper than the standard pastel fade. On coffin nails, those clear tips can look almost like ice panels if the extension is filed thin and sealed well.
The construction matters more here than on most sets. You need a clear extension or clear acrylic at the free edge, then the blue has to be feathered downward before it dies out. If the pigment runs too far, the clear tip loses its point. If it stops too high, the design looks unfinished.
A salon checklist helps:
- Ask for transparent tips or clear sculpted acrylic rather than milky white.
- Keep the blue strongest in the first half of the nail, not the last.
- Seal the underside of the clear edge if you want a cleaner look from every angle.
- Choose a high-gloss top coat so the transparent section stays crisp.
This is not the easiest ombre set to maintain because growth shows faster when color sits near the cuticle. Still, for someone who likes architectural nails and wants pale blue without the usual soft-focus vibe, it hits a different note entirely.
11. Marble Accent Light Blue Ombre Coffin Nails
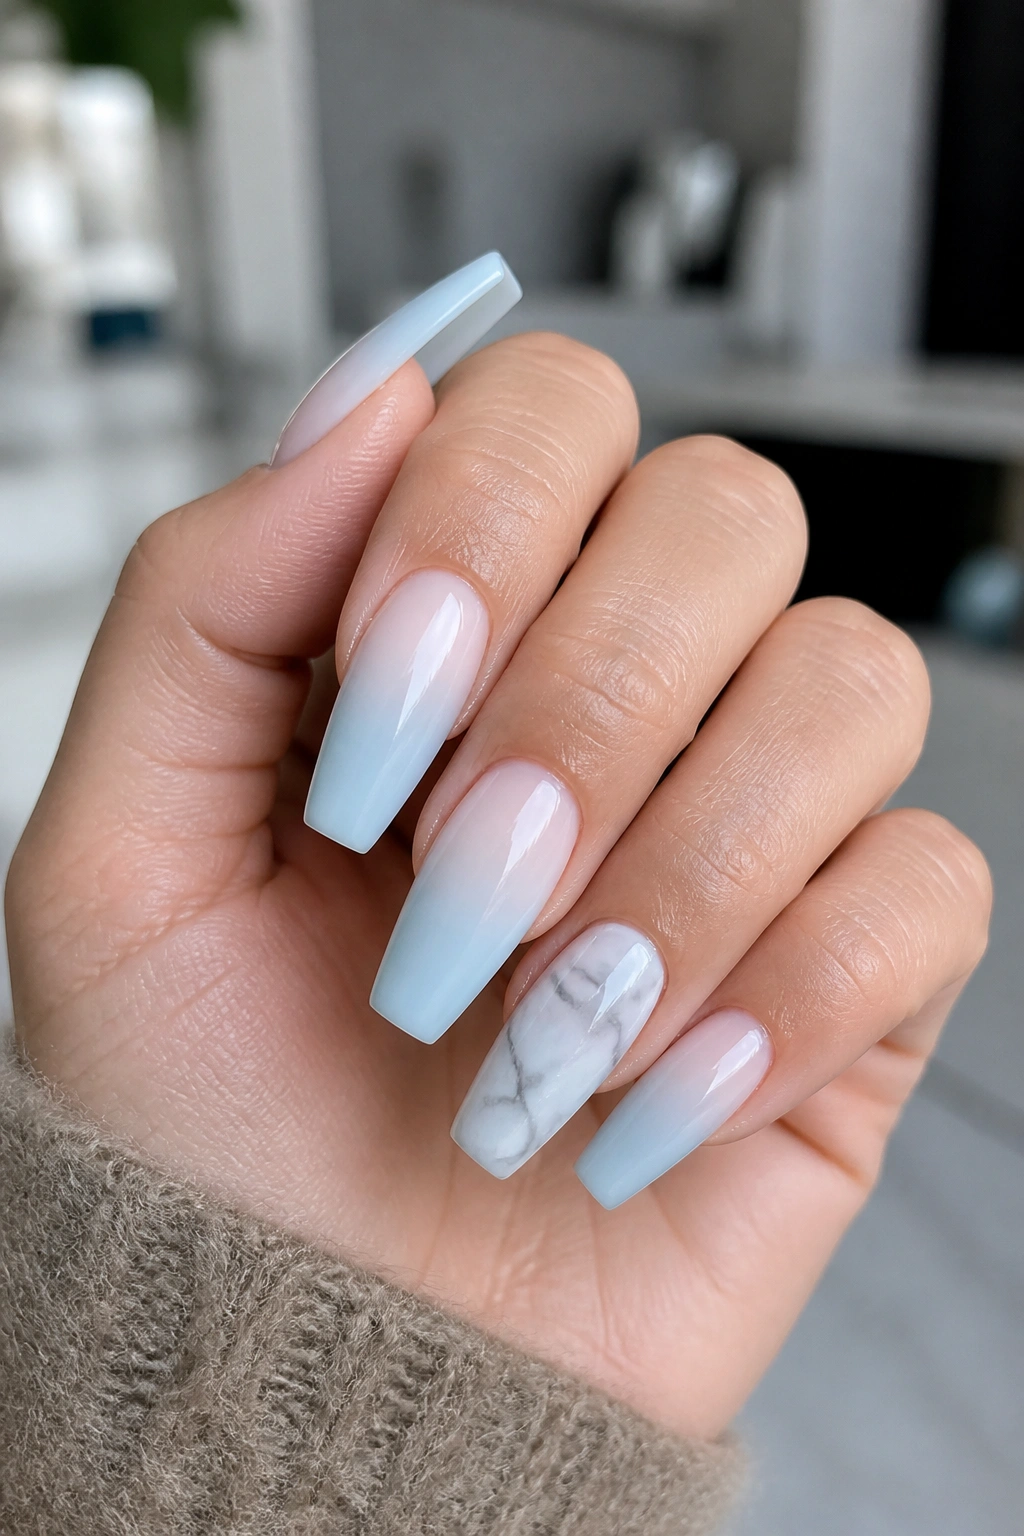
I like marble most when it behaves itself.
A full set of marble can be a lot, and on top of ombre it often turns into visual traffic. A better move is one or two marble accent nails layered over the same pale blue family, with thin grey or white veining that echoes the cool tone of the fade. That keeps the set connected instead of split into two ideas fighting for room.
The trick is scale. Veins should stay fine—almost threadlike—not thick black zigzags. Soft charcoal, smoke grey, and diluted white gel polish work best. Put the marble over a milky blue or sheer white base so the pattern looks like stone, not like a cracked phone screen.
Accent placements that stay clean
A few placements I come back to:
- Ring finger marble only on both hands.
- Thumb and ring finger accents if you like a little more art.
- One full marble nail plus one partial marble tip on the opposite hand.
I would also keep the rest of the nails plain ombre, no glitter, no crystals, no chrome dust on top. Marble already brings texture through line work. Add too much else and the set loses the calm feeling that makes light blue ombre worth doing in the first place.
12. 3D Floral Light Blue Ombre Coffin Nails
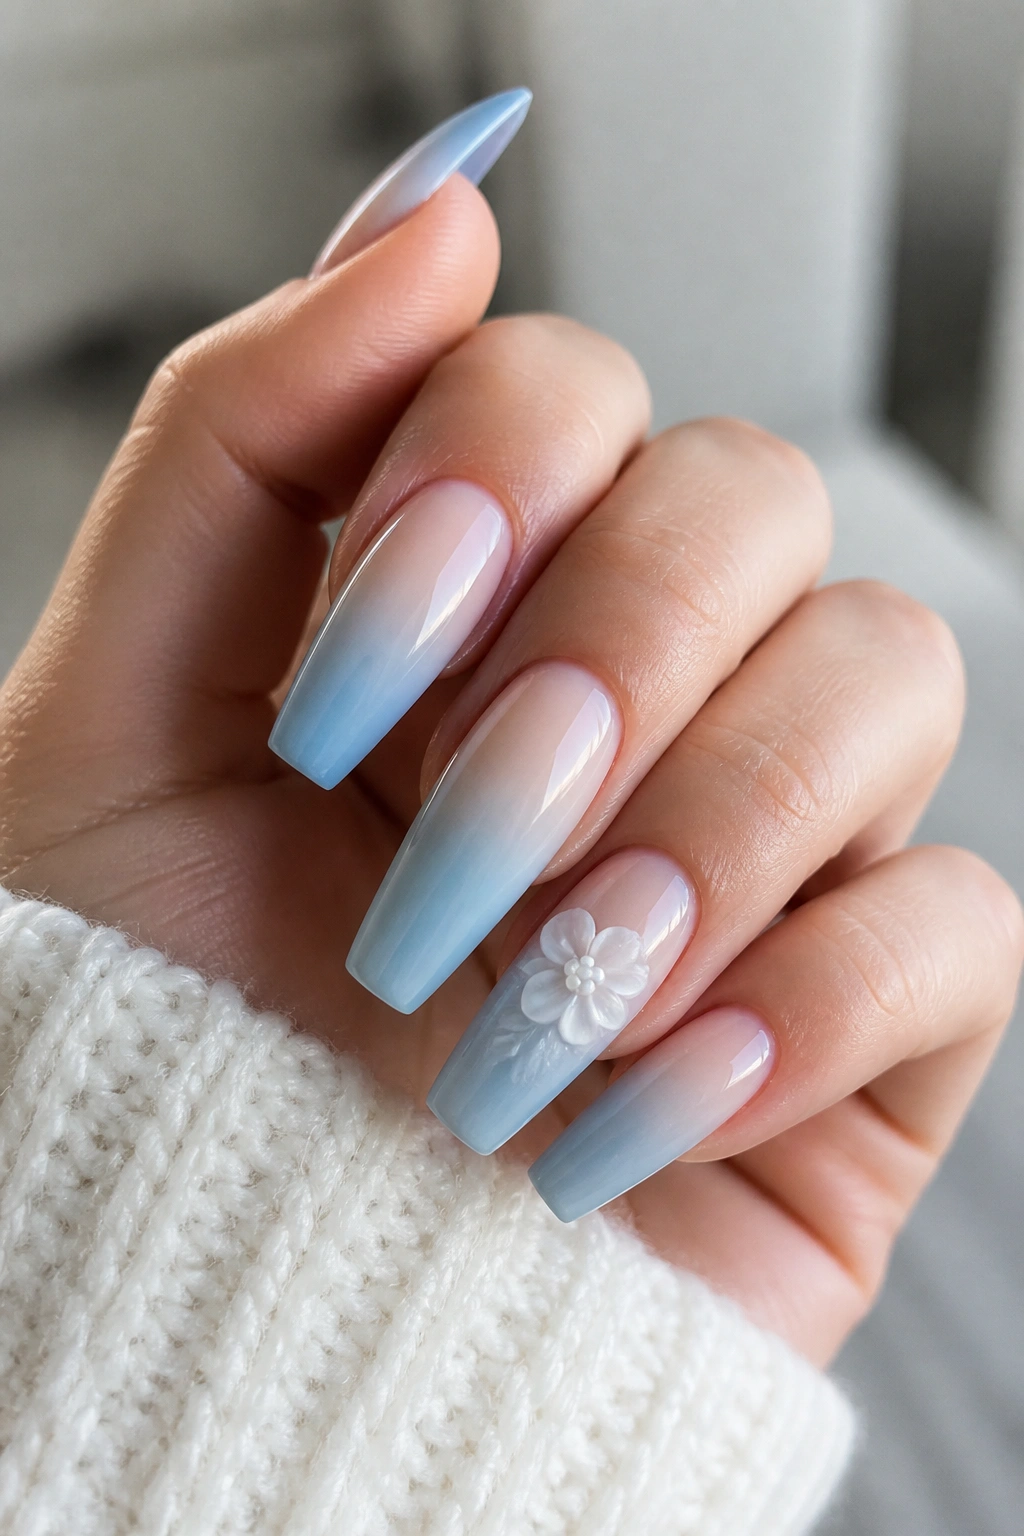
A small acrylic flower can turn a soft blue fade into occasion nails in about ten minutes.
The reason this design works is contrast. You have a smooth, airy ombre base, then one raised flower—usually sculpted in white, milky blue, or translucent acrylic—placed near the cuticle or sidewall. That one bit of height changes the whole manicure. It gives the coffin shape more presence and keeps pale blue from fading into the background.
Restraint matters. One flower on each ring finger is usually enough. Two can work if one is tiny. Ten 3D flowers, though? Hard no. You lose the line of the nail, you make daily life harder, and you turn a soft ombre set into something you have to protect from every zipper and sweater cuff you touch.
Placement is practical as much as visual. Flowers placed too close to the free edge chip sooner because the tip takes the most impact. Near the cuticle or just off-center on the lower third, they last better and draw the eye toward the strongest part of the coffin shape.
If you only want 3D florals for a weekend or an event, press-ons are worth considering. You get the full raised-art look without committing to two or three weeks of buttoning jeans carefully. Still, on a salon set done well, a single sculpted flower over light blue ombre can look thoughtful and polished in a way flat decals rarely do.
Final Thoughts
The best light blue ombre coffin nails all share one trait: the fade stays soft enough that your eye never trips over it. Chrome, glitter, marble, crystals, matte top coat—those details can all work, though none of them can rescue a harsh blend.
If you are picking your first version, go with the milky nude fade or the French ombre. They wear easily, grow out with less drama, and suit more outfits than the louder designs. If you already know you like a little extra on your nails, chrome and cuticle crystals give the most payoff with the least bulk.
And if you are torn between two ideas, choose the cleaner one. A sharp coffin shape and a smooth pale blue fade will carry a manicure farther than a pile of decorations ever will.
