

There’s something about a fresh manicure that makes you feel genuinely ready for a date. Long oval nails in particular strike that perfect balance — they’re elegant and refined without looking overly formal or dramatic. They complement virtually every hand shape, age group, and personal style. But here’s the thing: when you’re getting ready for a date night, you want nails that feel intentional. You want a design that says you put thought into this, that feels special but not overdone.
The challenge is finding designs that actually photograph well (because let’s be honest, you might want to share a photo), that stay intact through dinner and drinks, and that feel you. Not every trendy nail design works with long oval shapes, and not every design that looks great on short nails translates to longer beds. You need designs that actually take advantage of the extended canvas that long ovals give you — designs that look proportional, balanced, and genuinely impressive.
We’re talking about finishes that catch the light as you hold a wine glass, colors that complement a date night outfit without overwhelming it, and nail art techniques that read as sophisticated rather than costume-like. Whether you’re going for romantic, bold, minimalist, or sultry, the right long oval design can be the finishing touch that makes you feel completely confident walking into that restaurant or venue.
Here are ten date night nail ideas that work beautifully on long oval shapes — all of them designed to photograph well, stay polished through the evening, and make you feel genuinely stunning.
1. Classic Red with Gold Foil Accent
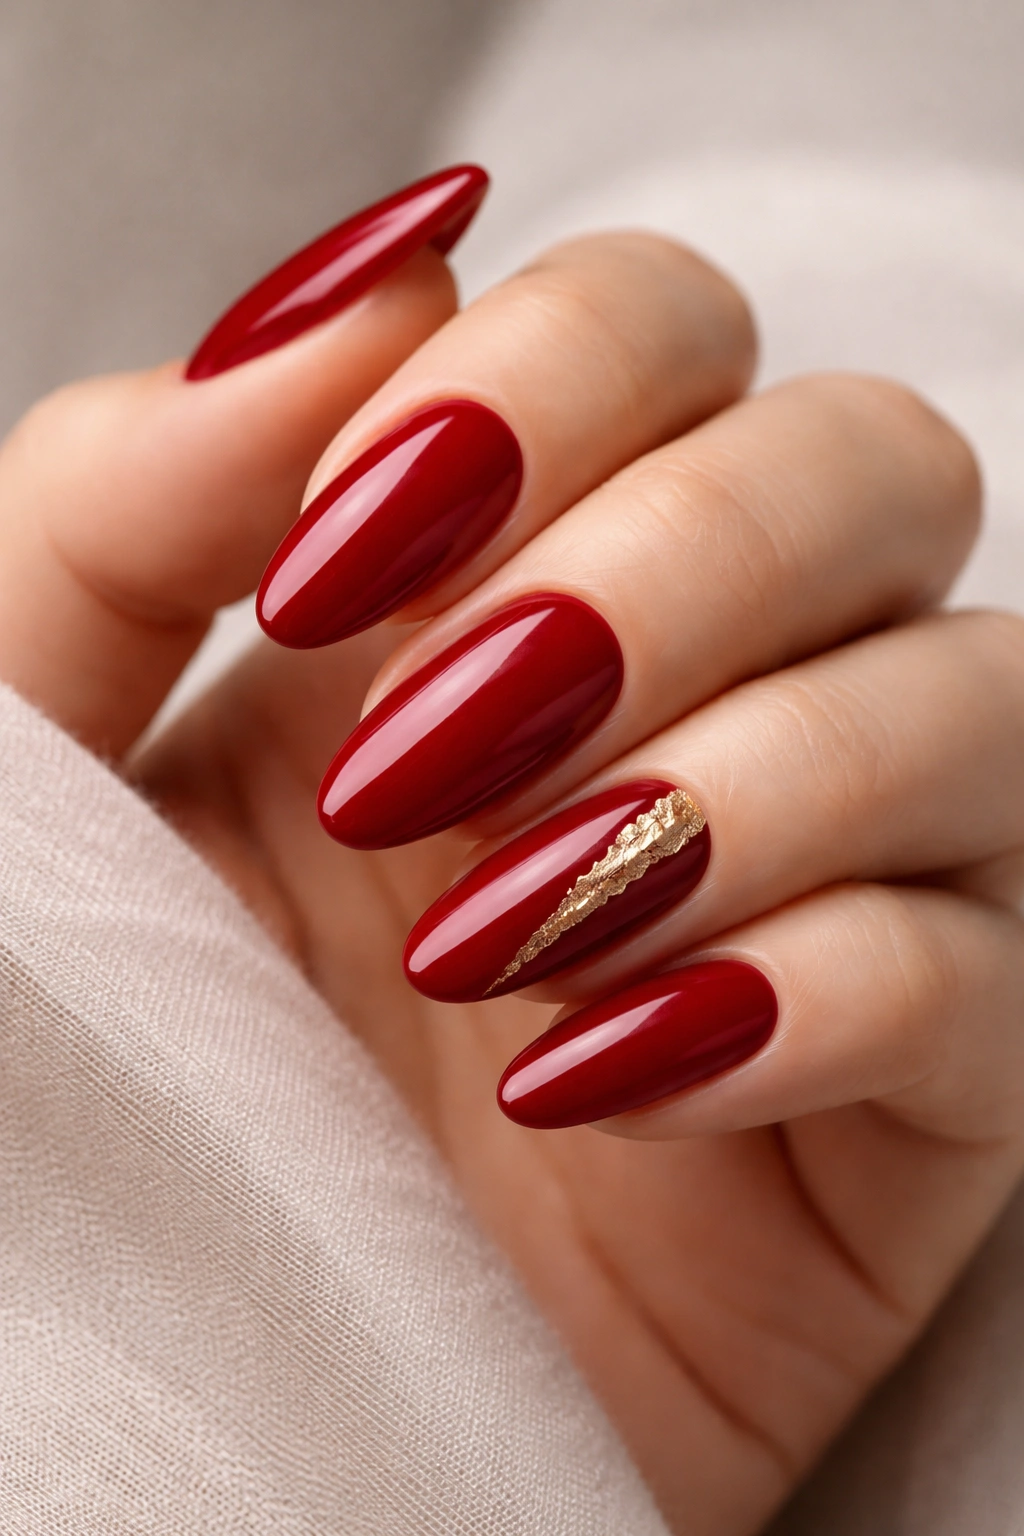
Red nails are the ultimate date night move, and there’s honestly a reason they’ve never gone out of style. On long ovals, a rich true red has real impact — it’s bold without feeling costume-like, and it pairs with virtually any outfit. The magic happens when you add a subtle accent: a thin stripe of gold foil running vertically down one accent nail, or a delicate gold geometric frame along the nail edge.
Why This Works for Date Night
The combination of red and gold reads as intentional and luxe without requiring advanced nail art skills. Red elongates the appearance of your nails even further, and the gold accent gives you just enough dimension to make the design feel modern rather than retro. It’s the kind of manicure that makes people assume you went to a high-end salon even if you did it yourself.
How to Get This Look
- Use a deep, opaque red base — two to three coats for complete coverage that doesn’t look streaky
- Allow the base to fully dry (at least two minutes between coats)
- Cut thin strips of gold foil (or use a gold foil press-on accent) and place on one or two accent nails while the topcoat is still slightly tacky
- Seal everything with a glossy topcoat for maximum shine and protection
- The design lasts approximately 10-12 days before visible chipping at the tips
Pro tip: Pair this with a nude or warm-toned lip to let your nails be the statement of your look — it’s a tried-and-true confidence move.
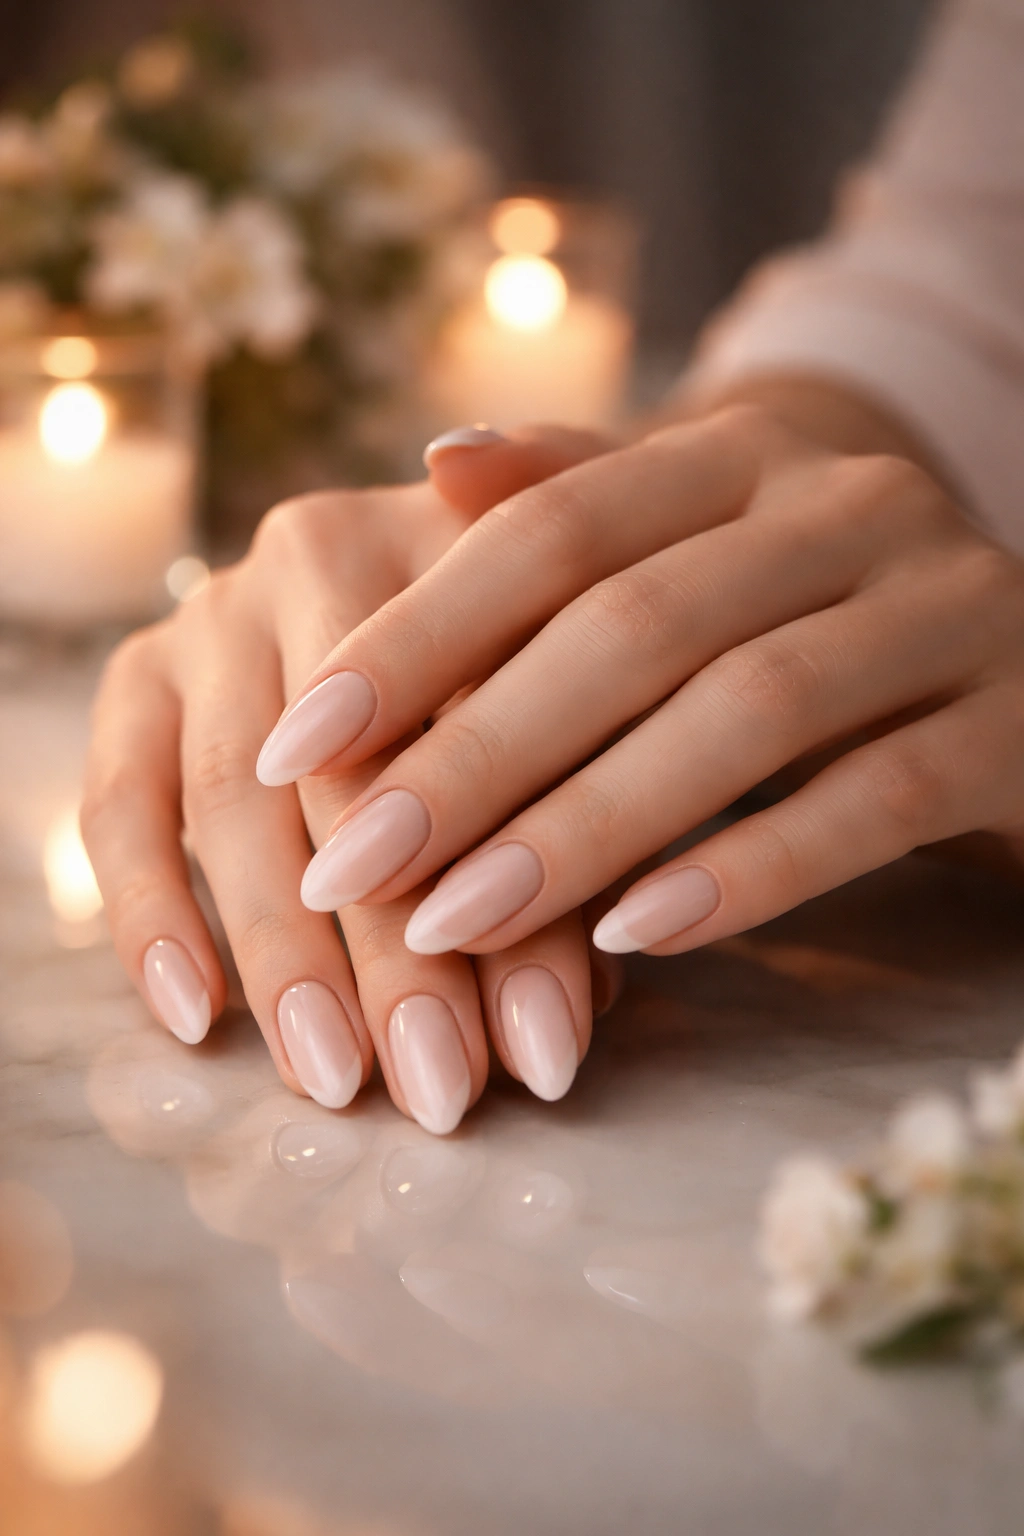
2. Soft Nude with Rhinestone Gradient
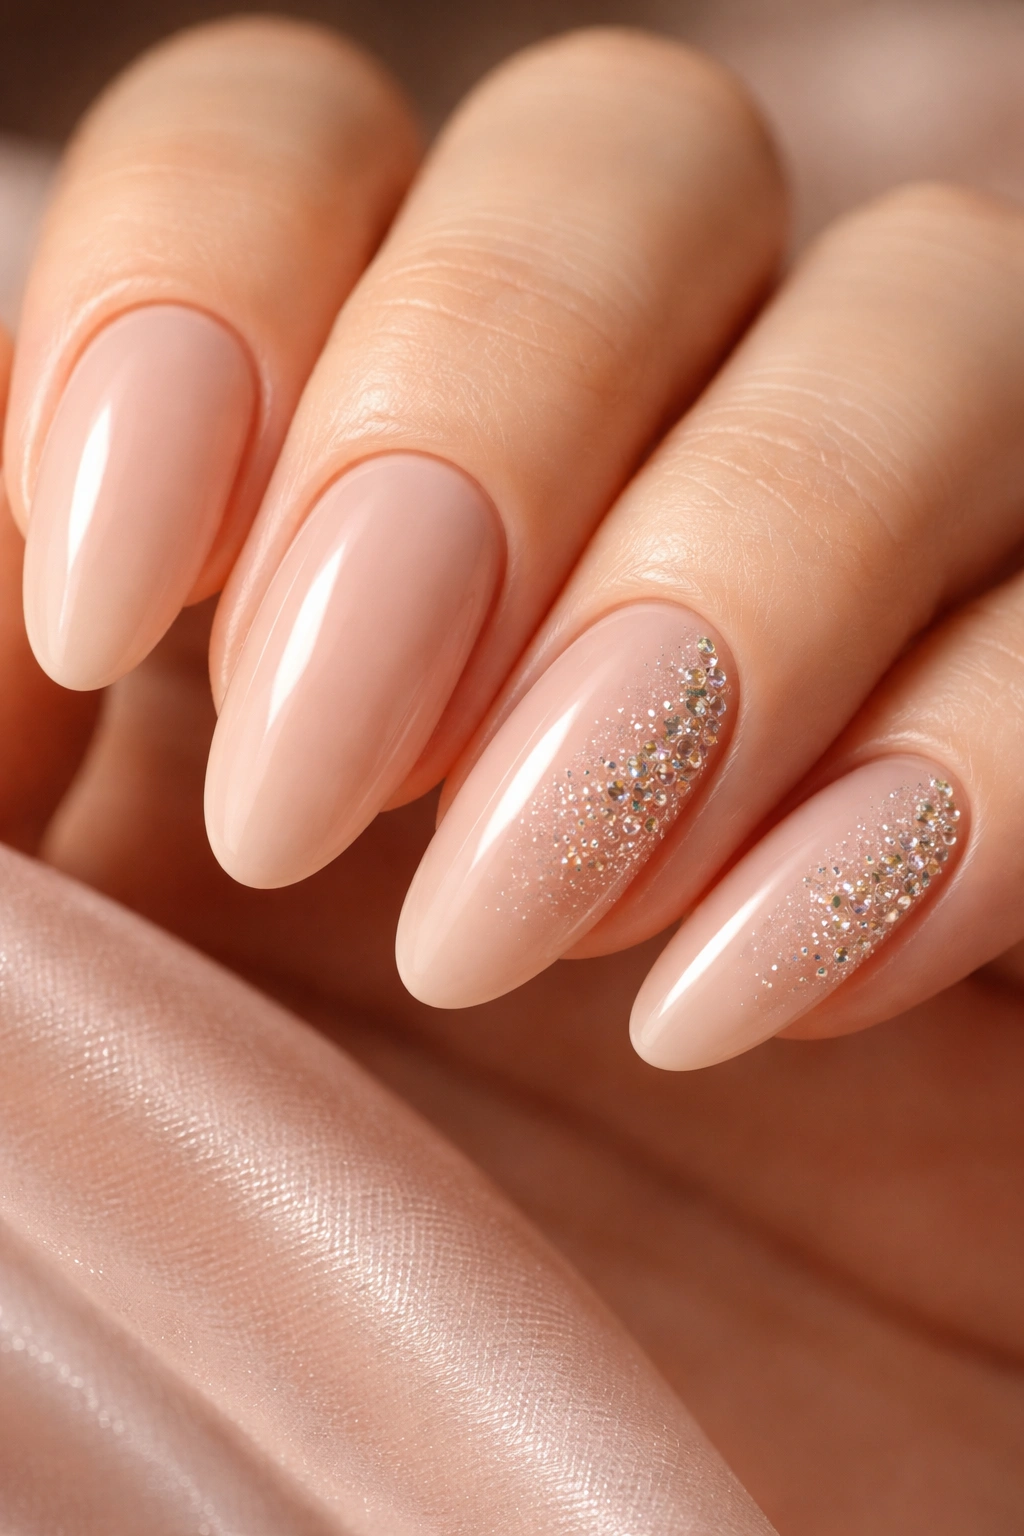
If you want nails that feel sophisticated and date-appropriate without being loud about it, this is your design. Start with a soft, neutral nude — something that matches your skin tone or sits just slightly warmer. On your accent nails (typically the ring finger and pinky), create a subtle gradient by placing small crystals or rhinestones in a diagonal line from the cuticle area upward, spacing them so they eventually fade out toward the tip.
The Quiet Luxury Approach
This design is all about understatement. It’s the manicure equivalent of wearing a piece of jewelry you love but isn’t obviously expensive. The nude base elongates your fingers while the rhinestones catch light in a way that feels romantic and intentional. It reads as polished and put-together without announcing itself loudly.
Application Details
- Choose a nude shade that’s within one shade of your actual skin tone for the most flattering, elongating effect
- Use a sticky gel base coat so rhinestones adhere properly without sliding
- Start placing stones at the cuticle area and gradually space them further apart as you move toward the tip
- Seal with a thick topcoat that encapsulates the stones for durability
- Expect this style to hold up beautifully for 12-14 days with minimal maintenance
Worth knowing: Small round rhinestones in crystal clear or champagne actually look more elegant than larger flashy stones — they catch light subtly rather than overwhelming the design.
3. Deep Burgundy with Metallic Tips
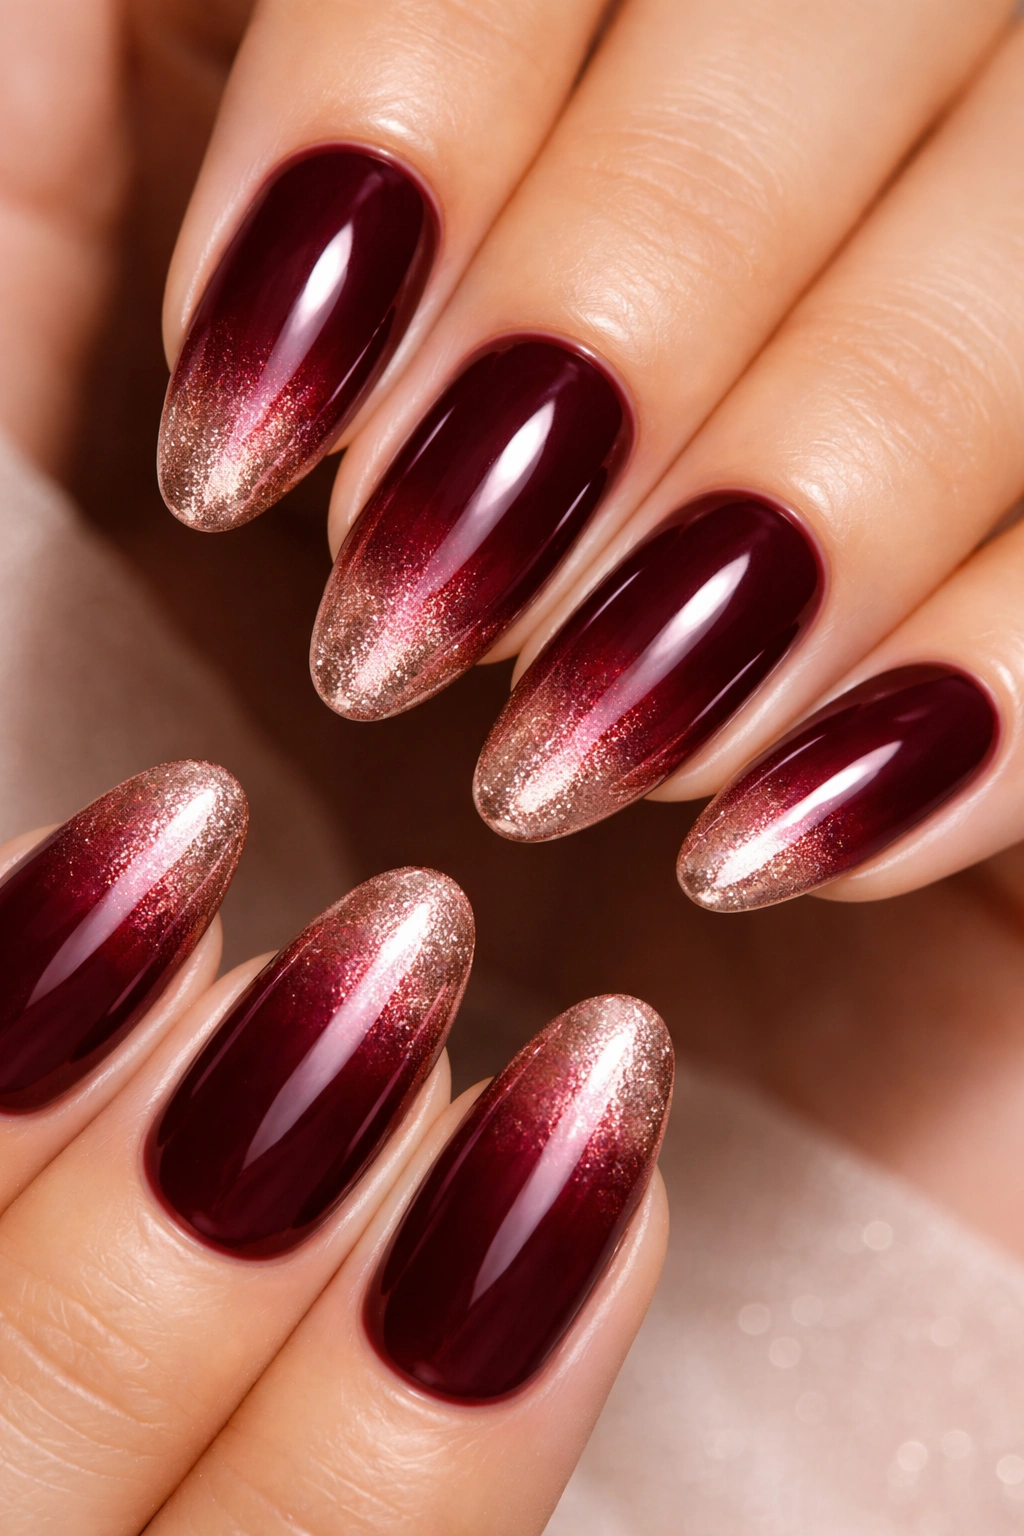
Long oval nails have enough length to showcase gradient effects beautifully, and this design uses that to full advantage. Begin with a deep burgundy base — think wine-colored, almost moody — and gradually fade the color into a shimmery rose gold or copper metallic at the tip. The gradient should feel soft and blended, not a harsh line.
Why This Design Feels Date-Appropriate
Burgundy is inherently sophisticated and pairs with virtually every date outfit from casual to formal. The metallic fade adds movement and dimension without requiring intricate nail art. On long ovals, this gradient makes your nails look even longer while the warm metallic tip catches light beautifully in dim restaurant lighting.
Creating the Gradient
- Apply two coats of your burgundy base and let it fully cure
- Using a makeup sponge (not a nail sponge — regular makeup sponges work better), dab your metallic polish onto the sponge
- Gently sponge the metallic color onto the tip and top third of the nail, feathering it upward to blend with the burgundy
- Apply 3-4 layers of this sponged metallic, letting each layer cure, for a smooth gradient
- Use a glossy or slightly shimmer topcoat to enhance the metallic effect
insider note: This design actually improves in appearance over 10-12 days because the gradient becomes more interesting as wear patterns develop naturally.
4. Sheer Pink with Delicate White Line Design
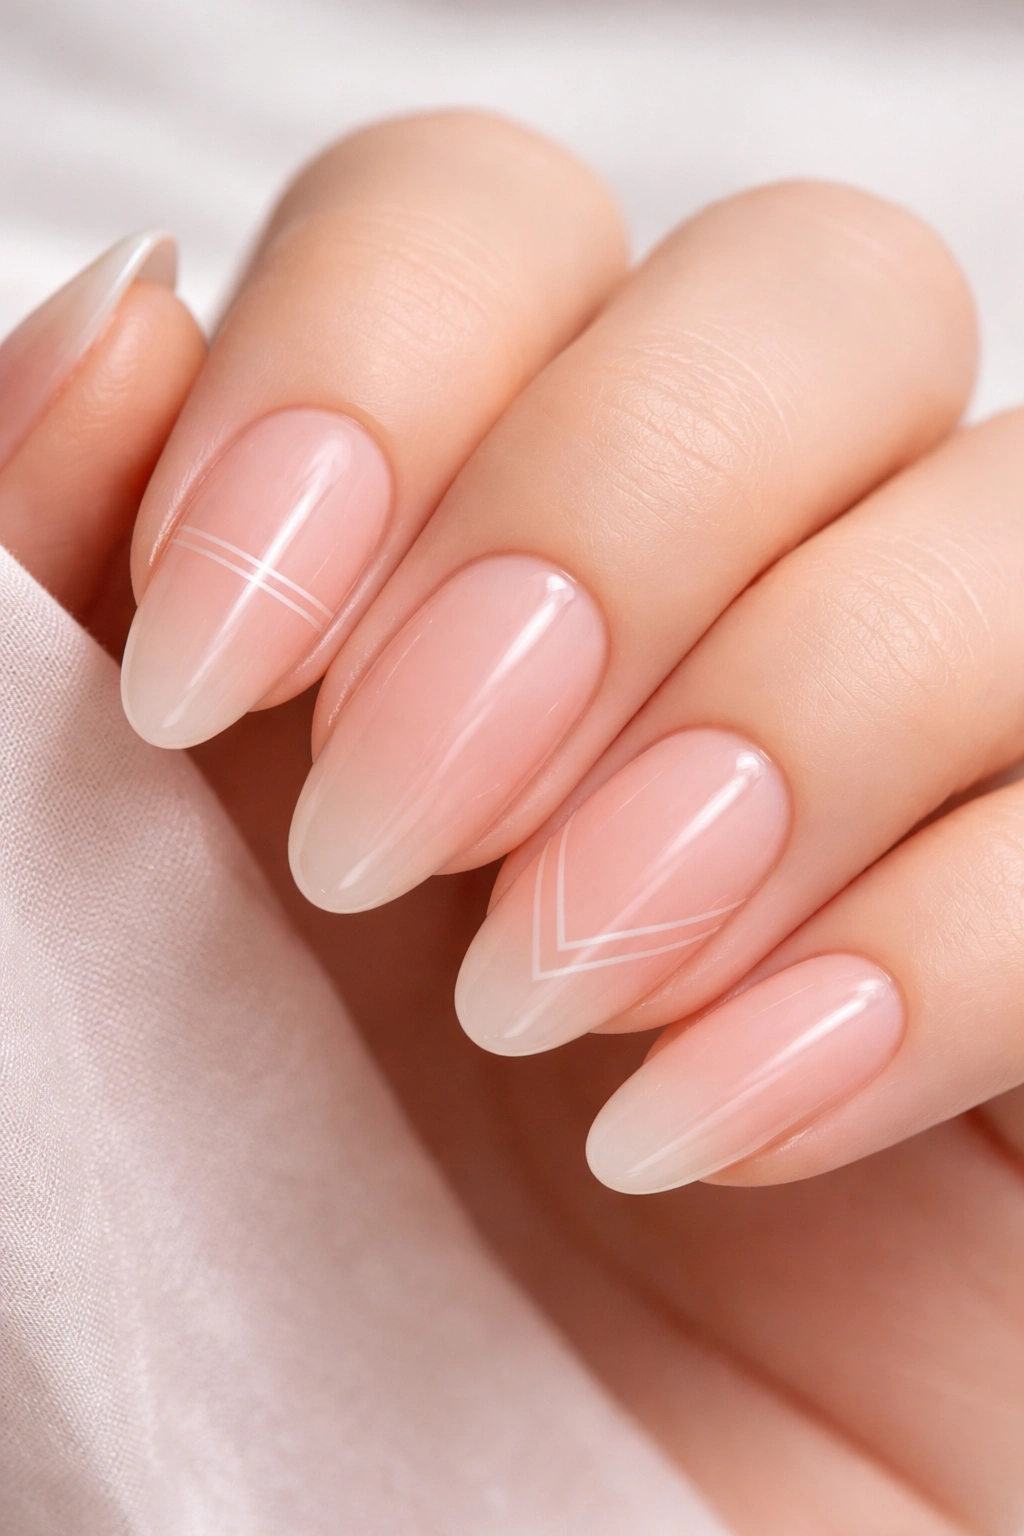
For a design that feels romantic without being over-the-top, consider a sheer pink base with minimalist white line work. Apply a soft, slightly sheer pink (think ballet slipper or light rose) and let your natural nail show through just slightly. Once dry, use a thin white nail art brush to create delicate, simple geometric lines — a thin vertical stripe, a horizontal line near the cuticle, or even a simple chevron on your accent nails.
The Femininity-Without-Trying Approach
This design reads as effortlessly elegant. The sheer pink lets your natural nail peek through, which feels fresh and modern, while the white lines add just enough structure to keep it sophisticated. It’s flirty without feeling costume-like, and it photographs beautifully.
Execution Tips
- Choose a sheer pink that’s noticeable but not opaque — you should see your nail color through it after one coat
- Apply thin, careful white lines using a detail brush or thin striping brush — shaky lines actually feel more modern and intentional than perfectly straight ones
- Keep your white design minimal and centered on the nail — less is genuinely more here
- Seal with a satin or matte topcoat for a modern finish (glossy works too, but matte or satin feels more contemporary)
- Expect this manicure to last 10-14 days depending on how gently you treat your nails
Quick fact: Matte topcoats hide fingerprints better than glossy ones, which can be useful if you’re nervous about your nails staying camera-ready all evening.
5. Black with Negative Space Art
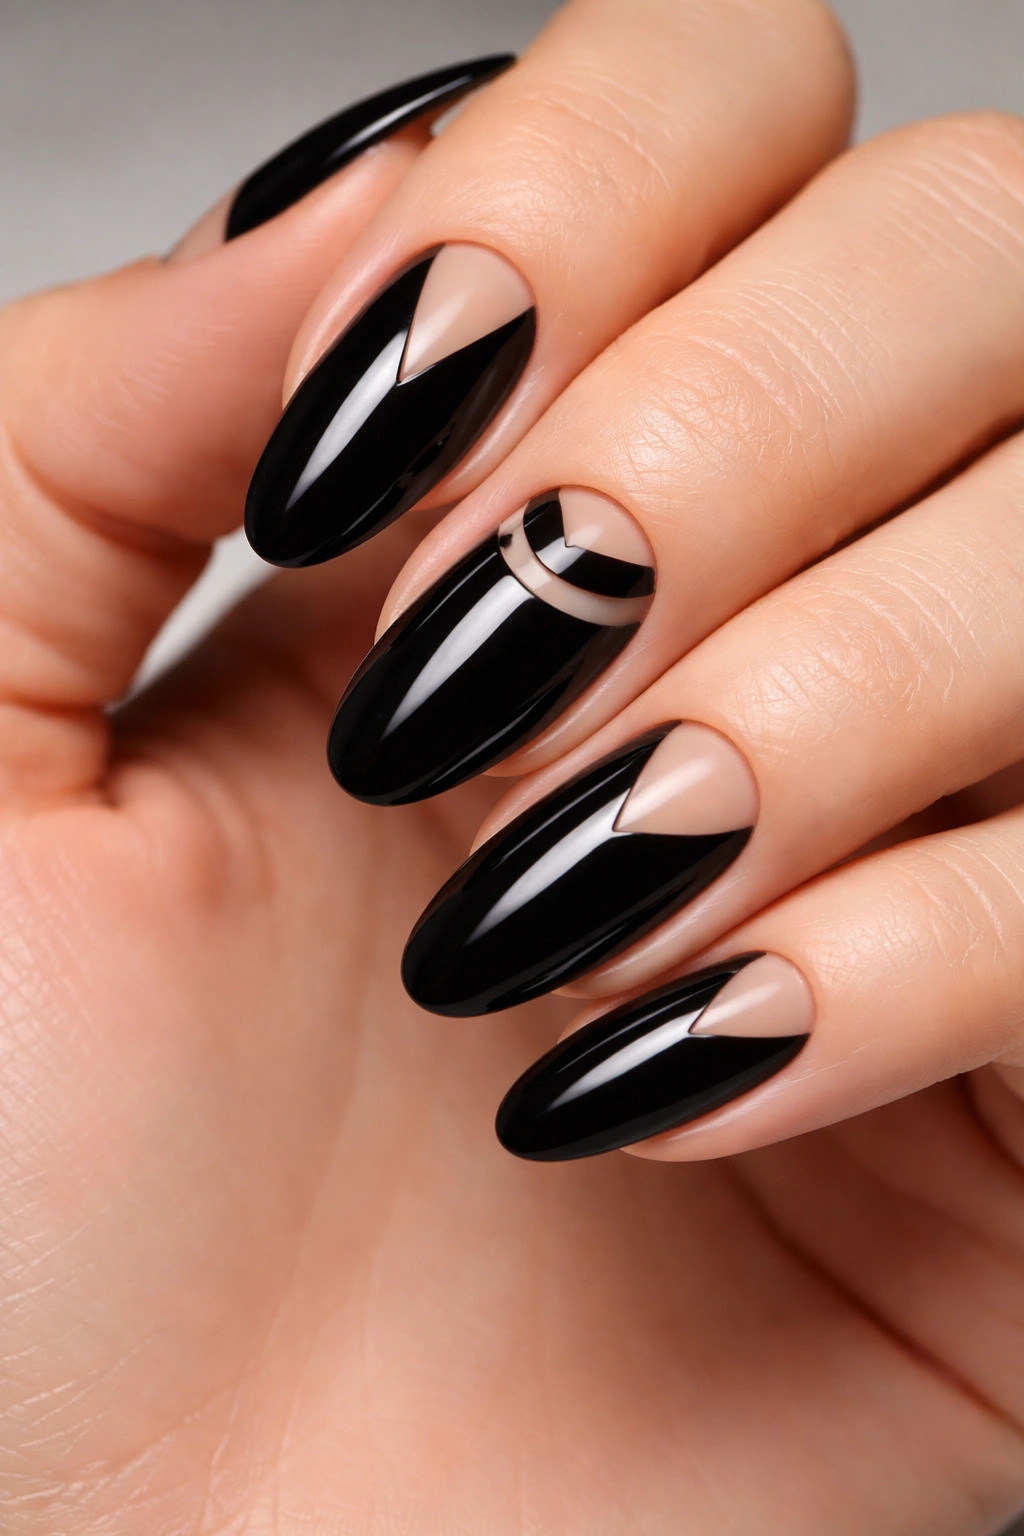
Black nails are bold, but when you’re dating someone you want to impress, negative space (areas where you leave the natural nail showing) keeps black feeling elegant rather than edgy. Paint most of your nail black, leaving geometric shapes unpainted — perhaps a triangular space at the cuticle, small circles near the tip, or a subtle frame around the edges. The natural nail showing through these spaces creates visual interest and softens the boldness of black.
Why Black Works on Long Ovals
Black has serious impact on longer nails. The negative space trick prevents it from looking like you’re ready for a costume party while letting the design feel genuinely artistic and modern. Long ovals give you enough surface area to really play with negative space design without it looking cramped.
Design Approaches
- Option 1: Paint your entire nail black, then use a thin brush and rubbing alcohol to carefully remove black polish from geometric shapes, revealing the natural nail
- Option 2: Plan your negative space first, use tape to mask out the shapes, then paint black around them
- Option 3: Paint the black base, let it fully dry, then use a white or metallic detail brush to outline your negative space shapes for added dimension
- Seal with a glossy topcoat to make the black really pop
Pro tip: Pair black nails with gold jewelry to balance the darkness and add warmth to your overall look.
6. Dusty Mauve with Marble Effect
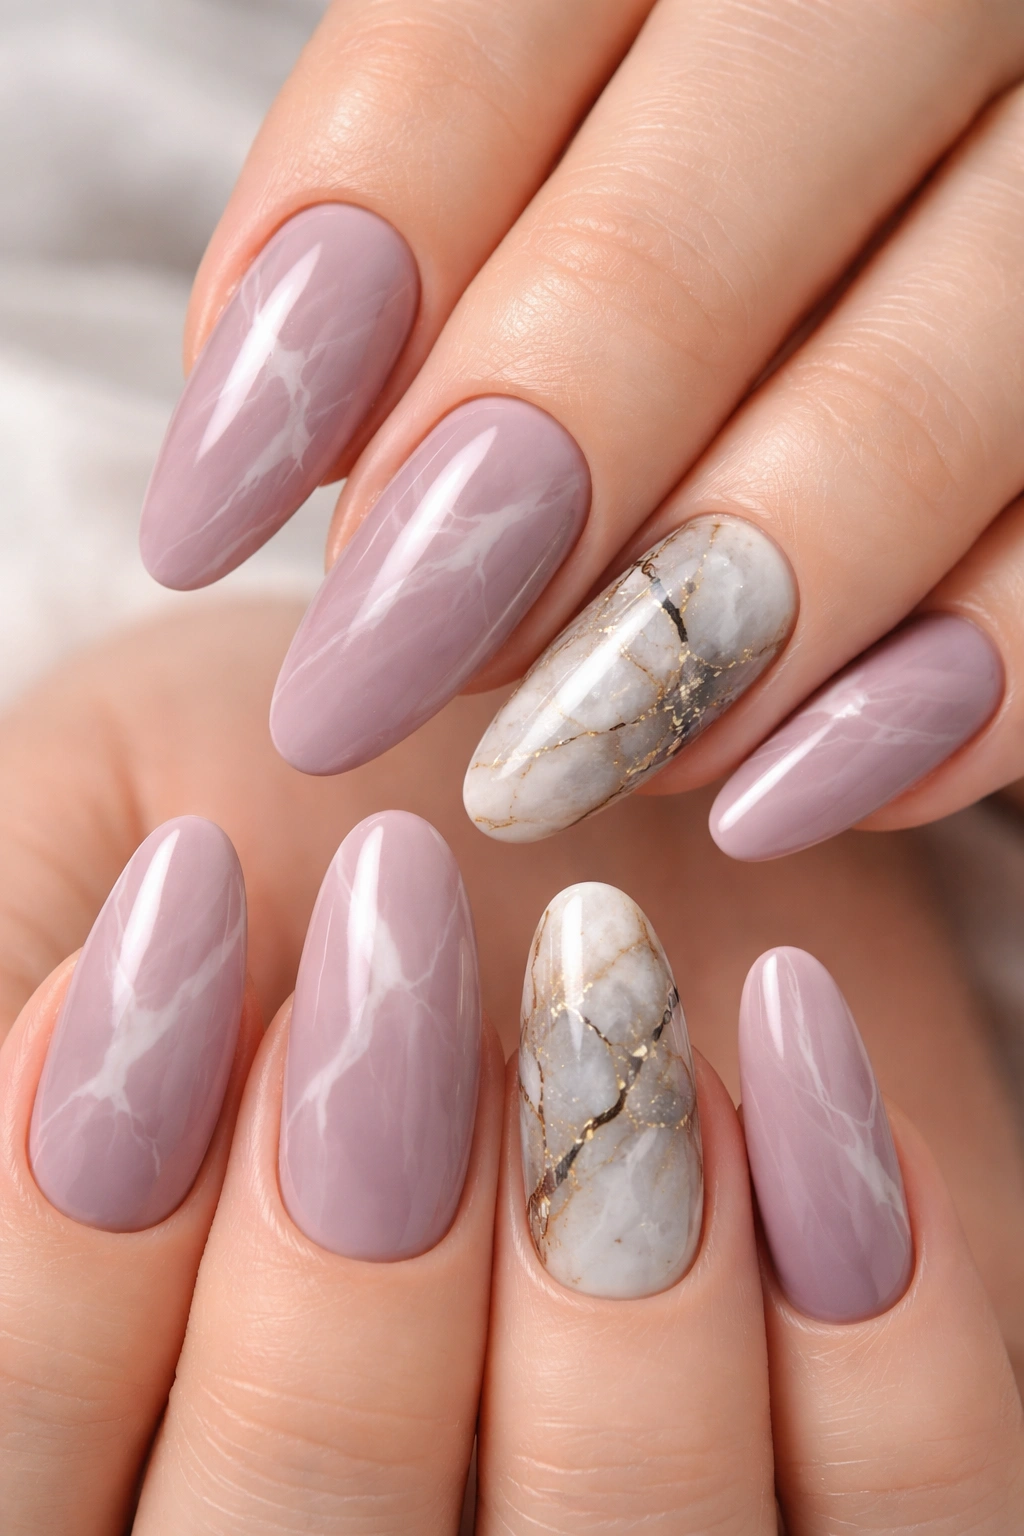
Mauve is having a moment, and for good reason — it’s sophisticated, universally flattering, and feels romantic without trying too hard. To elevate it, create a marble effect on at least two accent nails. Start with your dusty mauve base, then use a thin brush and white and gray polish to create veining patterns that mimic marble. The lines don’t need to be perfect; organic, slightly irregular marble lines actually look more elegant and modern.
The Artistic but Wearable Approach
This design gives you the visual interest of nail art without requiring you to be an artist. Marble effects are forgiving by nature — imperfect lines actually enhance the realistic marble look. On long ovals, this design feels gallery-worthy.
Creating Marble
- Apply two coats of your mauve base color
- Using a very thin nail art brush, lightly drag white polish across the nail in somewhat random directions
- Follow with gray polish in similar lines, sometimes overlapping the white
- You want the final effect to look like natural stone veining, not a children’s drawing
- Seal with a glossy topcoat
- This design holds beautifully for 14+ days
What to know: The marble effect works best when you use colors that are relatively close in tone — dusty mauve with white and gray works because they’re all in a similar saturation level.
7. Deep Emerald with Subtle Sparkle
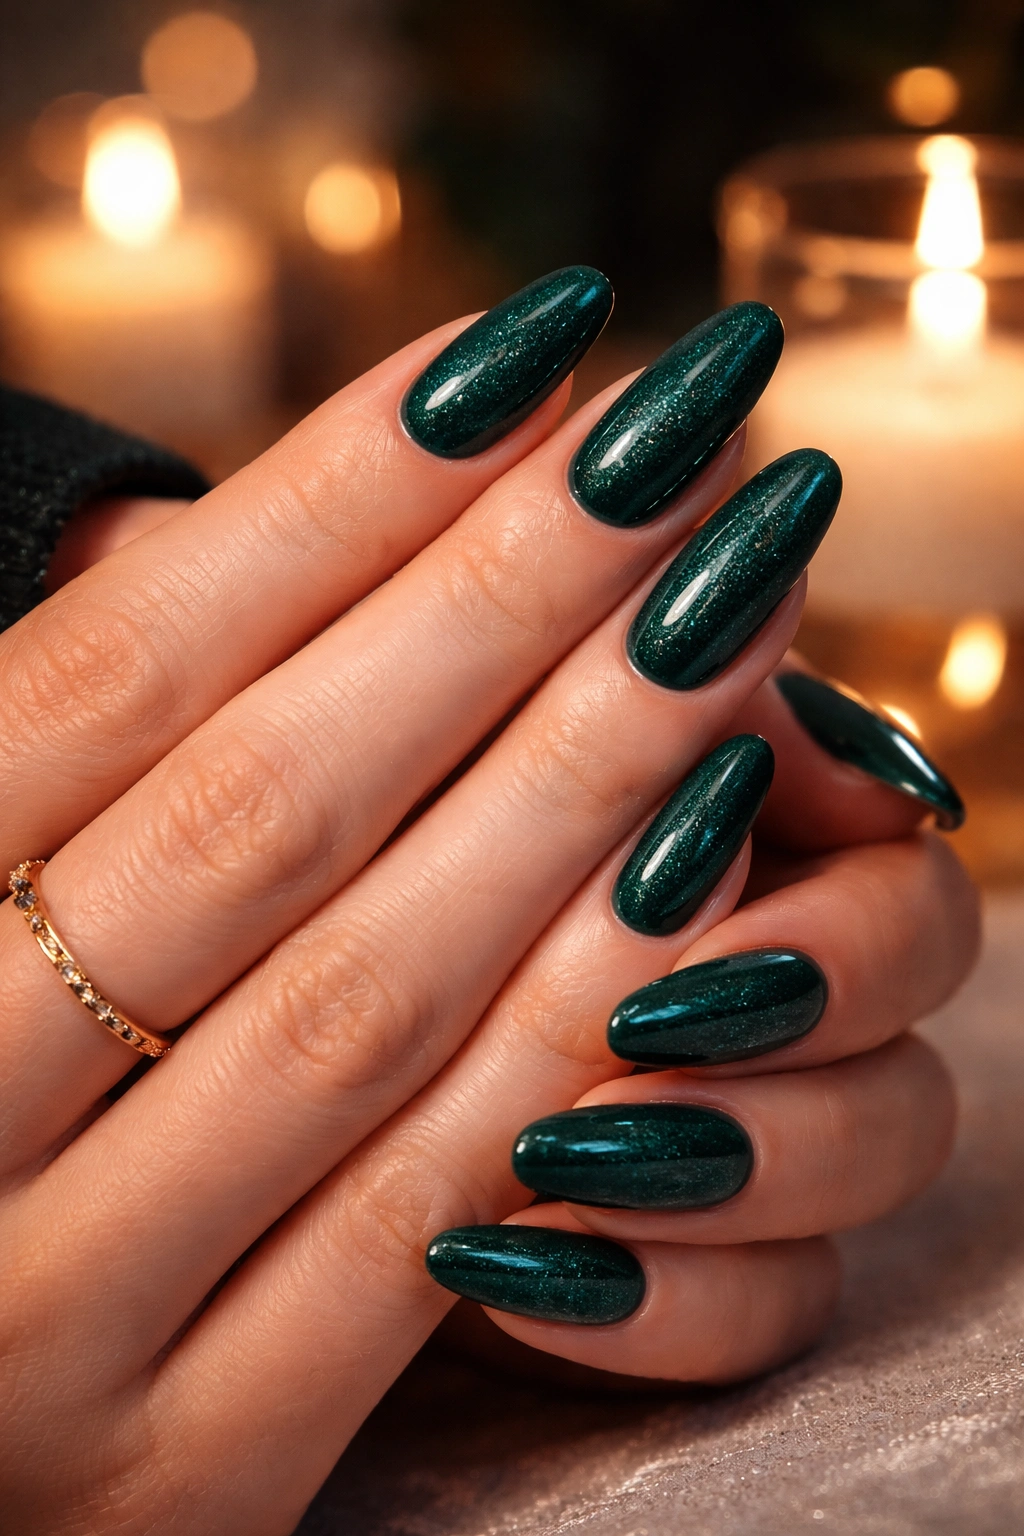
Emerald is the color of luxury, elegance, and romance rolled into one. On long ovals, a deep emerald base already makes a statement. Add a subtle sparkle by mixing a tiny bit of fine, clear glitter into your topcoat (or using a glitter topcoat designed for nails), which gives you just enough shimmer to catch candlelight without looking over-the-top. Alternatively, use a glitter gradient where glitter is more concentrated at the tip and fades upward.
Emerald as the Ultimate Date Night Color
Emerald flatters virtually every skin tone, pairs beautifully with gold or silver jewelry, and photographs magnificently. It reads as intentional and elegant without being dramatic. The subtle sparkle adds dimension and romance without making your nails look costume-like.
Application Strategy
- Start with two coats of a true, deep emerald shade — not blue-toned, not yellow-toned, but pure emerald
- For the sparkle approach: mix a small amount of fine crystal glitter into your topcoat, then apply this glitter-topcoat mixture over your dry base
- For the gradient approach: apply regular topcoat, then while still slightly tacky, use a makeup sponge to dab a glitter topcoat from the tip upward, creating a gradient of increasing sparkle
- Finish with one more sealing coat of clear topcoat
- This design lasts 12-15 days without chipping
Insider note: Emerald pairs surprisingly well with neutral, warm-toned clothing, so it’s actually more versatile for date outfits than you might think.
8. Nude with Thin Silver Striping and Pearl Accents
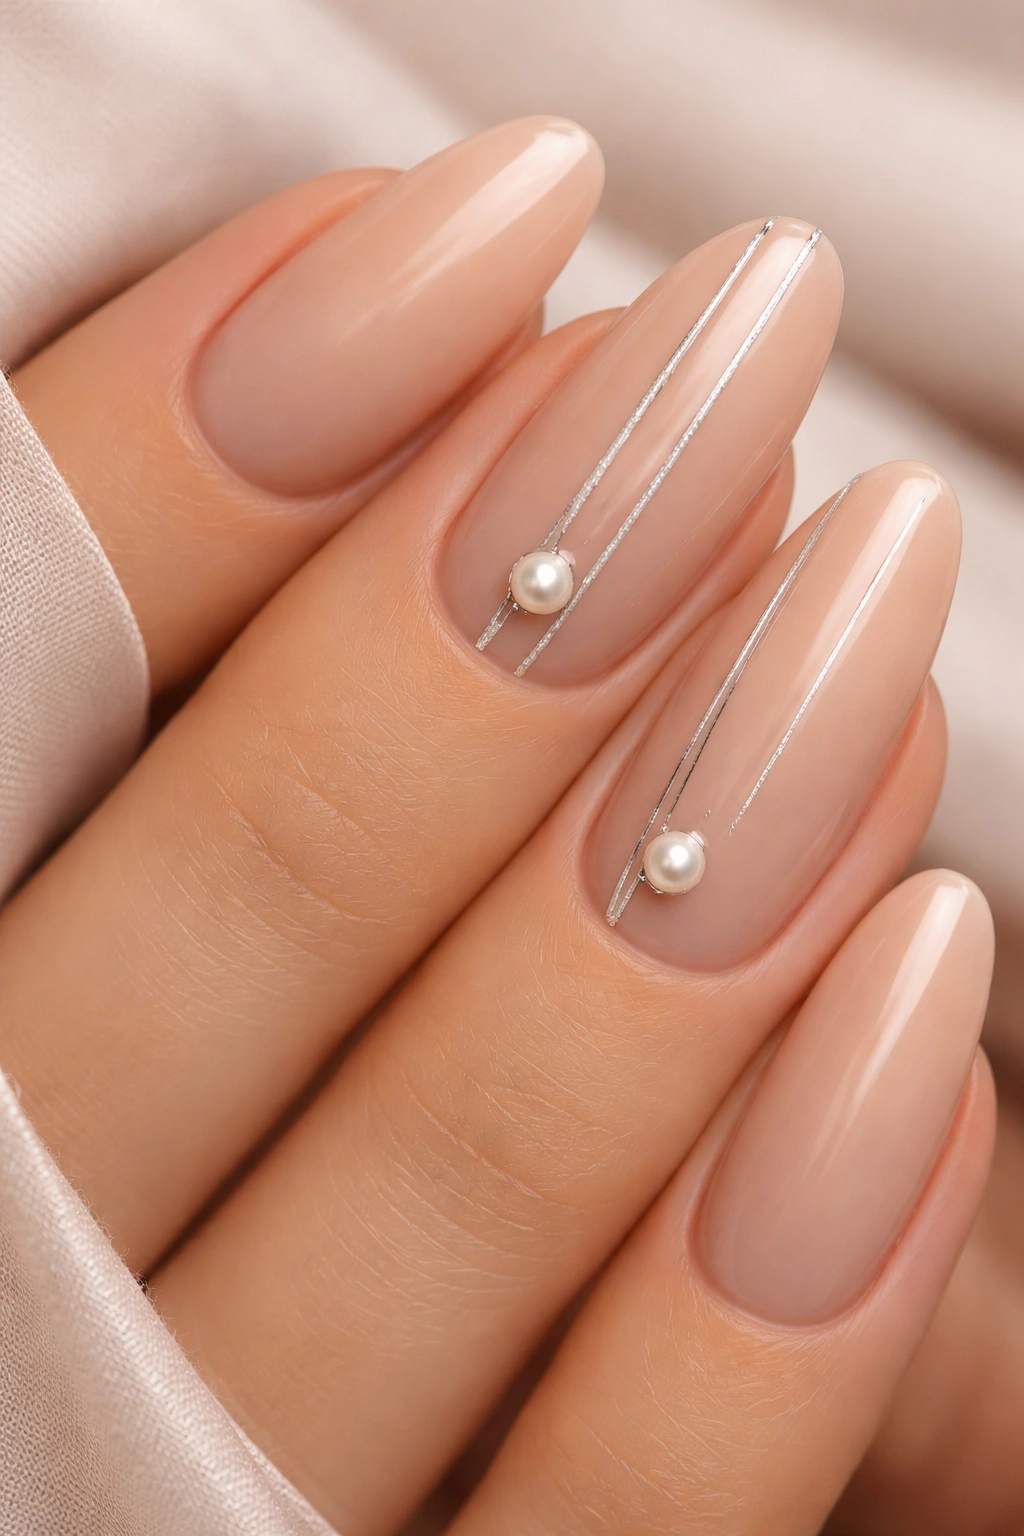
For a design that feels timeless and deeply elegant, go for nude with architectural detail. Use a nude base that’s slightly warmer than your skin tone, then add thin, crisp vertical silver stripes on two accent nails using a striping brush. On one nail per hand, place a single pearl or pearl-effect crystal at the cuticle area to anchor the design.
Modern Minimalism Meets Romance
This design is the manicure equivalent of wearing classic jewelry with a single statement piece. It feels intentional, elegant, and like you put real thought into your appearance without looking like you tried too hard. Long ovals showcase the striping beautifully because you have the length to make the lines feel purposeful.
Execution
- Use a nude that’s one to two shades warmer than your natural nail — this reads as more intentional than a perfect match
- Apply thin, even vertical stripes using a striping brush or nail art pen, spacing them about 2-3mm apart
- Use a clean detail brush to place one pearl at the base of your accent nails (typically ring finger and pinky)
- Topcoat everything with a glossy seal
- Expect 12-14 days of wear before visible tip wear
Quick fact: Silver striping actually photographs better than gold striping in most lighting conditions, so this design comes through beautifully in photos.
9. Deep Plum with Holographic Top Coat
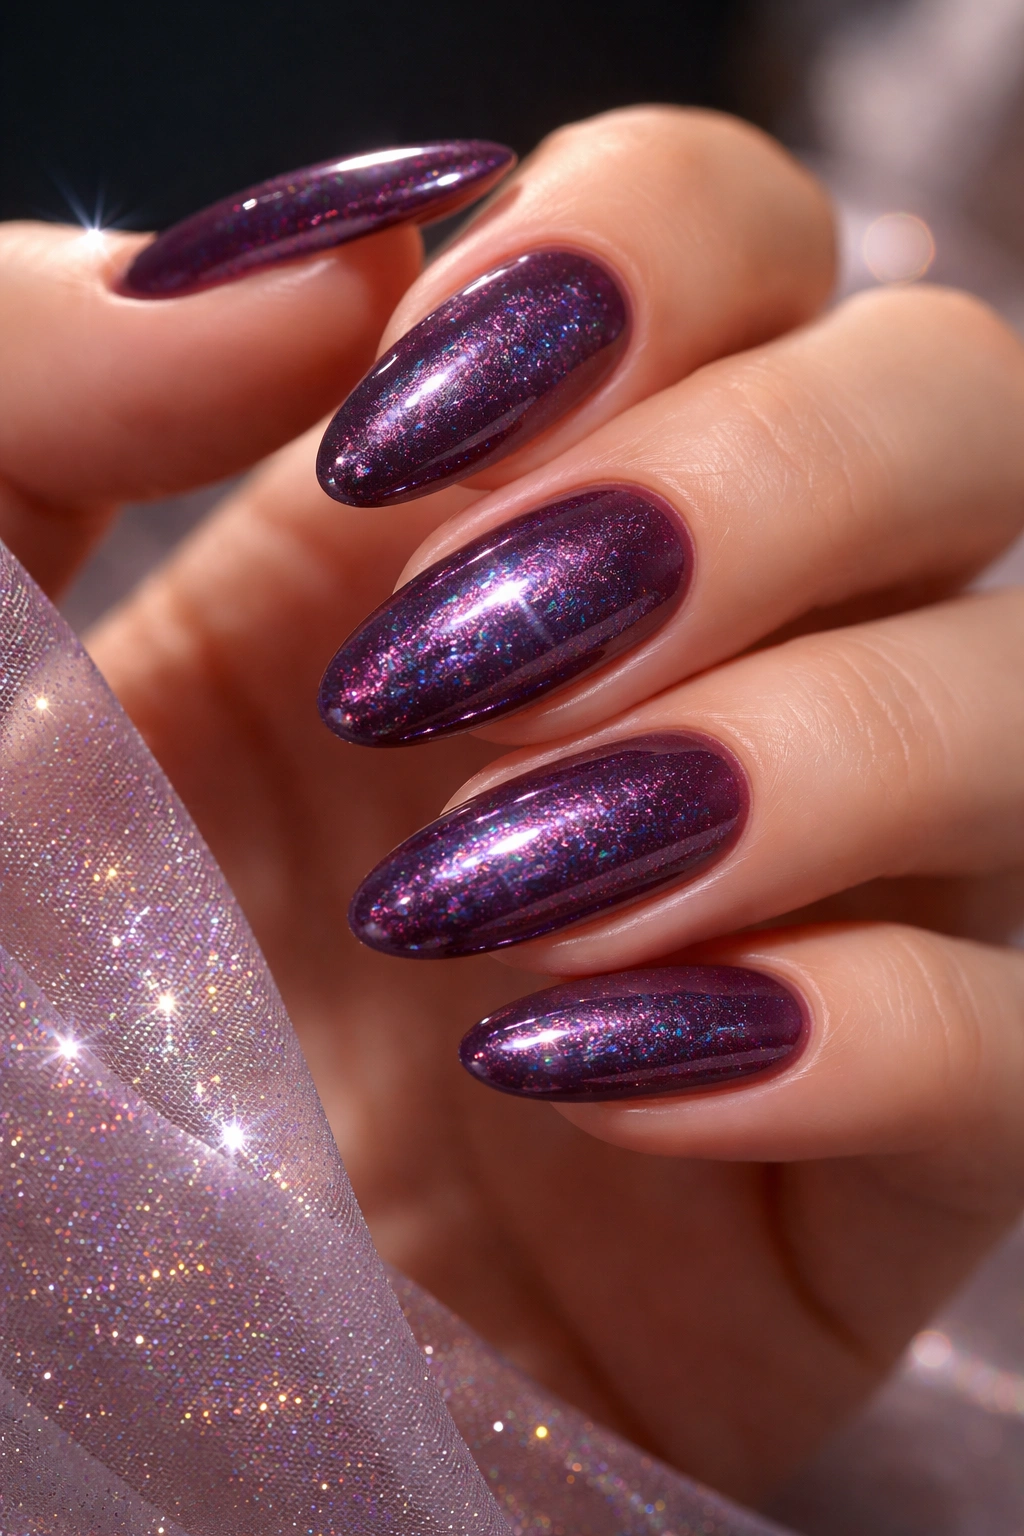
Plum is moody, romantic, and surprisingly flattering. Start with a deep plum base — not quite purple, not quite burgundy — and layer it with a holographic topcoat that adds a subtle iridescent shimmer. The holographic effect is barely visible in certain lighting but absolutely magical when light hits it directly. It’s the kind of detail that makes people lean in and ask what your nails are.
The “What Are You Wearing” Factor
Holographic topcoats are subtle but distinctive. They add visual interest and dimension without being loud or costume-like. On long ovals, the shimmer creates movement as you move your hands through the evening, making your nails feel alive and dynamic.
Getting the Look Right
- Apply two coats of a deep, rich plum base — make sure the coverage is opaque and even
- Select a holographic topcoat (brands like Sally Hansen and Essie make excellent options) and apply one generous coat
- Let the holographic coat cure completely before applying a final clear topcoat seal
- The holographic effect is most visible in bright light and sunlight; in candlelight it reads as a subtle shimmer
- Lasts 11-13 days before the holographic effect starts to fade noticeably
Pro tip: Take photos of your nails both in natural light and in indoor lighting to see the full effect — holographic nails photograph dramatically different in different light conditions.
10. Blush Pink with Ombré Gold Tips
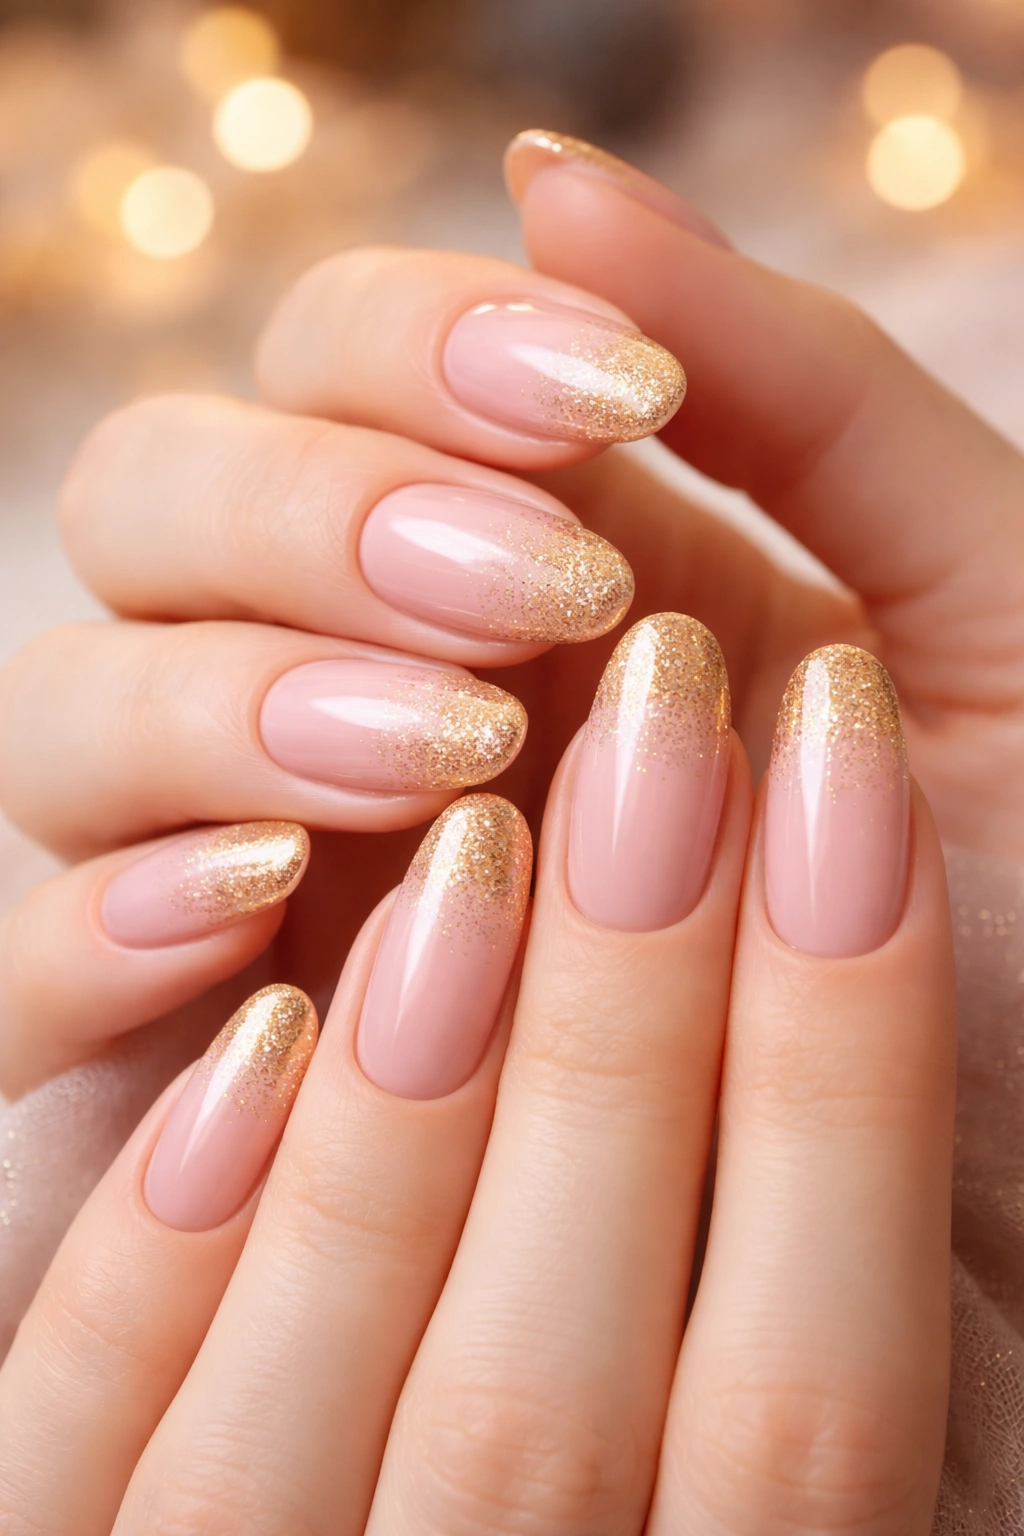
For your final date night option, consider a soft blush pink base that gradually transitions into a warm gold at the tips. This design combines romance (the soft pink), glamour (the gold), and sophistication (the gradient effect) all in one. On long ovals, the ombré works beautifully because you have the surface area to create a gradual, blended transition.
The Romantic Glamour Combination
Blush and gold together feel both romantic and put-together. The combination appeals to traditional romance while still feeling contemporary and intentional. It’s the kind of design that works whether you’re dressing up for a fancy dinner or heading out for drinks and conversation.
Creating the Ombré Transition
- Start with one to two coats of a soft blush pink base across all nails
- Using a makeup sponge, dab a warm gold polish onto the sponge
- Gently sponge this gold onto the tips of your nails, starting at the edge and working upward about one-third of the way up the nail
- Apply this sponged layer 3-4 times, letting each layer cure, to create a smooth, blended gradient
- The final effect should show pink at the base, blending smoothly into gold at the tips
- Seal with a glossy or shimmer topcoat to enhance the ombré effect and add shine
- This design typically lasts 12-15 days with good topcoat maintenance
Worth knowing: If your gradient looks harsh or streaky, apply an extra coat of pink on the base area to soften the transition — the blending should feel organic, not painted on.
Final Thoughts
The perfect date night nail design is one that makes you feel genuinely confident and beautiful. Long oval nails give you a real canvas to work with — they’re sophisticated by default, and they photograph beautifully. Whether you go for classic red, romantic blush, bold black, or any of these other designs, the key is choosing something that feels authentically you.
The best manicure for a date night isn’t the most complicated one or the trendiest one — it’s the one that makes you feel like the best version of yourself. These ten designs all work on long ovals because they respect the length and shape of your nails rather than fighting against it. They’re sophisticated without being costume-like, intentional without being overdone, and romantic without being saccharine.
Most importantly, they’re all designs that will still look incredible at the end of the evening when you’re doing that thing where you keep catching glimpses of your hands across the table. That’s when you’ll really appreciate having chosen a design that feels genuinely special.
