

Summer’s here, and you know what that means—it’s time to coordinate your nail game with your bestie. There’s something special about showing up to the beach, brunch, or a music festival with matching (or complementary) nail designs that scream “we’re together.” It’s like a secret handshake, but way cuter and visible from across the room.
The beauty of matching summer nails isn’t about being carbon copies of each other. You can play with complementary colors, split designs where each person gets half the story, or themed variations that tie together perfectly. Think of it as visual friendship bracelets for the Instagram age.
Whether you’re into bold neon vibes, soft pastels, or playful patterns, there’s a duo design that’ll fit your friendship’s personality. I’ve rounded up over 20 creative ideas that work for short nails, long coffin shapes, almond tips, and everything in between. Some are simple enough for a DIY Saturday afternoon, while others might need a talented nail tech to bring them to life.
Grab your best friend, scroll through these ideas together, and pick the one that makes you both say “yes, that’s so us.” Your summer memories deserve a manicure that’s just as fun.
1. Tropical Sunset Gradients
Picture this: your nails fading from deep orange to pink to purple, while your best friend rocks the same gradient but starts where yours ends. This creates a mirror effect that looks absolutely stunning when you hold your hands together.
The gradient technique works beautifully for summer because it captures those endless golden hour moments you’ll be chasing all season. One of you can start with a coral base that transitions to hot pink, while the other goes from lavender to deep magenta. When you’re both reaching for your iced coffees or posing for photos, the colors blend together like an actual sunset.
You don’t need to be a nail art expert to pull this off, either. Makeup sponges work perfectly for blending the colors—just dab the polish onto the sponge in stripes, then press and roll it onto your nails. A few coats later, you’ve got a professional-looking gradient. The key is using colors from the same warm family so they blend naturally rather than turning muddy.
This design also gives you flexibility with nail length and shape. It looks gorgeous on short, natural nails and equally dramatic on long almond or coffin shapes. The gradient does all the talking, so you can keep it simple or add a glossy top coat for extra dimension.
2. Watermelon Slices
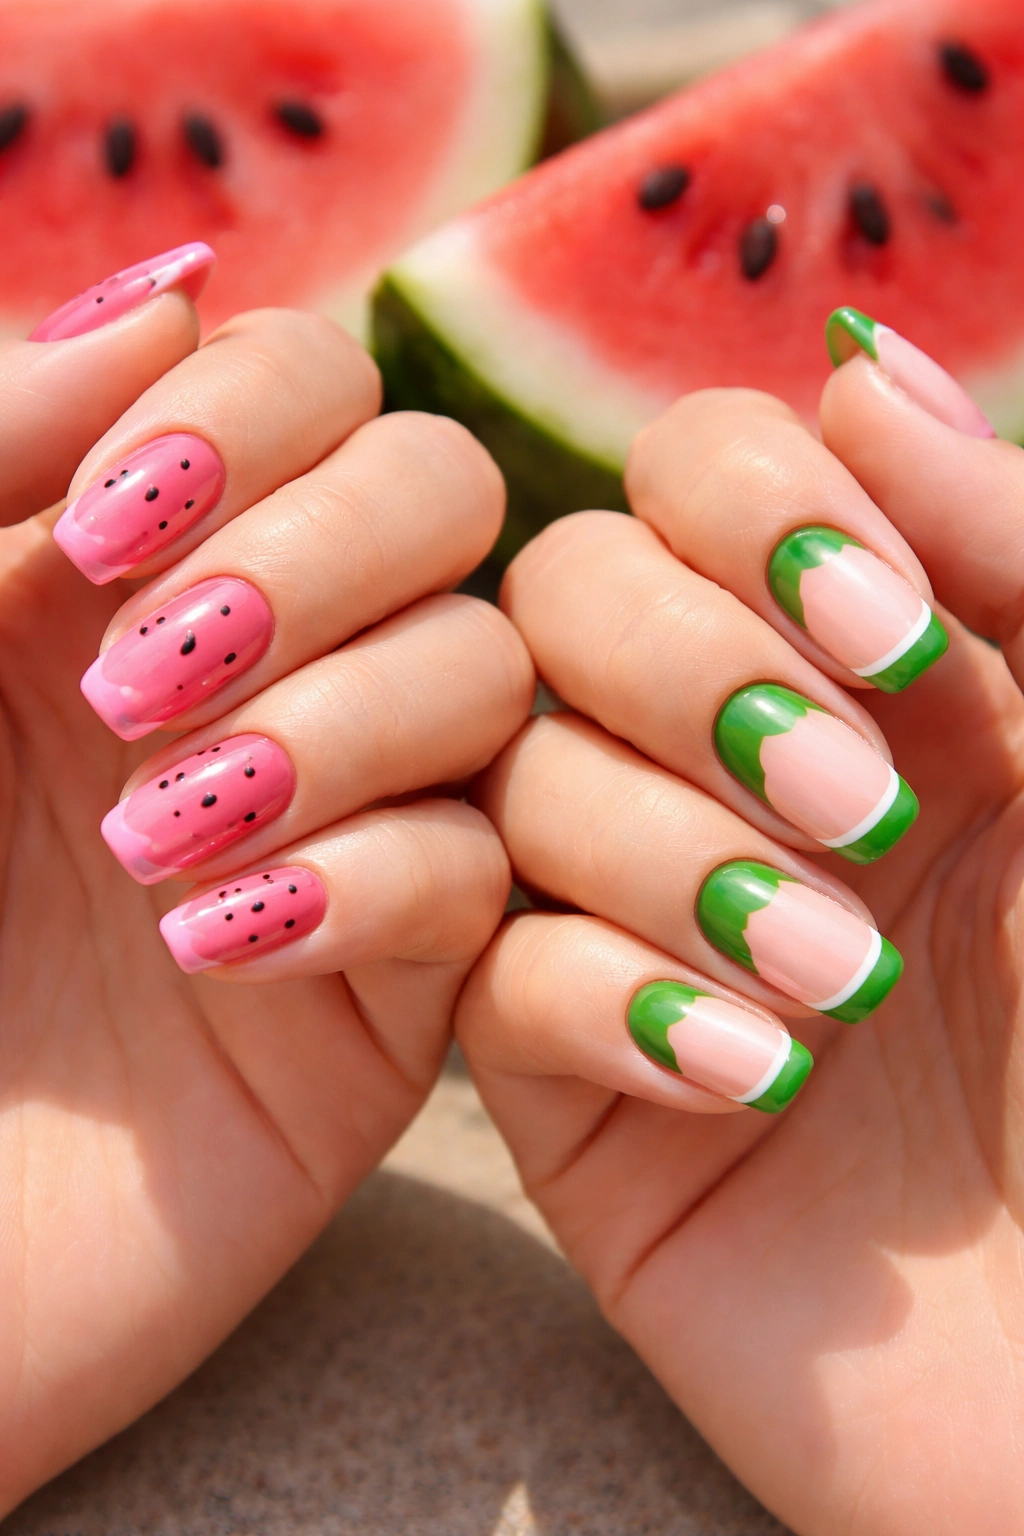
Nothing says summer quite like watermelon, and this playful design brings all that juicy freshness to your fingertips. One friend gets the bright pink “flesh” base with black seeds dotted on, while the other rocks the green rind with a thin white line separating it from pink tips.
This design works best when you coordinate who gets which part ahead of time. The pink portion is definitely the showstopper—use a vibrant hot pink or coral as your base, add tiny black dots with a dotting tool or the tip of a bobby pin, and you’re done. It’s surprisingly simple but gets compliments everywhere you go.
The green rind version requires a bit more precision with the white line, but it’s totally doable at home. Use striping tape to create a clean division between the green base and pink tips, or ask your nail tech to hand-paint a thin white stripe. Some people add a subtle yellow undertone beneath the green to mimic the outer rind layer, which adds an extra level of detail.
When you put your hands together, it literally looks like you’re holding watermelon slices. It’s perfect for pool parties, summer barbecues, or any occasion where you want people to smile when they see your nails. Plus, watermelon colors are flattering on all skin tones—the bright pink pops against deeper complexions, while the green adds an unexpected freshness for lighter skin.
3. Ocean Wave Ombré
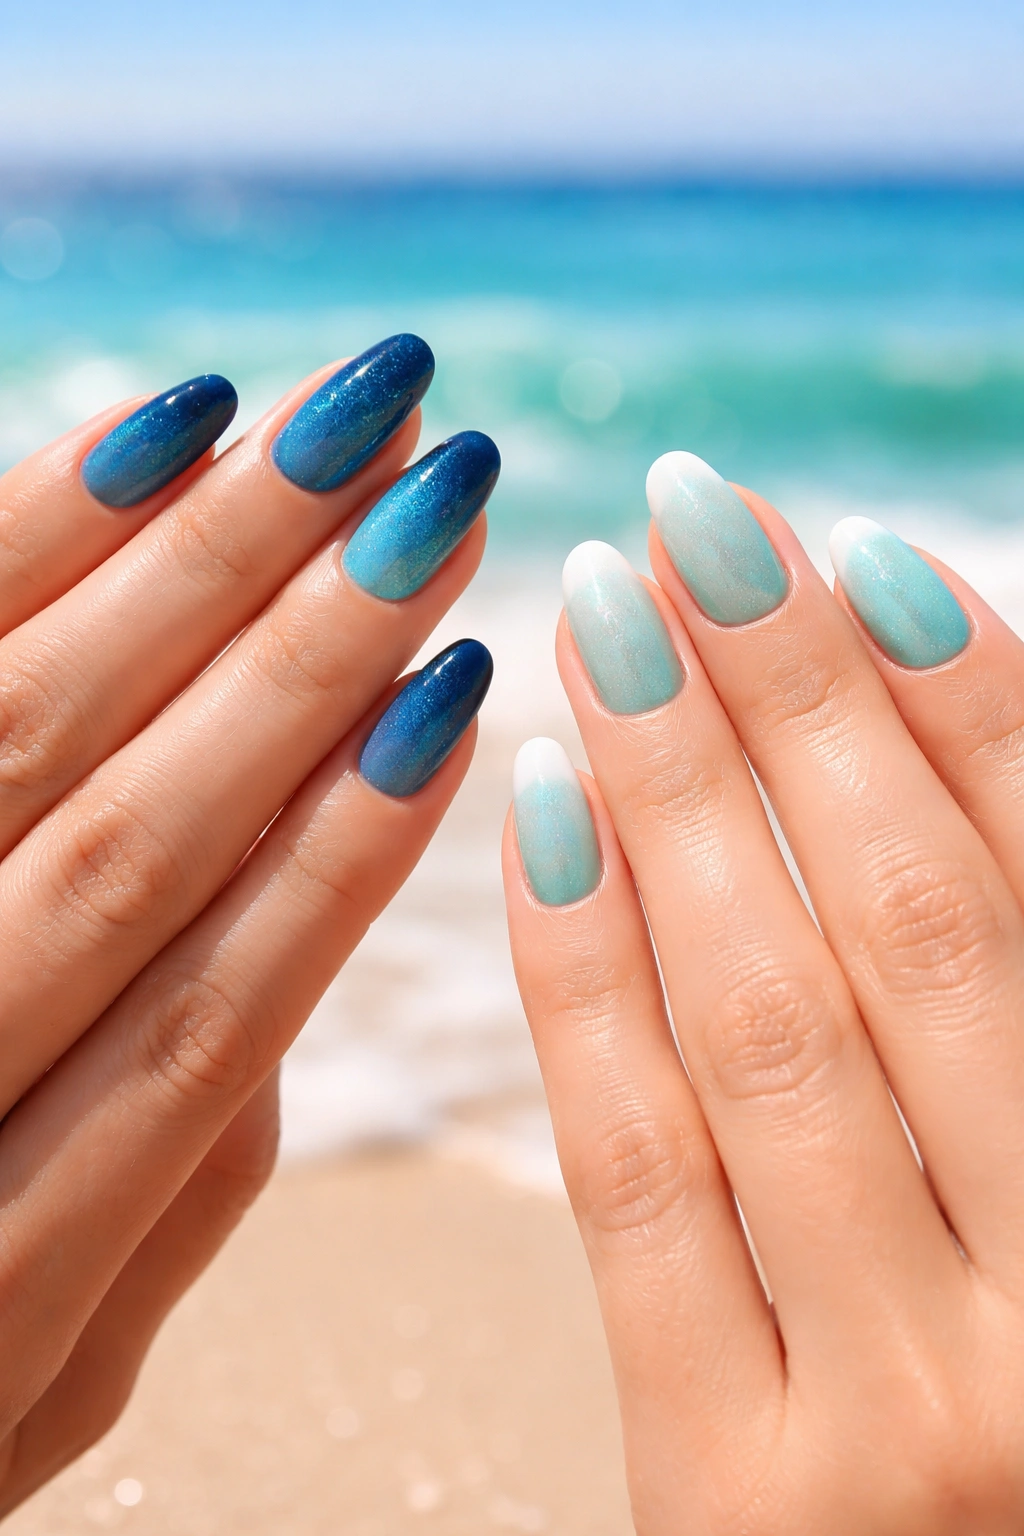
For the beach-obsessed duo, ocean wave nails capture that calming, mesmerizing feeling of watching waves roll in. One friend wears shades of deep navy and teal blending into turquoise, while the other sports seafoam green transitioning to white foam tips.
The magic happens in how you layer the colors. Start with the darkest shade at your cuticle and work toward lighter tones at the tips, mimicking how ocean water looks from shore—darker in the depths, lighter where it meets the sand. You can make this as subtle or dramatic as you want by choosing how many color transitions to include.
Adding a shimmer or glitter top coat takes this design from pretty to breathtaking. Look for top coats with fine iridescent shimmer that catches light like sun on water. Some nail artists even add tiny white streaks with a thin brush to represent sea foam or wave crests, giving the design actual movement and texture.
This style works year-round but feels especially right during those hot months when all you want is to dive into cool water. The color palette is naturally soothing, making it perfect if your personal style leans more bohemian or coastal grandmother rather than bold and bright.
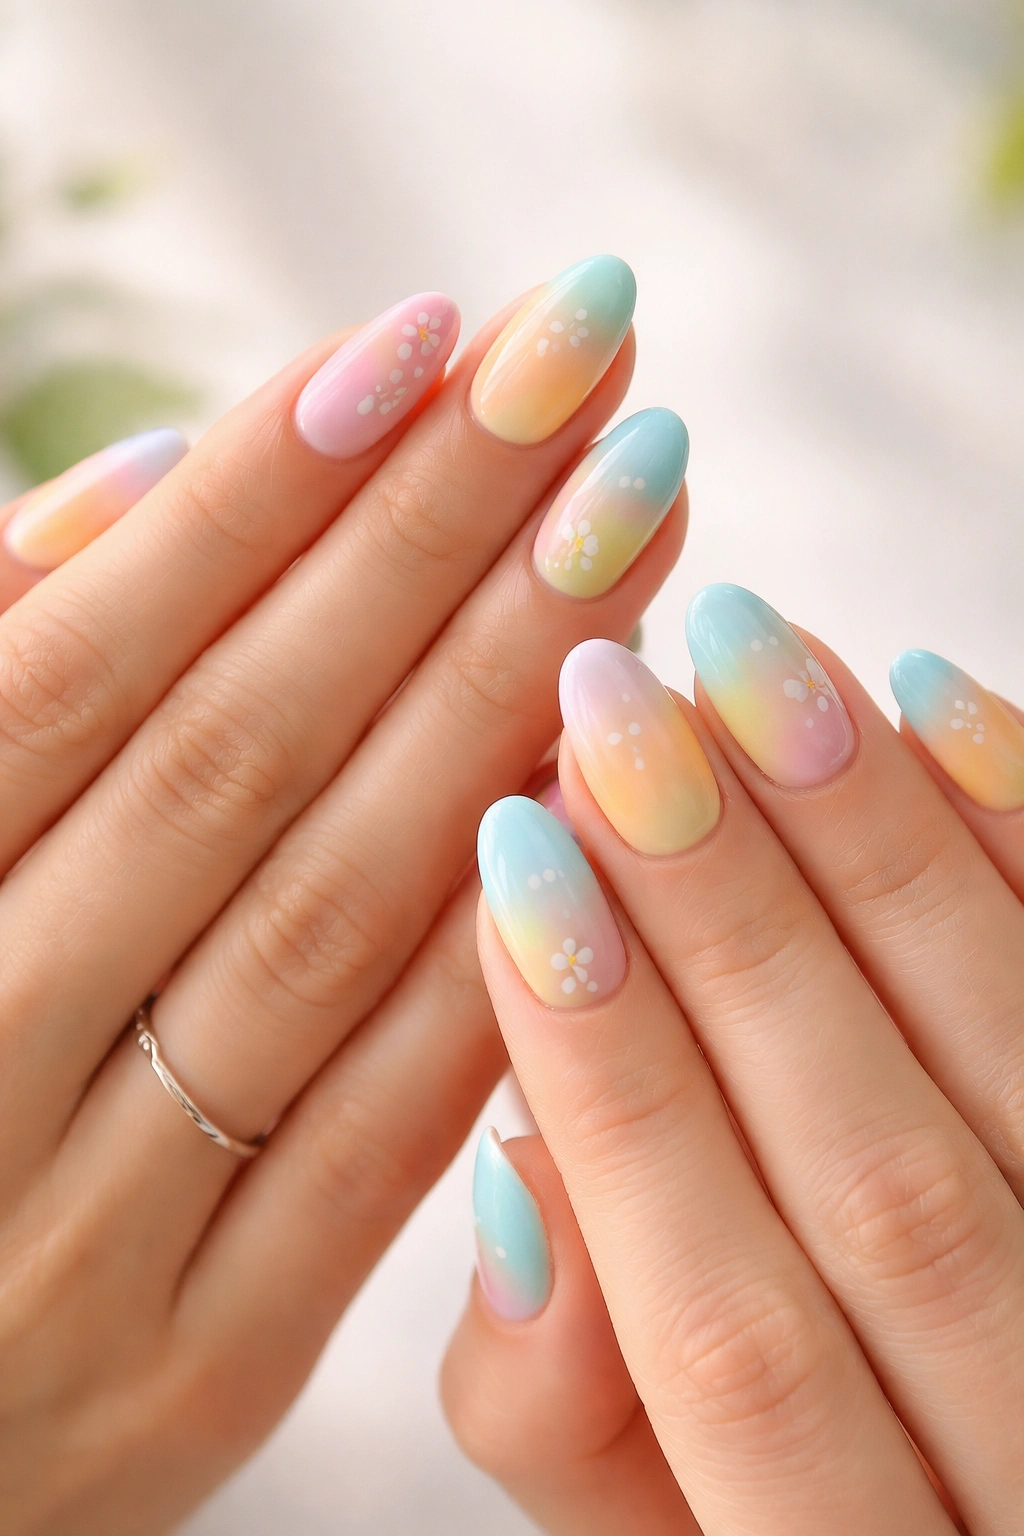
4. Matching Daisy Chains
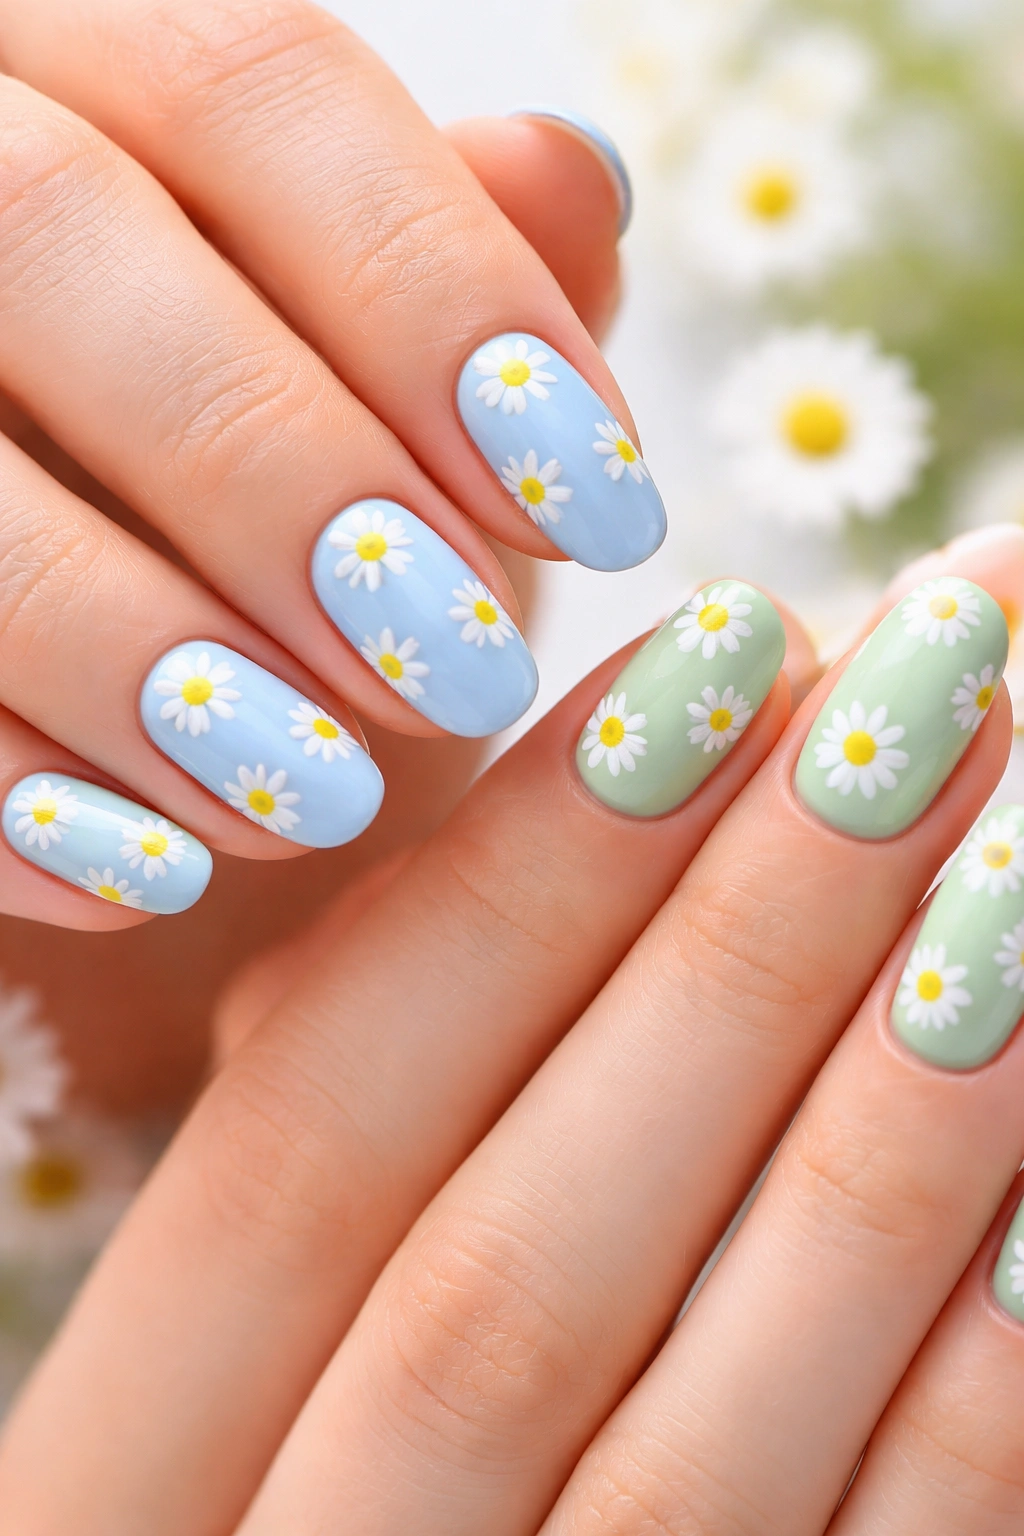
Delicate white daisies with yellow centers scattered across a pastel base create an innocent, summery vibe that’s honestly hard to beat. Both friends can sport the same daisy pattern but on different background colors—maybe one chooses baby blue while the other picks mint green or lavender.
The daisy itself is surprisingly easy to recreate. You’ll need white polish, yellow for the centers, and a dotting tool or toothpick. Make five white dots in a circle, add a yellow dot in the middle, and you’ve got yourself a daisy. Scatter them across all your nails or create an accent nail with multiple flowers—your choice.
What makes this design perfect for best friends is its sweet, carefree energy. Daisies represent innocence and loyal love, which feels appropriate for a friendship manicure. There’s also something nostalgic about it, like making daisy chains as kids during summer break.
You can mix up the placement so your designs complement rather than copy each other. One person might do a single daisy on each nail, while the other creates a garden scene with multiple flowers clustered together. Both approaches look cohesive when you’re together but also stand alone beautifully.
5. Rainbow Tips
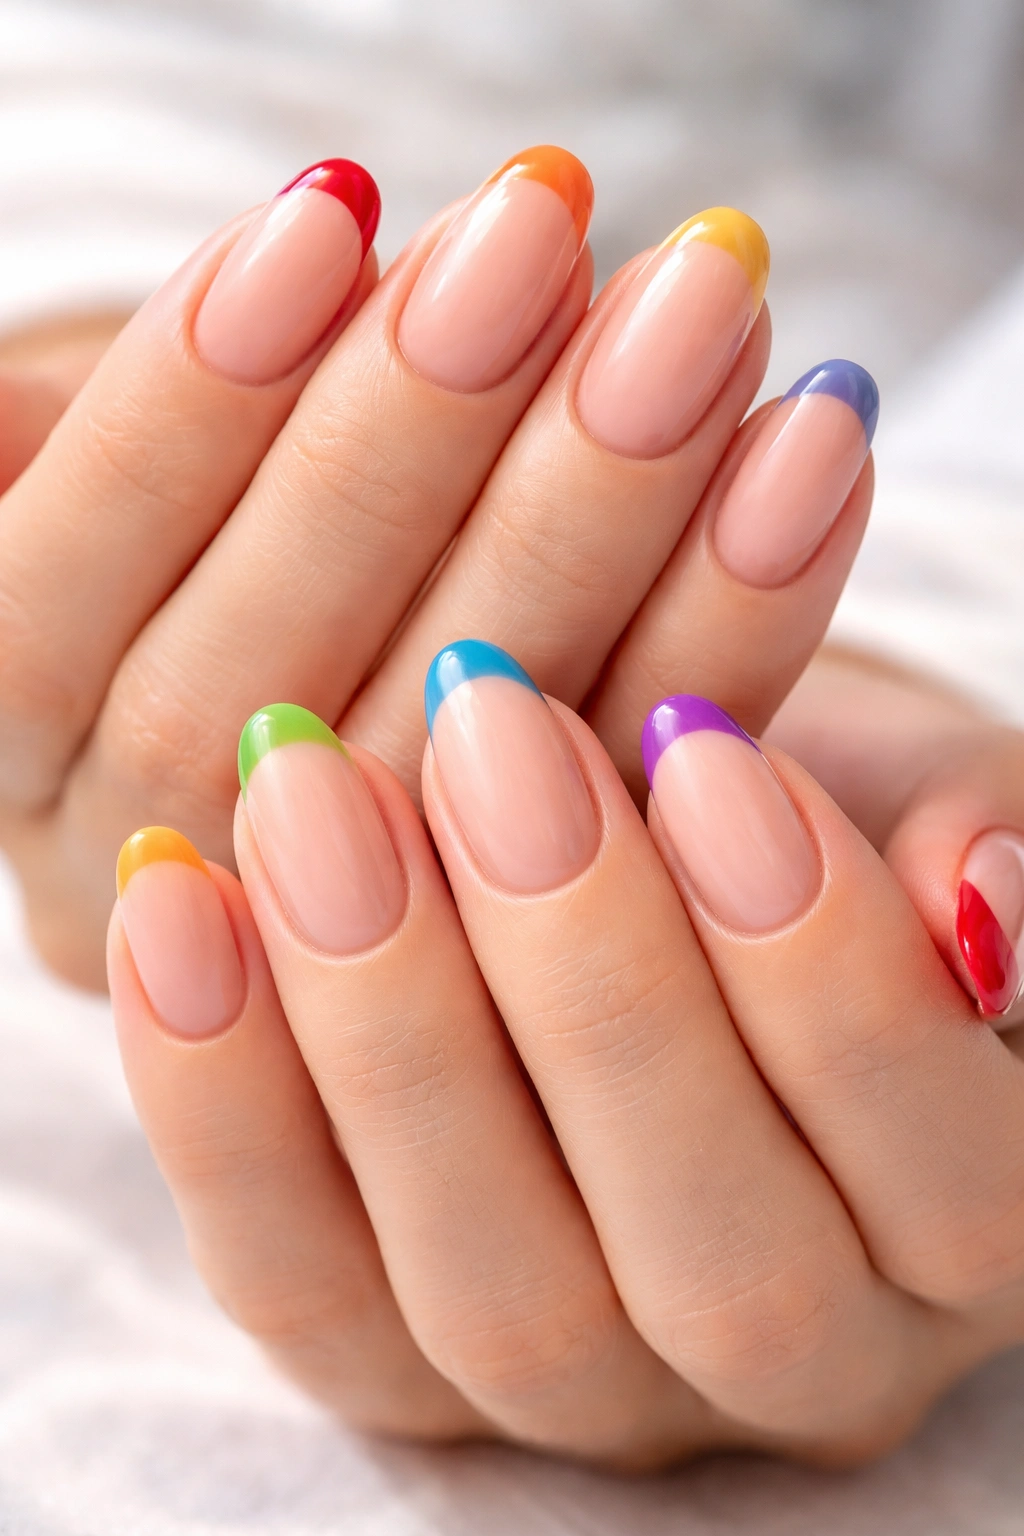
Classic French tips get a summer upgrade when you replace the traditional white with rainbow colors. Each nail gets a different color tip—red, orange, yellow, green, blue, purple—creating a full spectrum across your hands. Your best friend does the exact same thing, so you’ve got matching rainbow hands.
This design is joyful, inclusive, and incredibly versatile. You can keep the tips thin and subtle for a professional setting or go bold with thick, curved tips that make a statement. The rainbow order can be random or follow the traditional ROYGBIV sequence—whatever feels right to you.
The nude or sheer base keeps things from looking too chaotic, letting the colored tips be the focal point. Choose a base that matches your natural nail bed for the most seamless look. If you’ve got shorter nails, don’t worry—this design actually looks fantastic on any length because the color is concentrated at the tips.
One fun variation: alternate who does warm colors (red, orange, yellow) versus cool colors (green, blue, purple). When you’re standing next to each other, you represent opposite ends of the spectrum but still clearly match. It’s a subtle way to show you’re different people with the same vibe.
6. Butterfly Wings (Split Design)
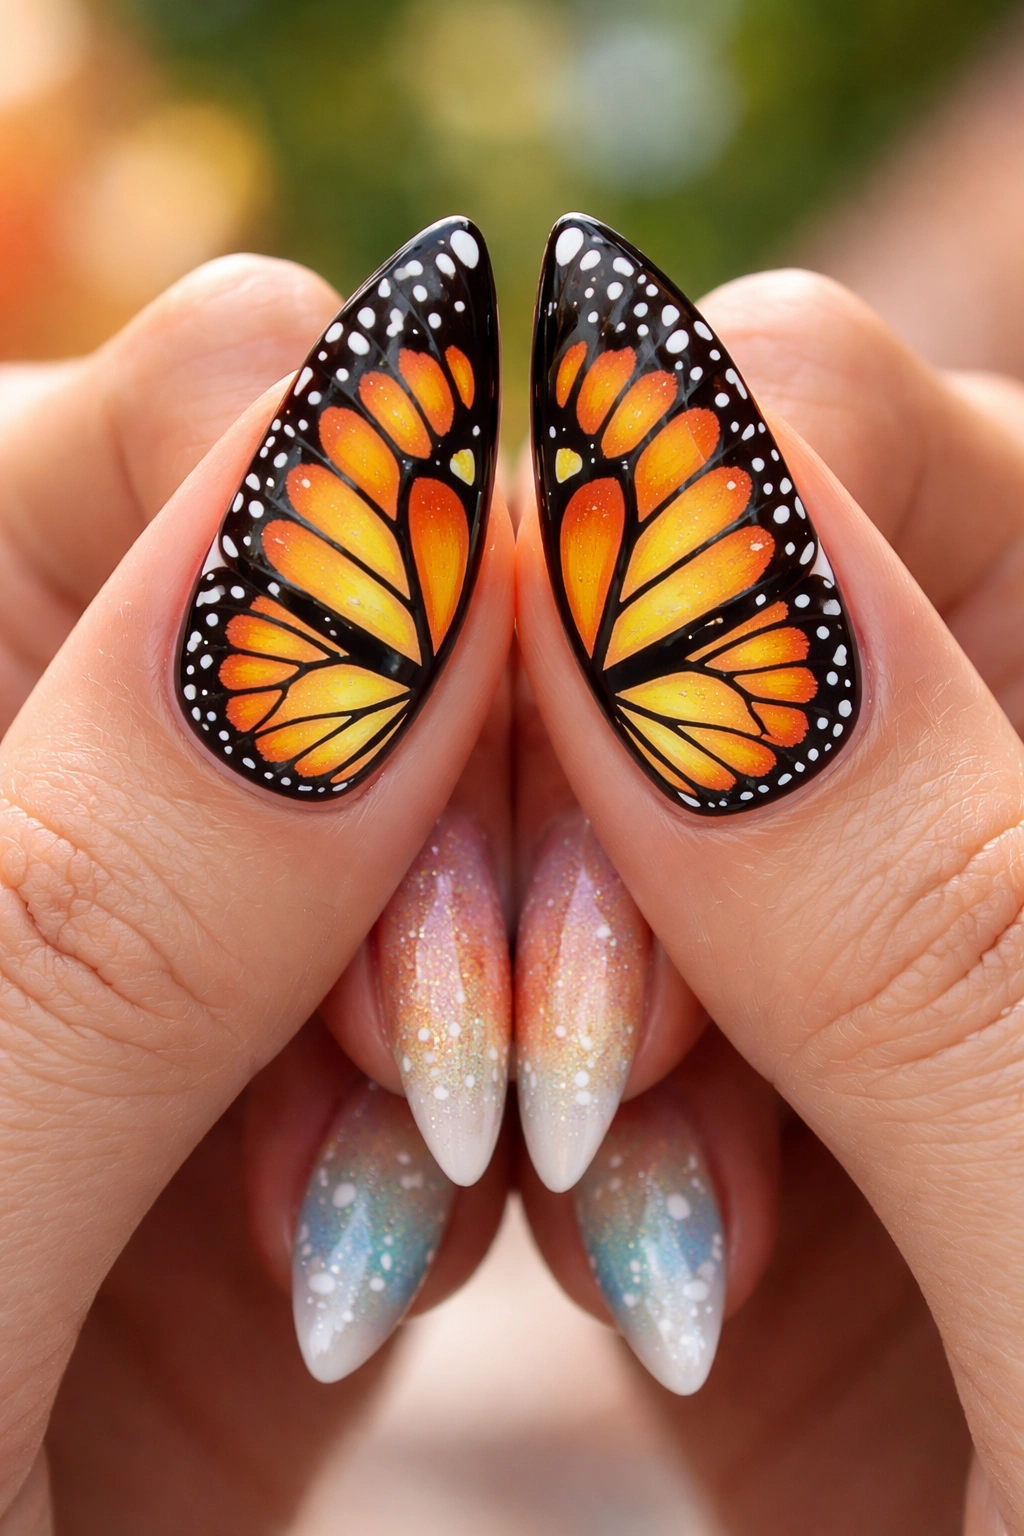
This might be the most Instagram-worthy option on the list. Each friend gets half of a butterfly design—when you press your pointer fingers together, the two halves create a complete butterfly. One person gets the left wings, the other gets the right wings.
The artistry required for this design means you’ll probably want to visit a skilled nail technician who can paint detailed wings with symmetry in mind. The wings can be realistic monarch butterflies in orange and black, ethereal blue morpho butterflies, or abstract designs in your favorite color combinations. The level of detail can range from simple color blocking to intricate patterns with dots, lines, and shading.
What makes this design so special is the intentionality behind it. You’re literally incomplete without your other half—your best friend. It’s a beautiful metaphor for friendship and makes for incredible photos. Every time you look at your nails, you’ll think of them.
Keep in mind that this design looks best on similar nail lengths and shapes, so you’ll want to coordinate that ahead of time. If one person has short round nails and the other has long stilettos, the butterfly won’t line up properly when you put your fingers together. Chat with your nail tech about getting your nails shaped similarly during the appointment.
7. Lemon and Lime Duo
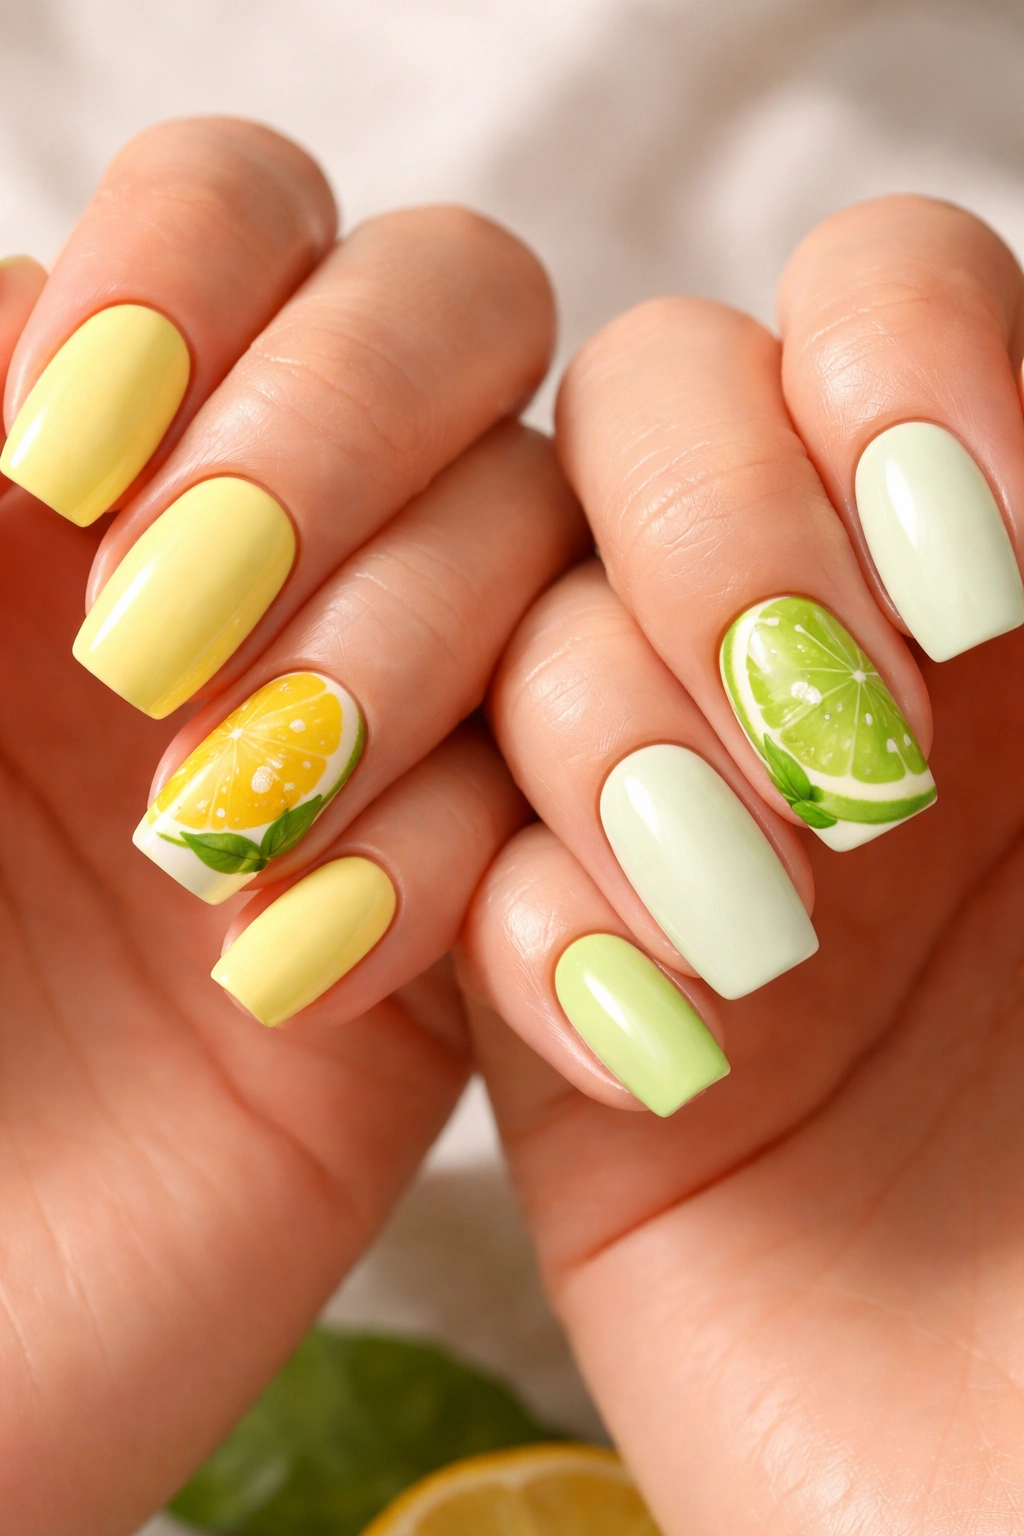
Fresh, citrusy, and absolutely adorable—one friend gets lemon designs while the other rocks lime. You can go literal with fruit slice cross-sections showing the segments, or keep it simple with solid yellow and green bases accented with tiny fruit illustrations.
The fruit slice design works best as an accent nail. Paint most nails a complementary color (white, cream, or pale yellow for lemons; white or pale green for limes), then feature detailed fruit slices on your ring fingers or thumbs. Use a thin brush to create the segment lines radiating from the center, and add a bit of white to suggest the pithy rind.
Another approach is creating a whole fruit on each nail with dimensional shading. Paint an oval shape in bright yellow or lime green, add a darker shade on one side for depth, and maybe include a tiny leaf for extra charm. This gives you actual tiny lemons or limes sitting on your nails.
The beauty of this pairing is how the colors complement each other naturally—yellow and green are right next to each other on the color wheel, creating visual harmony. When you’re together, it’s clearly coordinated. When you’re apart, each design stands perfectly on its own without looking like something’s missing.
8. Beach Glass Shimmer
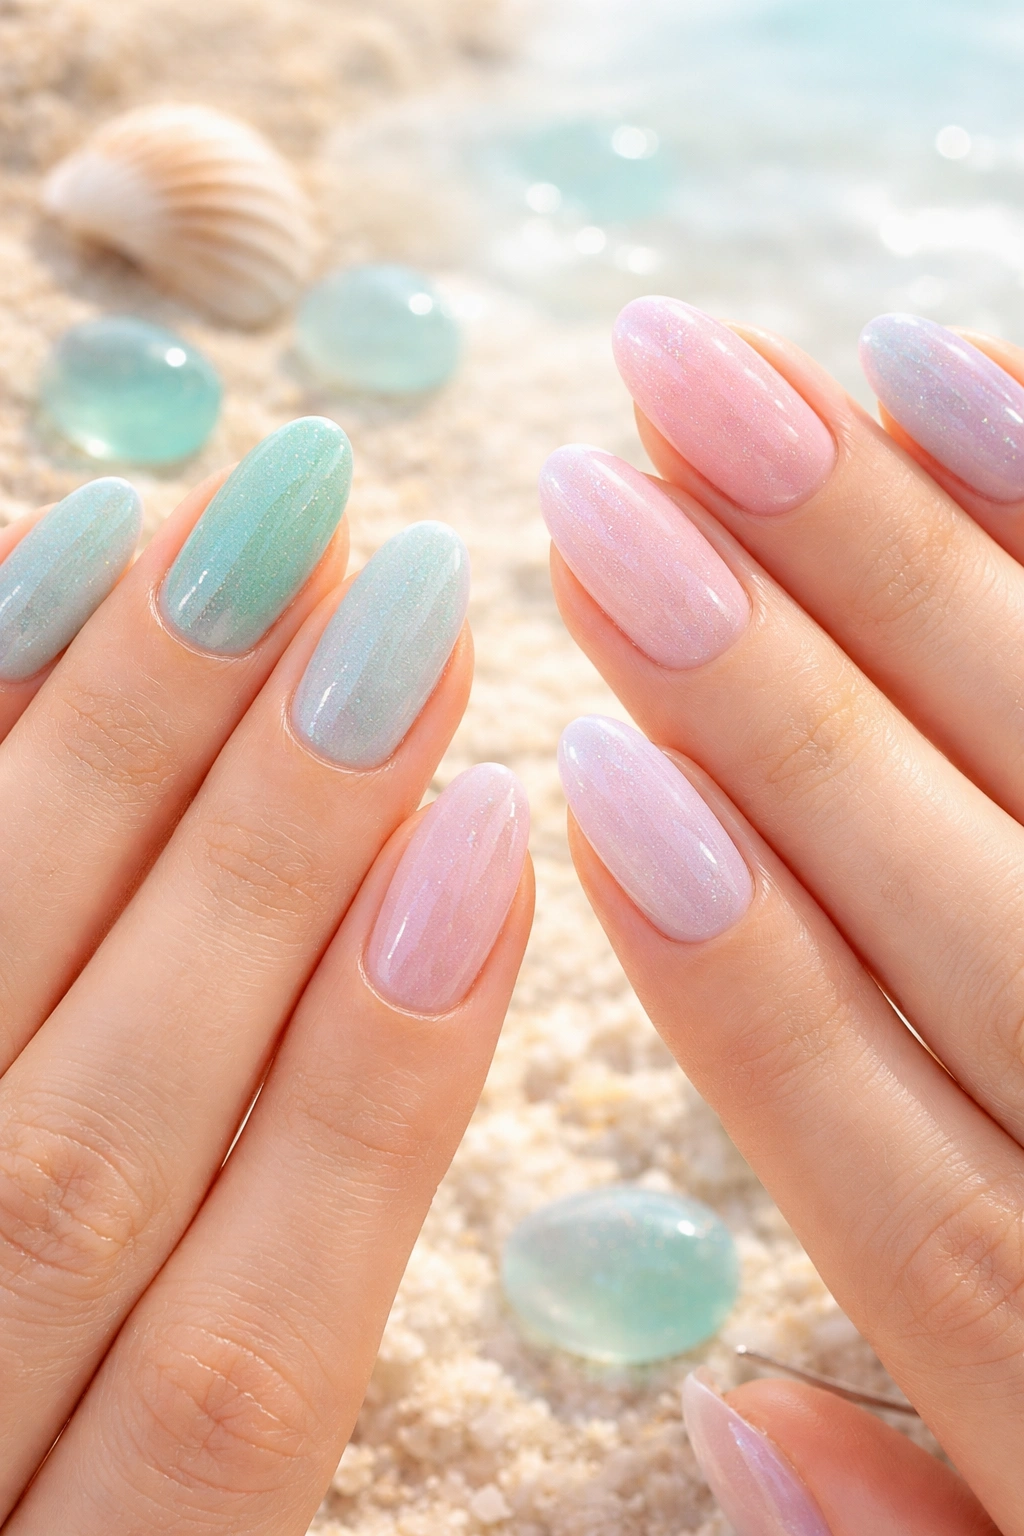
Soft, translucent colors with shimmer capture that frosted beach glass aesthetic you find during long walks on the shore. Think muted seafoam, pale aqua, frosted pink, and milky lavender—all with a subtle shimmer finish that catches sunlight beautifully.
Both friends can wear the same palette but arrange the colors differently across their fingers. You might do seafoam on your thumbs and pinkies while your bestie puts that same shade on her middle and ring fingers. This creates unity without being matchy-matchy in an obvious way.
The key to nailing this look (pun intended) is choosing polishes with a jelly or sheer finish rather than full opacity. You want that translucent quality that actual beach glass has. Layer two or three coats to build up color while maintaining some sheerness, then top with a shimmer coat that has fine, glass-like particles rather than chunky glitter.
This design has a quiet elegance that works for literally any summer occasion. It’s subtle enough for work, sophisticated enough for weddings, and beachy enough for vacation. The shimmer adds just enough interest to keep things from being boring, while the muted tones feel grown-up and refined.
9. Coral Reef Patterns
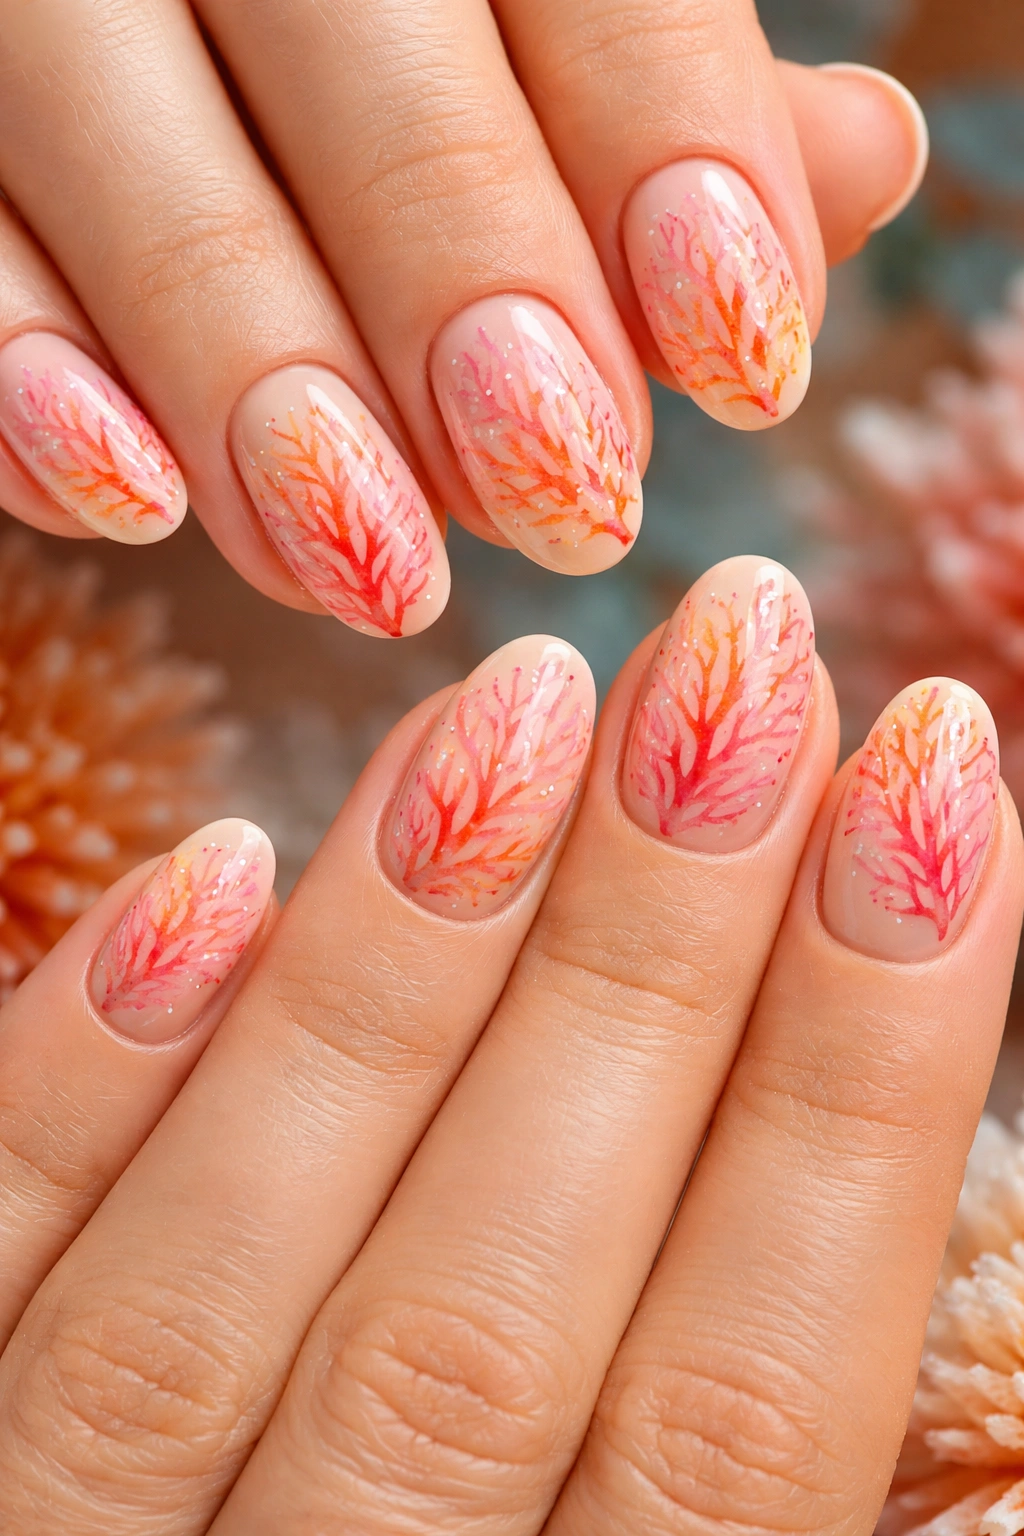
Bring the underwater world to your fingertips with coral-inspired designs in shades of pink, orange, red, and cream. These organic, branching patterns look complex but are actually quite forgiving since coral doesn’t have strict symmetry—imperfections look intentional.
One friend can focus on coral patterns while the other does complementary sea elements like starfish, small fish, or bubbles. This creates a full underwater scene when you’re together but gives each person a distinct design. The color palette stays consistent—warm corals, sandy neutrals, pops of turquoise—so everything ties together visually.
Creating coral patterns involves painting branching, tree-like structures in various coral shades over a light base. Start with a main “trunk” and add smaller branches extending outward, getting thinner as they go. Layer different coral colors for dimension—maybe a pink coral overlapping with an orange one. Add small dots at the branch ends to represent coral polyps.
This design reads as artistic and unique rather than typical summer nails. It shows you put thought into something creative and nature-inspired rather than just slapping on some bright polish. Plus, it’s a great conversation starter about ocean conservation—you can mention how you’re supporting coral reef protection efforts while showing off your nails.
10. Ice Cream Cone Cuties
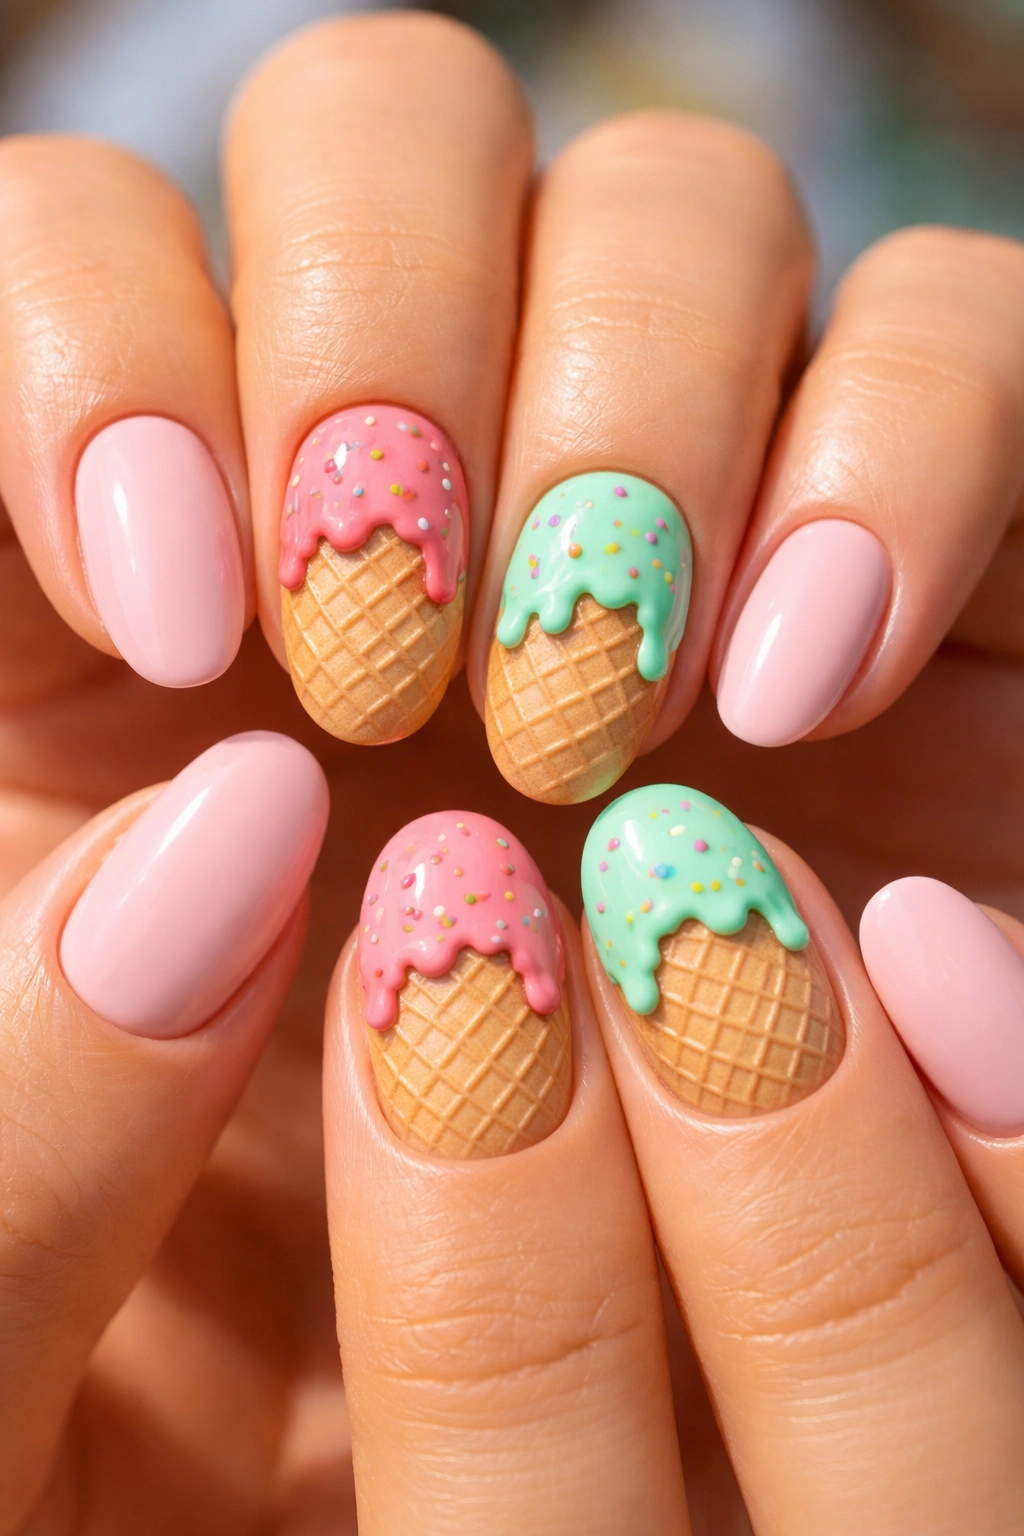
Playful and sweet (literally), ice cream cone nails bring nostalgic summer fun to your manicure. One friend can rock strawberry pink scoops while the other goes for mint chocolate chip green with tiny brown flecks, both atop waffle cone-textured accent nails.
The waffle cone texture is easier to achieve than you’d think. Paint the nail a warm tan or brown, then use a thin brush or nail art pen to create a crosshatch pattern that mimics the cone’s texture. It doesn’t need to be perfect—the overall effect is what matters. Top with a matte finish to enhance the waffle texture.
For the ice cream portion, choose creamy, pastel shades that look delicious. You can paint solid color nails or get fancy by adding a “melting” effect where the ice cream color drips down from the tip. Some people add sprinkles using colorful micro-dots or actual caviar beads for three-dimensional texture.
Another cute variation: different ice cream flavors on each nail, so you’ve got a full dessert menu on your hands. Strawberry, mint, chocolate, vanilla, and bubblegum all translate beautifully to nail colors. Your best friend can do the same flavors in different positions, or choose complementary flavors that you’d order together at an ice cream shop.
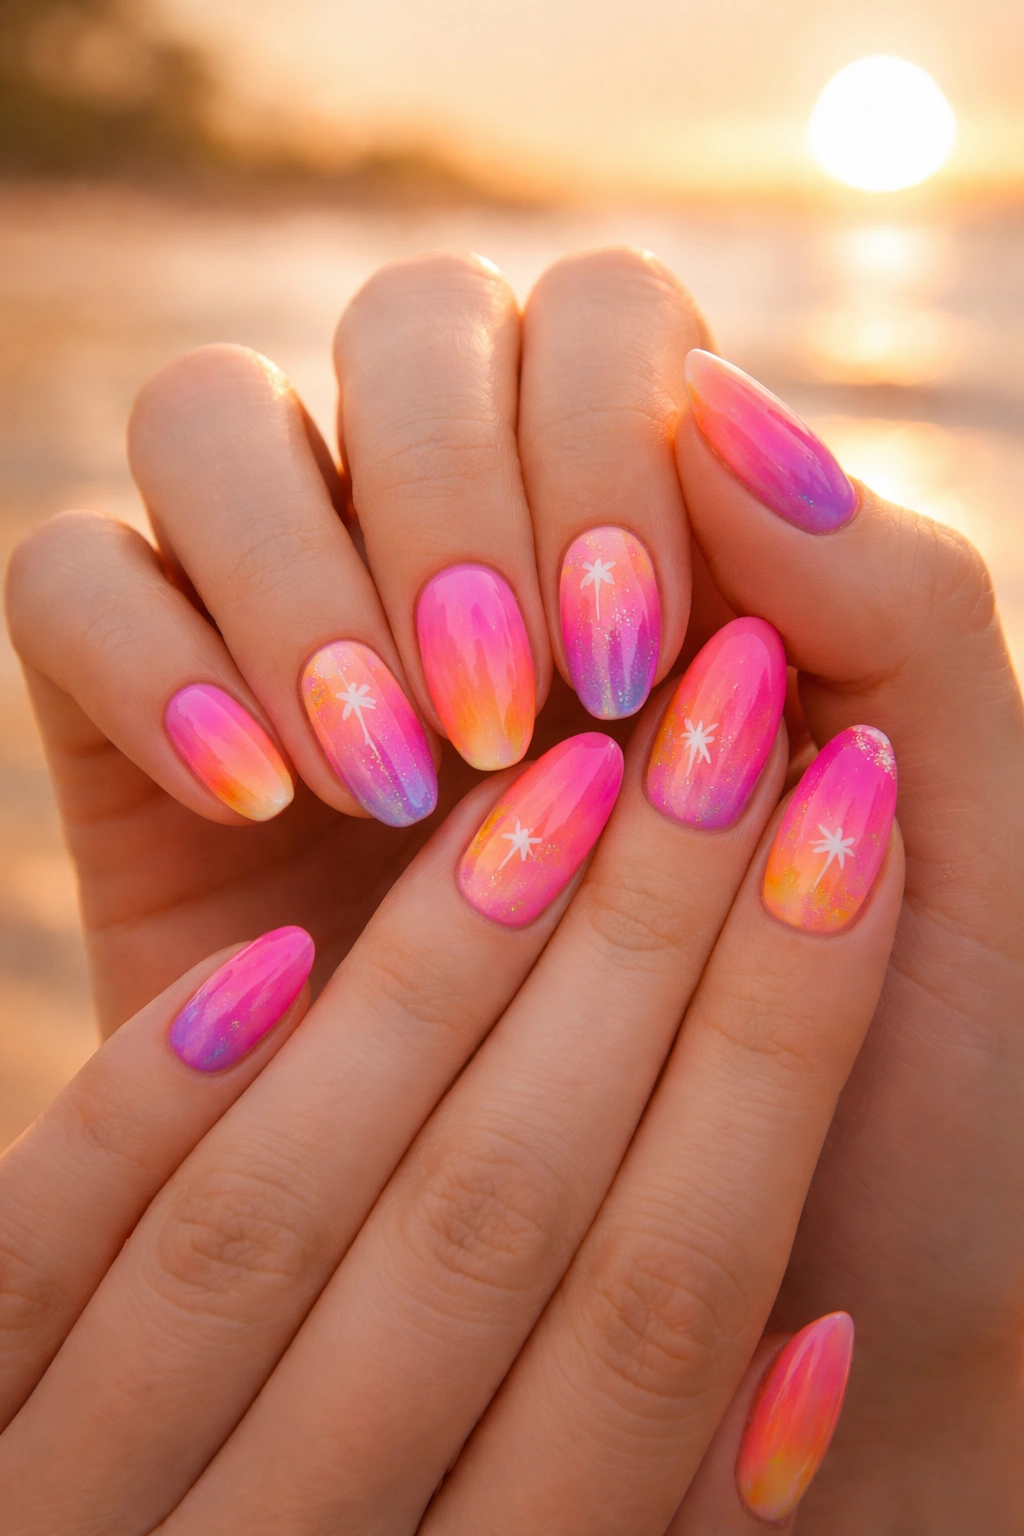
11. Palm Tree Silhouettes
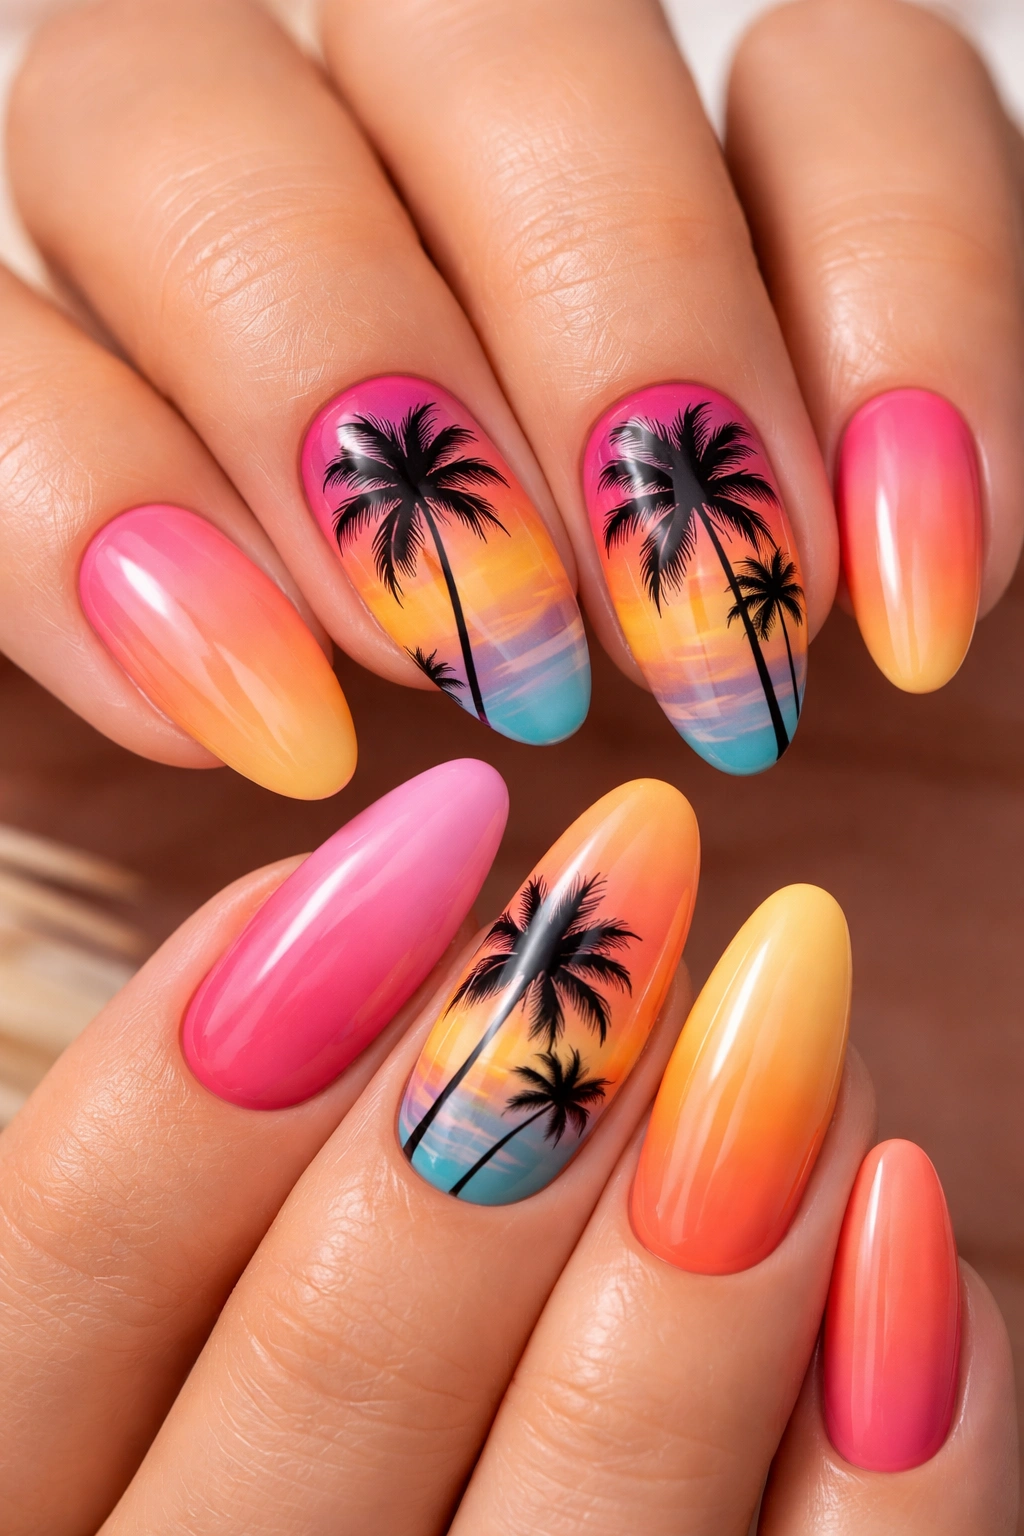
Tropical vibes are mandatory for summer, and palm tree silhouettes against gradient sunset backgrounds deliver exactly that. These work beautifully as accent nails—most fingers feature solid colors or gradients, while one or two nails per hand show the actual palm tree design.
The sunset background can be that gradient technique we talked about earlier—orange melting into pink, or pink fading into purple. Once that’s completely dry, use black polish and a thin nail art brush to paint the palm tree silhouette. The trunk is relatively straight with subtle texture lines, and the fronds fan out at the top in that distinctive palm shape.
One friend might do palm trees on her ring fingers while the other features them on thumbs. You could also split the scene—one person does palm trees on the left side of the sunset, the other on the right side. When you stand next to each other, it creates a full tropical landscape.
This design looks way more complicated than it actually is. The silhouette approach means you don’t need to worry about realistic details or shading—just clean, bold black shapes against a colorful background. Even if your palm trees aren’t botanically accurate, they’ll still read as tropical and summery. That’s the beauty of silhouette art.
12. Neon French Tips
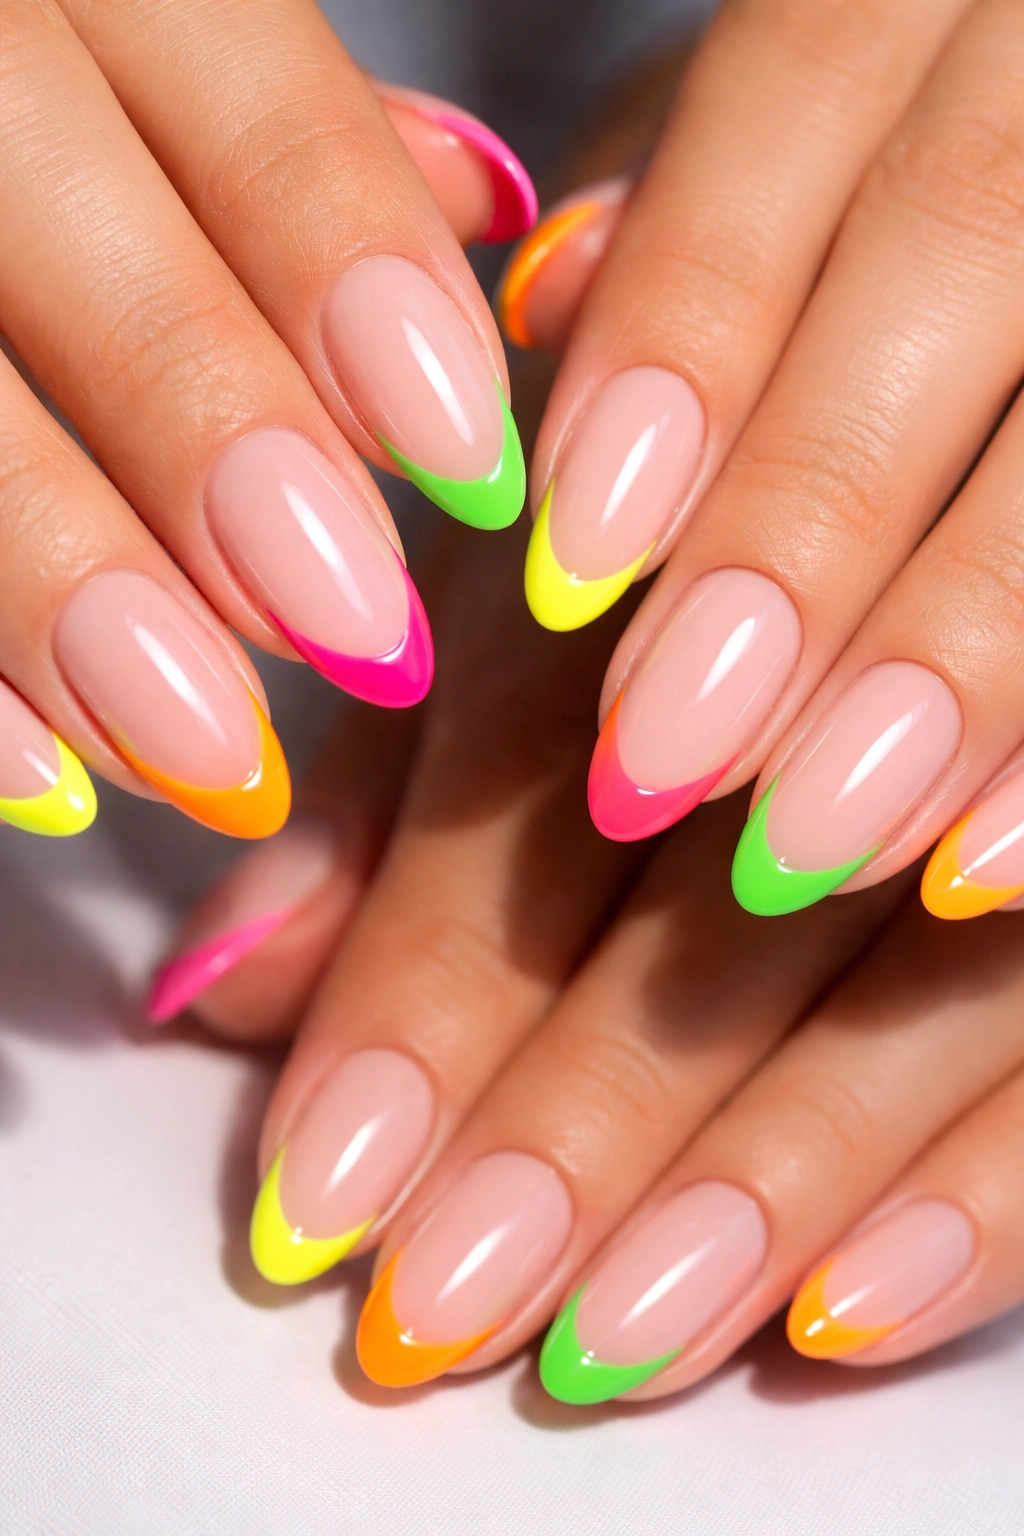
Take the classic French manicure and crank up the volume with electric neon tips. We’re talking highlighter yellow, hot pink, lime green, and orange that practically glows under blacklight. Both friends sport the same neon palette but can choose different color arrangements or tip thicknesses.
Neon polishes have come a long way in terms of formula and opacity, but they still photograph beautifully and make a bold statement in person. The contrast between the neutral or nude base and the intense neon tips creates visual impact without covering your entire nail in bright color—which can sometimes feel overwhelming.
You can go traditional with thin, curved tips, or modernize it with thicker, straight-across tips that look more graphic and contemporary. Some people alternate neon colors across their fingers, while others do all one color. There’s no wrong approach here.
One insider tip: neon polishes tend to stain nails more than regular colors, so definitely use a good base coat. Let your base coat dry completely before applying the neon to prevent any bleeding into the nude portion. A gel top coat will make the neons even more vivid and extend their wear time significantly.
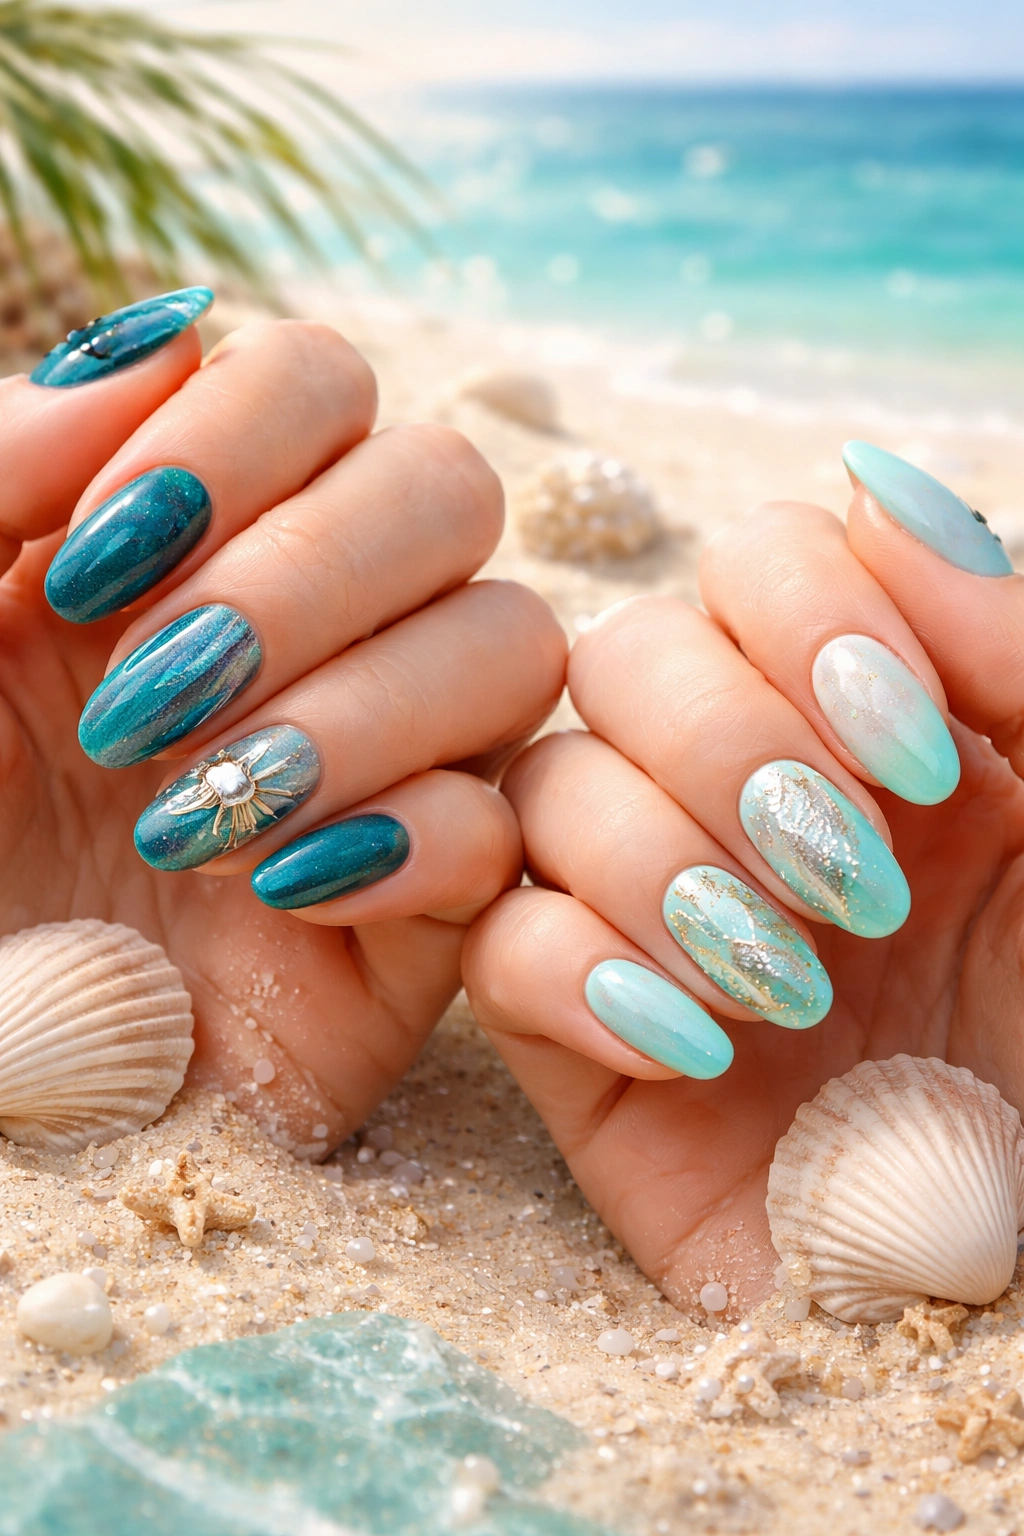
13. Seashell Accents
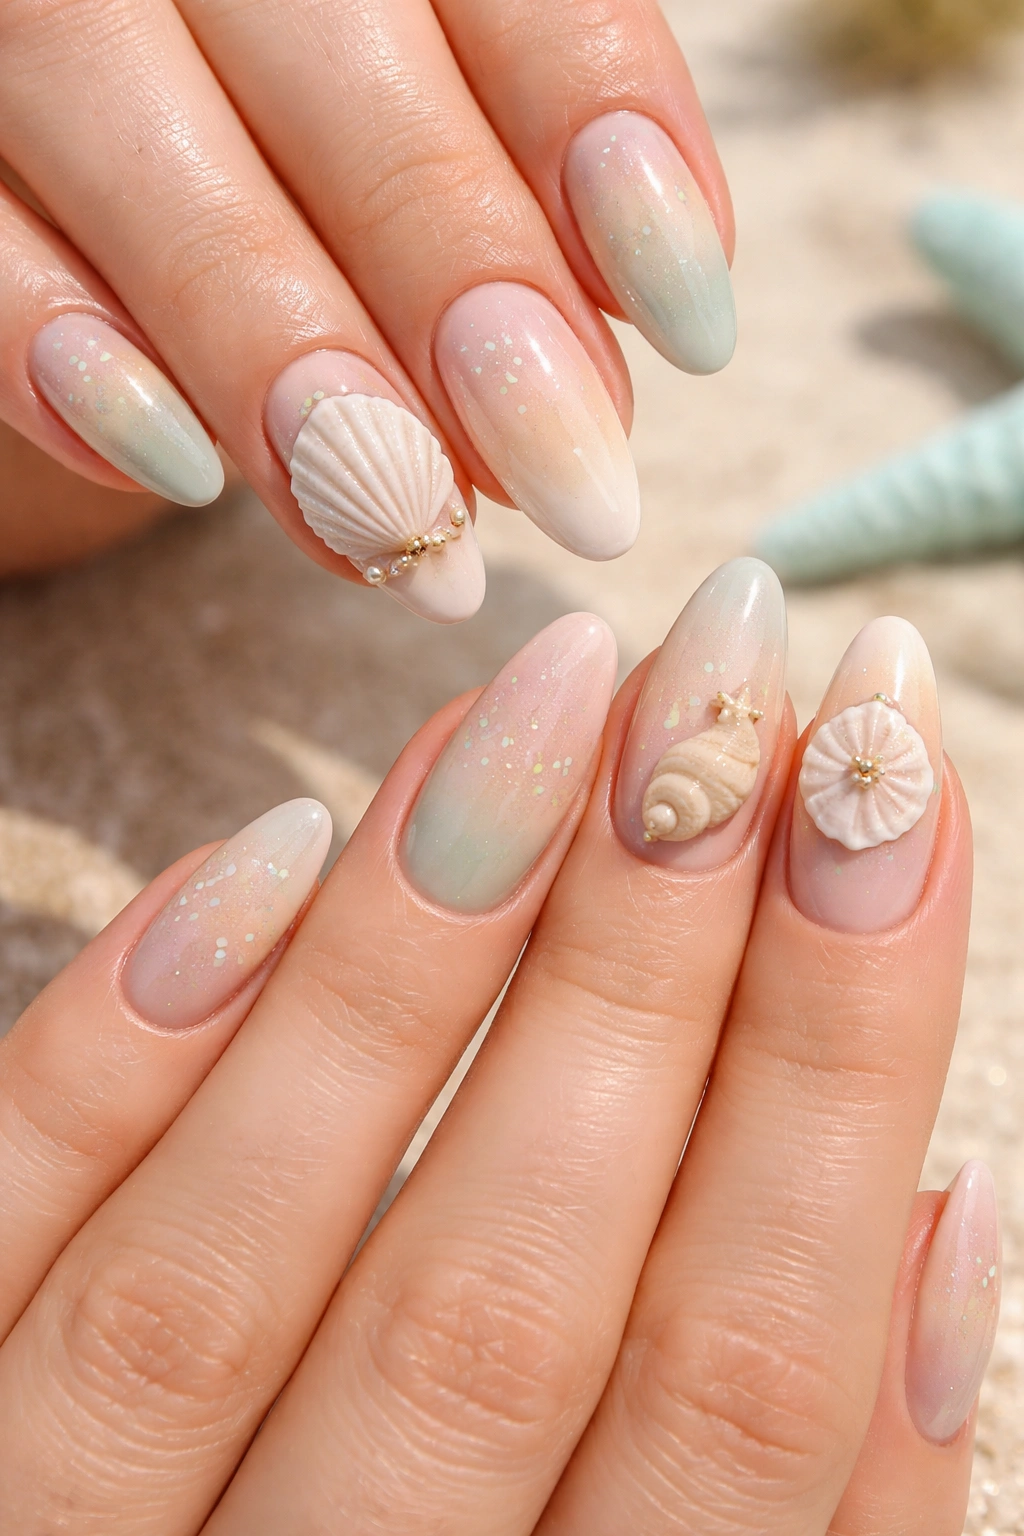
Delicate seashells painted on soft, beachy backgrounds bring that “just returned from a coastal vacation” energy. Choose a palette of sandy beige, soft white, pale pink, and seafoam green. Both friends can feature different shell types—one does scallop shells while the other paints tiny spiral conchs or sand dollars.
The shell designs work best as accent nails rather than on every finger. Paint most nails solid beach-inspired colors, then feature detailed shell artwork on one or two nails per hand. You can paint the shells by hand using a thin detail brush, or use shell-shaped nail stickers if detailed painting isn’t your strong suit.
Adding dimension to your shell designs makes them look more realistic and impressive. Use slightly darker shades of your shell color to add shadows and grooves, then highlight the raised areas with white or a lighter shade. A tiny dot of iridescent shimmer suggests that pearlescent quality real shells have.
For an even easier version, you can use actual crushed shells embedded in clear or nude polish. Apply a thick clear coat, sprinkle tiny shell fragments onto your wet nail, press them down gently, then seal with another clear coat once dry. This gives you authentic texture and that collected-treasures-from-the-beach vibe.
14. Sunflower and Bee Pair
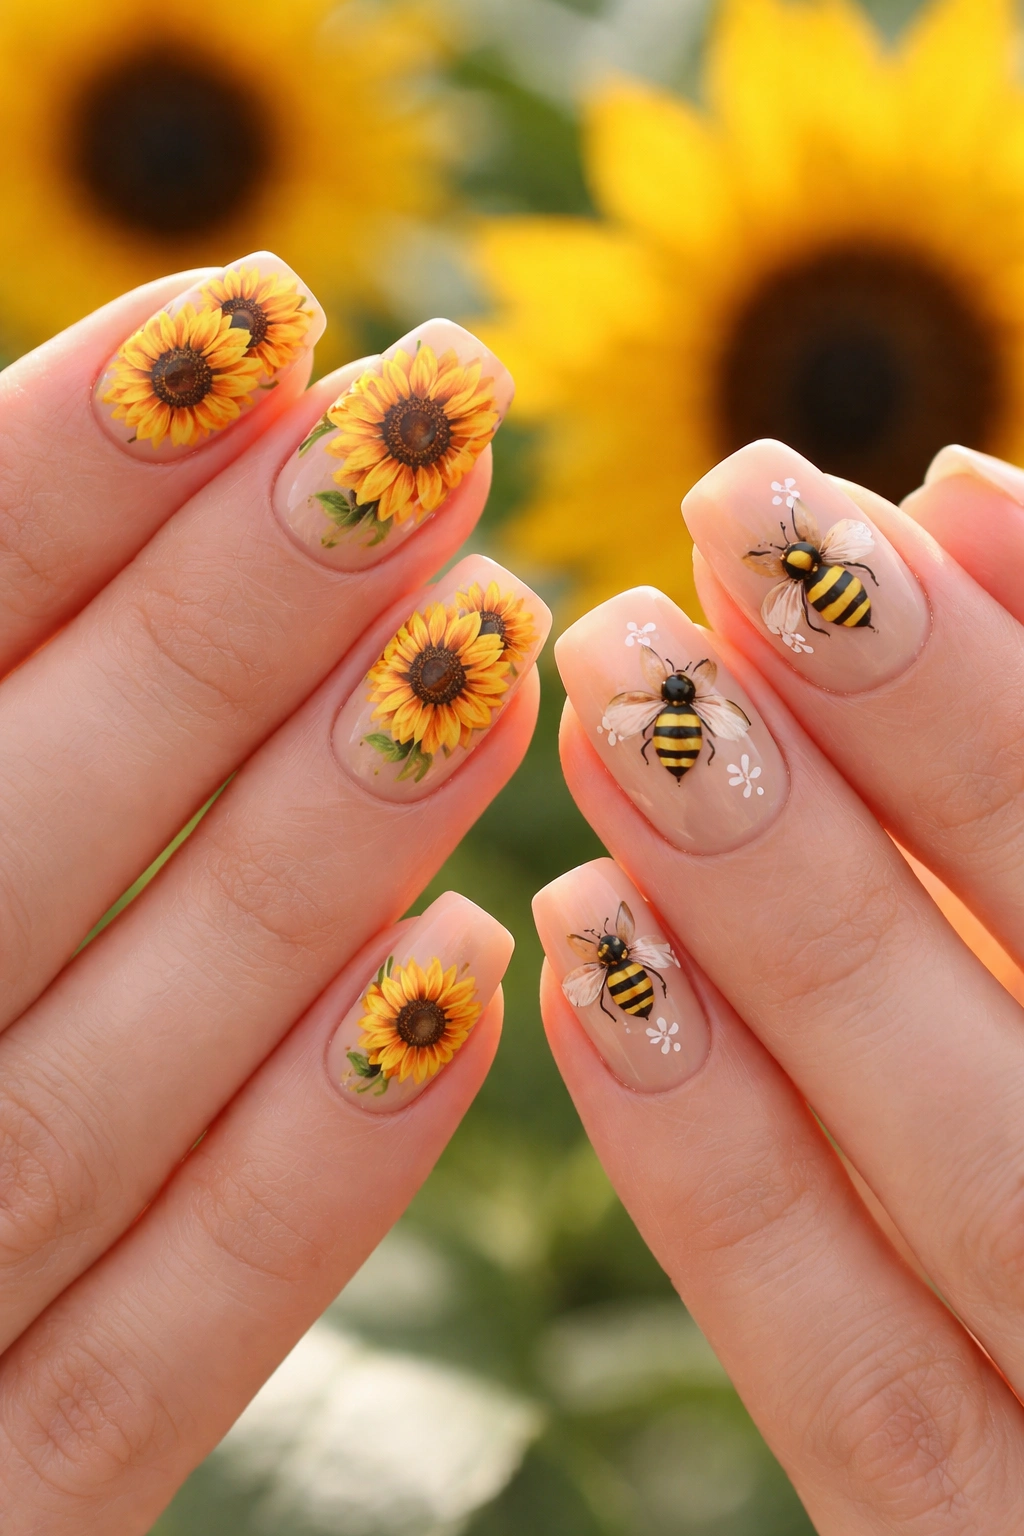
This duo is almost too cute to handle—one friend gets cheerful yellow sunflowers with brown centers, while the other features buzzing bees with black and yellow stripes. Together, you’re representing the whole pollination process, which is honestly adorable and slightly educational.
The sunflower design involves painting yellow petals around a brown or dark orange center. You can go realistic with individually painted petals, or simplify it with yellow dots arranged in a circle around the center (similar to the daisy technique but with more petals). Adding tiny seed details to the center with a dotting tool makes them look more authentic.
Bee designs are delightfully simple—create an oval body with alternating black and yellow stripes, add a small circle for the head, and finish with delicate white or translucent wings. The wings can be as simple as two white ovals or curved lines extending from the body. Give your bee a tiny white highlight dot to suggest shine and bring it to life.
This pairing is perfect if your friendship has that sunshine-and-pollinator dynamic—one of you is the bright, energetic one while the other keeps things running smoothly. Or maybe you both just think bees and sunflowers are cute. Either way, it’s a conversation piece that feels wholesome and summery without being overly trendy.
15. Mermaid Scales
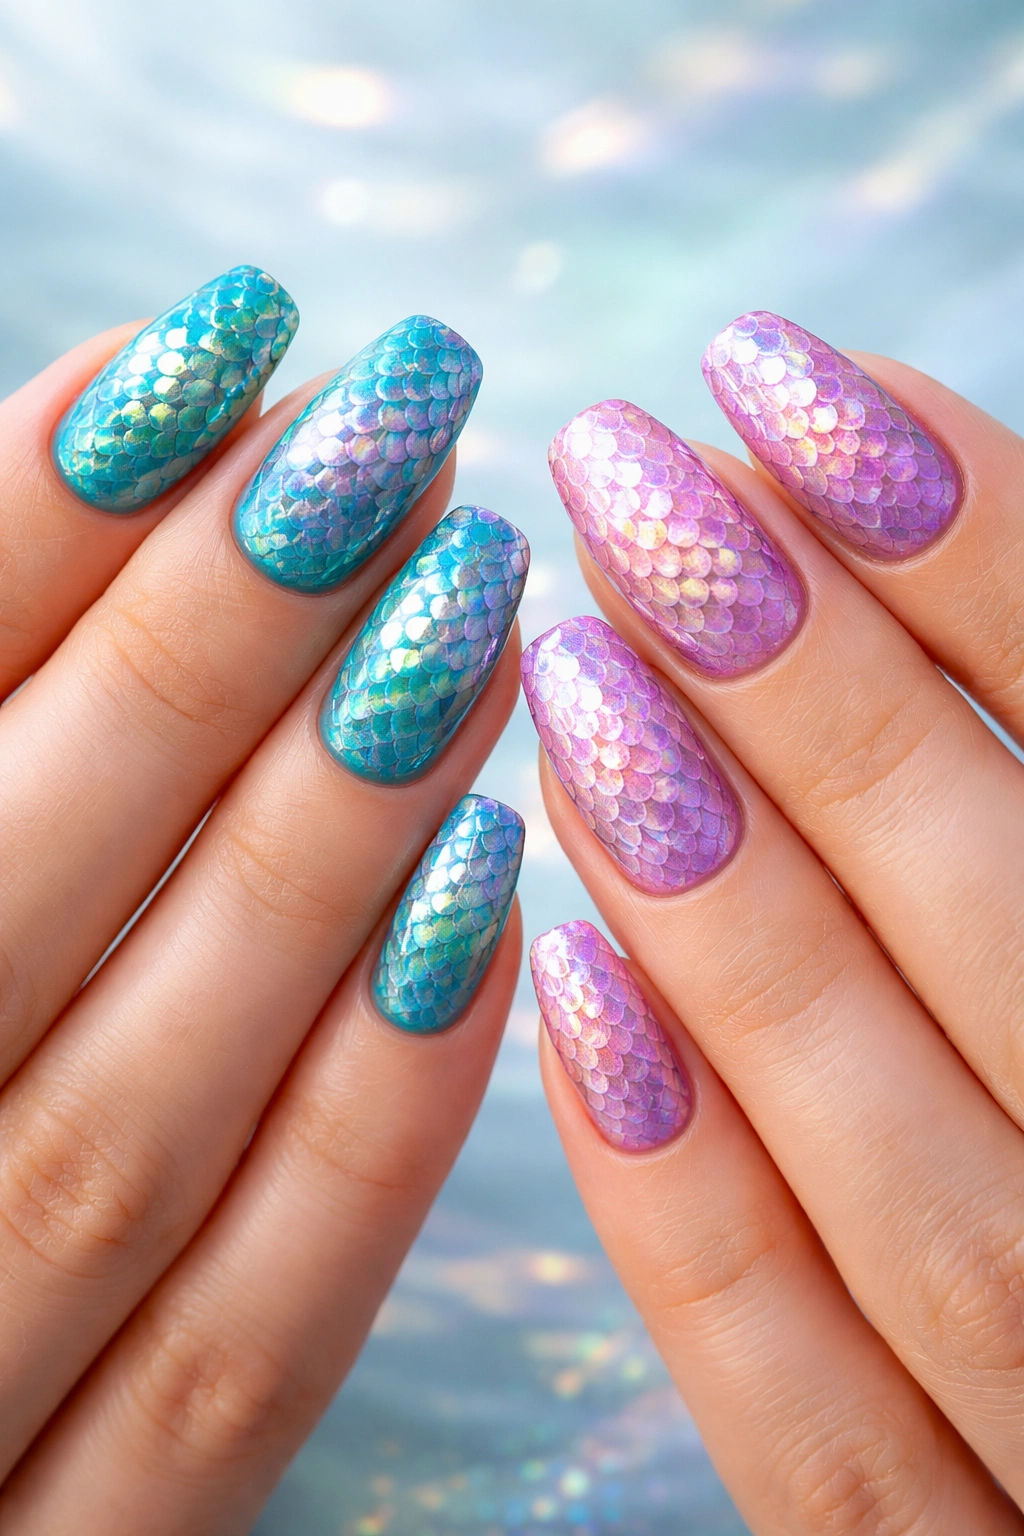
Channel your inner mythical sea creature with iridescent scale patterns that shift colors in different lighting. Both friends wear the same scale technique but can choose different base colors underneath—one might do teal scales while the other goes purple or pink.
Creating mermaid scales involves using a special fish-scale nail vinyl stencil or freehand painting using a fan brush technique. The vinyl stencils are honestly worth the investment because they create perfect, uniform scales every time. Place the stencil on your base color, dab on an iridescent or contrasting polish, peel off the stencil, and boom—instant scales.
The real magic comes from the polish choices. Iridescent, duochrome, or holographic top coats make the scales shimmer and shift like actual fish scales. Layer different colors for a more complex, dimensional look. Some mermaid scale designs use three or four different shades of the same color family, creating an ombré effect within the scale pattern itself.
This design definitely has that “mythical creature” fantasy vibe, but it’s also surprisingly wearable. The scale pattern is small and intricate enough that it reads as textured shimmer from a distance, only revealing its full mermaid glory up close. It’s like a secret bit of magic on your fingertips.
16. Matching Fruit Salad
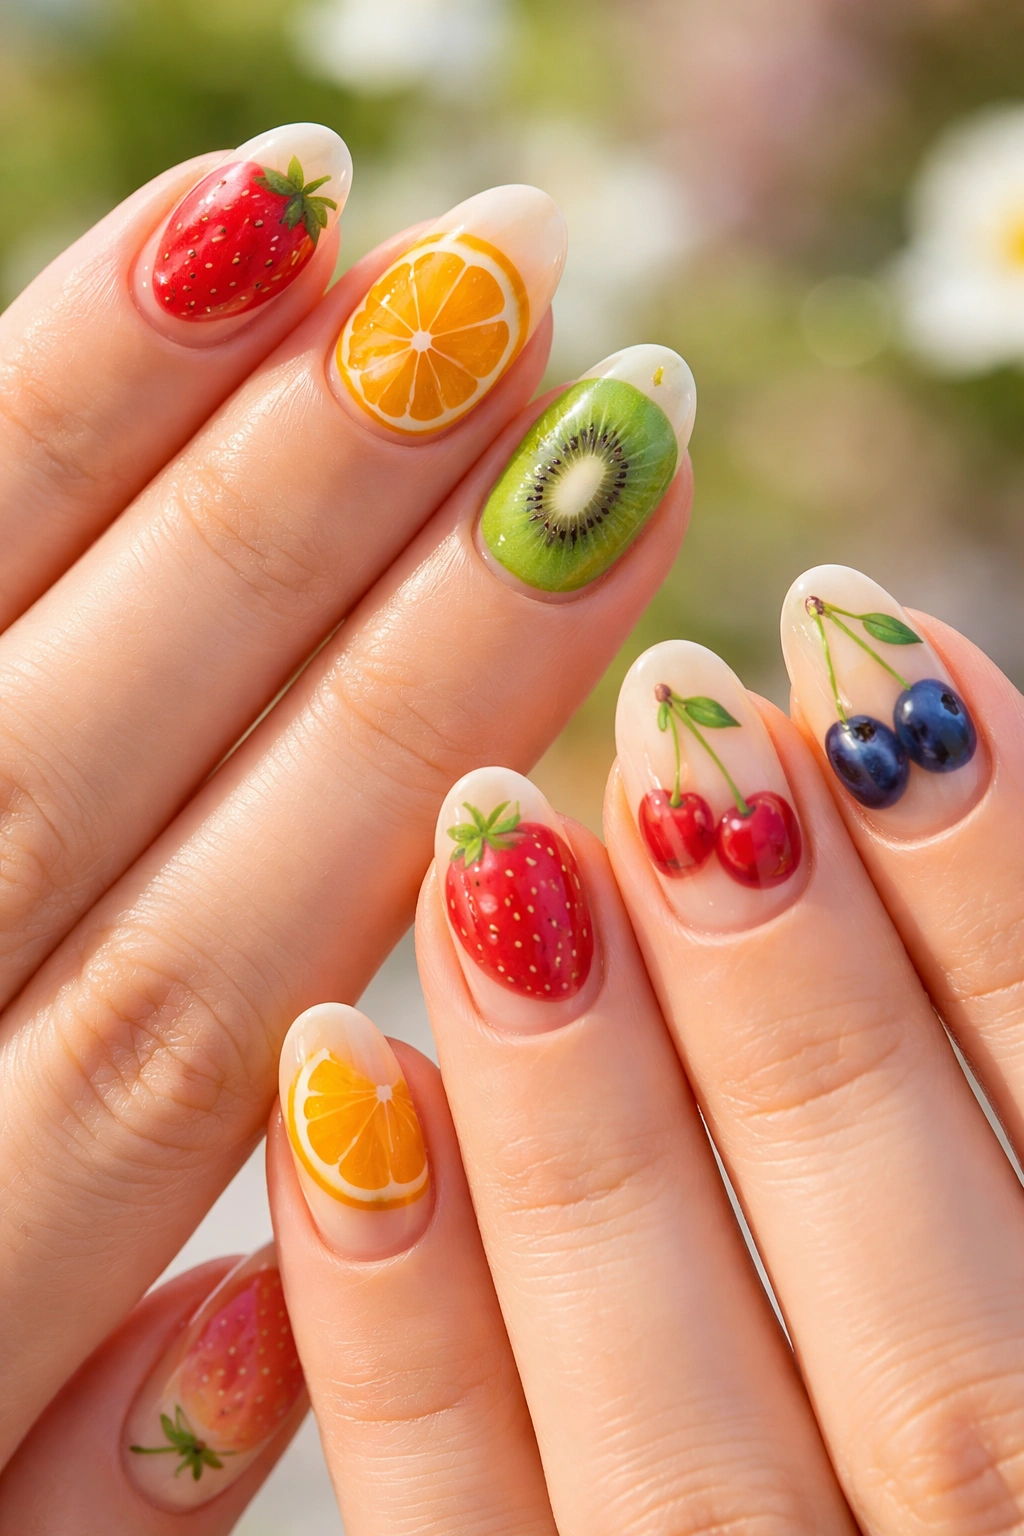
Why pick just one fruit when you can have the whole produce section? This playful approach gives each finger a different summer fruit—strawberries, oranges, kiwi slices, cherries, blueberries. Both friends do the same fruit assortment but can arrange them differently across their hands.
Each fruit gets its own nail as a detailed mini-illustration. Strawberries are red with tiny yellow seeds dotted across and a green leaf cap at the base. Orange slices show the citrus segments in a circle. Kiwis have the distinctive brown fuzzy exterior or the bright green interior with black seeds radiating from the center. Cherries appear as red spheres with green stems, often painted in pairs.
The key is keeping your base color neutral—white, cream, or clear—so the colorful fruits really pop. Each fruit should be recognizable and detailed enough to be clearly identified, but stylized enough that they all feel cohesive as a set rather than random illustrations.
This design is pure summer joy in manicure form. It’s whimsical without being childish, colorful without being chaotic, and unique enough that you won’t see a dozen other people wearing the same thing. Plus, it’s a great reminder to eat your fruits during those hot summer months when nothing else sounds appealing.
17. Tie-Dye Swirls
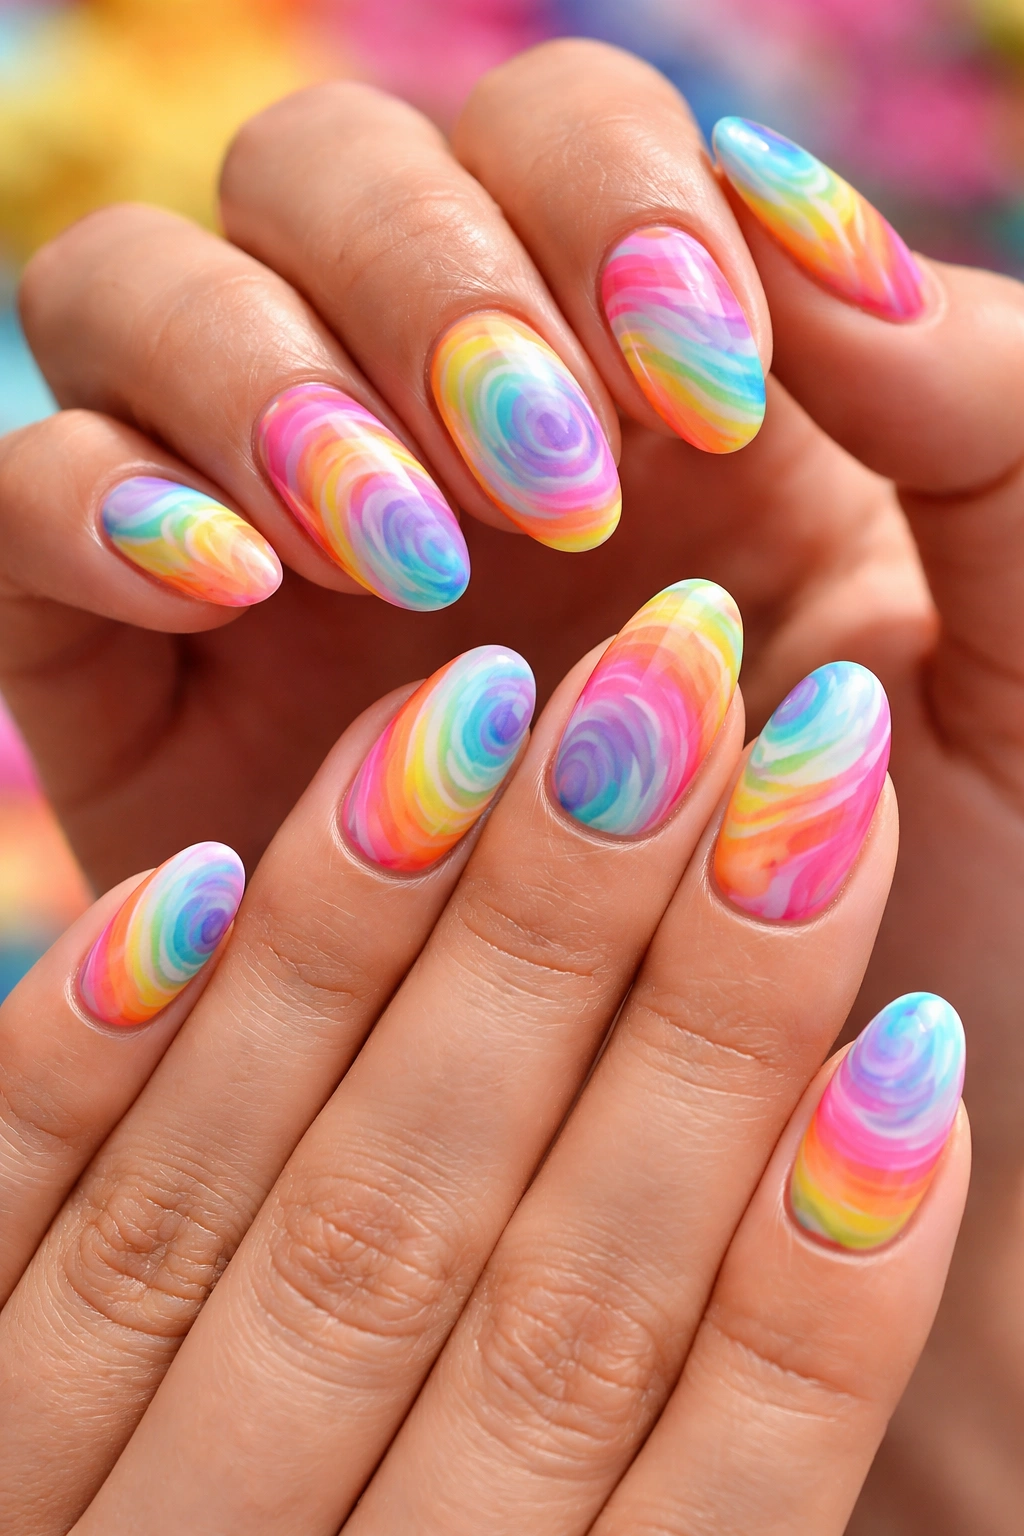
Bringing back that ’60s and ’70s festival energy, tie-dye nails feature multiple bright colors swirled together in that distinctive organic pattern. Both friends sport the same color palette—maybe rainbow, or sunset shades, or cool blues and purples—but the swirl patterns will naturally be unique on each person’s nails.
Creating tie-dye nails involves dropping different colors of polish onto a surface (a plastic baggie works great), swirling them together lightly with a toothpick, then pressing your nail into the design. It’s similar to water marbling but more forgiving and easier to control. Each nail will come out slightly different, giving you a cohesive set that’s still varied and interesting.
You can also achieve a tie-dye effect with a makeup sponge. Apply different colors to the sponge in sections, then dab it onto your nail. The colors will blend where they meet, creating that soft, blended tie-dye look. This method gives you more control over color placement but less of that organic, unpredictable tie-dye character.
The beauty of matching tie-dye with your best friend is that you don’t have to stress about making them identical. The whole point of tie-dye is the unique, organic patterns. As long as you’re using the same colors, your nails will clearly coordinate even though every single nail is technically one-of-a-kind.
18. Flamingo Pink Variations
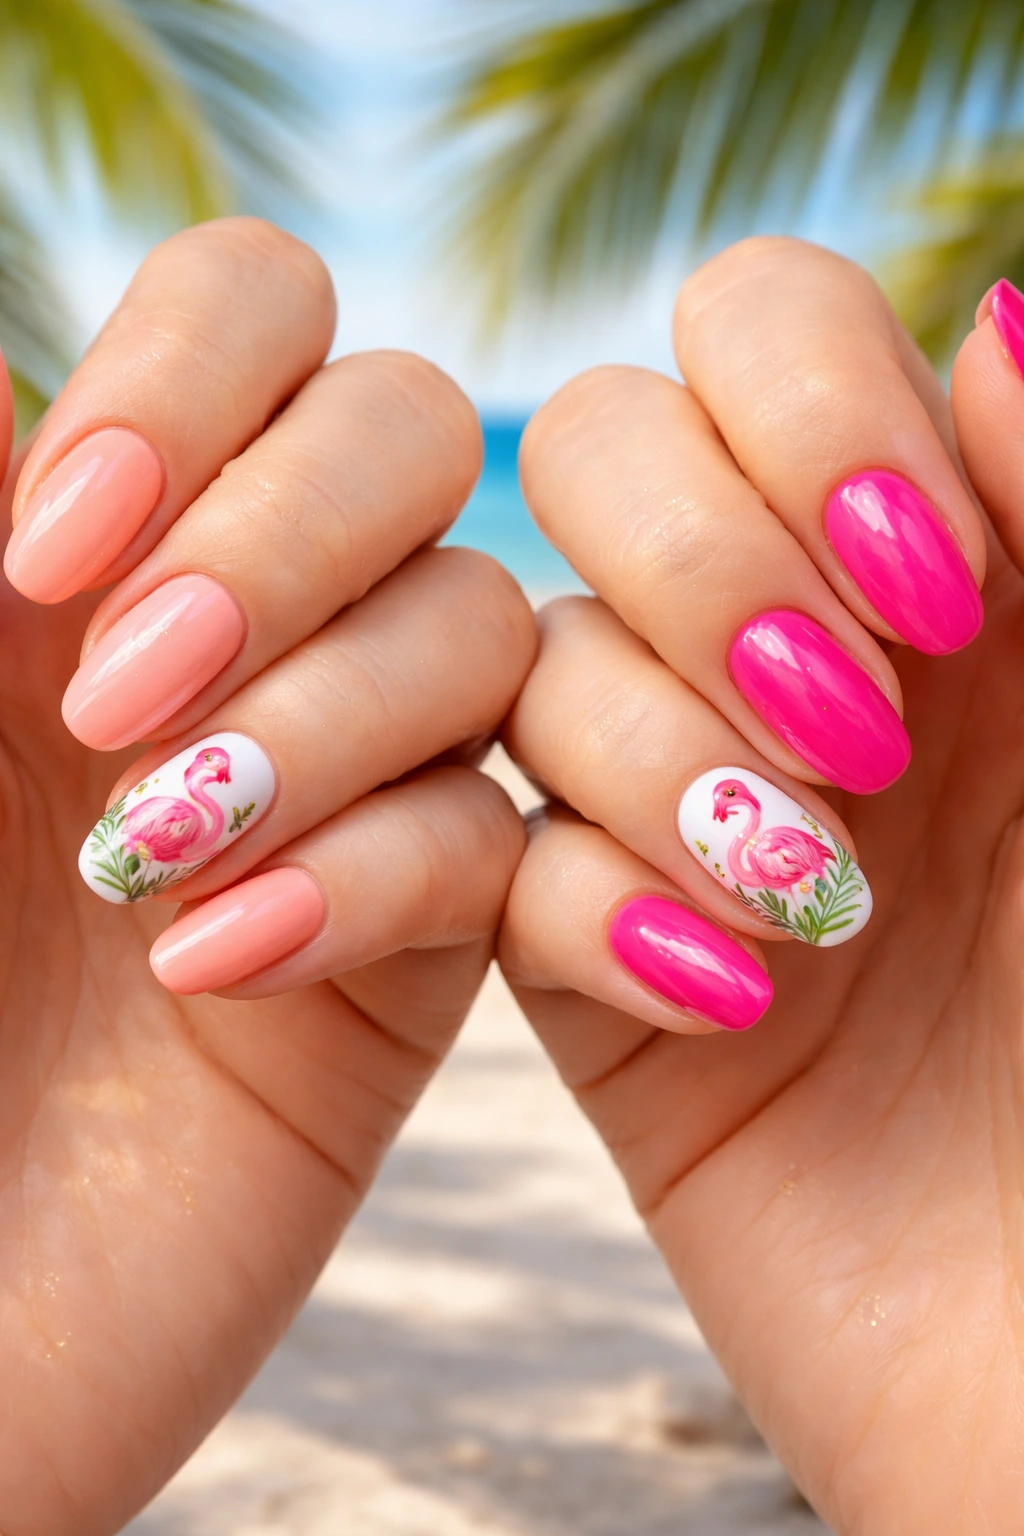
Flamingo pink encompasses everything from soft blush to hot fuchsia, and this design explores that full range. One friend wears lighter flamingo shades—soft peachy-pink, rose, and pale coral—while the other rocks the more saturated versions—hot pink, magenta, and fuchsia.
You can keep it simple with solid blocks of color, different shades on each finger creating an ombré effect across your hand. Or add actual flamingo illustrations on accent nails—these long-legged, elegant birds are surprisingly fun to paint in a simplified, stylized way. Two curved lines for the neck and body, stick legs, and a distinctive beak are all you really need.
Another approach is creating a flamingo-inspired scene with tropical elements. Paint most nails in various pink shades, then add palm leaves, water, or sunset backgrounds on one or two accent nails. The flamingo itself might only appear on one nail, but the overall tropical pink theme ties everything together.
Flamingo pink is incredibly flattering across all skin tones. The softer shades complement cool undertones beautifully, while the coral-leaning pinks look gorgeous on warm undertones. The hot fuchsias are universally vibrant and fun. This gives you and your bestie room to each choose the pink family that suits you best while still clearly coordinating.
19. Starfish and Sand Dollars
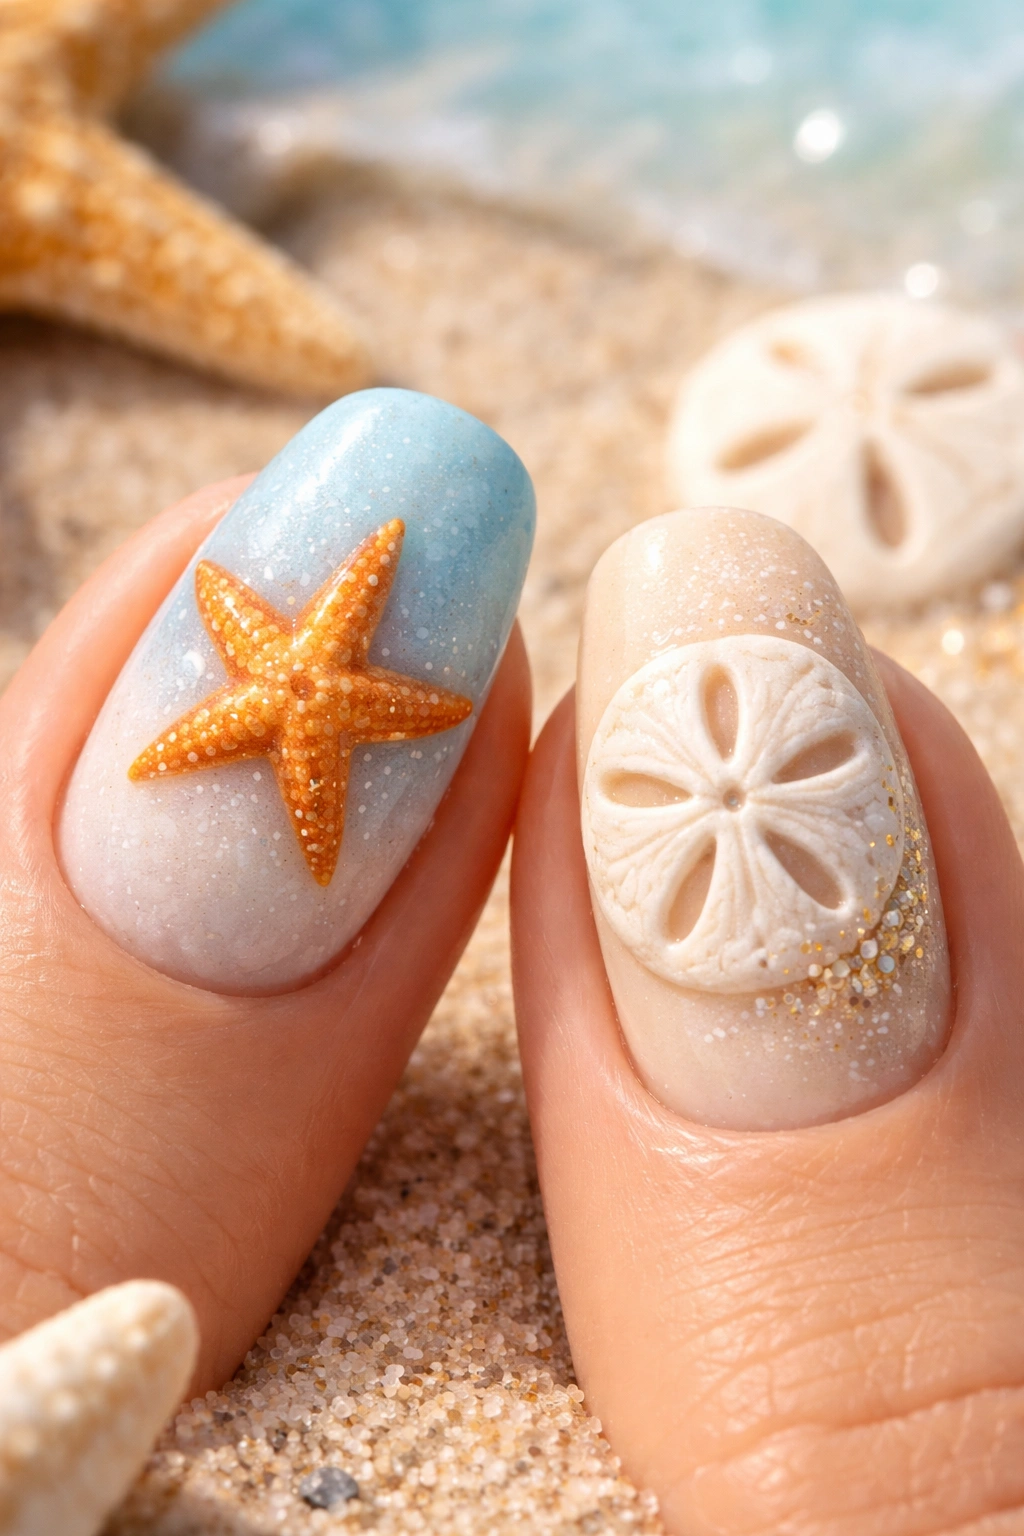
These distinctive sea creatures make perfect accent nail designs on beachy backgrounds. One friend features orange or pink starfish while the other does white or tan sand dollars, both set against soft blue, sandy beige, or seafoam green bases.
Starfish are wonderfully simple to recreate. Paint a five-pointed star shape in your chosen color, then add texture with tiny dots in a slightly darker shade. The dots radiate from the center along each arm, mimicking the bumpy texture of real starfish. A subtle highlight down the center of each arm adds dimension and makes the starfish look more three-dimensional.
Sand dollars are even easier—they’re basically flat circles with a distinctive five-petal flower pattern on top. Paint a cream or white circle, then use a thin brush to add the flower design in a slightly darker shade. Some sand dollars have a star pattern instead of a flower, so you’ve got options. Add subtle shading around the edges to suggest the gentle doming of a real sand dollar.
These designs feel sophisticated and coastal rather than overly cutesy. They’re perfect if you want something summery and beach-themed but slightly more elegant than, say, watermelon slices or ice cream cones. They also photograph beautifully on social media with actual beach backgrounds—holding up your starfish nails with real shells in the sand makes for an excellent vacation photo.
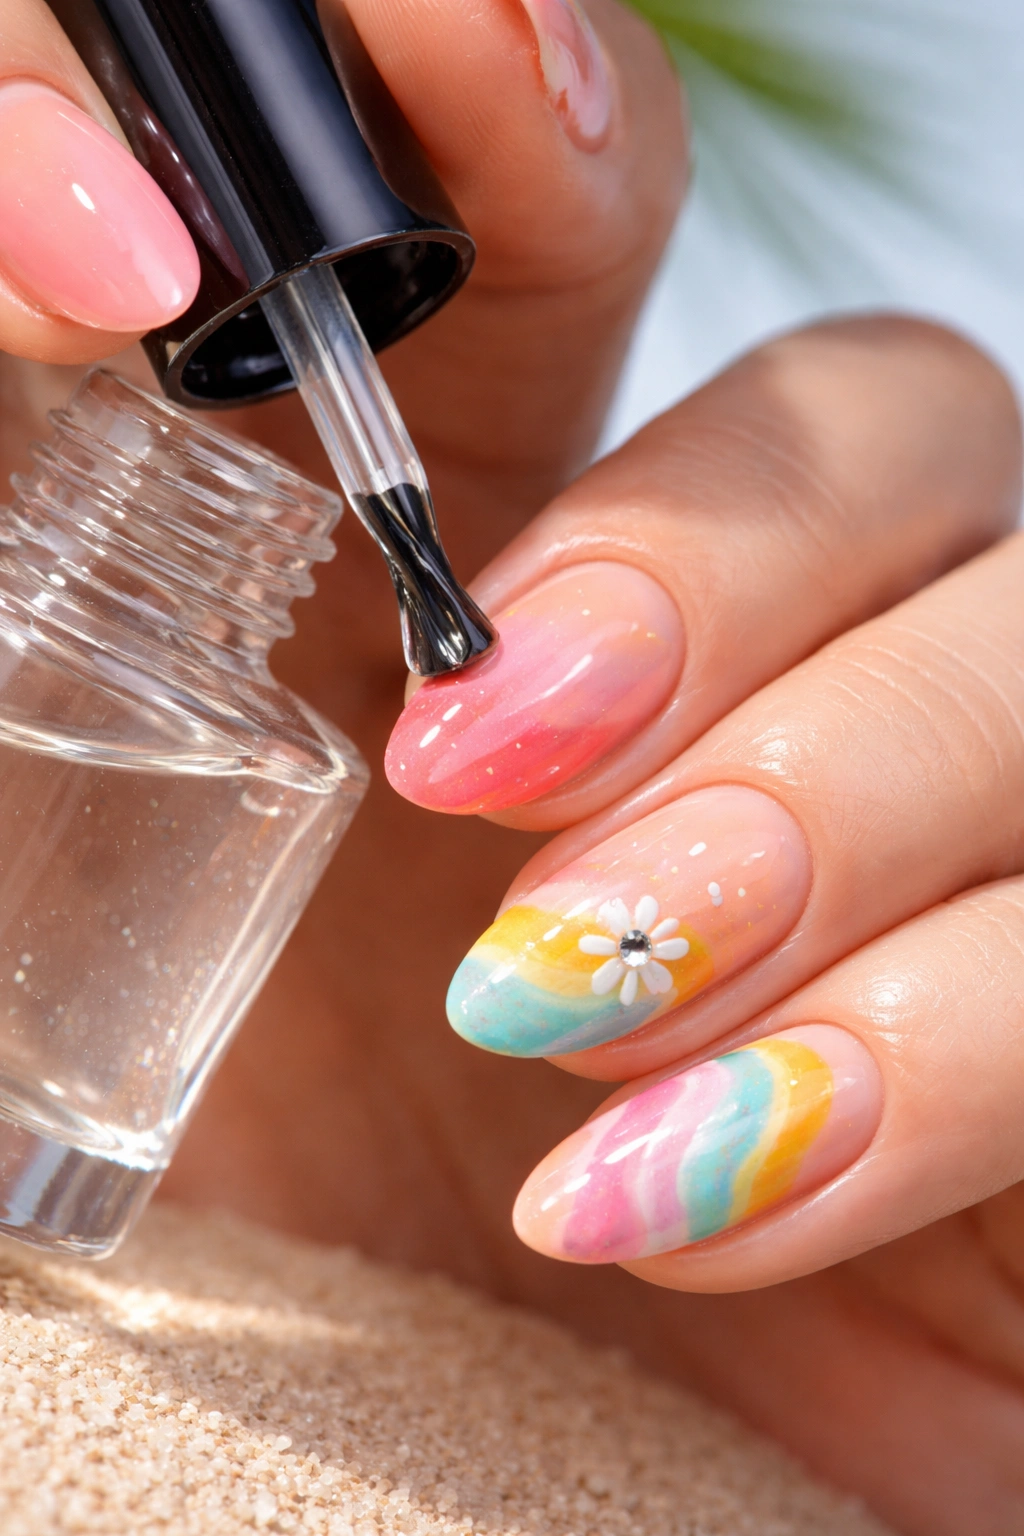
20. Cloud and Rainbow Set
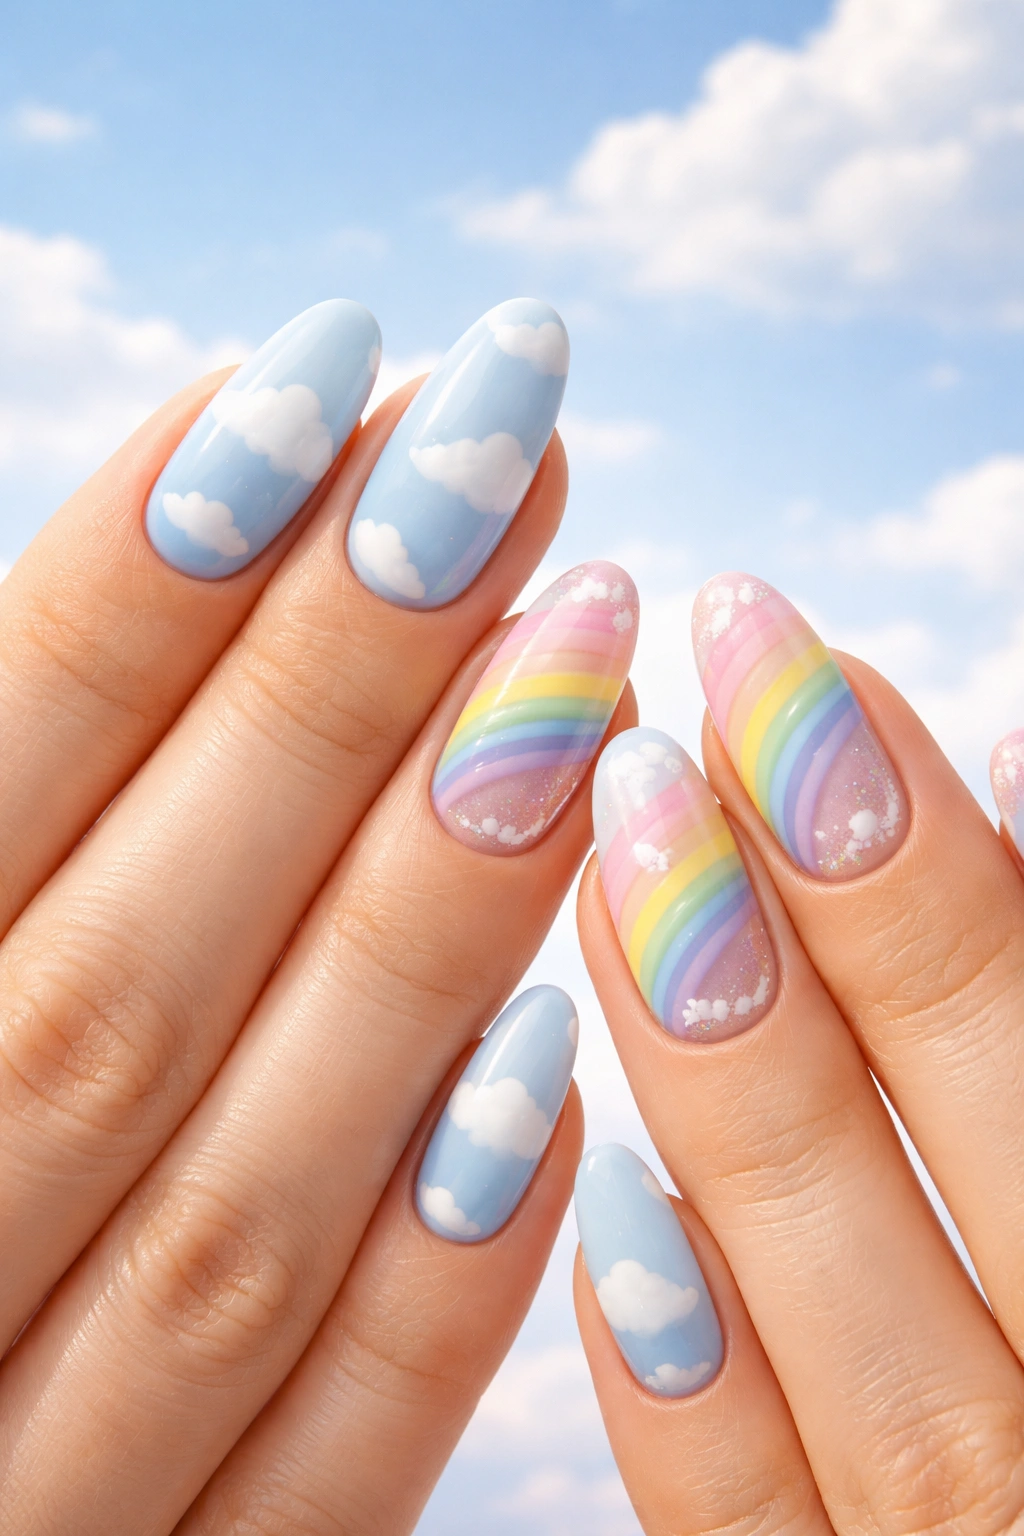
Soft, dreamy, and impossibly sweet, this pairing has one friend wearing fluffy white clouds on a baby blue background while the other sports a rainbow design. It’s literally the aftermath of a summer rain shower captured on your nails.
Cloud nails are easier than you might think. Paint your nails a soft sky blue, then use a makeup sponge to dab on white polish in cloud shapes. The sponge creates that soft, fluffy edge that’s perfect for clouds. You can make them wispy and subtle or full and puffy depending on how much white you apply. Adding a tiny bit of gray or purple to the underside of some clouds gives them more dimension and realism.
The rainbow side can go several directions. Full rainbow stripes across each nail create a bold statement. A single rainbow arc on an accent nail with clouds on the other fingers feels storybook-sweet. Or create rainbow tips with the cloud-blue base, meeting the earlier rainbow French tip concept with this theme.
Together, these nails tell a complete weather story. There’s something nostalgic and childlike about this combination without it feeling juvenile. It’s the kind of manicure that makes people smile when they notice it, which is honestly what summer nails should do.
21. Popsicle Partners
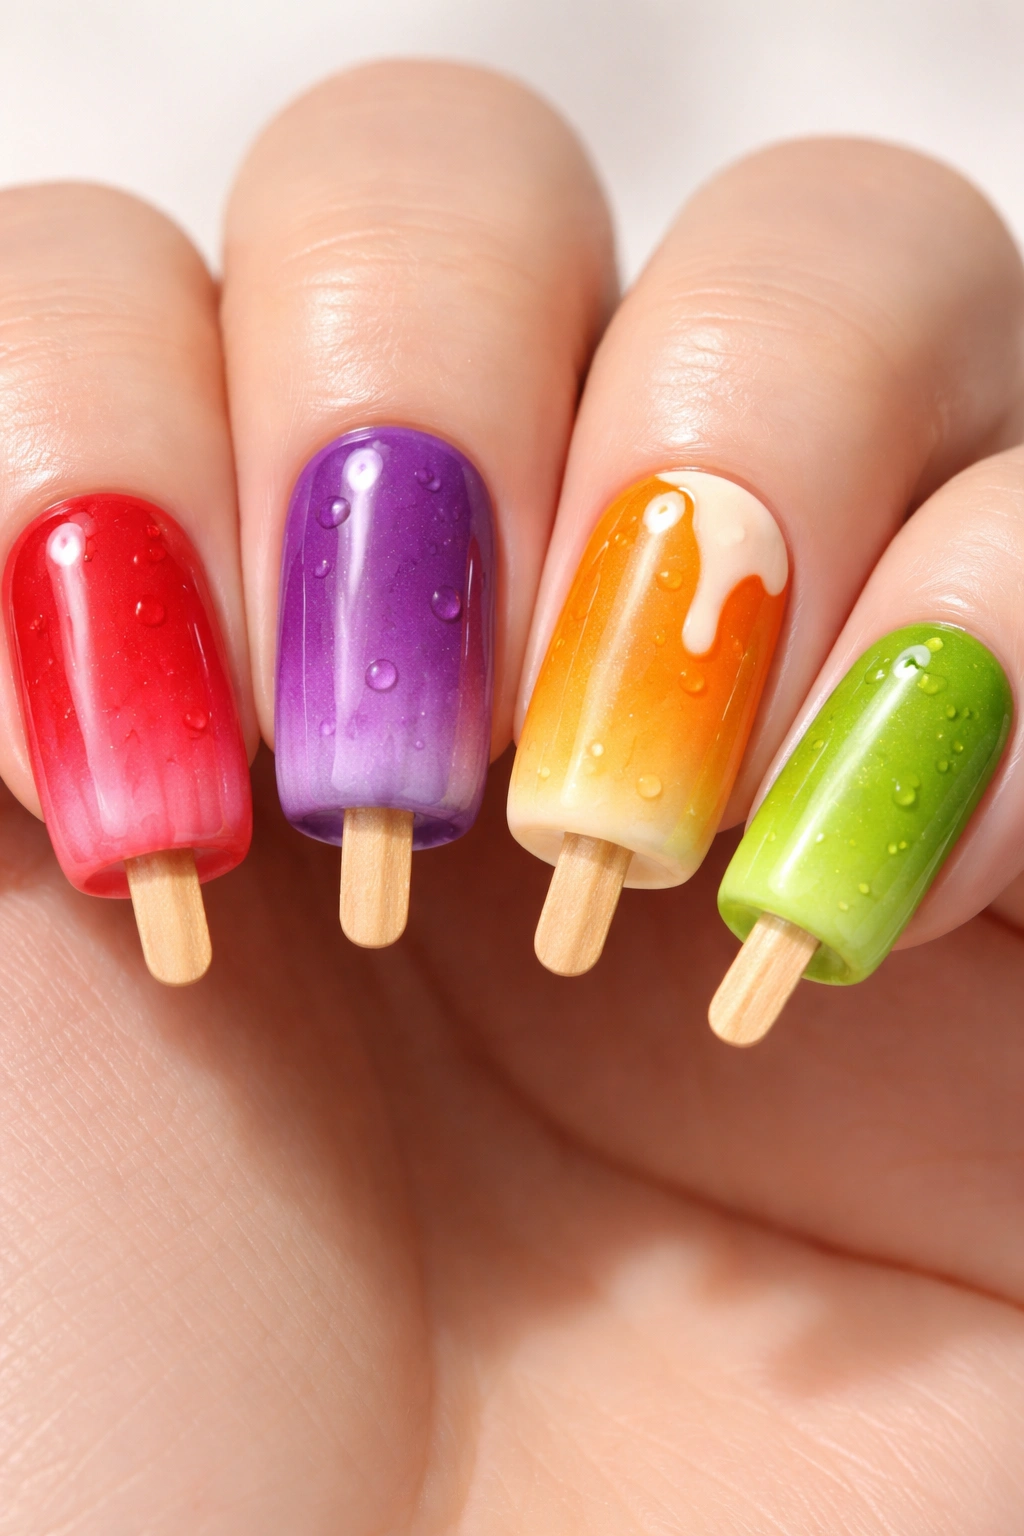
Twin popsicles or ice cream bars in bright, fruity colors capture that cooling-off-on-a-hot-day feeling perfectly. Each nail becomes a popsicle in different flavors—cherry red, grape purple, orange, lime green—complete with a stick at the base.
Creating popsicle nails involves painting the main nail area in your chosen bright color, then adding a thin brown or tan rectangle at the base to represent the wooden stick. You can leave it as a simple colored rectangle, or add details like a bite taken out of the side, melting drips, or a contrasting swirl for creamsicle-style popsicles.
Both friends can do the same flavor lineup, or divide them—one person takes the fruit flavors (red, orange, purple) while the other does the cream flavors (vanilla, chocolate, strawberry cream). Either way, when you’re together holding your cold drinks on a hot day, your nails will echo exactly what you’re doing.
Some designs include the popsicle wrapper text and graphics, which looks super authentic but requires steadier hands or nail stickers. The simpler solid-color-plus-stick version is totally sufficient and still immediately recognizable as popsicles. Sometimes less is more, especially with playful designs like this.
22. Matching Hibiscus Flowers
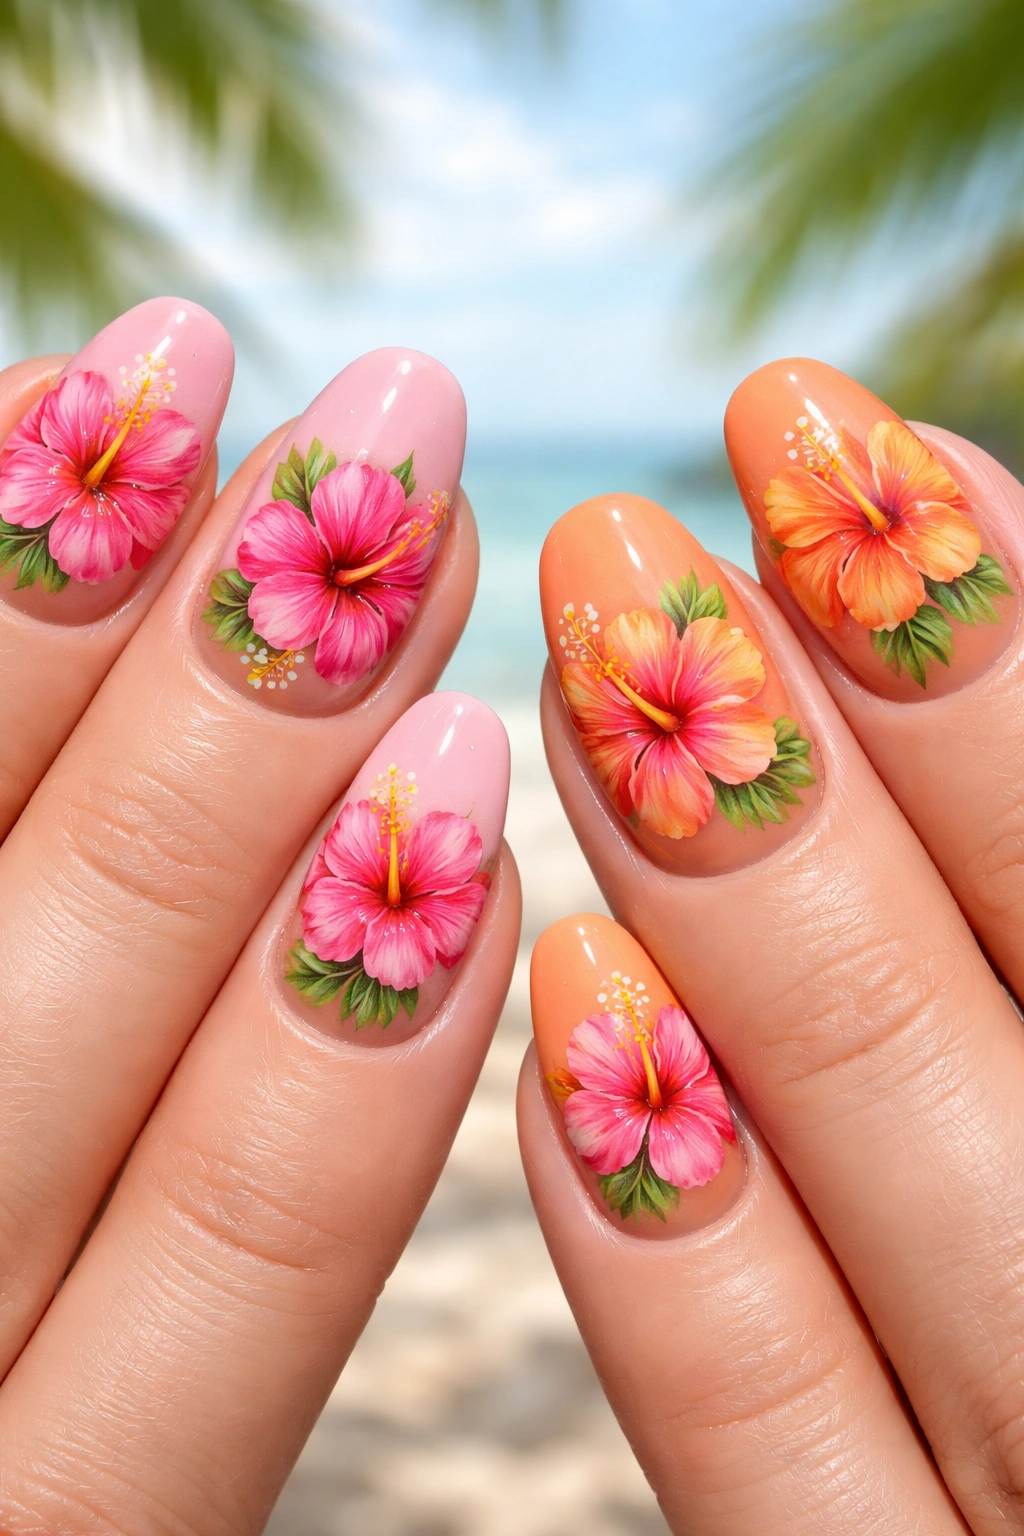
Large, tropical hibiscus flowers in shades of red, pink, orange, or yellow create a lush, vacation-ready look. Both friends can wear hibiscus designs but in complementary colors—one does hot pink blooms while the other chooses orange or yellow.
Hibiscus flowers have five large, overlapping petals and a distinctive long stamen extending from the center. They’re bold and dramatic, making them perfect for accent nails. Paint most of your nails a solid complementary color (the hibiscus color itself, or a neutral like white or nude), then feature the detailed flower on your ring fingers or thumbs.
Creating hibiscus flowers requires a bit more artistic skill than some simpler designs, so this might be one where you rely on a nail artist or high-quality nail stickers. The key is getting those overlapping petals right and adding the characteristic stamen with tiny dots at the end representing pollen. Shading the petals with darker tones near the center makes them look more dimensional and realistic.
These flowers scream tropical vacation energy. They’re bold without being tacky, colorful without being childish, and detailed enough to show you put thought into your manicure. Hibiscus designs work beautifully for destination weddings, tropical vacations, luaus, or just pretending you’re somewhere more exotic than your actual backyard.
How to Coordinate Without Looking Identical
You’ve picked your design concept, but here’s the thing—matching doesn’t mean identical. In fact, the best coordinated nail designs leave room for individual expression while still clearly connecting you as a pair.
Color variations within the same family work beautifully. If you’re both doing ocean nails, one person can focus on the deep blue-green spectrum while the other stays in the aqua-seafoam range. You’re both clearly doing ocean vibes, but with your own twist. This approach respects that you’re different people with potentially different color preferences and skin tones that might be flattered by different shades.
Split designs like the butterfly wings option make coordination obvious and intentional. Each person’s nails are literally incomplete without the other’s, which is a sweet metaphor for friendship. Other split concepts include lock and key, sun and moon, or left and right halves of any symmetrical image. These require planning and precision but create that wow moment when you put your hands together.
Themed variations give you both creative freedom within a concept. If you choose “tropical fruit,” you each pick different fruits to feature but stay within that category. One person does pineapples while the other does coconuts. Both are unmistakably tropical fruit, but you’re not wearing identical designs. This works for any broad theme—flowers, geometric patterns, gradient styles, or texture techniques.
The nail shape and length you both choose matter more than you might realize. Matching designs look most cohesive when both friends have similar nail shapes—both almond, both square, both stiletto. If one of you has short natural nails and the other has long extensions, the same design will read quite differently on each hand. Have an honest conversation about whether you’re willing to adjust your preferred nail length and shape to match for this particular manicure.
Tips for Long-Lasting Summer Nail Art
Summer is brutal on manicures. You’ve got chlorine, salt water, sunscreen, and all that extra hand-washing to combat. Here’s how to make your matching bestie nails last the full season without chipping or fading.
Start with healthy nails as your foundation. Dehydrated, damaged nails don’t hold polish well regardless of how good your technique is. In the week before your matching manicure, moisturize your cuticles daily with oil or a thick hand cream. If your nails are peeling or splitting, consider taking a break from polish to let them recover, or use a nail strengthening treatment before your color application.
Base coat is non-negotiable, especially for bright colors and neons that tend to stain. Choose a base coat suited to your nail type—if you have weak, bendy nails, go for a strengthening base. If you have hard, brittle nails, pick a flexible base coat that moves with your nail. Let it dry completely before adding color. This seems obvious, but waiting that extra minute prevents polish from pulling away from your nail bed and dramatically extends wear time.
Thin coats are your friend. You’ll get better coverage and longer wear from three thin coats than from two thick gloopy ones. Thick layers take forever to dry, trap solvents that never fully evaporate, and dent or smudge more easily. Each thin layer should dry until it’s no longer tacky before you add the next. This takes patience but pays off with a manicure that lasts.
Seal your tips with both your color and top coat. After applying polish to the nail surface, quickly swipe the brush along the free edge of your nail tip. This encapsulates the edge where chips most commonly start. Do this with every layer—base, color, and top coat. It’s a professional trick that makes a huge difference in longevity.
Gel top coat extends wear time significantly even over regular polish. If you don’t want to commit to full gel nails but want that extra durability, apply regular polish then finish with a gel top coat cured under a UV or LED lamp. This creates a hard, protective shell over your nail art. Your design will last 7-10 days easily, sometimes longer depending on your activities.
Reapply top coat every 2-3 days to refresh the shine and add protection. This simple habit can double the life of your manicure. Just swipe a fresh layer of top coat over your existing polish, sealing any microscopic cracks that would otherwise spread and cause chips. It takes two minutes but makes a massive difference.
Protect your hands during potentially damaging activities. Wear gloves when cleaning, doing dishes, or gardening. Apply sunscreen to your hands but let it absorb fully before touching anything—the oils in sunscreen can break down nail polish. After swimming in chlorinated or salt water, rinse your hands with fresh water and apply cuticle oil to replace lost moisture.
Final Words
Summer and matching nails with your best friend just go together. There’s something undeniably fun about coordinating your look with someone who gets you, whether you’re going full-on identical or choosing complementary designs that tell a complete story when you’re together.
The designs I’ve shared give you a starting point, but honestly, the best matching nails are the ones that reflect your actual friendship. Maybe that’s bold and loud, or soft and subtle. Perhaps you’re the adventurous duo who wants 3D elements and complex artwork, or the minimalist pair who appreciates simple elegance.
Don’t stress about making your nails perfect or Instagram-worthy if that’s not your thing. The point is having fun with your best friend, trying something creative together, and carrying a little visual reminder of your bond everywhere you go this summer. Whether you’re DIYing at home with a bottle of polish and some YouTube tutorials, or sitting side-by-side at the nail salon scrolling through inspo photos, you’re creating a memory.
So grab your bestie, pick your design, and get ready for all the “where did you get those done?” questions you’ll be answering all season long. Your matching summer nails are going to look amazing.
