

Remember when you and your best friend wore matching everything? Butterfly clips, platform sneakers, those iconic velour tracksuits? Well, Y2K fashion is back with a vengeance, and this time it’s all about the nails. Matching nail designs with your bestie isn’t just cute—it’s a full-blown statement that screams early 2000s nostalgia mixed with modern nail art techniques.
The beauty of Y2K nail trends is they’re bold, unapologetic, and totally fun. We’re talking chrome finishes, chunky glitter, mismatched patterns that somehow work together, and enough rhinestones to make Paris Hilton proud. Whether you’re planning a girls’ night out, attending a festival, or just want to show off your friendship goals on social media, coordinating your nails with your BFF takes things to another level.
What makes Y2K matching nails different from other friendship nail art? It’s the fearless approach to color, texture, and design. You’re not limited to subtle pastels or minimalist lines. Instead, think metallics, neons, 3D embellishments, and patterns that would’ve looked right at home on a Nokia phone case circa 2002. The vibe is playful, nostalgic, and just a bit chaotic—in the best way possible.
1. Butterfly Clips and Butterfly Nails
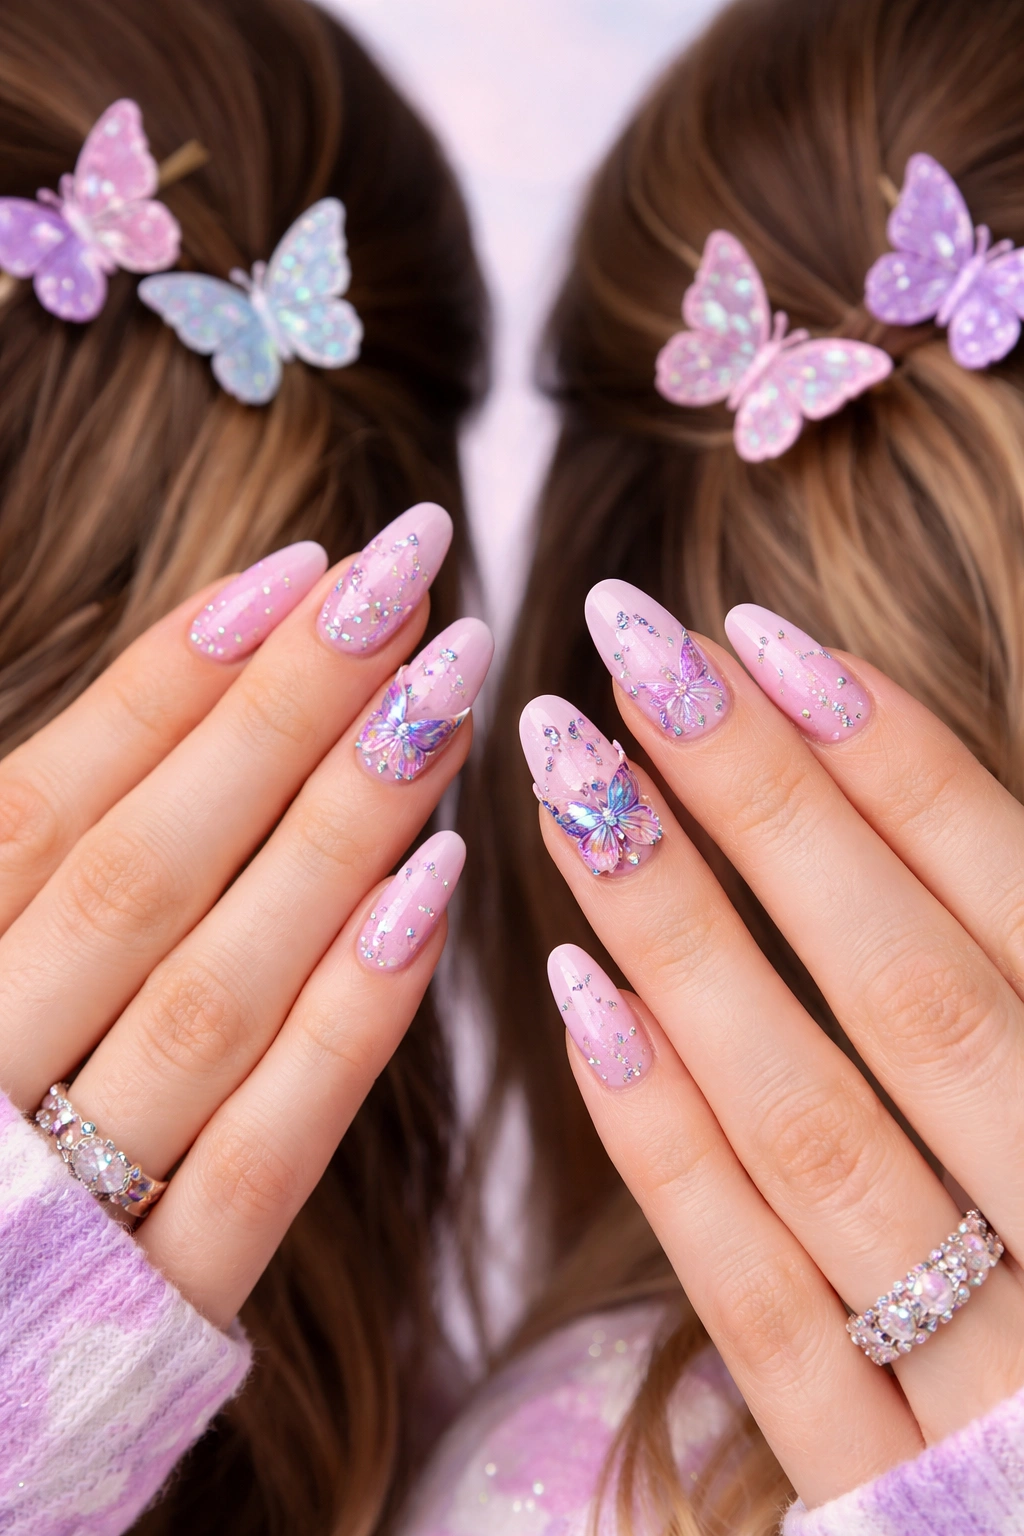
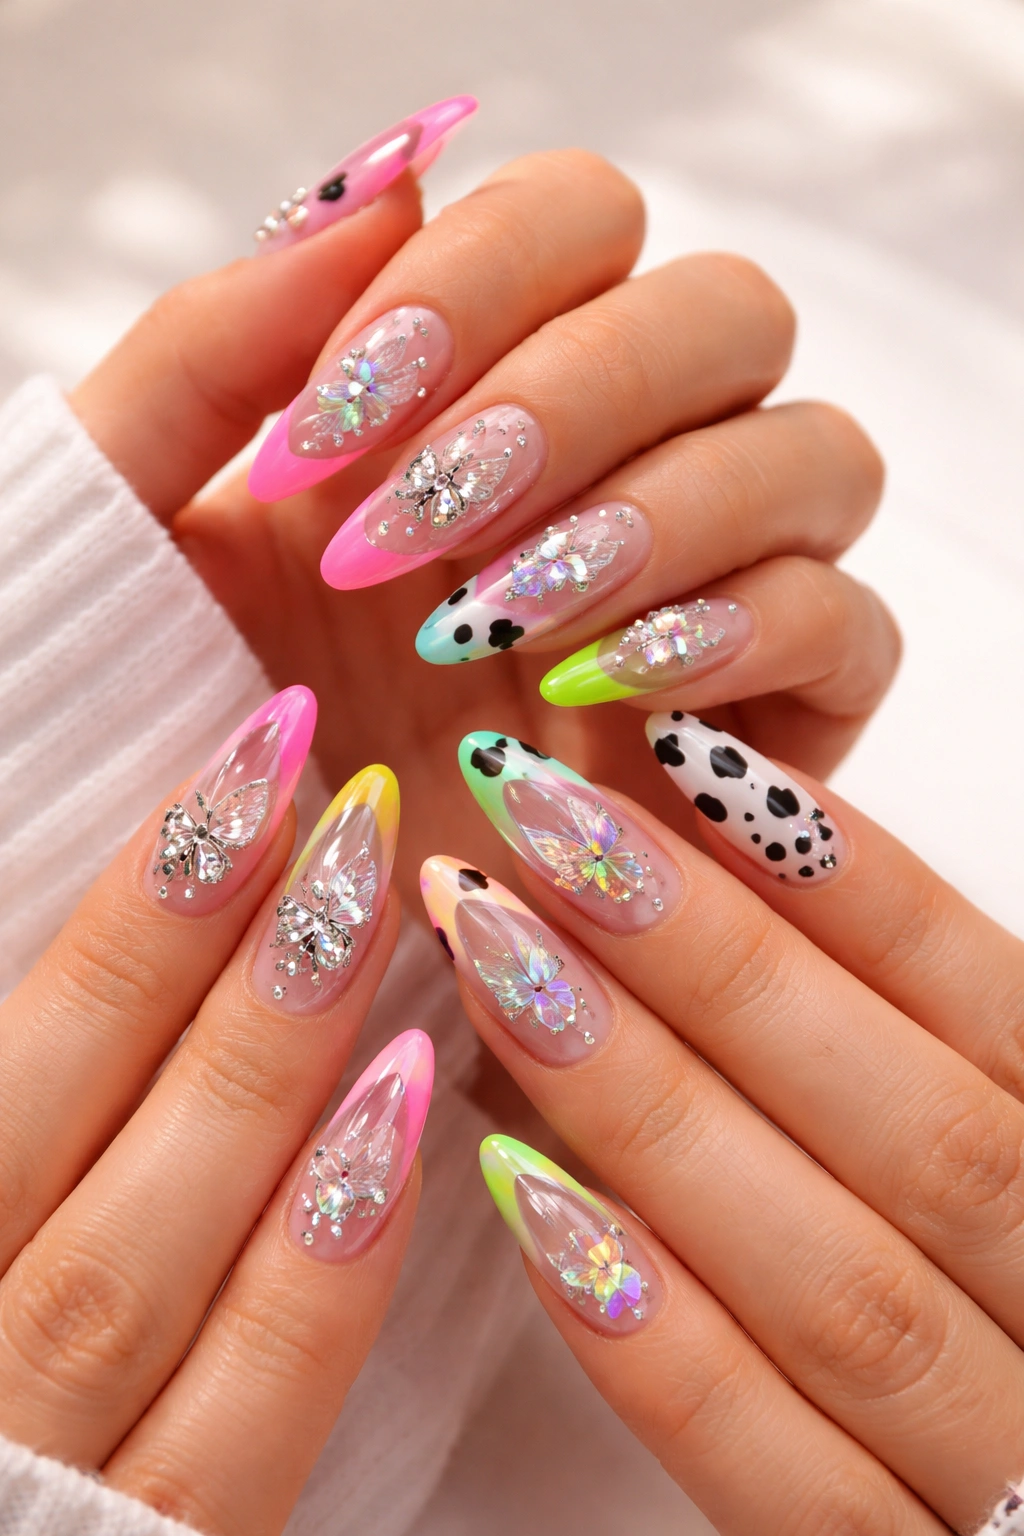
Nothing says Y2K quite like butterfly motifs. These delicate insects were everywhere in the early 2000s—on clips, chokers, temporary tattoos, and now they’re making a comeback on your fingertips. You and your friend can rock matching butterfly nail art that captures that carefree, whimsical energy of the era.
For this design, consider using a soft lavender or baby pink base coat on most nails. Then, dedicate one or two accent nails per hand to feature detailed butterfly designs. You can go with hand-painted butterflies if your nail tech has steady hands, or opt for high-quality butterfly decals that look just as good. The wings can incorporate iridescent details, tiny rhinestones, or even holographic flakes that catch the light.
What’s great about butterfly nails is the versatility. One of you could do butterflies on the ring finger while the other does them on the middle finger. Or you could mirror each other exactly—same placement, same colors, same everything. Add tiny silver or gold studs around the butterflies to give them that extra Y2K sparkle. Some nail artists even create 3D butterfly embellishments that seem to flutter right off your nails.
The color palette works best with pastels mixed with metallics. Think soft purple paired with silver chrome, or baby blue combined with pearl white. You could also go bolder with neon pink butterflies on a black base for a more edgy Y2K punk aesthetic. The key is making sure both of you coordinate your base colors and butterfly styles so they clearly match when you hold your hands together for that perfect Instagram shot.
2. Pink Chrome Everything

Chrome nails dominated the late 90s and early 2000s, and pink chrome specifically became the color for anyone wanting to channel their inner Bratz doll. This mirror-like finish reflects light like crazy and photographs beautifully, making it perfect for matching manicures that’ll look stunning in photos.
Getting the perfect pink chrome finish requires a good base. Your nail tech will typically start with a gel base coat, cure it under UV or LED light, then apply the chrome powder using a silicone applicator or sponge. The powder gets buffed into the nail until you achieve that smooth, reflective surface. For matching nails with your bestie, you’ll both want the same shade of pink chrome—whether that’s a cooler-toned pink with blue undertones or a warmer peachy-pink.
You can keep it simple with all ten nails in matching pink chrome, or get creative by adding variations. Maybe alternate pink chrome nails with clear nails featuring pink glitter. Or dedicate your ring fingers to white chrome while keeping everything else pink. Some people add tiny heart decals or star stickers on one or two accent nails to break up the chrome without losing that cohesive look.
The maintenance on chrome nails is worth mentioning. They tend to show scratches more easily than regular polish, so be prepared to treat your nails gently if you want them lasting two to three weeks. Apply cuticle oil daily to keep the surrounding skin healthy and to maintain that glossy finish. When both of you commit to the same chrome shade, you’re basically walking around with matching metallic accessories on your hands—and that’s pretty iconic.
3. Baby Blue Swirls and Clouds
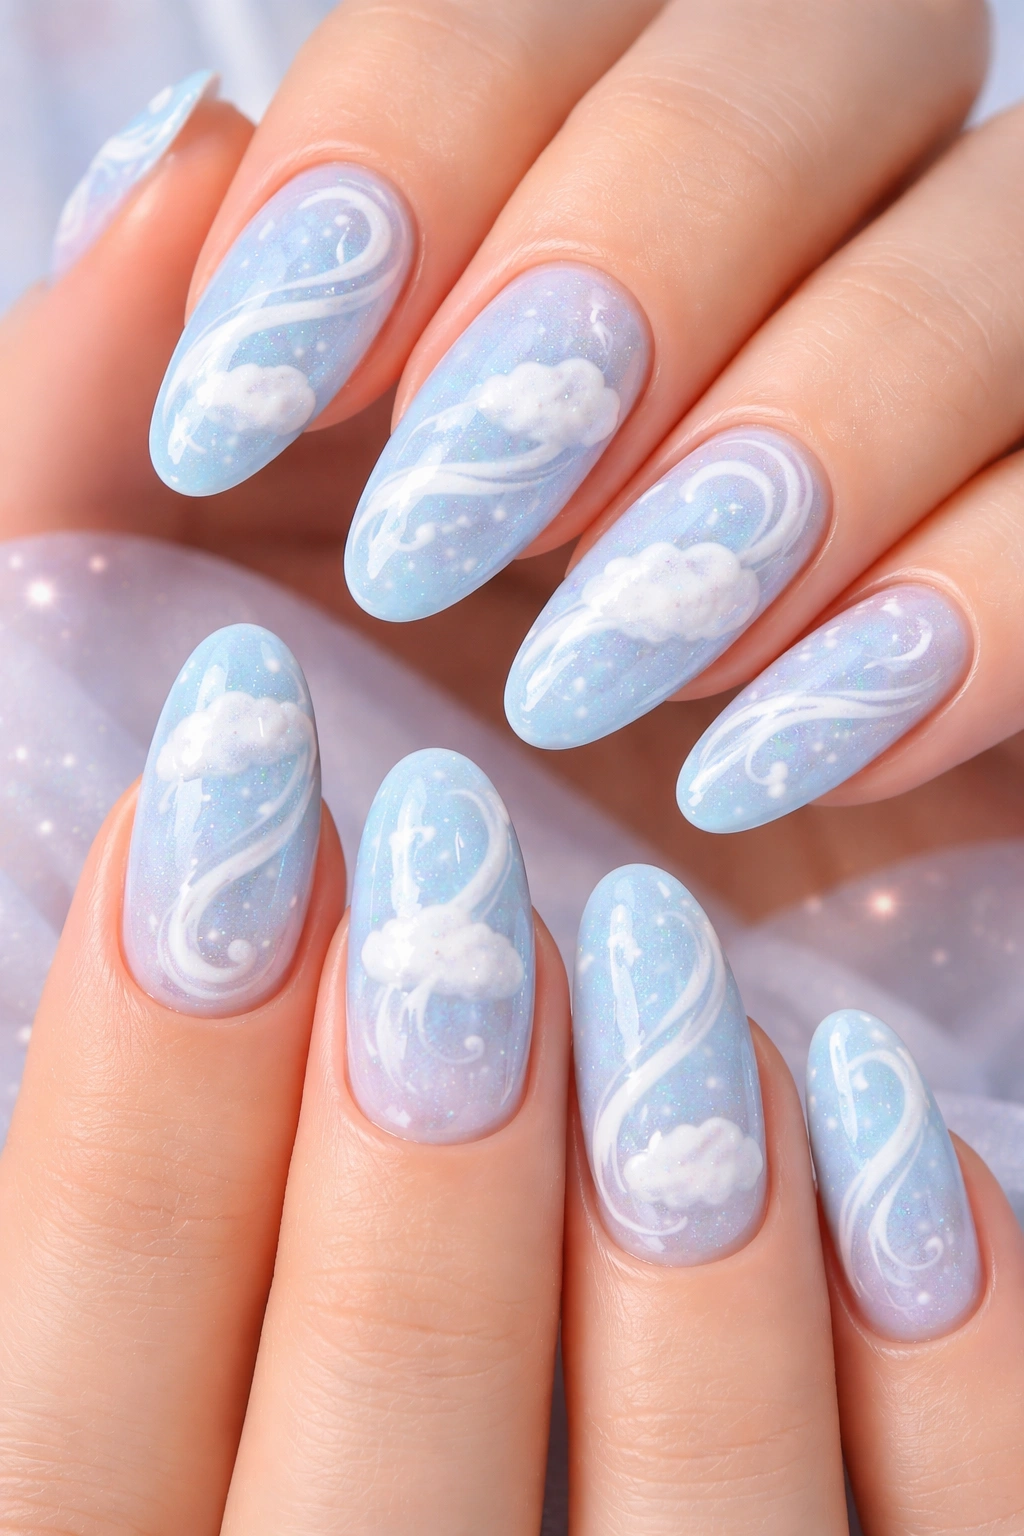
The early 2000s loved anything that looked dreamy and ethereal. Baby blue nails with white swirls and cloud patterns capture that soft, celestial aesthetic that was all over Lisa Frank products and teen bedroom walls. This design works beautifully as matching nails because it’s recognizable but allows for slight variations between you and your friend.
Start with a baby blue base—not too bright, not too pastel, somewhere right in the middle. Once that’s cured or dried, the fun begins with white swirly patterns. Your nail artist can use a thin brush to create freehand swirls that mimic clouds or smoke. No two nails need to look identical, which actually adds to the charm. The organic, flowing nature of swirls means each nail becomes a tiny piece of art.
You could take this design further by adding small details like stars, moons, or even tiny cherub stickers (very Y2K). Some people incorporate shimmer into the blue base or add an iridescent topcoat that gives off rainbow reflections in certain lighting. Another option is to reverse the color scheme on one or two nails—white base with blue swirls—to create visual interest while maintaining the matching theme.
This design photographs like a dream, especially outdoors in natural light. The soft colors won’t clash with most outfits, making these nails surprisingly versatile despite their statement-making appearance. When you and your best friend both have these cloud-like swirls on your nails, it creates this cohesive, almost magical vibe that feels straight out of a Y2K music video.
4. Checkerboard Pattern Perfection
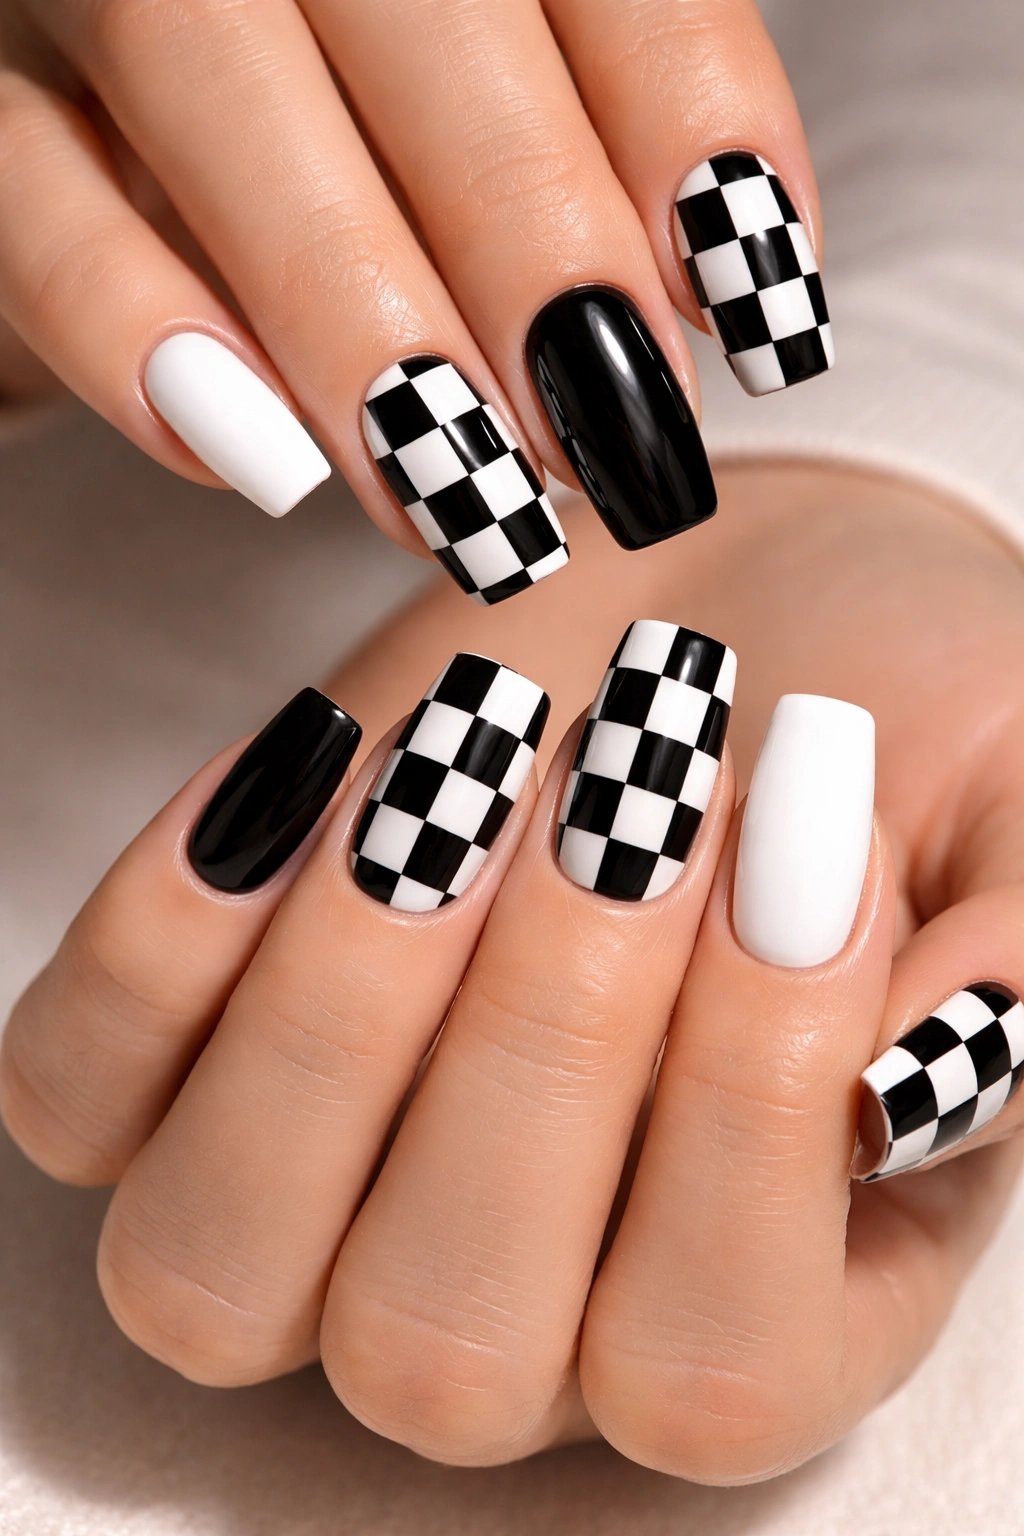
Checkerboard patterns were everywhere in Y2K fashion—on Vans sneakers, racing flags, ska band merchandise, and countless accessories. Translating this bold pattern to nails creates an eye-catching design that’s unmistakably early 2000s. The contrast typically works best with black and white, though you can experiment with other color combinations.
Creating clean checkerboard squares on nails requires precision. Most nail techs use thin striping tape to section off the nail before applying alternating colors, then remove the tape once everything’s dry. For matching nails, you and your friend should decide whether you want the checkerboard on all nails or just as accent nails. Many people opt for checkerboard on just the ring and middle fingers, keeping other nails solid black or white.
The scale of your checkerboard matters. Tiny squares give a more intricate, detailed look but can be harder to execute cleanly on shorter nails. Larger squares are bolder and easier to see from a distance. You might also consider doing vertical or diagonal checkerboard instead of the traditional horizontal layout. Some nail artists even curve the pattern to follow the natural shape of the nail, creating a wrapped effect.
For a more colorful Y2K twist, swap black and white for neon pink and lime green, or purple and yellow. These unexpected color combos feel more playful and less formal than classic black and white. Add a glossy topcoat to make the pattern pop, or go with a matte finish for a more modern interpretation. When you’re both wearing these matching checkerboard nails, you’ll definitely turn heads—the pattern is just that striking.
5. Flames and Fire Vibes
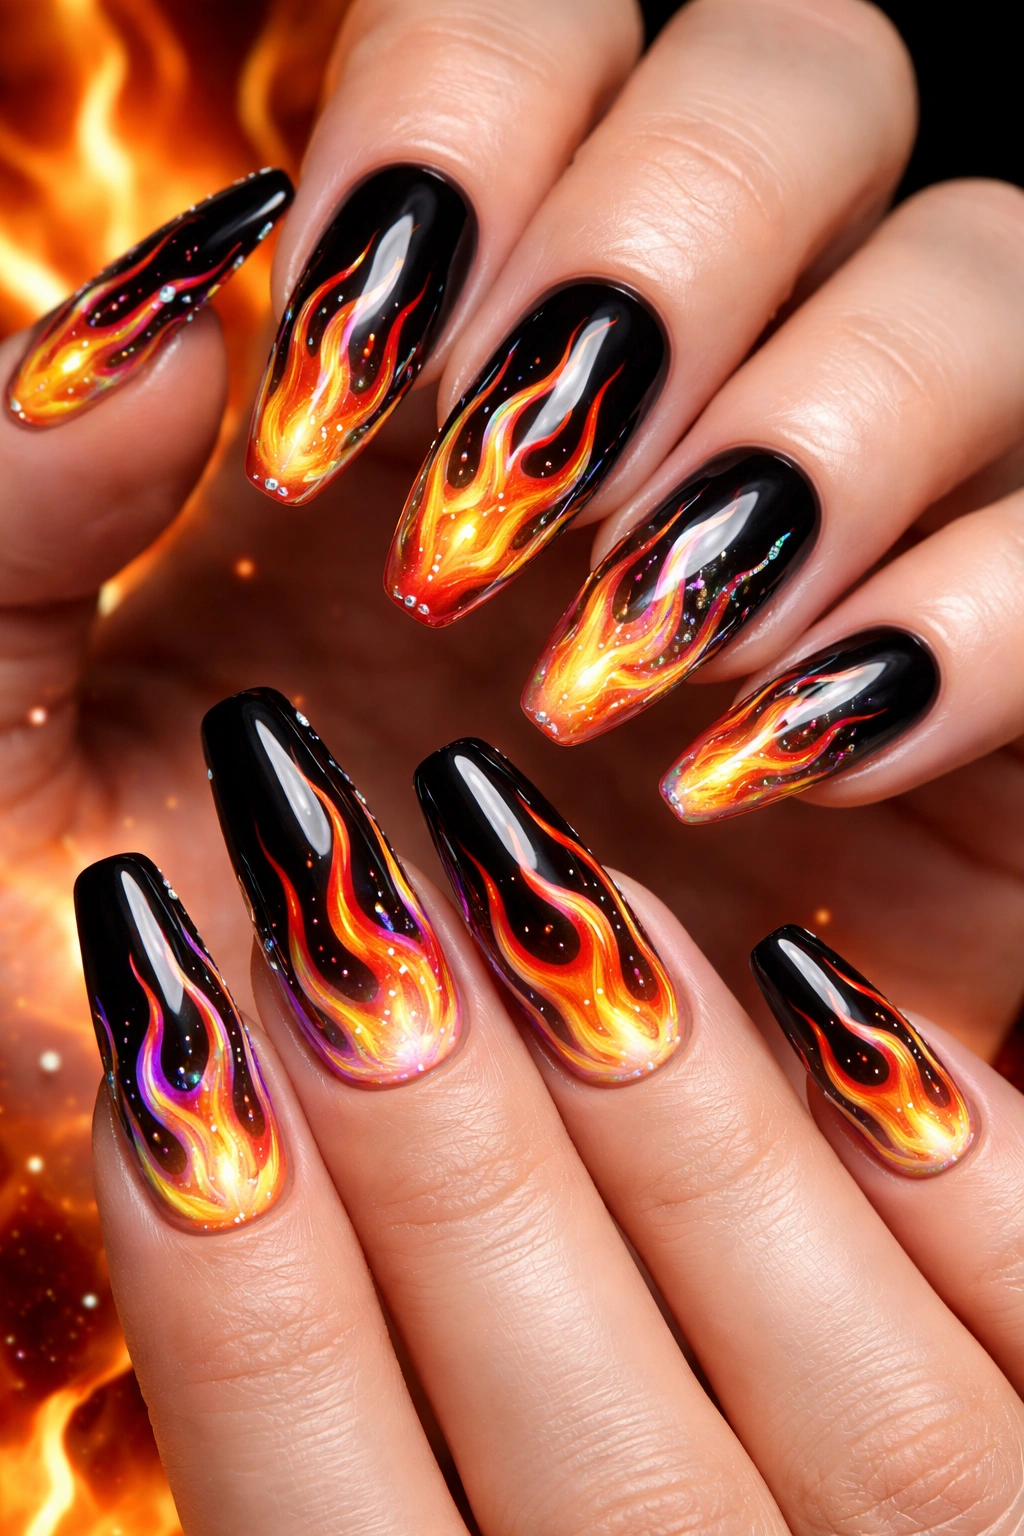
Nothing screams early 2000s rebellion quite like flame designs. These were painted on cars, printed on bowling shirts, embroidered on jeans, and yes—they looked amazing on nails too. Flame nails with your bestie channel that edgy, confident energy that defined Y2K pop culture, from Christina Aguilera’s “Dirrty” era to Hot Wheels collectibles.
Traditional flame designs start with a dark base—usually black, deep red, or even navy blue. The flames themselves typically gradient from yellow at the base to orange, then red at the tips, mimicking real fire. Your nail tech can hand-paint these or use airbrushing techniques for a smoother gradient. For matching nails, coordinate your base color and flame direction (usually pointing toward the tip, but some people reverse it).
You don’t have to stick with realistic fire colors. Y2K aesthetics embraced the unrealistic and fantastical, so consider blue flames, pink flames, or even holographic flames that shift colors depending on the angle. Metallic flame designs also work beautifully—silver flames on a black base look sleek and futuristic. Adding tiny rhinestones along the flame edges can elevate the design from cool to absolutely stunning.
The placement flexibility makes flame nails great for matching with variations. Maybe you both do flame accent nails on your ring fingers while keeping other nails solid colors. Or perhaps one of you does flames rising from the cuticle while the other has flames coming from the tips, creating a mirrored effect when you put your hands together. Either way, flame nails make a bold statement that’s unmistakably Y2K.
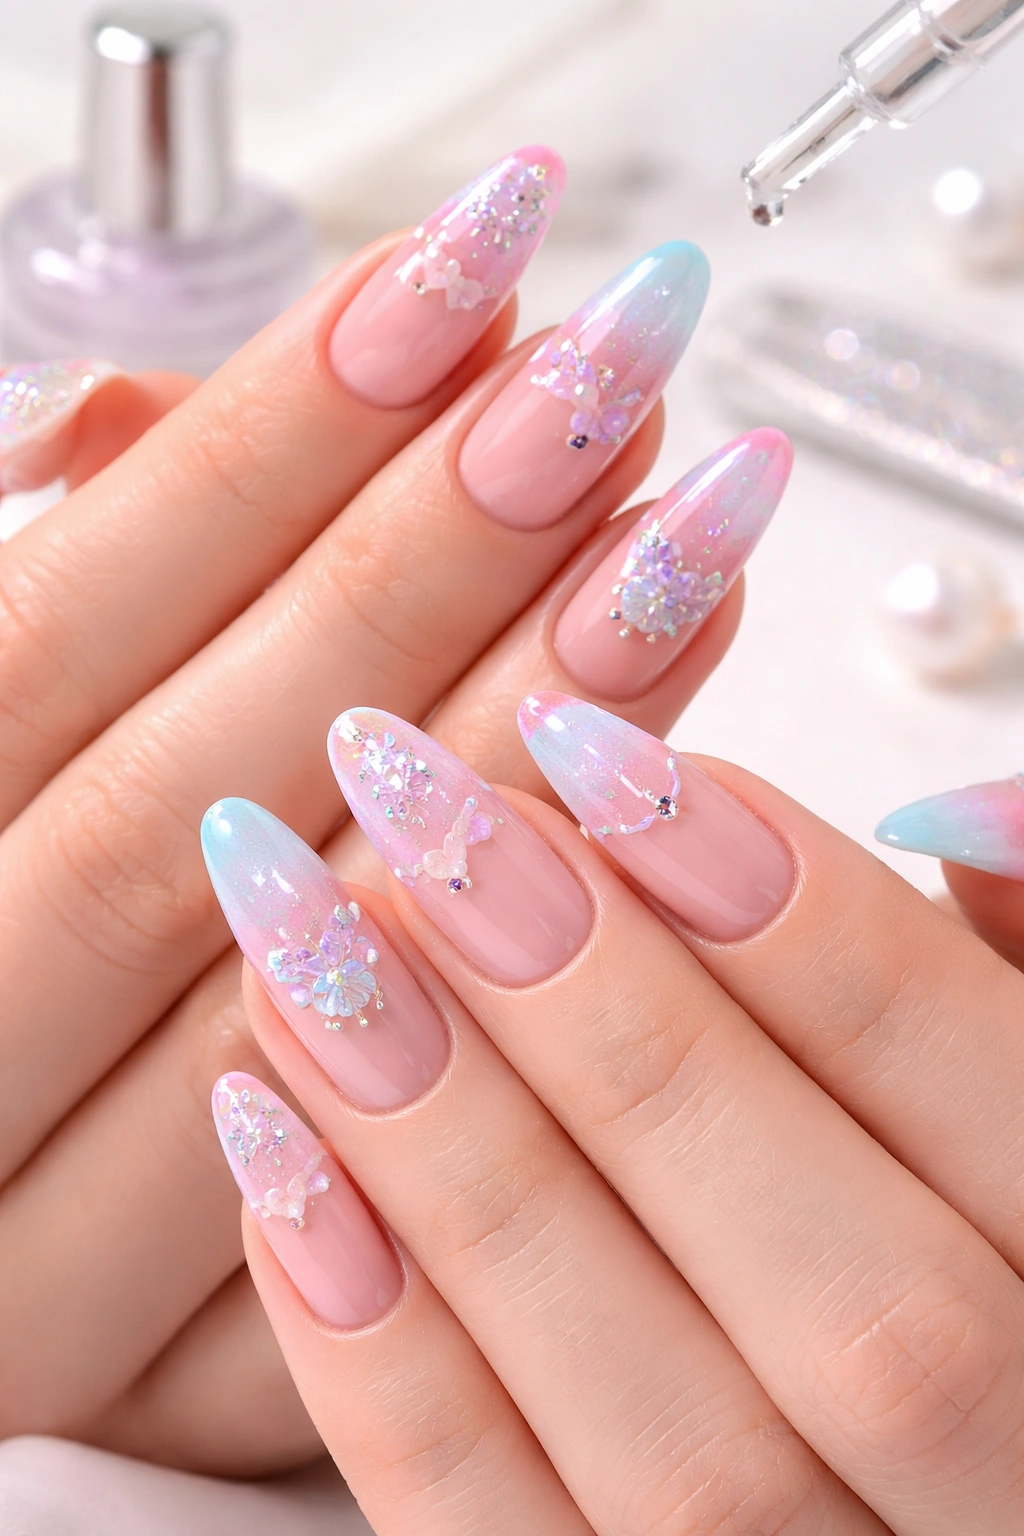
6. Holographic Hearts
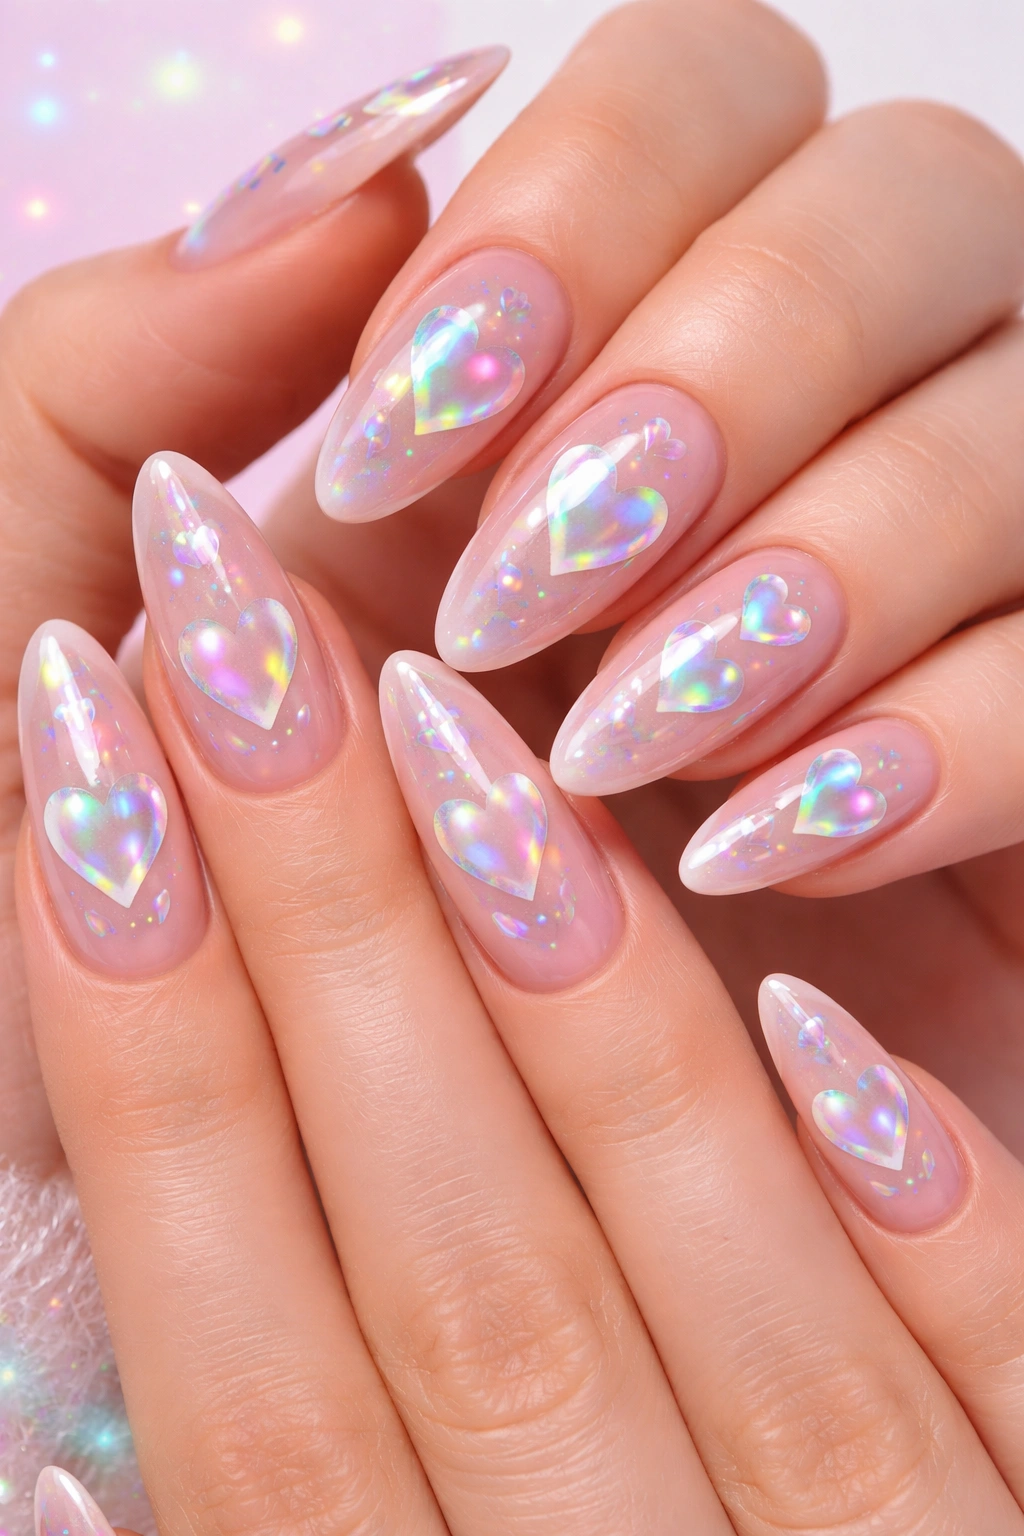
Holographic finishes were absolutely everywhere in the early 2000s—stickers, notebooks, phone cases, makeup, you name it. That rainbow-shifting, oily-looking surface fascinated everyone, and it translates beautifully to nail art. Combining holographic effects with heart shapes creates a design that’s sweet, eye-catching, and perfectly nostalgic.
The base for holographic heart nails can go several directions. Some people prefer a clear or nude base so the holographic hearts really stand out. Others opt for a solid pastel like lavender or mint green, then add holographic heart decals or hand-painted hearts on top. The hearts can be different sizes scattered across the nail, or you could feature one large heart on each accent nail.
Holographic polish itself has improved dramatically since the Y2K era. Modern formulas create stronger rainbow effects with better wear time. You could do an entirely holographic base on all nails, then add heart outlines in contrasting colors. Or reverse it—solid color hearts on a holographic background. Mixing textures creates depth; try matte hearts on a glossy holographic base, or vice versa.
For matching with your best friend, coordinate your heart placement and colors. Maybe you both do pink holographic hearts, but you place yours on the ring finger while they put theirs on the middle finger. You could even get creative with broken heart designs—one of you wears the left half of a heart, the other wears the right half, and when you put your hands together, the hearts connect. That’s peak best friend nail art right there.
7. Neon French Tips
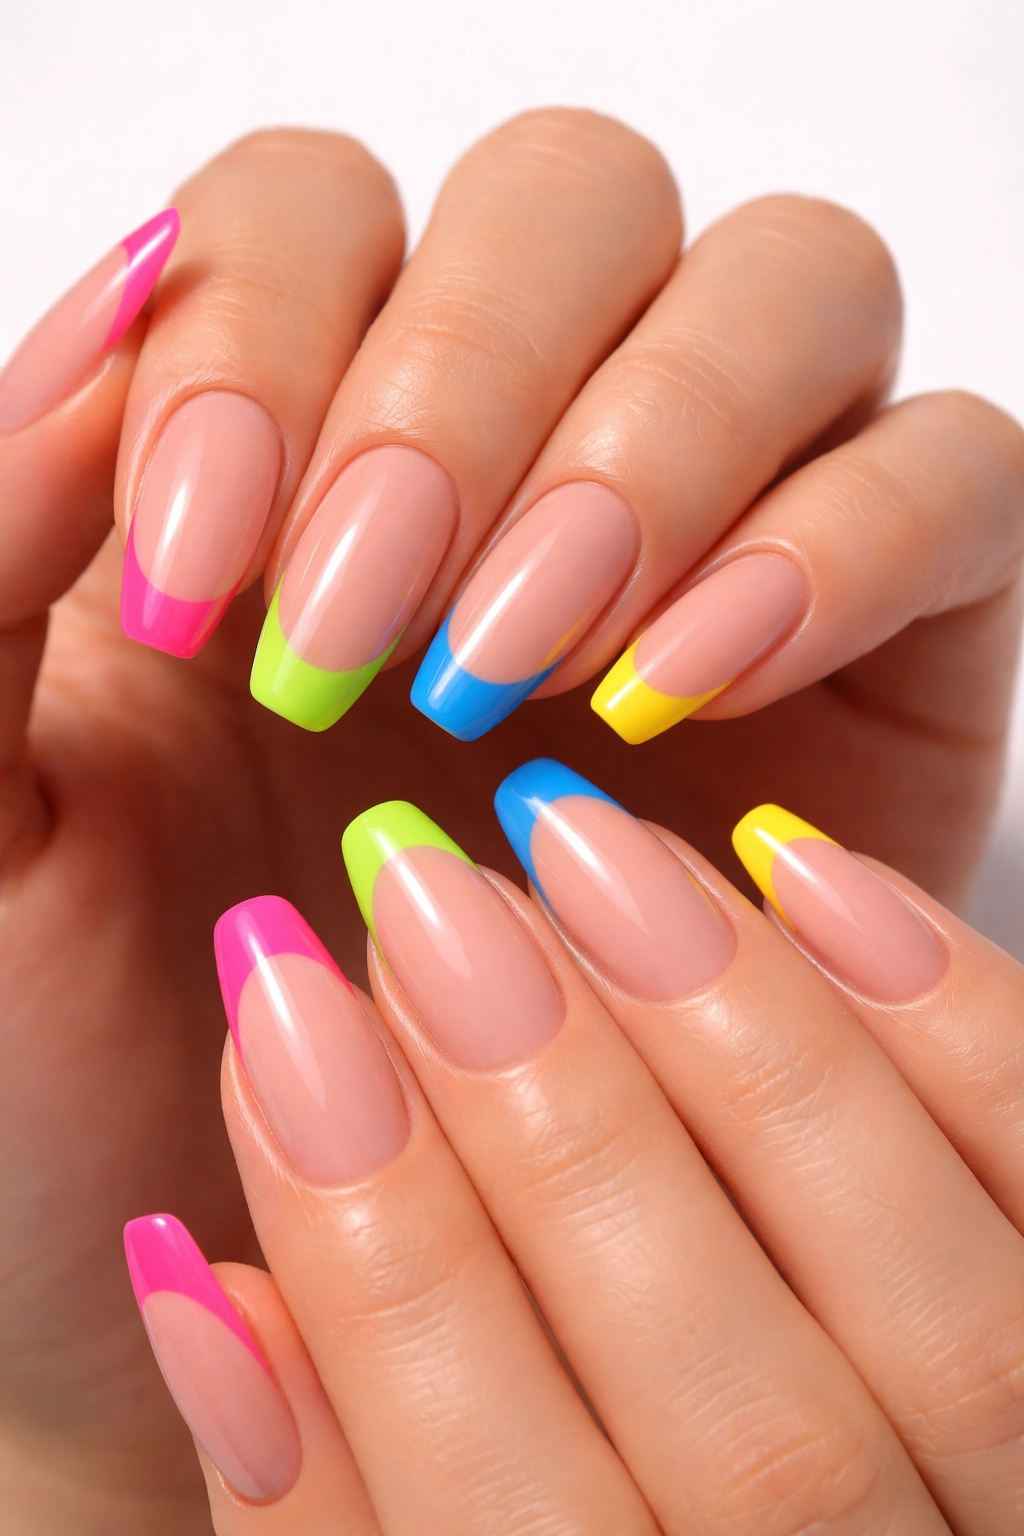
French tips got a serious Y2K makeover when designers started swapping out classic white tips for blazing neon colors. This updated take on a traditional manicure feels fresh, fun, and undeniably early 2000s. The contrast between neutral nail beds and electric tips creates a look that’s both polished and playful.
Creating neon French tips starts with your color choice. Hot pink, lime green, electric blue, and sunny yellow were the most popular Y2K neon shades. Your nail tech will apply a clear or nude base coat, then carefully paint the tips in your chosen neon. The tip can be thick or thin depending on your preference—chunkier tips feel more authentically Y2K, while thinner tips lean slightly more modern.
You and your bestie have several matching options here. You could both choose the same neon color for a perfectly coordinated look. Or create a rainbow effect—one of you does pink tips, the other does yellow, and together you’ve got that multi-color Y2K vibe. Another approach is alternating neon colors across your own nails; maybe pink and green alternate on each finger, and your friend mirrors the same pattern.
Don’t forget about nail shape. While traditional French tips work on any nail shape, neon French tips look particularly striking on square or squoval nails, which were hugely popular in the early 2000s. The flat edge provides a clear line for the neon color and maximizes the visual impact. Add a glossy topcoat to make those neons really pop, or experiment with a matte topcoat for a contemporary twist on this nostalgic design.
8. Zigzag Lightning Bolts
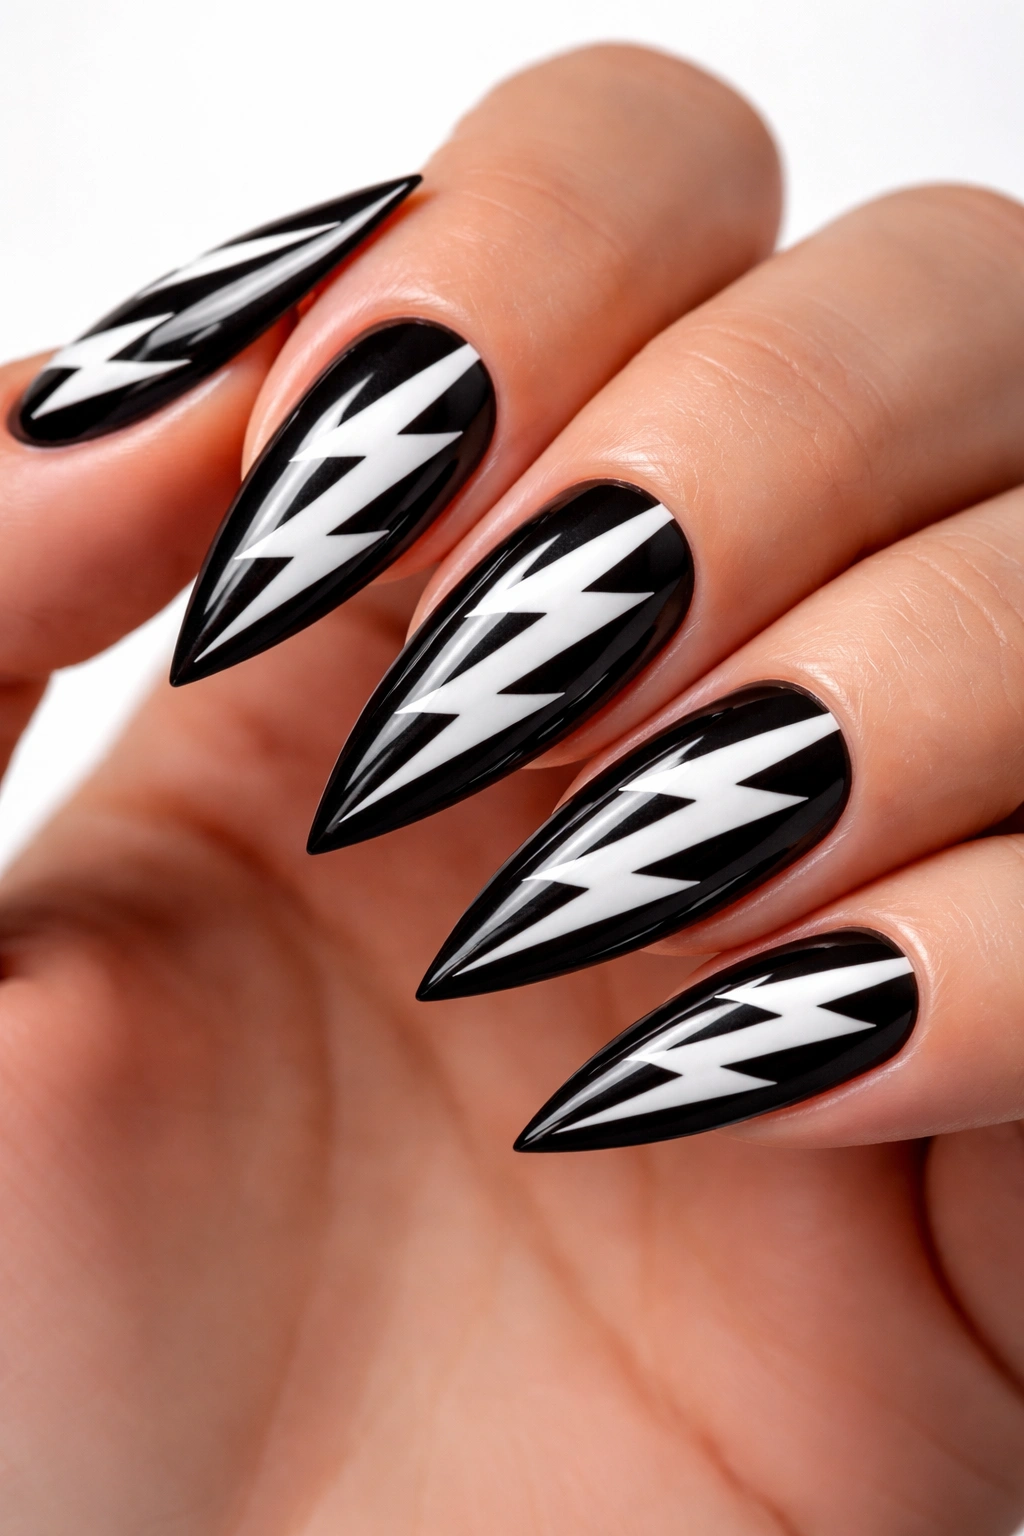
Graphic, geometric patterns dominated Y2K design, and zigzag lightning bolts perfectly capture that angular, energetic aesthetic. These sharp, dynamic shapes add movement to your nails and create a bold statement that’s impossible to ignore. When you and your friend both rock lightning bolt nails, you’re channeling serious electric energy.
Lightning bolt designs work on various base colors, though they show up best against contrasting backgrounds. Black base with white or yellow lightning bolts feels classic. Pastel bases with metallic lightning bolts feel more soft and modern. You could even do a gradient or ombre base with solid-color lightning cutting through it. The lightning bolts can be hand-painted with a thin brush, or your nail tech can use vinyl stencils for crisp, clean edges.
The placement of lightning bolts offers creative freedom. Diagonal bolts cutting across the nail from one corner to another create maximum drama. Vertical bolts running from cuticle to tip elongate the nail visually. You could place multiple small bolts scattered across each nail, or feature one large, prominent bolt on accent nails only. For matching with your bestie, coordinate the direction and placement of your bolts so they mirror or complement each other.
Adding dimension takes lightning bolt nails to the next level. Try outlining your bolts with thin metallic lines or tiny rhinestones. Some nail artists create a “glow” effect around lightning bolts using gradient techniques, making them appear to radiate light. Holographic or chrome lightning bolts on matte bases create an interesting textural contrast. The graphic nature of this design photographs beautifully and reads clearly even from a distance.
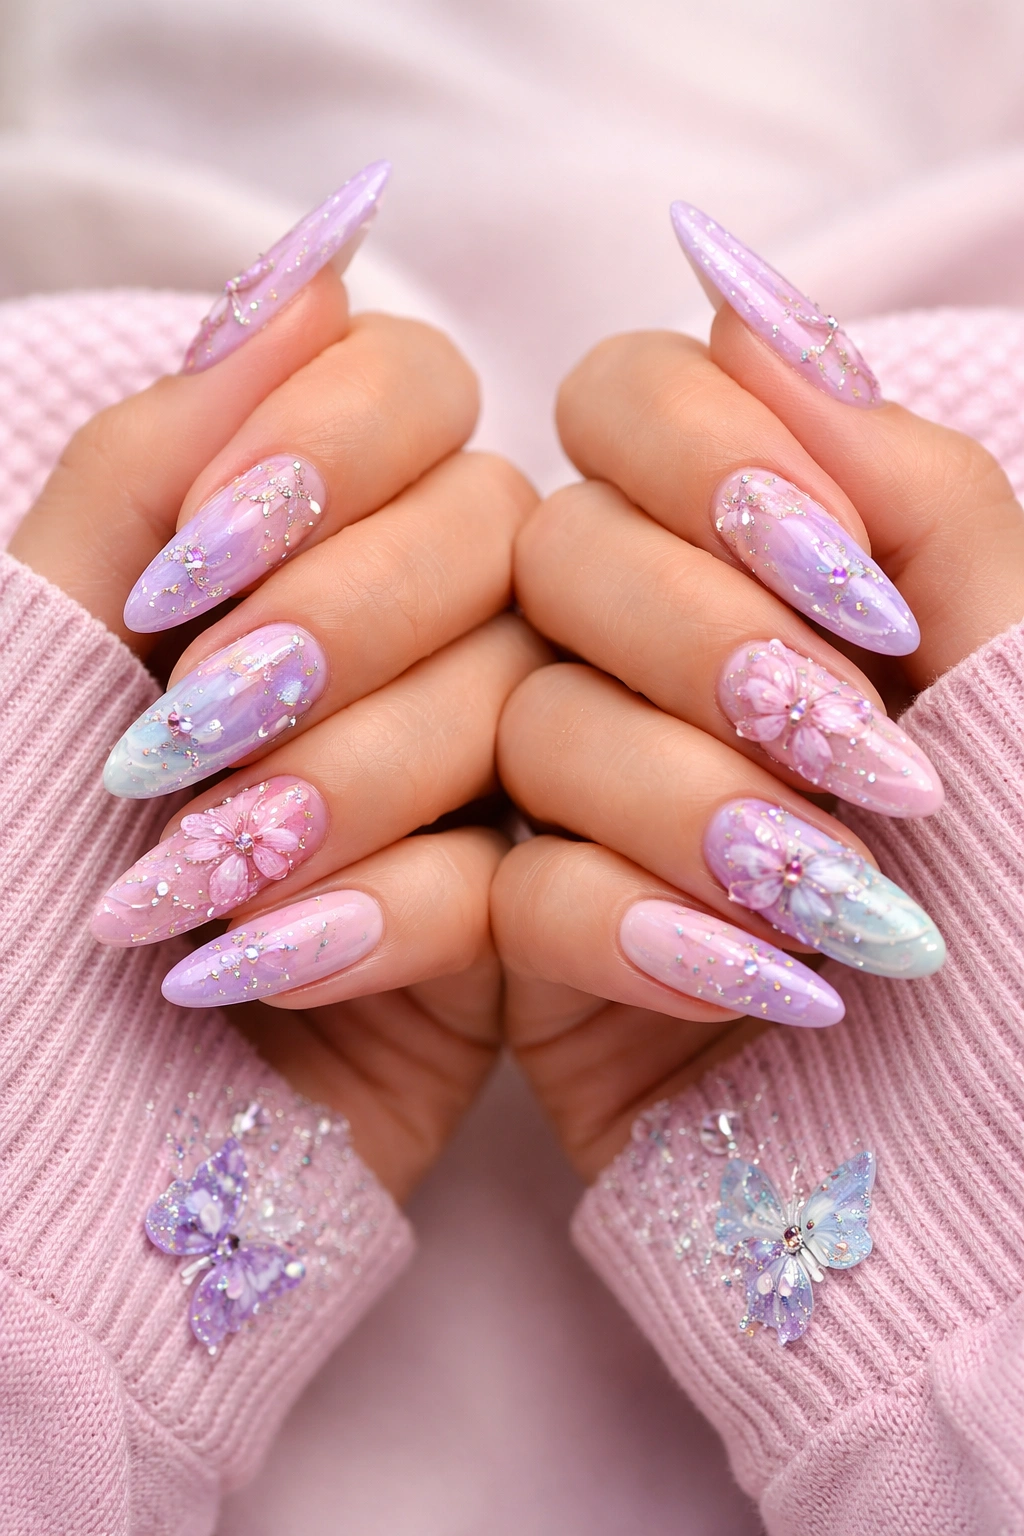
9. Bedazzled Daisy Designs
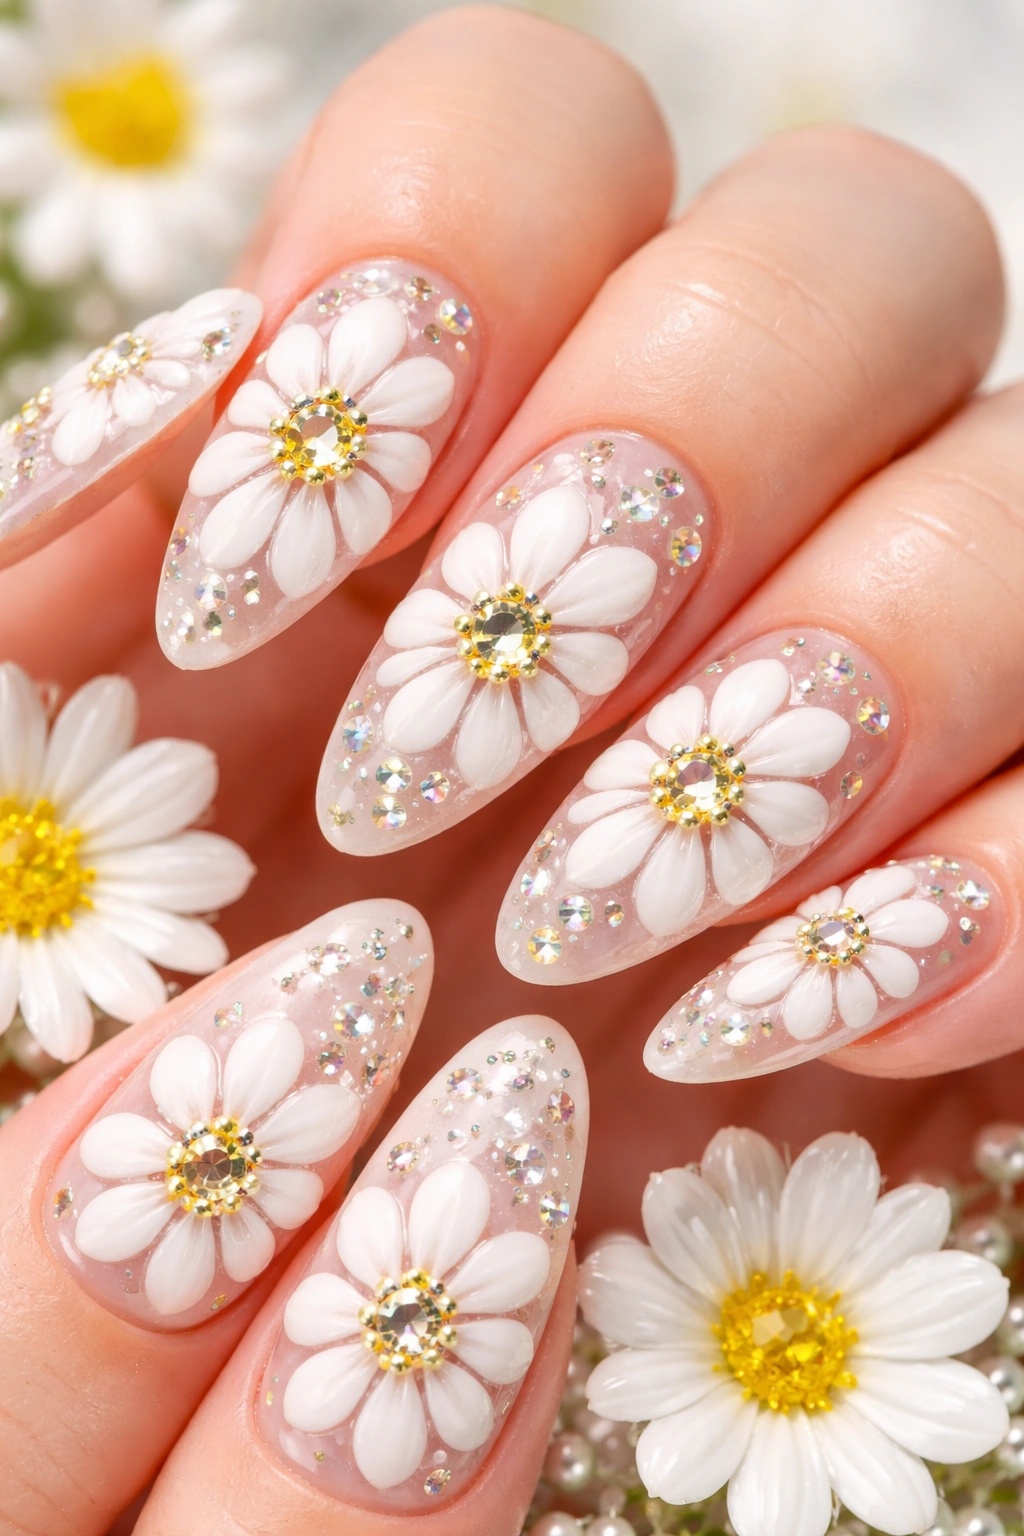
Daisies were the flower of the Y2K era, showing up on everything from platform flip-flops to peasant tops. These simple, cheerful flowers represent the optimistic, carefree spirit of the early 2000s. Adding rhinestone embellishments—or “bedazzling”—amps up the glamour factor and makes your matching nail art truly special.
A daisy nail design typically features white petals arranged in a circle with a yellow center, though Y2K aesthetics embraced colorful variations too. You might see pink daisies, blue daisies, or rainbow daisies with each petal a different color. The flowers can be hand-painted directly onto the nail, or your tech can apply pre-made daisy decals. For a more dimensional look, some nail artists create 3D daisies using acrylic or gel.
Here’s where the bedazzling comes in. Place a small rhinestone in the center of each daisy instead of painting it yellow. This creates sparkle and texture that catches light beautifully. You can also add tiny rhinestones around the daisies as accents, or create rhinestone stems and leaves. Some people go full maximalist and surround their daisies with scattered rhinestones in various sizes, creating an almost jewelry-like effect on their nails.
For matching with your best friend, coordinate your daisy colors and rhinestone placement. You might both do white daisies with crystal rhinestone centers, placing them on the same fingers. Or create variety while staying cohesive—you do white daisies while they do pink daisies, but you both use the same rhinestone style. The key is balancing coordination with individual expression. These nails work beautifully for spring and summer events, festivals, or any time you want to embrace that sunshine-filled Y2K positivity.
10. Glitter Ombre Fade
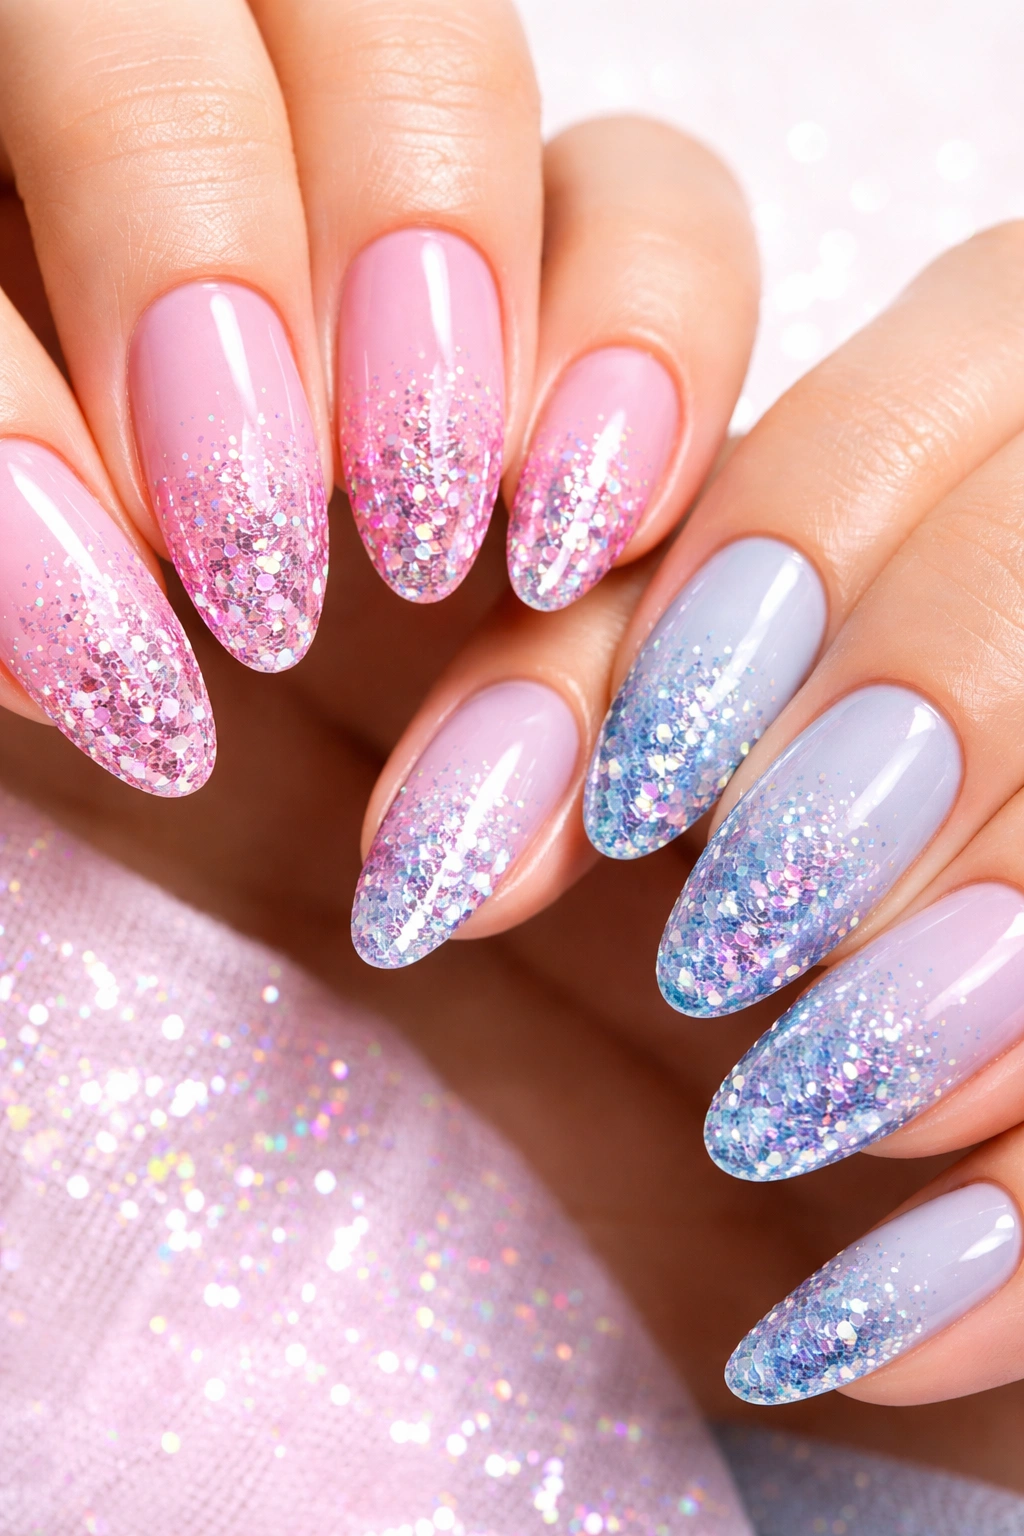
Glitter was an absolute requirement in Y2K fashion and beauty. The bigger and chunkier, the better. Glitter ombre nails combine that signature Y2K sparkle with the gradient technique that’s remained popular through the decades. The result is nails that transition smoothly from solid color to full glitter coverage, creating a dazzling effect.
Creating a glitter ombre requires layering and blending. Your nail tech will start with your chosen base color—let’s say baby pink. Then they’ll apply glitter polish (or loose glitter in gel) starting heavily at the tips and gradually fading toward the cuticle. The fade should look smooth and intentional, not patchy. Chunky hexagon glitter gives that authentic Y2K feel, while finer glitters create a more subtle shimmer.
You and your bestie can coordinate your glitter ombre in several ways. Match your base colors exactly and use the same glitter shade for perfect synchronization. Or choose complementary colors—one does pink base with silver glitter while the other does purple base with silver glitter. You could even create a rainbow effect by each choosing different colors that look cohesive when seen together.
The glitter density matters too. Some people prefer a subtle ombre with just a hint of sparkle at the tips. Others go for full coverage, heavy glitter that creates serious impact. Y2K aesthetics typically leaned toward maximum sparkle, so don’t hold back. Consider mixing different glitter shapes and sizes in your ombre for added texture. Pair larger hexagons with fine shimmer, or combine holographic glitter with solid metallics. Seal everything with a good topcoat—you’ll need at least two layers to smooth out the glitter texture.
11. Cow Print Chaos
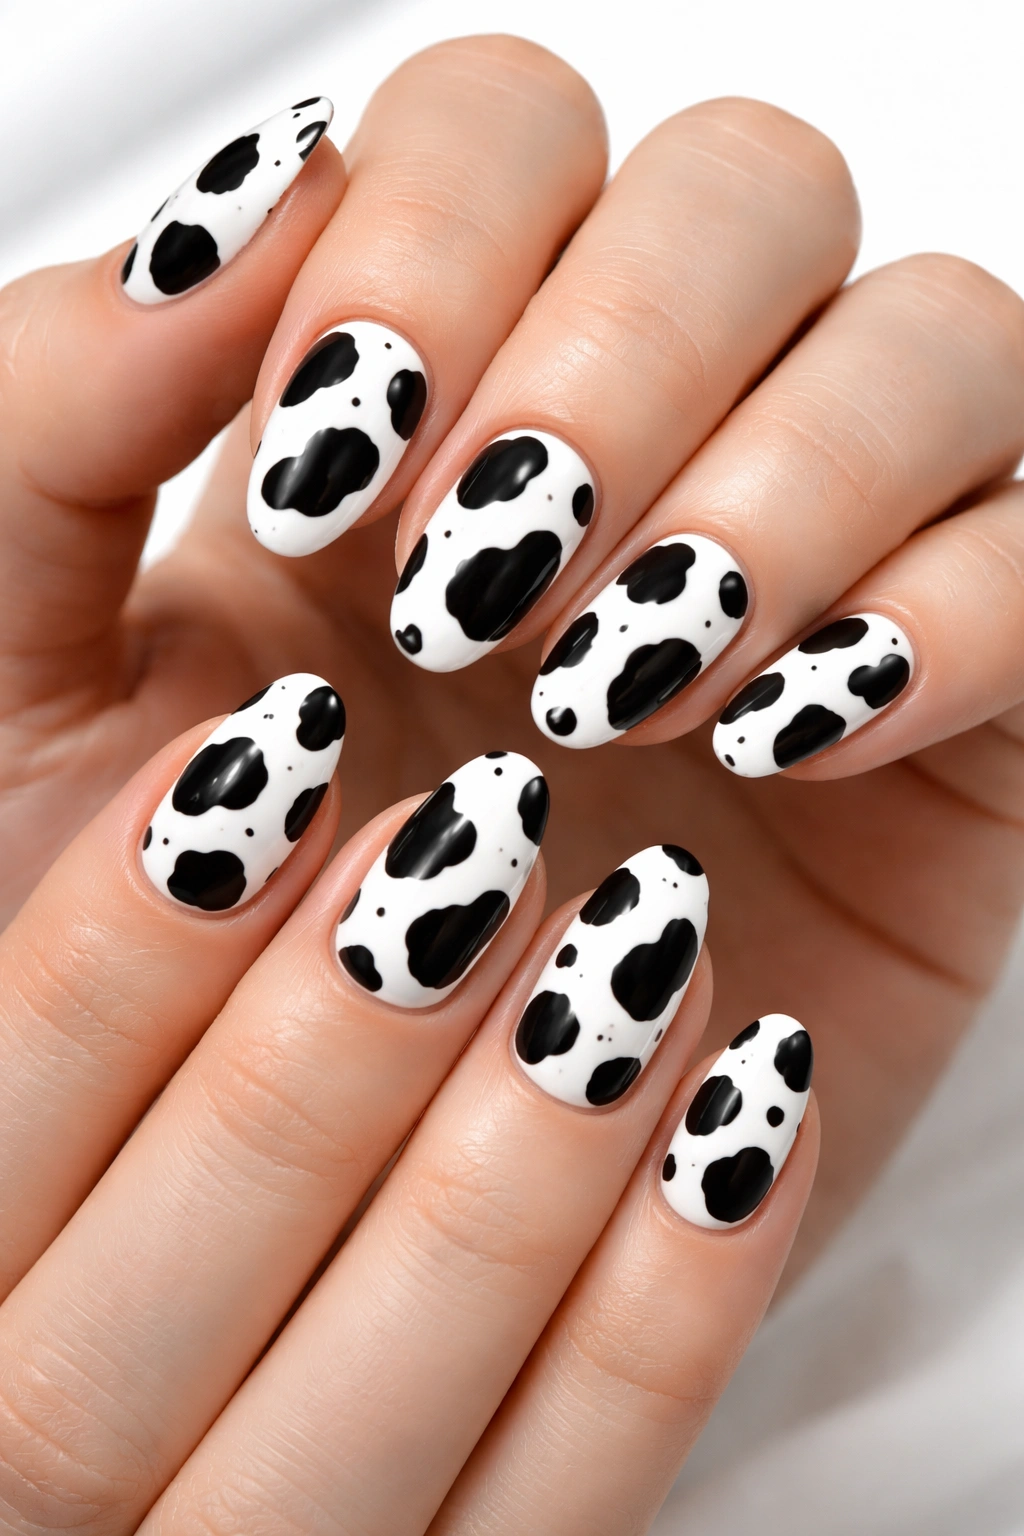
Cow print exploded in Y2K fashion thanks to influences from pop stars and the general trend toward bold animal prints. Unlike leopard or zebra print, cow print feels more playful and less predictable. Black and white cow spots on nails create a striking high-contrast design that’s instantly recognizable and undeniably nostalgic.
Creating cow print on nails is relatively simple, which makes it great for matching manicures. Start with a white base coat on all nails. Once that’s completely dry or cured, use black polish and a small brush or dotting tool to create irregular organic shapes—think connected blobs and spots rather than perfect circles. The randomness is what makes cow print work; no two nails should look identical, and that’s part of the charm.
For matching with your friend, you’ll both follow the same technique but end up with unique spot placements. That’s perfect—you’re clearly coordinating without looking like carbon copies. You could also designate certain nails as accent nails; maybe only the ring and middle fingers get cow print while the others stay solid white or black. Another variation is reversing the colors on some nails—black base with white spots—to create visual interest.
Y2K cow print often ventured beyond basic black and white. Consider pink and white cow spots for a more feminine, Barbie-inspired take. Brown and cream creates a more natural, earthy vibe. Some people even do rainbow cow print with spots in multiple colors on a white base. Add a glossy topcoat to make the colors pop, or try matte for a more contemporary feel. These nails pair perfectly with platform boots, denim everything, and that confident Y2K energy.
12. Tribal Swirls and Waves
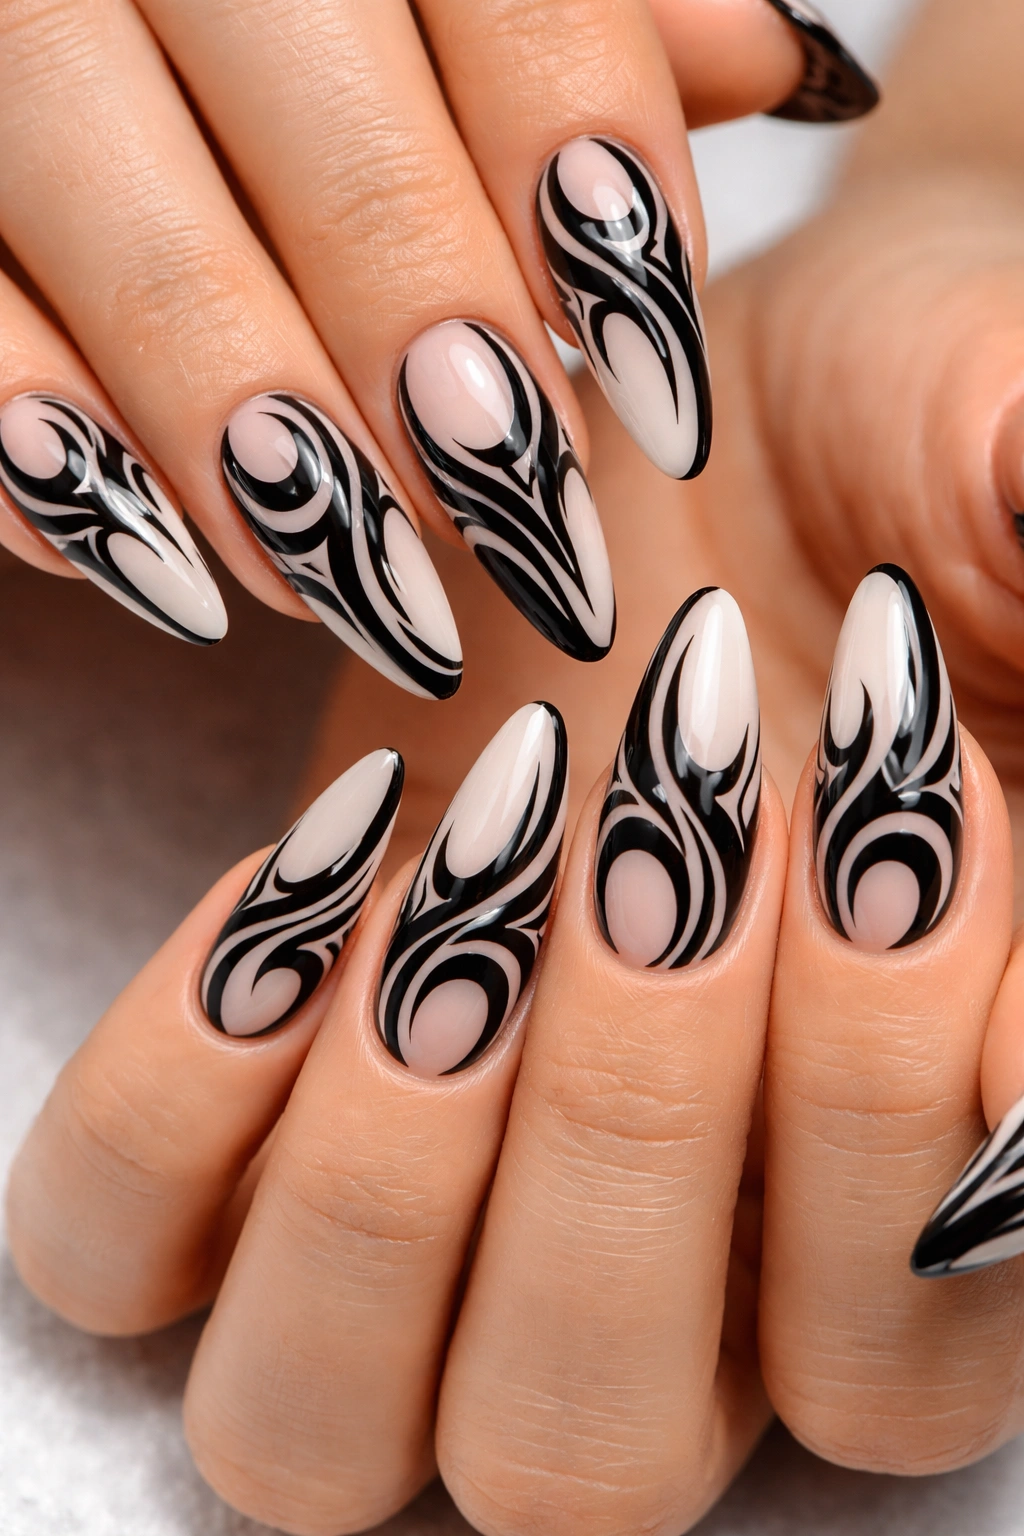
The early 2000s saw a huge trend of tribal-inspired designs in fashion, jewelry, and body art. While the cultural appropriation aspects of this trend are worth acknowledging and avoiding, the abstract swirling patterns and wave designs that emerged from this era can be adapted respectfully as purely decorative geometric nail art. These flowing, interconnected lines create movement and visual interest on nails.
Tribal-style swirls typically involve thick, bold black lines creating symmetrical or flowing patterns on a light base. The designs often incorporate spirals, waves, connected S-shapes, and geometric elements. On nails, these patterns work best when they flow with the nail’s natural shape, creating a sense of movement from cuticle to tip. Your nail tech can hand-paint these designs using a thin brush and steady hand.
For matching manicures, coordinate the style and placement of your swirl patterns. You might both do swirls on your ring fingers and thumbs while keeping other nails solid colors. Or create complementary patterns—your swirls spiral clockwise while your friend’s spiral counterclockwise. The beauty of these organic, flowing designs is that they don’t need to be identical to clearly match.
Consider adding color to these traditional black-and-white designs for a more Y2K twist. Deep blue swirls on a silver base, or purple waves on a pink background, keep the graphic quality while adding that color-loving Y2K energy. Some people outline their swirls with metallic polish or add tiny dots and details within the patterns. These nails feel artistic and intentional, perfect for expressing your creative side while matching with your bestie.
13. Smiley Face Surprise
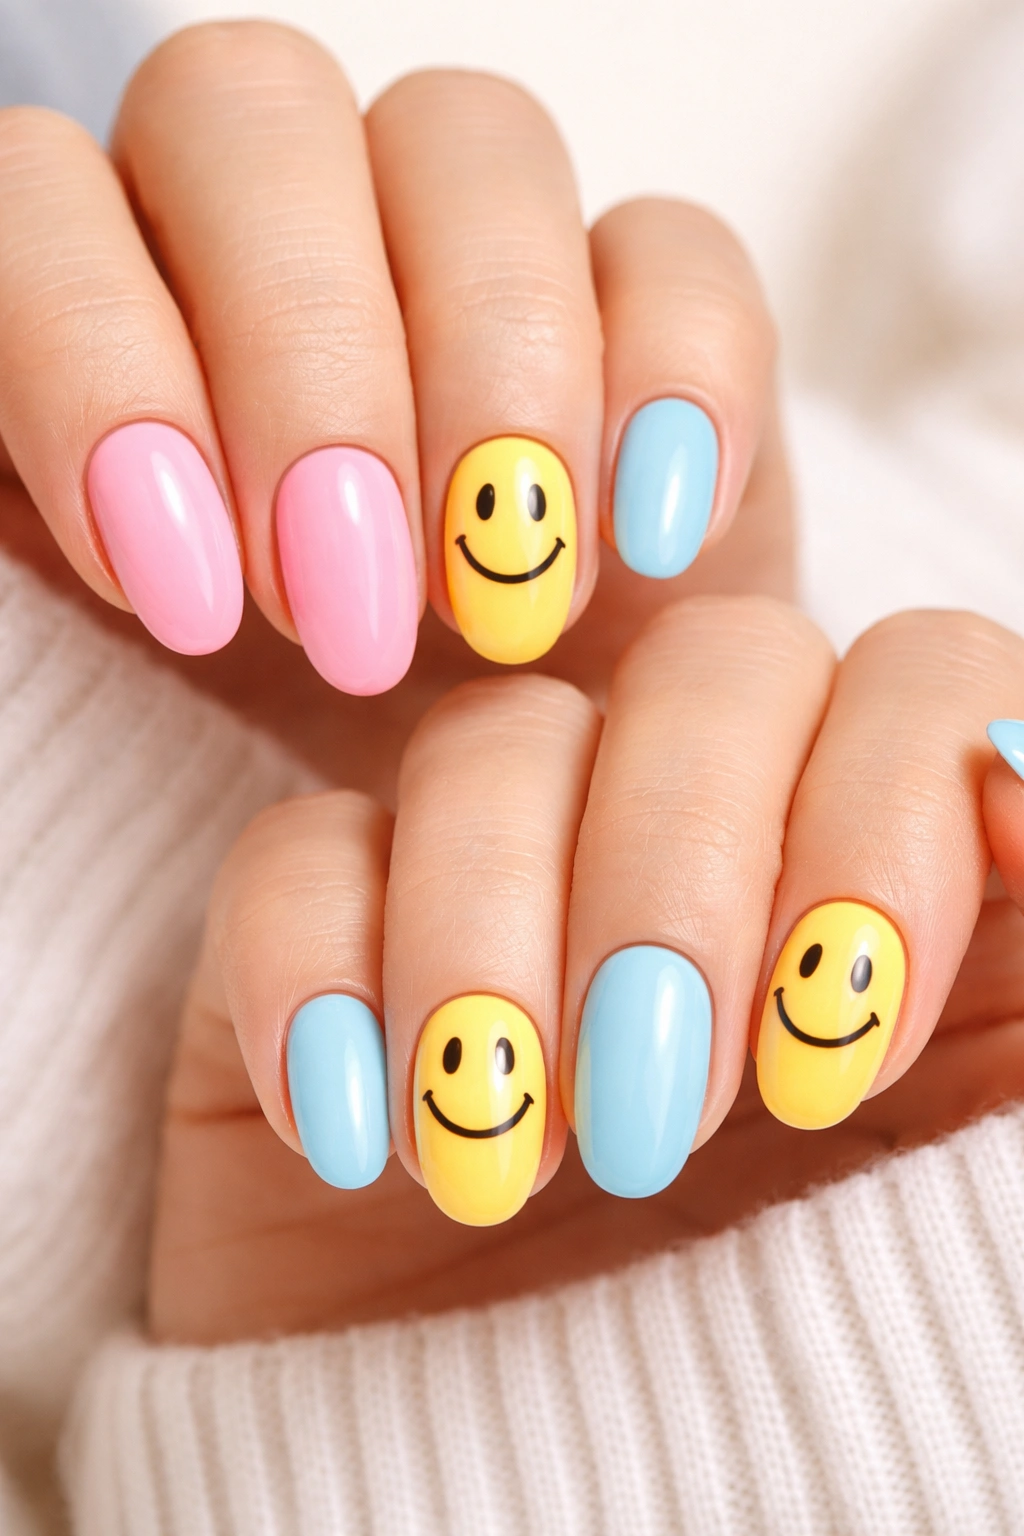
Happy faces, specifically the simple yellow circle with two dots and a curved line, became an icon of Y2K positivity. This cheerful symbol appeared on everything from pajama pants to bedroom decor, and it translates perfectly to nail art. Smiley face nails radiate good vibes and playful energy, making them ideal for best friend matching manis.
The classic approach puts a yellow smiley face on one or two accent nails while keeping the rest of your nails a complementary solid color. The face can be painted freehand or applied as a decal or sticker. For a more modern take, some nail artists create translucent smiley faces on colored bases, or reverse the classic colors—white face on a yellow nail, or even black face on a neon background.
You and your friend have lots of options for coordination here. Match exactly with the same placement and colors. Create variation by putting your smiley faces on different fingers—you choose ring fingers, they choose middle fingers. Or get creative with expressions; maybe one of you has regular smiley faces while the other has winking faces or faces with tongue out. You’re still clearly matching while adding personality.
Embellishments take smiley nails up a notch. Use tiny rhinestones for the eyes instead of painted dots. Add a holographic or glitter topcoat over the entire nail for sparkle. Some people create 3D smiley faces using gel that’s built up slightly from the nail surface. You could also scatter multiple small smiley faces across each nail rather than featuring one large face. The simplicity of the design means it works on any nail length or shape, and it’s universally recognizable—everyone who sees your matching smiley nails will immediately get the Y2K reference.
14. Rhinestone-Encrusted Drama
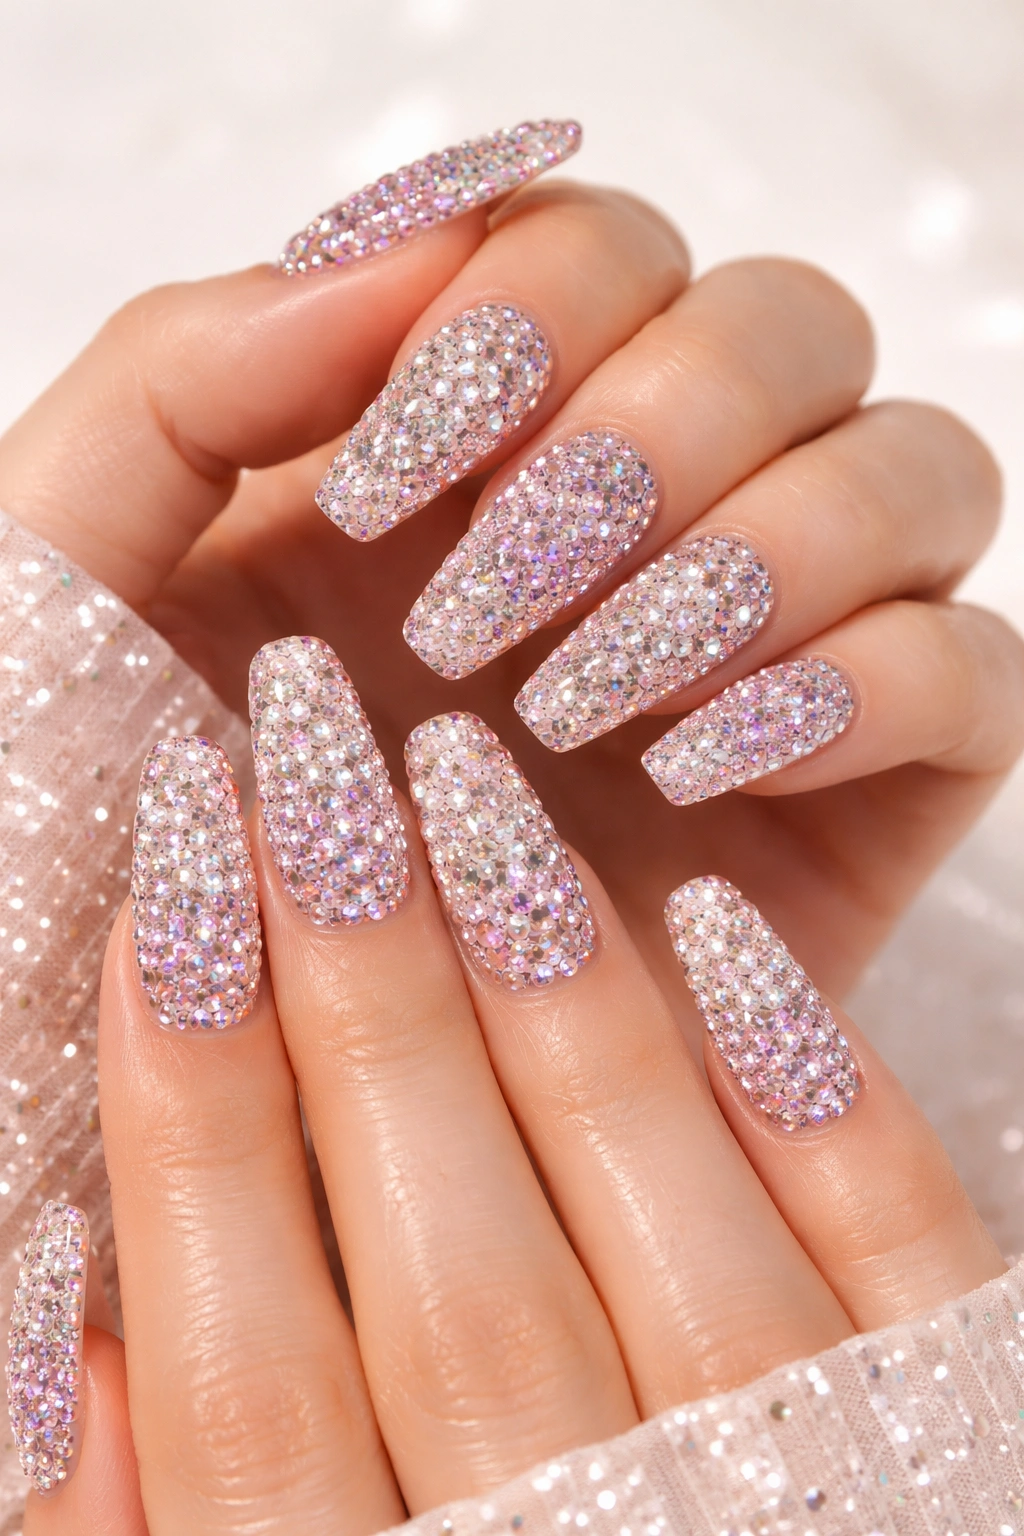
If there’s one thing that defines Y2K nail aesthetics, it’s the fearless use of rhinestones. More is more when it comes to this era, and rhinestone-encrusted nails embrace that philosophy completely. We’re talking full coverage of crystals, creating nails that look more like jewelry than traditional manicures. When you and your bestie both commit to maximum rhinestone drama, you’re making a serious statement.
Full rhinestone coverage requires patience and precision. Your nail tech will apply a base color (or leave nails clear), then meticulously place individual rhinestones using gel or nail glue. The stones should sit close together with minimal gaps, creating a smooth, encrusted surface. Clear crystals are classic, but colored rhinestones add even more personality. Consider all pink stones, or create patterns with different colored crystals.
For matching with your friend, coordinate your rhinestone colors and coverage. You might both do full rhinestone coverage on just your ring fingers while keeping other nails complementary solid colors. Or alternate—rhinestone nails and plain nails in a pattern. Some people do gradient rhinestone coverage, with stones getting denser toward the tips. You could also create designs within your rhinestone coverage; arrange colored stones to form hearts, stars, or initials.
The maintenance on heavily rhinestoned nails is real. Stones can catch on clothing and occasionally pop off despite best efforts. Bring nail glue with you for quick repairs. These nails last longest when you’re gentle with your hands—probably not ideal if you’re typing all day or doing manual work. But for special occasions, events, or just living your best Y2K life? Rhinestone-covered nails are absolutely worth it. The way they catch light and sparkle is genuinely stunning, and they photograph beautifully. Your matching rhinestone nails will be the star of every photo op.
15. Mix-and-Match Color Blocking

Y2K fashion embraced unexpected color combinations and bold blocking—think Powerpuff Girls color schemes and those plastic segmented bracelets everyone wore. Color-blocked nails take this principle and apply it to your manicure, creating a playful, graphic look that’s cohesive without being matchy-matchy. This design celebrates individuality while still clearly coordinating with your best friend.
Color blocking on nails means using solid, bold colors in intentional patterns. You might do three nails in hot pink, two in electric blue, and your thumb in lime green. The colors should be from the same family or have similar saturation levels so they feel cohesive. Neon colors together, pastels together, or jewel tones together all work. Avoid mixing too many different vibes—neon and pastel together can look confused rather than intentional.
For matching with your friend, choose the same color palette but distribute them differently. If you’re working with pink, blue, and yellow, maybe you do three pink nails while they do three blue nails, but you’re both using the same specific shades. Or mirror each other exactly—when you hold your hands palm-to-palm, your colors align. You could even create a pattern where your ten nails plus their ten nails create a specific color sequence when arranged together.
Consider adding thin dividing lines between your color blocks using metallic polish or nail striping tape. This creates cleaner divisions and adds another design element. Some people incorporate negative space by leaving strategic nails bare or clear, breaking up the solid color blocks. Geometric shapes within your blocks—triangles of one color on a base of another—add complexity while maintaining that graphic, blocked aesthetic. The key is bold, confident color choices that reflect that fearless Y2K approach to style.
16. Digital Matrix Green
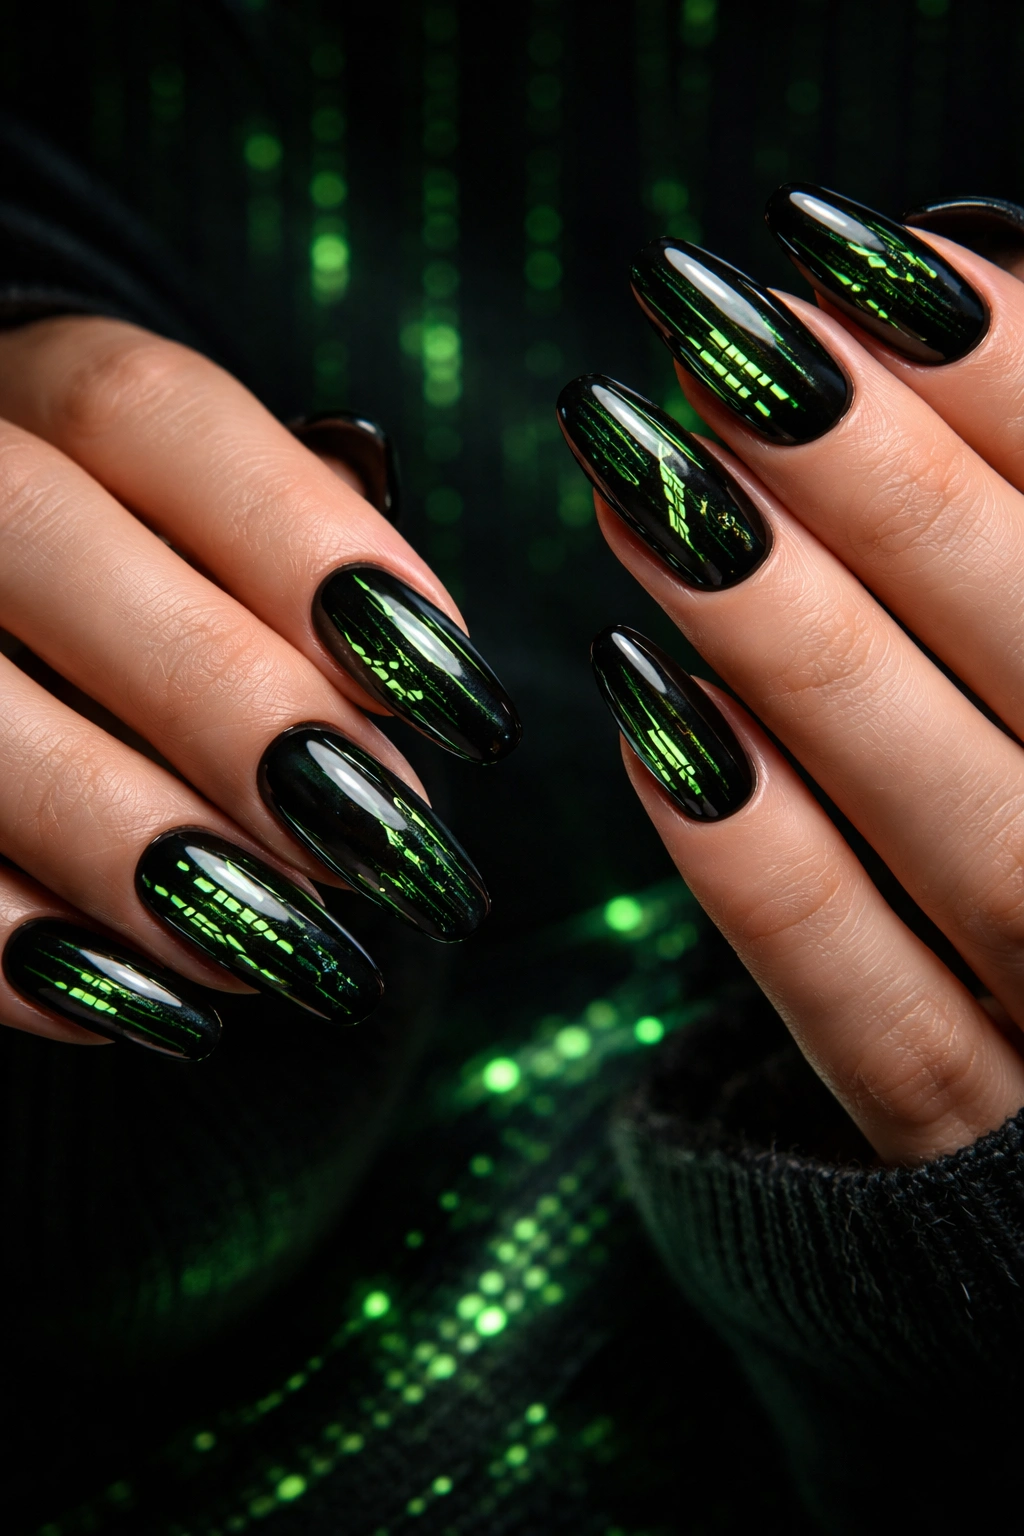
The Matrix movies defined tech aesthetic in the late 90s and early 2000s, and that iconic falling green code became a cultural touchstone. Matrix-inspired nails bring that digital, cyber aesthetic to your fingertips, creating a look that’s dark, edgy, and unmistakably Y2K. This design works particularly well for friends who loved the gothic or cyber punk side of early 2000s fashion.
Creating Matrix nails typically starts with a black base—deep, dark, and glossy or matte depending on preference. Then comes the green element. Some nail artists hand-paint tiny symbols, numbers, or characters in bright lime green to mimic the falling code. Others use a sponging technique to create a fade of green across certain nails. Metallic or neon green works best; you want that digital glow effect.
For a more abstract interpretation, forget the actual code and focus on the green-on-black color scheme. Maybe alternate solid black nails with solid green nails. Or create green geometric designs—lines, grids, or circuits—on black backgrounds. Some people add chrome or holographic green accents that shift colors like a computer screen. Tiny green rhinestones clustered on one or two accent nails can represent digital pixels or data points.
Matching Matrix nails with your bestie means coordinating your black-and-green ratio and design approach. You might both do the code-inspired detailed design, or one of you does detailed code while the other does abstract geometric green designs—different but clearly part of the same aesthetic. These nails pair perfectly with black clothing, silver jewelry, and that cool, confident energy that says you’re not here to follow trends, you’re here to set them.
Coordinating Your Matching Y2K Nails Successfully
Getting matching nails with your best friend requires more than just showing up at the salon. A bit of planning ensures you both end up with manicures you love that actually coordinate well. Here’s how to make the process smooth and the results stunning.
Book appointments together at the same salon. This seems obvious, but it matters. When you’re both sitting side-by-side getting your nails done, you can make real-time decisions about colors, placement, and details. Your nail techs can also consult with each other to ensure consistency. If you can’t get appointments at the same time, book them on the same day so you can text photos back and forth during the process.
Create a shared inspiration board before your appointment. Use Pinterest, Instagram saves, or even screenshots texted between you to collect design ideas. Having visual references helps tremendously when explaining what you want to your nail tech. You’ll avoid miscommunication and ensure you’re both on the same page about the vibe you’re going for. Save at least 5-10 reference images showing different angles and variations of your chosen design.
Decide on your coordination approach ahead of time. Will you match exactly, mirror each other, or coordinate with complementary variations? Knowing this beforehand prevents decision paralysis at the salon. If you’re doing variations, decide who’s doing what—maybe you get pink flames and they get blue flames, but you agree on this before sitting down. Write it down if you need to so there’s no confusion.
Choose your nail tech wisely. Not every nail artist excels at intricate Y2K designs with lots of detail, rhinestones, or hand-painting. Check portfolios on Instagram or the salon’s website. Look for techs who’ve done similar designs before. Don’t hesitate to call ahead and ask if they’re comfortable with your specific design request. A skilled tech makes all the difference in how your nails turn out.
Making Your Y2K Nail Art Last Longer
Y2K designs often involve multiple layers, embellishments, and details that require proper care to maintain. Follow these tips to keep your matching manicures looking fresh for as long as possible.
Invest in quality base and top coats. Your design is only as good as what’s underneath and on top of it. A proper base coat prevents staining and helps polish adhere better. A high-quality top coat seals everything in and adds shine. If your design includes rhinestones or 3D elements, ask your tech to use extra top coat around those areas or apply builder gel for added security.
Be gentle with your hands for the first 24 hours. Even if gel nails cure immediately under the light, the first day is still somewhat vulnerable. Avoid long hot showers, swimming, or anything that involves prolonged water exposure. Don’t pick at your cuticles or test whether rhinestones are secure—just leave everything alone to fully set and bond.
Moisturize your cuticles daily. Dry cuticles make even the best manicure look raggedy. Use cuticle oil every night before bed, massaging it into the nail beds and surrounding skin. This keeps your cuticles healthy and prevents lifting at the edges where your nail meets your skin. Healthy cuticles mean your nail art looks fresh longer.
Wear gloves for household tasks. Cleaning products, dish soap, and even prolonged water exposure can break down polish and loosen rhinestones. Get into the habit of wearing rubber gloves when washing dishes, cleaning the bathroom, or doing any task involving chemicals or lots of water. Your nails will thank you by lasting an extra week or more.
Address chips or loose stones immediately. Carry a small bottle of clear polish or nail glue with you. If you notice a chip forming or a rhinestone getting loose, address it right away before the damage spreads. A quick touch-up extends your manicure’s life significantly. If multiple nails are showing wear after two weeks, consider it a good run and schedule your next matching mani session with your bestie.
Final Thoughts
Y2K matching nails with your best friend combine nostalgia, creativity, and friendship into one sparkly, colorful package. These designs aren’t subtle or understated—they’re bold statements that celebrate the fearless, fun-loving spirit of the early 2000s. Whether you’re going full rhinestone drama, rocking neon French tips, or showing off matching cow print, you’re participating in a fashion moment that’s both a throwback and thoroughly modern.
The beauty of Y2K nail art is how it encourages experimentation. You’re not confined to “tasteful” neutrals or minimalist designs. Instead, you can play with chrome, glitter, clashing colors, and enough embellishments to make your nails feel like wearable art. Doing this with your best friend amplifies the fun—you’ve got someone to bounce ideas off, someone who’ll match your energy, and someone who understands that yes, you really do need those holographic butterfly decals.
Remember that matching doesn’t mean identical. The best coordinated manicures balance unity with individual expression. You’re showing the world that you and your friend are connected, but you’re still your own people with distinct personalities. That’s what makes matching Y2K nails so special—they’re a visual representation of your friendship, done up in all the colors, sparkles, and bold choices that made the early 2000s such an iconic era.
So grab your bestie, pick your favorite design from this list (or combine several), and book those nail appointments. Your matching Y2K nails are waiting, and they’re going to look absolutely incredible. Don’t forget to take photos from every angle—your hands stacked, fingers interlaced, nails displayed against colorful backgrounds—because these nails deserve to be documented and celebrated. After all, friendship and fabulous nails both deserve to be shown off.
