

Green almond nail ideas have a sneaky advantage: the shape softens the color, and the color keeps the shape from feeling too sweet. Almond nails already lengthen the hand a little; green brings personality, from mossy and quiet to neon and unapologetic. Put them together and you get a manicure that can look polished, artsy, moody, or clean depending on the shade and finish.
A bad green can go flat fast. Too opaque, and it looks heavy. Too sheer, and it can read patchy instead of intentional. The sweet spot is usually in the details people skip over: how wide the sidewalls are, how much free edge you leave, whether the finish is glossy or matte, and whether the green has yellow, blue, or gray in it.
That part matters more than people think. A sage shade with a soft matte top coat tells a different story than a forest tone under chrome, even if both live in the same color family. On almond nails, that difference shows up fast because the tapered tip gives your eye a clear line to follow.
Start with the one that feels closest to your own style, then push it a little further.
1. Green Almond Nail Ideas: Deep Emerald Gloss
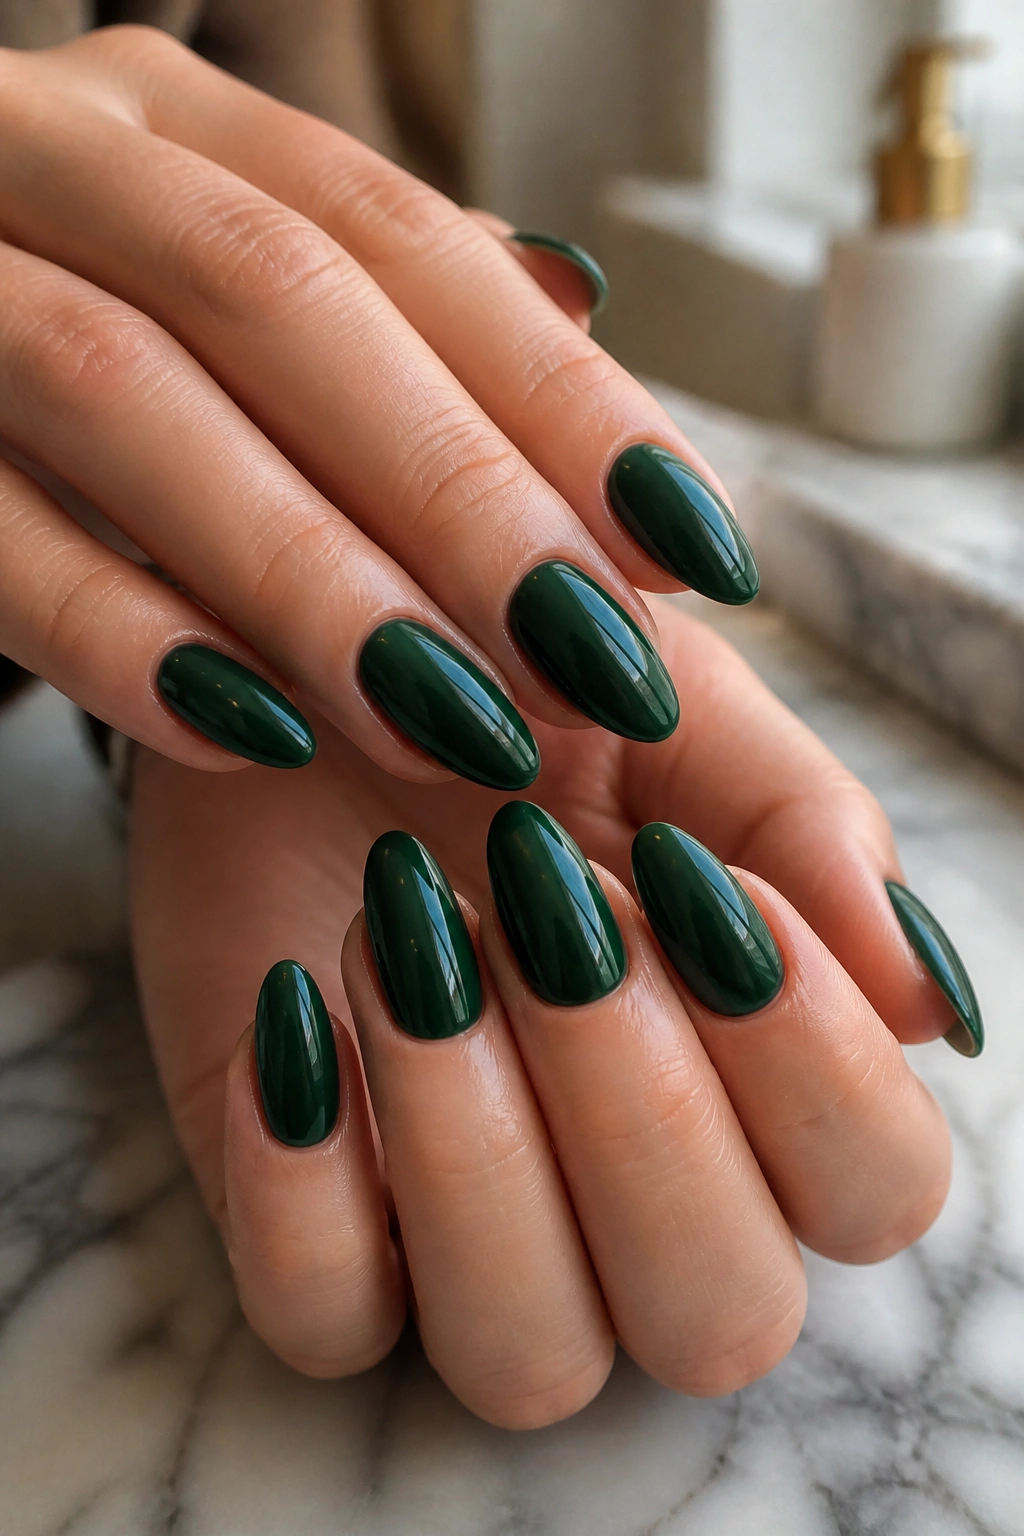
Deep emerald is the safest place to begin if you want green almond nail ideas that still feel rich and grown-up. The color has enough depth to look elegant on its own, so you do not need nail art to make it work. A clean almond shape and a glassy top coat do most of the heavy lifting.
I like this look best at medium length, where the tip is tapered but not sharp. Two opaque coats usually get you there, and a third thin coat can fix any streaks around the smile line if the polish is on the thinner side. Keep the cuticle area neat; dark green forgives a lot, but it does not forgive sloppy edges.
The easiest way to wear it is with a high-shine finish and no accent nails. That keeps the whole manicure from feeling busy. If you want a tiny twist, use a deeper green on most nails and one slightly lighter emerald on the ring finger.
A small detail changes everything here. A clean sidewall line makes dark green look expensive. Messy edges make it look rushed.
2. Sage Matte Almond Nails
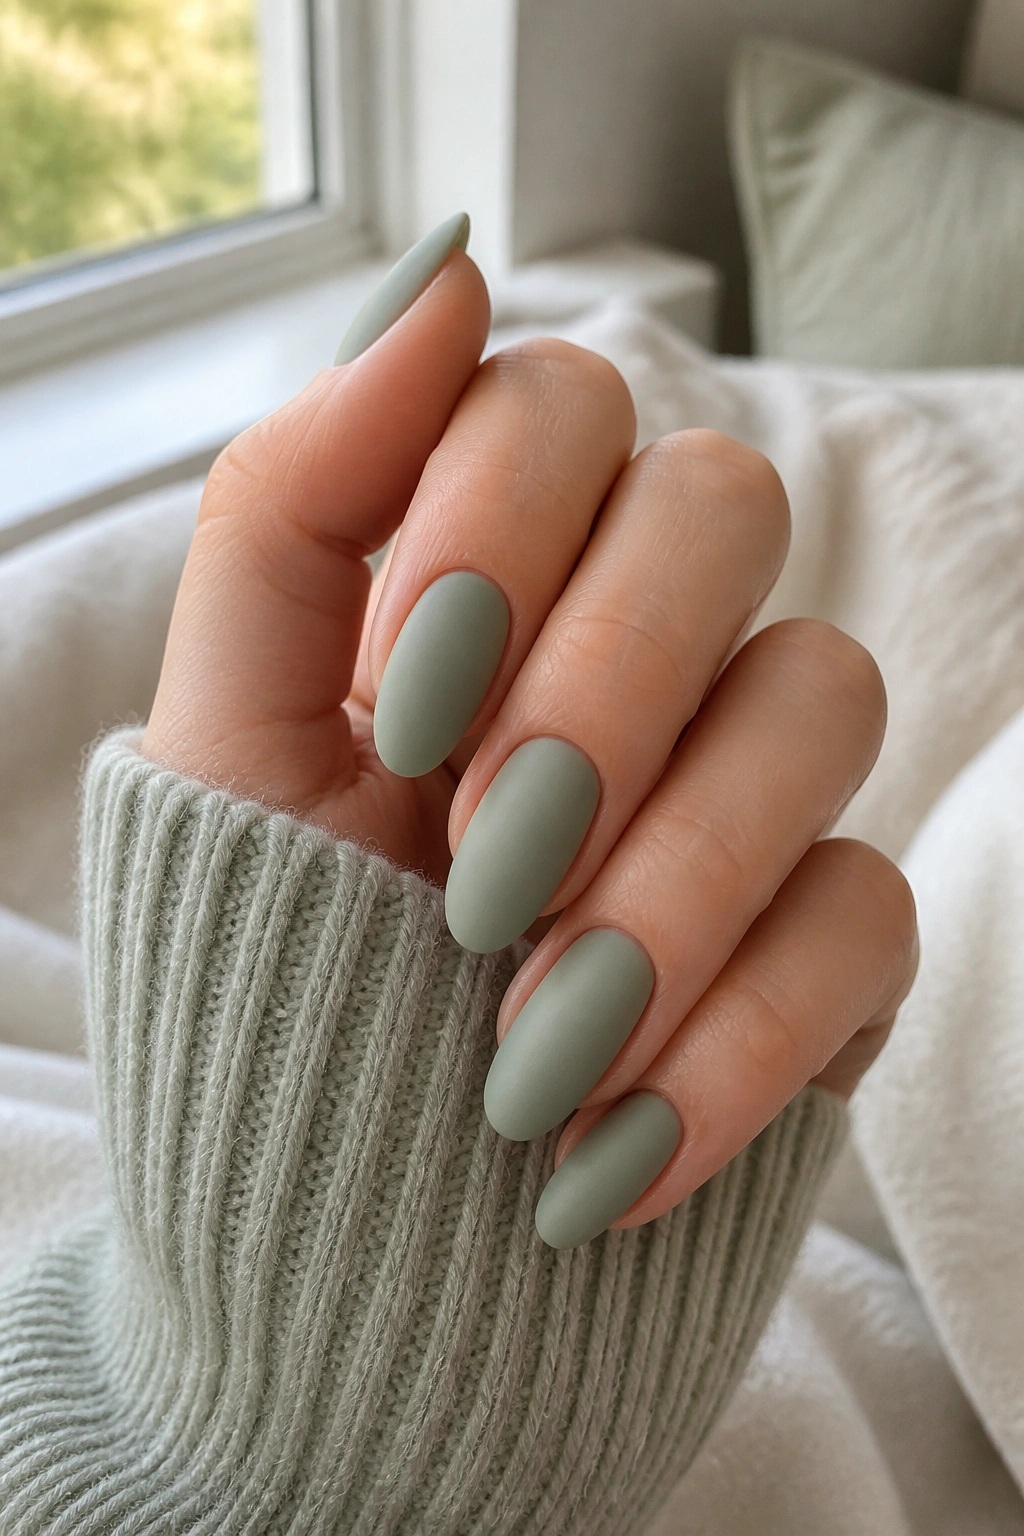
Sage matte is the softer cousin in the green family, and it has a very different mood from glossy emerald. It looks calmer, less formal, and a little more relaxed without getting dull. On almond nails, that softness keeps the shape from feeling too pointed.
Why It Reads So Soft
Matte polish removes the reflection, so the color itself has to carry the look. Sage does that well because it has enough gray in it to feel quiet, but enough green to stay interesting. It also plays nicely with shorter almond lengths, where a glossy dark polish can sometimes overpower the nail.
If you like understated nails but you don’t want beige again, this is a smart lane. Sage matte gives you color without shouting. That is the appeal.
How to Wear It
- Choose a sage shade with a little gray, not one that leans mint.
- Ask for a smooth matte top coat; cheap matte finishes can turn chalky.
- Keep the almond tip rounded, not pointy, so the look stays soft.
- Add a single glossy nail if you want contrast without clutter.
A quick note: matte shows texture more easily than gloss. Buff the nail plate lightly first, or every ridge will show through.
3. Olive French Tips on Almond Nails
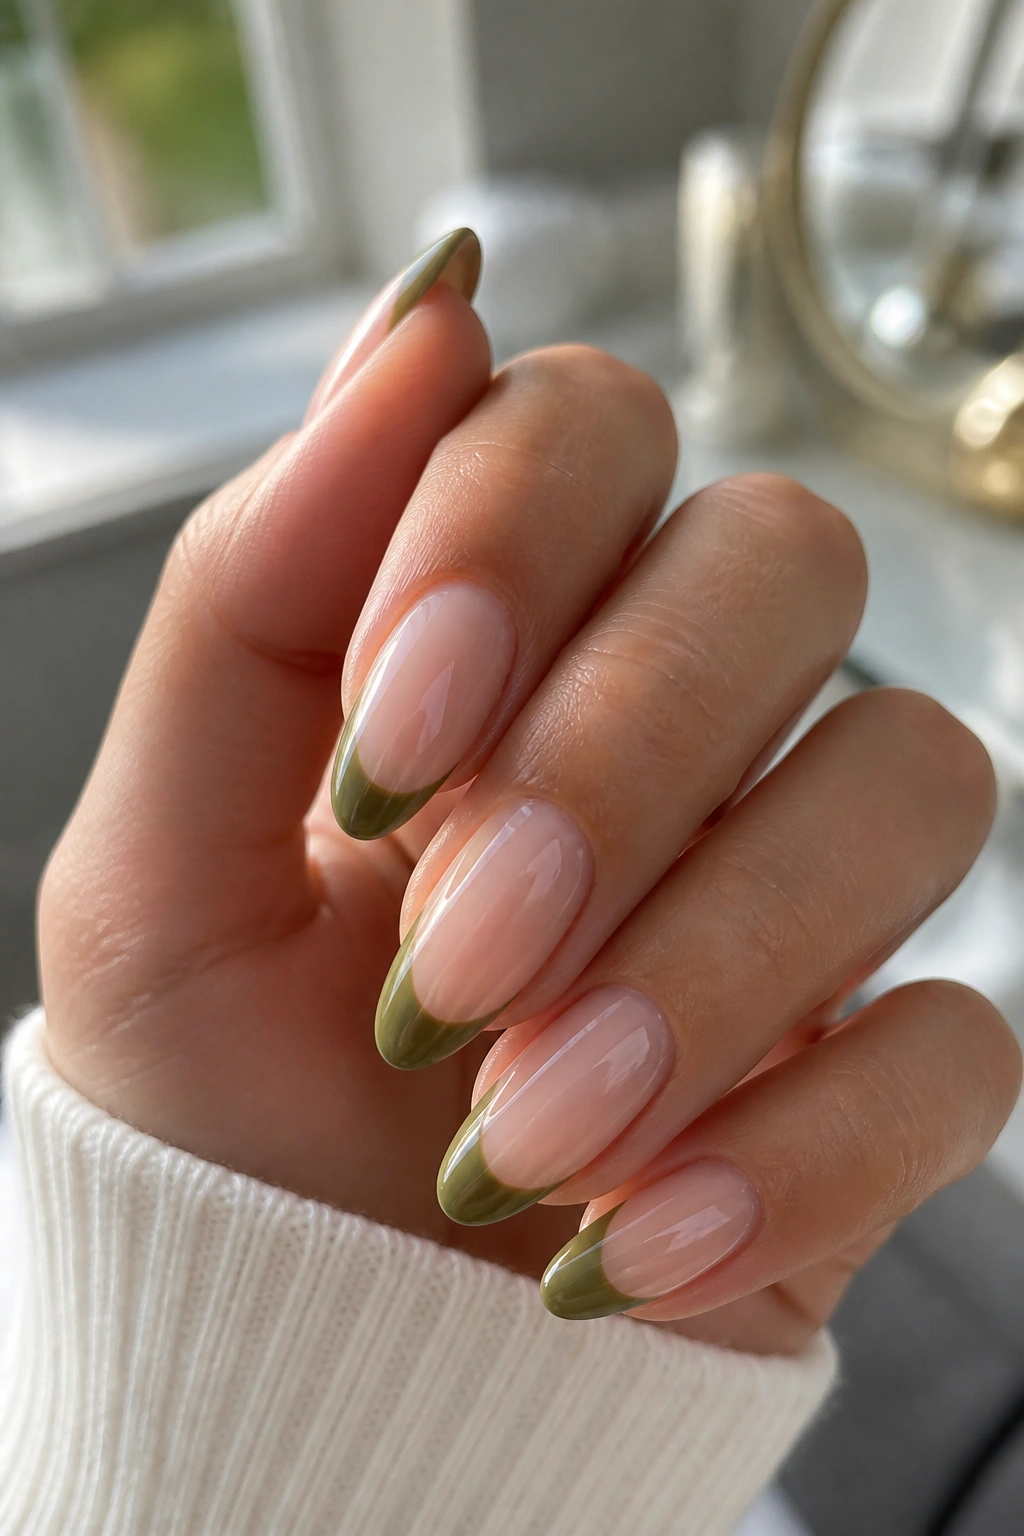
Olive French tips are the manicure version of good tailoring. You get the clean structure of a French design, but the green keeps it from feeling prim or dated. On almond nails, the curve at the tip makes the line look natural instead of stiff.
This design works especially well if you want nail art that does not scream for attention. Keep the base sheer pink, milky beige, or a soft neutral nude. Then paint the olive tip narrow, usually around 2 to 3 millimeters on shorter almond nails and a touch wider on longer ones. That small width makes a huge difference.
A steady hand helps, but a thin striping brush helps more. Two thin layers beat one thick one every time. Thick tips lose the crisp edge that makes this style look intentional.
If you want a tiny variation, turn the French line into a slightly slanted tip on the index and middle fingers, then keep the rest classic. It gives the manicure movement without making it fussy.
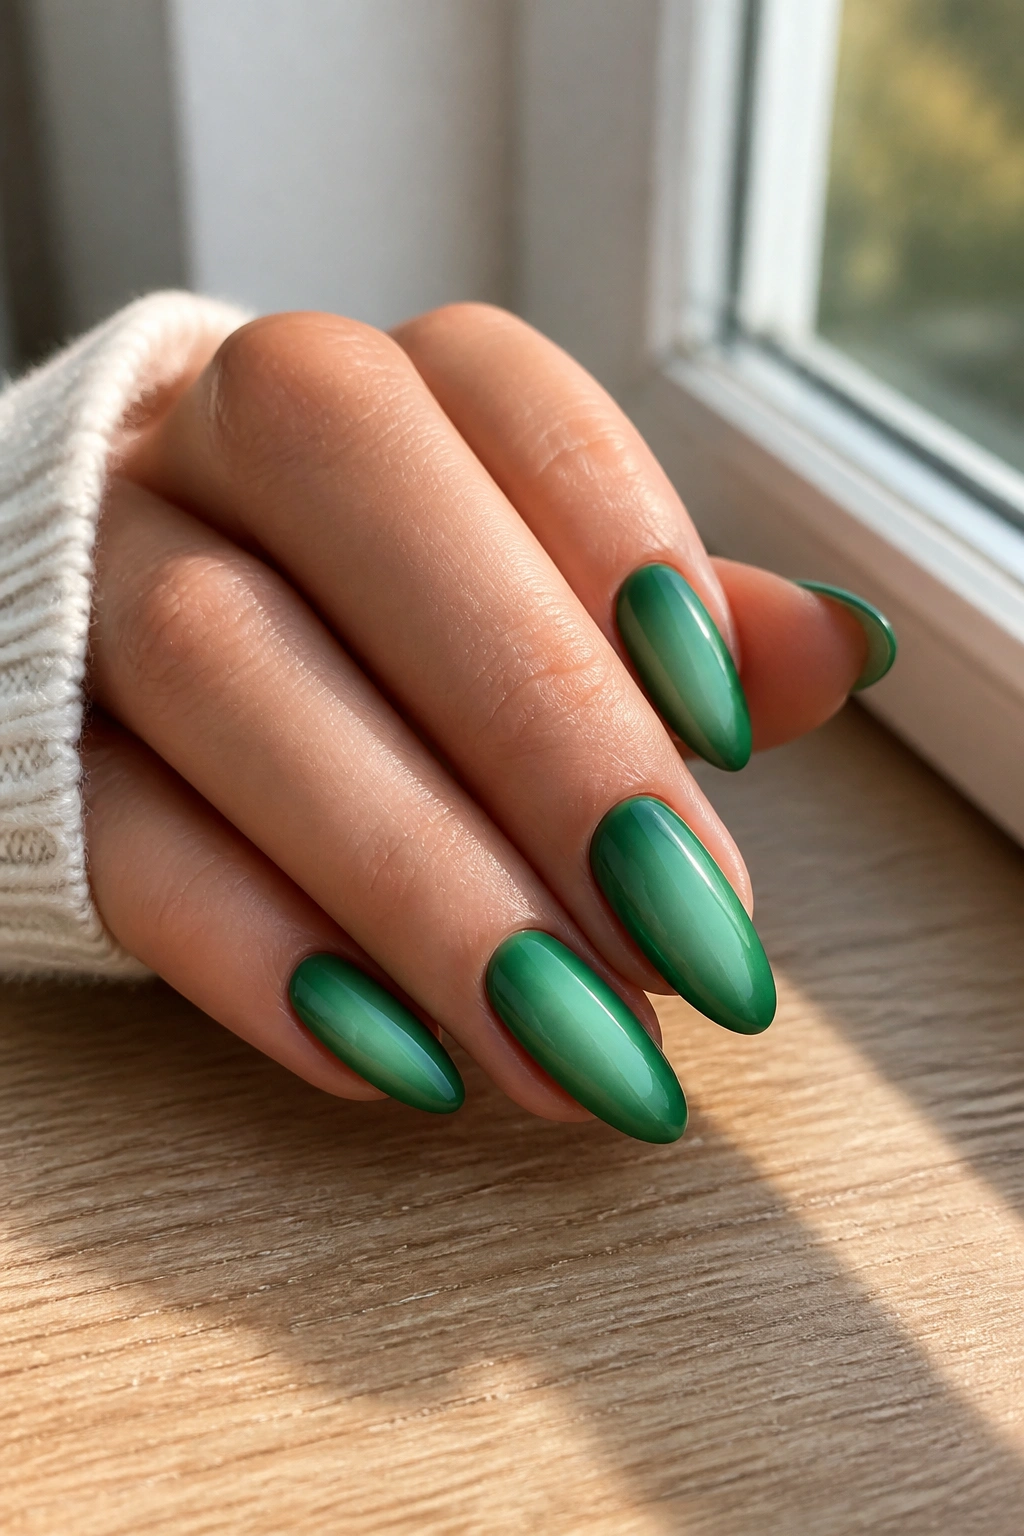
4. Forest Green Chrome
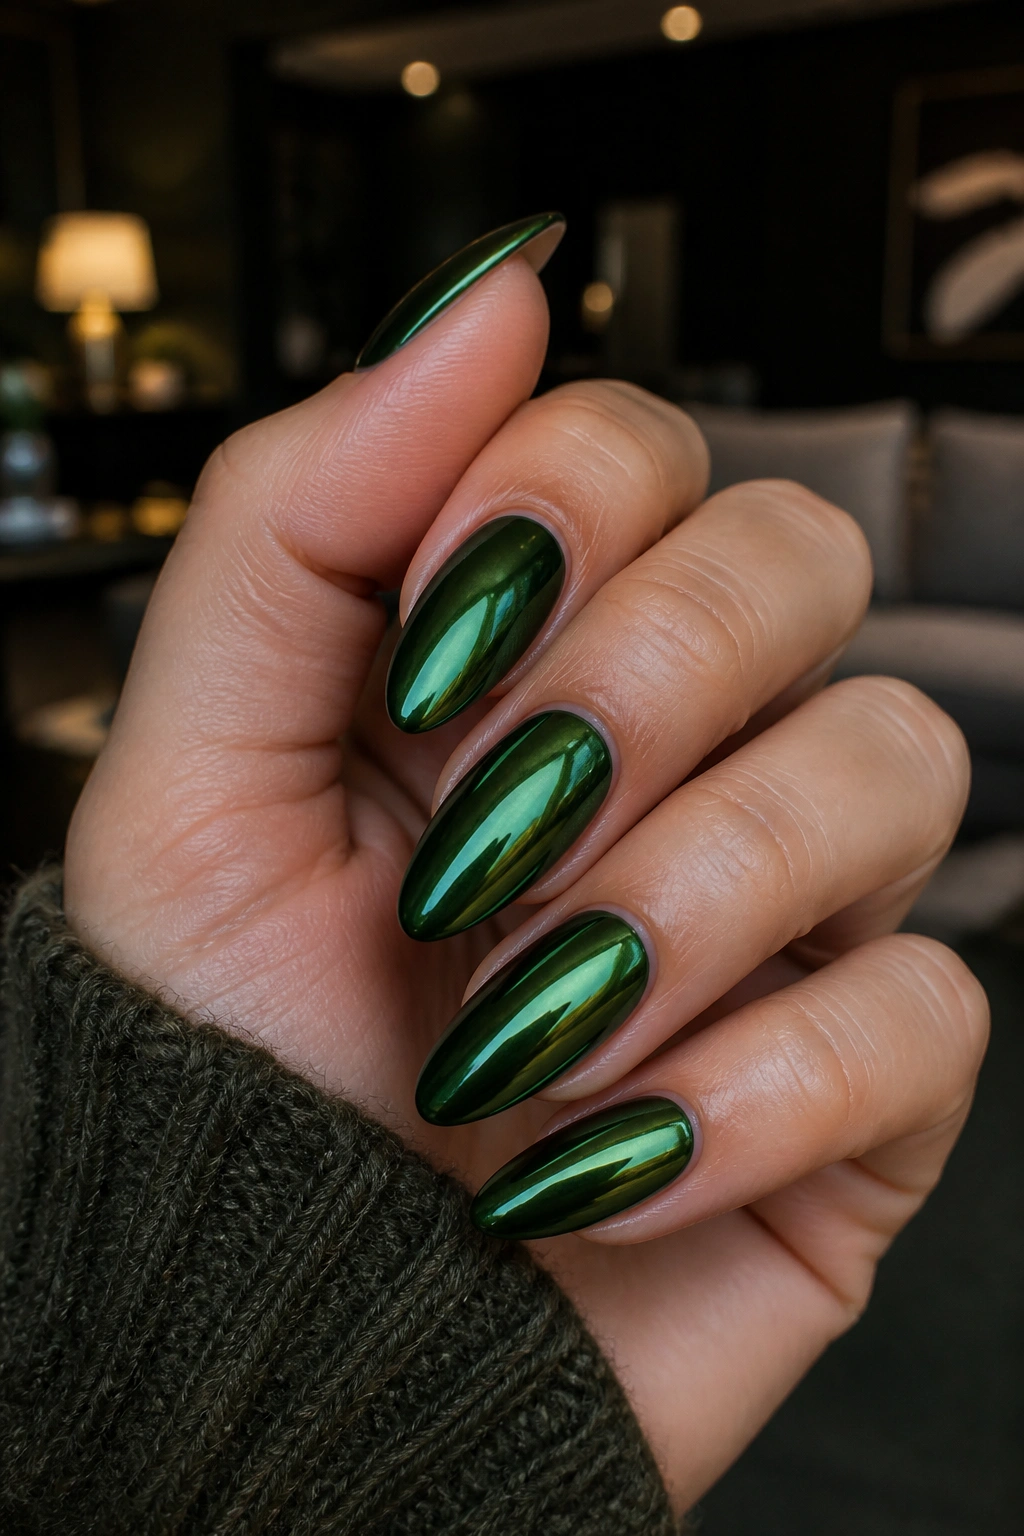
Forest green chrome is not shy. It has that reflective, slightly futuristic shine that makes even a simple almond shape look dressed up. If emerald gloss is polished, chrome is sharper and a bit cooler.
The trick is to keep the base dark enough. A black or near-black green base gives the chrome powder something to cling to, and that depth makes the finish look richer. On pale green bases, chrome can get washed out fast. On deeper bases, it picks up that mirror effect people notice from across the room.
I would wear this on medium to long almond nails, because the reflection has room to travel along the curve. Short nails can handle it too, but the effect is less dramatic. And that may be fine if you want something more wearable.
No extra art is needed. Seriously. Let the finish do its job, then stop. A chrome manicure with too many accents starts to look crowded, and this shade deserves space.
5. Mint and Milky Swirls
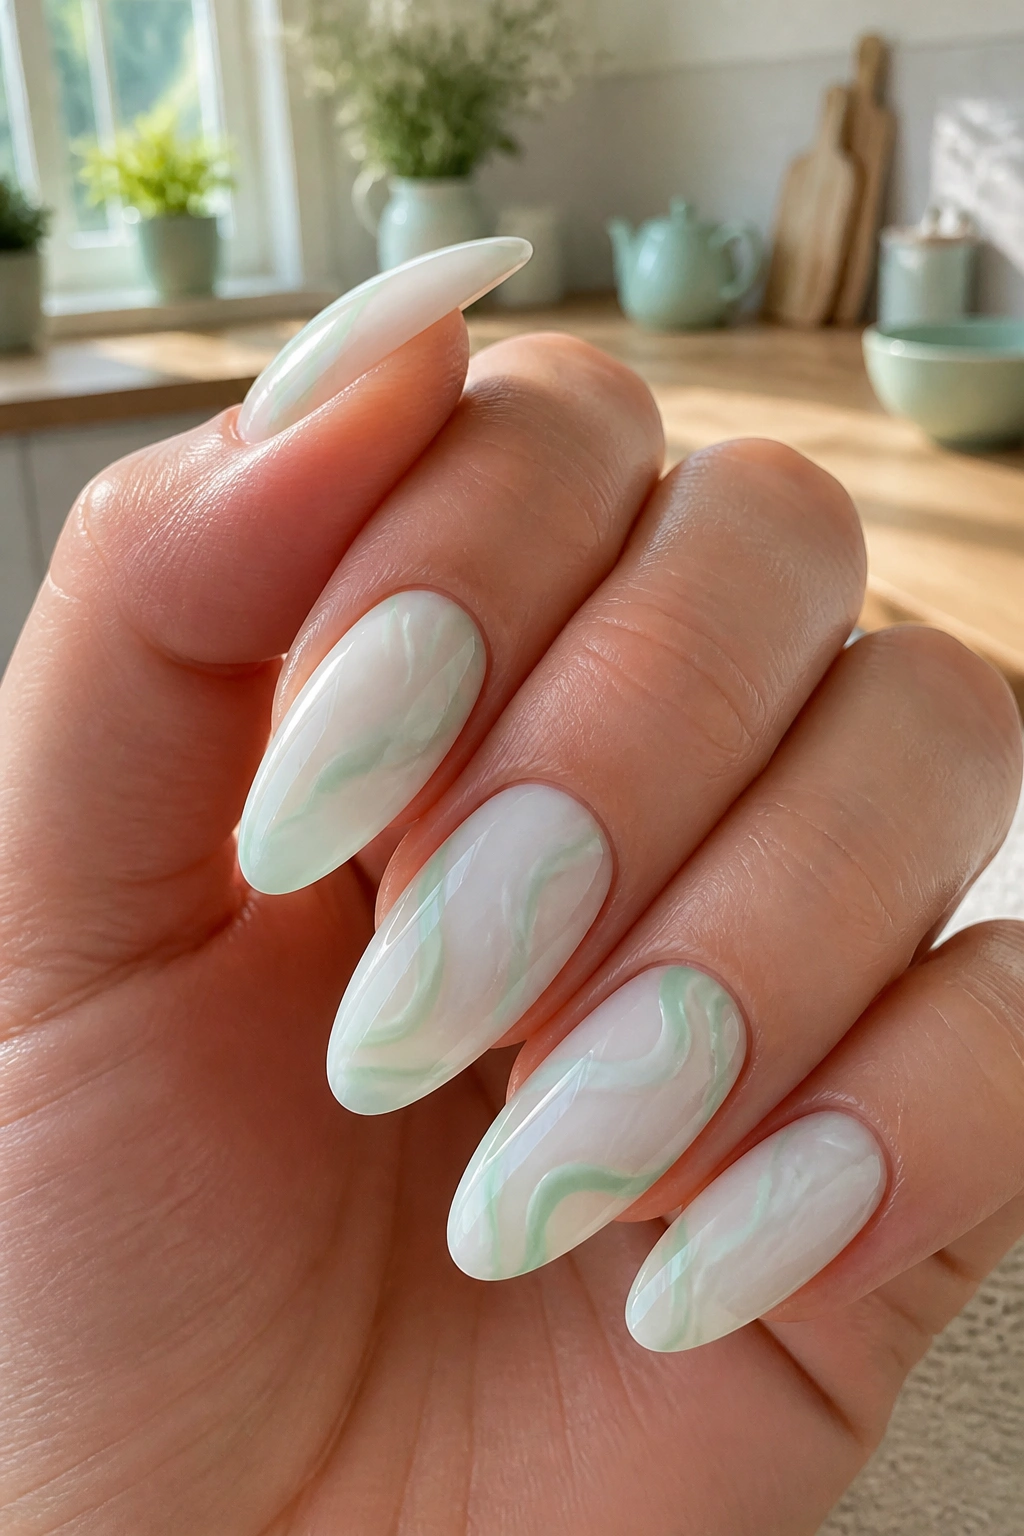
Mint swirls on a milky base have a lighter, airier feel than a solid color manicure. They are a good pick when you want green almond nail ideas that still feel open and breathable. The milky base keeps the design from getting sharp, and the mint line gives it movement.
The pattern works best when the swirl is irregular. Too much symmetry makes it look stiff. One nail can have a thin ribbon of mint near the tip, another can have a swoop near the cuticle, and a third can stay nearly plain. That uneven rhythm feels more natural than matching every finger.
Keep the swirl thin enough that some base shows through. If the line gets too thick, the nail starts to feel heavy. A fine detail brush or even a short liner brush gives you more control than a wide one.
This is one of those manicures that looks simple until you sit close to it. Then the layers matter. The milky base, the soft green, the empty spaces between them — that’s what gives the design its charm.
6. Moss Velvet Finish
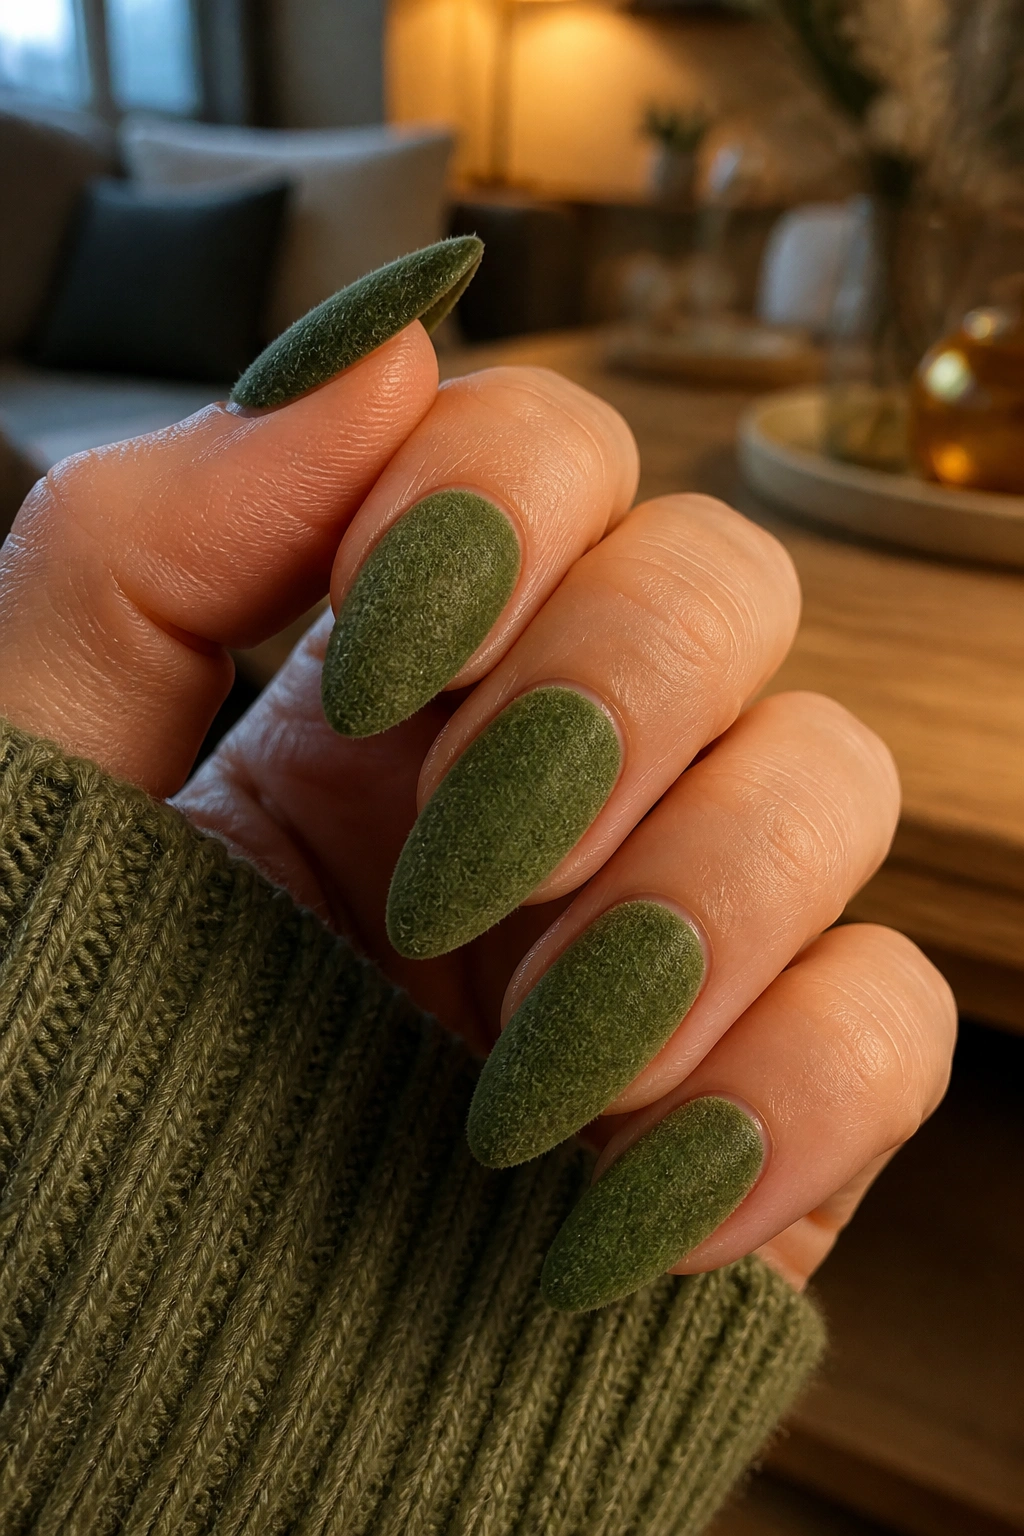
Moss velvet is for people who like texture but do not want glitter. The finish has a soft, moving sheen that changes when your hands tilt, and that tiny shift keeps the manicure from feeling flat. On almond nails, the effect follows the curve in a way that plain polish cannot.
Compared with gloss, velvet polish feels warmer and more tactile. It has a plush look that suits olive and moss shades especially well. The color sits somewhere between earthy and refined, which is why it works so well on everyday nails.
A good velvet manicure needs a smooth base. Any ridge or bump shows through the magnetic or velvet effect, and the final look can go patchy if the surface is rough. Two thin coats are usually better than one thick one, because thick layers can blur the texture.
If you want to wear it longer, avoid very oily cuticle cream right before photos or an event. It can flatten the surface effect. A little goes a long way here.
7. Green Almond Nail Ideas With a Jade Aura
Jade aura nails have a soft center glow that makes the manicure feel almost diffused, like the color is lit from inside. On almond nails, that round glow works especially well because the shape already pulls the eye toward the center. It is one of the prettiest ways to use green without going fully solid.
Where the Glow Should Sit
The brightest part should sit just off center, not dead in the middle. That tiny shift makes the aura look more natural and less stamped on. I’d keep the edges a shade darker so the middle stays the focus.
Best Way to Ask for It
- Ask for a sheer nude or pale green base.
- Build the aura with a sponge or airbrush effect.
- Keep the outer edge soft, not outlined.
- Finish with a glossy top coat to blend the layers.
This style is a nice middle ground if you want something artistic but not crowded. Jade aura nails look calm, but they still have dimension. That is what makes them so easy to wear.
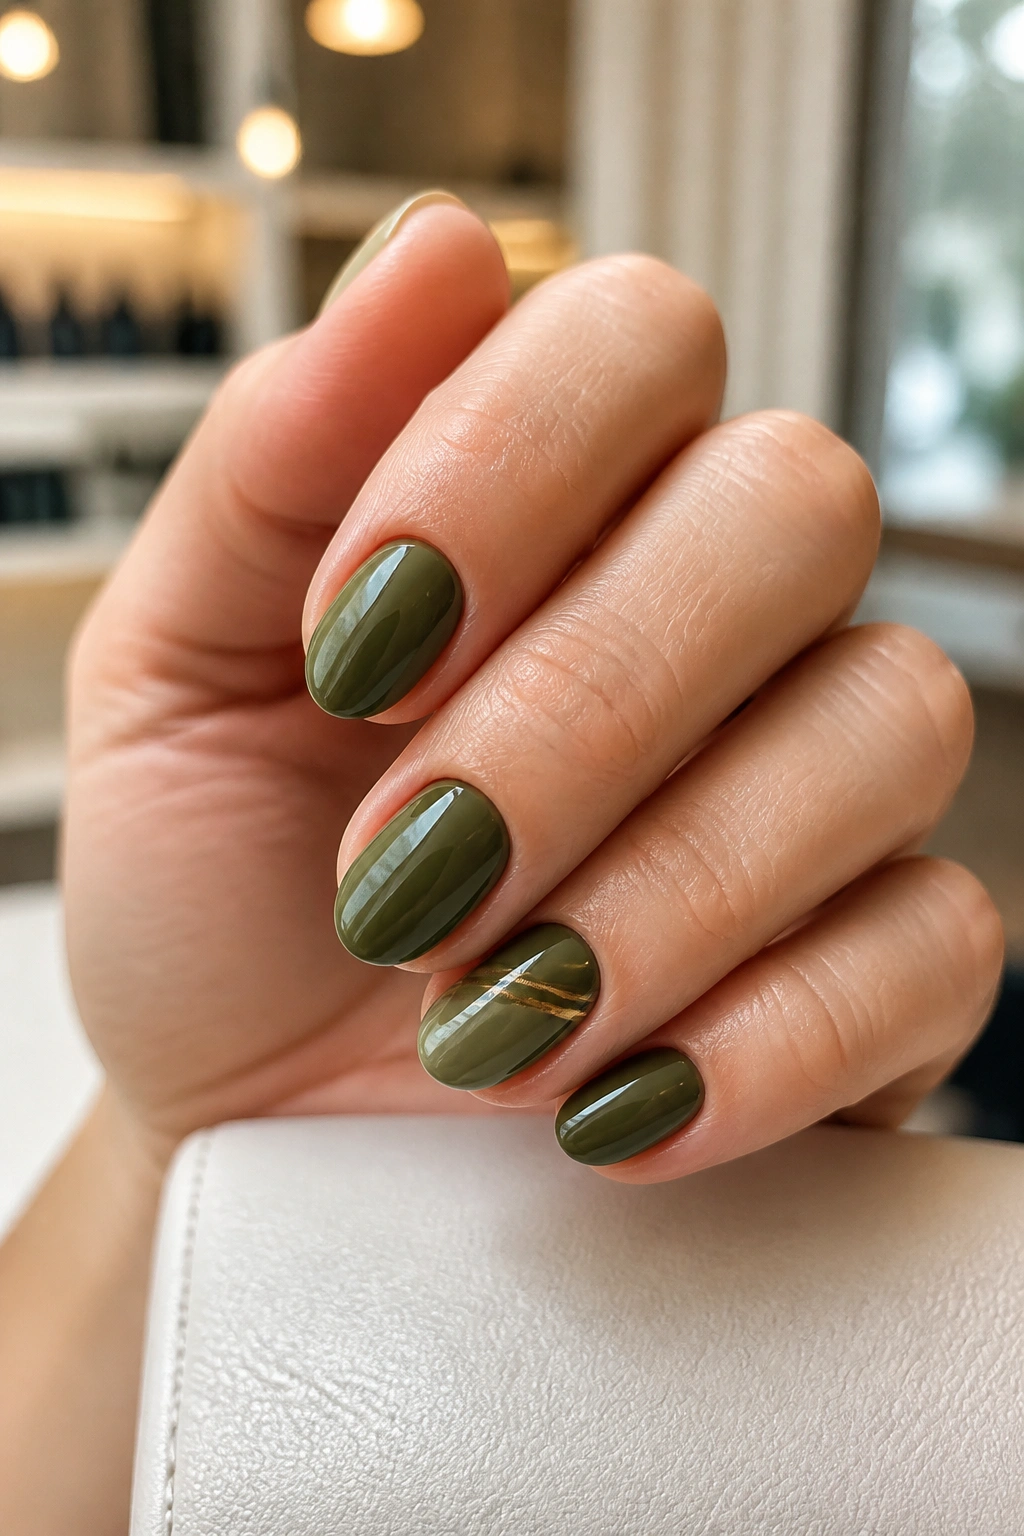
8. Dark Green, Gold Foil
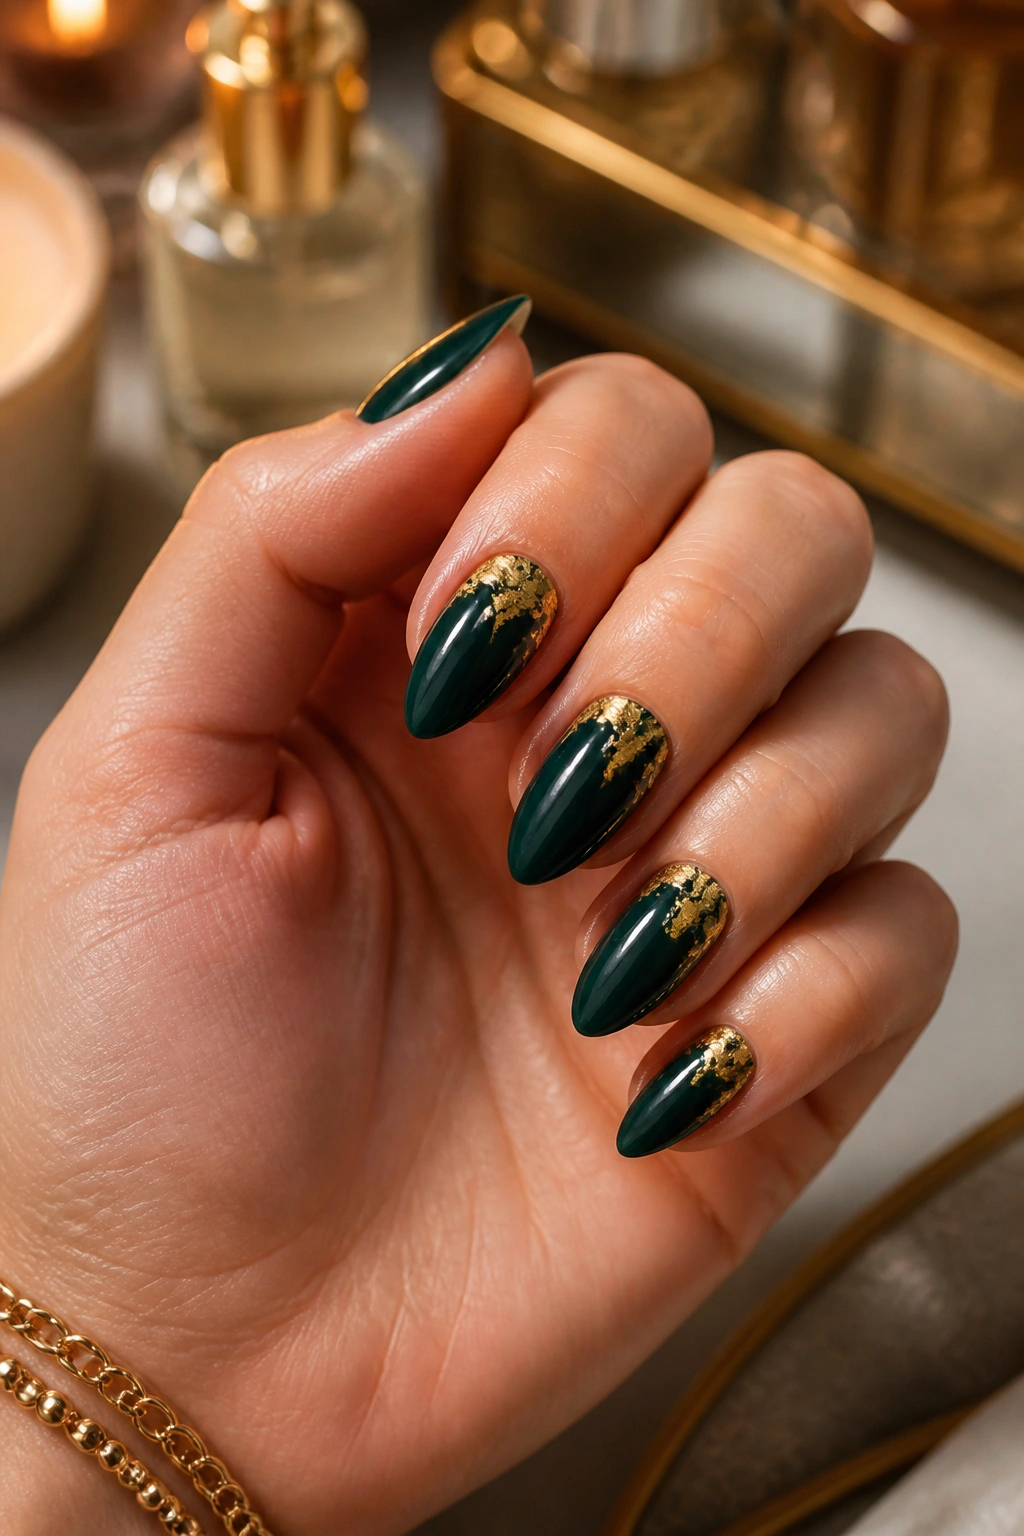
Dark green with gold foil has a slightly luxurious edge without feeling overdone. The foil catches just enough light to break up the solid base, and the contrast between deep green and warm gold is hard to beat. It reads classic, but not boring.
The smartest placement is usually near the cuticle or just off to one side of the nail. Random little pieces work better than a neat border, because foil looks better when it feels a bit broken and organic. If every nail gets the same amount, the design starts to look too planned.
A good base color here is pine, fir, or blackened teal-green. Very bright green can make gold feel loud, while a darker base lets the foil do the talking. You can keep the rest of the manicure plain and let one or two accent nails carry the foil, or scatter tiny pieces across all ten if you like a busier finish.
This is one of my favorite choices for almond nails with a little length. The tapered tip gives the foil a natural place to stop.
9. Neon Lime Micro-French
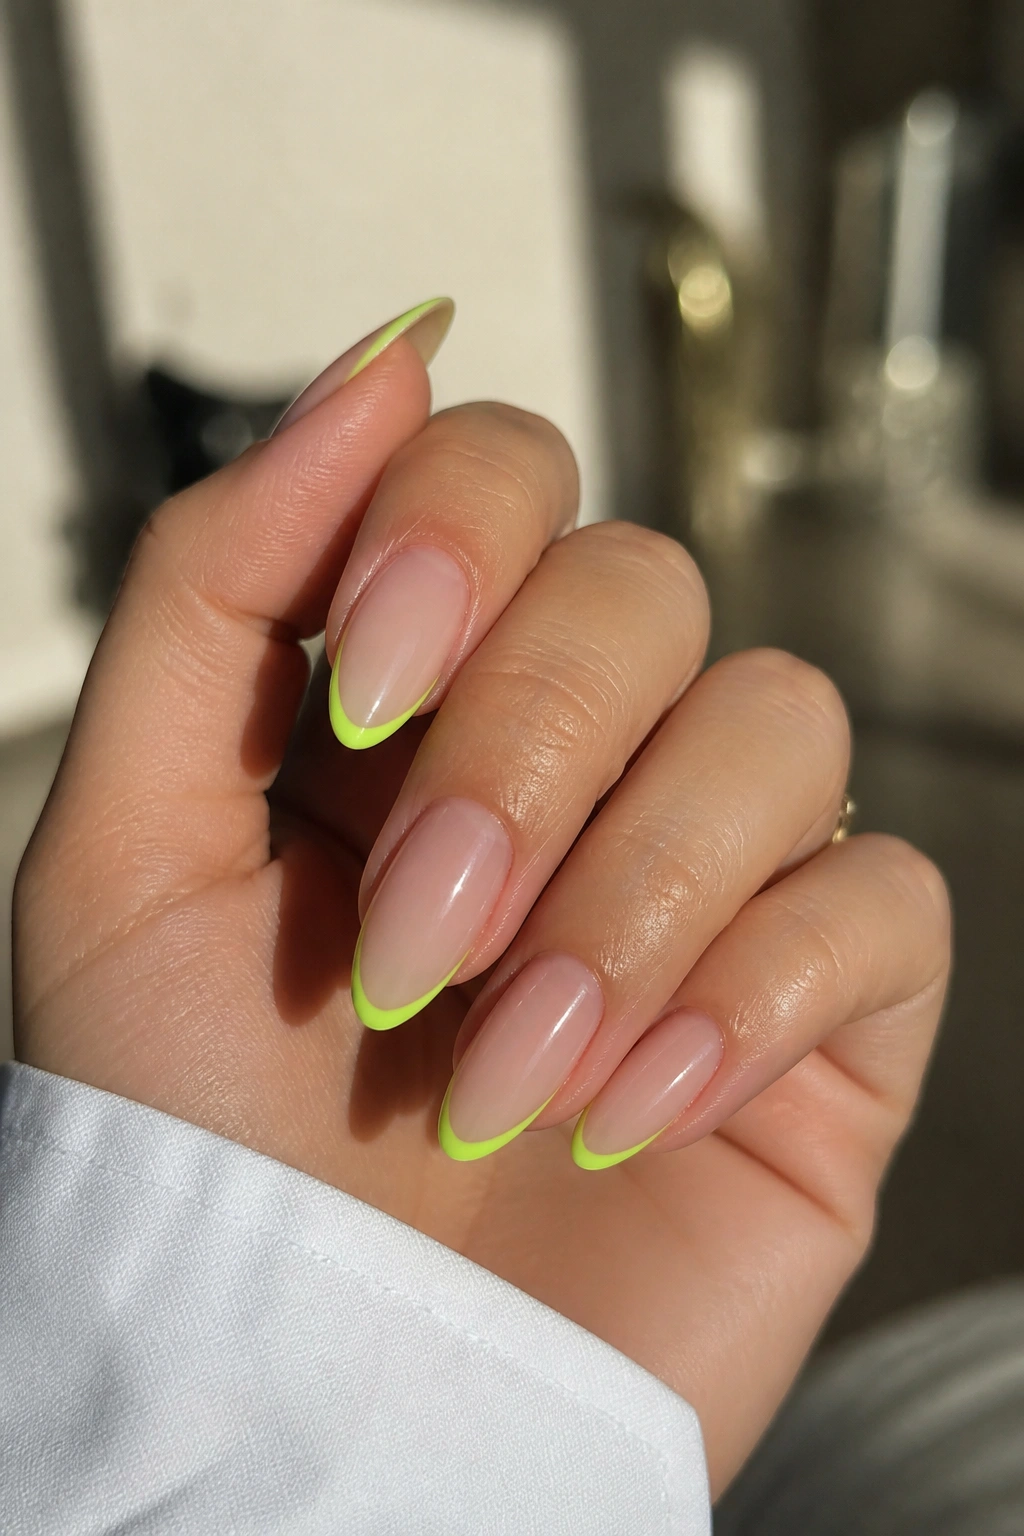
Neon lime is tricky, but a micro-French makes it far easier to wear. Instead of covering the whole nail, you only paint a razor-thin edge at the tip. That small strip delivers the punch without taking over the whole hand.
Why Small Neon Works
A full neon manicure can feel loud in a way that limits what you wear with it. A micro-French does the opposite. It gives you one bright detail, then lets the nude base keep everything grounded. On almond nails, the curve makes the neon line look sleek rather than harsh.
What to Watch For
- Keep the line narrow, usually 1 to 2 millimeters.
- Use a nude base that matches your skin tone fairly closely.
- Seal the tip carefully; neon chips show faster.
- Skip thick top coats that blur the line.
If you want one statement manicure that still works with denim, black knits, or silver jewelry, this is a smart pick. It has edge, but not too much. And yes, it looks better when the line is clean. Messy neon is hard to ignore.
10. Tortoiseshell and Green Mix
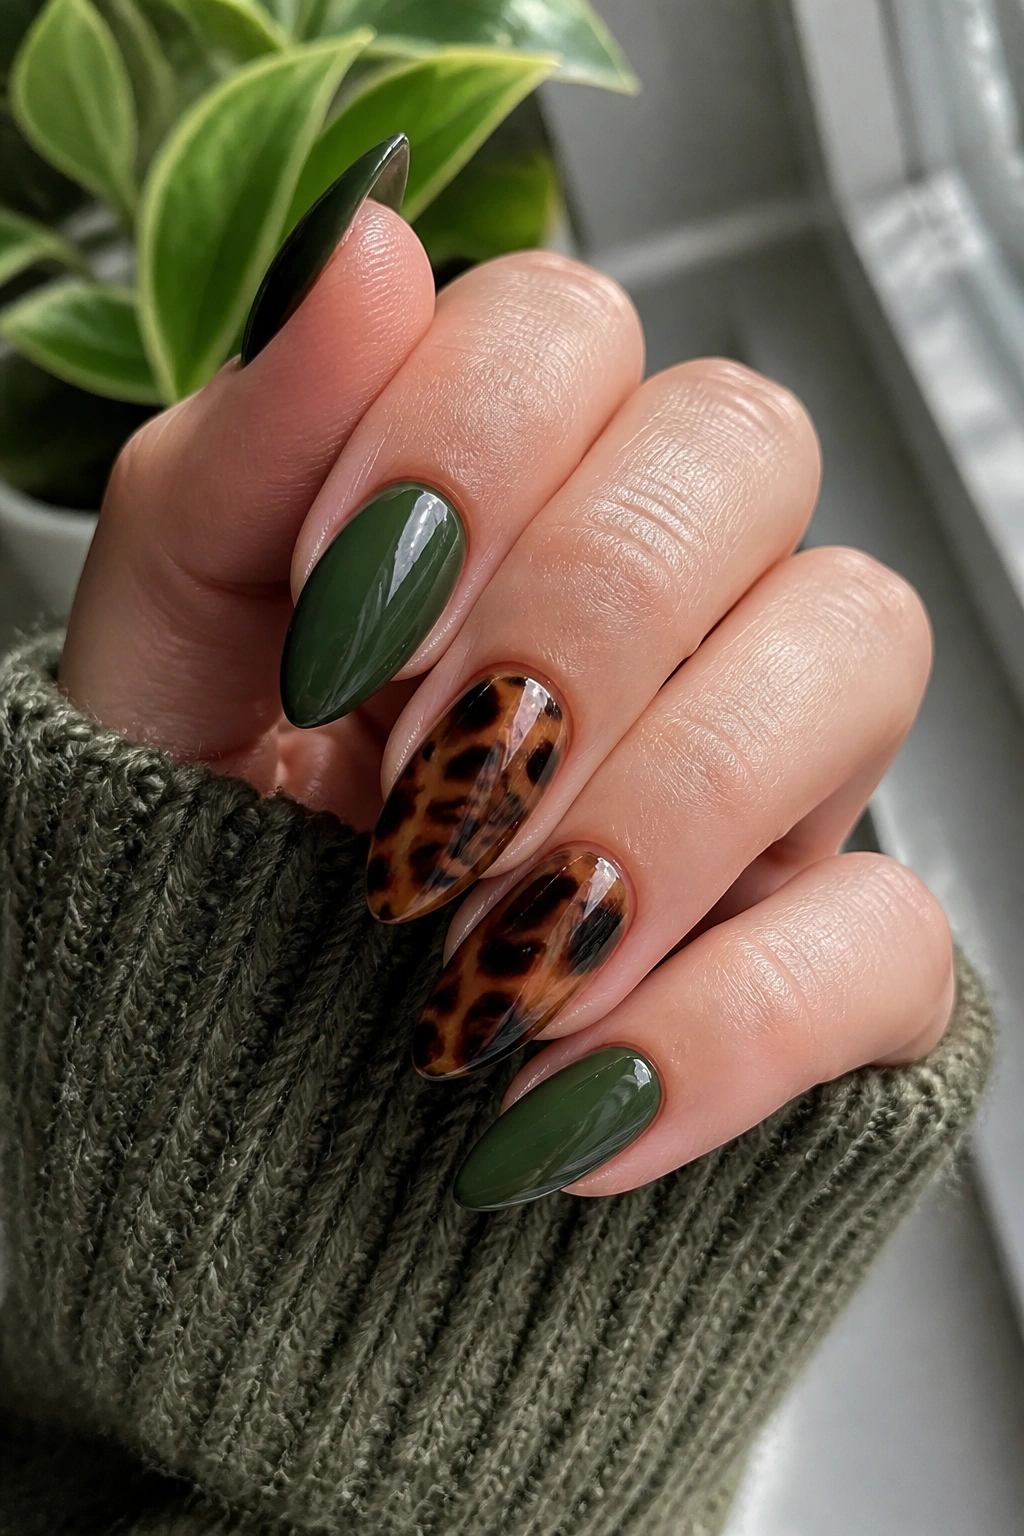
A tortoiseshell-and-green manicure sounds busy on paper, yet it usually looks more balanced than expected. The warm amber and brown tones soften the green, and the green keeps the tortoise pattern from feeling too traditional. That contrast is what makes it work.
I like this look best when only one or two nails carry the tortoiseshell pattern. Put the rest in a deep olive or forest shade, and the whole manicure feels deliberate. Too much tortoise on every nail can get noisy fast, especially on almond tips where the pattern already has movement.
The cleanest version uses a sheer brown base, dark caramel spots, and a thin layer of green somewhere nearby — usually as a side accent or on a neighboring nail. The two tones should speak to each other, not fight. Keep the spots soft-edged rather than sharp.
A small detail matters here: warm brown makes green feel richer. It gives the manicure depth without adding more color families.
11. Green Marble Nails
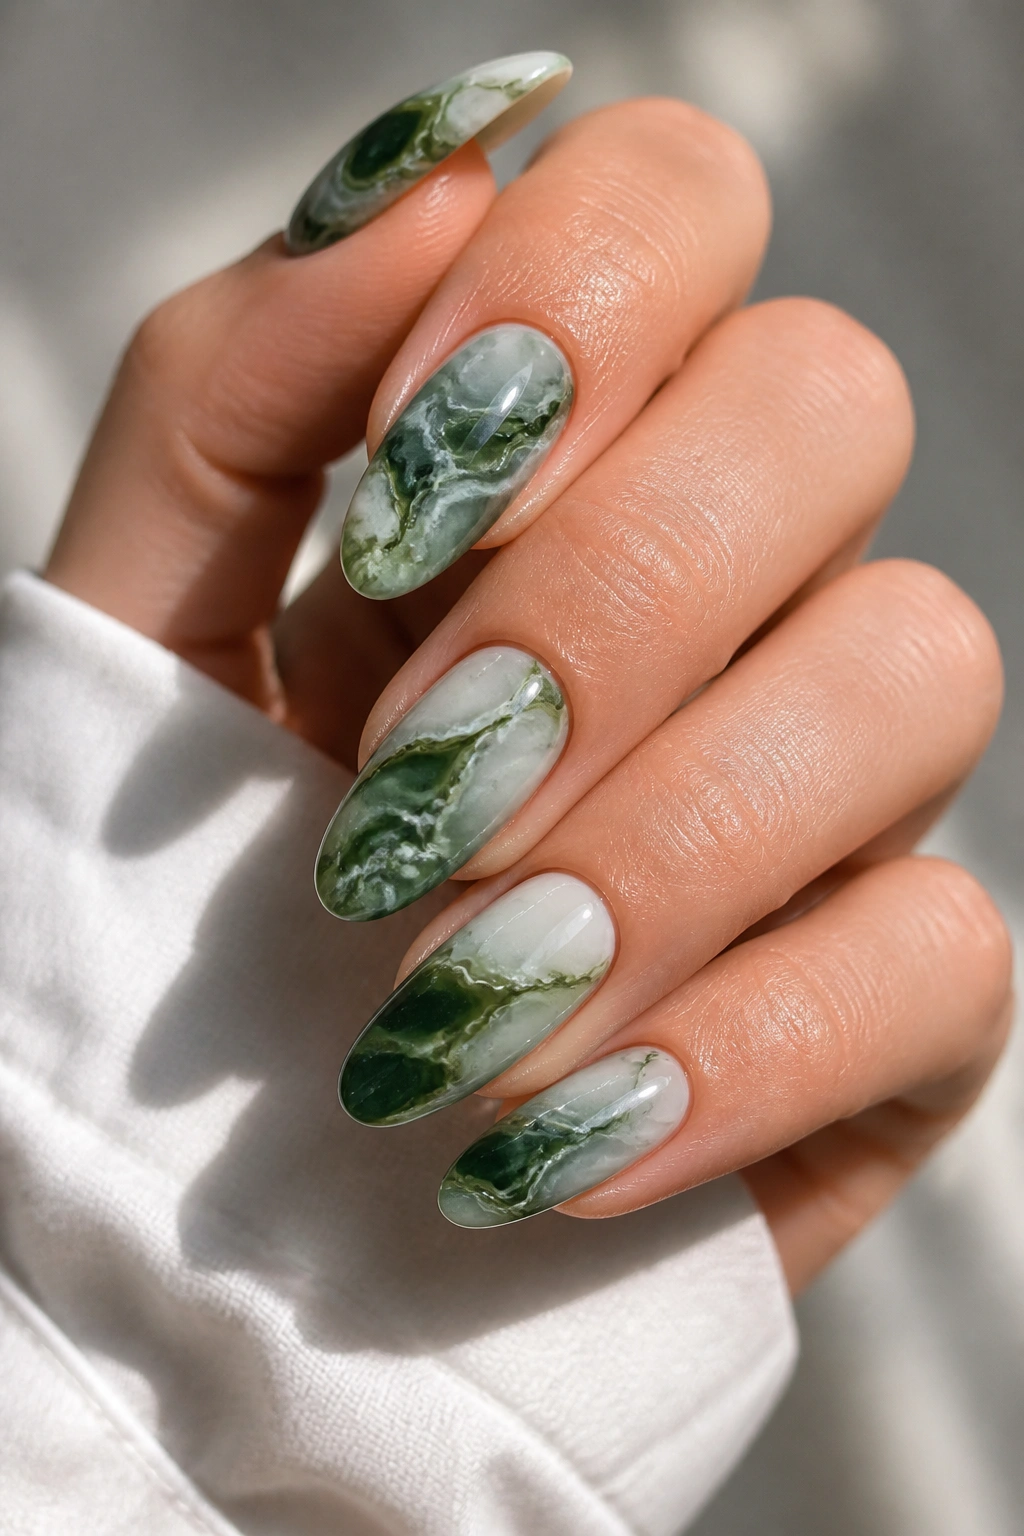
Green marble nails are one of those designs that look complicated but can be surprisingly forgiving. The swirls hide tiny imperfections, which is handy if your brush hand is not perfect. On almond nails, the flowing lines follow the shape well and keep the manicure from looking boxy.
The best marble designs use only two or three shades. Try a deep green, a softer olive, and a touch of white or sheer nude. Too many colors muddy the effect. A good marble should still read as marble when you pull your hand away.
I prefer the veining to stay thin and irregular. Thick streaks can make the nail look like candy, which is a different look entirely. If you want a cleaner finish, place the strongest swirl on just the ring fingers and keep the others quieter.
This design has range. It can go luxe with gold flakes, earthy with olive and cream, or cool with smoky gray. That flexibility is why it never feels stale.
12. Forest Cat-Eye Magnet
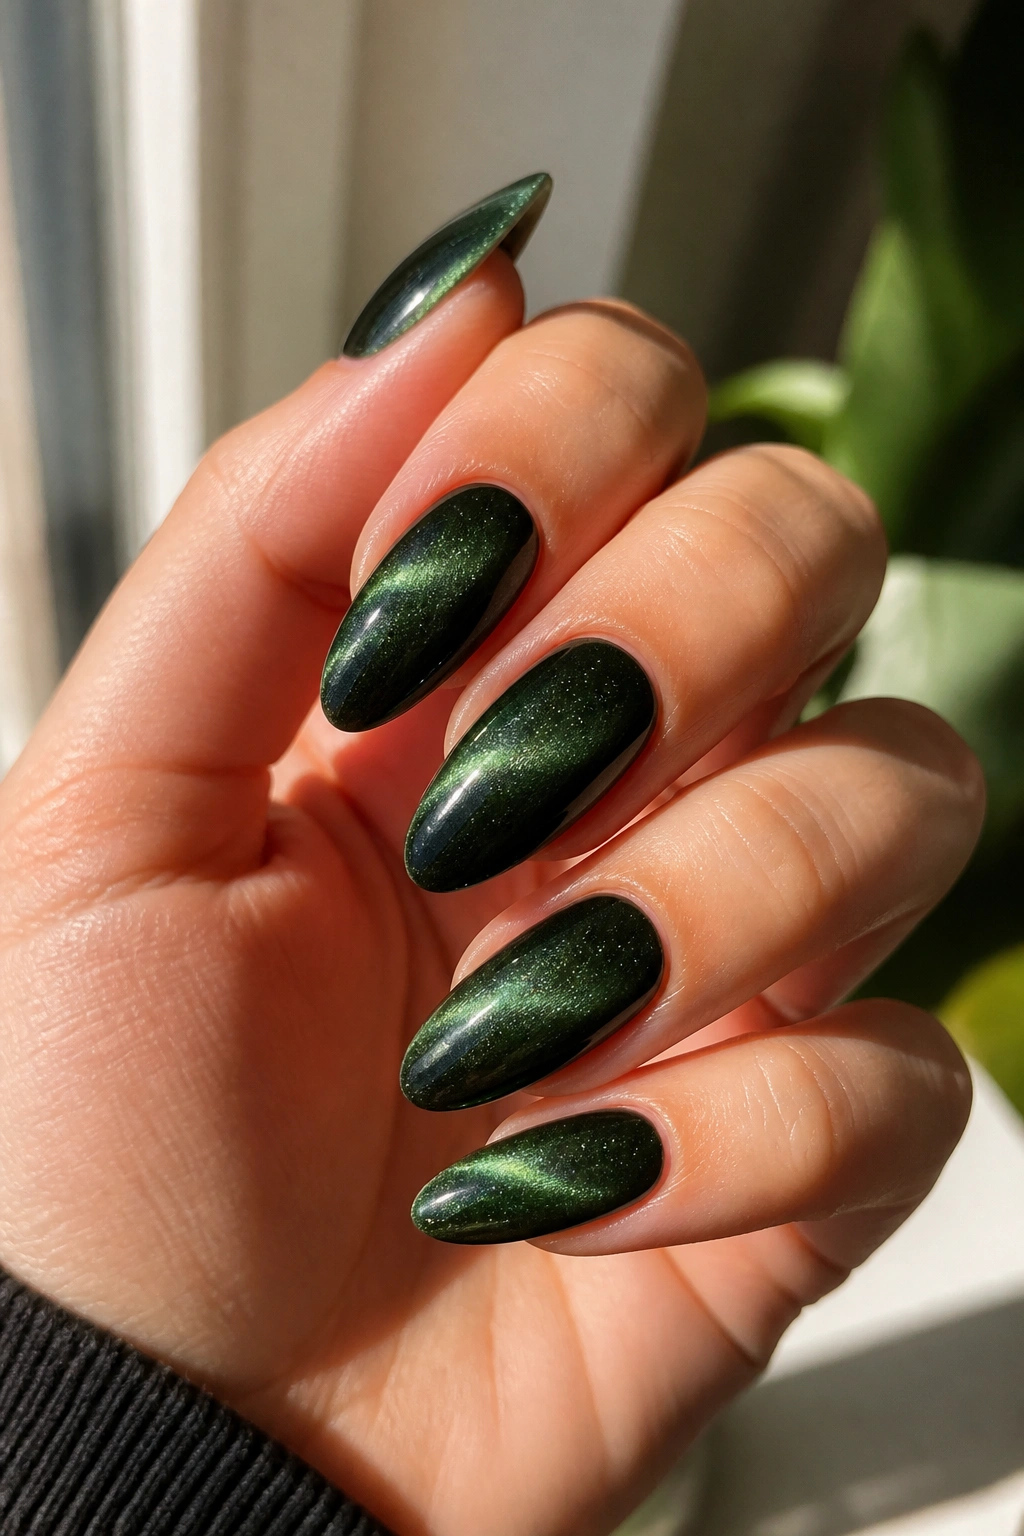
Forest cat-eye nails are all about the line. Magnetic polish creates a bright stripe that shifts when the light moves, and the effect looks especially strong in dark green. On almond nails, the tapered shape gives that stripe a nice runway to travel down.
How the magnet is held changes the whole look. If it sits too far away, the line gets weak. Too close, and the effect can spread out too much. A few millimeters above the wet polish is usually enough, and holding it for a few seconds gives the shimmer time to gather.
Getting the Beam Right
Use a dark forest or black-green base, then pull the magnet either through the center for a classic beam or diagonally for a more dramatic slant. The diagonal version feels a little more modern and less expected. A glossy top coat is non-negotiable here, because it sharpens the reflective line.
This manicure is not subtle. That is the point. If you want a green that moves when your hand moves, this is the one.
13. Olive and Nude Negative Space

Negative space is the smartest way to keep green almond nails from feeling heavy. By leaving part of the nail bare — a half moon near the cuticle, a side slice, or a diagonal window — you let the green breathe. The almond shape helps even more, because the taper keeps the empty space from looking accidental.
This style is especially good if you like clean lines and do not want every nail fully covered. Olive works well here because it sits quietly against a nude base. Very bright green can overpower the spacing, while olive keeps the design grounded.
The shape of the empty area matters. A crisp side cut looks sharper, while a curved negative moon feels softer. I’d keep the rest of the manicure uncluttered and avoid extra accents on the same nail. The point is contrast, not layering.
If you want a manicure that grows out a bit more gracefully, negative space is worth your time. The bare section softens the regrowth line, which means the manicure can look decent a little longer between fills.
14. Green Almond Nail Ideas for Short Nails
Short almond nails can absolutely handle green, and in some ways they wear it better than long ones. The smaller canvas forces the design to stay tidy. That means less room for sloppy art and more room for good color choices.
What Works Best on Short Lengths
- Stick to medium-dark greens or muted olive shades.
- Keep the almond taper gentle so the nail still looks balanced.
- Use tiny accents instead of full murals.
- Limit chunky glitter; it swallows short nails fast.
A short almond shape also lets you wear a richer green without feeling weighed down. Dark polish can look especially clean when the nail is trimmed close and shaped neatly. If you want art, one slim stripe or a tiny foil accent is usually enough.
I like short green almond nails when the finish is glossy and the cuticle area is precise. That combination makes the manicure feel crisp, not cramped. If you’ve been avoiding green because you worry it will overpower short nails, this is the section to steal from.
15. Emerald Glitter Gradient
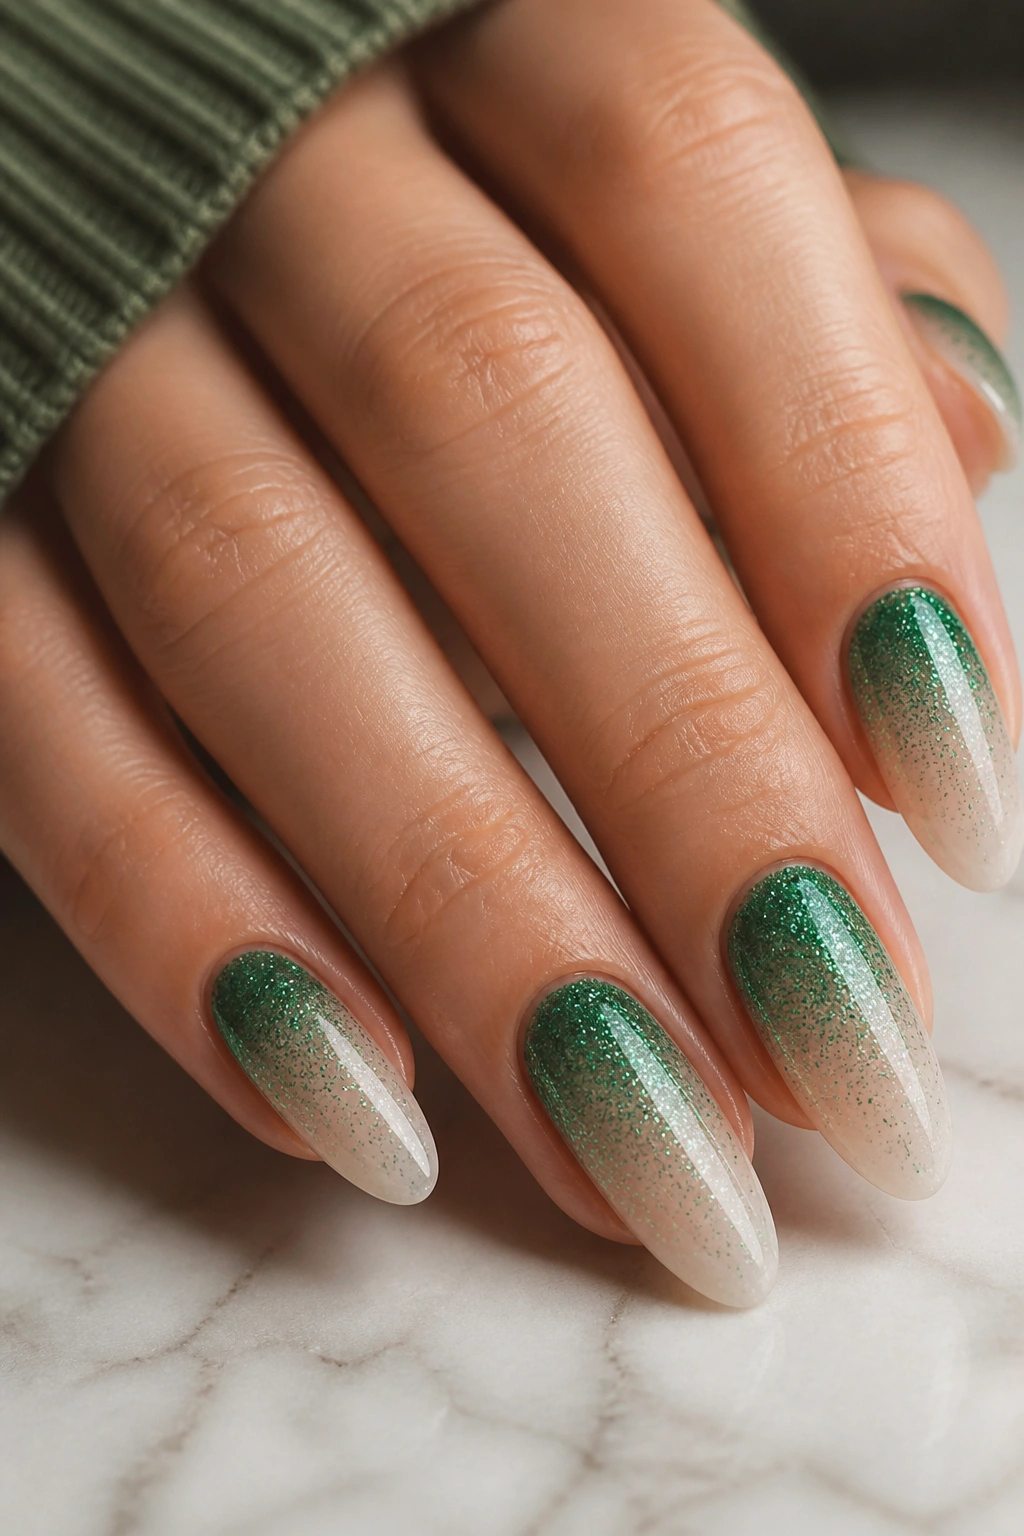
Emerald glitter gradients have a nice built-in softness because the sparkle concentrates at one end and fades out. On almond nails, that fade follows the taper naturally, so the design looks planned instead of random. It is a good choice if you want shine without coating every inch.
A fine glitter tends to read cleaner than chunky pieces. Chunky glitter can catch more light, but it also creates more texture and can make the tip feel heavy. A fine or mixed-size glitter gives you a smoother gradient from dense sparkle to plain polish.
Best Placement for the Fade
- Put the heaviest glitter near the cuticle for a growing-out-friendly look.
- Move the sparkle toward the tip if you want more drama.
- Use a sponge for the densest section.
- Seal with two layers of top coat so the surface stays smooth.
This design is one of the few that looks good both from far away and up close. The shimmer gets the attention, then the fade keeps it from turning into a block of green glitter.
16. Matte Olive with Thin Gold Lines

Matte olive with thin gold lines has a sharp, edited feel. The matte finish makes the nail look soft and grounded, while the gold line adds a clean break across the surface. On almond nails, that mix of soft and crisp feels especially balanced.
The line should stay thin. A gold stripe that is too wide can take over the nail and make the design feel costume-y. A line that is under 1 millimeter usually looks cleaner, especially if it follows the curve of the almond shape rather than cutting straight across it.
I like this style when the line sits near the tip, but a diagonal stripe can be even more interesting. Just keep the rest of the nail plain. One strong line is enough. Two or three starts to crowd the matte surface.
This manicure is quiet in a good way. It has enough detail to feel styled, but it still reads polished at a glance. If you wear a lot of gold jewelry, even better.
17. Green Checkered Accent Nails
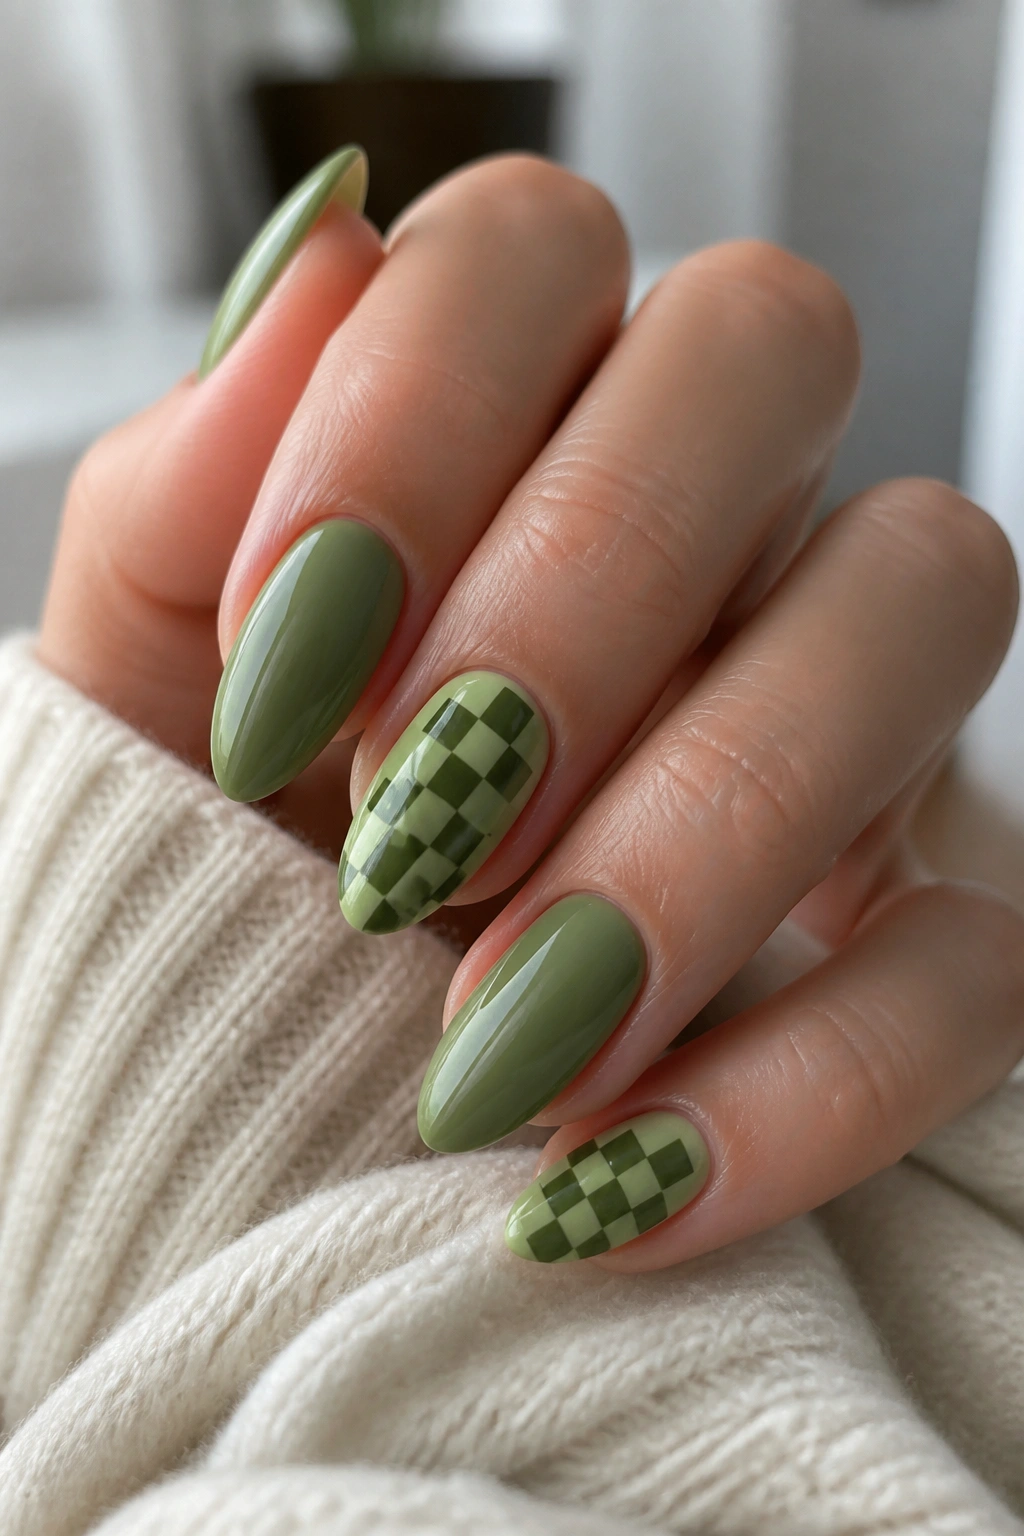
Checkered nails can go childish fast if the squares are too big or the colors are too loud. A green version avoids that when the pattern stays tight and the rest of the manicure stays calm. On almond nails, the shape keeps the checkers from looking blocky.
The smartest move is to use the pattern on one or two accent nails only. Let the other fingers wear a solid sage, olive, or deep green. That balance keeps the design from feeling like a costume. A checkerboard also works best when the squares are small and even, usually no wider than the tip of a detail brush.
How to Keep It Clean
- Choose two tones with clear contrast.
- Paint a grid first if your hand shakes.
- Keep the corners crisp, not rounded.
- Seal the design with a flat layer before the final top coat.
I like this look when the green is forest or jade and the second color is cream, black, or even a dusty beige. Bright lime checkers can work, but they need restraint. The pattern already does enough talking.
18. Botanical Leaf Art
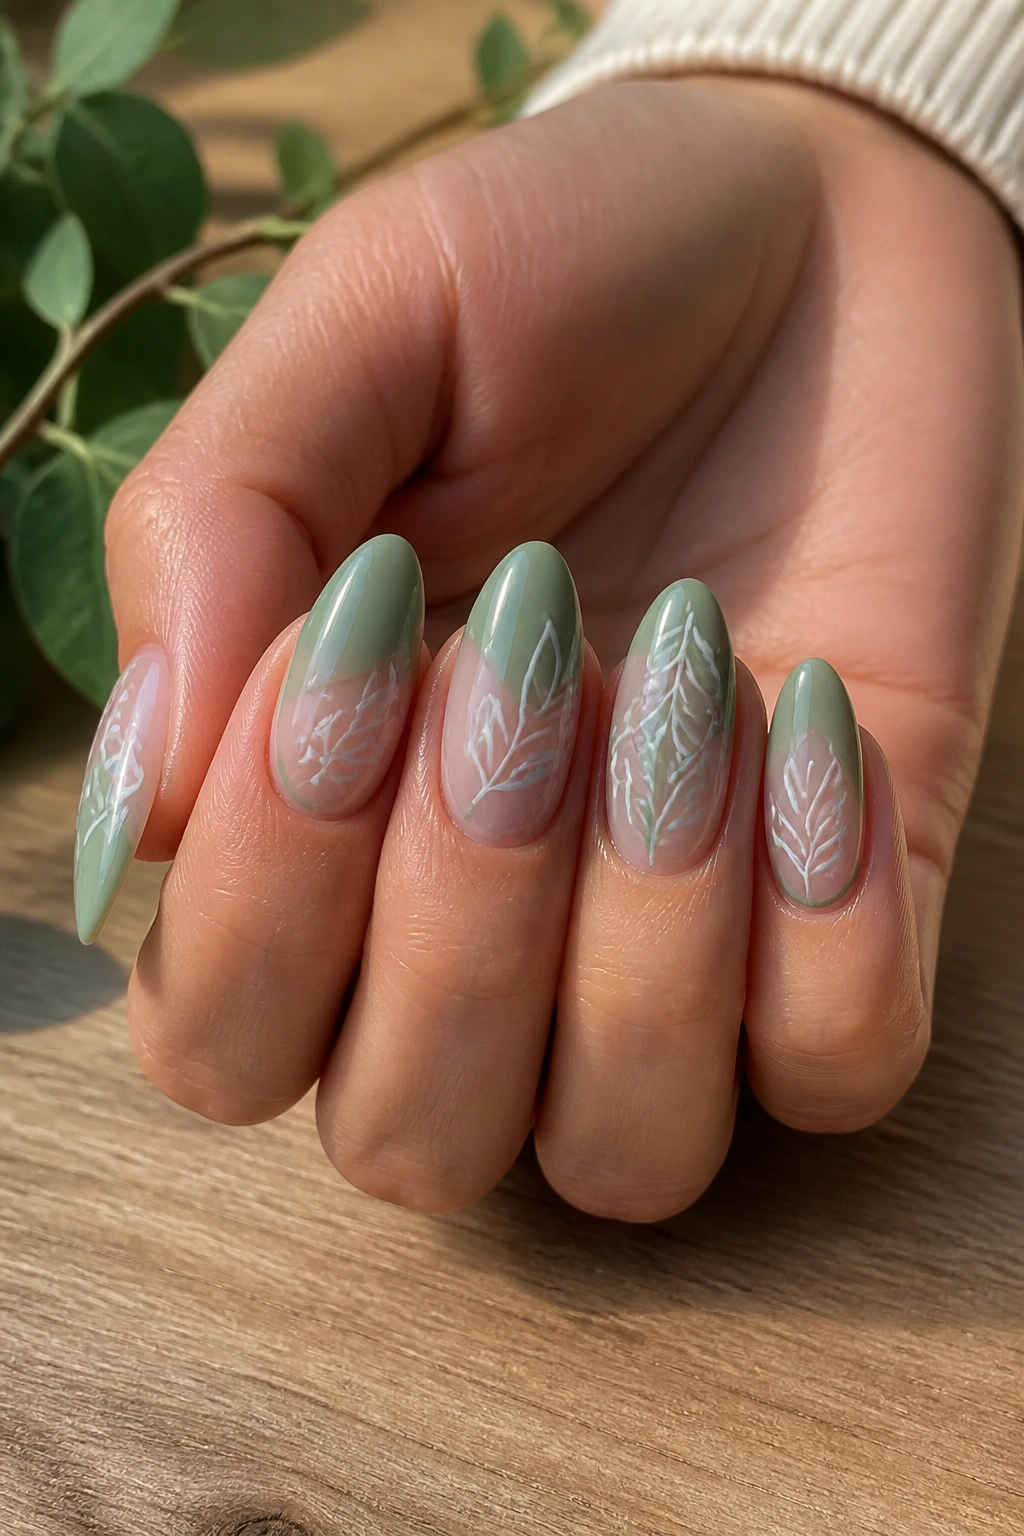
Botanical leaf art is one of the easiest ways to make green almond nails feel delicate instead of bold. Tiny leaves, small stems, and thin vine lines look especially nice on almond tips because the shape echoes the curve of a leaf. That visual echo is the whole trick.
A sheer nude or soft milky base gives the art room to breathe. Then the green can show up in small strokes rather than full coverage. If every nail has a leaf, keep the leaves tiny; if only one or two nails carry the design, you can make the stems a little longer.
This is a manicure that rewards restraint. A single vine running diagonally across the nail can be more interesting than a crowded cluster of leaves. White linework mixed with green also helps, because it adds contrast without making the design loud.
I think this style works especially well when the rest of your look is simple. Linen shirts, plain knits, clean rings. The nails do the talking.
19. Transparent Green Jelly Nails
Transparent green jelly nails have a candy-like finish that looks lighter than a solid polish, even when the shade is deep. The translucence gives the manicure depth, because you can still see a bit of the nail underneath. On almond nails, that see-through quality keeps the shape airy.
Why Jelly Layers Matter
The polish should go on in thin coats. If you pile it on too fast, it loses that glassy look and turns muddy. Two sheer coats usually give a nice tint, while a third can deepen the color without killing the transparency.
A jelly green can lean playful, but it does not have to. Deep jelly green looks sleek on almond nails, while a brighter version feels more casual. Either way, the finish should stay glossy. Matte kills the whole point.
You can also add a tiny shimmer layer underneath if you want more depth. Keep it fine, though. Chunky sparkle fights the jelly effect, and the manicure loses that smooth, glassy look.
20. Black and Green Dramatic Almonds
Black and green together can look expensive, edgy, or a little mysterious, depending on how much black you use. On almond nails, the contrast is strong enough to feel intentional without making the manicure harsh. Deep green over black, green smoke, or split-tone art all work here.
The nicest version keeps one color dominant. A black base with green flame lines feels sharper; a green base with black accents feels softer. I lean toward deep forest with black edges when I want something that reads bold but still wearable. It gives you drama without turning the whole hand into a costume.
A small detail can change the mood fast. A thin black outline around the tip makes the almond shape stand out. A soft green fade into black feels more fluid. If you like jewelry with a little edge — silver bands, dark stone rings, maybe even a leather jacket — this manicure knows how to keep up.
This is the loudest idea in the set, and that is why it works at the end. It gives green a harder frame.
Final Thoughts
Green almond nails are so useful because the shape does not fight the color. It gives the shade room to stretch, whether you want something soft like sage matte or sharper like chrome, foil, or black contrast. The same basic shape can look earthy, glossy, edgy, or delicate, and that range is half the fun.
If you want the easiest starting point, choose a deep green gloss or an olive French tip. If you want more personality, jump straight to cat-eye, aura, or jelly finishes. The smartest manicures usually do one thing well and leave the rest alone.
That rule saves a lot of bad nails. Keep the lines clean, the finish intentional, and the details small enough to let the shape breathe.
