

White soft square nails have become the go-to aesthetic for anyone who wants their nails to look intentionally polished without screaming for attention. There’s something inherently sophisticated about a clean white nail that’s not too sharp, not too round—just perfectly squared off with softened edges. It’s the kind of manicure that works for the boardroom, a casual weekend brunch, or a formal event, and honestly, it never feels out of place.
The magic of white soft square nails lies in their versatility. You can keep them minimal and nearly invisible, or layer them with subtle details that add just enough personality to make them uniquely yours. The soft square shape itself is a game-changer—it avoids the severity of a sharp square nail while maintaining that clean, modern silhouette that makes your hands look instantly more refined. Whether you’re drawn to matte finishes, glossy perfection, or something with a hint of shimmer, white provides an endlessly adaptable canvas.
What makes these designs work so well is that they suit virtually every skin tone, outfit, and occasion. The neutrality of white is genuinely freeing—you’re not limited by color coordination rules, seasonal trends, or what else you’re wearing. A white soft square nail sits confidently with minimalist jewelry, bold statement rings, or bare hands entirely. It’s the kind of manicure that reads as “I’ve got my life together” without requiring constant maintenance or elaborate upkeep.
We’ve gathered the most elegant, achievable, and genuinely beautiful white soft square nail designs that deliver that coveted clean finish. Each one is designed to be accessible whether you’re visiting a nail salon or tackling this at home with the right tools and patience.
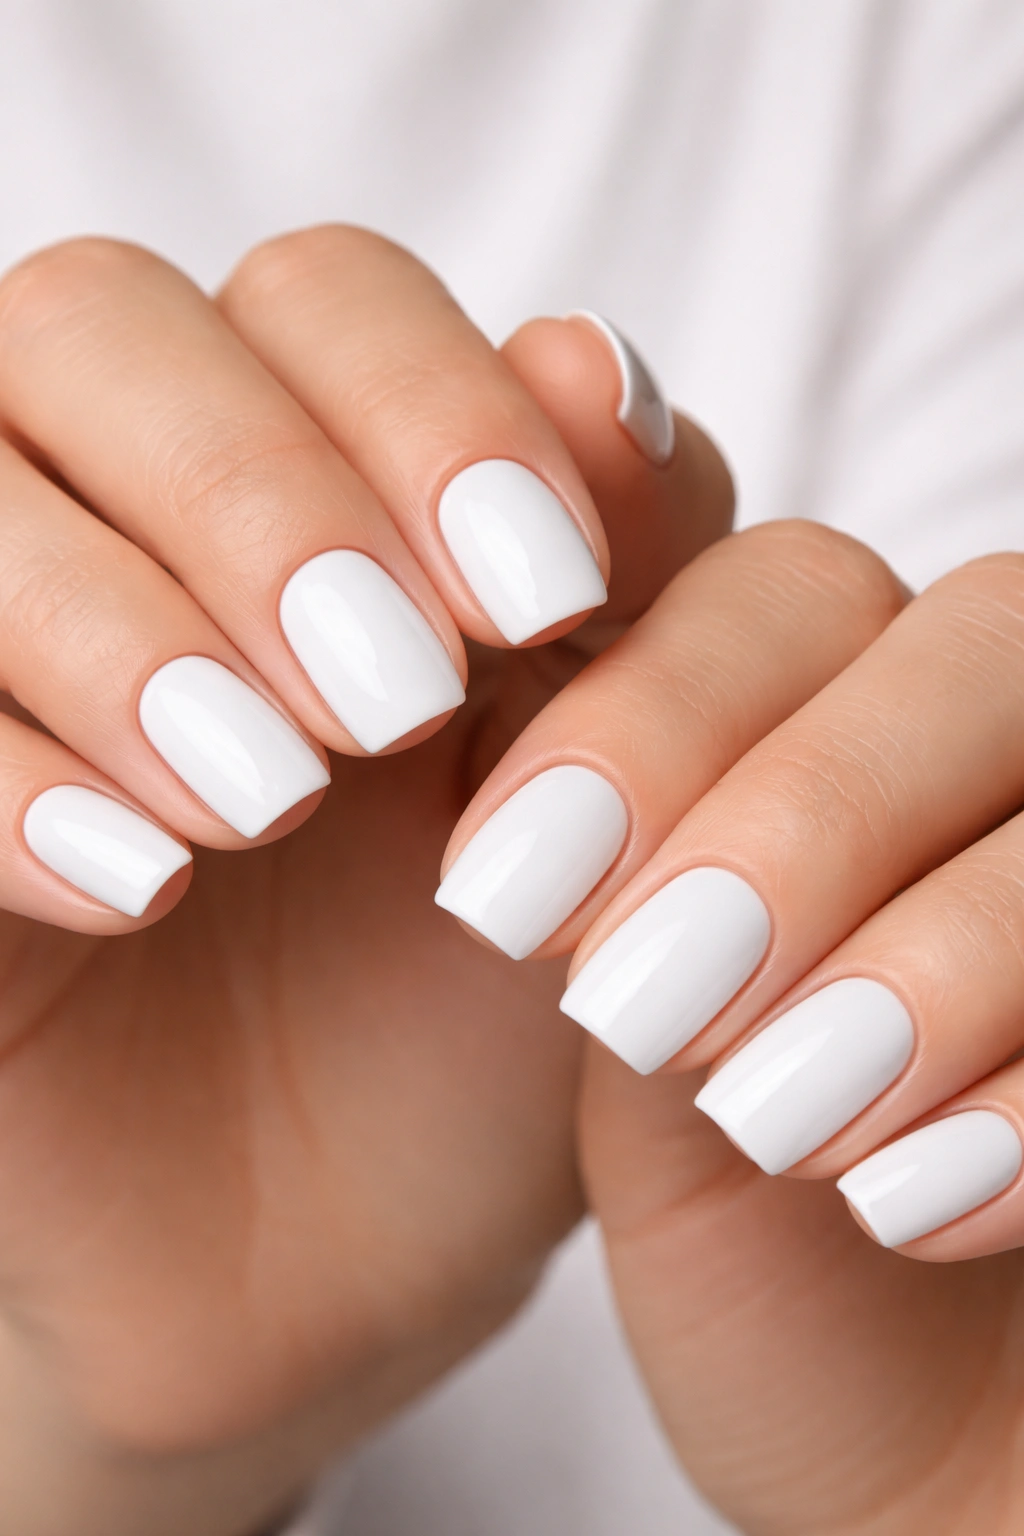
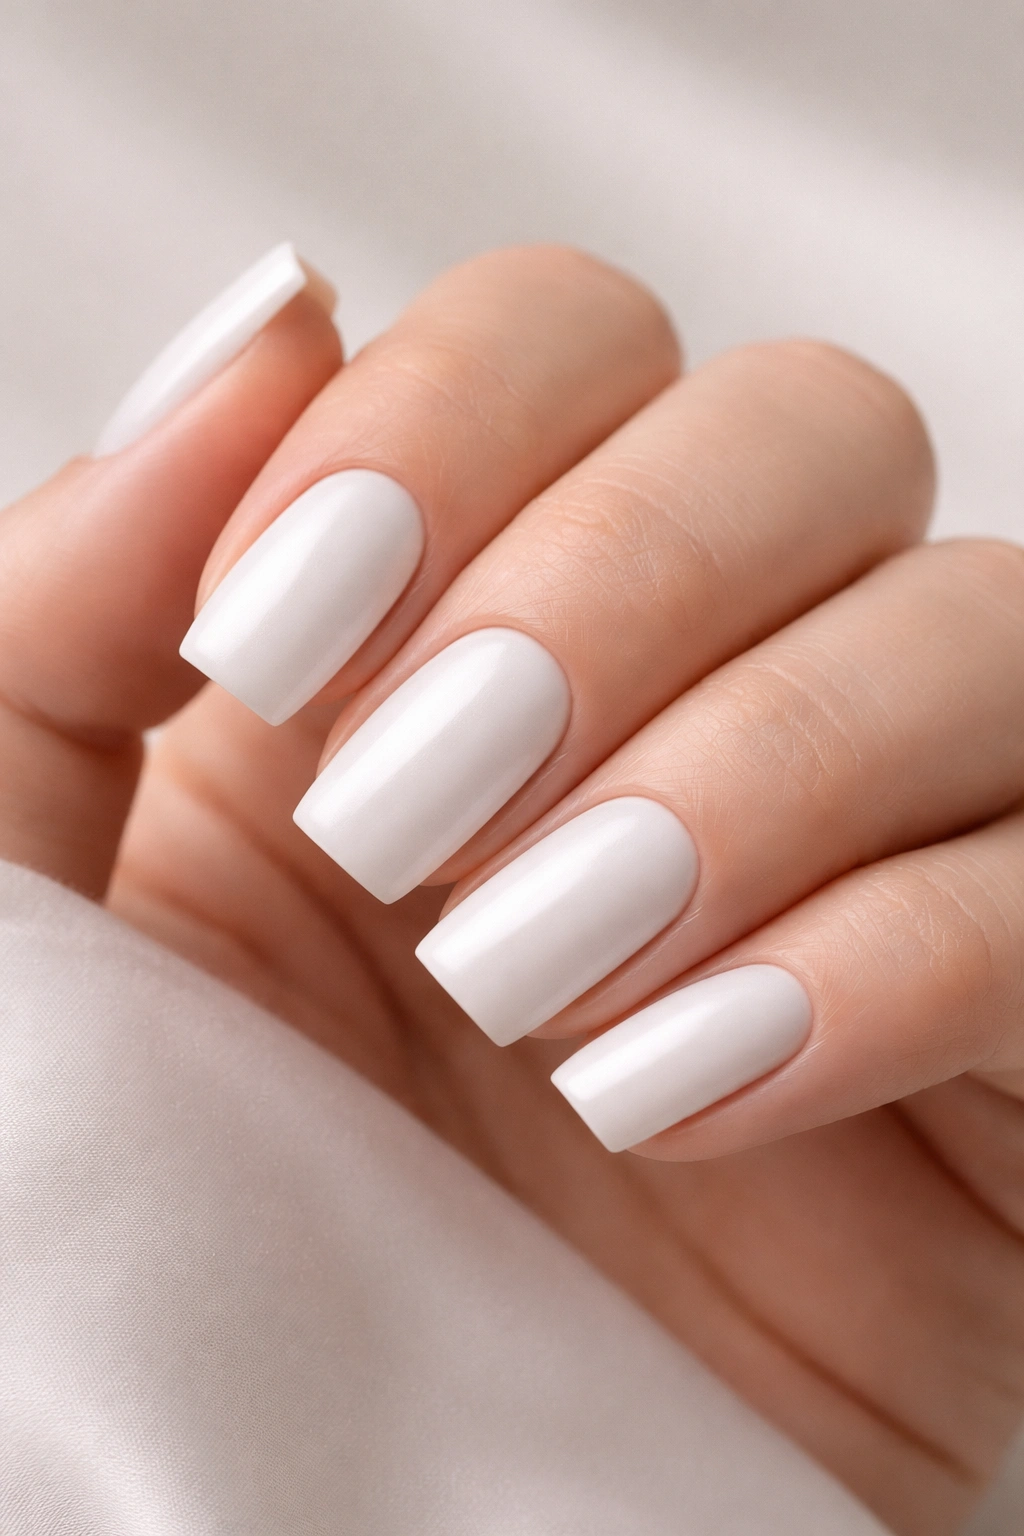
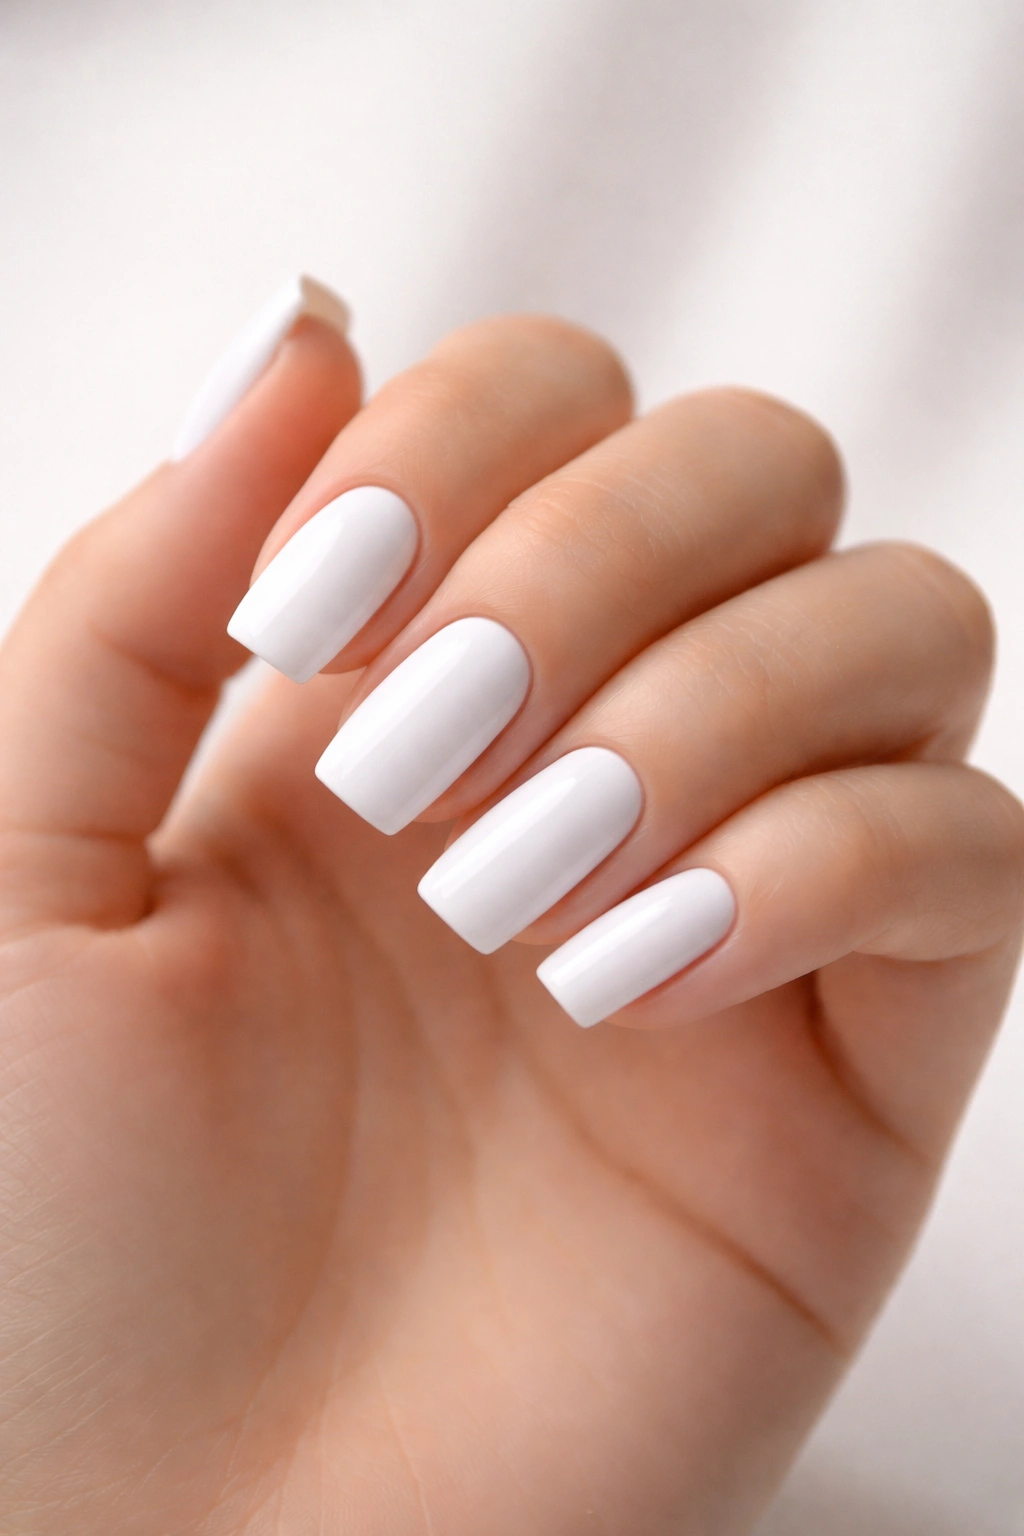
1. Classic White Square with Glossy Finish
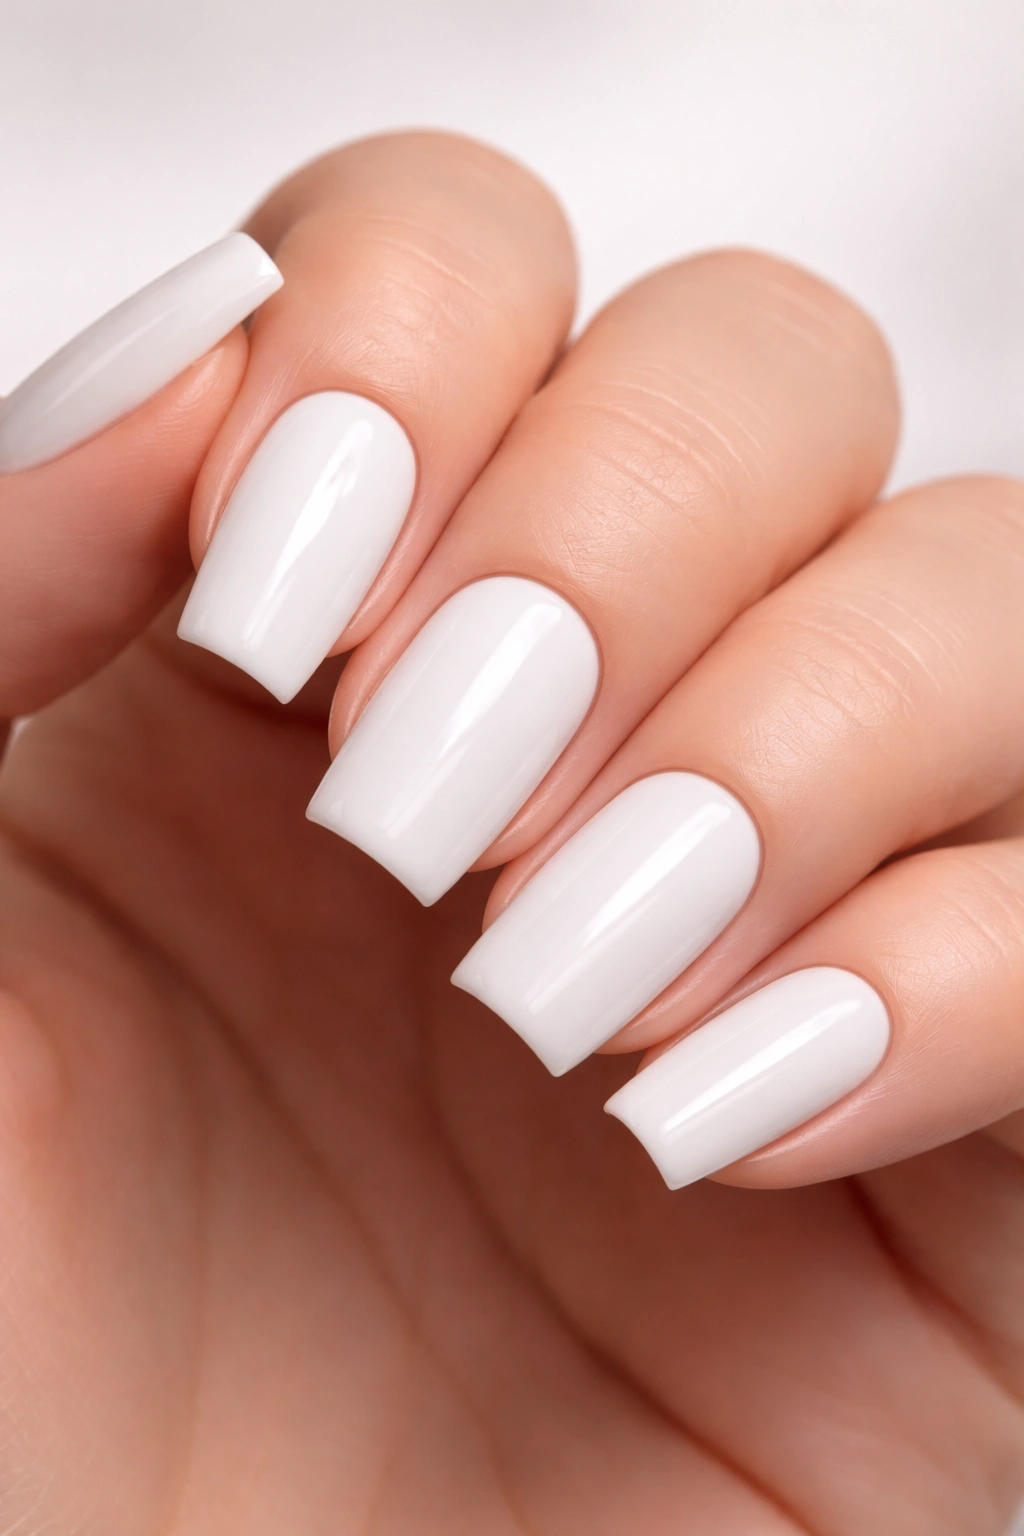
The foundation of all white square nail designs, the classic glossy white square is timeless for excellent reason. This is your baseline—crisp white polish applied in two even coats, finished with a shiny topcoat that catches the light just enough to make your nails look healthy and intentional. The simplicity is deceptive; this look requires precision, clean lines, and well-maintained cuticles to truly shine.
Why This Design Never Ages Out
A glossy white square nail has been iconic for decades because it’s essentially a blank slate that flatters every skin tone and adapts to any environment. The shine emphasizes the shape and draws attention to your nail bed’s natural dimension. It’s professional enough for job interviews, formal enough for weddings, and casual enough for everyday wear. The glossy finish also makes nails appear longer and more slender than they actually are.
How to Nail This Look
- Start with a gentle file and buff the nail plate until it’s smooth and even, removing any ridges that would show through the white polish
- Apply a base coat to protect your natural nail and provide better adhesion for color
- Apply two thin coats of bright white polish rather than one thick coat—this prevents streaking, bubbles, and an uneven finish
- Use a topcoat specifically formulated for high shine; budget versions often look flat and dull by comparison
- Maintain clean, flush cuticles because any cuticle overgrowth reads as unkempt against bright white
- Reapply topcoat every 3-4 days to maintain that fresh, wet-looking shine as it naturally dulls from daily wear
Pro tip: Use a thin brush and paint in one long stroke down the center of the nail, then use short strokes on each side rather than painting side-to-side. This technique prevents visible brush marks and delivers cleaner edges.
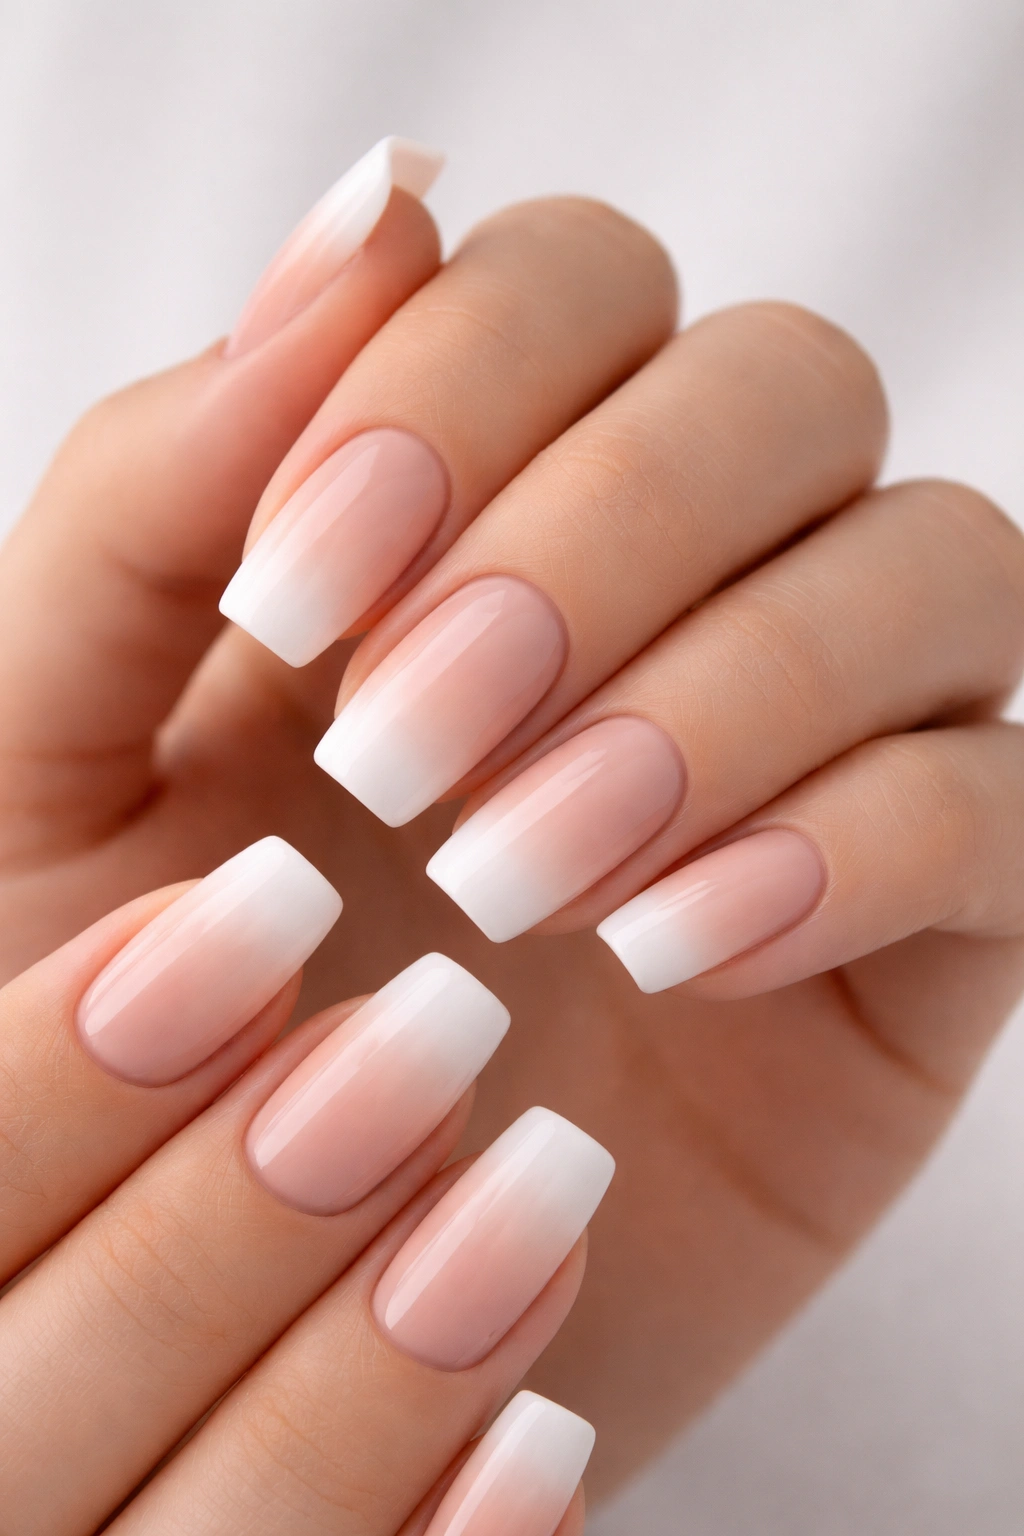
2. French Ombre Gradient to Sheer White
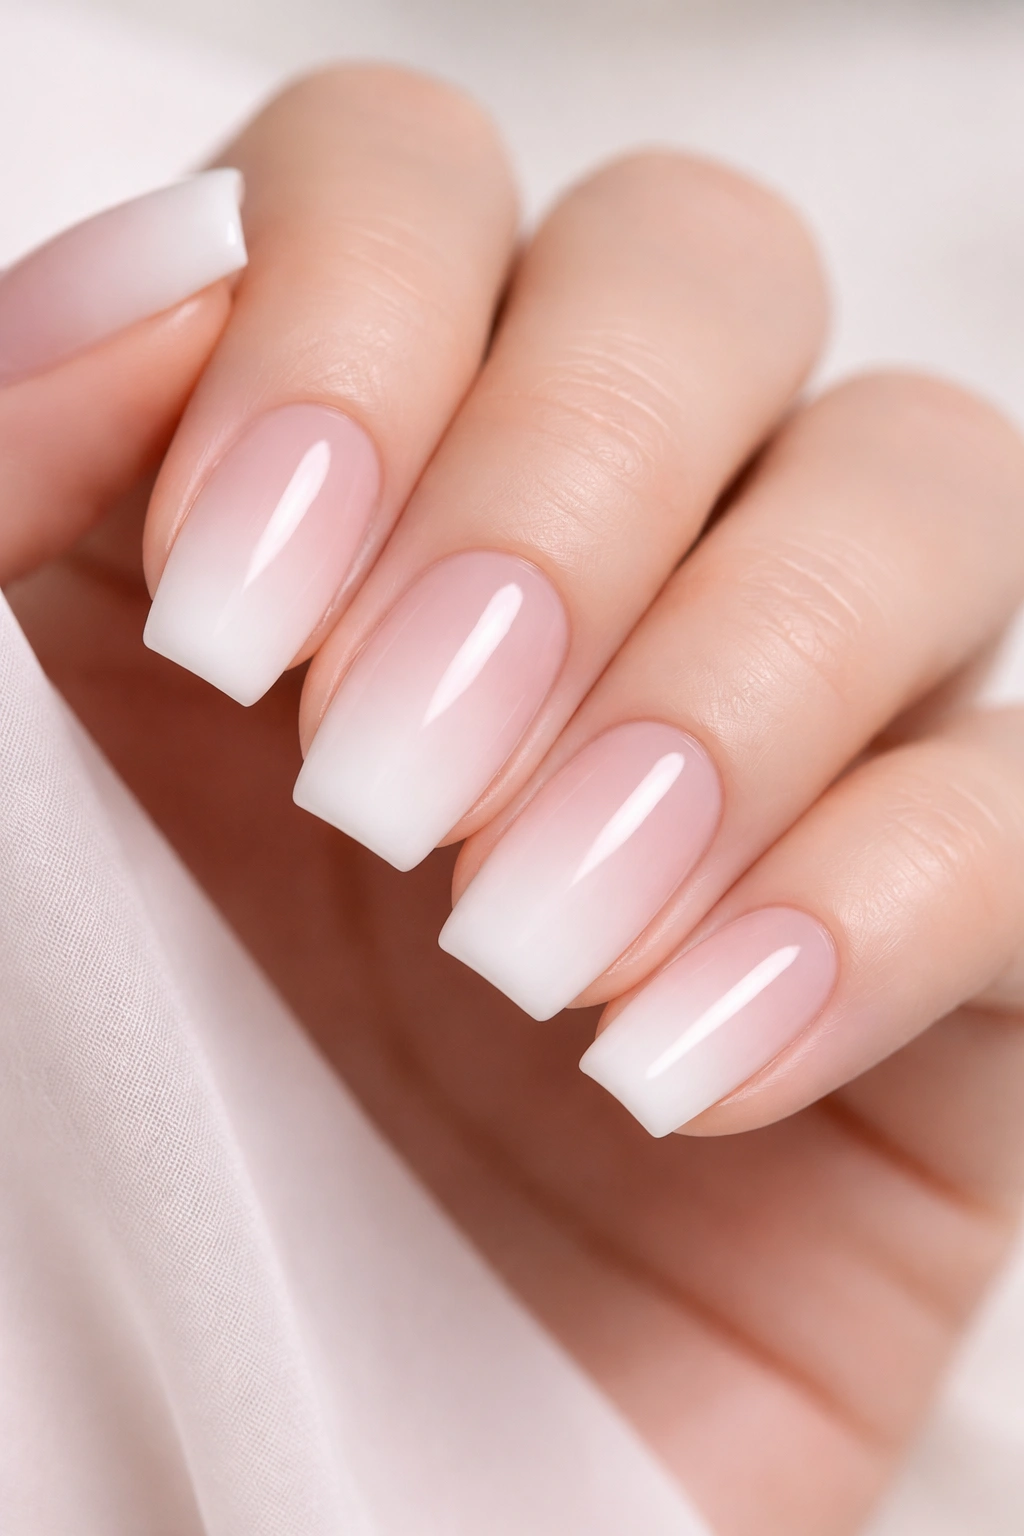
A subtle evolution of the classic French manicure, this design features a soft gradient that transitions from opaque white at the tip through translucent, barely-there white toward the nail bed. The gradient is so gentle that it almost looks like a natural color shift, creating an ethereal, soft appearance that’s less stark than a traditional French manicure but infinitely more modern and interesting.
The Appeal of the Soft Gradient
The ombre effect eliminates the harsh line that traditional French manicures can create, which is exactly why so many nail artists are moving in this direction. Your nail looks longer because the white isn’t confined to just the tip—it extends gradually across the nail. The overall effect is less “manicure” and more “these nails just happen to be this color,” which is probably the most sophisticated compliment a nail design can receive.
Steps to Create This Gradient
- Apply a base of sheer pink or nude polish to your entire nail as a foundation
- Use a makeup sponge to apply white polish to just the tip in a concentrated stripe
- Sponge white polish progressively less opaque as you move toward the center, creating soft gradation
- Build the gradient over 2-3 applications rather than trying to perfect it in one pass
- Blend the white where it fades into the sheer base using a clean, dry sponge with light dabbing motions
- Seal everything with a glossy topcoat that unifies the entire design and adds dimension
Worth knowing: This design photographs beautifully but requires careful sponge technique. If your sponge is too wet with polish, the gradient will be harsh; if it’s too dry, it won’t deposit enough color. The sweet spot is a slightly damp sponge with just enough product to create a soft fade.
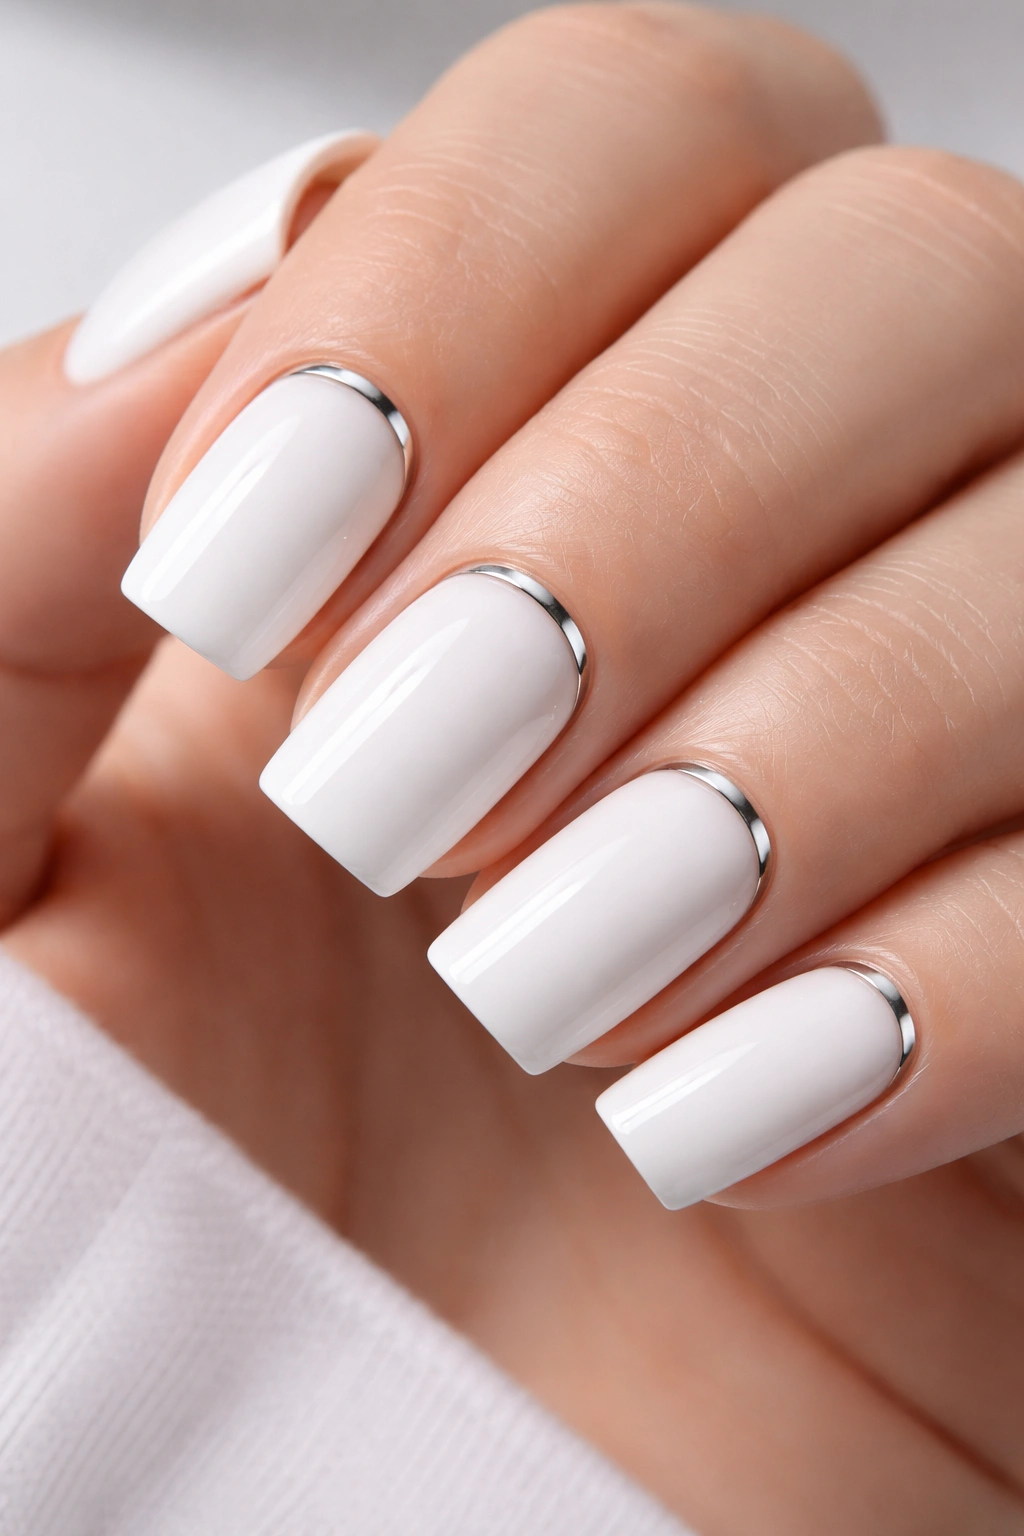
3. Minimalist Chrome Edge Line
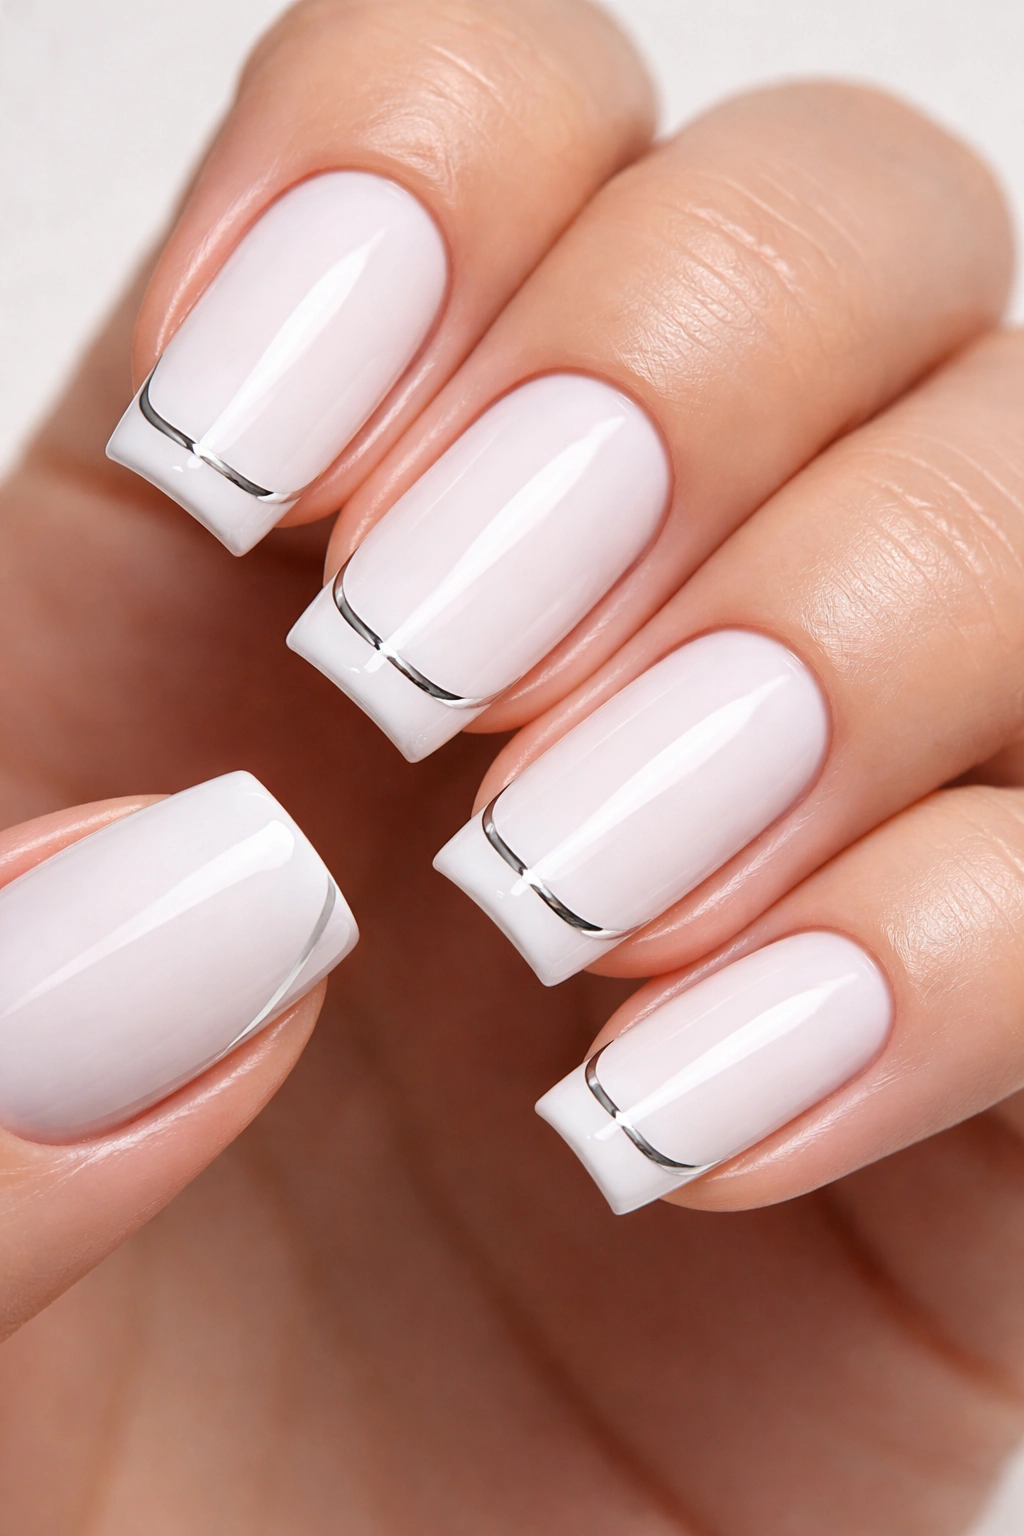
Ultra-modern and surprisingly easy to execute, this design features a single thin line of chrome or metallic silver that traces just below the white tip, creating a razor-thin definition line that makes the white appear more dimensional. The chrome catches light differently than the white matte or glossy base, adding a subtle accent that transforms a simple white nail into something distinctly intentional and elevated.
Why the Chrome Line Elevates Everything
That thin metallic line acts as a visual anchor—it draws the eye and adds a design element without overwhelming the clean, minimalist aesthetic. Chrome finishes have that futuristic quality that makes even simple designs feel sophisticated and current. The line also creates the optical illusion of a sharper nail edge even if your actual edge is soft and rounded, which is why this works so beautifully with soft square shapes.
Application Technique for Clean Lines
- Paint your nails with white glossy or matte polish and let them dry completely
- Use a thin striping brush or a nail art pen with metallic finish
- Apply the line in one smooth, confident stroke just below where the white tip meets the main nail bed
- If metallic finishes aren’t available at your salon, a thin line of nude, soft beige, or barely-there gray creates a similar dimensional effect
- Keep the line absolutely straight—any wavering becomes immediately visible and obvious
- Seal with clear topcoat only, not a colored one, to preserve the chrome’s reflective quality
Pro tip: If you’re doing this at home and worry about shaky hands, place a strip of painter’s tape below where you want your line to be. This gives you a clean edge to paint against, and you can remove the tape immediately after while the polish is still wet.
4. Soft White Matte Finish
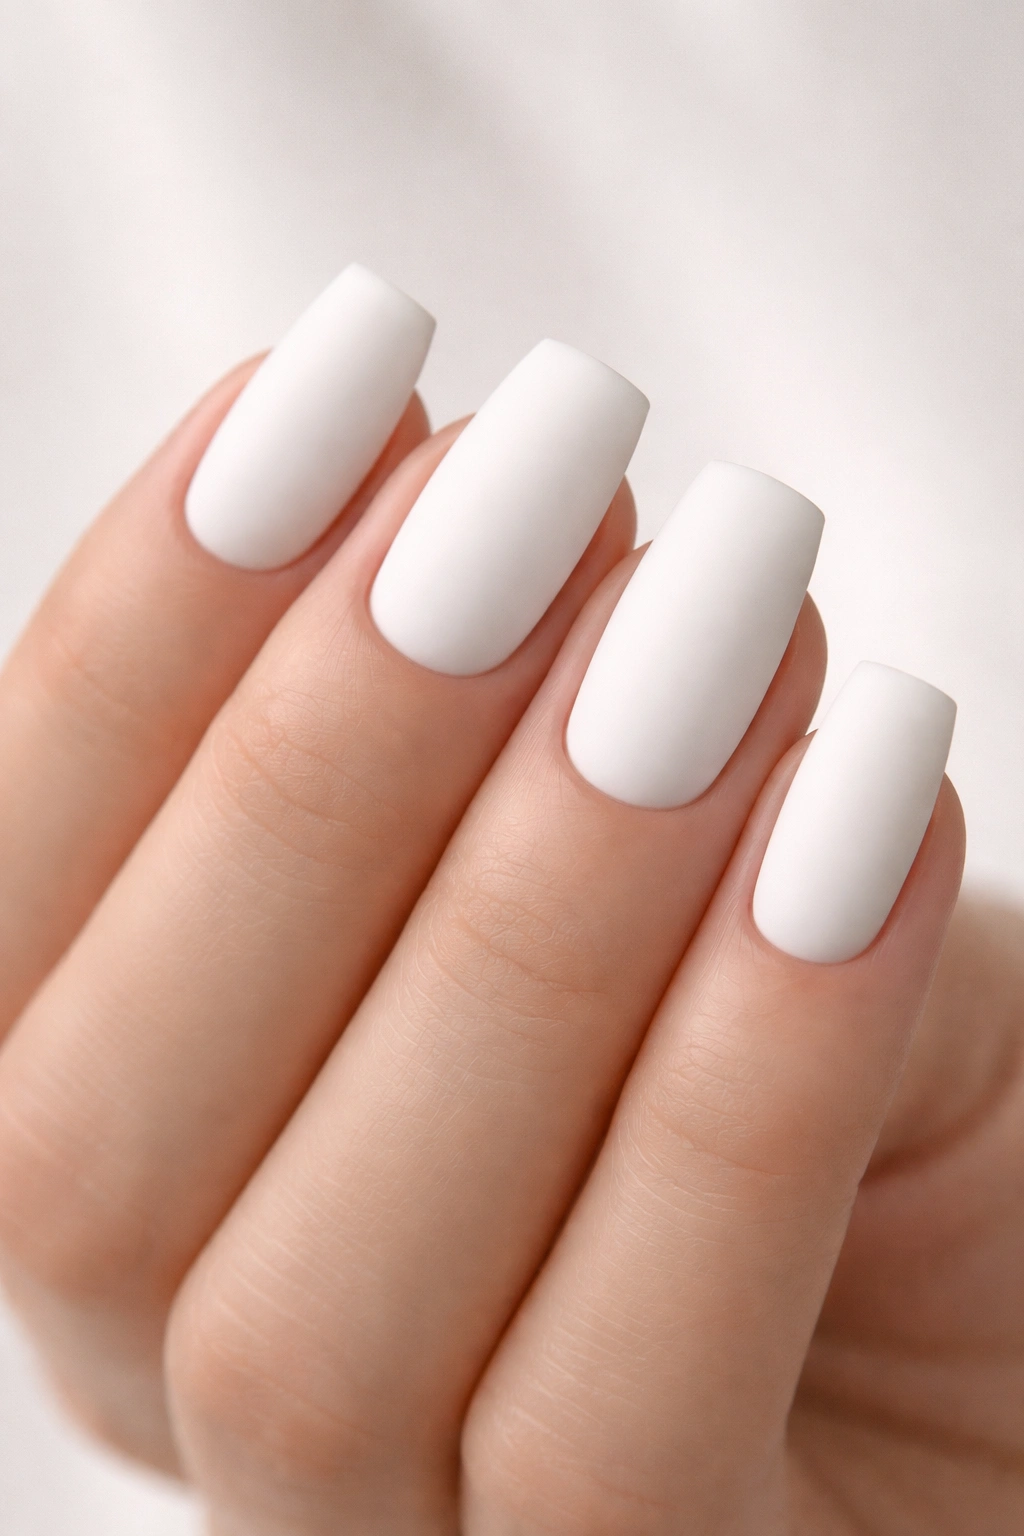
For those who find high shine overwhelming or prefer a more subdued aesthetic, matte white is the answer—elegant, understated, and surprisingly modern. The matte finish removes the gloss and creates a velvety, soft appearance that feels less “formal manicure” and more “I naturally have perfect nails.” The square shape is even more defined in matte because there’s no shine to soften the edges.
The Sophistication of Matte
Matte finishes have an expensive, almost ceramic quality that makes nails look intentionally designed rather than simply painted. The finish is extremely forgiving about small imperfections—tiny bubbles or uneven coverage that would be glaringly obvious in a glossy finish practically disappear in matte. Matte also shows no water spots or fingerprints throughout the day, which is a practical advantage glossy finishes can’t claim.
Achieving Perfect Matte White
- Use a matte white polish (not glossy white topped with matte topcoat, which often looks chalky and uneven)
- Apply two thin coats for solid, even coverage that doesn’t look flat or washed out
- Use a matte topcoat to seal and protect, or skip topcoat entirely if you’re using a one-coat matte formula
- Avoid high-shine base coats that can create an unintended sheen through the matte finish
- If your matte finish begins to lose its texture from wear, don’t add regular glossy topcoat—use matte topcoat exclusively
- File and shape carefully because any scratches show up against the matte finish more readily than glossy
Insider note: If you can’t find true matte white and only have glossy white available, apply a matte topcoat over glossy white polish for nearly identical results. The matte topcoat absorbs light instead of reflecting it, creating the same velvety finish.
5. Pearl Gradient Effect with Iridescent Shift
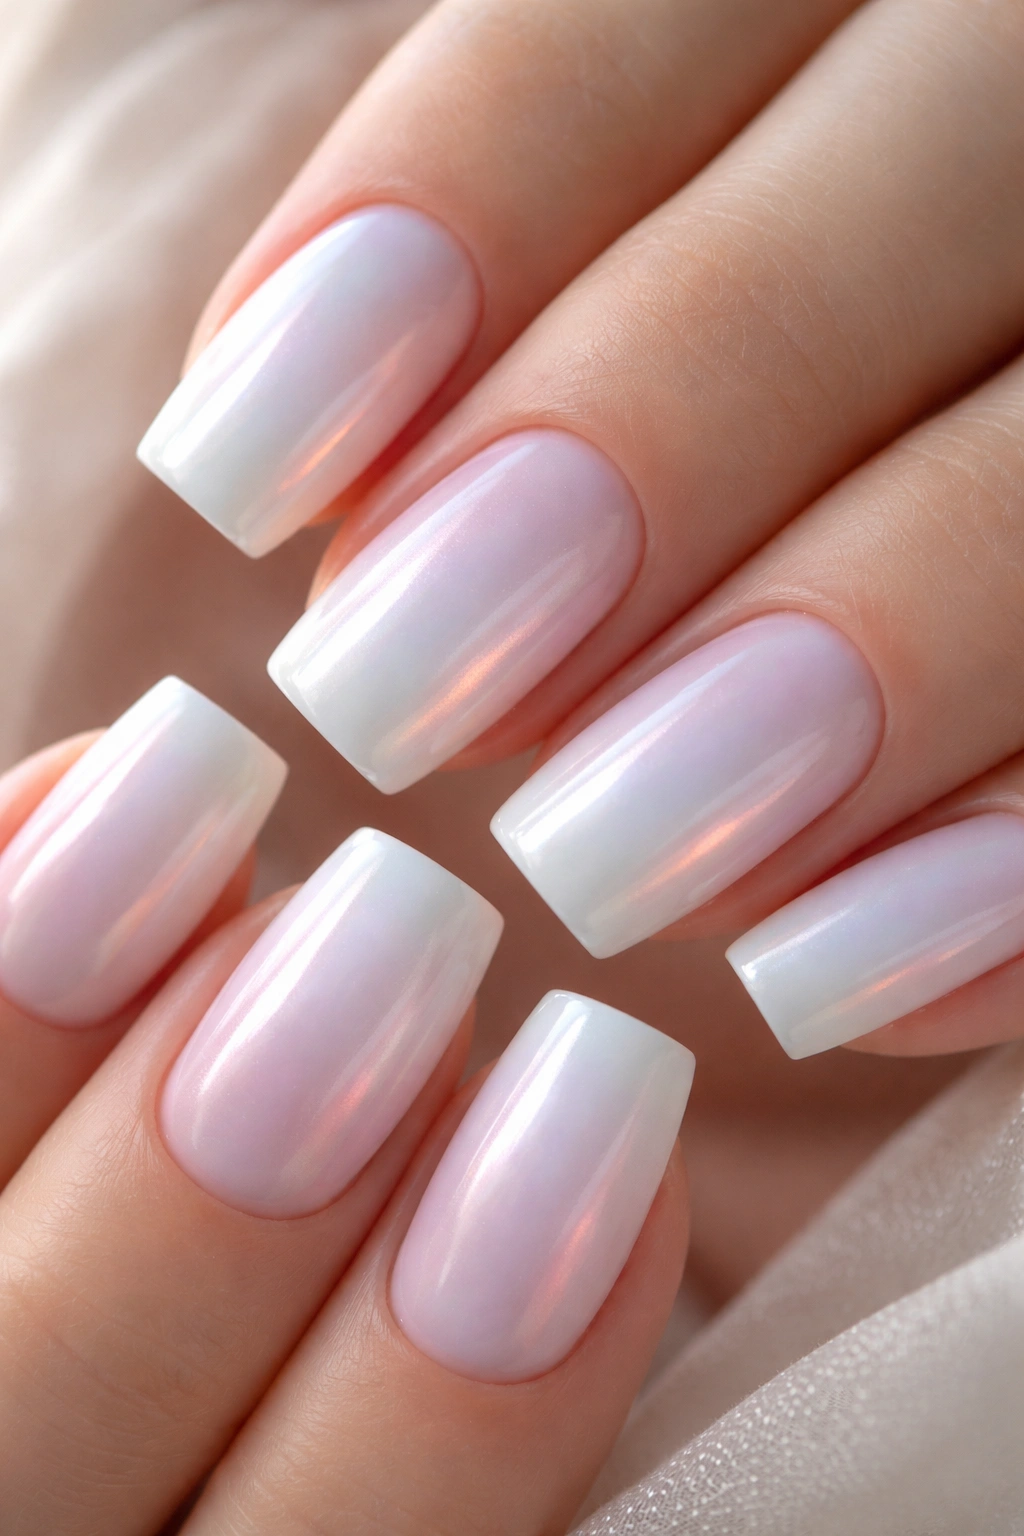
This design takes white and adds an ethereal dimension with a subtle pearl or iridescent finish that shifts between white, soft pink, and lavender depending on how light hits your nails. It’s not overt or over-the-top—just a whisper of color-shifting magic that makes your nails catch light in unexpected, beautiful ways.
The Magic of Pearl Finishes
Pearl finishes contain mica and light-refracting particles that create depth and dimension without being glittery or obviously sparkly. The effect is sophisticated because it’s subtle—someone might compliment your nails without quite being able to pinpoint what makes them special. Pearl white reads as luxe and expensive, even though pearl finishes are widely available at every price point. The soft square shape perfectly showcases the pearl’s dimensional quality.
Building the Pearl Gradient
- Start with a white base coat (this helps the pearl show its true color)
- Apply pearl white polish, letting each coat dry completely before applying the next
- Layer 2-3 coats to build the pearl effect—one coat will look too thin and translucent
- For additional dimension, use a pearl white polish that has a slight champagne or pink undertone
- Apply a clear topcoat or a topcoat with additional pearl finish to amplify the effect
- Consider adding a brushstroke of nude or pale pink along the tip if you want a subtle gradient between white and warmth
Worth knowing: Pearl finishes can look muddy or grayish in poor lighting if applied too thin, so don’t skimp on layers. In bright light or sunlight, a properly applied pearl white is absolutely stunning—it’s one of those finishes that truly rewards the extra coats.
6. Geometric Accent Line with Negative Space
A clean geometric design featuring white polish with a thin line of negative space (exposed nail bed) that runs vertically down the center, or a subtle accent stripe that doesn’t extend edge-to-edge. This creates a minimalist graphic element that makes the design feel contemporary and intentional without being complicated or visually busy.
Why Negative Space Works
Negative space instantly elevates a simple design into something that feels curated and thoughtful. The exposed nail bed creates contrast against the white, making the nail appear more dimensional. Geometric elements are eternally modern—they never feel dated or trendy in a way that looks silly three months later. This design also requires confidence; pulling off clean geometric lines reads as someone who’s intentional about their aesthetic.
Creating Clean Geometric Accents
- Paint your nails white and allow complete drying
- Mark your negative space line with a pencil or thin tape to ensure perfect straightness
- Use a thin striping brush or nail art pen to create an outline on either side of where your negative space will be
- Carefully scrape away the white polish along the marked line to reveal the naked nail bed beneath
- Seal everything with clear topcoat to protect the design and prevent the scraped area from catching and snagging
- Alternatively, paint a thin accent line in a contrasting color (soft gray, nude, or pale pink) instead of creating negative space
Pro tip: Precision is everything here. Shaky, wavering lines read as amateur; confident, clean lines read as intentional design. If your hands aren’t steady, painter’s tape is your best friend. Place thin tape strips on either side of where your line should be, paint right up to the tape, and remove while polish is wet.
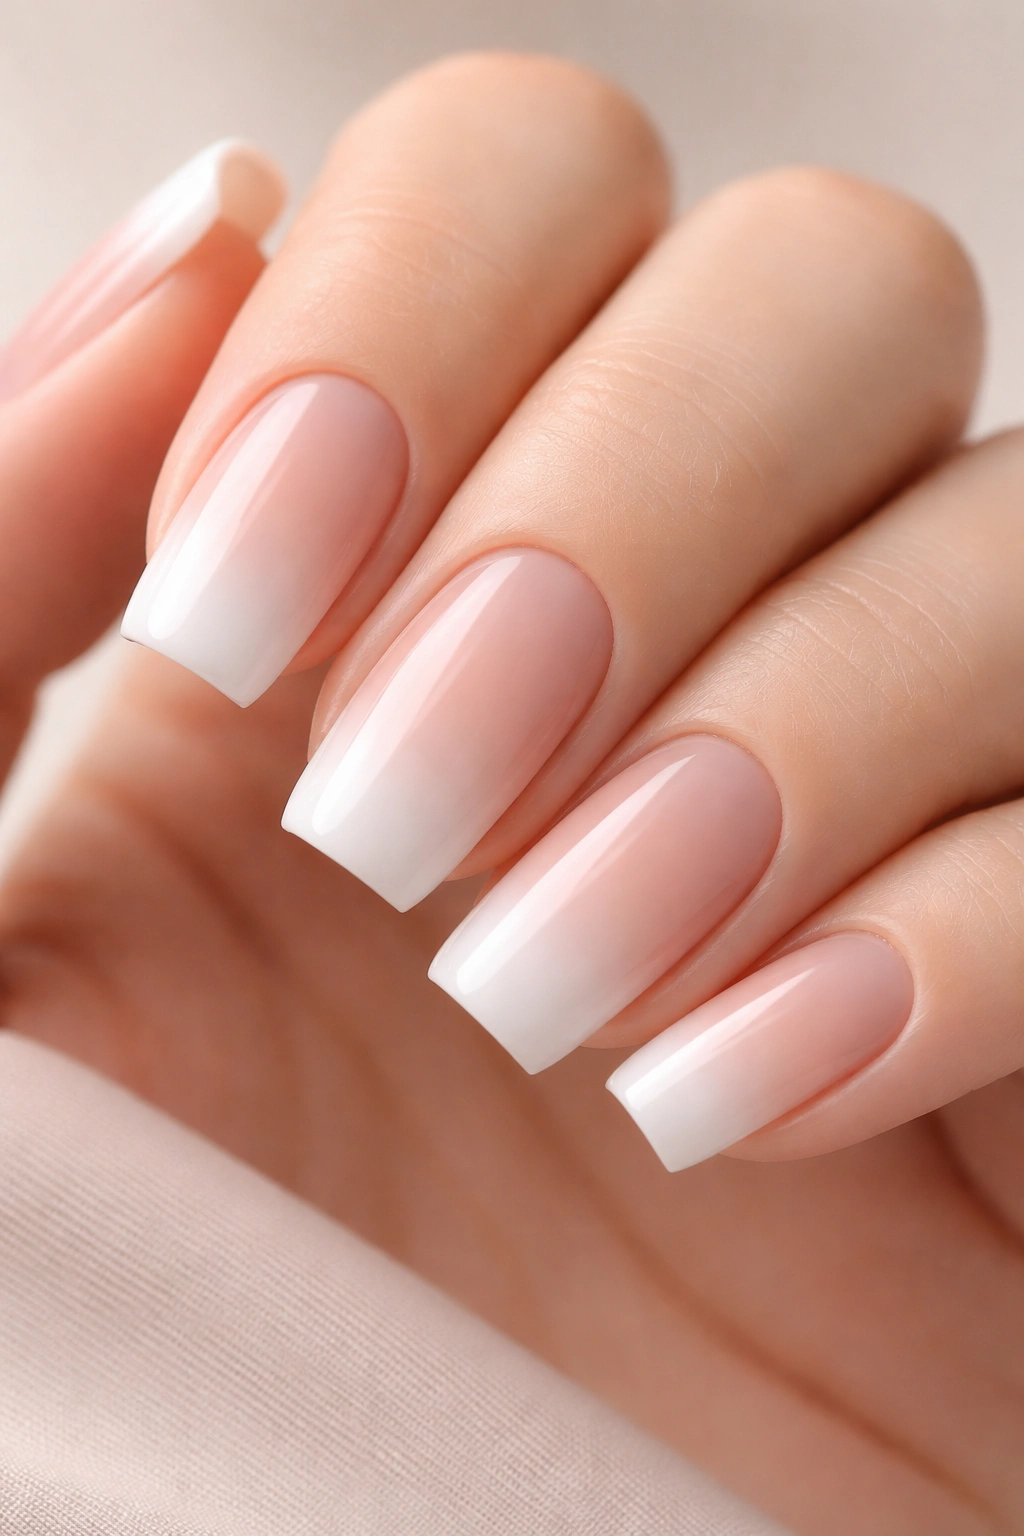
7. Nude-to-White Gradient Ombre
A sophisticated gradient that transitions from your natural nail tone or a soft nude on the base to pure white at the tip, creating the illusion of naturally grown-out white-tipped nails while maintaining the clean aesthetic of the soft square shape. The gradient is gentle and natural-looking, which is probably why this design has sustained popularity for years.
The Illusion of Natural Length
This ombre works because it visually extends your nail—the gradient draws the eye from base to tip and makes nails appear longer than they actually are. The nude-to-white transition is flattering to every skin tone because the nude component can be customized to match your natural undertones. You get the clean-finish appeal of white without the starkness of pure white against your skin.
Blending Nude and White Seamlessly
- Start with a nude base coat on the entire nail (choose one that matches your natural nail tone or your skin undertone)
- Apply white polish to the tip of the nail in a concentrated band
- Use a makeup sponge to blend the white into the nude—dab the sponge along the line where they meet, moving the white slightly upward and the nude slightly downward
- Build the gradient gradually over 2-3 sponging applications rather than trying to perfect it in one pass
- The middle of the nail should be the blurred transition area; the base stays nude and the tip stays white
- Seal with glossy or matte topcoat depending on your preference for shine
Worth knowing: This design is incredibly forgiving because the transition area can be blurred and soft—harsh lines actually ruin the effect. If your gradient looks too defined, blend it more. The goal is a natural fade that could almost pass for your actual nails at a glance.
8. Translucent White Tips with Sheer Base
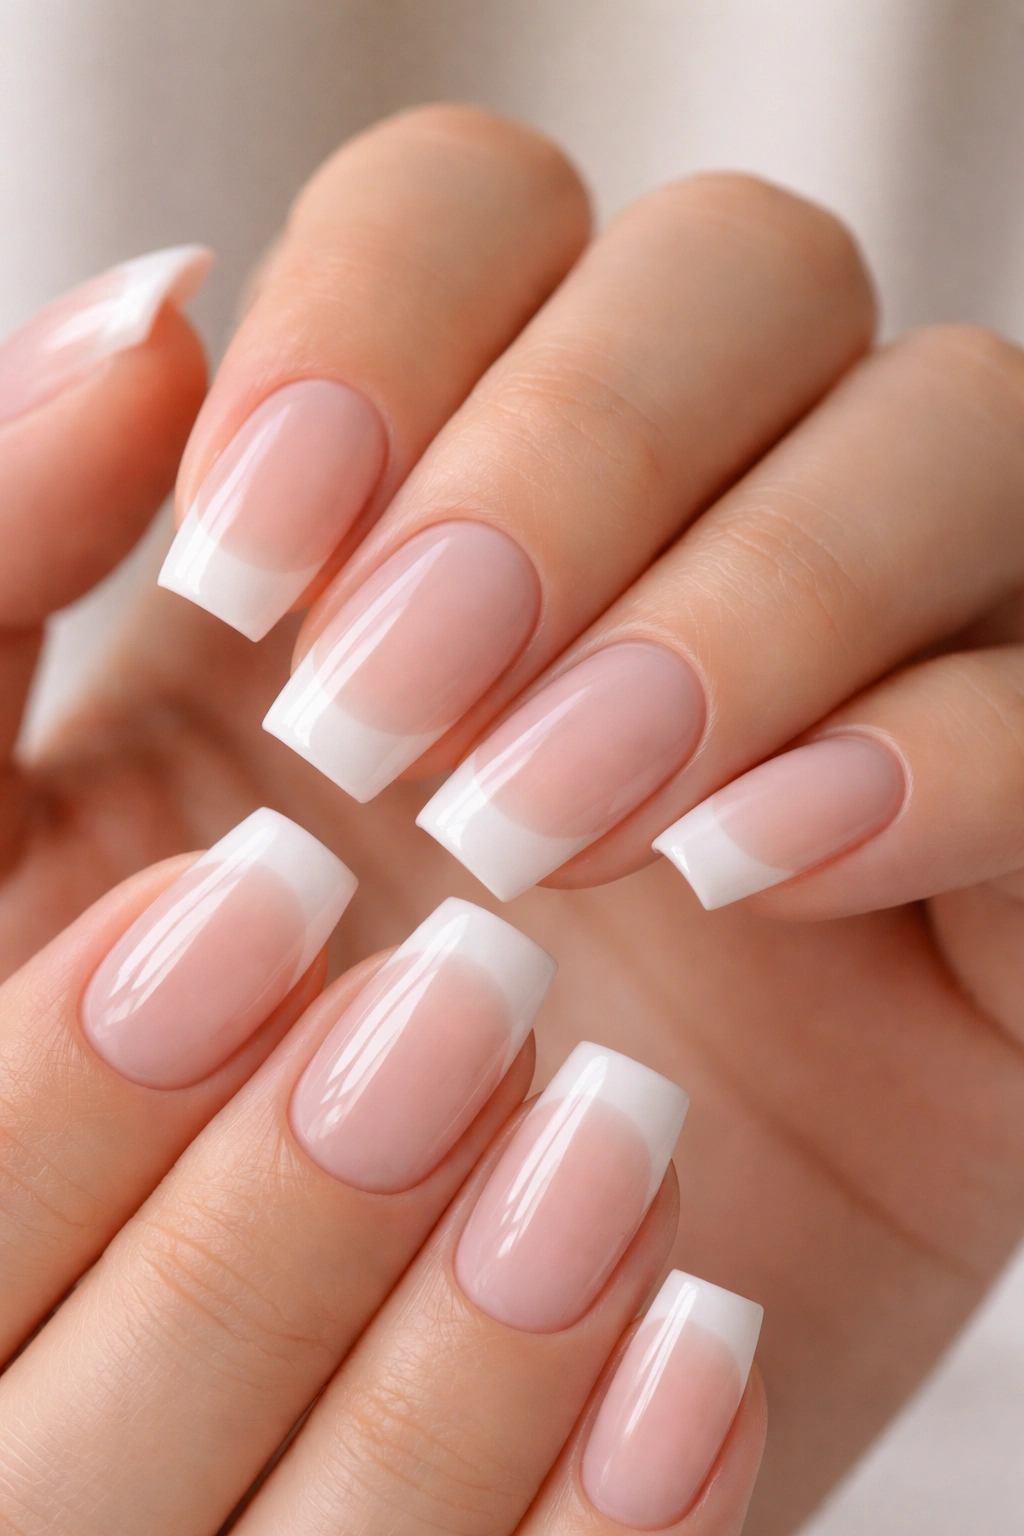
A modern take on the classic French, this design uses translucent white polish (not opaque white) on the tips while keeping the nail bed sheer and barely visible beneath. The effect is ethereal and delicate—your nails look sophisticated and manicured without appearing heavily polished. The soft square shape looks especially refined with this translucent approach because the shape remains visible without being overwhelming.
Why Translucent Works Better Than Opaque
Translucent white tips feel more wearable and less formal than thick, opaque white. The design reads as “naturally well-groomed” rather than “formal event manicure.” Translucent finishes also adapt beautifully to different lighting conditions—they look soft in fluorescent light, romantic in warm lighting, and clean in daylight. Building translucent layers creates depth that opaque coats can’t achieve.
Layering for Translucent Perfection
- Begin with a base coat alone on the entire nail (don’t add color underneath)
- Apply translucent white polish to just the tip area in a concentrated band
- Build the translucent white through 2-3 layers to create visible color without opacity
- Each layer should be thin and allow the nail bed beneath to show through slightly
- Use a makeup sponge to fade the white slightly as it approaches the center of the nail
- Seal with a clear topcoat that enhances the translucent effect
- Your nail bed should always remain visible—this is what makes the design feel soft and approachable
Pro tip: If you apply translucent white and it looks too pink or too peachy, your base coat might have slight color. Try using a completely clear base coat instead, which eliminates any unexpected undertones.
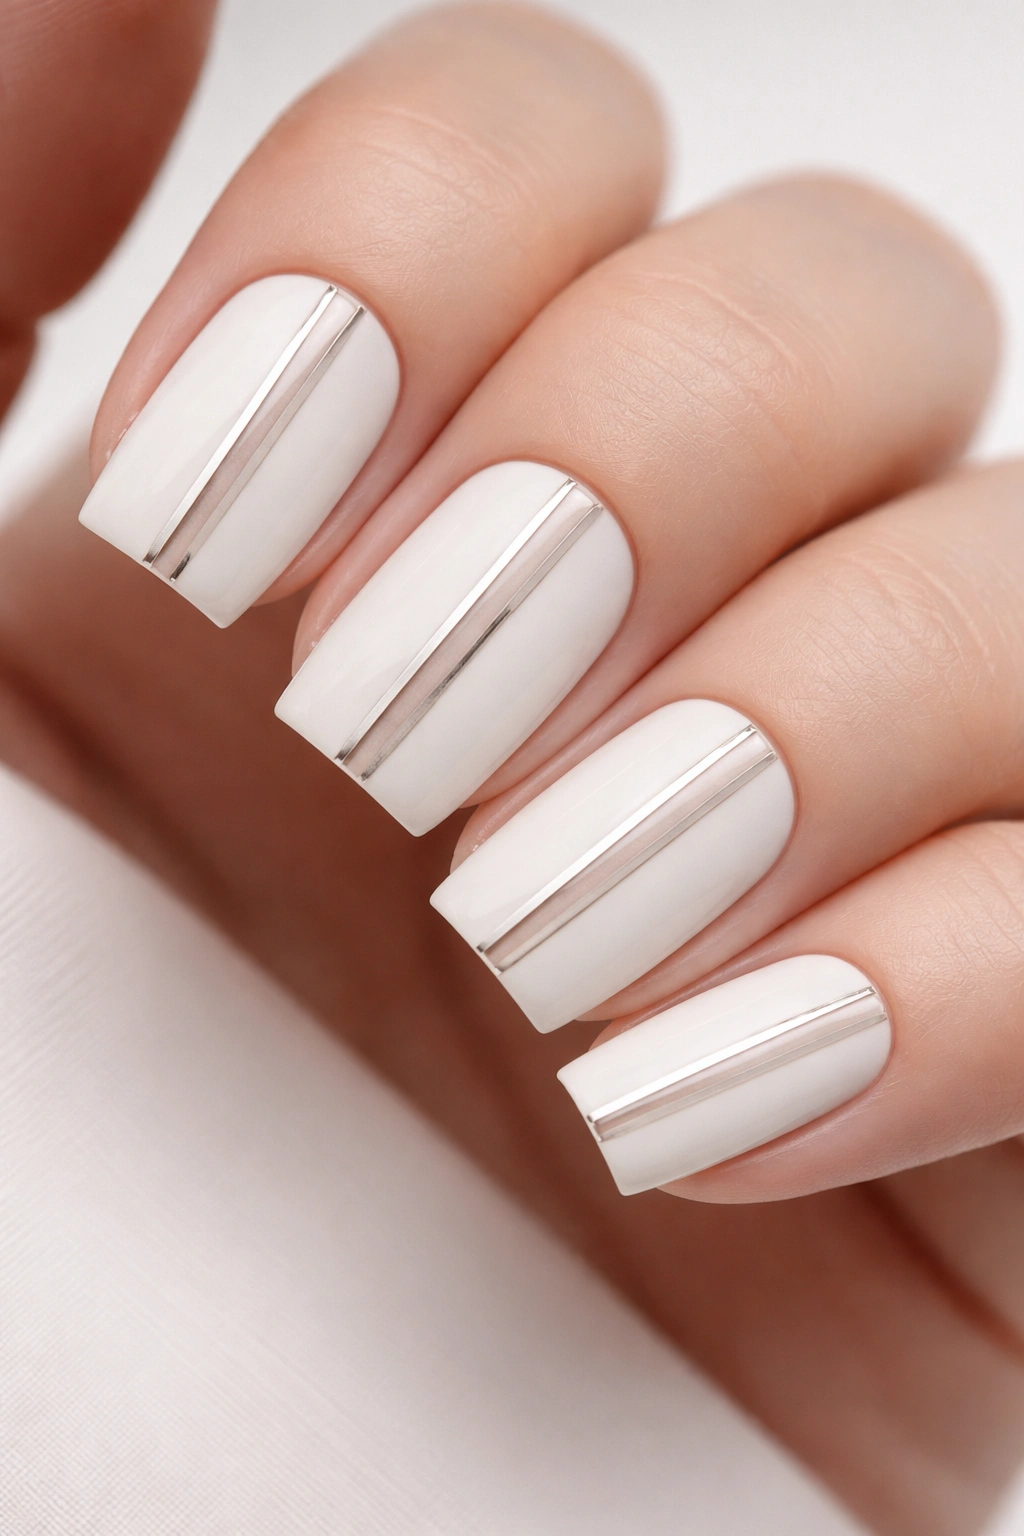
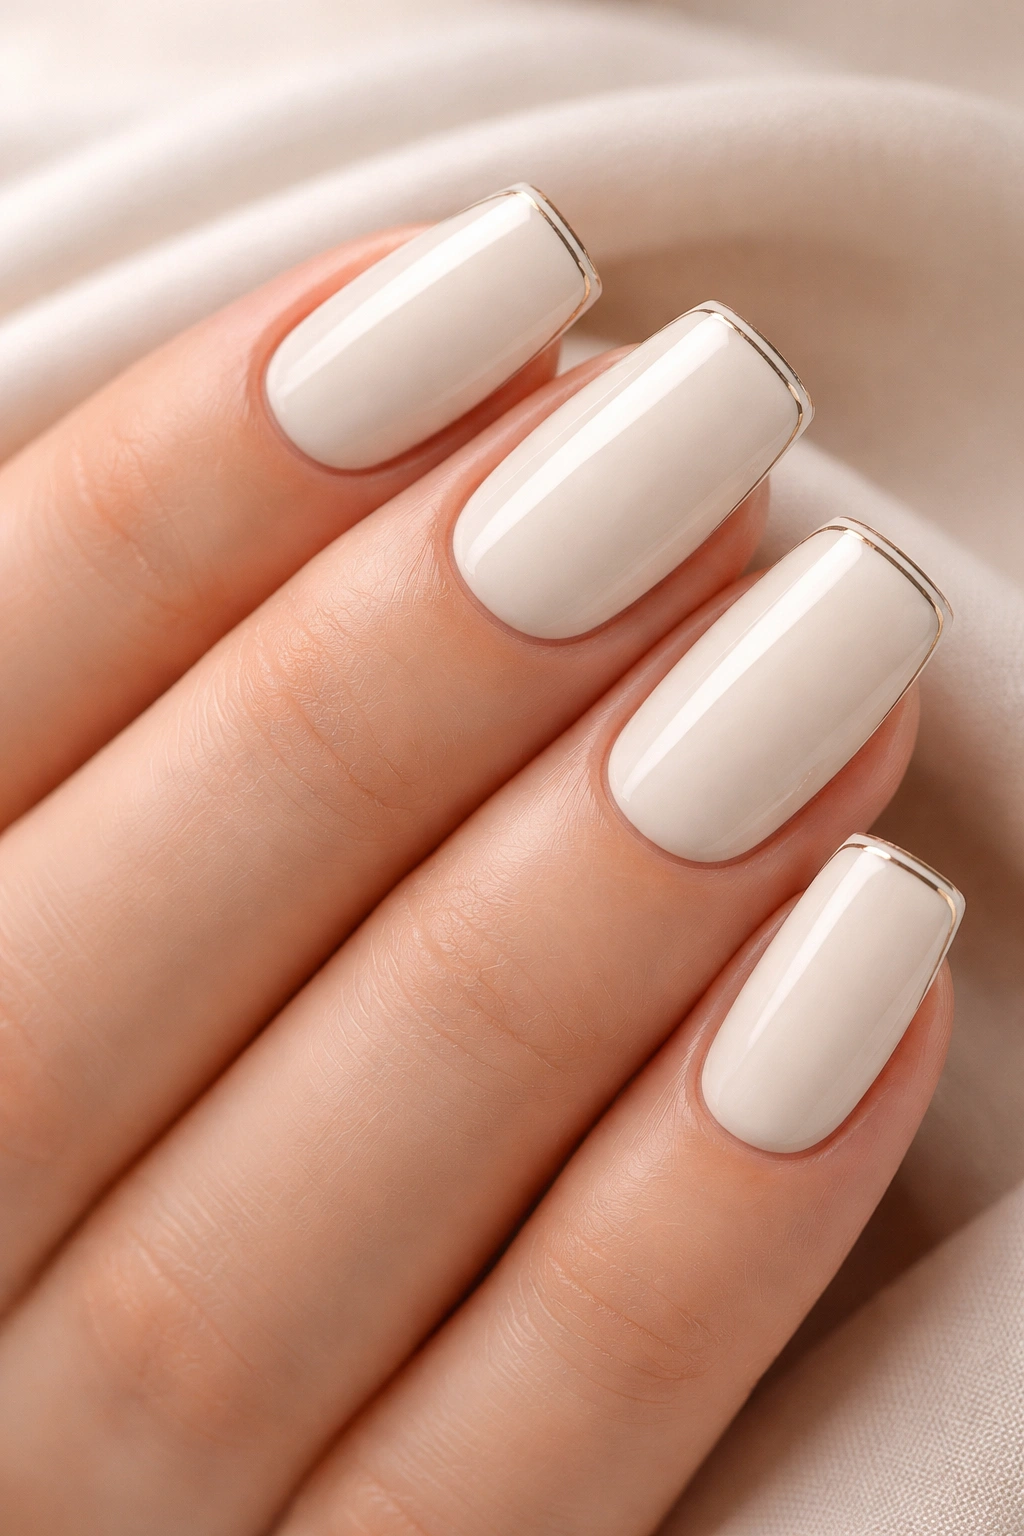
9. Metallic Accent Detail on Nail Bed
A single element of metallic detail—perhaps a thin chrome stripe along the cuticle line, a gold accent dot, or a subtle silver half-moon shape at the base—adds just enough glimmer to make white square nails feel special without compromising the clean aesthetic. The metallic element should be small, intentional, and placed with precision to maximize impact.
The Power of Subtle Metallics
Metallics immediately upgrade any nail design because they catch light and draw attention. A single metallic element is far more sophisticated than full coverage because it demonstrates restraint and intentionality. The soft square shape provides the perfect canvas for a single metallic accent—it’s clean enough that the accent stands out, but structured enough that the accent feels at home rather than floating randomly.
Placement Strategies for Metallic Accents
- Cuticle stripe: A thin line of chrome or gold running horizontally just above the cuticle line, about a quarter-inch thick
- Half-moon base: A subtle metallic half-moon shape at the base of the nail, creating a modern moon manicure variation
- Diagonal accent: A thin diagonal line of metallic running from one corner toward the center, suggesting movement and dimension
- Centered dot or detail: A single small element of metallic placed dead-center on the nail, serving as a focal point
- Edge highlight: A metallic line running just below the white tip, similar to the chrome edge but using gold or rose gold for warmth
Worth knowing: Metallic details require precision tools—a thin striping brush or a nail art pen with a fine tip. If your tool is too thick, the accent becomes a bar rather than a refined detail, which changes the entire effect.
10. Curved Tip White with Rounded Square Shape
A deviation from the standard geometric square, this design softens the corner edges while maintaining the width of a square shape, creating a “rounded square” or “soft square” silhouette. White polish makes the curved edges feel ultra-modern and feminine—the combination of curves and white creates a distinctly contemporary aesthetic that’s different from both pure squares and pure rounds.
The Elegance of Curved Edges
Curved square tips are experiencing renewed popularity because they split the difference between several styles—they’re not as sharp as a true square, not as round as an oval or round, and visually interesting enough to be a design choice in themselves. Curves create a flattering, elongating effect while remaining practical for everyday wear. White emphasizes the curvature because the light follows the edge of the shape.
Filing for Perfect Curved Squares
- File your nails to a square shape first, creating clean corners and edges
- Gently round just the corners of the square using a file at a 45-degree angle, creating smooth curves rather than sharp points
- The bulk of the nail length remains square; only the corners are rounded
- File slowly and test frequently by looking at the nail from the side to ensure symmetrical curves on both corners
- Buff the entire edge smooth so there are no rough spots where curves meet straight edges
- Apply white polish in two thin coats and seal with glossy topcoat to emphasize the curved silhouette
Pro tip: Curved square tips are particularly flattering if you have shorter nail beds or want to make your hands look more delicate. The curves soften the overall look while the square width still provides definition.
11. Glitter Fade Design from Clear to White Sparkle
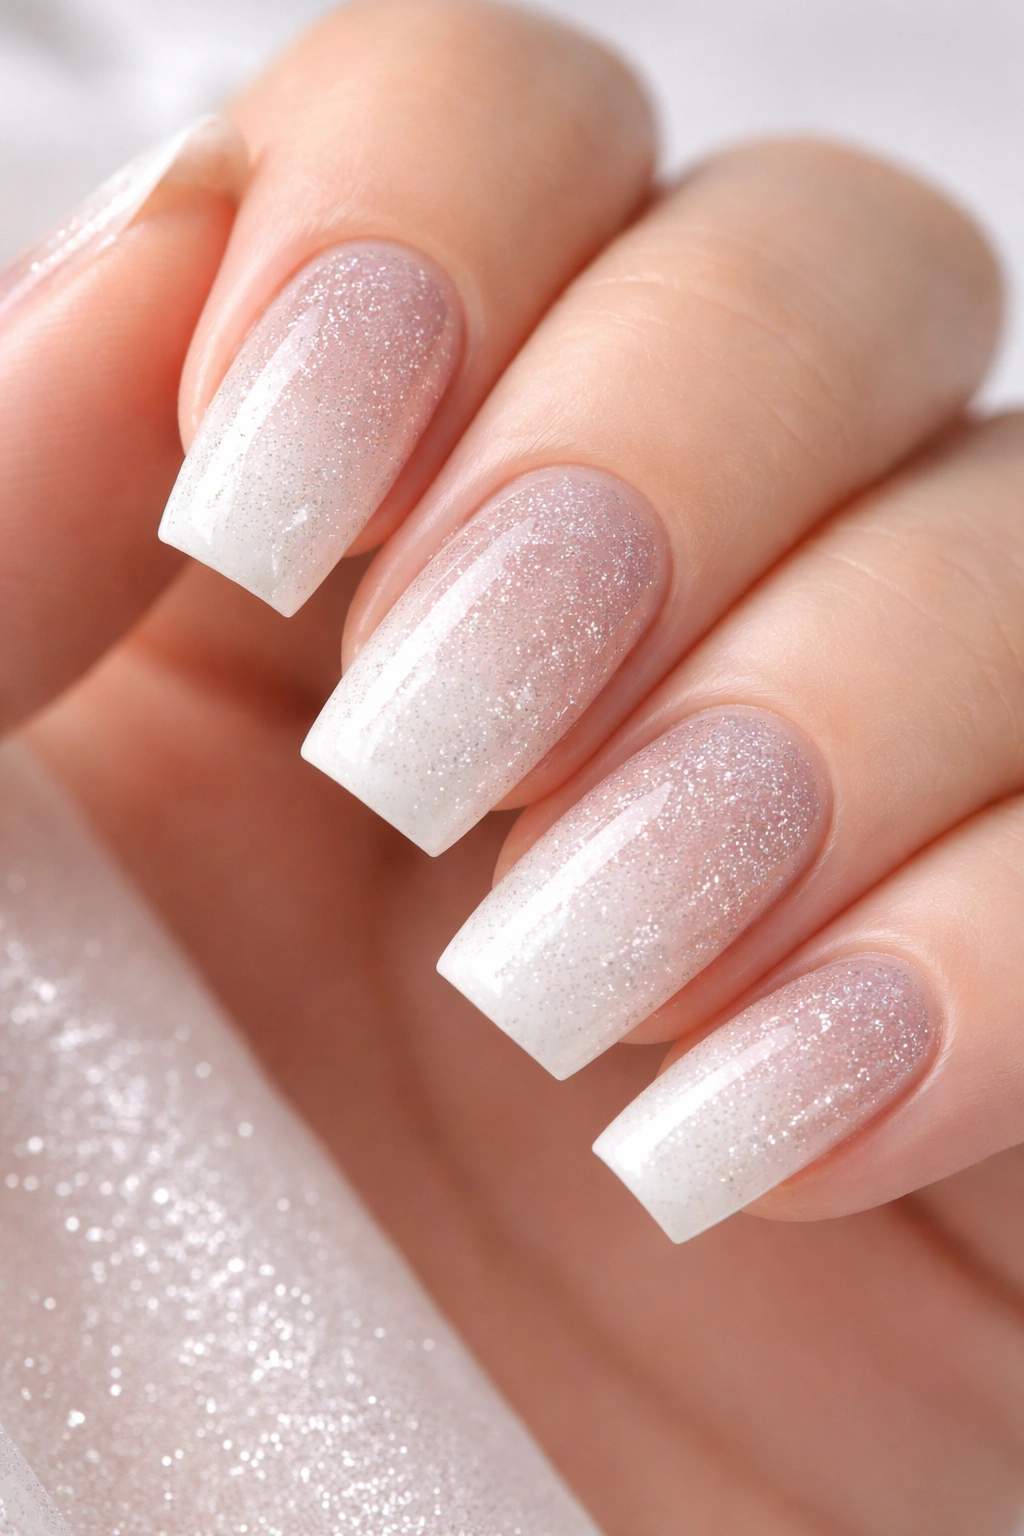
A subtle sparkle effect that starts with clear glitter at the tip and fades to opaque white as it approaches the nail bed, creating depth and dimension while maintaining the clean white aesthetic. The glitter elements are fine and refined—champagne, clear, or silver micro-glitters—not chunky or obviously sparkly. This design walks the line between understated and celebratory.
Building Glitter Gradient Effectively
Glitter fades work because the transition from glitter-heavy to glitter-light creates visual interest without chaos. At the tip, the glitter concentration is highest, catching light and creating sparkle. As you move toward the base, the glitter becomes more sparse until you reach pure white. The effect is almost like sunlight hitting your nails—bright at the edges, softer at the base.
Layering Glitter for the Fade Effect
- Apply white base polish to the entire nail in two coats
- Use a makeup sponge to apply a thin topcoat mixed with glitter to just the tip (you can mix loose glitter into clear topcoat or use a pre-made glitter formula)
- Apply concentrated glitter to approximately the top third of the nail
- Dab a sponge with slightly diluted glitter mixture to the middle third, creating a transition zone
- Apply the bottom third with either pure white or a minimal glitter concentration
- Seal the entire design with a clear topcoat that holds all the glitter in place
- The gradient should be smooth, with clear visibility of the white beneath
Worth knowing: Loose glitter can be unpredictable in topcoat—some pieces settle to the bottom, others float randomly. Pre-made glitter polishes are more reliable, or you can use clear topcoat and hand-place individual glitter pieces with a thin brush for maximum control.
12. Cream White with Fine Lining Details
Off-white or cream polish instead of pure bright white, paired with extremely fine lining details in a complementary color—perhaps pale gray, soft taupe, or nude. The cream base is warmer and slightly less stark than pure white, while the fine lines add visual interest and precision. This design feels upscale and thoughtfully composed.
Why Cream Reads as More Sophisticated
Pure bright white can feel clinical or sterile in certain lighting, whereas cream white maintains the clean aesthetic while feeling warmer and more approachable. Cream is especially flattering on cooler skin tones because it doesn’t create harsh contrast the way pure white sometimes does. Cream white also reads as slightly luxe—it’s the nail color equivalent of cream-colored linens rather than bright white ones.
Adding Fine Lines to Cream Base
- Choose a cream or off-white base polish and apply two coats
- Decide on your lining detail: a single thin line at the nail edge, fine lines bracketing the sides, a delicate outline just below the tip, or minimal geometric striping
- Use a thin striping brush or nail art pen in a complementary color (gray, taupe, beige, or soft pink all work beautifully with cream)
- Create your lines in one confident stroke per side or section—multiple passes appear clumsy
- Keep lines very thin and precise; they should look like they were drawn with a mechanical pencil rather than a thick marker
- Seal with topcoat that complements your base (glossy or matte depending on your preference)
Pro tip: Practice your line on a piece of paper or a nail wheel first. Fine lining requires confidence—shaky or wavering lines undermine the sophisticated effect you’re going for.
13. Soft Silk Finish White
A special topcoat creates a soft, silk-like texture that sits between matte and glossy—it catches light subtly but doesn’t shine bright, and it has a velvety-smooth texture that’s absolutely luxe to the touch. This finish is relatively new and increasingly available through specialty nail brands. The texture elevates white from simple to genuinely special.
The Luxury of Silk Texture
Silk finishes feel expensive and high-end because they look professionally applied and finished. The texture is smooth to the touch, which provides sensory feedback that glossy nails can’t offer. The finish reflects light just enough to appear intentional without appearing high-shine—it’s the Goldilocks of nail finishes. White with a silk finish looks like a high-end salon manicure that cost far more than it actually did.
Achieving the Silk Finish
- Apply white base polish (glossy or matte, depending on your starting preference) in two coats
- Once completely dry, apply a silk-finish topcoat according to the brand’s instructions (some require being under a UV lamp, others air-dry)
- Build the silk effect through 1-2 topcoat layers—one layer may appear too subtle
- Avoid adding regular glossy topcoat over silk finish topcoat; this will destroy the texture and create an unintended sheen
- If your silk finish begins to wear away from daily use, you can reapply just a fresh layer of silk topcoat rather than redoing the entire manicure
- The finished texture should feel smooth and velvety, not rough or bumpy
Worth knowing: Silk topcoats are sometimes called “velvet finish,” “suede finish,” or “satin finish” depending on the brand. They’re all creating similar texture effects, though the exact feel can vary slightly. Order based on reviews if you’re trying a new brand.
14. White with Negative Space Accent Strip
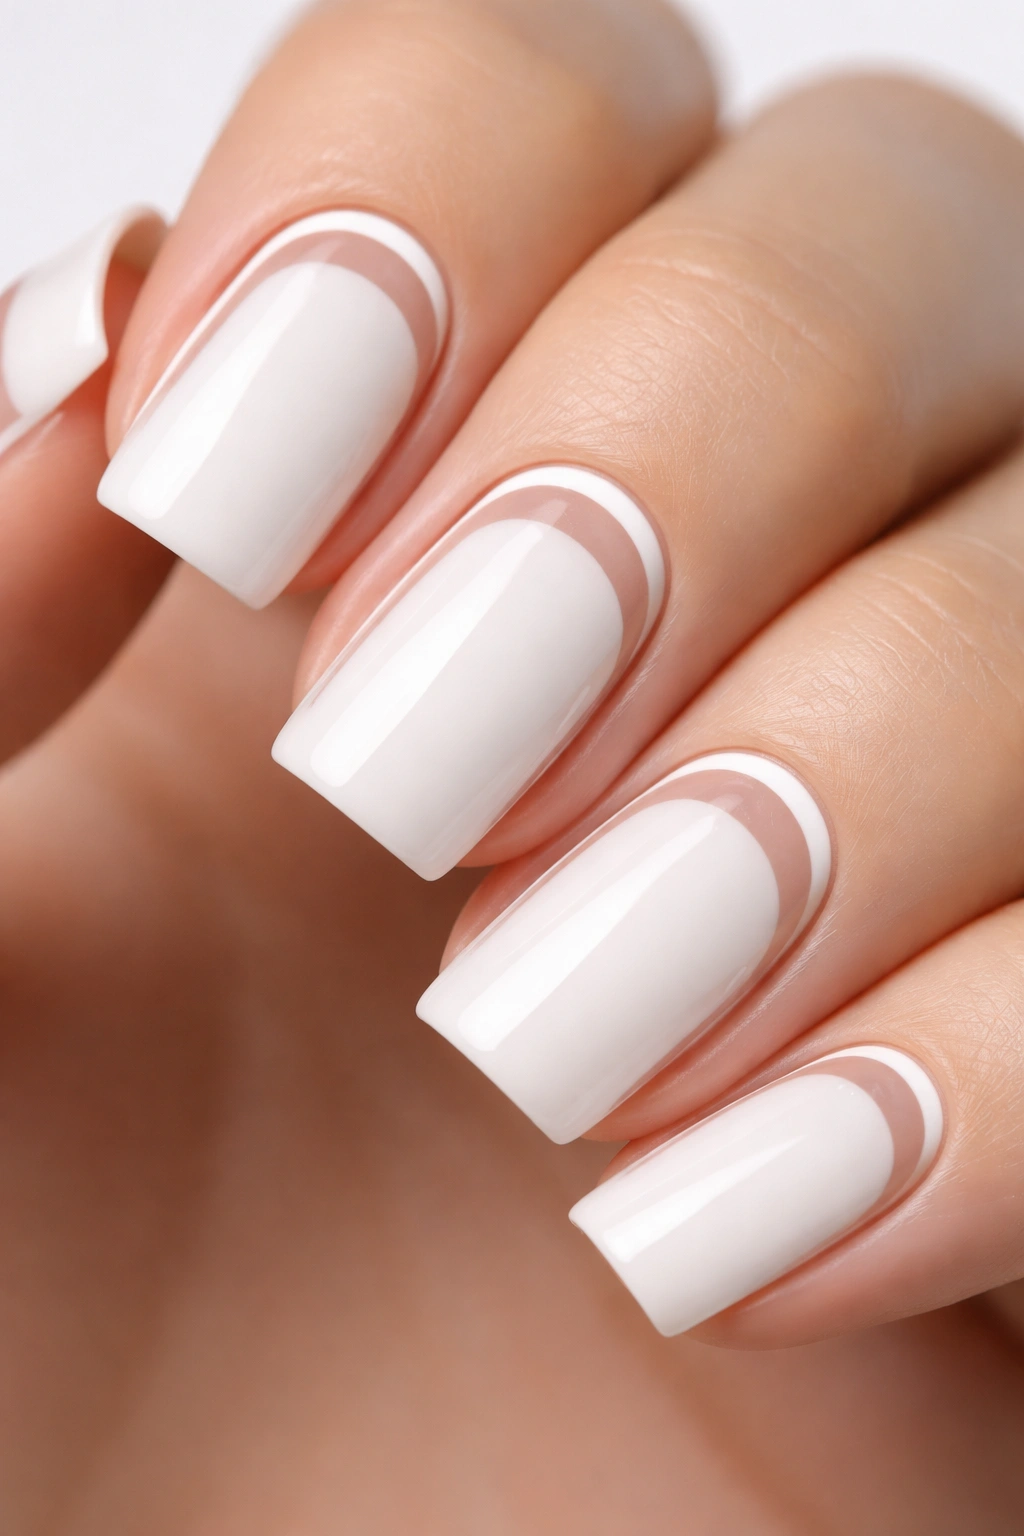
A clean white base with a defined strip of negative space (exposed nail bed) running down one side or through the center, creating a stark graphic element. The negative space could be curved, straight, diagonal, or asymmetrical—the negative space is the design, and white serves as the frame around it. This is high-concept minimalism that makes a clear design statement.
The Strength of Negative Space Design
Negative space designs read as intentional and artistic in a way that solid colors sometimes can’t achieve. The exposed nail bed creates contrast against the white, making the design pop. This approach also feels less “manicure” and more “hand art”—it’s distinctive enough that people notice and remember it. The soft square shape provides enough surface area for the negative space to be visually interesting without appearing awkward.
Creating Clean Negative Space
- Paint your nails white and allow complete drying
- Decide on your negative space shape: a vertical stripe down the center, a curved swoosh, an asymmetrical section, or a geometric block
- Mark the area with a pencil or tape to ensure clean, even edges
- Carefully remove the white polish from your marked area using a thin brush and polish remover, or gently scrape the dried polish away with a cuticle pusher
- Smooth any rough edges along the exposed nail bed
- Seal the entire design with clear topcoat to protect the nail bed and prevent snagging
Pro tip: You can also create this design by applying clear topcoat to the base, using tape to mask off your negative space area, and painting white everywhere except the masked area. Remove the tape while the polish is still slightly wet for the cleanest edges.
15. Gradient White to Nude Reverse Fade
The opposite of the classic nude-to-white ombre, this design features white at the base of the nail and fades to soft nude or beige at the tips. The gradient runs in the opposite direction from what most people expect, which makes it feel fresh and unexpected. The effect is still soft and natural-looking—almost like your nails have been kissed by sunlight—but the direction flips the entire dynamic.
Why Reverse Gradient Feels Modern
Reversing the expected gradient creates visual interest and novelty without being complicated or over-the-top. The design still maintains that clean, sophisticated aesthetic while feeling distinctive. The reverse gradient actually makes nails appear even longer because the darker nude at the tips creates visual weight that the eye naturally reaches toward. This design pairs beautifully with minimalist jewelry and modern fashion.
Creating the Reverse Fade
- Apply a white base coat on the entire nail
- Use a makeup sponge to apply nude or soft beige polish to just the tip area
- Blend the nude into the white by dabbing a sponge along the transition line, moving the nude slightly toward the center and softening the white upward
- Build the gradient over 2-3 applications—it should be soft and blurred, not a harsh line
- The base of your nail should remain white; the tip should transition to clearly visible nude, with a soft transition zone in the middle
- Seal with glossy or matte topcoat depending on your finish preference
- The final effect should look like the nude is floating over the white base, not like two separate colors simply placed side by side
Worth knowing: This design can be tricky because if your transition is too harsh, it reads as a line rather than a gradient. If it’s too blurred, it becomes muddy and loses definition. Practice on your non-dominant hand first to get the sponging technique right before doing your dominant hand.
Final Thoughts
White soft square nails deliver that rare combination of sophistication and simplicity that makes them endlessly wearable and genuinely beautiful. Whether you’re drawn to minimalist designs that let the shape and finish speak for themselves, or you prefer adding subtle details that elevate the look into something more intentional, there’s a white soft square design that matches your aesthetic perfectly.
The best part about this nail category is that the foundation is so strong—the white color and soft square shape are already doing most of the heavy lifting—that you can experiment freely with finishes, details, and accents without the design ever feeling chaotic or overdone. Start with whichever design speaks to you most, and don’t hesitate to try variations once you’ve mastered the basics.
Remember that the most elegant nail designs aren’t necessarily the most complicated ones. Sometimes a perfectly applied white square with nothing but a glossy topcoat outshines an intricate design simply because the execution is flawless and intentional. Invest in quality polish, take your time with application, and trust that the simplicity itself is the statement you’re making.
