

Orange nails are having their moment, and honestly, it’s impossible to ignore. Whether you’re drawn to vibrant tangerines that practically glow against your skin or prefer warm, earthy terracottas that whisper sophistication, orange offers a color palette that’s endlessly adaptable. This isn’t just a seasonal choice—it’s a mood, a statement, and a confidence boost all rolled into one warm, inviting shade. The beauty of orange nails is that they work with virtually every skin tone, every personal style, and every occasion. From boardroom meetings to beach vacations, bold celebrations to quiet elegance, there’s an orange nail idea that fits perfectly into your life.
What makes orange so special is the sheer range of expression it allows. This color carries warmth, creativity, and playful energy without the intensity of red or the sweetness of pink. It sits in this sweet spot where it feels both contemporary and timeless, trendy yet deeply wearable. The versatility extends beyond just the shade itself—you can wear orange as a solo statement, pair it with complementary colors, add metallic accents, incorporate intricate nail art, or keep things minimalist and refined. No matter your preference, orange adapts to meet you there.
1. Classic Glossy Orange Nails
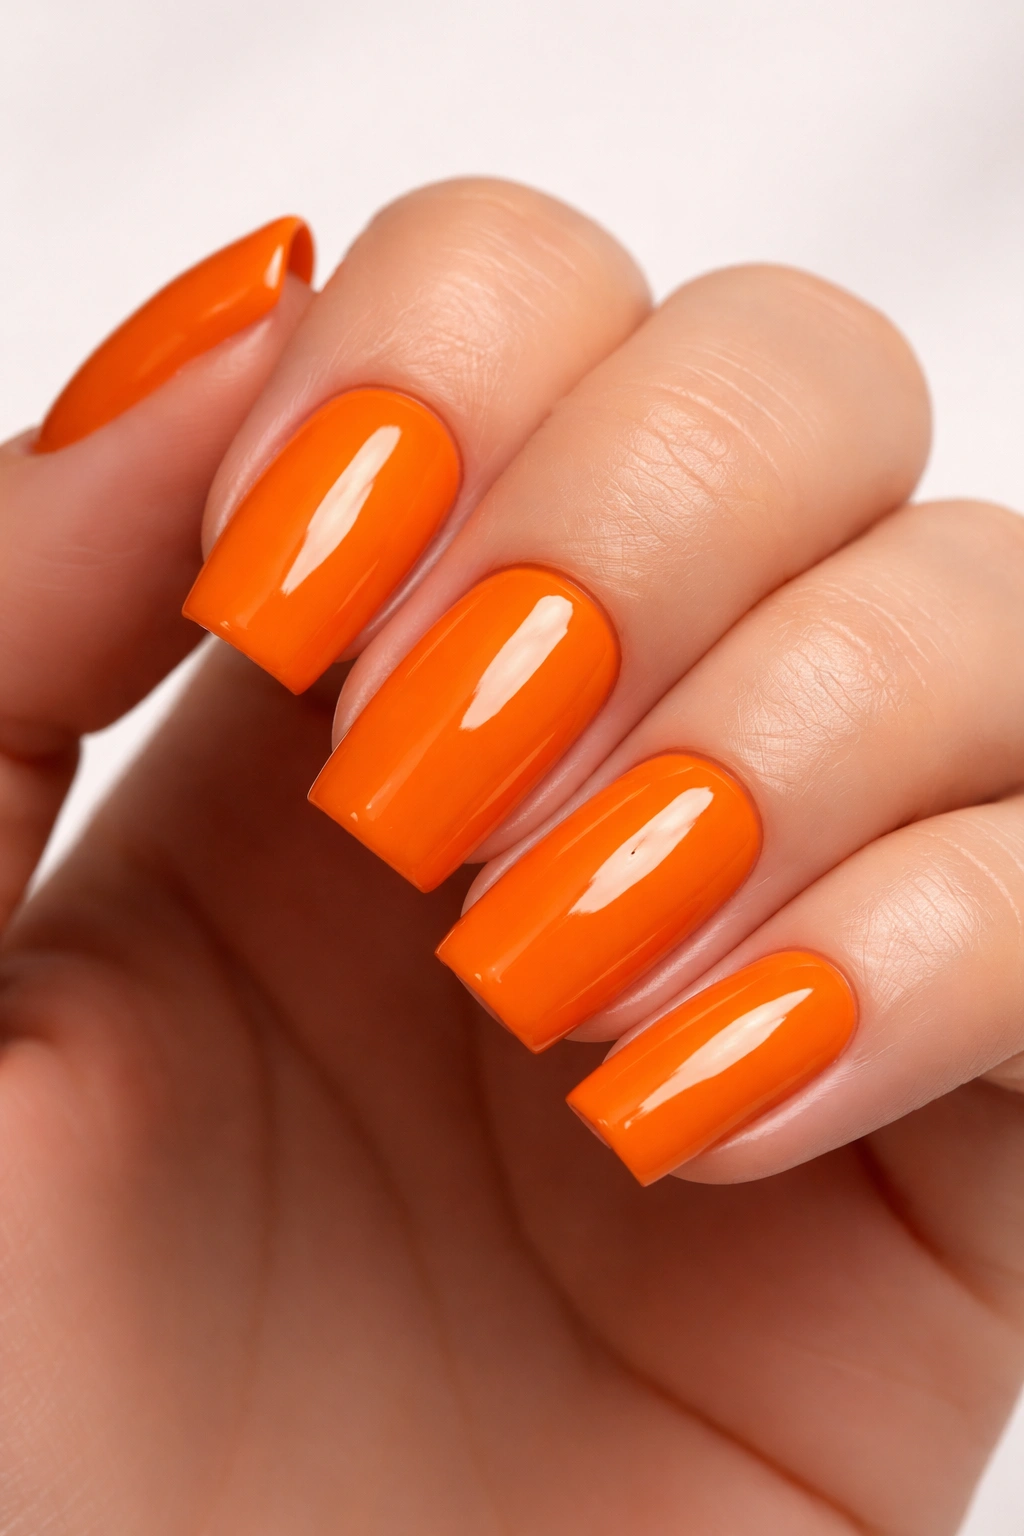
Sometimes the most powerful statement comes from simplicity. A high-shine, solid orange manicure is like that perfectly tailored blazer in your closet—it never goes out of style because it fundamentally works. There’s something undeniably chic about trusting a single color to carry the entire look, especially when that color is as warm and inviting as orange.
Why This Timeless Look Never Fails
A solid orange manicure relies on the inherent warmth and luminosity of the color itself. The key is choosing the right shade for your undertones—warm golden oranges complement most complexions beautifully, while coral-leaning oranges offer additional versatility. The simplicity of a glossy finish means the color becomes the star, and there’s nowhere for the polish to hide, which is exactly why quality matters. Two perfectly applied coats with a professional-grade top coat create depth and shine that catches the light every time you move your hands.
What You Need to Know
- Requires a quality base coat to prevent staining on lighter skin tones
- Best applied with thin, even coats rather than one thick coat for longevity
- The shine intensifies the warmth of the orange, making it appear more vibrant
- Works as both a professional manicure for work settings and a bold statement for weekend wear
- Lasts beautifully for two to three weeks with minimal chipping when applied correctly
Pro tip: Apply your orange polish in thin layers and allow each coat to dry completely. This creates a smoother finish with better adhesion than rushing through thick coats.
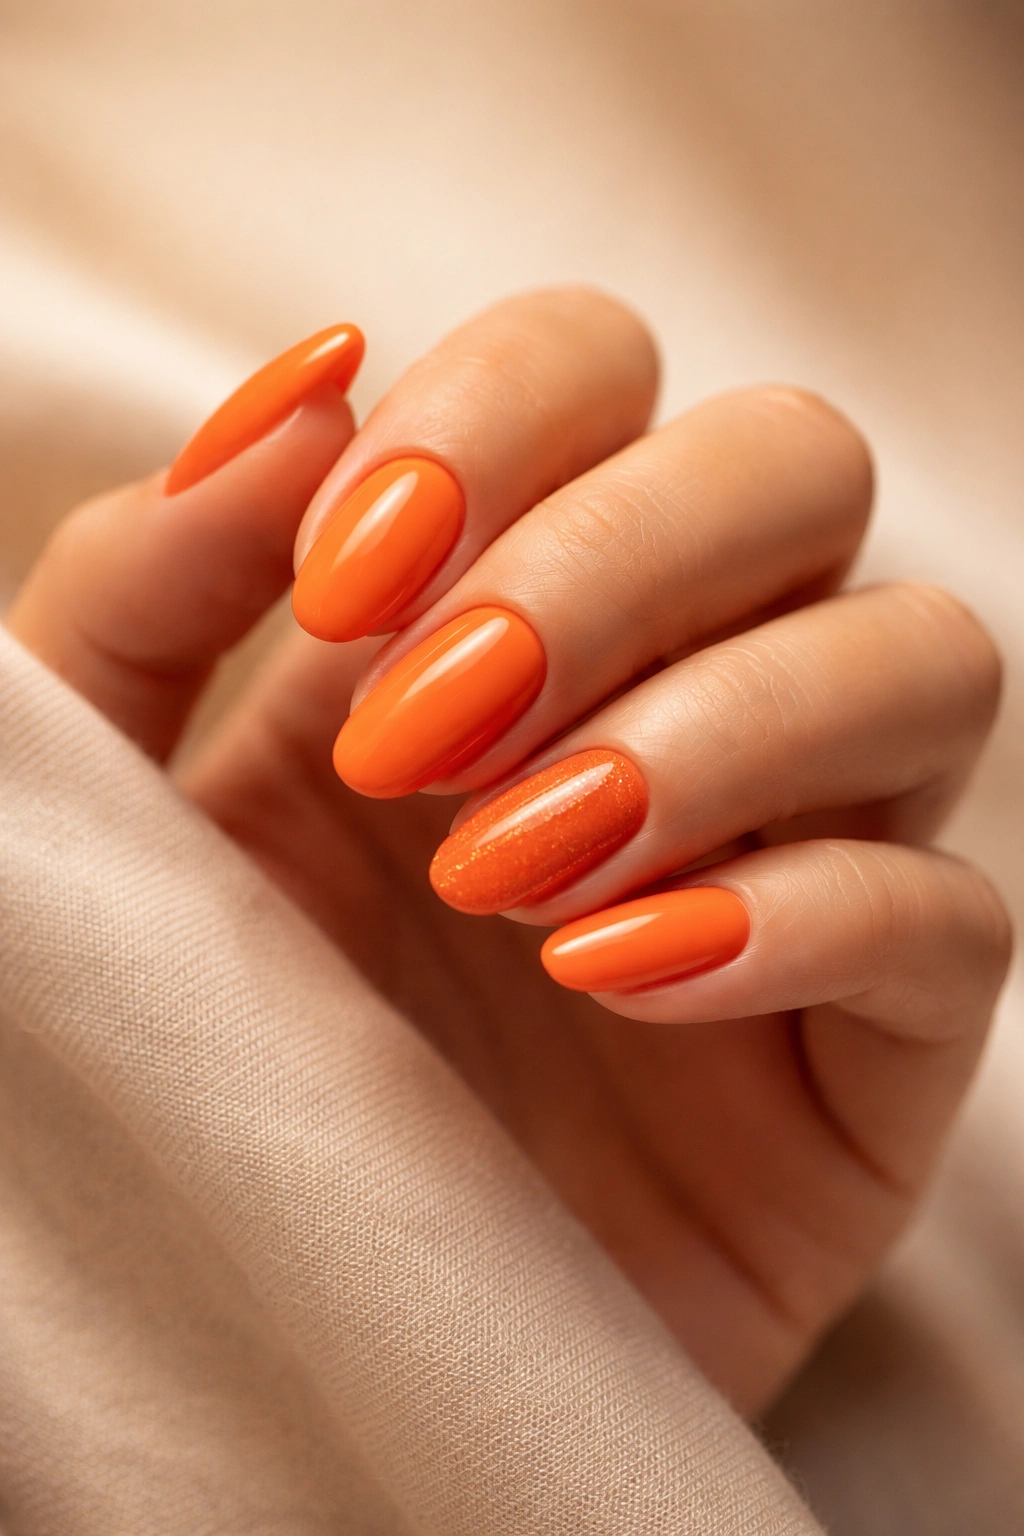
2. Neon Orange Pop
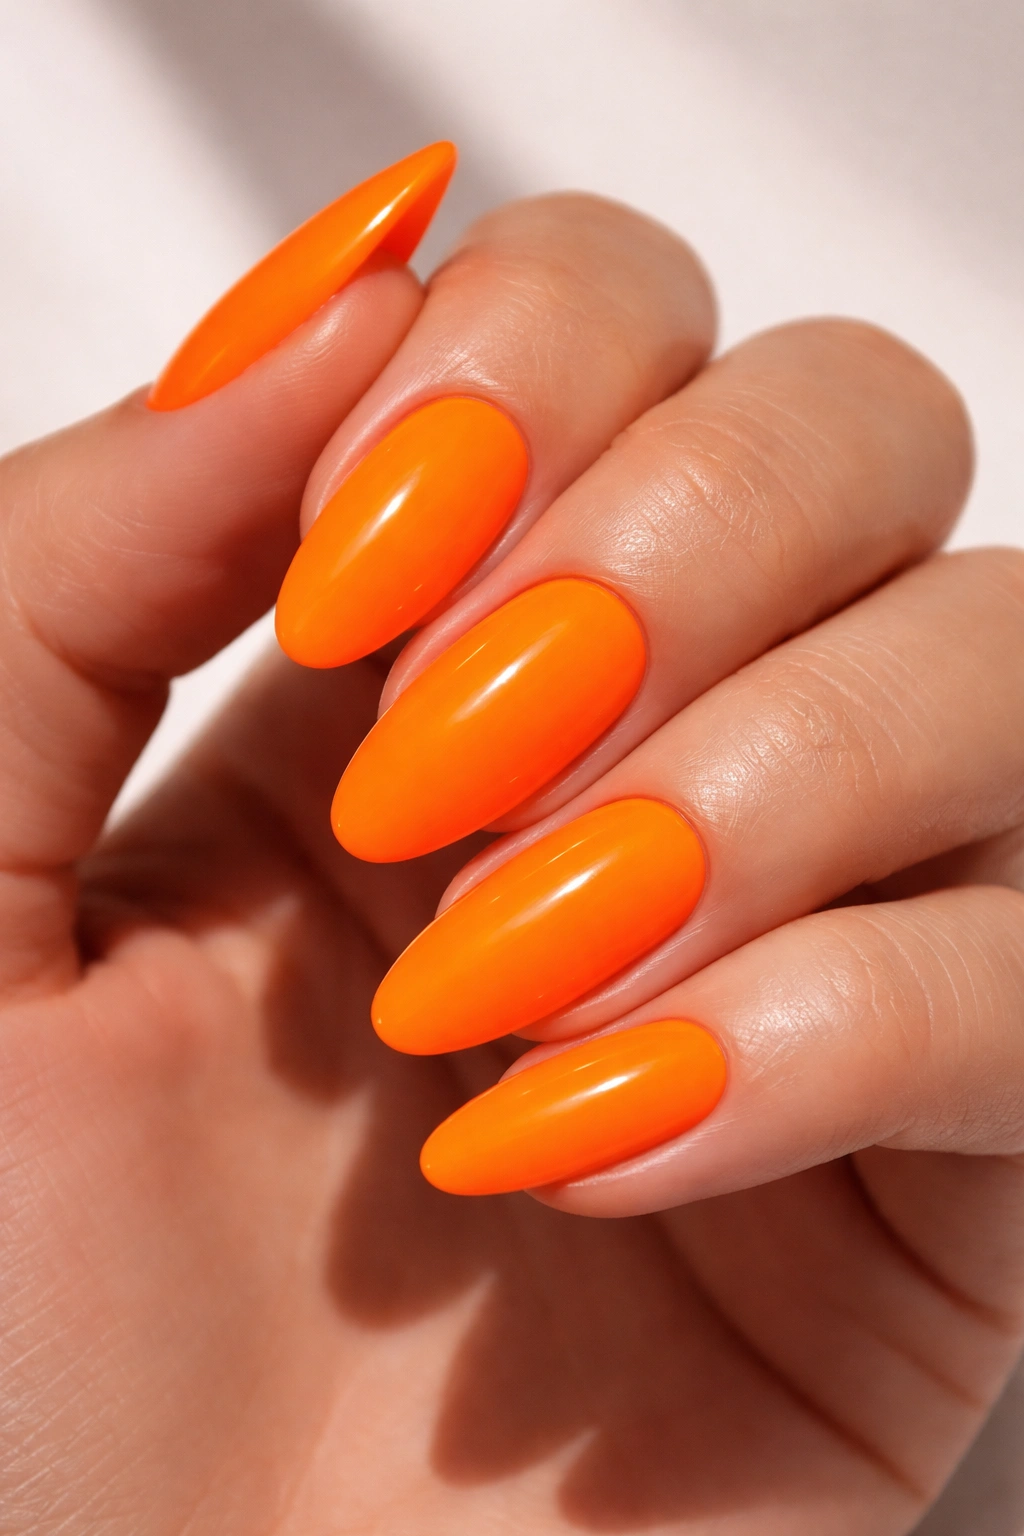
For those ready to make an unmistakable entrance, neon orange delivers pure, unapologetic energy. This isn’t a shade for the faint of heart—it’s a declaration, a conversation starter, and an instant mood lifter all at once. Neon orange practically glows with its own light source, creating an electric intensity that stops traffic.
The Appeal of Electric Intensity
Neon shades exist in a category all their own because they defy the normal rules of color theory. The brightness comes from a specific pigmentation that’s engineered to stand out in any lighting condition, whether you’re indoors under fluorescent lights or basking in natural sunlight. Neon orange works particularly well on warmer skin tones where it creates a striking contrast, though it’s honestly stunning on every complexion when you own it with confidence. The flatness of neon (many neon polishes have a creme finish rather than a shine) gives it a graphic, almost street-art quality that feels undeniably modern.
Everything About Electric Orange
- Perfect for summer festivals, night events, or any occasion where bold is better
- Pairs best with minimal outfits in neutral colors so the nails can be the focal point
- The brightness means any nail shape works—short nails look graphic, long nails look editorial
- Creates amazing photos and stands out on video calls
- Looks incredible with minimal nail art, like a single gold stripe or geometric accent
Worth knowing: Neon orange shows fingerprints and dust more readily than other shades, so keep a chamois cloth handy for quick touch-ups between washes.
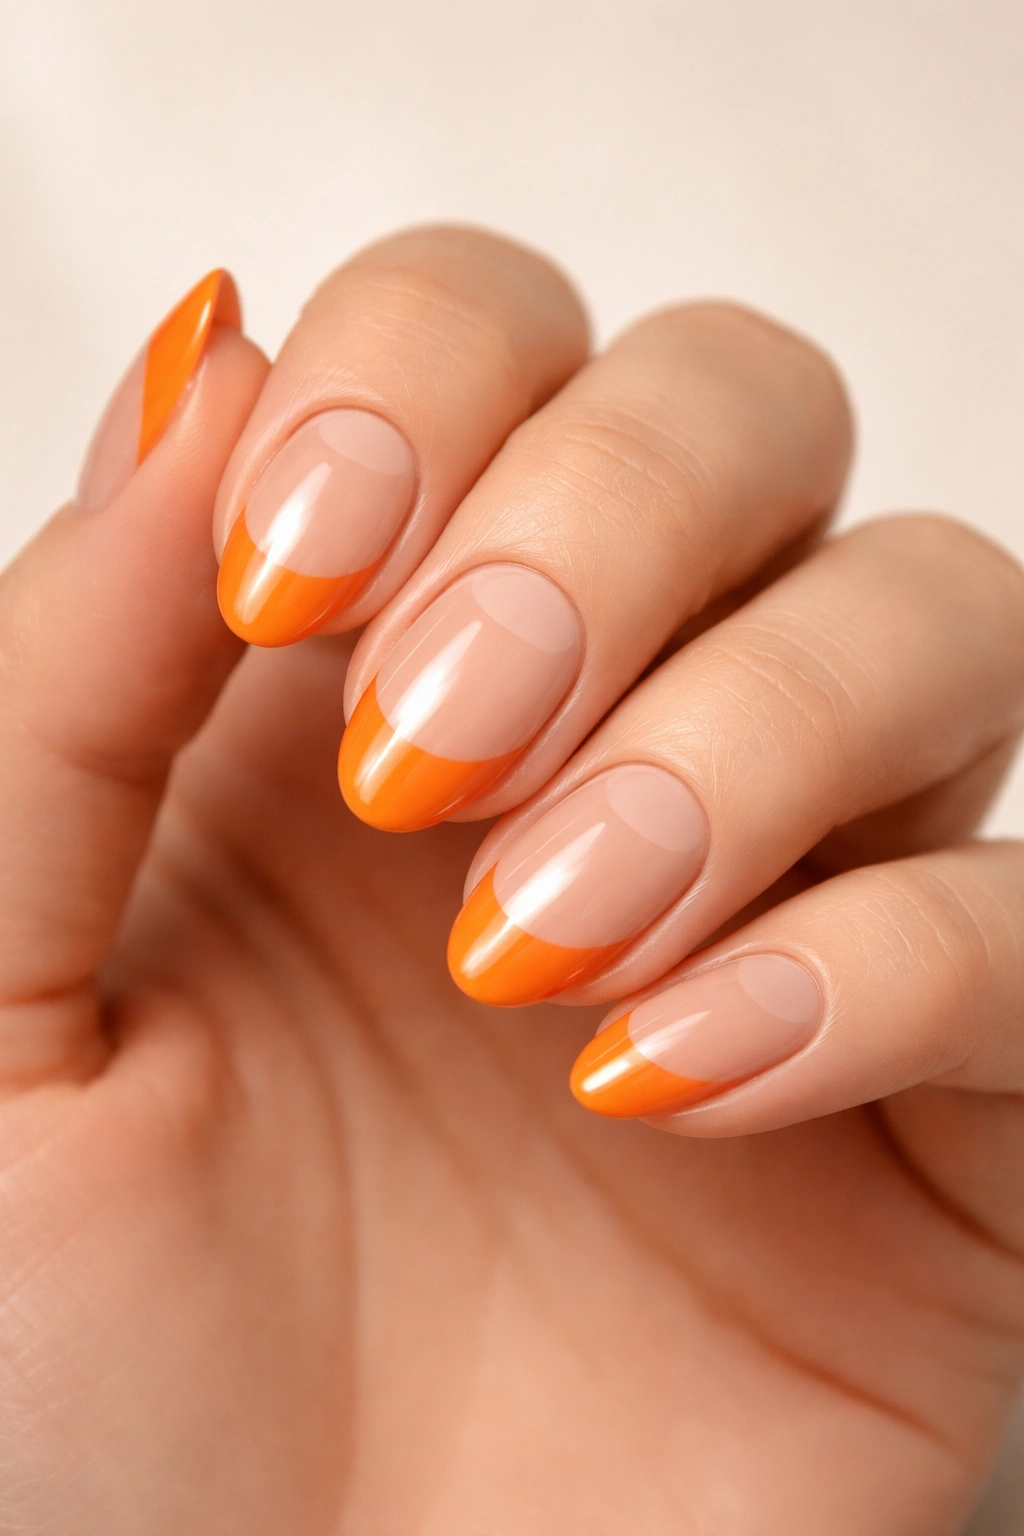
3. Orange French Tips
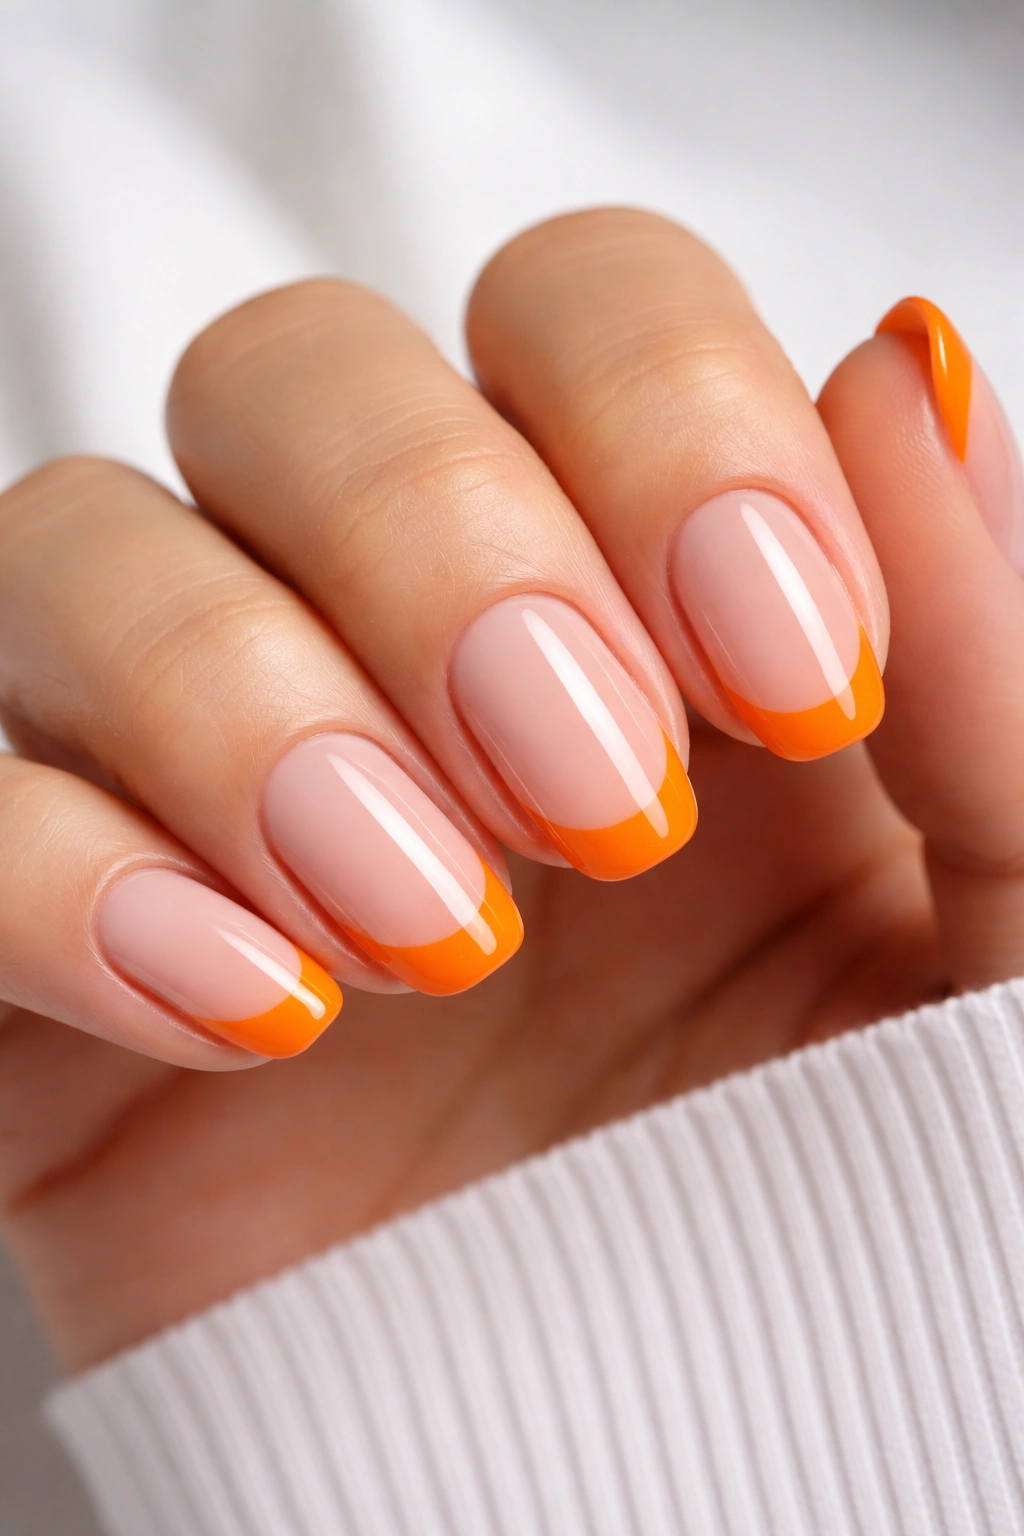
The French manicure is sacred for a reason—it’s elegant, clean, and universally flattering. But traditional white tips can feel predictable, which is exactly why swapping in a bold orange completely reinvents the look. This modern twist keeps the refined geometry of French nails while injecting playfulness and personality.
Why Orange French Tips Hit Different
The contrast between a neutral or clear base and a vivid orange tip creates visual interest that a traditional French manicure might lack. The orange draws attention to the tips of your fingers, subtly elongating the nail and highlighting the shape in the most flattering way. Whether you choose a thin, delicate line or a bolder, more statement-making tip width, the French formula remains forgiving and wearable. You can go subtle with a pale peach on the tips for a softer look, or dramatic with a true tangerine for something showstopping.
Key Elements of This Design
- Thin tips appear elegant and office-appropriate; thicker tips feel more fashion-forward
- Works beautifully on short nails for a clean, professional appearance
- Longer nails allow the orange tip to make an even bolder statement
- Pairs perfectly with minimalist jewelry so the nails remain the statement
- The nude or clear base keeps the look feeling sophisticated and balanced
Insider note: Use a thin striping brush or nail tape to keep the orange line crisp and clean. The precision of the line is what makes this design feel intentional rather than accidental.
4. Abstract Orange Swirls
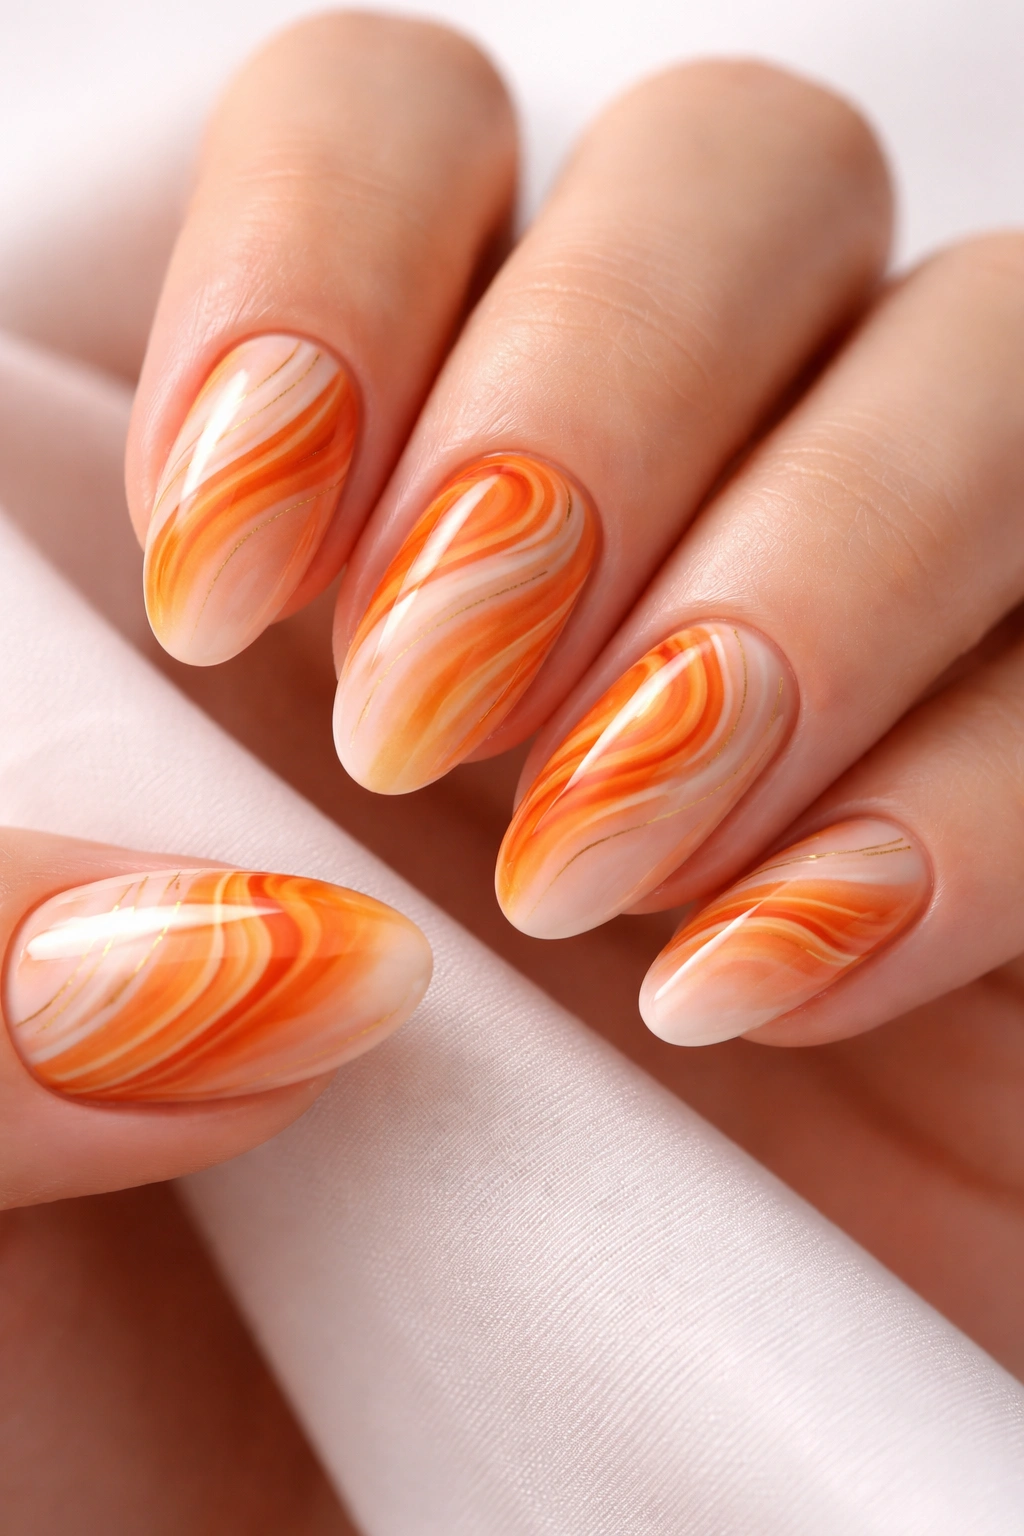
When you’re ready to embrace artistic freedom, abstract swirls invite endless creativity. These designs celebrate the beauty of imperfection, where organic curves and unexpected color interactions create something utterly unique. Every swirl is different, which means your manicure becomes a one-of-a-kind wearable art piece.
The Artistry Behind Organic Designs
Abstract swirls work because they combine orange’s warmth with the visual dynamism of movement. The beauty is that you don’t need to be a skilled artist—in fact, imprecision is part of the charm. Pairing orange swirls with contrasting bases like white, nude, or pale pink creates layered visual interest that draws the eye. The flowing quality of swirls feels contemporary and allows the color to move across the nail in unexpected ways, creating depth and dimension.
Making Swirls Work for You
- Use a thin brush or toothpick to create flowing lines across the nail
- Combining multiple orange tones (coral, tangerine, burnt orange) adds richness
- Swirls on a white or nude background maximize contrast and readability
- The organic quality means they’re forgiving—no two swirls need to match
- Works on any nail length and shape, though almond and oval nails showcase curves beautifully
Pro tip: Practice on paper first to loosen up your hand and get comfortable with the flowing motion. Once you’re ready, work quickly while the base coat is still slightly tacky—this helps the swirls blend slightly rather than sitting flat on top.
5. Orange and Pink Duo
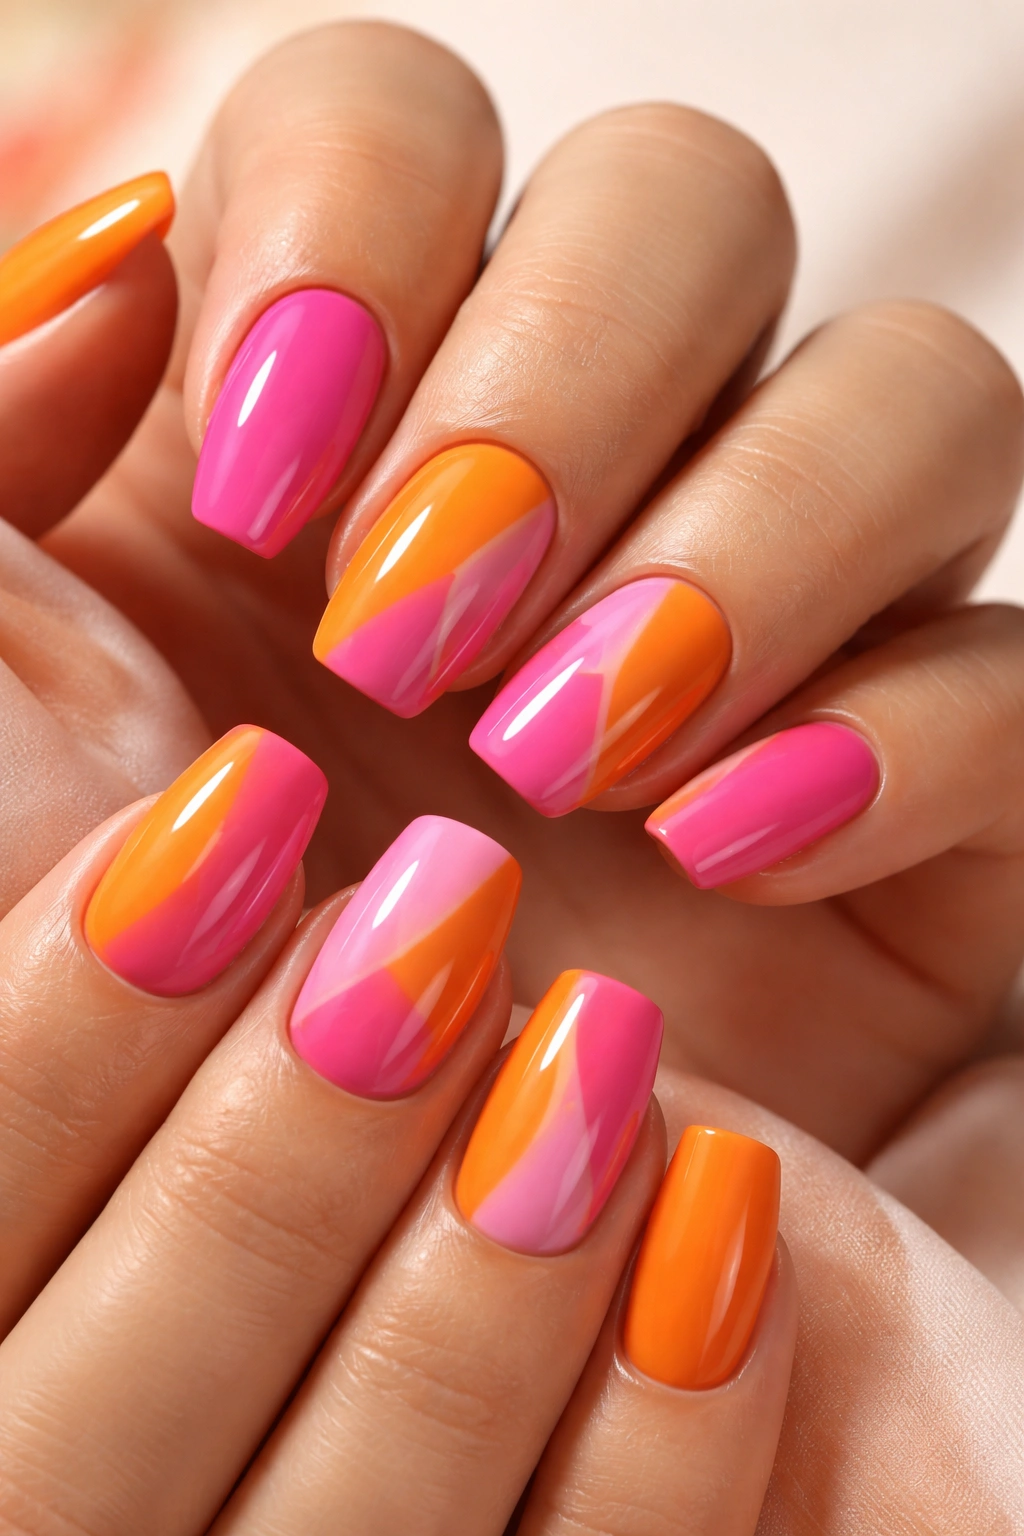
When two complementary warm shades come together, pure joy happens. Orange and pink are neighbors on the color wheel, which means they speak the same visual language while creating a vibrant, youthful combination that feels both cohesive and exciting. This pairing is the definition of fun without being childish.
Why Warm Tones Belong Together
Orange and pink represent the best of warm color territory—both energizing yet approachable, both bold yet fundamentally wearable. The two shades naturally complement each other because they share similar undertones and saturation levels, which creates visual harmony. You can alternate the colors nail by nail for a playful rhythm, use them in geometric patterns, create gradients that blend from one to the other, or add accents of one shade to a base of the other. The versatility of this pairing means you can dress it up or down depending on your mood.
Design Approaches for This Combination
- Alternating pattern: one nail orange, one nail pink, repeating across all fingers
- Gradient or ombré effect: blend from peachy pink to coral orange to tangerine
- Geometric blocks: sharp sections of orange and pink creating a modern look
- Accent nails: three fingers one color, two fingers the other, creating balance
- Watercolor effect: soften the boundary between the two shades for a dreamy vibe
Worth knowing: This combination absolutely pops in photos and videos, making it perfect if you love posting your manicures on social media.
6. Peachy Nude Gradient
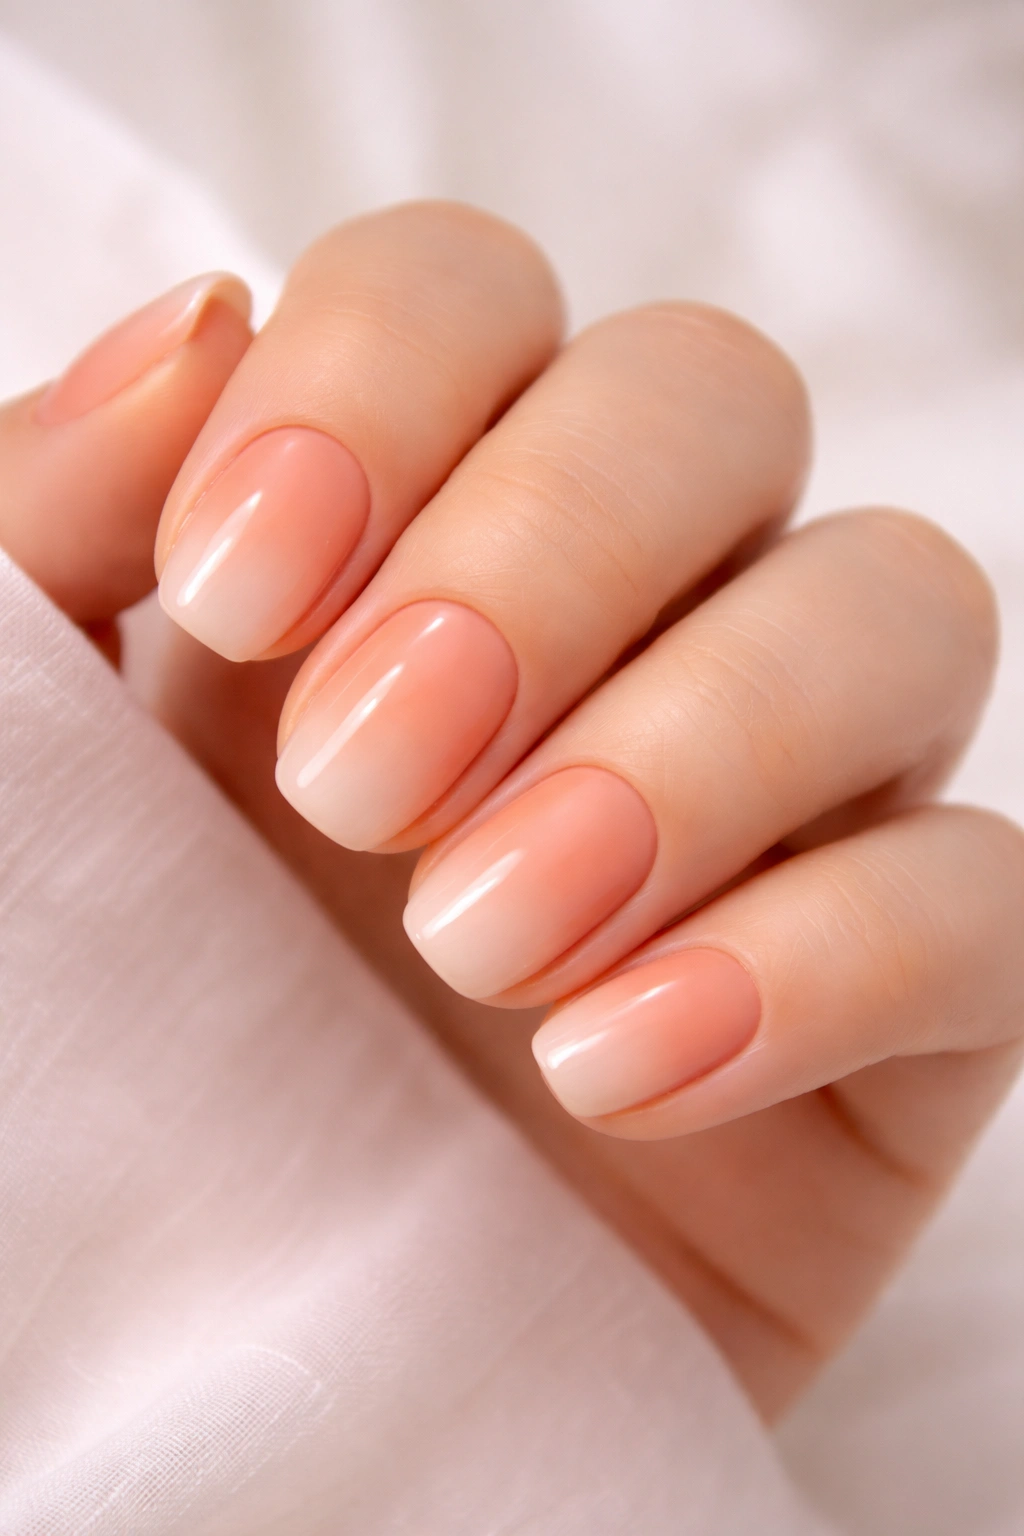
Not everyone wants to shout from the rooftops with their manicure, and that’s where peachy nude gradients come in. This gentle ombré transitions from a soft peach to a barely-there nude, creating an effect that’s understated yet undeniably sophisticated. It’s elegance in its most subtle form.
The Quiet Luxury of Understated Color
A gradient from warm peach to neutral nude delivers warmth without intensity. This design appeals to anyone seeking that sweet spot between completely neutral nails and a bold color statement. The transition feels effortless and requires less precision than geometric designs, making it approachable for at-home manicures. The warmer peachy tone at the base catches light and adds dimension, while the nude tip keeps things elegant and elongated. This combination works in virtually any setting—corporate offices, formal events, everyday wear, and everything in between.
Creating the Perfect Gradient
- Use a makeup sponge to apply the ombré effect for a seamless blend
- Start with peach at the cuticle and gradually transition to nude at the tip
- Apply a smooth top coat to blur any obvious lines and create fluidity
- Works beautifully on nails of any length, though longer nails show the gradient more dramatically
- Pairs perfectly with minimalist outfits or elevates more patterned styles
Pro tip: If you’re nervous about blending, try using a slightly more peachy-beige instead of pure nude. This middle ground is more forgiving and still delivers an elegant ombré effect.
7. Orange with Gold Foil
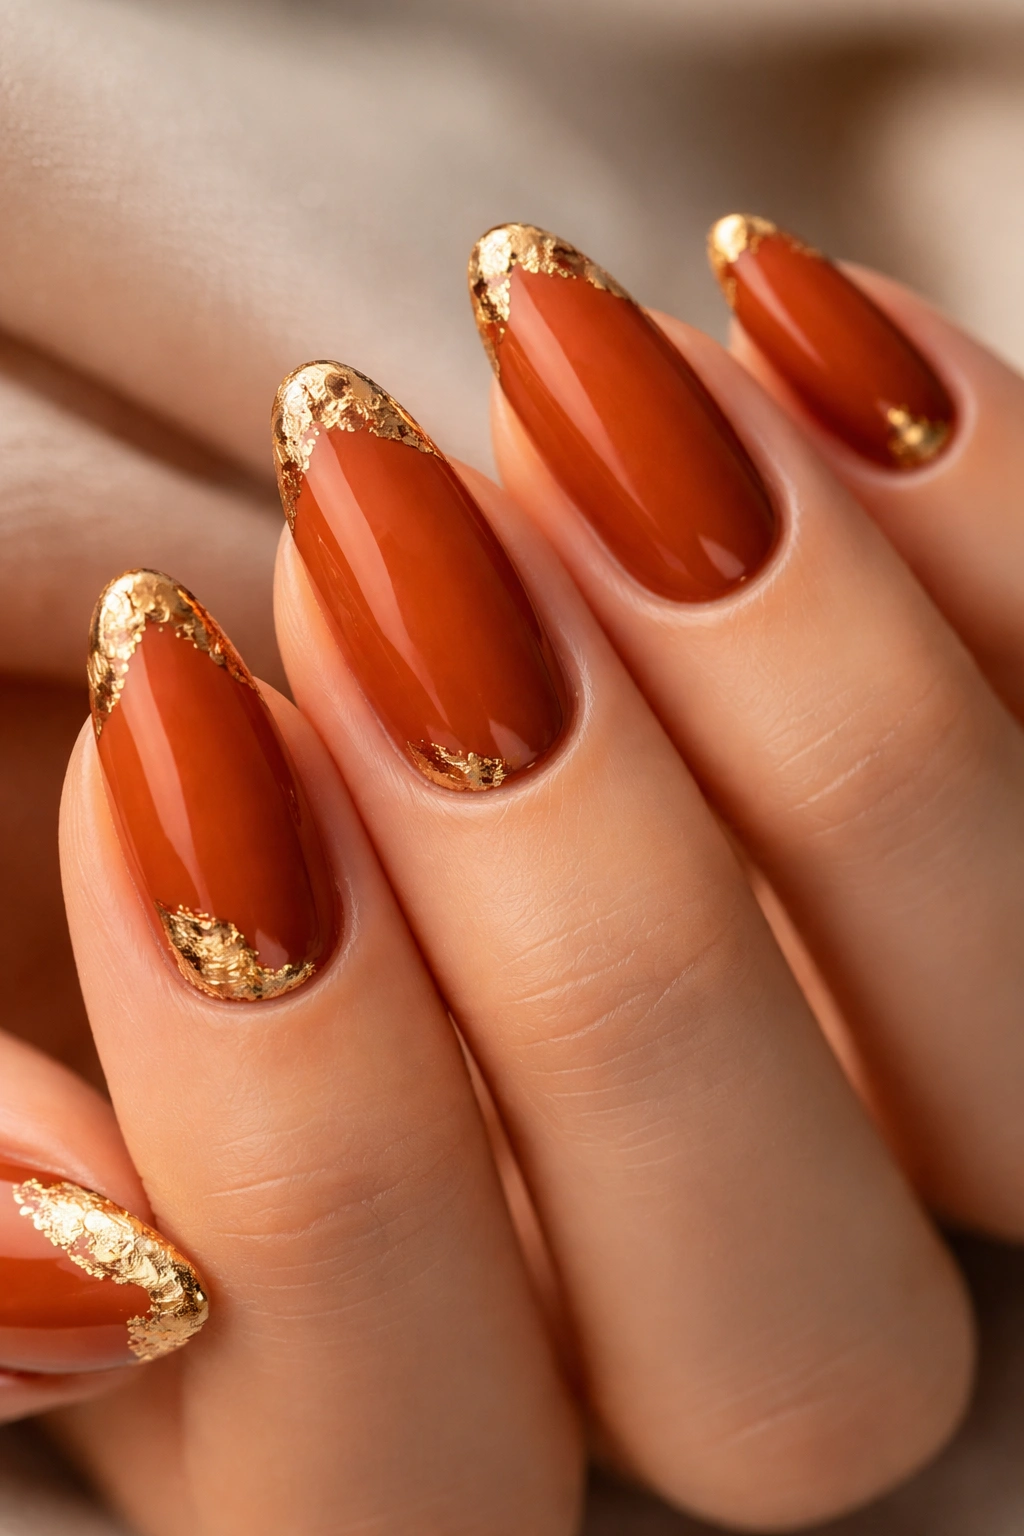
Luxury often comes down to the addition of a single golden accent. When you combine burnt orange with gold foil, you create something with genuine glamour—rich, warm, and undeniably luxe. This pairing feels especially suited to autumn and special occasions, yet it works year-round for anyone seeking a polished, elevated look.
The Magic of Metallic Accents
Gold foil transforms a solid orange manicure into something that feels intentional and refined. The warmth of gold mirrors the warmth of orange, creating a monochromatic color family that feels cohesive while adding textural interest and light-reflecting shine. You can use gold foil as a border around French tips, as an accent on a single nail, as delicate stripes, or scattered across the nail like confetti. The metallic quality catches light differently than polish, creating movement and dimension that elevates the overall design.
Gold Foil Application Ideas
- Create a French tip: burnt orange base with gold foil outlining the tip
- Stripe design: alternating thin lines of burnt orange and gold foil
- Accent nail: solid orange on most nails with one nail featuring gold foil details
- Border: gold foil framing a burnt orange center, creating a geometric look
- Confetti effect: irregular patches of gold foil scattered across the orange base
Insider note: Foil adheres best to sticky top coat or base coat. Many manicurists use a specific foil adhesive that keeps the metallic pieces secure for the full duration of the manicure.
8. Tropical Fruit Nails
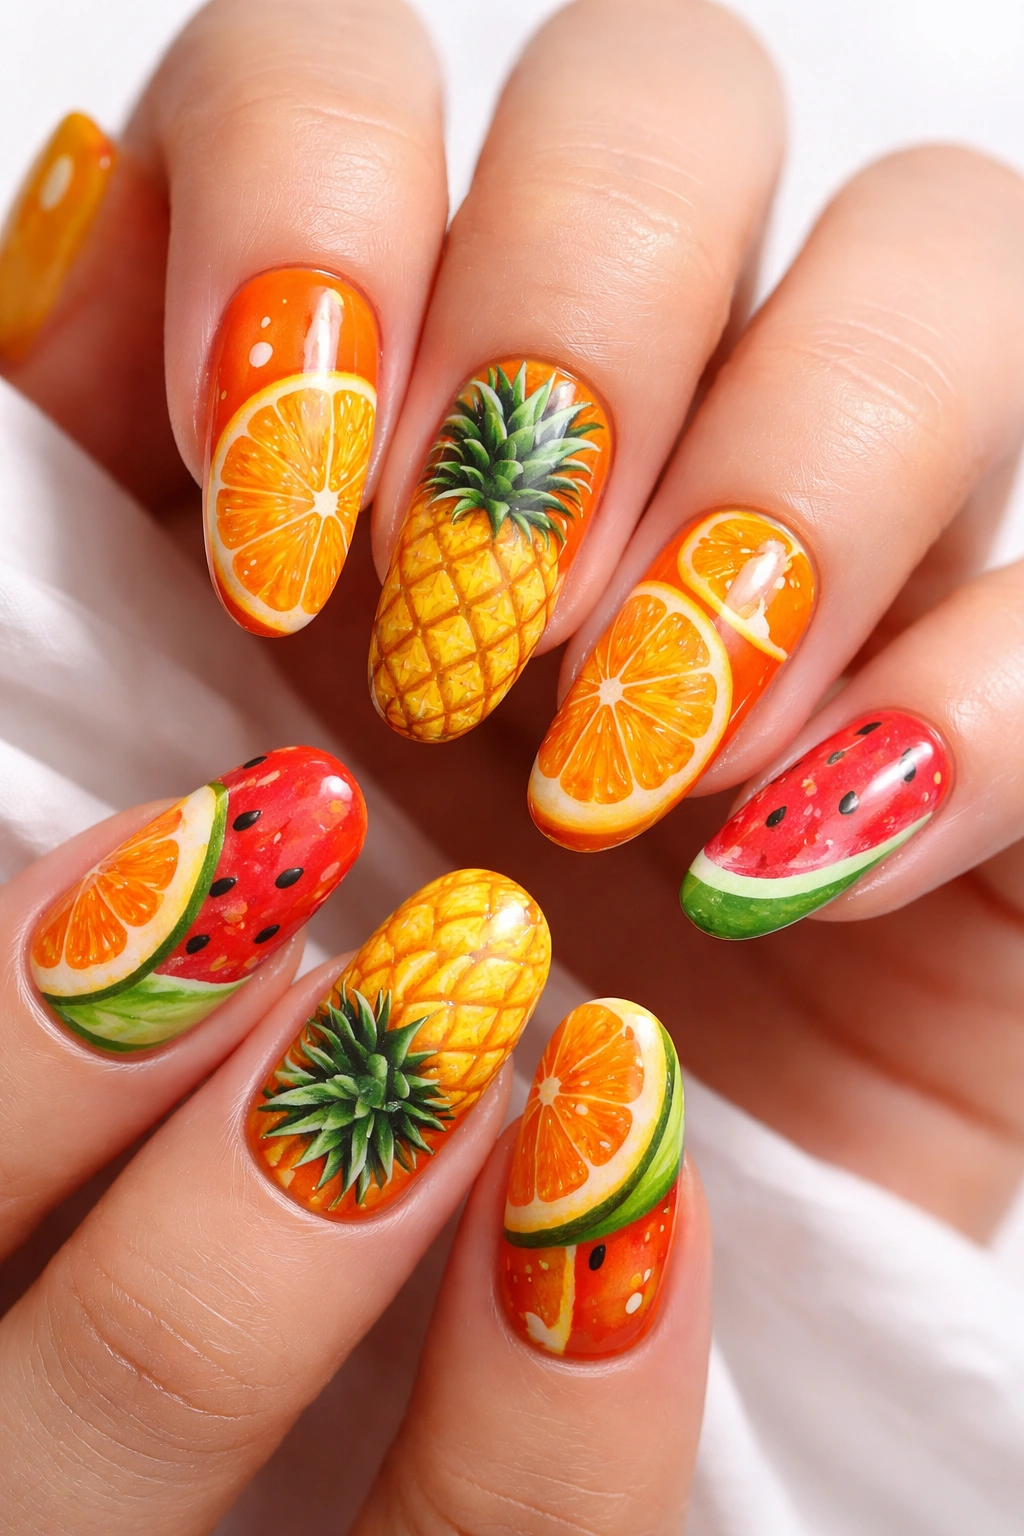
Bring vacation energy to your fingertips with whimsical fruit designs painted directly onto your orange base. These playful nails celebrate the fun and color of tropical fruits—sliced oranges, mangoes, pineapples, watermelons, and more. It’s pure joy in nail art form.
The Appeal of Fruity Designs
Tropical fruit nail art works because it combines multiple elements: beautiful color, recognizable imagery, and a mood that’s inherently optimistic. The orange base color becomes the perfect canvas for darker fruit illustrations because the contrast is immediate and visually striking. Whether you’re skilled at hand-painting or prefer to use nail stickers (which look professional when applied carefully), fruit designs add personality and whimsy. They work especially well on shorter nails, where the smaller canvas focuses the design beautifully.
Popular Fruit Designs to Try
- Sliced orange with juice droplets and visible seeds
- Pineapple with textured yellow exterior and bright orange accents
- Mango with peachy flesh and orange skin coloring
- Watermelon with pink and green against the orange background
- Mixed fruit salad effect with multiple fruits scattered across the nails
Pro tip: Use high-quality nail stickers if hand-painting isn’t your strength—modern stickers are incredibly realistic and professional-looking.
9. Matte Terracotta Nails
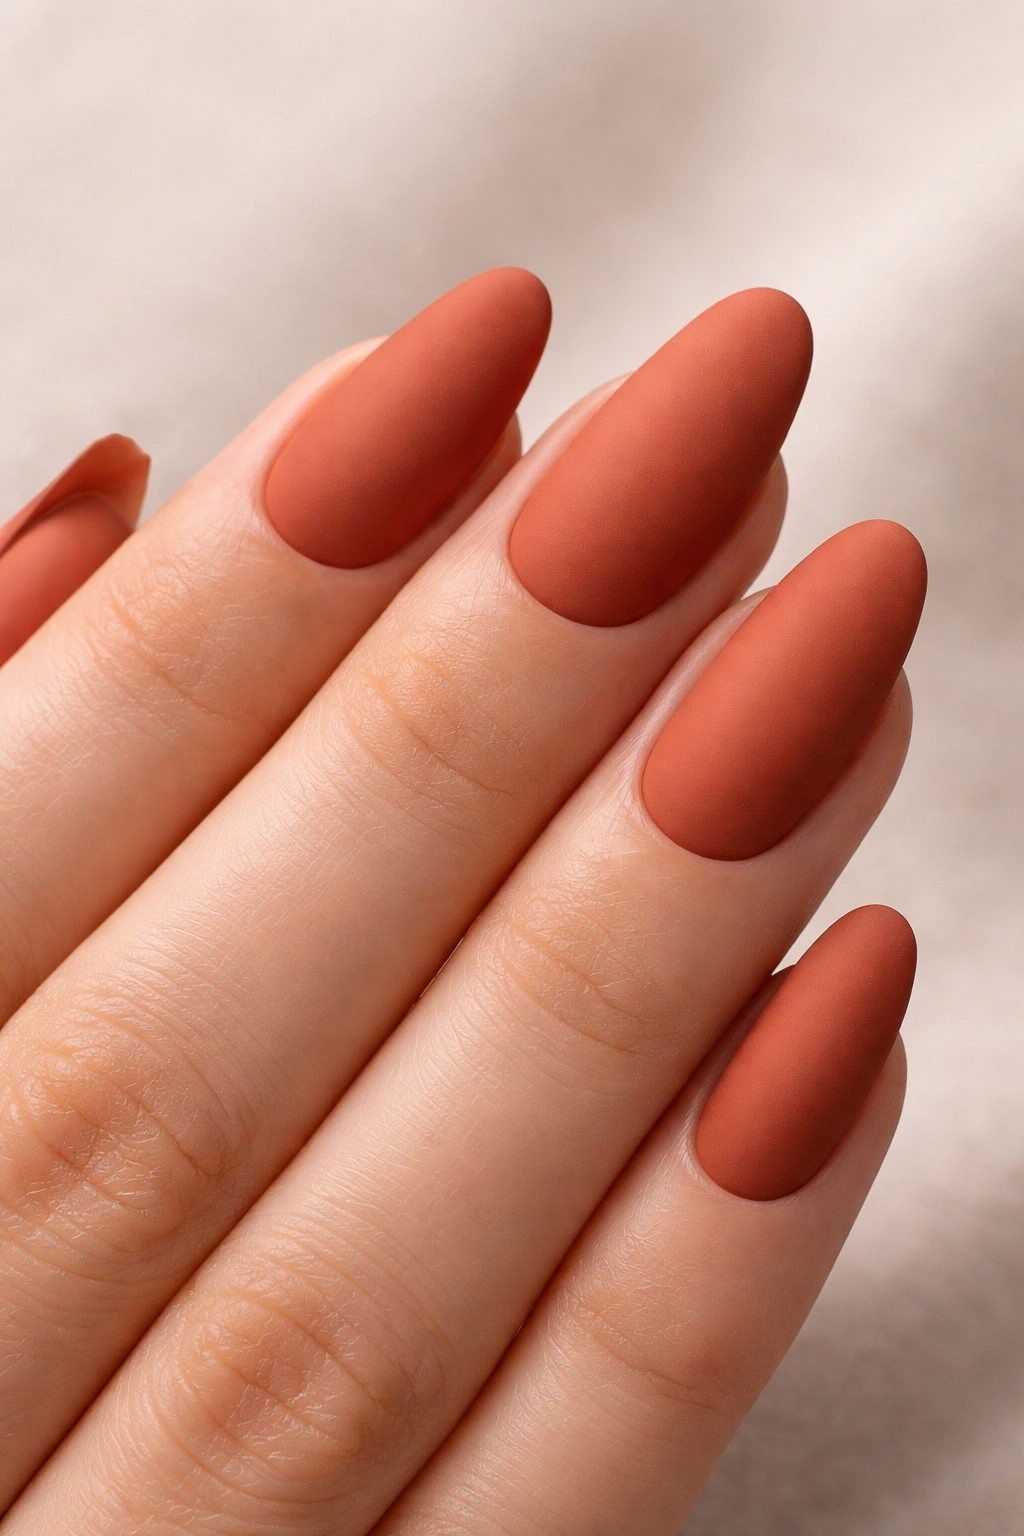
Switch off the shine and embrace texture with matte terracotta nails that feel earthy, sophisticated, and undeniably modern. Matte finishes transform any color, and terracotta in particular gains a refined, almost artisanal quality when stripped of shine. This velvety finish feels premium and intentional.
Why Matte Changes Everything
The absence of shine creates a completely different visual and tactile experience. Matte terracotta appears deeper and richer than glossy versions of the same shade, and the flat finish reads as contemporary and editorial. Matte nails have this inherent sophistication because they feel intentionally styled rather than just “polished.” The texture invites a second glance—people notice matte nails differently than glossy ones. Terracotta in particular benefits from this treatment because the earthy, clay-like quality of the color is enhanced when the finish mimics actual matte surfaces.
Achieving and Maintaining Matte Nails
- Apply a quality matte top coat over terracotta base polish
- The matte finish shows every imperfection, so flawless base application matters
- Pairs beautifully with minimal or minimalist designs
- Lasts well but requires occasional maintenance to keep the matte finish pristine
- Works with any nail length, though longer nails showcase the finish more dramatically
Worth knowing: Matte top coats vary in quality. Invest in a good one because cheap versions can appear chalky rather than luxuriously velvety.
10. Orange Flames
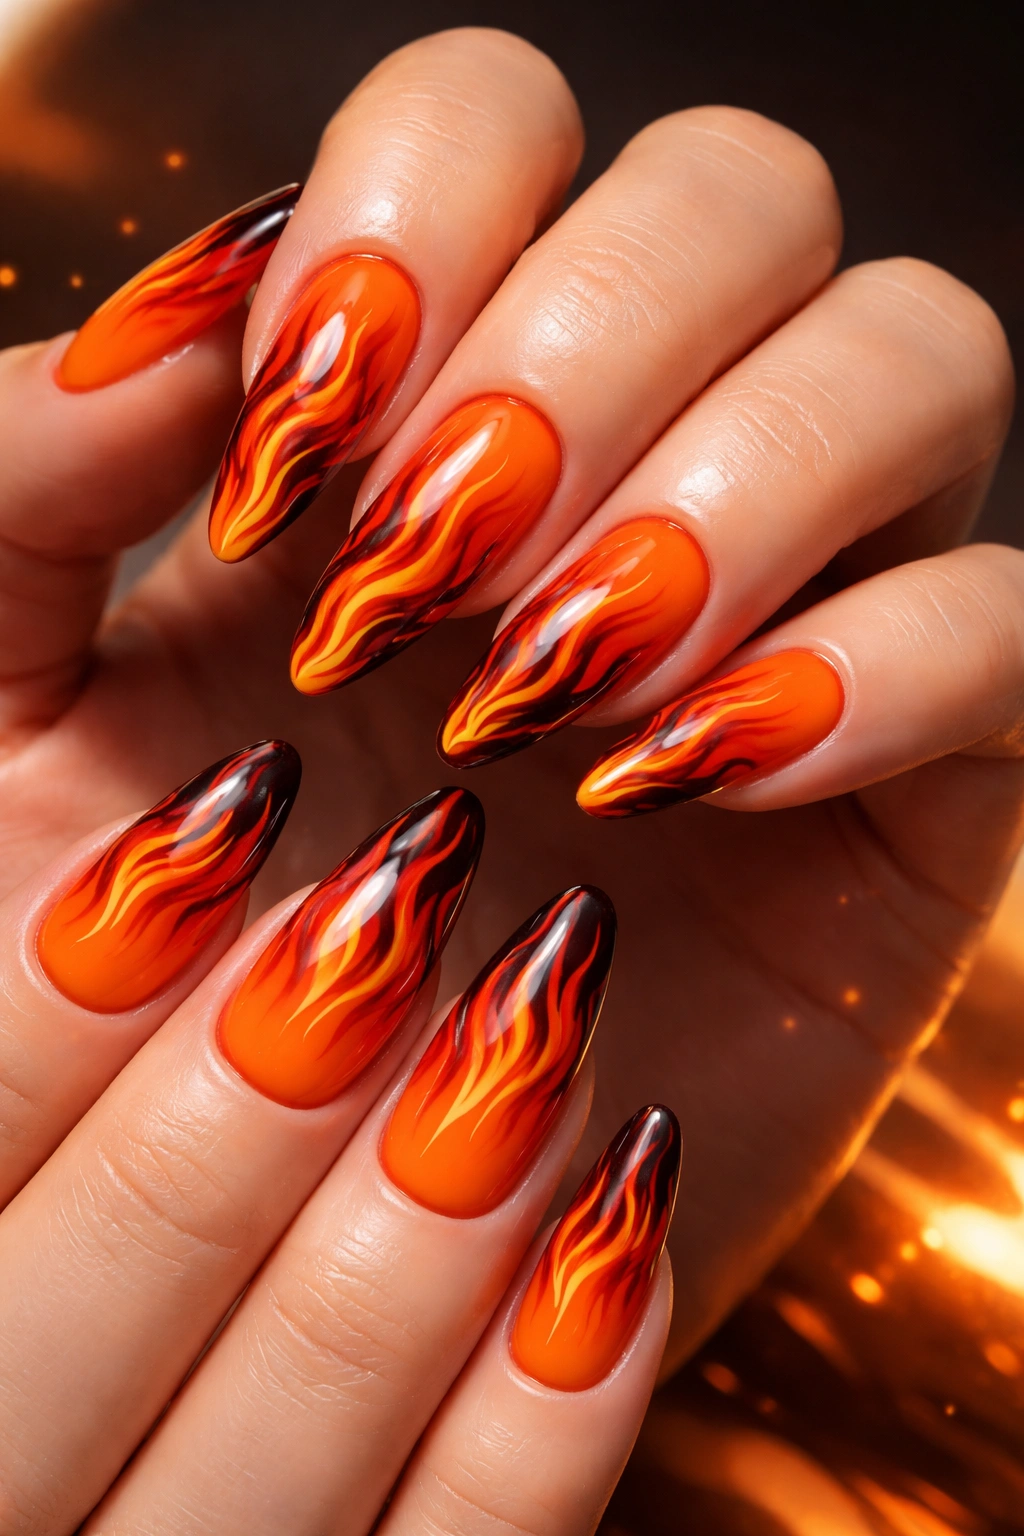
Turn up the heat with fiery flame designs that literally look like they’re burning across your nails. This bold, edgy design celebrates movement and intensity, perfect for anyone ready to make a statement. Flames work on orange because they’re essentially a more saturated version of the base color, creating visual cohesion while adding dramatic impact.
The Edge of Flame Designs
Flames feel dangerous in the best way—they’re graphic, they’re bold, and they absolutely demand attention. The key to successful flame designs is creating a sense of movement and dimensionality through color variation and careful placement. Using darker oranges, reds, and blacks to create depth makes the flames appear three-dimensional and authentic. Flames can be realistic with careful brushwork or more abstract and stylized, and both approaches look equally cool.
Flame Design Execution
- Start with a bright orange base and paint darker flames rising from the tip
- Use multiple shades: orange, coral, red, and black to create depth
- Flames work best on longer nails where there’s room for detail
- Pair with minimal outfits so the nails remain the statement
- Works on any nail shape, though almond and stiletto enhance the movement feeling
Pro tip: Use a thin brush or even a toothpick to create the flame details. Start with the darkest color (black or deep red) in the center of the flame, then layer lighter oranges around it.
11. Orange and White Geometric Design
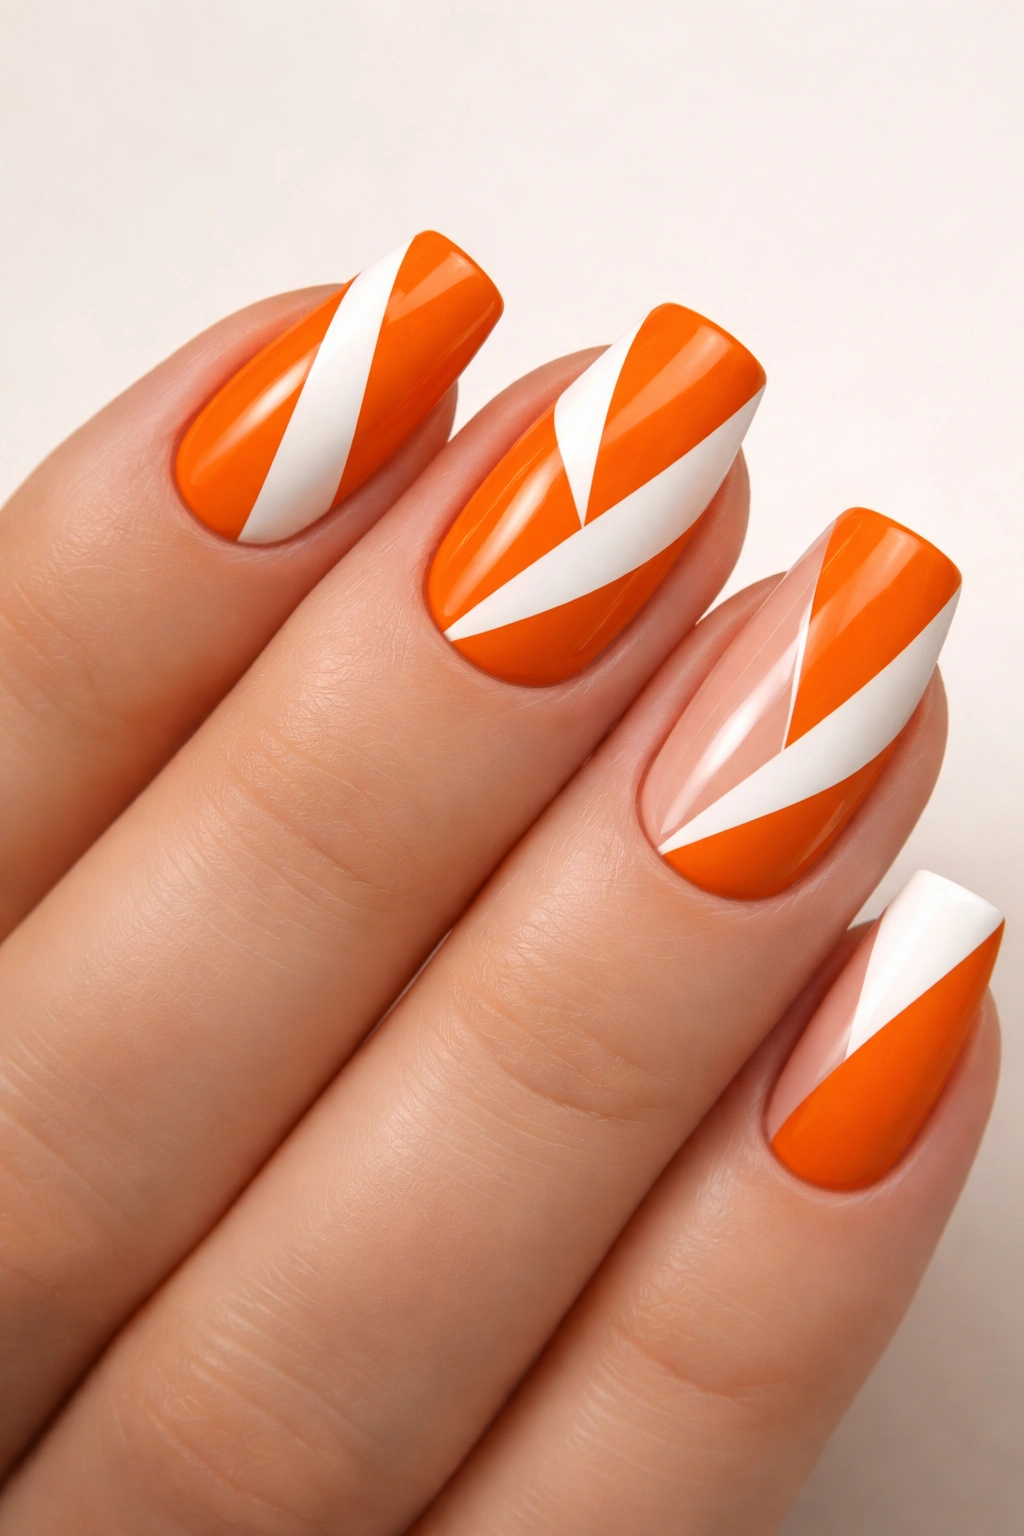
Crisp geometry meets warm color with sharp, angular designs that feel modern and fashion-forward. Geometric nail art celebrates clean lines, bold contrast, and visual sophistication. The combination of orange and white creates maximum contrast while remaining balanced and intentional.
Why Geometry Works
Geometric designs tap into contemporary design trends while offering timeless appeal. The contrast between bright orange and crisp white creates visual punch, while the clean lines read as intentional and professional. Geometric patterns work on any nail length and actually look more refined on shorter nails, where the proportions feel balanced. The precision required makes these designs feel expertly executed, even when done at home with nail tape and steady hands.
Geometric Pattern Ideas
- Triangles in alternating orange and white sections
- Stripes in varying widths creating rhythm and movement
- Color-blocked sections creating a modern, editorial look
- Chevron patterns that elongate the nail visually
- Angular shapes that appear three-dimensional through shading
Insider note: Nail striping tape is your best friend for clean, crisp lines. Apply it while the base coat is still slightly tacky for better adhesion.
12. Glittery Sunset Blend
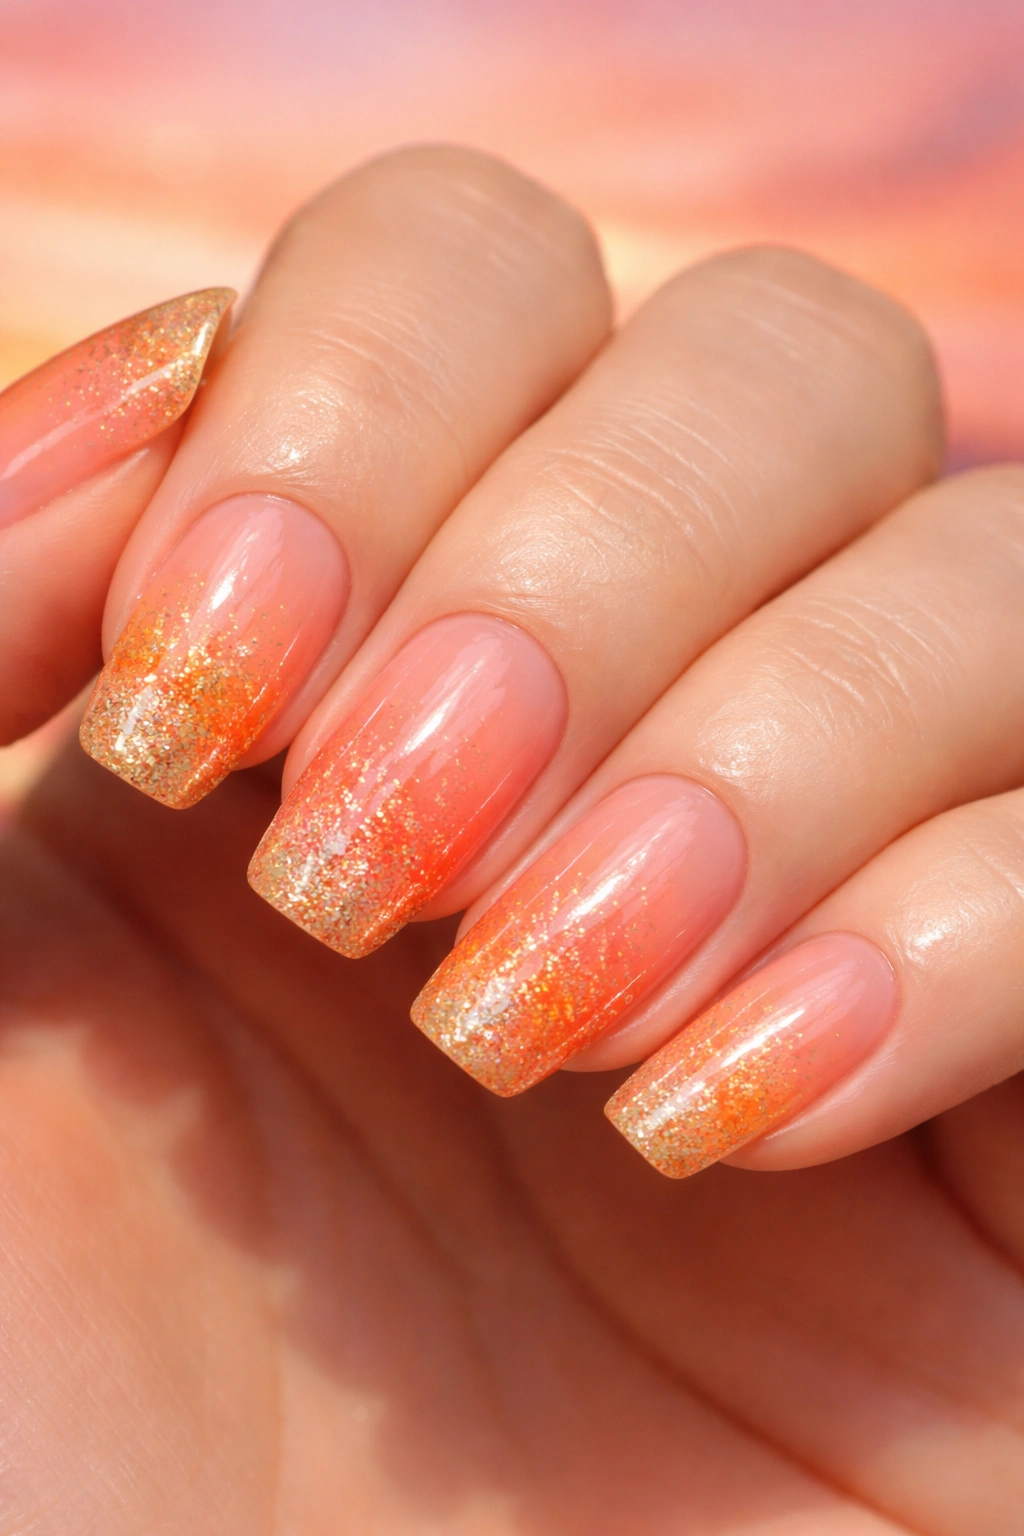
Capture the magic of a summer sunset right on your fingertips with a gradient that blends orange, coral, and gold glitter. This romantic, dreamy design celebrates the beauty of natural light and color transitions. It’s perfect for anyone who believes nails should be an extension of their mood and personality.
The Romance of Sunset Colors
Sunsets inspire wonder because they capture an impossible color transition that happens right before our eyes. Recreating this on nails requires blending warm tones (orange and coral) with sparkly gold accents that catch light like the sun itself. The addition of glitter takes the design from wearable to show-stopping, adding dimension and movement. This design works beautifully for summer vacations, special events, or any time you want your nails to feel celebratory and intentional.
Building the Sunset Gradient
- Start with a pale peach at the base
- Gradually transition through coral and bright orange in the middle
- Add gold glitter that increases in density toward the tip
- Seal with a glossy top coat to enhance shine and blend everything seamlessly
- Works on medium to longer nails where the gradient has room to develop
Pro tip: Use a makeup sponge to apply the gradient, pressing the colors together rather than attempting to blend with a brush. This creates natural transitions that mimic an actual sunset.
13. Burnt Orange with Minimal Art
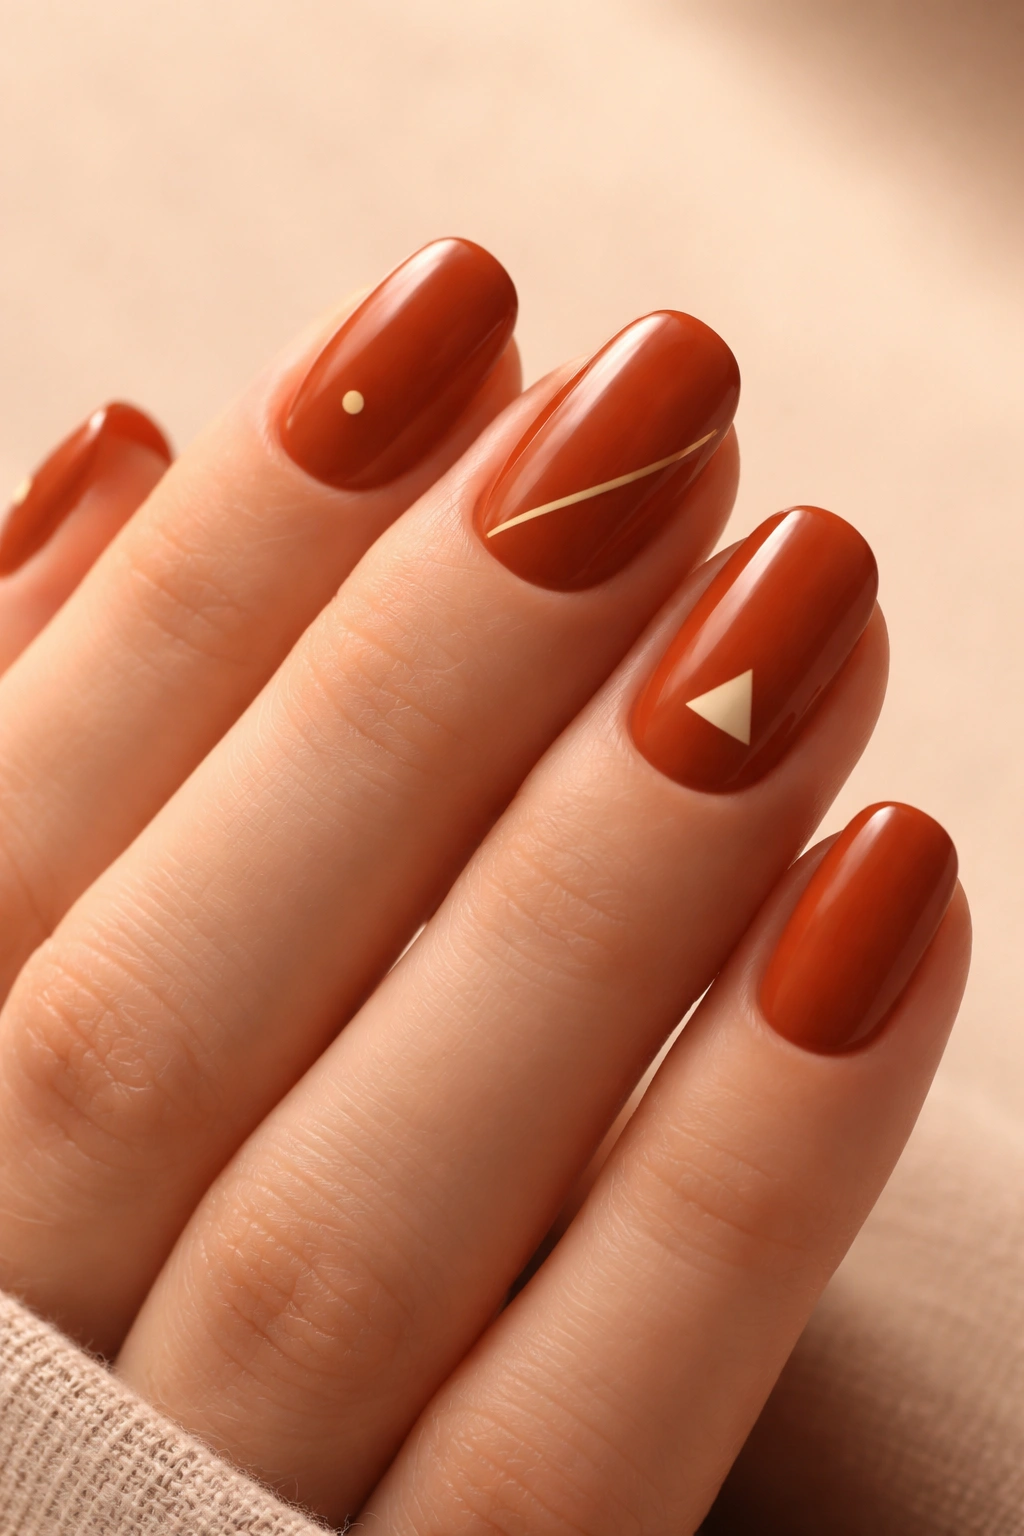
Prove that less truly is more with a sophisticated burnt orange base paired with tiny, carefully placed minimalist designs. This approach appeals to anyone seeking impact without chaos—elegance with just enough personality to feel intentional. A single delicate element on a solid burnt orange background speaks volumes.
The Power of Restraint
Burnt orange is rich and complex enough to command attention all by itself, which means any additional design should serve the overall aesthetic rather than compete with it. Minimal art—a tiny dot, a thin line, small geometric shapes—acts as punctuation on the nail, adding interest without overwhelming the base color. This design works in professional settings because it respects the elegance of the base shade while adding a subtle creative spark.
Minimal Design Elements to Consider
- Tiny dots in contrasting colors scattered across one or two nails
- A single thin line in white, gold, or black running across the nail
- Small geometric shapes: triangles, squares, or circles on an accent nail
- Delicate hand-painted lines that mimic calligraphy or brush strokes
- A single metallic accent nail surrounded by solid burnt orange
Worth knowing: Minimal designs rely on precision. A shaky line or imperfectly placed dot reads as unintentional, so take your time and use quality tools.
14. Half-Moon Orange Nails
Revive retro elegance with half-moon nails, a vintage design experiencing a major contemporary comeback. This classic shape—where a curved cutout at the cuticle reveals the nail base beneath—creates geometric interest and a distinctly fashion-forward silhouette. Pairing it with orange and a neutral shade creates perfect balance.
The Retro-Modern Appeal
Half-moon nails bridge vintage and contemporary aesthetics in a way few designs do. The geometric shape is inherently sophisticated, and combining orange at the tips with a nude or white curved section at the cuticle creates visual movement and elongation. This design works because it leverages negative space and geometric principles, creating something that feels intentionally styled and editorial. The half-moon shape flatters the nail by drawing focus to the center and tip.
Executing the Half-Moon Look
- Apply nude or white base coat first
- Once dry, apply orange polish to the tip, leaving a curved section uncovered at the cuticle
- The curved shape can be done freehand with a thin brush or with cuticle guides for precision
- Alternatively, apply base coat, use curved tape as a guide, and paint orange after
- Works on any nail length but looks particularly refined on medium to long nails
Pro tip: If freehand curves feel intimidating, pre-made half-moon nail guides are affordable and make achieving perfect curves effortless.
15. Orange Marble Design

Finish strong with luxe marble nails that swirl orange with white, nude, or cream tones, creating an effect that’s both organic and sophisticated. Marble designs celebrate natural variation and imperfection, making them forgiving for DIYers while looking undeniably expensive and editorial.
The Luxury of Marbled Effects
Marble nail art mimics actual stone, creating an elevated aesthetic that feels gallery-worthy. The combination of orange with neutral tones creates a sophisticated color palette, while the marbled pattern adds complexity and visual interest. No two marble nails look identical, which means each manicure is unique. The technique involves blending colors where they meet, creating soft transitions that feel intentional rather than chaotic.
Creating Marble Designs
- Use a makeup sponge to dab colors onto the nail, allowing them to blend and swirl naturally
- Combine orange with white for maximum contrast, or with nude for something more subtle
- The water marble technique creates more defined patterns for a different aesthetic
- Seal with a glossy top coat that enhances the marble effect and blurs color boundaries
- Works on any nail length, though longer nails showcase the full marble pattern
Insider note: The beauty of marble is that it’s incredibly forgiving—if something looks off, additional dabs of color actually enhance the effect rather than ruining it.
Final Thoughts
Orange nails represent so much more than just another nail color option. They’re a statement of warmth, confidence, and creative expression. Whether you’re drawn to the timeless simplicity of a solid glossy orange, the artistic freedom of abstract designs, or the sophisticated restraint of minimalist accents, this color palette offers something genuinely special. The versatility of orange—from soft peachy tones that whisper elegance to electric neons that shout joy—means there’s truly a shade and design for every personality, occasion, and mood.
The real magic happens when you stop thinking of orange as a trend and start seeing it as an expression of your personal style. Orange nails work because they’re fundamentally wearable, flattering across skin tones, and endlessly adaptable. Whether you’re heading into the office, planning a vacation, celebrating a special occasion, or simply waking up and deciding today is a day for bold color, orange delivers. The designs in this guide are starting points—feel free to mix techniques, combine ideas, or develop entirely new approaches. Your nails are a canvas, orange is the perfect medium, and the possibilities are genuinely limitless.
