

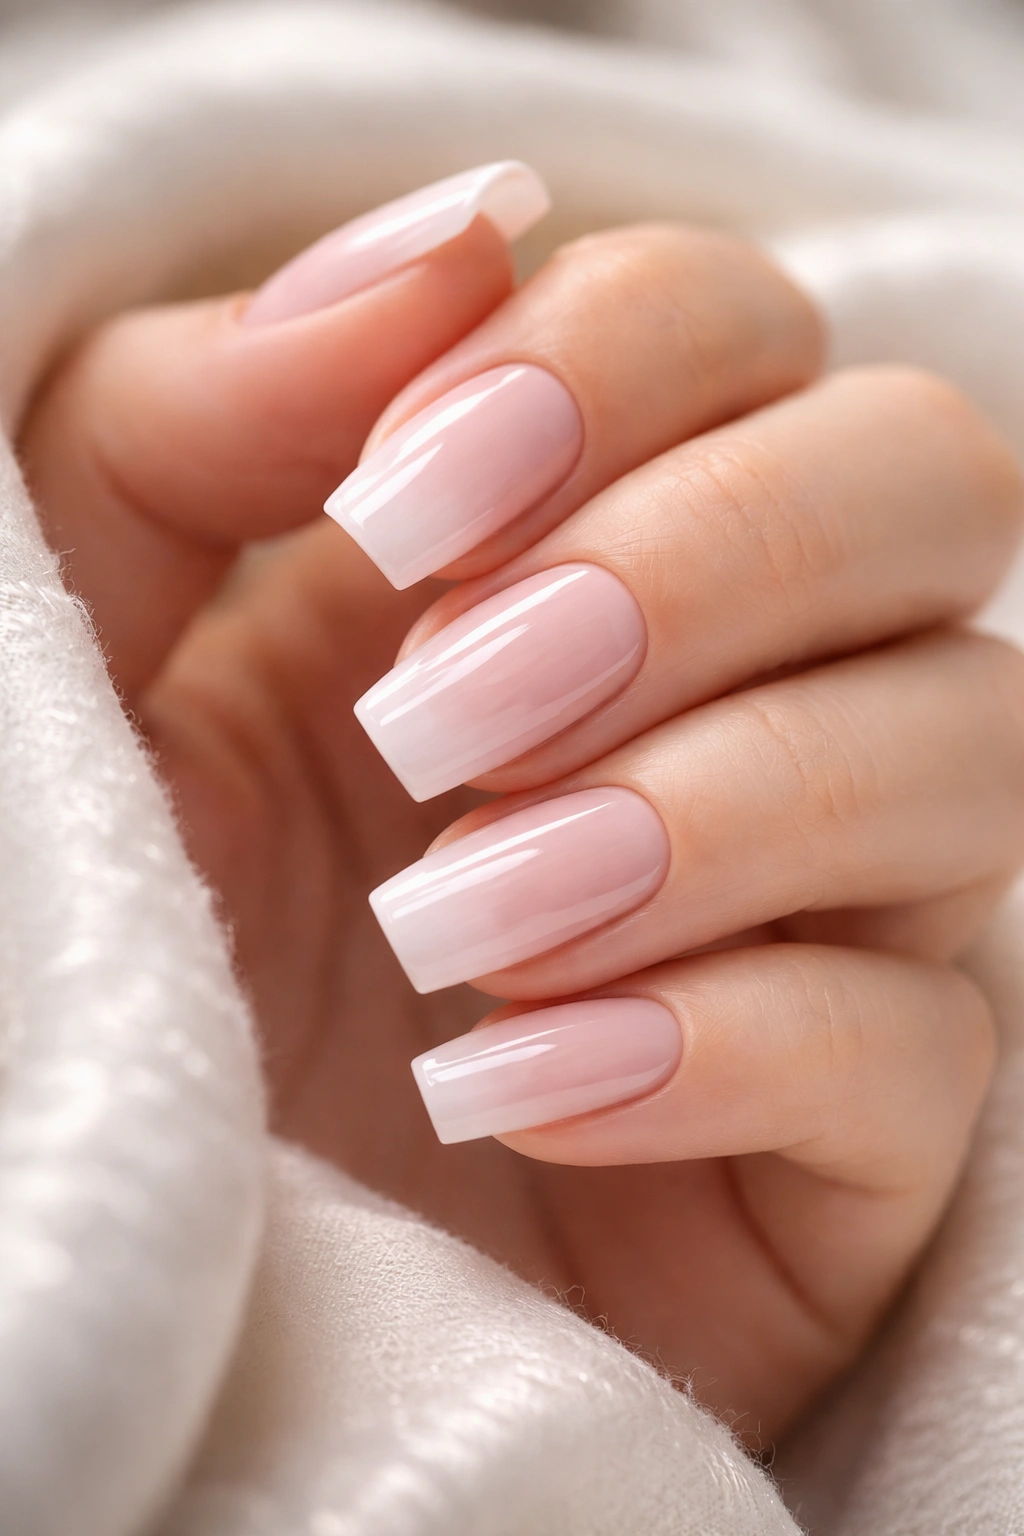
Soft square nails have quietly become the go-to shape for anyone who wants sophisticated, wearable elegance without the drama of stilettos or the maintenance nightmare of long coffins. There’s something about that squared-off edge paired with slightly rounded corners—it’s modern but not edgy, polished but forgiving, and honestly, it looks expensive no matter what design you choose. The shape flatters almost every hand, works with casual and formal settings alike, and gives you enough surface area to actually display nail art without it looking cramped or lost.
If you’ve been stuck in a rut with the same basic manicure for months, or you’re just discovering the joy of acrylic nails and want to find a style that genuinely suits you, soft square nails are where the magic happens. The beauty of this shape is that it’s incredibly versatile—it works just as well with minimalist nude designs as it does with bold patterns, glitter, ombre effects, or nail art that demands attention. You’re not locked into any particular aesthetic.
What makes soft square so special isn’t just the shape itself, though. It’s the psychology of the shape combined with smart design choices. Acrylic nails in this silhouette have a way of making your hands look longer and more refined without feeling impractical. You can type, work, exercise, and live your actual life without constantly worrying about breakage or snagging. This is nail art that fits into the real world, not just Instagram.
Let me walk you through fifteen soft square acrylic nail designs that deserve a spot on your inspo board—whether you’re looking for your next appointment or trying to describe exactly what you want to your nail technician.
1. Milky White with Nude Ombre Tips
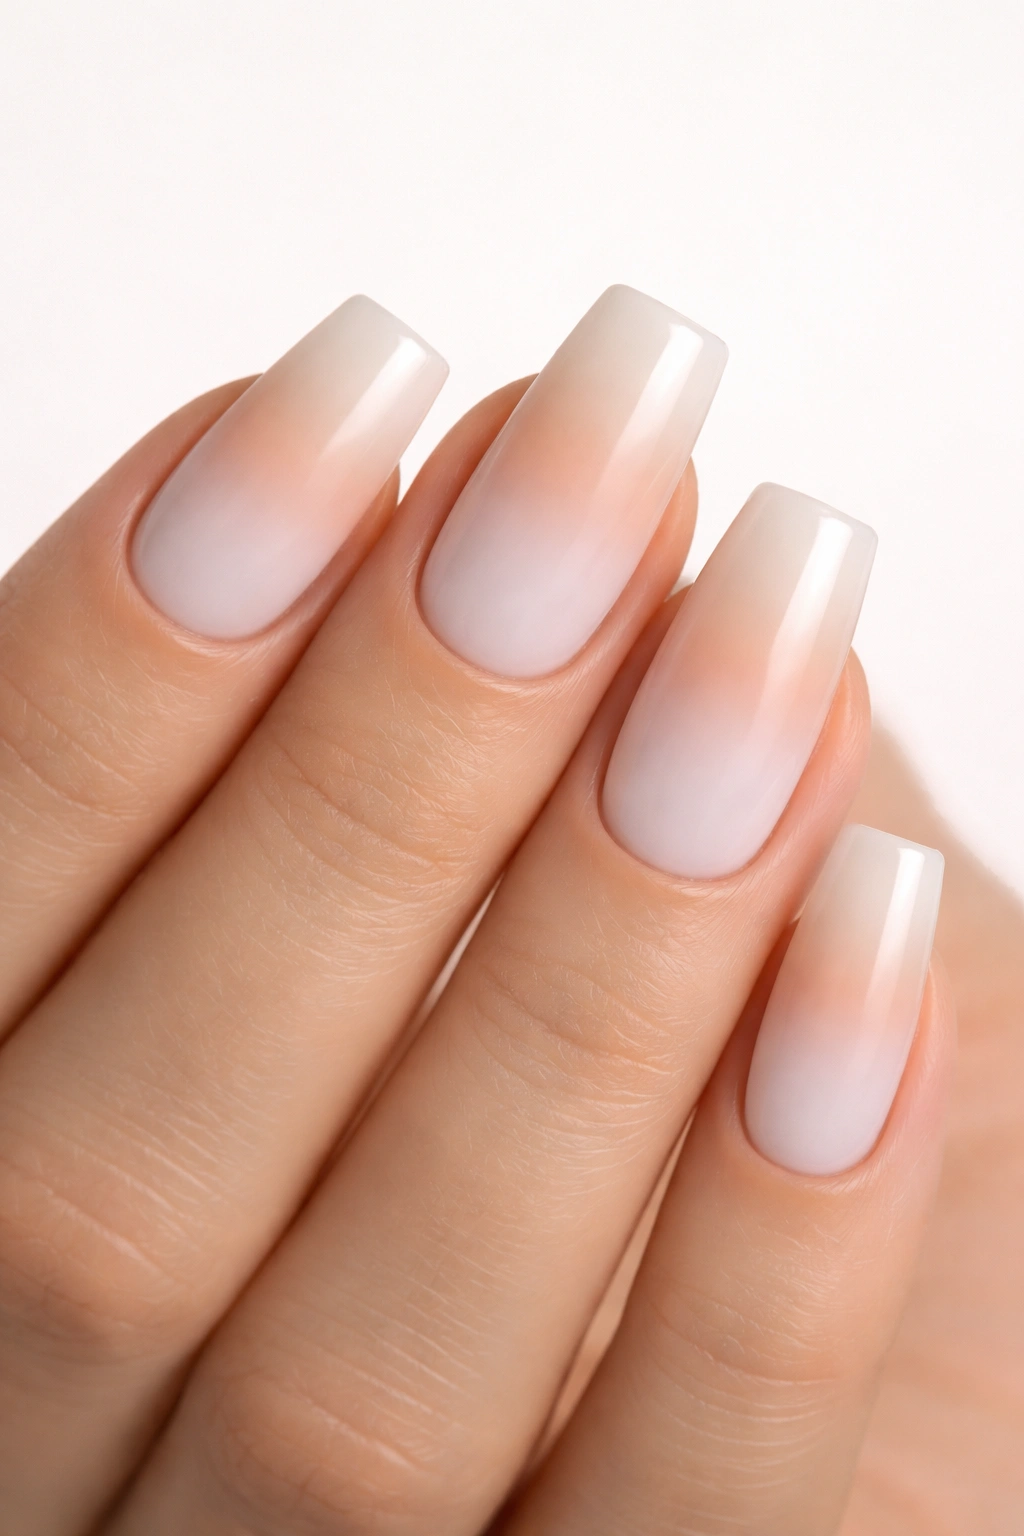
This design walks the perfect line between minimalist and interesting by using a soft milky-white base that gradually transitions into a warm nude at the tip. The ombre effect is subtle enough that it feels sophisticated rather than trendy, and it creates a naturally elongated look without needing length. The softer white-to-nude gradient is far more forgiving than stark white-to-pink French tips because it’s almost impossible to see where one color begins and another ends, so even as your nails grow out, the design maintains its polished appearance.
Why This Design Works So Well
This combination has staying power because it mimics the natural nail growth pattern in a flattering way. The nude tips make your fingertips appear softer and more refined, while the milky base keeps everything looking fresh and clean. It’s the kind of design that works whether you’re in business casual or casual wear—nothing about it screams “high maintenance,” even though it absolutely looks intentional and well-cared-for.
How to Ask Your Technician For It
Bring a photo showing the exact shade transition you want, because the magic is in the gradient—not too dark, not too peachy, somewhere in the warm neutral family. Ask your technician to feather the ombre rather than create hard lines, and request that they use a matte topcoat if you prefer a softer finish, or glossy if you want it to pop slightly more. The soft square shape should have corners that are squared but not harsh—almost like a very subtle rounded square.
Pro tip: This design photographs beautifully in natural light, and it actually gets better as it grows because the gradient naturally elongates as your real nail grows out.
2. Glossy Black with Gold Geometric Lines
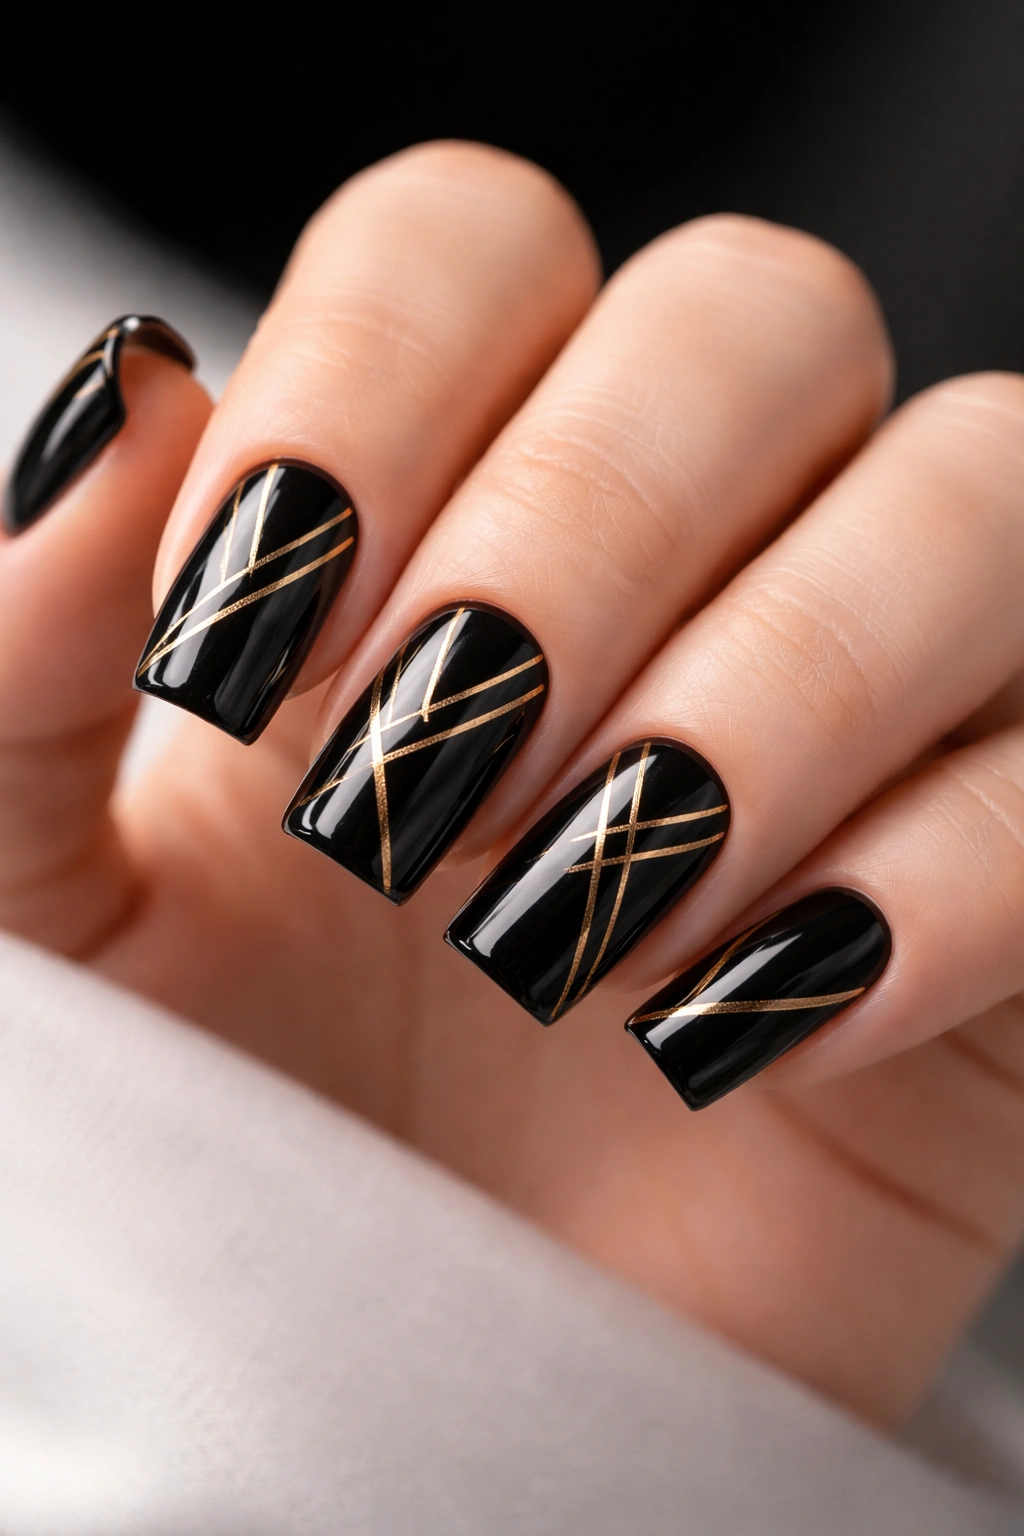
A black base paired with fine gold lines creates an art deco vibe that reads as both modern and timeless. The gold geometry—whether you go with thin accent lines down the center, triangular sections, or abstract patterns—gives the darkness something to do visually. Black acrylic nails on a soft square shape have a sleek, confident energy that works for evening events, professional settings, and anyone who just wants their nails to make a statement without being loud about it.
The Visual Impact of This Combination
Black and gold together create immediate contrast and sophistication. The gold lines catch the light and draw attention to the shape of your nails, which actually highlights why soft square is such a flattering silhouette. You’re not fighting against busy patterns or clashing colors—you’re letting the elegance of the geometry and the high-polish finish speak for itself.
Design Variations to Consider
- Thin gold lines running vertically down the center of each nail for a streamlined look
- Diagonal geometric sections, alternating between fully black and black-with-gold accent nails
- A gold-framed negative space design where the gold outlines a bare or nude section in the middle
- Art deco fan patterns in the corners that get subtly bolder toward the tip
The beauty of this design is that you can customize the amount of gold detailing based on how bold you want to go. A single gold line per nail is understated; geometric sections covering half the nail are more dramatic.
3. Soft Peachy Nude with Minimal White Accent Line
This is nude with personality—a warm, peachy-nude base that feels skin-tone adjacent but more intentional, paired with one or two thin white accent lines along the edge of the nail or down the middle. It’s minimal nail art that actually reads as designed rather than accidental. The soft square shape is absolutely essential here because it gives the accent line somewhere clear to live, and the shape’s proportions make the minimalism feel intentional rather than like you just forgot to finish your manicure.
Why Peachy Nude Works Across All Skin Tones
Unlike pure beige which can wash out some skin tones, a peachy undertone has warmth that flatters nearly everyone. It reads as polished and intentional without being bold, and it’s genuinely wearable for literally any occasion—work, formal events, casual outings, gym sessions. The white accent line provides just enough visual interest to keep it from feeling plain.
Application Tips for Perfect Accent Lines
Ask your technician to create the accent line using a thin brush or a fine-tipped striping tool, and request that they apply a glossy topcoat with a matte topcoat over just the nude portion if you want contrast in finish. The white line staying glossy against a matte nude background creates unexpected depth. Alternatively, keep everything glossy for a sleeker, more contemporary feel.
Worth knowing: Peachy nudes are surprisingly forgiving as they grow out because the gradual transition between your natural nail and the acrylic becomes part of the design rather than a visible line of demarcation.
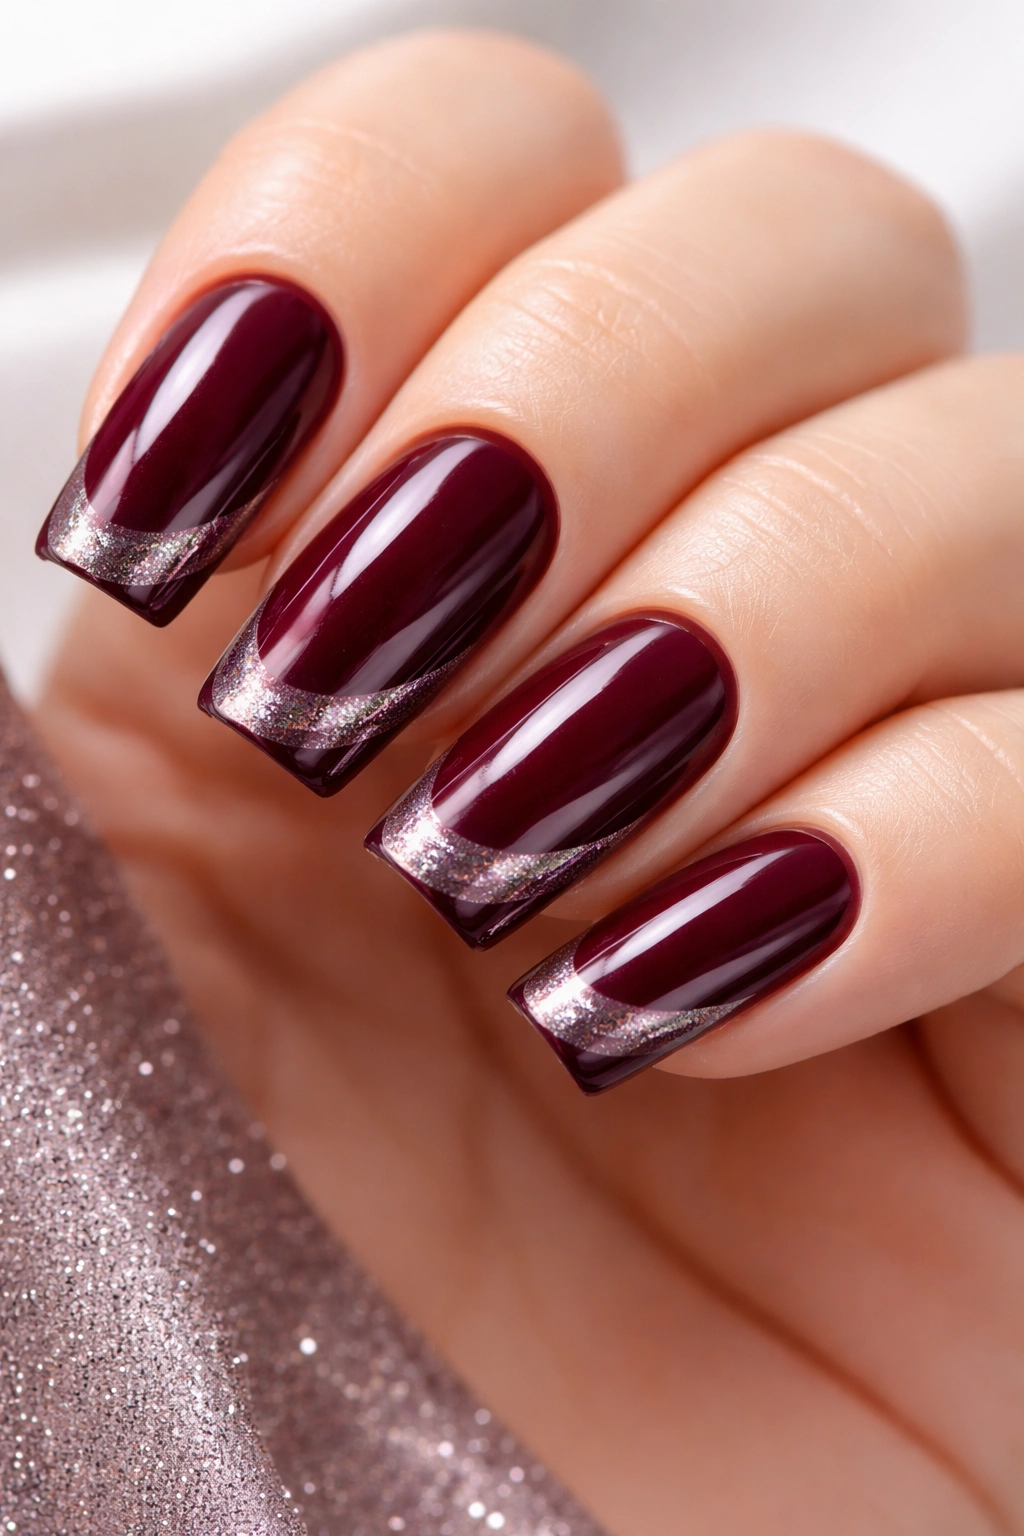
4. Deep Burgundy with Shimmer and Chrome Details
Burgundy acrylic nails on soft squares are the definition of versatile elegance—deep enough to feel sophisticated, warm enough to feel approachable, and the color works year-round despite feeling slightly autumnal. Add a fine chrome powder or shimmer details along the tips or in geometric sections, and you’ve got a design that catches the light beautifully without being glittery in a casual way. This is nail art that feels intentional and curated.
The Durability and Aging of Deep Burgundy
Unlike true reds which can stain and look orange as they grow out, burgundy is forgiving. The color ages gracefully because the line between your natural nail and the acrylic becomes nearly invisible—burgundy is close enough to the natural nail bed that regrowth doesn’t look like a stark two-tone situation. You can stretch your appointment schedule by another week without it looking neglected.
Chrome and Shimmer Placement Options
- Chrome dusted across the tips in a gradient that fades from full chrome to burgundy
- Thin shimmer running vertically down each nail for a subtle shine
- Chrome accents only on alternating nails for a balanced, not-overdone look
- A chrome frame around the outer edge of the nail while the center stays pure burgundy
The chrome-and-shimmer approach keeps burgundy from feeling dark or heavy, which is crucial on soft square nails where you want the shape to remain the visual focus.
5. Milky Nude Base with Delicate Floral Nail Art
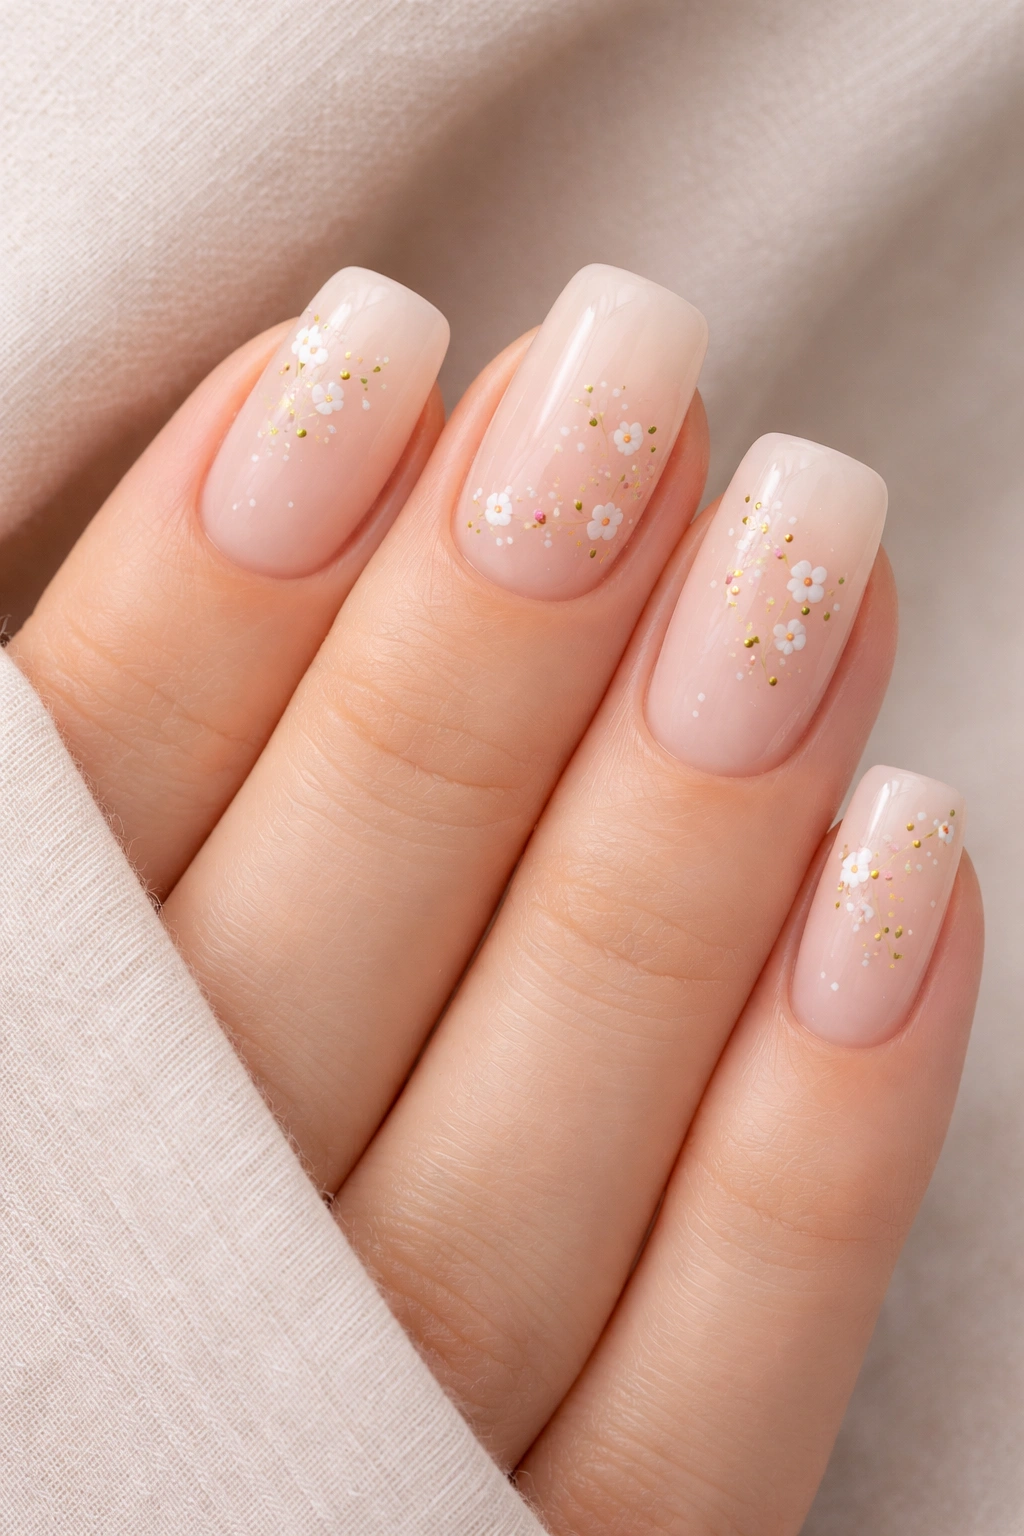
Soft florals painted across a creamy nude base create romantic, wearable elegance—tiny painted flowers, leaves, or botanical elements that feel artisanal and personal without being costume-like. The neutral background lets the artwork be the star, and the soft square shape provides enough real estate for the design to be visible and intentional without overwhelming your nails. This works beautifully for weddings, special events, or anyone who just loves a touch of artistry on their hands daily.
Design Complexity Levels
- Minimalist: One small delicate flower near the tip of each nail, with leaves scattered subtly
- Moderate: A small botanical garden spread across the tips of 2-3 accent nails while others stay solid nude
- Bold: A larger floral design covering the entire tip area, or a continuous garden flowing across all five nails
The soft square shape is actually ideal for floral designs because the squared tip provides a clear endpoint for where the design naturally terminates—the flower or leaf doesn’t get lost in a pointed tip or overwhelmed by too much empty space like it might on a coffin shape.
Longevity and Touch-Up Reality
Hand-painted nail art will show wear after 2-3 weeks as your nails grow and you use your hands. Ask your technician if they prefer hand-painting or if they use stamping or decals for the floral elements, as each method has different longevity. Hand-painted designs often look most beautiful in the first two weeks.
Pro tip: Photos of floral nail art look stunning, and this design actually becomes more charming as it ages and the flowers become slightly more delicate-looking through natural wear.
6. Nude Base with Ombré Glitter Fade
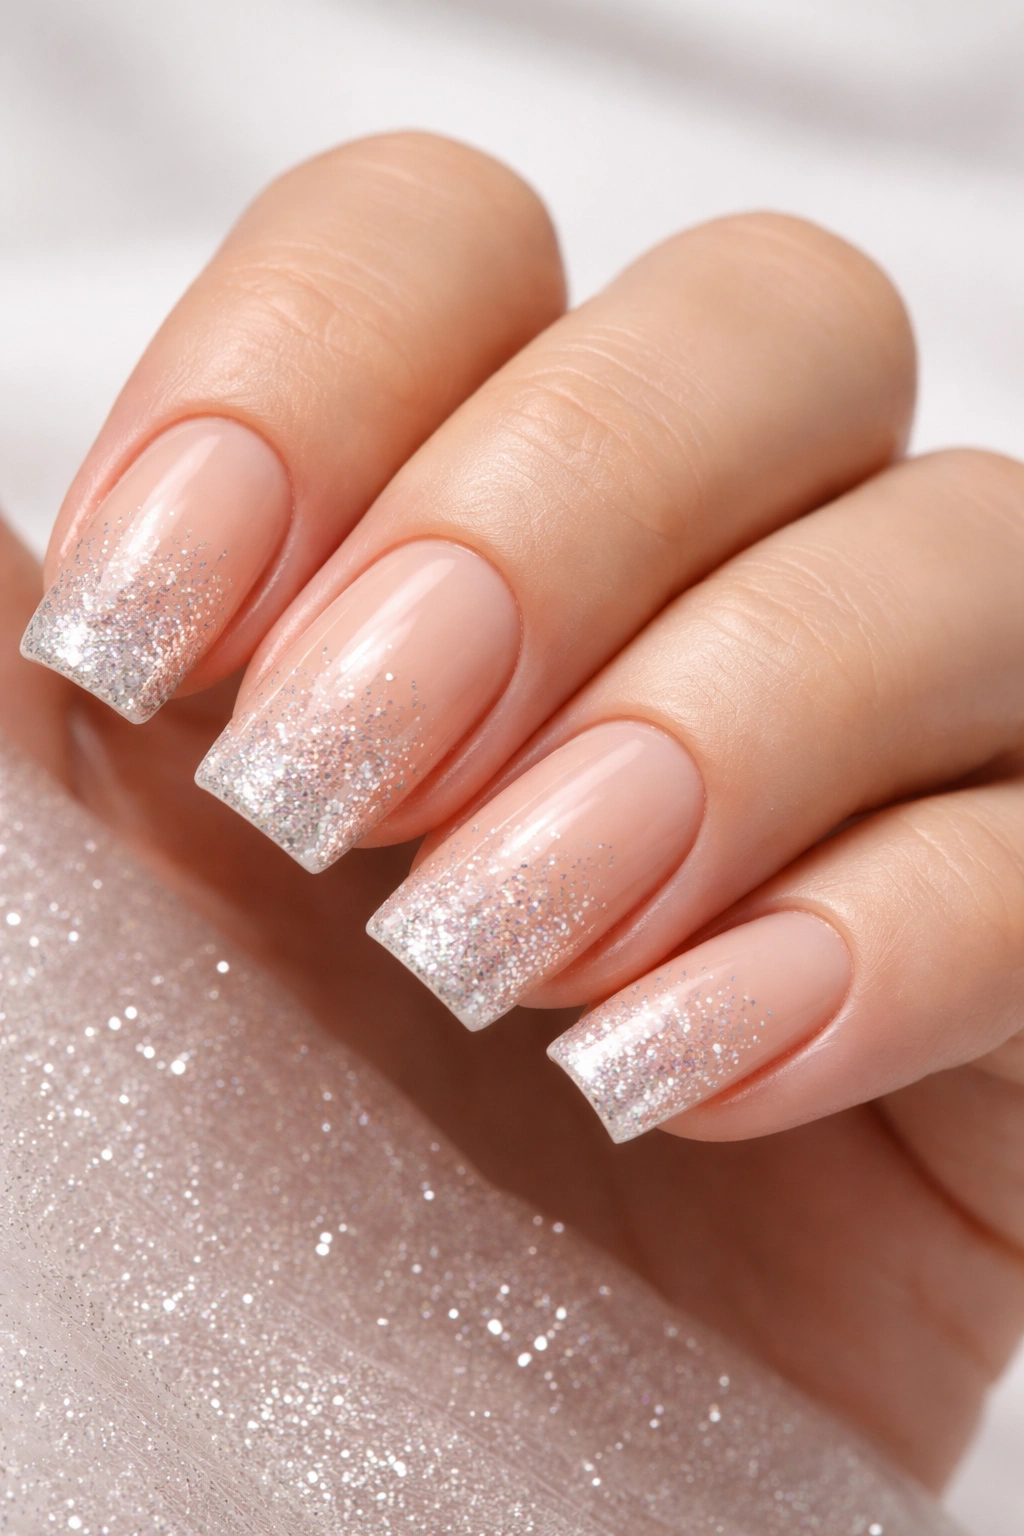
A clean nude base that gradually transitions into glitter-heavy tips creates movement and visual interest without committing to full glitter coverage. The ombre glitter fade works beautifully on soft square nails because the shape’s broad surface area showcases the gradient perfectly—you can see the evolution from solid nude to sparkle, and it reads as intentional rather than like glitter just got stuck to your nails. This design is endlessly customizable based on glitter size and color.
Glitter Options for Different Vibes
- Fine champagne or rose gold glitter for an elegant, subtle sparkle
- Multi-colored holographic glitter for a fun, playful energy
- Deep jewel-tone glitter (emerald, sapphire, amethyst) for sophisticated sparkle
- Clear glitter for maximum shimmer without changing the color story
The gradient approach means you can use bold, statement-making glitter colors while still keeping the overall look balanced and wearable because half the nail is pure neutral.
Making Your Glitter Ombre Last
Ask your technician to seal the glitter heavily with topcoat because loose glitter on soft square nails tends to shed faster than on longer shapes simply because you’re using your nails more actively. A good thick seal keeps the glitter locked in place and prevents the frustrating situation where sparkle starts disappearing after a week.
7. Pale Pink with Subtle Pearl Finish
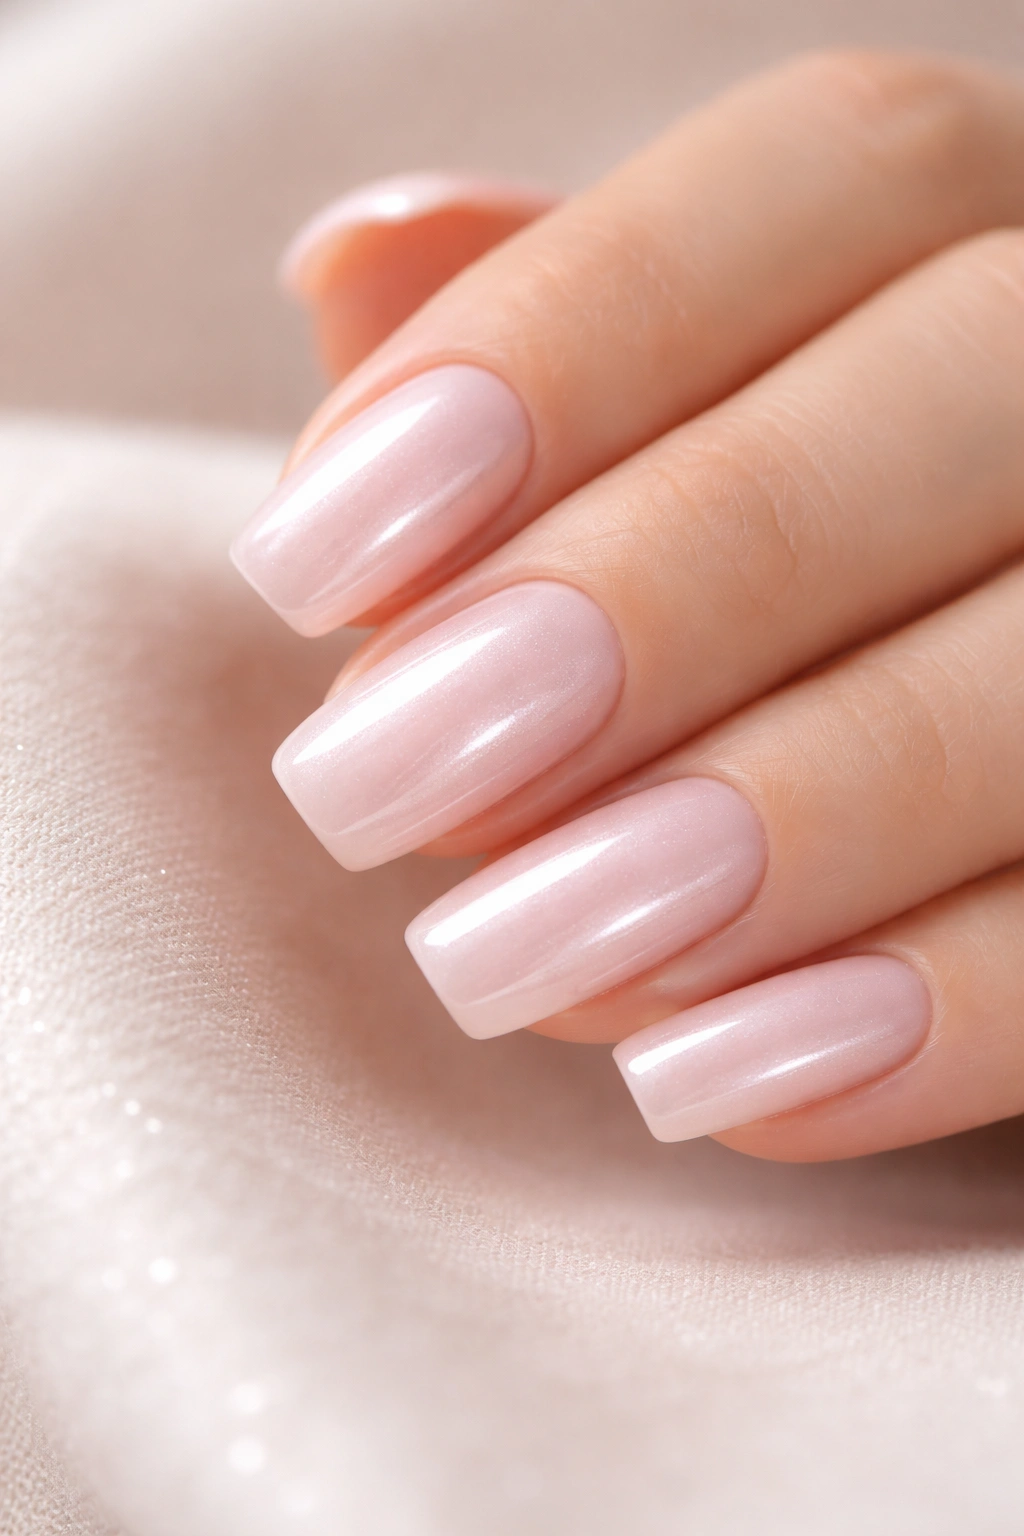
Soft pink acrylic nails with a pearl or mother-of-pearl finish create an almost ethereal quality—the color shifts slightly depending on the angle and lighting, which keeps the design interesting without it being busy. Paired with the soft square shape, this design reads as understated luxury. It’s the kind of manicure that looks effortlessly elegant and works across every setting, from boardroom to brunch.
The Psychology of Pearl Finishes
Pearl effects work because they’re never quite the same color twice—they shift and shimmer in a way that feels natural and organic rather than artificial. This iridescence actually draws the eye to the shape of your nails, which is why soft square looks so refined with a pearl finish. The finish becomes a subtle accent to the silhouette rather than overshadowing it.
Customizing the Pearl Intensity
Ask your technician about the strength of the pearl effect they’re using. Some pearl topcoats are super subtle (barely noticeable unless you’re looking closely), while others are more obvious and shift between pink and lavender or pink and gold depending on the angle. Discuss whether you want the pearl effect on the entire nail or concentrated on the tips, as placement changes the overall impact significantly.
Worth knowing: Pearl finishes can actually hide minor imperfections better than a creme finish because the light-shifting quality distracts from tiny bubbles or inconsistencies in application.
8. Chocolate Brown Base with Gold Leaf Accents
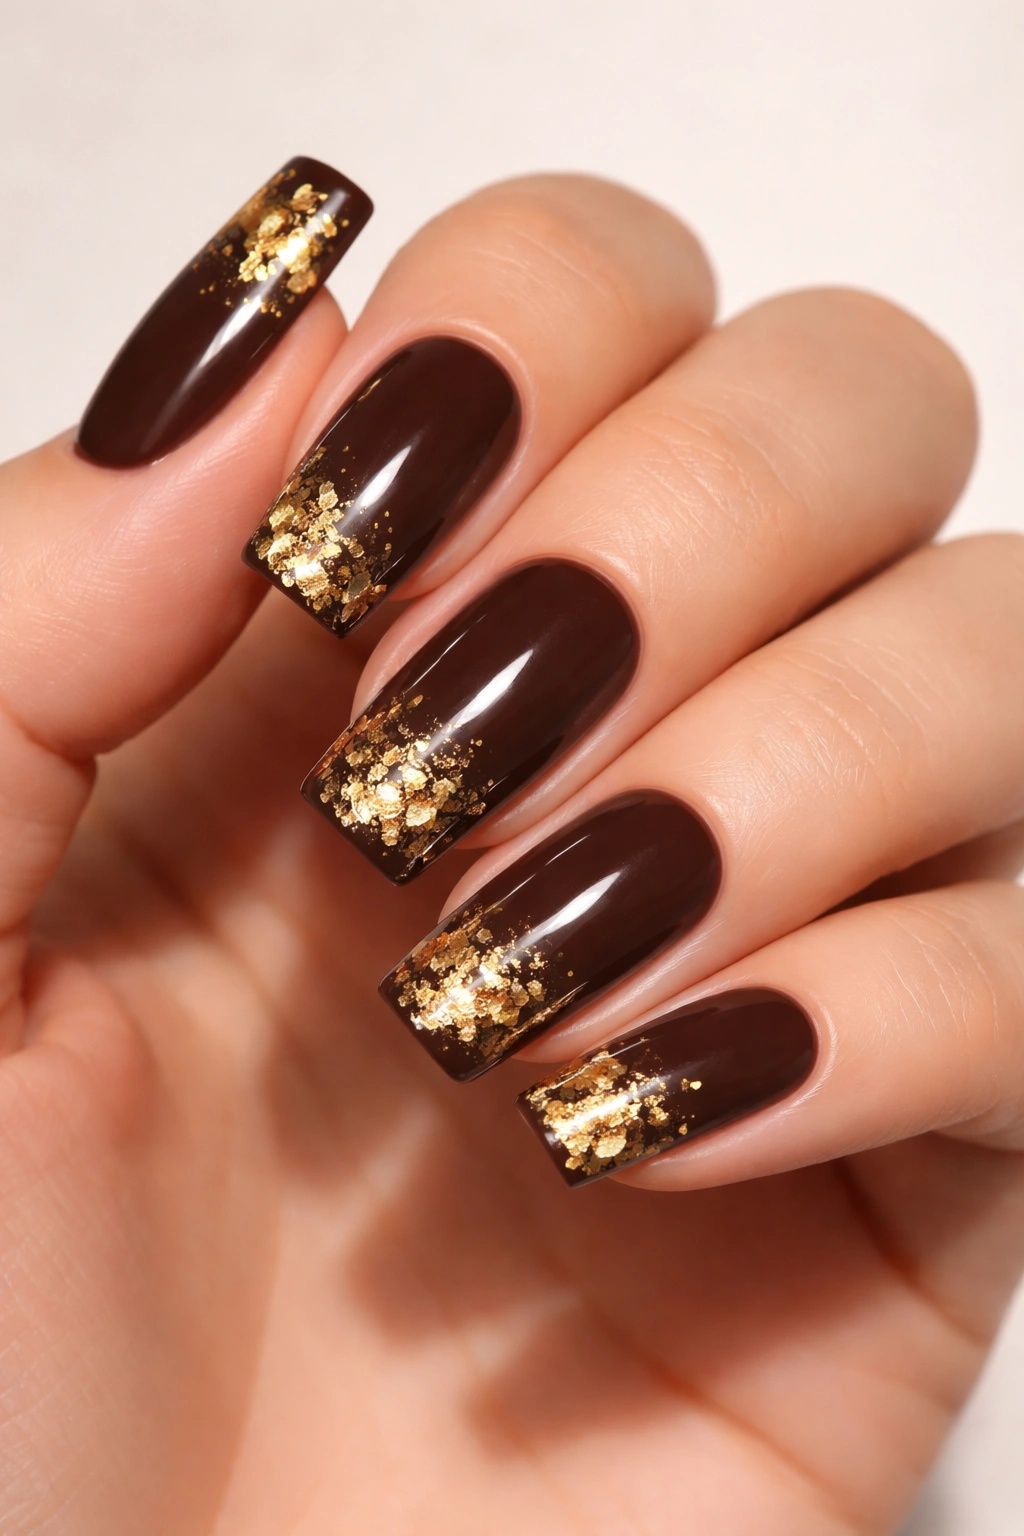
Deep chocolate brown is sophisticated and earthy while still feeling completely modern, especially paired with gold leaf accents scattered across the tips or clustered in geometric patterns. This combination has a luxury aesthetic that reads expensive and intentional. Soft square shapes in this color story look refined without being boring, and the design works year-round while still having those warm, grounded vibes that feel particularly good in fall and winter months.
Why Gold Leaf Elevates Simple Colors
Gold leaf creates textural interest and catches light in a way that flat painted gold cannot. The metallic elements add dimension to the design and make the chocolate brown feel richer and more sophisticated. When the gold leaf is applied selectively rather than covering the entire nail, it creates a sense of curated luxury—like you deliberately chose exactly where you want the emphasis.
Application Techniques Worth Requesting
- Scattered gold leaf across the tips for a confetti effect
- Gold leaf concentrated in the center or bottom corner of each nail
- Full gold leaf coverage on accent nails (perhaps just the ring finger and pinkie) while other nails stay solid chocolate brown
- Gold leaf embedded in a glossy topcoat that creates a glass-like effect over the brown
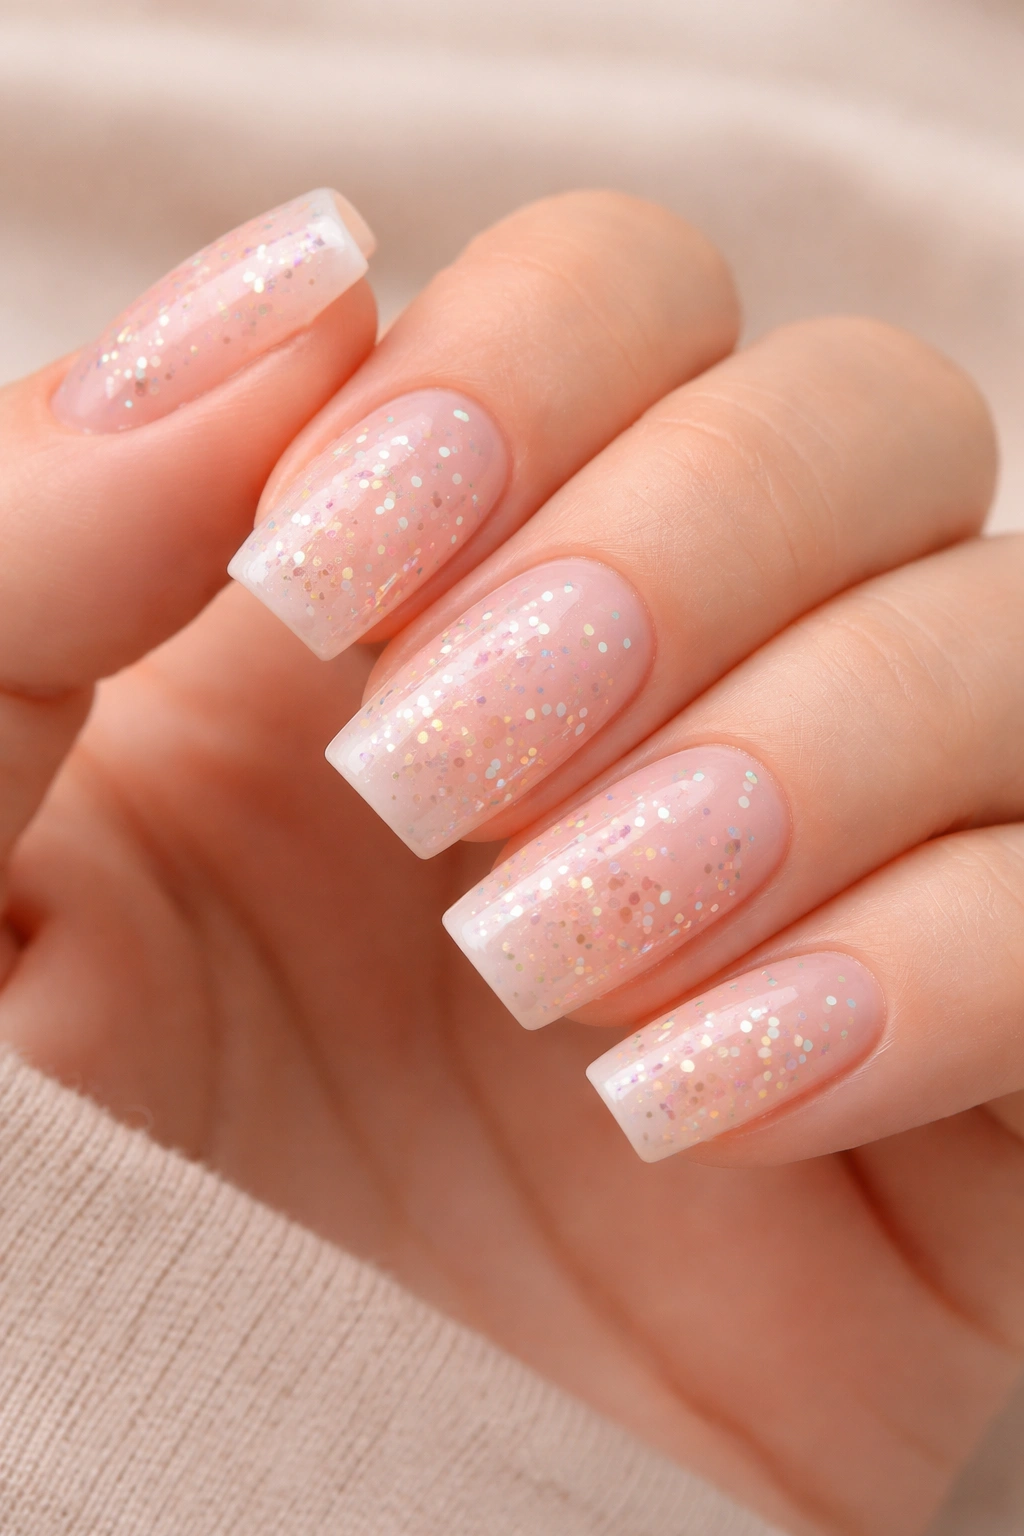
9. Sheer Pink Nude with Multicolored Confetti Flakes
This design combines barely-there sheer pink (you can almost see through to your nail) with small, colorful confetti-like flakes scattered throughout. The sheer base keeps the overall aesthetic refined and wearable, while the confetti adds personality and subtle color without the design being loud. It’s the sweet spot between sophisticated and playful, making it perfect for anyone who wants their nails to feel special without demanding constant attention.
The Beauty of Sheer Formulas
Sheer acrylic bases let your natural nail slightly show through, which creates an illusion of thinner, more delicate nails—flattering even if your natural nails are on the thicker side. The sheer pink also photographs beautifully and works across virtually every skin tone because it’s so transparent and warm.
Confetti Placement Strategy
- Sparse confetti scattered only near the tips for a minimalist approach
- Dense confetti clustered on accent nails (usually ring finger or pinkie) while other nails stay pure sheer pink
- Confetti concentrated along the edge of each nail like a natural gradient
- Mixed confetti types (metallic flakes, tiny iridescent pieces, colored specks) for added visual texture
The soft square shape gives you just enough space to make confetti placement intentional and visible without the design becoming chaotic.
10. Soft Gray with White Marble Veining
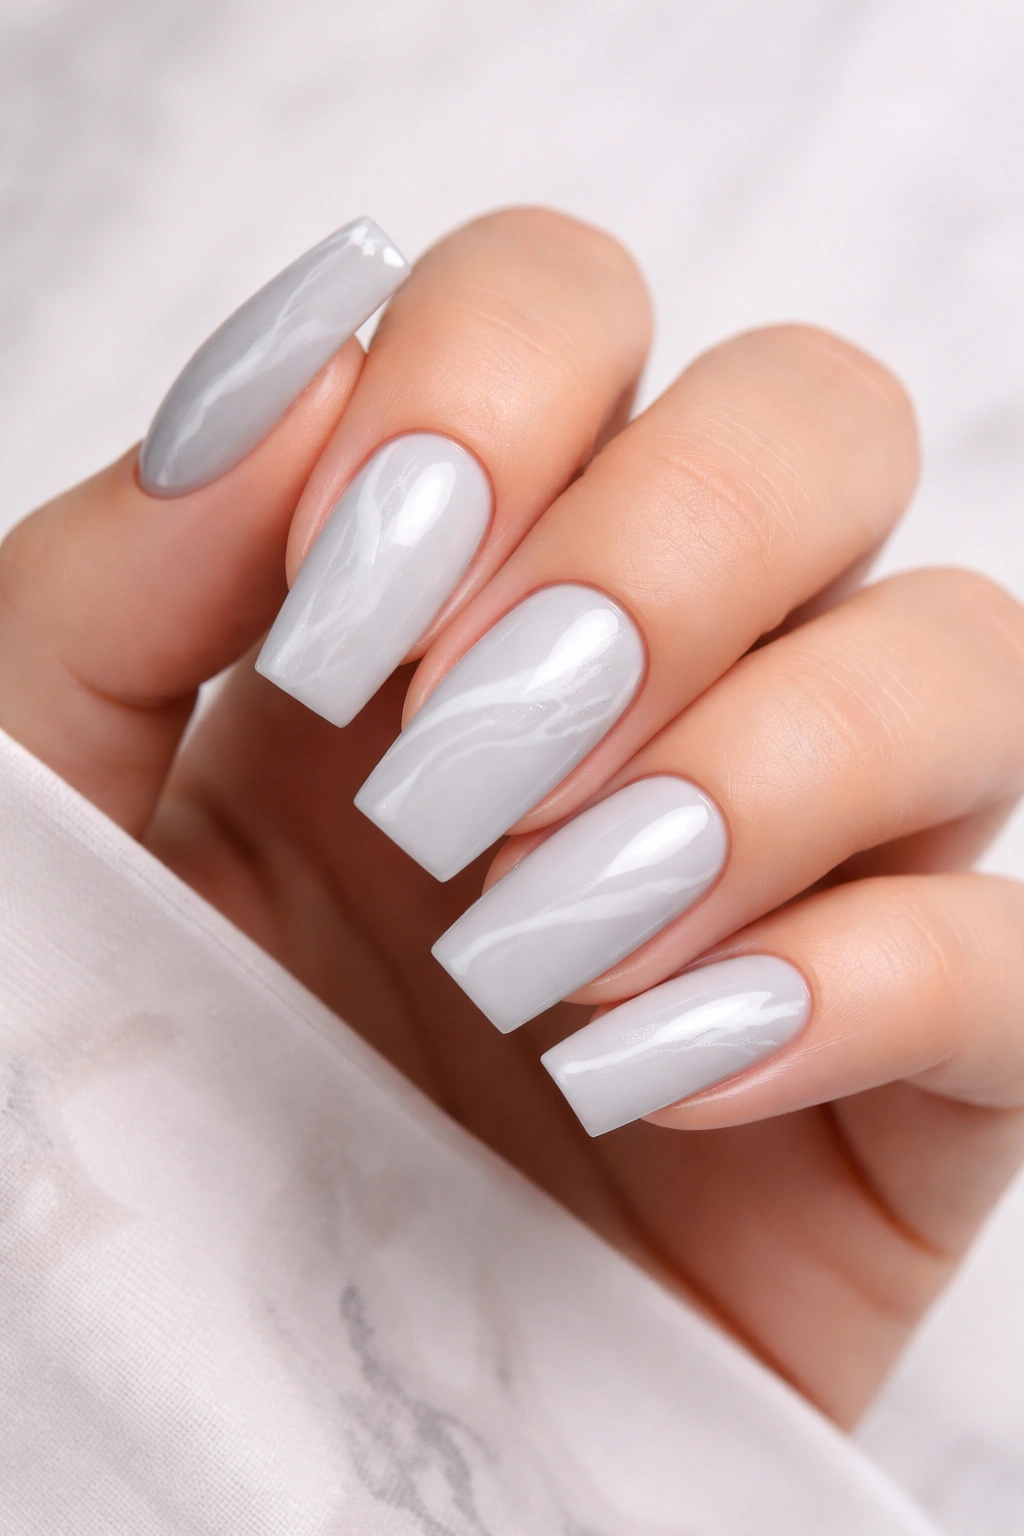
Elegant, neutral gray serves as the perfect canvas for white marble veining that creates an organic, natural-looking pattern reminiscent of actual marble stone. The soft square shape showcases this design beautifully because the veining can follow the flow of your nail shape and creates visual movement across the surface. This design feels sophisticated and timeless—it’s the manicure equivalent of wearing a neutral outfit that somehow looks more interesting than anything flashy.
Marble Veining Techniques
Hand-painted veining is traditional and allows for completely custom patterns, while some technicians use stamping plates or water marble techniques to create the effect more quickly. Each method produces slightly different results—hand-painted tends to look more organic and imperfect (in a good way), while stamping can create more uniform, symmetrical patterns.
Making Marble Work on Your Nail Shape
Request that your technician vary the thickness and opacity of the white veining so some lines are bold and clear while others are more subtle. This variation makes the marble effect look more natural and less like a flat design. The veining should flow in different directions across different nails rather than all running the same direction—organic marble doesn’t repeat predictably.
Pro tip: Gray and white marble designs actually look better slightly matte than super glossy because the finish mimics actual stone rather than making it look like a printed image on your nail.
11. Warm Beige with Thin Black Line Details and Negative Space
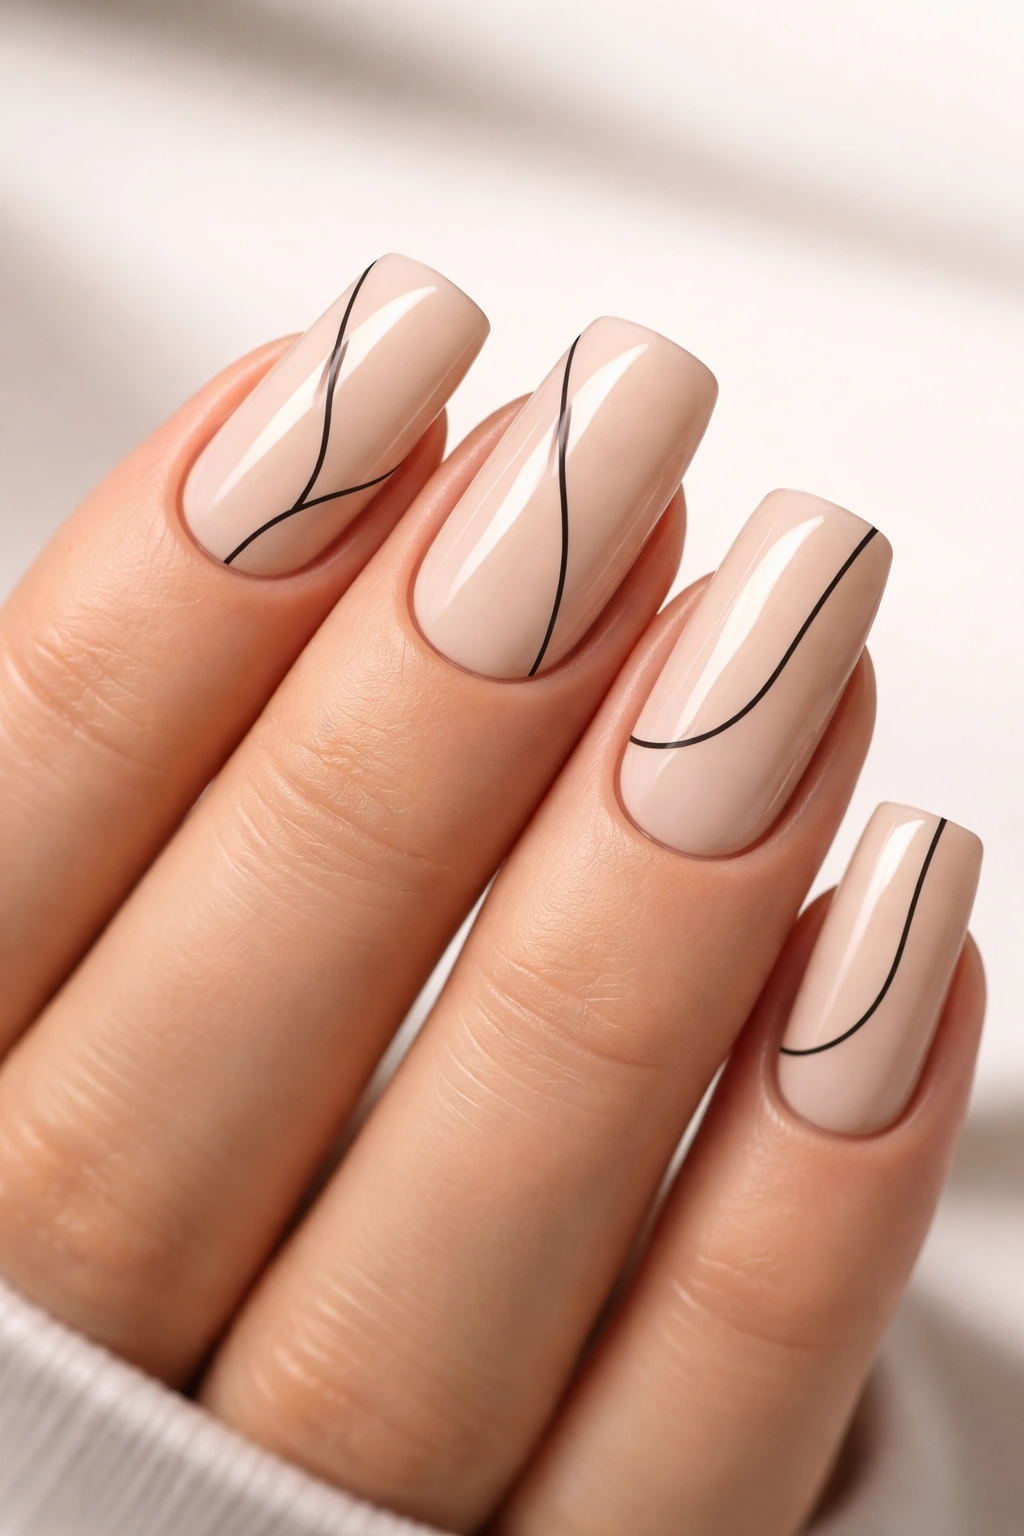
A warm, sophisticated beige paired with minimalist black line work and sections of negative space (exposed acrylic or actual nail showing through) creates a contemporary, gallery-like aesthetic. The soft square shape is absolutely ideal for this design because the straight edges of the shape work perfectly with linear black details. This is nail art that feels modern and intentional without being loud or trendy.
Negative Space Possibilities
- A small negative space rectangle or square in the center of each nail, outlined by thin black lines
- Negative space concentrated on the tip while the base stays solid beige
- Geometric negative space sections (triangles, trapezoids) arranged in patterns across the nail
- Negative space creating frames around the edges while the center stays beige
Negative space designs are visually interesting because they’re literally not there—they create optical illusions and make the design feel more sophisticated because it’s not relying on color or texture, just composition.
Line Work Application Tips
Ask your technician to use a very thin striping brush or fine-tipped detailing tool for the black lines, and request that they seal the work heavily because thin lines can look less defined over time as topcoat yellows or chips. Some technicians prefer hand-painting lines while others use striping tape, so discuss which method they’re most comfortable with.
12. Blush Pink with Gradient to Deep Mauve Tips
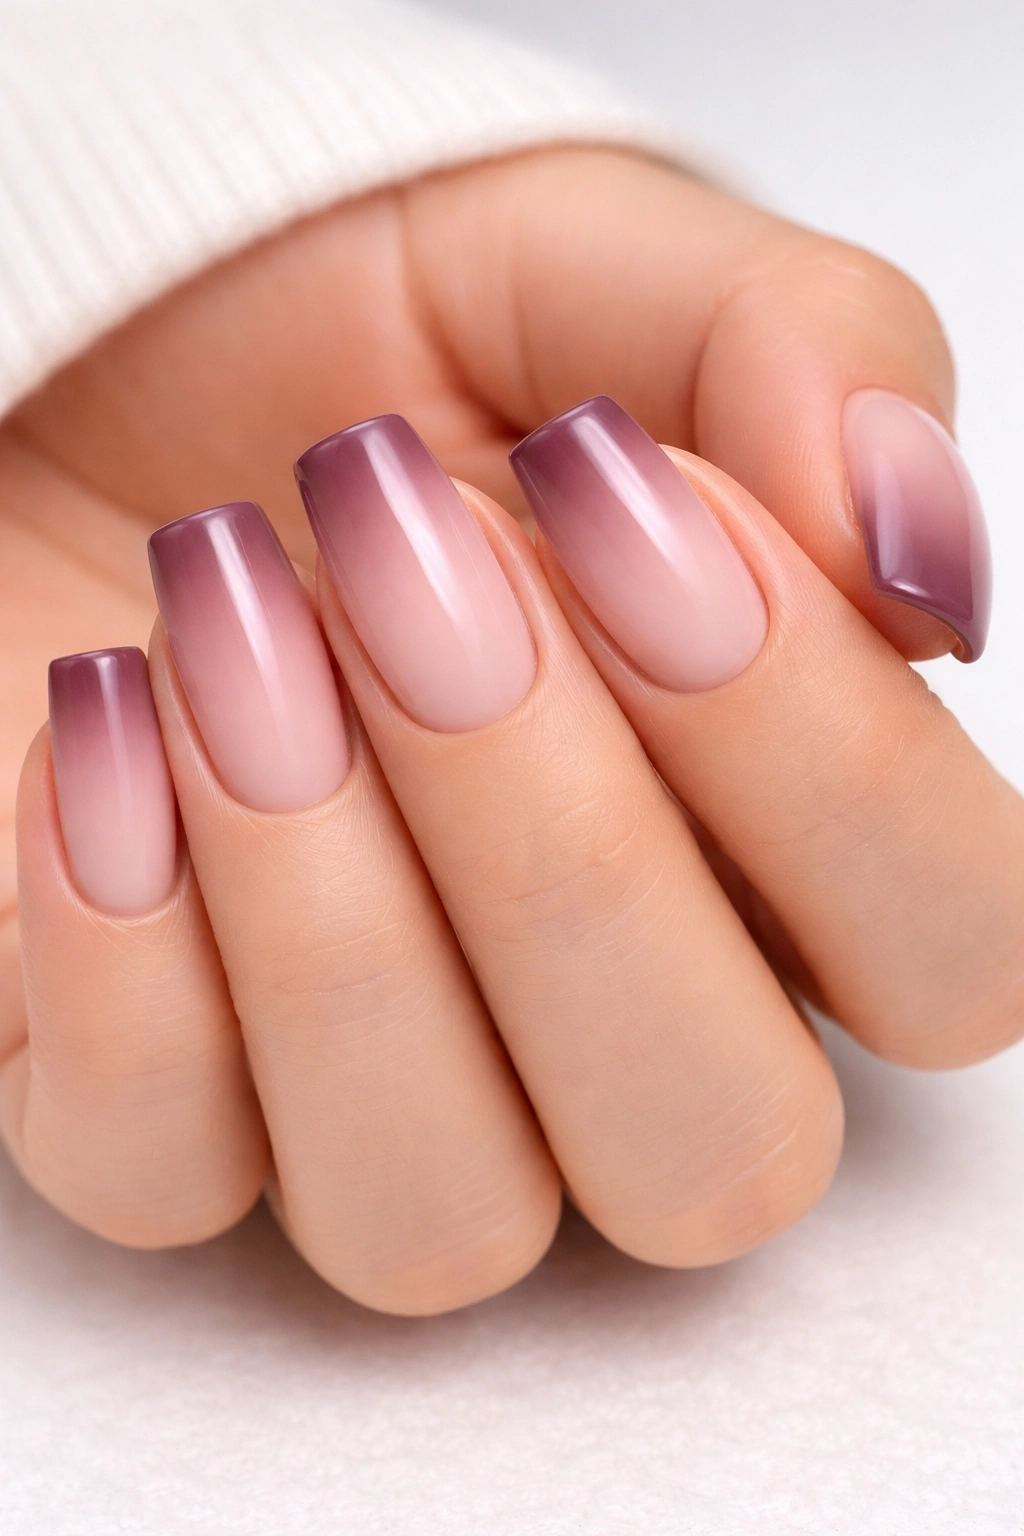
A romantic soft pink that transitions gradually into deep mauve or plum at the tips creates an ombré effect that’s elegant and distinctly feminine without being overly girly. The color transition feels intentional and sophisticated on soft square nails, and the gradient creates visual interest while maintaining a cohesive color story. This design works beautifully for weddings, romantic occasions, or anyone who loves the blush-to-mauve color family year-round.
Color Transition Importance
The beauty of this design lives in how smoothly the colors blend. A harsh line between pink and mauve would look cheap; a feathered, gradual transition looks expensive and intentional. Ask your technician specifically about their ombré technique—do they layer colors and blend with a brush, or do they use a sponge technique? Different methods produce different results, and some create softer transitions than others.
Making the Gradient Personal
- Keep the ombré subtle with colors very close in tone for a soft, romantic effect
- Go bolder with a wider color range from light blush to dark mauve for more dramatic impact
- Request that the gradient is concentrated on the tips (starting halfway down the nail) for a classic ombré look, or have it flow from the base to tip for a more gradual transition
13. Ivory with Delicate Gold Filigree Pattern
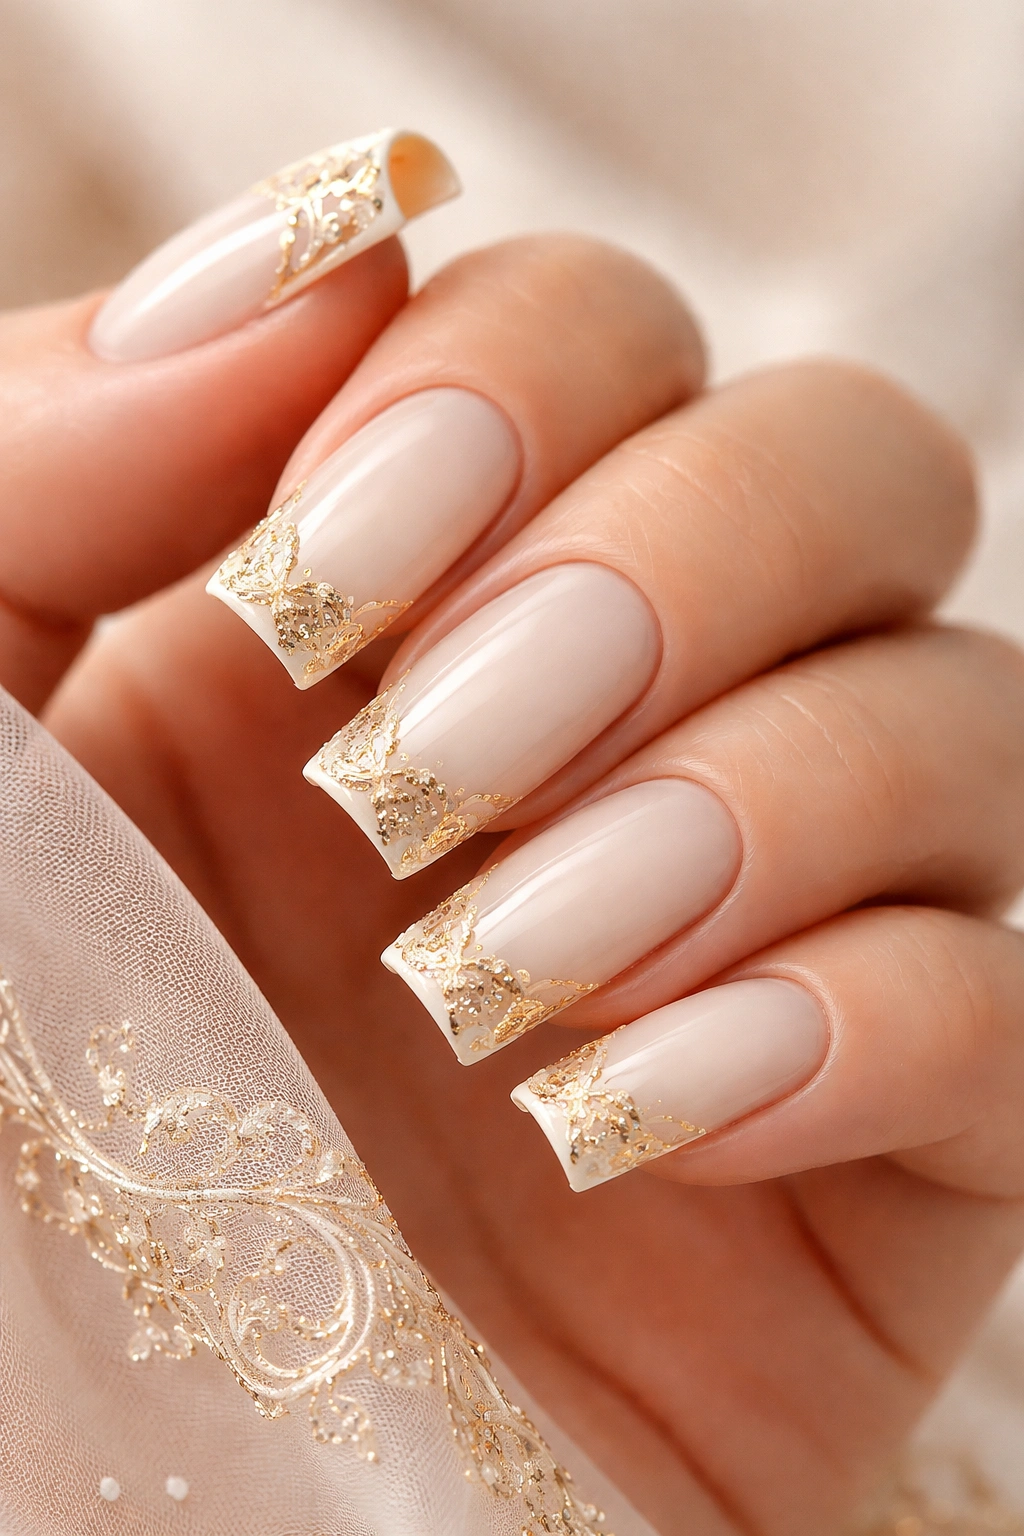
Ivory (slightly warmer than pure white) paired with intricate gold filigree designs creates an ornate, elegant aesthetic that somehow still feels modern on soft square nails. The filigree pattern mimics jewelry or henna art, giving your hands a deliberately curated, luxurious quality. This design works beautifully for special occasions or for anyone who appreciates detailed, artistic nail work as part of their everyday aesthetic.
Filigree Design Complexity
- Minimalist: Delicate filigree concentrated only on the tips, covering maybe the top third of each nail
- Moderate: Filigree patterns framing the edges of each nail or creating a lace-like border
- Ornate: Intricate filigree covering a larger portion of the nail, perhaps with varying density (some areas more detailed than others)
The soft square shape actually provides an ideal canvas for filigree because the straight edges give the pattern clear boundaries and the spacious surface lets the details be visible and appreciated.
Gold Tone Selection Matters
Ask your technician whether they’re using warm gold, rose gold, or champagne gold for the filigree, as the tone dramatically changes the overall vibe. Warm gold feels classic and timeless, while rose gold feels slightly more contemporary, and champagne gold reads as particularly romantic.
14. Nude with Glossy Finish and Subtle Half-Moon Manicure Detail
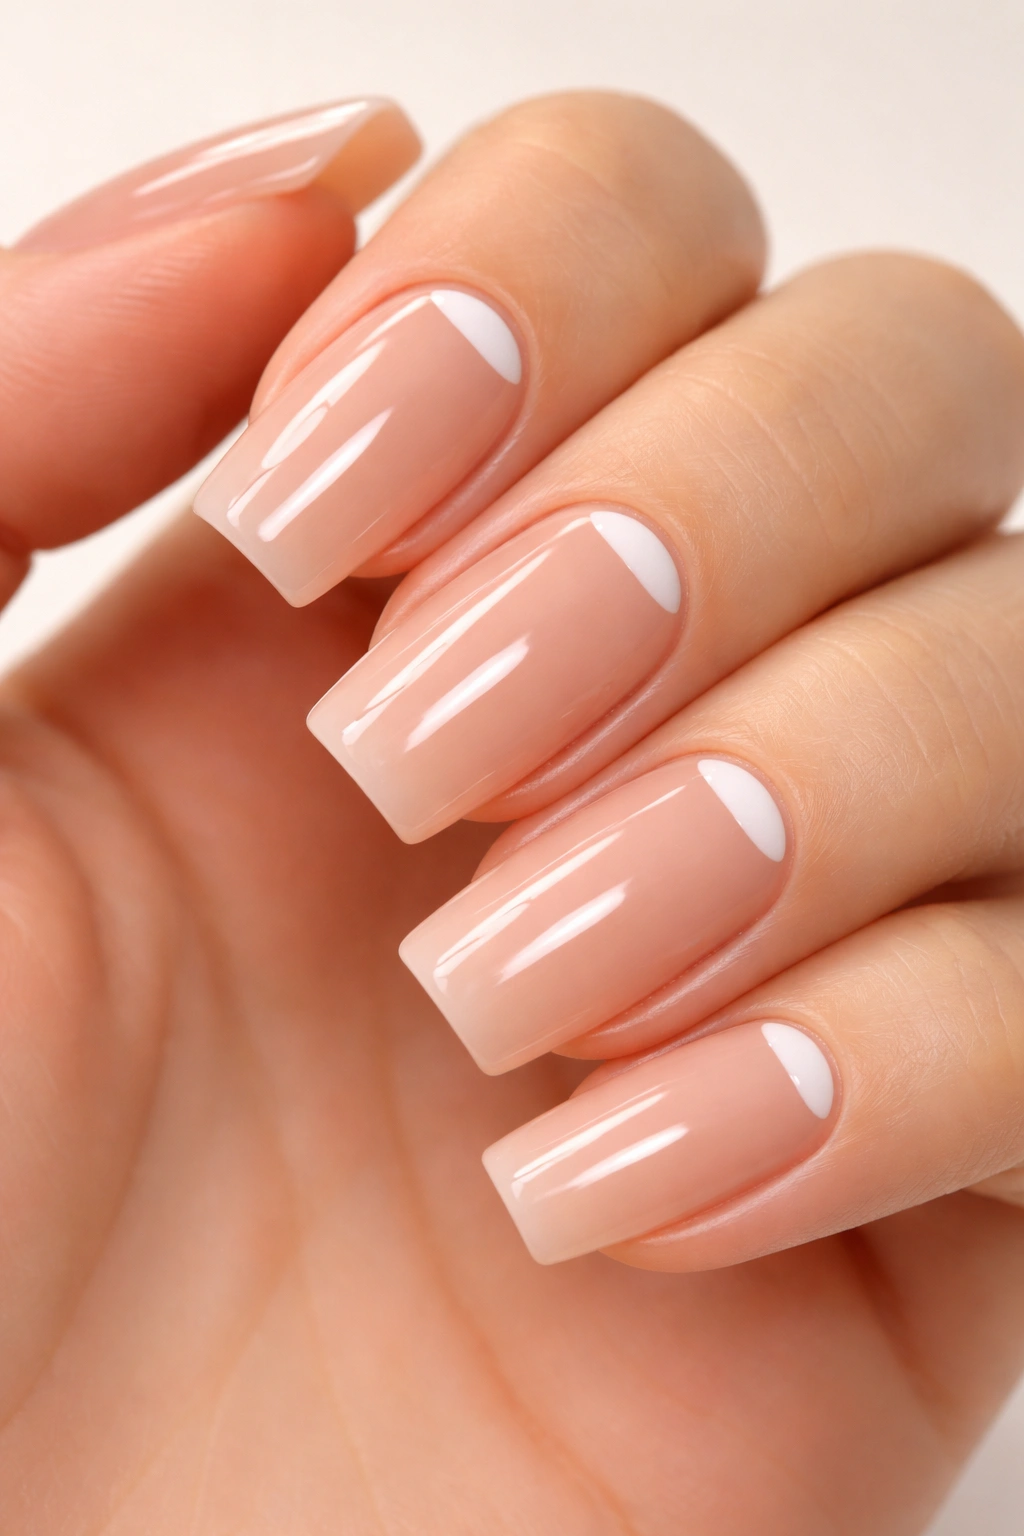
A classic half-moon manicure brought to soft square nails with a modern twist: solid nude with a delicate contrasting color (white, gold, or soft pink) creating a moon shape at the base of the nail. The contrast is subtle but immediately elevates the design from basic to intentionally designed. This works beautifully because the soft square shape gives the half-moon plenty of space to be visible without overwhelming the nail.
Half-Moon Placement Variations
- Classic: A clean contrasting moon shape at the very base of the nail
- Elongated: The moon extends slightly higher up the nail for more visual impact
- Colorful: Use colors like soft pink, champagne gold, or even a deep emerald for the moon while keeping the main body nude
- Floating: A half-moon shape not at the base but floating in the middle of the nail for a contemporary twist
The beauty of this design is its simplicity—it doesn’t require detailed artwork or complex techniques, yet it reads as intentionally designed and sophisticated.
Keeping the Moon Edge Clean
The defining characteristic of a successful half-moon manicure is a clean, precise edge where the colors meet. This requires a steady hand and often the use of striping tape or a nail guide to keep the line sharp. Ask your technician about their process for creating precise edges, and don’t skip this step as it’s what separates a polished manicure from a sloppy one.
15. Soft Lavender with Dried Flower Inclusions
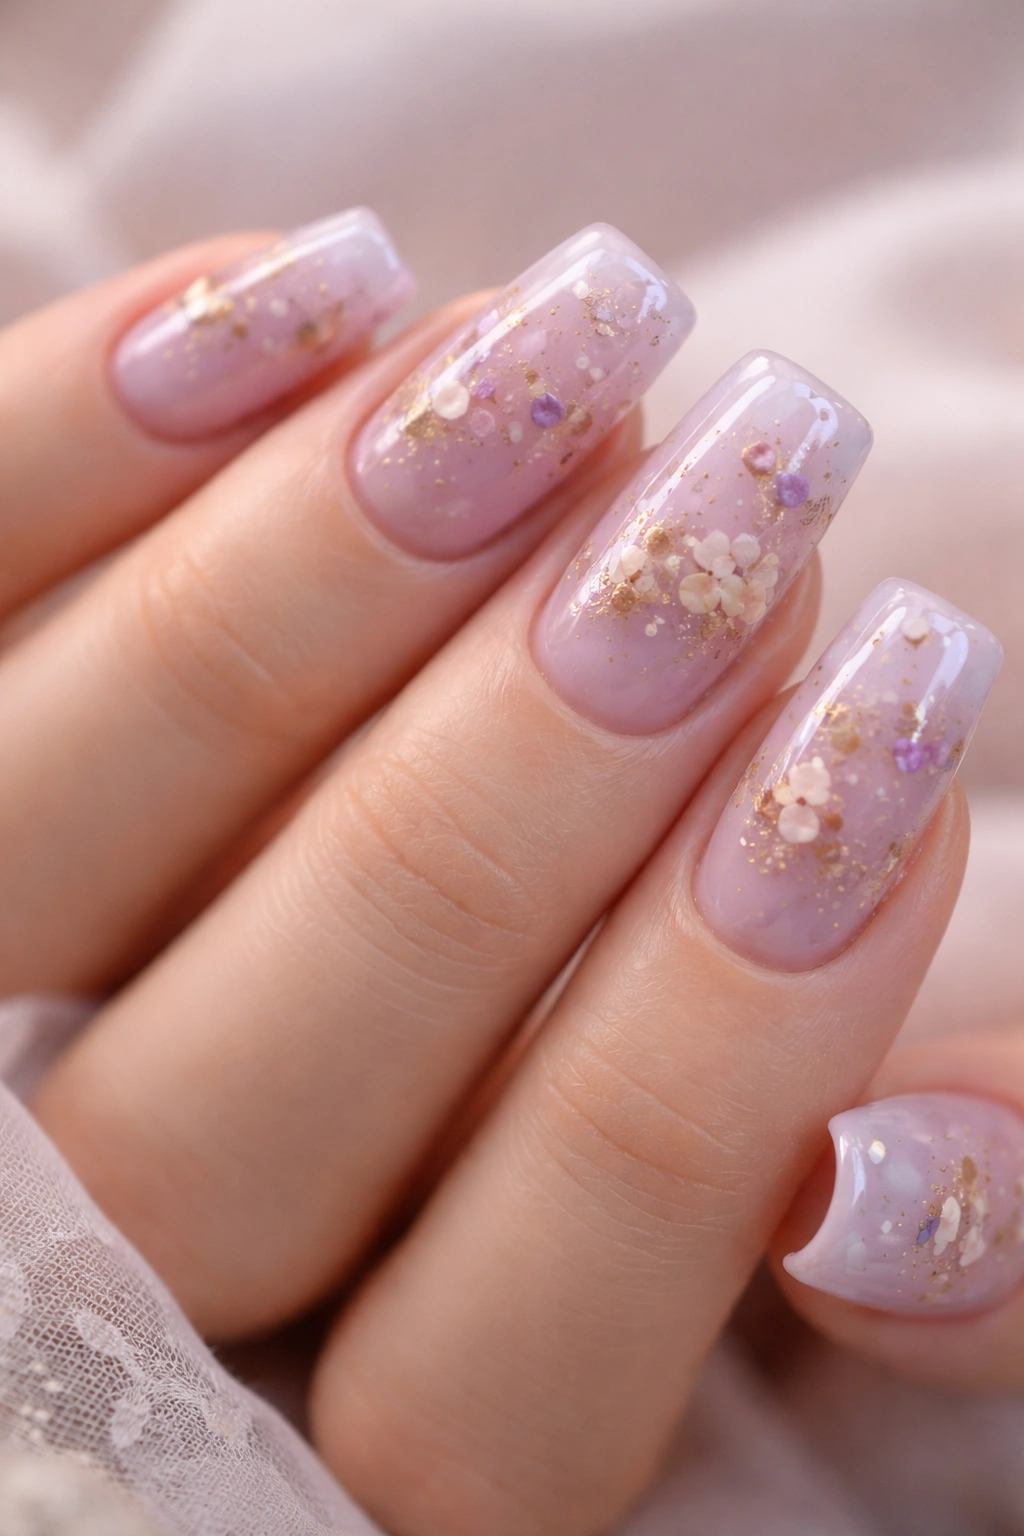
Pale lavender acrylic embedded with tiny dried flowers or flower petals creates a botanical, romantic aesthetic that’s delicate and visually unique. The soft square shape provides enough surface area for the flowers to be visible and appreciable, and the pale lavender base ensures the design reads as elegant rather than crafty. This is the kind of manicure that people will ask about because it genuinely looks like something special.
Dried Flower Options
- Tiny preserved baby’s breath for a minimal, delicate look
- Small dried rose petals scattered throughout for a romantic vibe
- Pressed flowers (pansies, violets, daisies) for visible, recognizable botanical elements
- Mixed dried botanicals for textural variety and interest
Dried flowers are embedded during the acrylic application process, so they become truly part of the nail rather than sitting on top, which means they won’t fall off or shift around. This creates a durable design despite its delicate appearance.
Durability and Care Reality
Dried flower designs are more fragile than standard acrylic designs—the flowers can crack or become brittle under UV light over time. Ask your technician to seal the flowers heavily and to advise on whether they recommend a matte or glossy topcoat (glossy tends to protect the flowers better). These nails are beautiful but might need touch-ups sooner than traditional designs, so plan accordingly.
Worth knowing: Dried flower acrylic nails are conversation starters—be prepared to explain what they are and be complimented frequently. The design photographs incredibly well and always looks more expensive and intentional than the effort required to create it.
Final Thoughts
The versatility of soft square acrylic nails means you can genuinely find a design that matches your personality, profession, lifestyle, and aesthetic preferences—whether that’s minimalist and professional, romantic and artistic, bold and statement-making, or anywhere in between. The shape itself is so flattering and wearable that whatever design you choose will look refined and intentional rather than trendy or temporary.
The real secret to loving your acrylic nails long-term is choosing a design that feels authentically you rather than chasing what looks good on someone else’s hands. Soft square is forgiving enough to work with nearly every design style, and the shape genuinely does make your hands look more elegant—that’s not hype, it’s just geometry working in your favor.
When you’re ready to book your appointment, bring clear photos of the exact designs and colors you love, discuss your lifestyle and how much maintenance you’re willing to do, and be honest with your technician about how long you want your nails to be and what activities you’re doing with your hands daily. That conversation will help them recommend designs that’ll not only look beautiful initially but will age gracefully and remain wearable throughout the entire growth cycle until your next appointment.
