

Short squoval nails represent the sweet spot between practicality and polish. The shape itself—a hybrid of square and oval with slightly curved sides and squared-off tips—offers surprising durability while still looking intentional and manicured. Gel polish transforms this already-sturdy foundation into something even tougher. The key to keeping short squoval gel nails chip-free isn’t just about technique, though that matters. It’s about understanding which designs, finishes, and color choices genuinely resist visible damage better than others. Some nail art photographs beautifully but chips spectacularly by day three. Others sit on your nails for two full weeks looking flawless. This guide covers 15 specific short squoval gel nail designs that earn their keep through real-world durability, not just Instagram appeal.
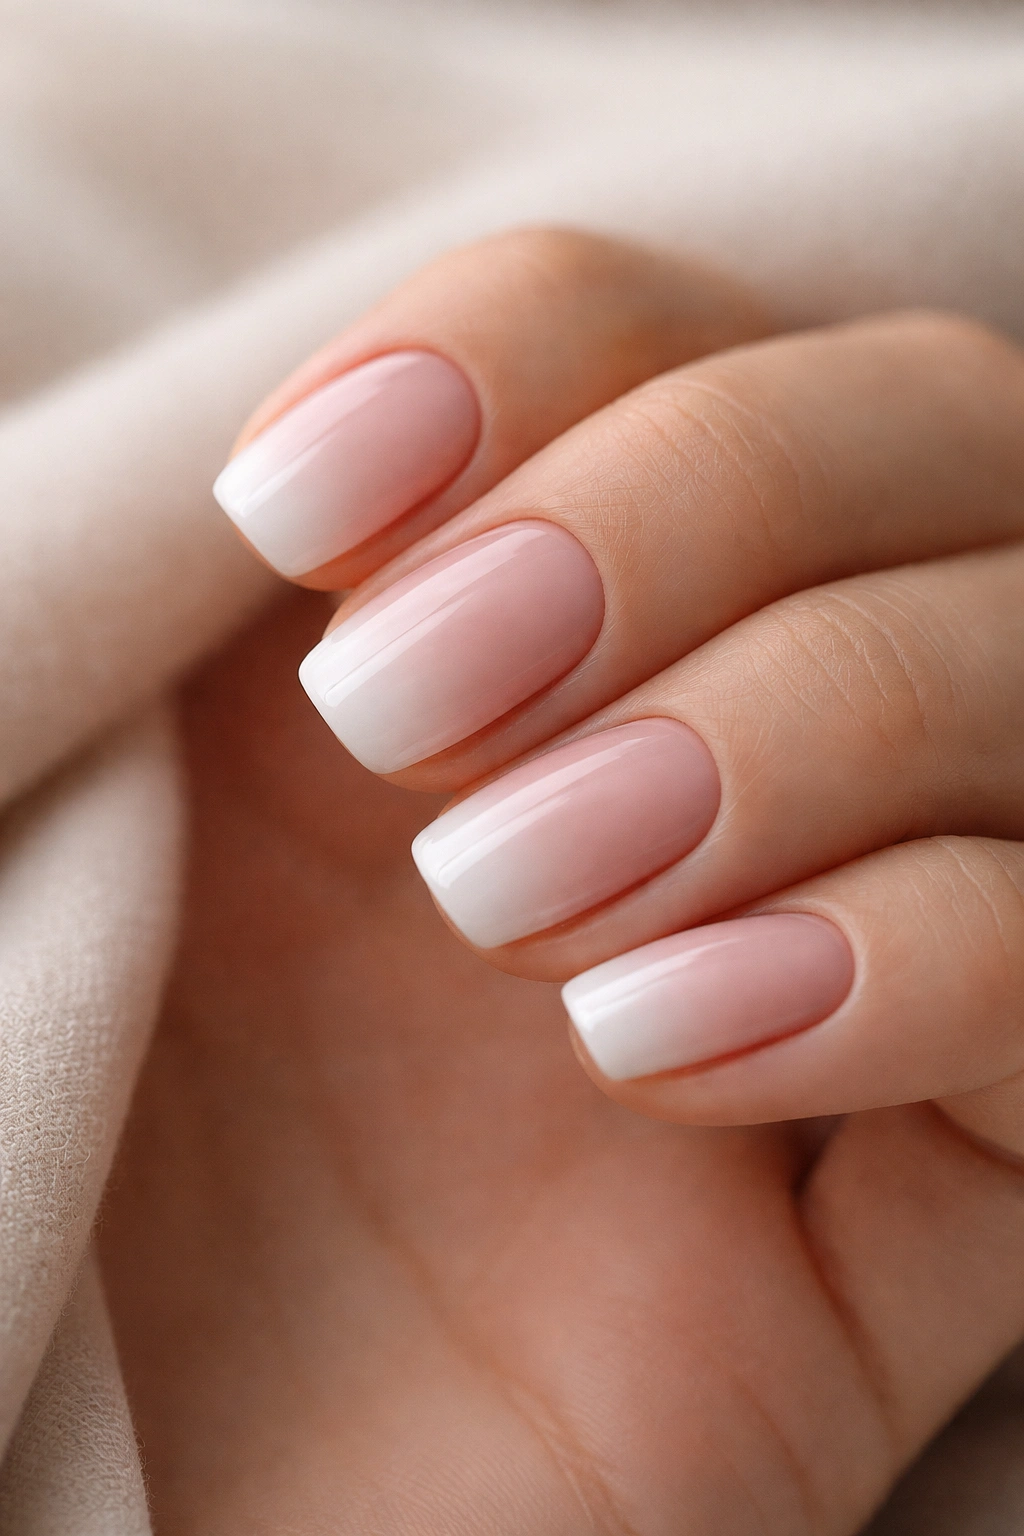
1. Classic French Ombre Squoval
The French ombre—a soft gradient fade from a nude or pale pink base to a white or cream tip—works exceptionally well on short squoval nails because the gradual color transition camouflages small imperfections and chips that would show up immediately on solid colors. The ombre effect creates visual interest without relying on intricate nail art that might catch and tear.
Why This Design Stays Pristine
Squoval nails, with their slightly tapered sides, guide the eye along clean lines. The ombre fade sits perfectly within these proportions. The nude-to-white gradient creates a lengthening illusion even on very short nails—a psychological trick that makes the manicure feel more premium than its simplicity suggests.
How to Prevent Chipping
The magic happens in the application. Use a quality builder gel base that adheres to the nail plate completely—this is non-negotiable. File the ombre edges gently with a soft-grit buffer after curing to create a seamless transition. Seal everything with a high-quality glossy top coat. When the gradient is perfect, any tiny chips at the white tip blend into the faded effect and become nearly invisible.
Pro tip: Apply slightly thicker polish layers in the white tip zone—this extra coating acts as built-in protection for the most vulnerable area of short nails.
2. Deep Burgundy with Gold Leaf Details
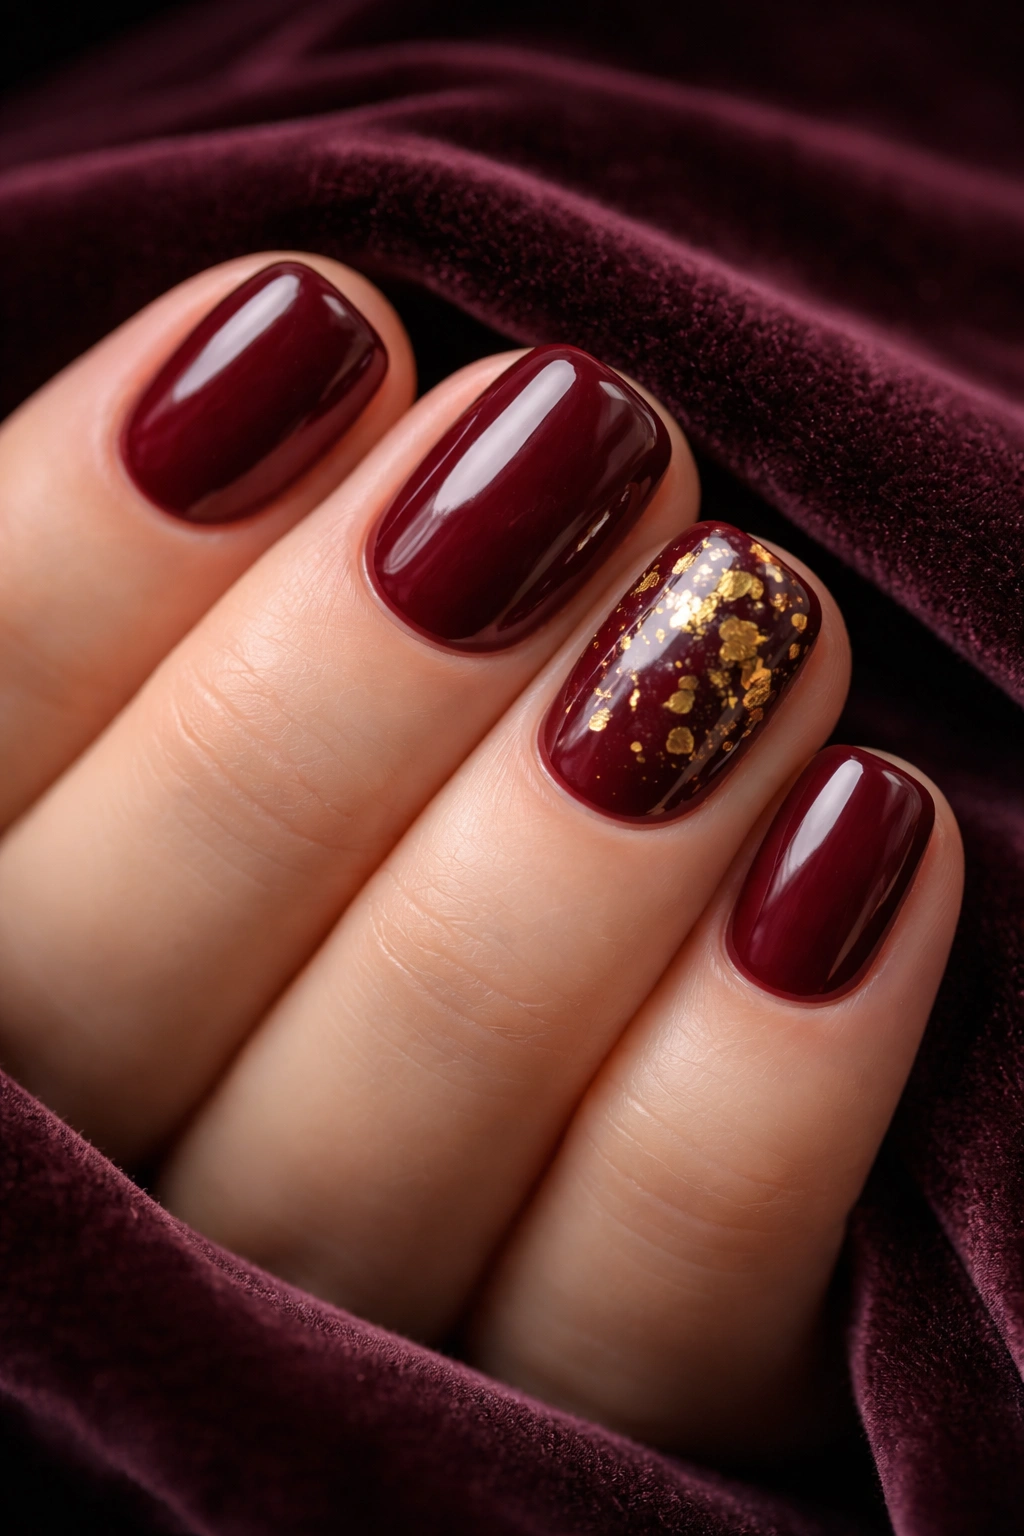
Burgundy demands respect. This wine-deep shade carries sophistication that never dates, and on short squoval nails it looks intentional rather than trying too hard. Gold leaf accents—tucked into the negative space or scattered across one or two accent nails—add richness without complicating maintenance.
The depth of burgundy is forgiving. Micro-chips that would announce themselves on nude or pastel shades disappear into the color’s natural darkness. The gold leaf, applied under a thick top coat, sits protected within the gel layers rather than on the surface.
Building This Design
Start with two coats of burgundy builder gel, curing between each layer. The builder gel formula’s thickness provides immediate chip resistance. Place gold leaf pieces while the second coat is still slightly tacky—this adhesion matters. Once the leaf is set, apply a glossy top coat that extends slightly past the edge of the nail. This seal is crucial; it locks the gold in place and protects against peeling.
Why It Lasts
Burgundy’s density means the gel absorbs and distributes stress differently than lighter colors. Gold leaf, when properly encapsulated, becomes harder to disturb than exposed nail art sitting on the surface. The visual weight of the color also makes shine look richer longer—dulling that would be obvious on pale polish reads as intentional texture on deep burgundy.
3. Matte Nude with Minimalist Lines
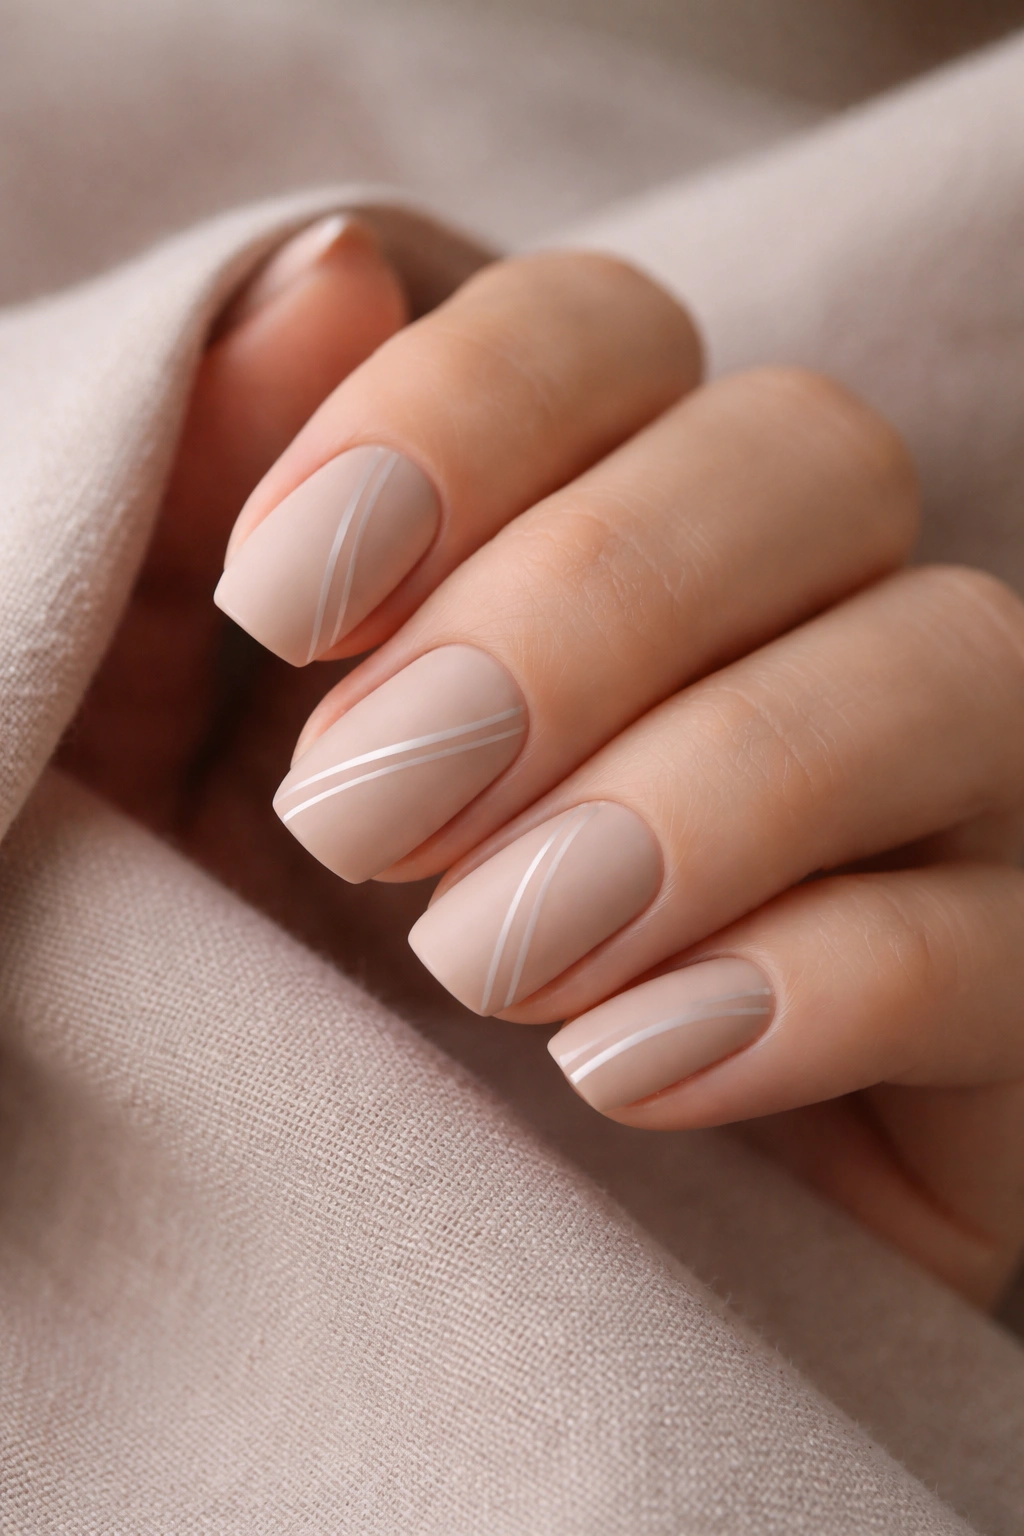
A soft, warm nude in matte finish pairs with ultra-fine geometric lines—just two or three thin white or gray lines per nail, placed asymmetrically. This is nearly invisible from a distance but undeniably sophisticated up close. The matte finish is the secret weapon here for chip resistance.
Matte top coats change how light interacts with the nail surface. Glossy finishes show every microscopic imperfection and edge reflection. Matte absorbs light more evenly, making minor chips virtually undetectable. Combined with the neutral base, this design can go three full weeks without looking worn.
Application Precision Matters
The nude base needs flawless application—two thin, well-cured coats with no streaking. Use a matte top coat from the moment you know this will be your finish; matte gel applies and cures differently than gloss, and mixing finishes creates texture issues. The thin lines require a steady hand or a thin liner brush, but they’re worth the effort. These lines sit on the surface under a protective layer of matte seal, so they won’t pull or catch.
The minimalism is the entire point. Short squoval nails don’t need busy designs. This one proves that. The visible nail plate breathing through the design makes the manicure feel modern and intentional rather than bare.
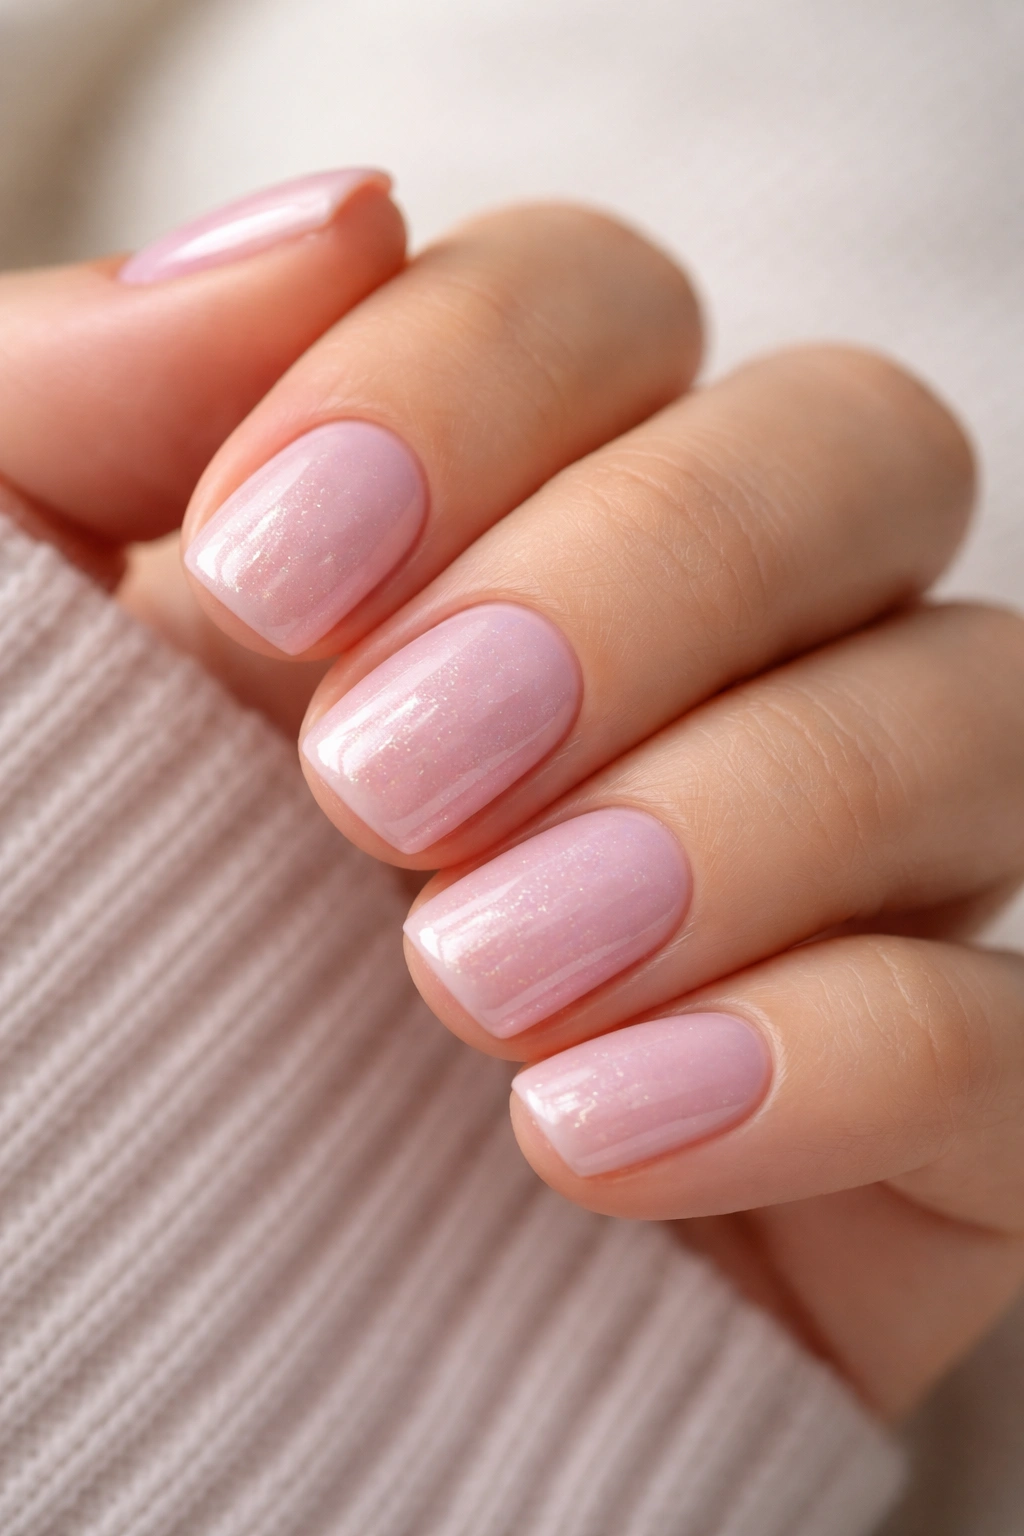
4. Glazed Donut Nails
Glazed donut nails—creamy, translucent pink with pearl shimmer and a slightly glossy finish—have become ubiquitous because they’re genuinely chip-proof. The design originated from Japanese nail trends and translates beautifully to short squovals. The soft pink base with fine pearl particles catches light in ways that hide imperfections automatically.
The translucent formula is the game-changer. Light passes through the gel, so chips don’t create dark edges or obvious gaps. The pearl particles scatter light across the surface, disguising wear patterns. This manicure can look fresh for four weeks because visual degradation is nearly invisible.
Getting the Texture Right
Use a translucent builder gel base—not a clear base with pigment mixed in, but a formula specifically designed for the glazed donut effect. Two coats create the proper saturation. The pearl shimmer comes from either tiny shimmer particles in the gel or from a translucent gel with embedded micro-glitter. The final topcoat should be glossy to maximize that ceramic-like shine that makes the design iconic.
Critical point: This design requires proper sealing at the free edge. Glossy topcoat must wrap the edge completely, creating a seal that prevents peeling from the tip. When applied correctly, you can wear these nails until the gel grows out naturally—actual chipping is rare.
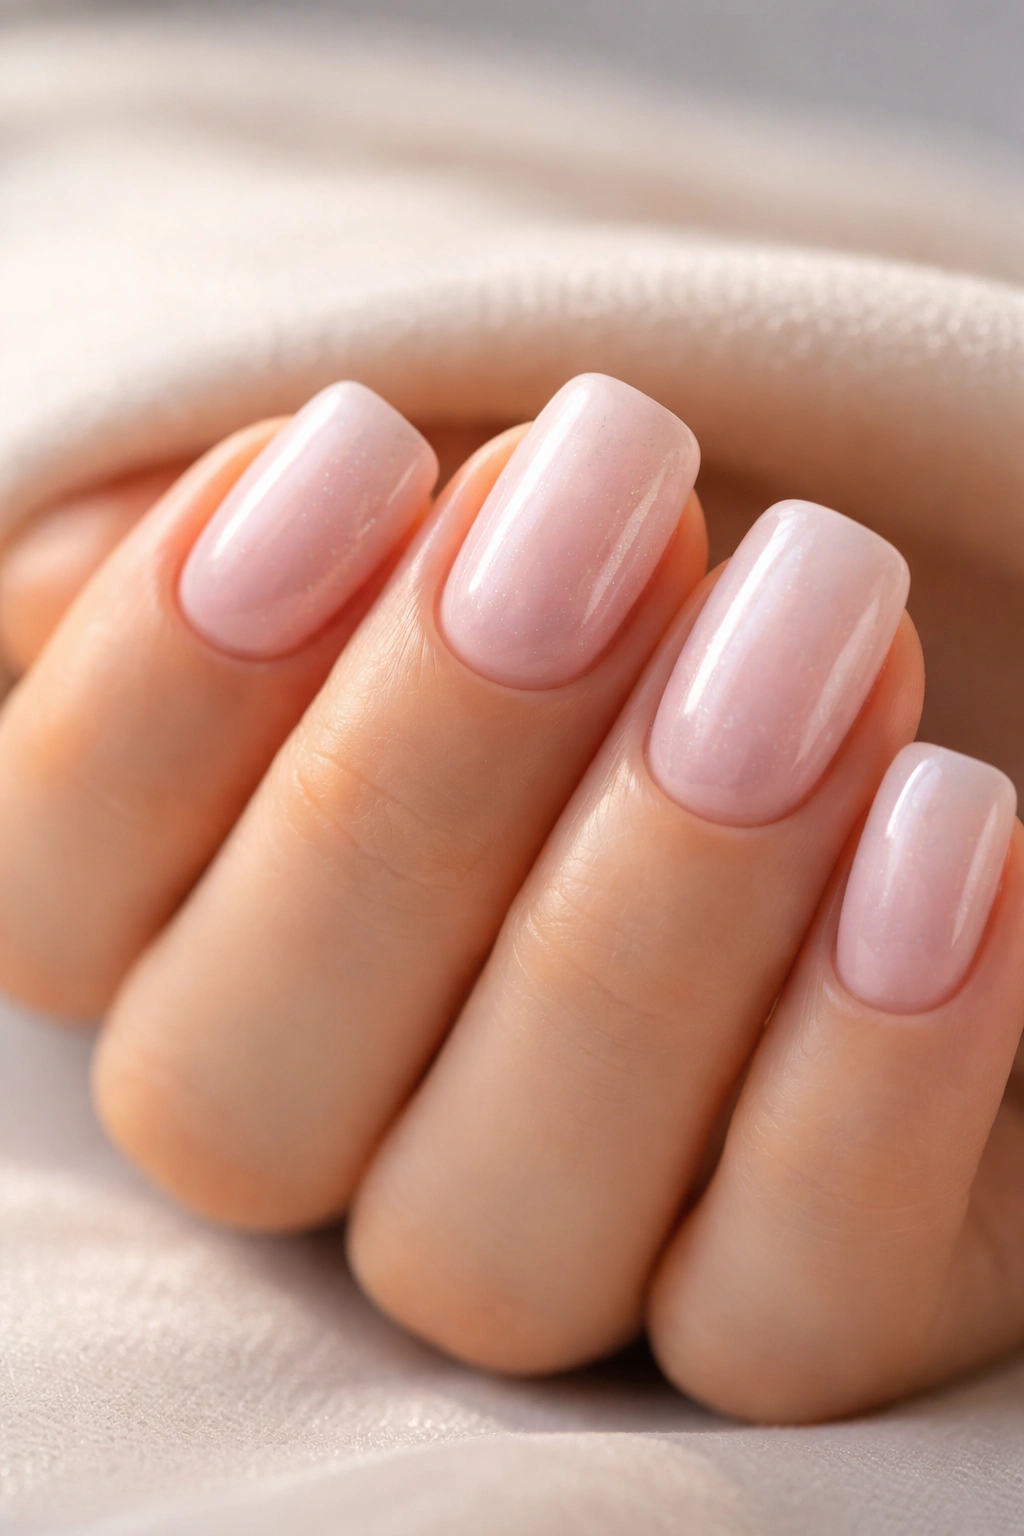
5. Soft Pink with Pearl Finish
A creamy soft pink—think ballet-slipper pink, not baby pink—topped with a pearl shimmer finish creates an understated elegant look. This isn’t the same as glazed donut nails; this design uses opaque pink instead of translucent, giving it more coverage while maintaining the forgiving pearl effect.
The opaque pink base provides full coverage in two coats, and the pearl finish adds depth. Pink is one of the most flattering colors for short nails because it elongates hands and reads as intentional rather than bare or undone. The pearl keeps things modern without being trendy.
Durability Through Finish
Pearl finishes behave differently than solid colors or glitter. The micro-shimmer particles catch light in ways that create visual texture. Small chips don’t read as obvious damage because the reflective finish disguises gaps. The pearl also tends to sit within the gel layers rather than on the surface, offering built-in protection.
Apply opaque pink with full coverage—thin streaky coats fail at durability, so don’t rush the base. Once cured, layer the pearl shimmer finish. Some pearl finishes are in gel form; others are separate products applied over the base. Either method works if executed properly. Seal with glossy topcoat, ensuring the shine wraps the entire nail including the underside of the free edge.
6. Emerald Green with Chrome Details
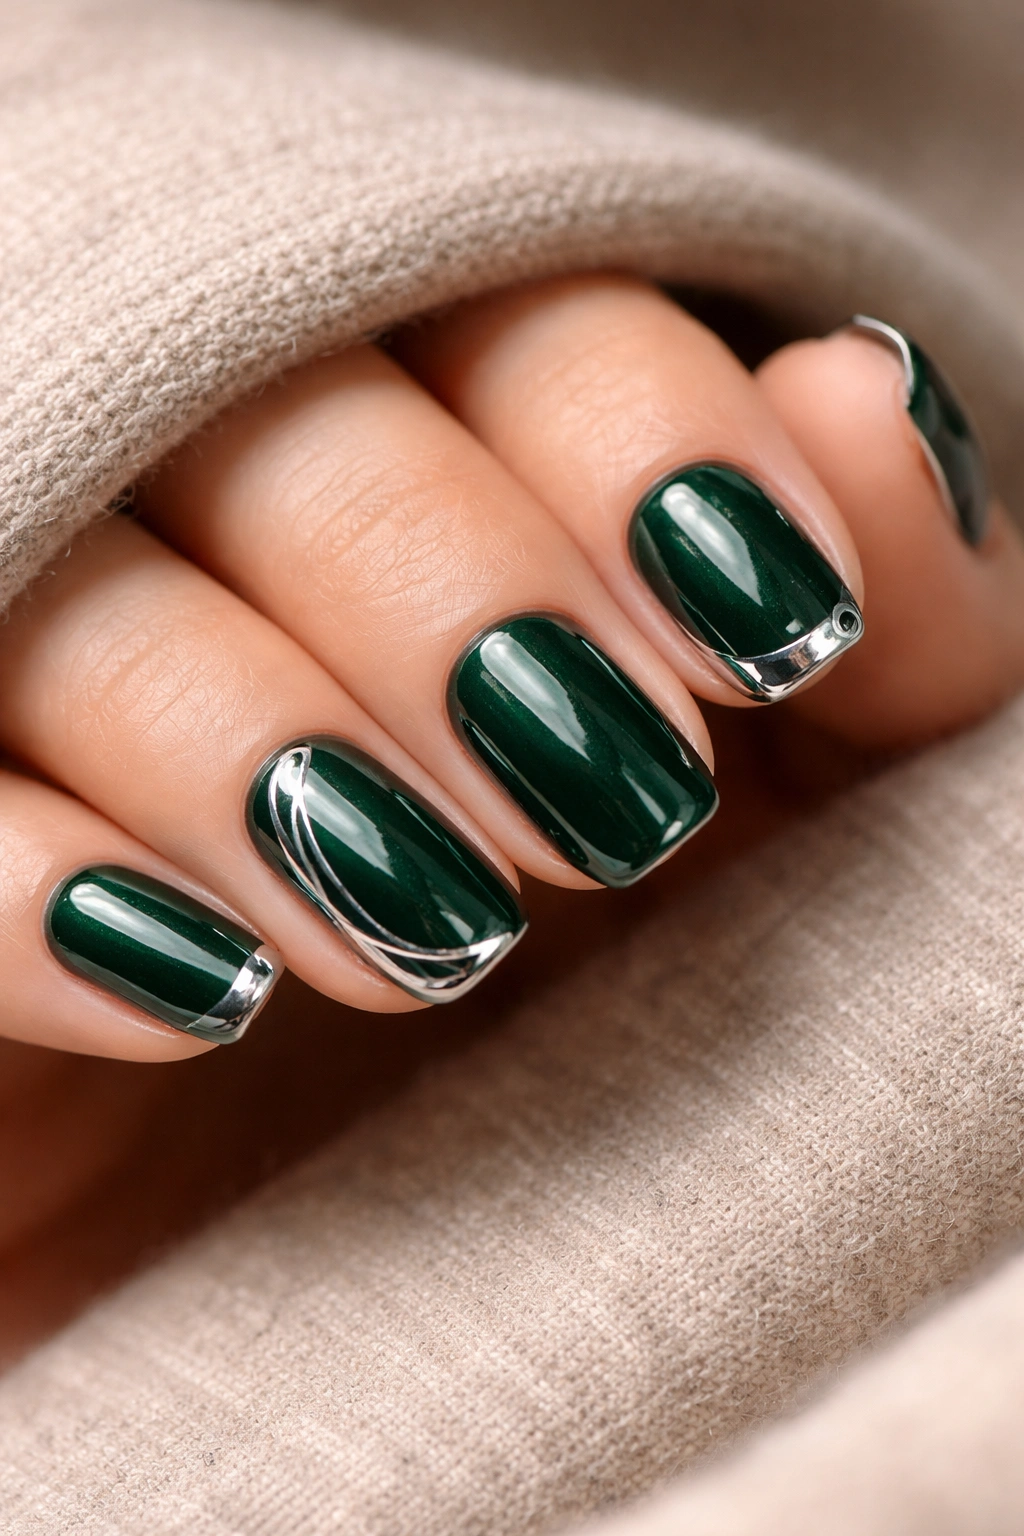
Jewel-tone emerald demands confidence and rewards it with a sophisticated look that photographs stunningly. On short squoval nails, emerald reads less trendy and more timeless than on longer shapes—the compact nail bed keeps the color contained and intentional.
Chrome details—small chrome accents placed on the tip or scattered as micro-patterns—add modern edge without requiring intricate nail art skills. Chrome powder, applied to a sticky base coat, reflects light in ways that make simple placements look complex and expensive. The emerald base is deep enough to ground the reflective chrome, preventing it from looking cheap.
Applying Chrome Successfully
Emerald requires two full coats to achieve rich color without translucency. Apply the first coat, cure, inspect for coverage, and add a second coat if needed. Once the emerald is solid, you have two chrome application options: use a chrome gel formula (easier to control) or apply traditional chrome powder to a sticky layer. For short nails, chrome gel placed on one accent nail per hand is often more striking than scattered patterns.
The emerald-chrome combination resists visible chipping because emerald’s depth masks micro-damage, while chrome sits protected under a sealed topcoat. The visual impact is high enough that you won’t notice minor imperfections.
7. Nude Base with Micro Diamonds
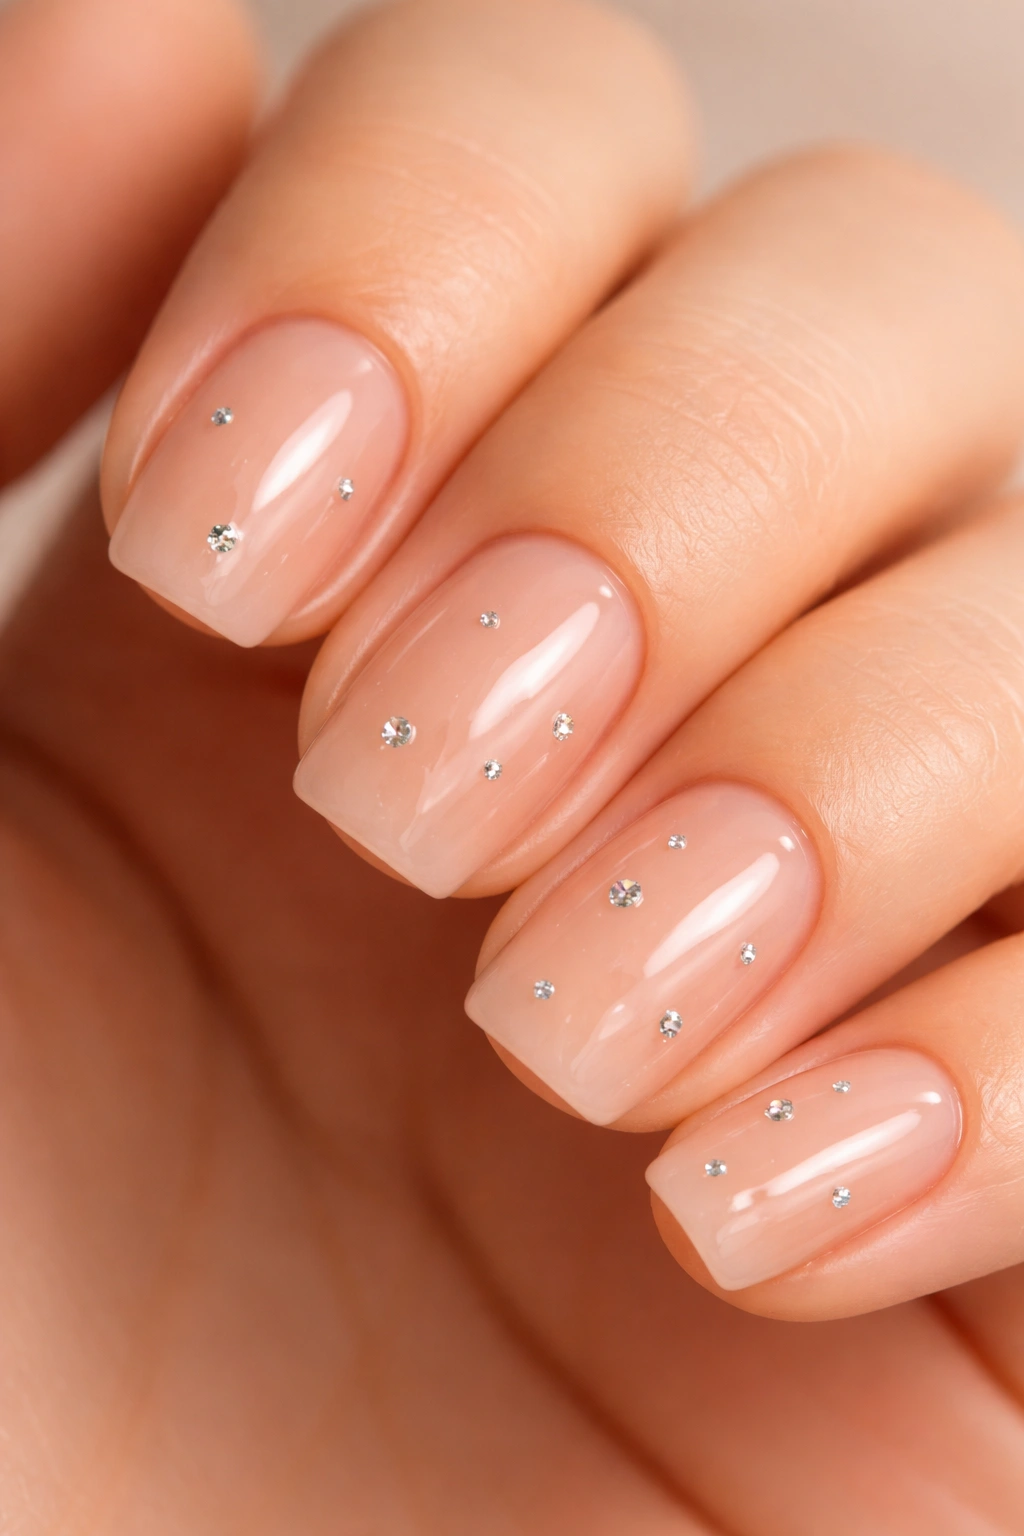
A warm nude background studded with tiny diamond or rhinestone accents creates texture and light play that flatters short nails. Each accent sits under a protective topcoat layer, making them incredibly durable compared to surface nail art. The sparse placement—maybe 4-6 small diamonds per nail, arranged asymmetrically—adds luxury without excessive maintenance.
Micro-diamonds aren’t just decoration; they’re strategic. The light-catching effect draws attention to the sparkle rather than the integrity of the base coat. Even if the nude polish begins showing wear, the diamonds remain pristine and eye-catching, maintaining the overall polish of the manicure.
Placement and Encapsulation
Apply the nude base in two coats with full, even coverage. While the final coat is still slightly tacky (not fully cured), place micro-diamonds using a dotting tool and precision. Once you’re satisfied with placement, cure the nail. The diamonds should sit slightly embedded in the gel. Apply a thick topcoat layer—this encapsulation is crucial. The topcoat must fully seal the diamonds, creating a protective barrier.
This encapsulation method means diamonds won’t shed or lift, a major advantage over surface placement. The sealed topcoat also means the nude base beneath remains undamaged longer.
8. Mauve Marble Effect
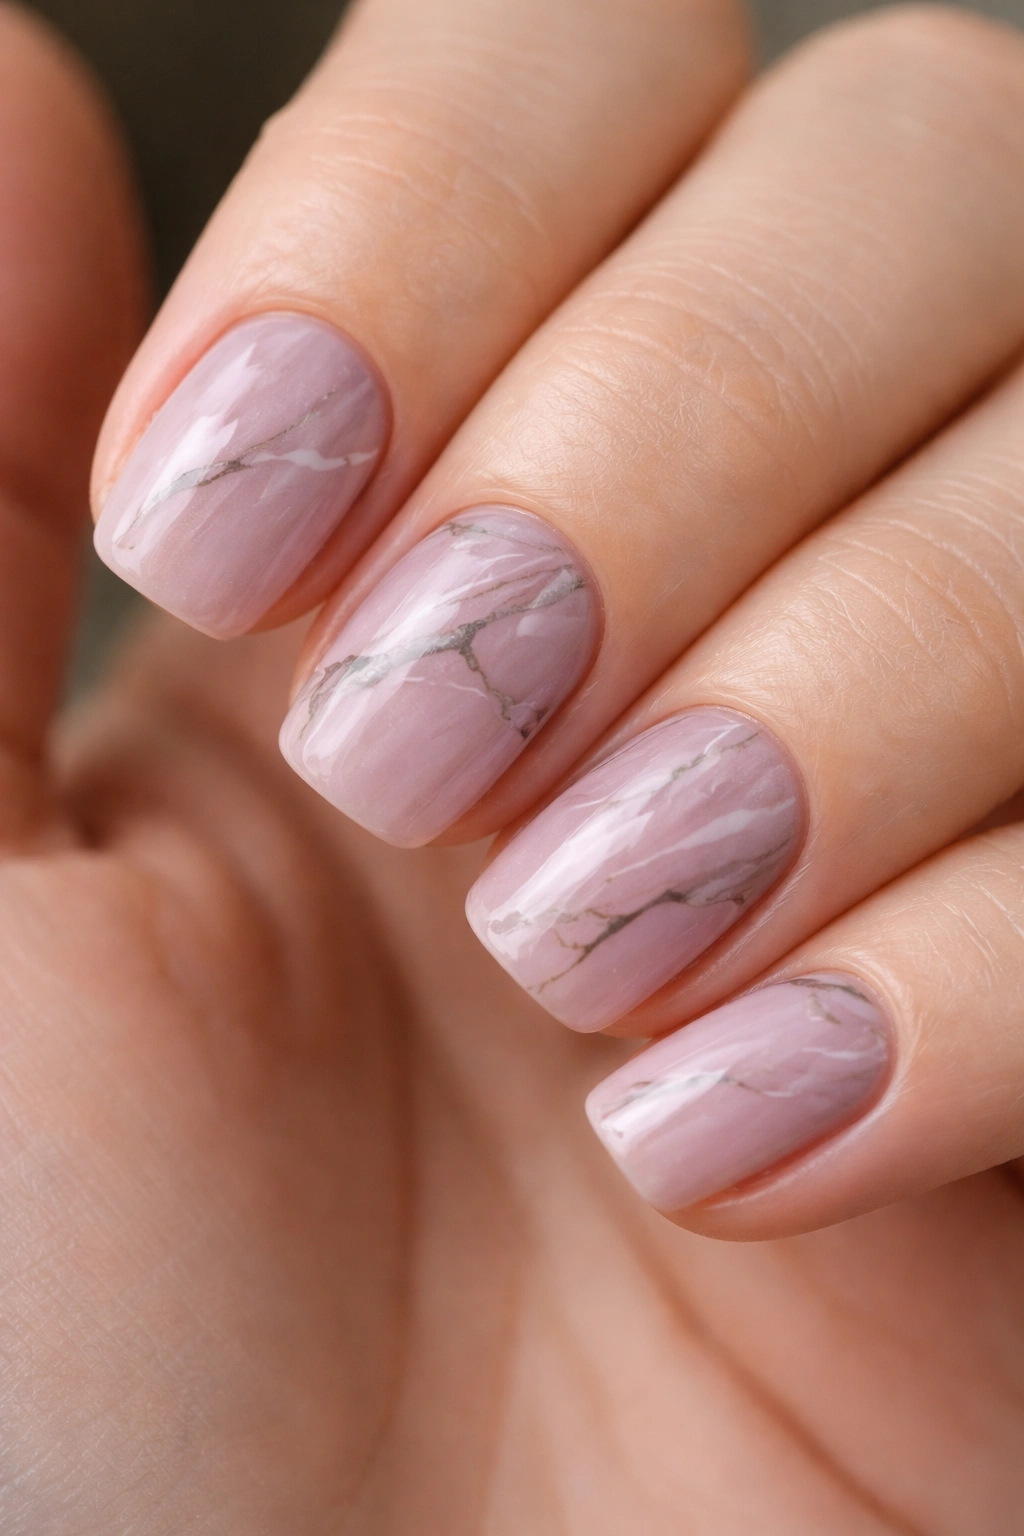
Mauve—that sophisticated blend of gray, purple, and taupe—becomes even more refined when you add a subtle marble effect. Thin veins of charcoal, white, or slightly deeper mauve swirled through the base create organic complexity without looking busy. On short squoval nails, the marble pattern fits neatly within the nail plate, creating a gallery-quality look.
The marble effect is forgiving in ways that solid colors aren’t. Veins and color variation mask wear patterns naturally. A chip that would announce itself on solid mauve disappears into the pattern variation. The visual interest keeps the eye moving rather than focusing on any single spot.
Creating the Marble
Mauve builder gel forms the base—two full coats for complete coverage. While the second coat is still tacky, drag thin lines of a contrasting color using a thin brush or toothpick. These lines don’t need to be perfectly executed; organic variation is the point. Cure the nail, and the pattern is now locked in. Apply a glossy topcoat, and the marble gains depth and dimension.
The key is restraint. Too many vein lines read as busy; 3-4 lines per nail is often perfect. Let them flow naturally from cuticle toward free edge, following the nail’s growth pattern. This directional flow looks intentional and elongates the nail visually.
9. Soft Coral with Fine Art Lines
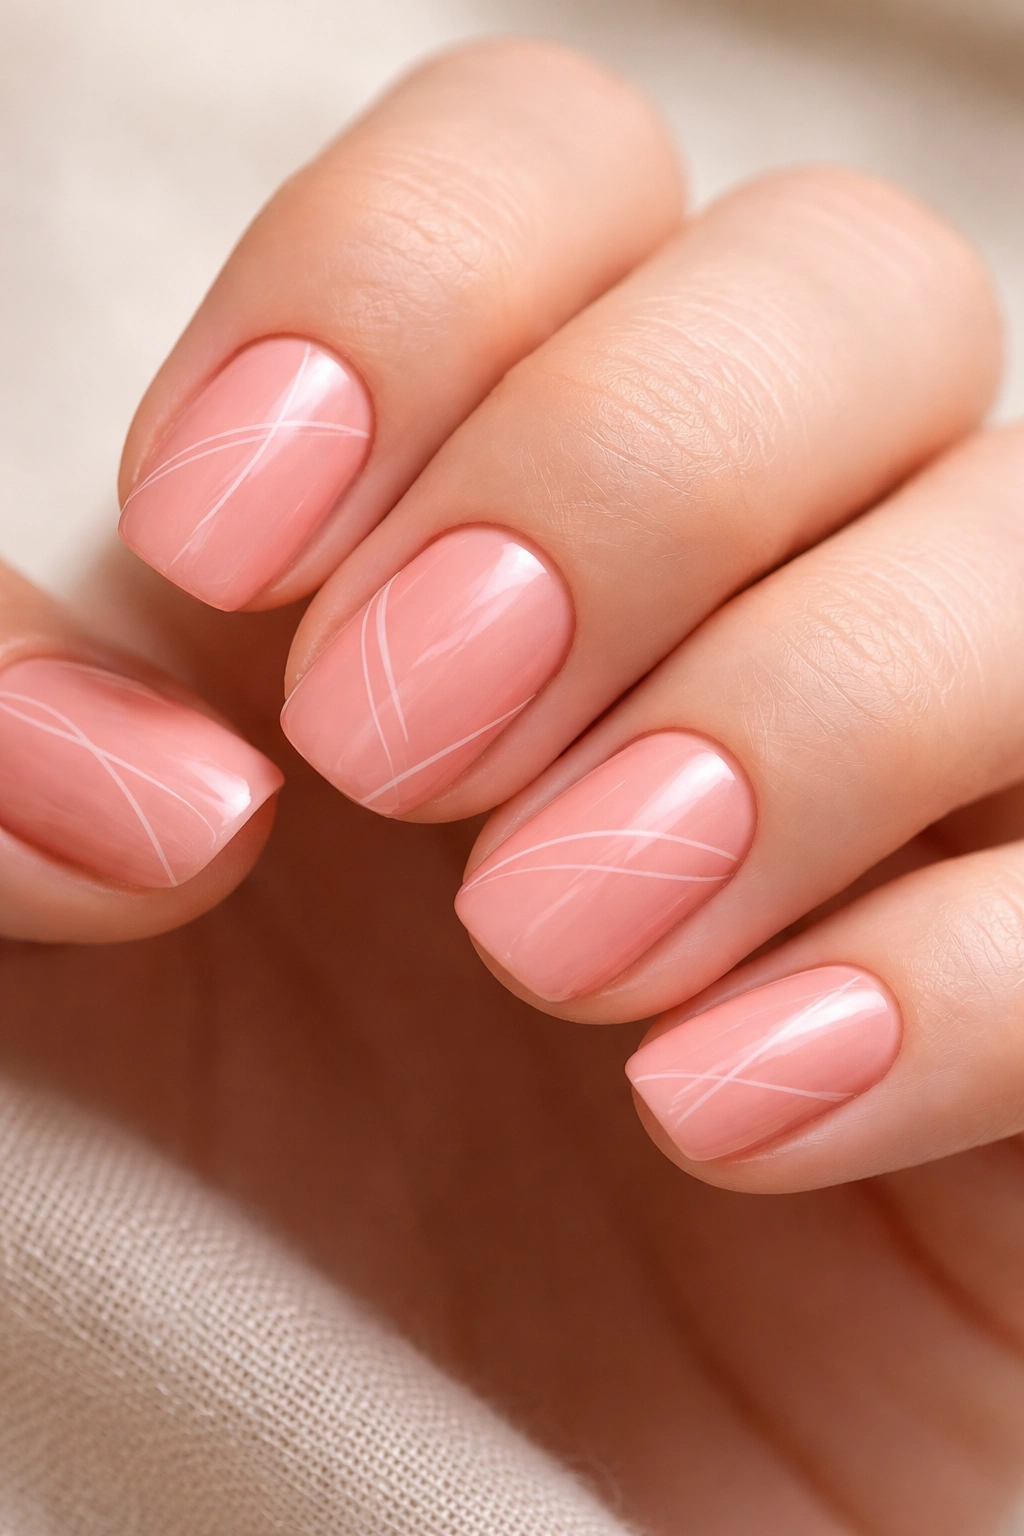
Soft coral—not neon, not orange, but the peachy-pink between the two—provides warmth and flatters almost every skin tone. Ultra-fine white or pale gray lines placed strategically create movement. These lines can be straight minimalist designs, organic curves, or scattered details. On short squoval nails, the lines fit proportionally without overcrowding.
Coral is naturally warm and forgiving, but when combined with fine linework, it becomes elevated. The lines sit protected under topcoat layers, and coral’s moderate saturation masks any slight wear. The manicure reads polished for the full wear cycle.
Line Application Techniques
Soft coral requires two opaque coats—thin lines often show base variations more than solid colors do. Use a thin liner brush or a thin gel pen designed for nail art. The lines should be thin enough to feel delicate but substantial enough to remain visible. Applied under a protective topcoat, they’re nearly impossible to chip away.
The coral itself provides enough visual interest that line placement doesn’t need to be perfectly symmetrical. Asymmetrical placement actually reads more modern and intentional than mirrored designs on nails. Let some nails have multiple lines and others have single accent lines. This variation creates cohesion without predictability.
10. Pale Lavender with Negative Space
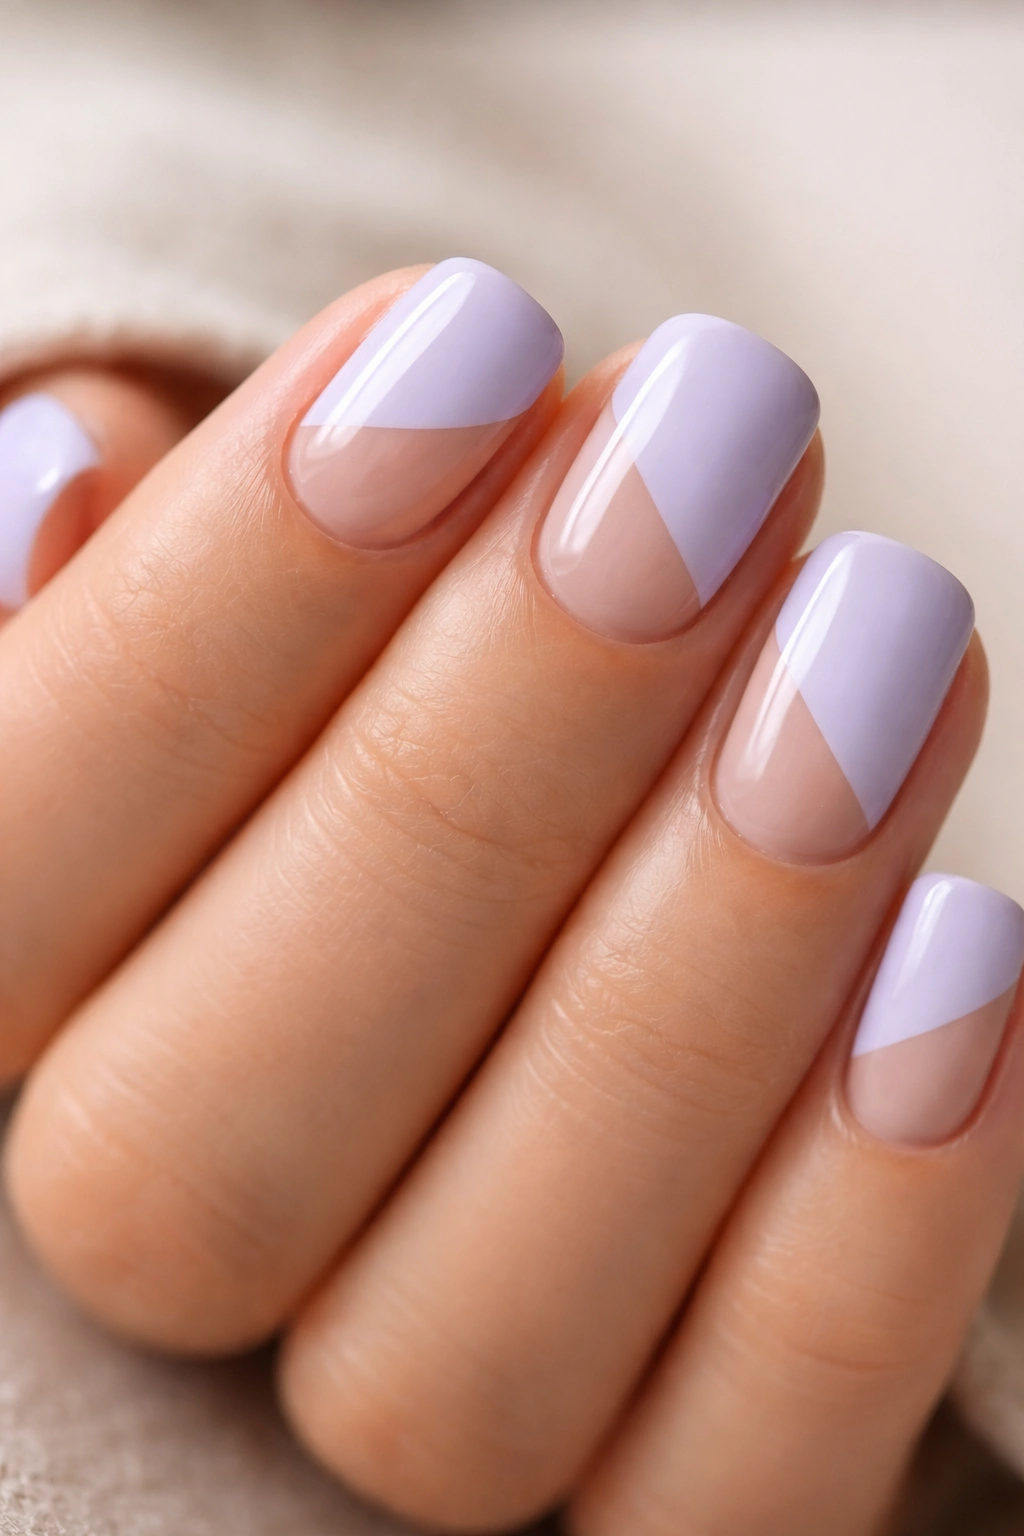
Pale lavender with negative space—areas where the nail plate shows through, creating exposed zones—offers sophistication through restraint. The pale lavender covers most of the nail, but geometric shapes of negative space (thin vertical lines, small squares near the cuticle, or abstract shapes) break up the color and add visual interest.
Negative space designs inherently resist showing chips because the exposed nail isn’t supposed to be covered. Small imperfections in the negative area read as intentional rather than damage. The pale lavender, being a light color, benefits from this design strategy because it would otherwise show every tiny wear mark.
Designing Negative Space
Apply pale lavender with complete, even coverage in two coats. While the final coat is tacky, use a dotting tool, thin brush, or thin tape to create negative space zones. You can use actual thin stickers as guides and remove them once the nail cures, or you can freehand the design. Once cured, apply topcoat over everything—yes, even the negative space areas get sealed. This creates a smooth, integrated finish.
The beauty of this design is that negative space doesn’t rely on intricate artistic skill. Simple geometric shapes—vertical lines dividing the nail, small shapes at the cuticle, or corner cutouts—read as intentional design rather than damage.
11. Beige with Tortoiseshell Accent
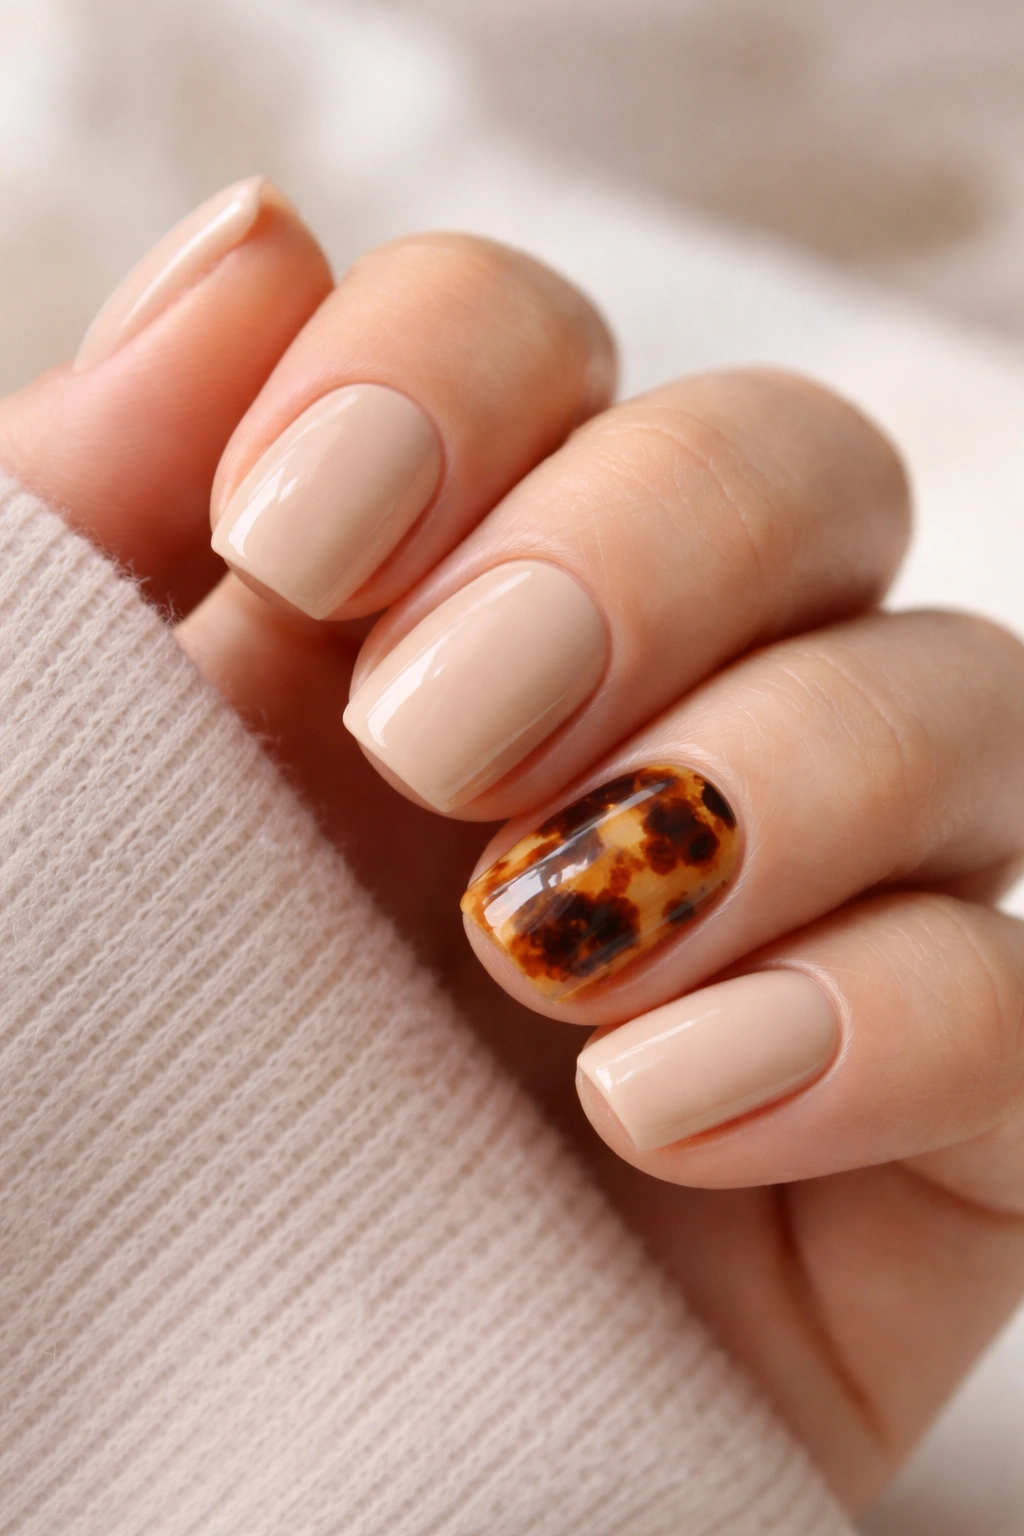
Classic beige provides the perfect neutral canvas, and a tortoiseshell accent on one or two nails adds depth and movement. Tortoiseshell—that mottled combination of browns, golds, and amber tones—looks complex but requires surprisingly little technical skill to execute. The placement on just accent nails keeps the overall manicure wearable while adding personality.
Beige is utterly forgiving. It masks wear, photographs warmly, and suits every skin tone. The tortoiseshell accent adds sophistication without requiring a busy overall design. Even when the manicure enters its third week, beige looks intentional rather than dull, and the tortoiseshell detail anchors the overall look.
Tortoiseshell Technique
Base all nails in beige—two coats for full coverage. On your designated accent nail(s), apply a second topcoat layer. While this layer is tacky, drag thin brushstrokes of darker brown, warmer tan, and gold across the surface using a thin brush. The colors should blend and layer, creating that organic mottled appearance. Don’t overwork it; tortoiseshell looks best when colors overlap naturally rather than being perfectly blended.
Once the tortoiseshell is cured, seal everything with a glossy topcoat. The layering creates an effect that looks premium and complex while remaining durable. The dark tones of the tortoiseshell hide any chips that might develop on the accent nail, and the beige background remains forgiving throughout the wear cycle.
12. Dusty Rose with Geometric Shapes
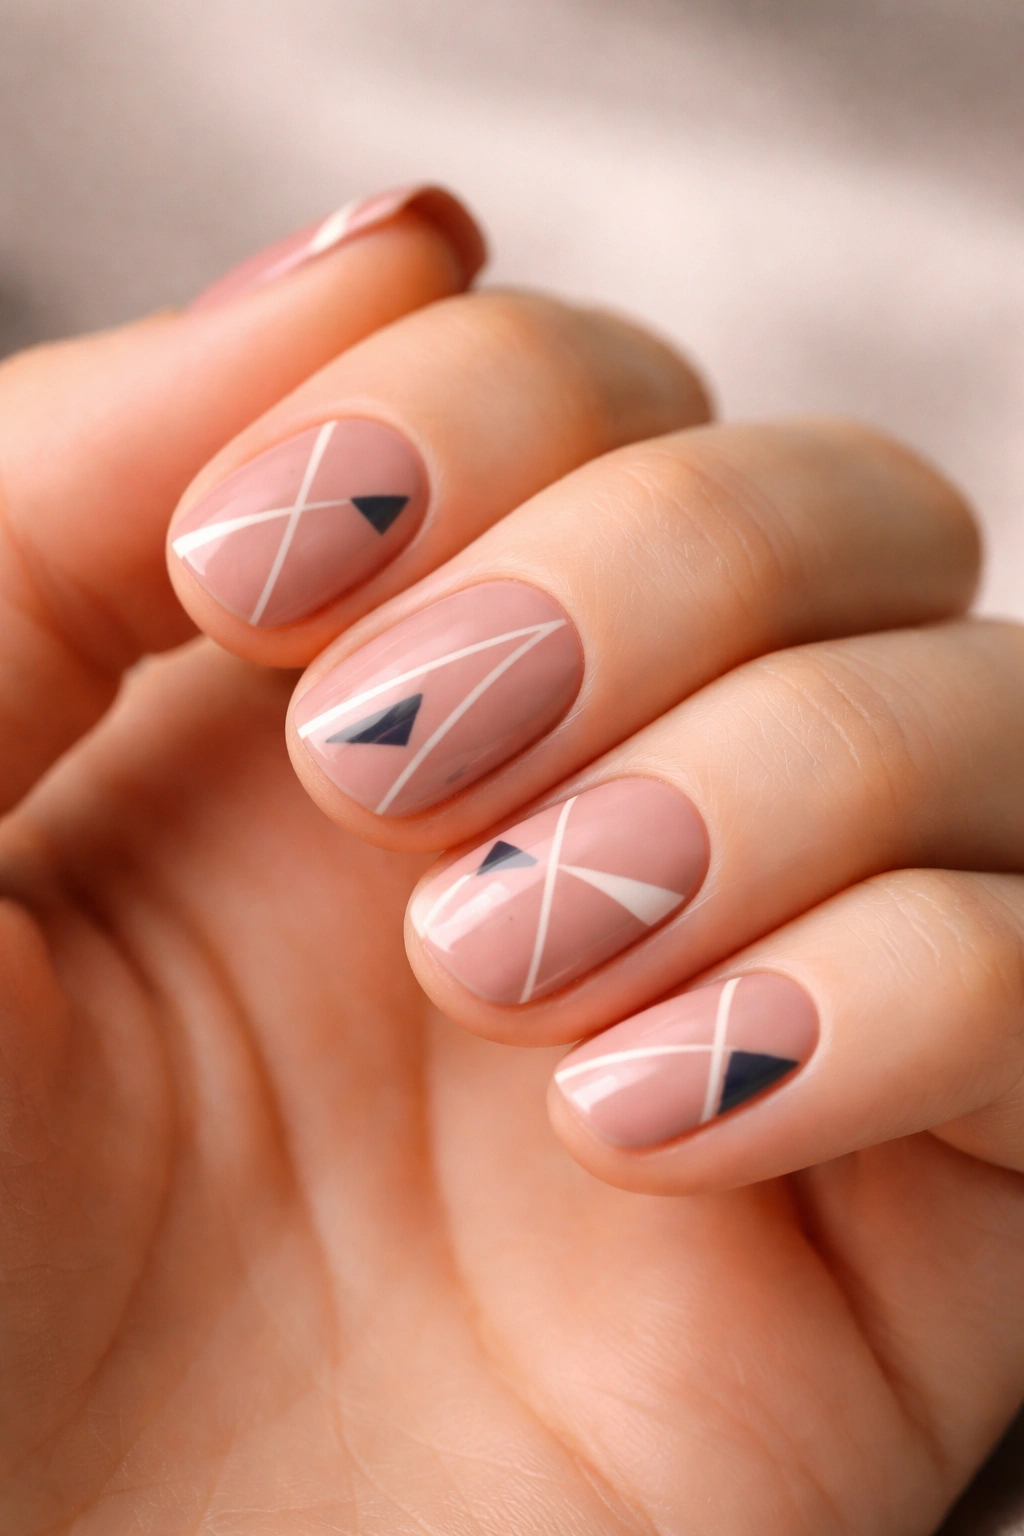
Dusty rose—a muted, sophisticated pink with gray undertones—becomes modern and artistic when paired with geometric shapes in white, navy, or charcoal. Thin geometric lines, small triangles, or angular shapes create movement and visual interest without requiring freehand artistic precision. The shapes can be repeated across nails or placed asymmetrically for more contemporary feel.
Geometric designs have the advantage of looking intentional and modern. Shapes can be placed using thin tape, stickers, or careful brush application. The key is clean lines and consistent sizing. On short squoval nails, geometric shapes fit neatly within the nail plate, creating integrated designs rather than patterns that feel cramped.
Executing Geometric Designs
Apply dusty rose base in two full coats. Use thin tape or gel stickers to create geometric outlines if you’re concerned about freehand precision. Apply contrasting color—white and navy together create striking contrast while remaining professional—within the taped areas. Remove tape and cure. The result is clean, precise geometric shapes.
Seal everything with a glossy topcoat. Geometric designs sit nicely under topcoat protection because the design itself is on the surface of the gel, so topcoat encapsulates it fully. Dusty rose’s moderate saturation masks any wear while the geometric shapes remain crisp.
13. Sage Green Solid with Shine
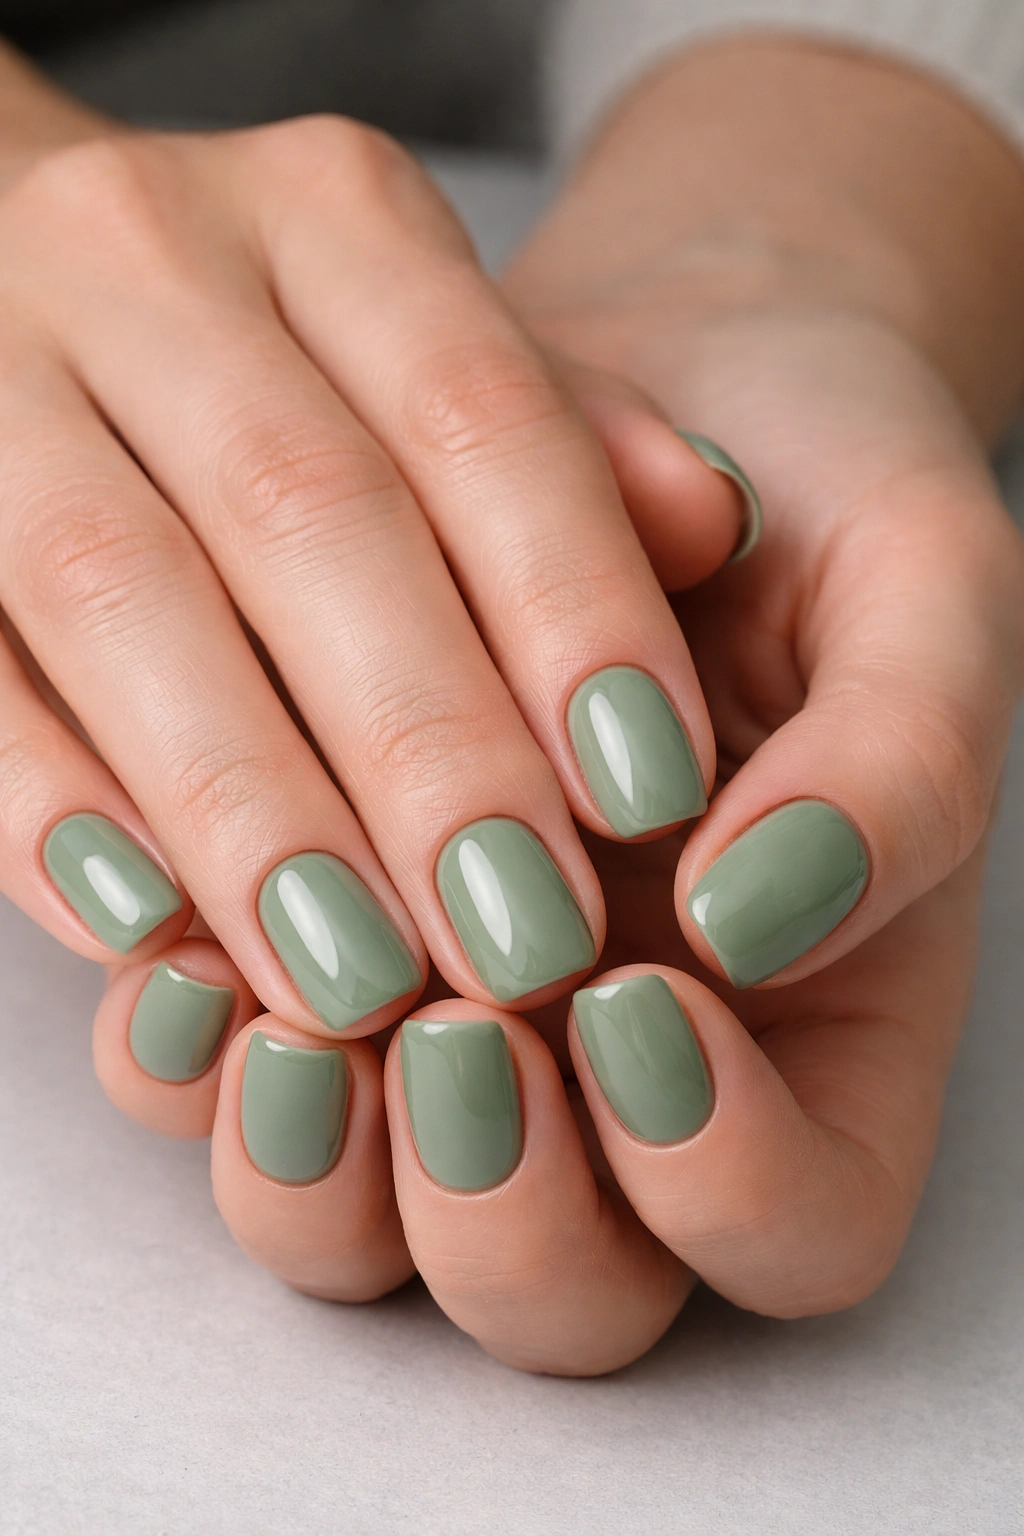
Sage green—that sophisticated blend of green and gray—offers beauty through simplicity. A solid sage green manicure with high-shine topcoat looks expensive and intentional. The color itself is unusual enough that it reads as a deliberate choice rather than default. On short squoval nails, solid sage green achieves maximum elegance through perfect execution rather than complex design.
This design lives or dies on application quality. The color needs flawless coverage and perfect sealing. When executed correctly, solid sage green can go weeks without looking worn because the color remains true and the shine masks minor imperfections. There’s nowhere to hide with solid color, which is precisely why it’s so impressive when done well.
Achieving Flawless Solid Coverage
Sage green requires two to three coats depending on formula thickness. Thin the first coat slightly if needed—thin, even applications build better than thick, uneven ones. Inspect the first coat under bright light. If you see any translucency or streaking, add a third base coat. Once the color is solid, apply a thick, glossy topcoat. The topcoat should be noticeably glossy and should extend just past the free edge, creating a sealed cap.
Sage green’s moderate saturation is forgiving with light imperfections, but the solid nature means the manicure depends on exceptional application. When you get it right, though, it’s stunning for the entire wear cycle.
14. Soft White with Lace Detail
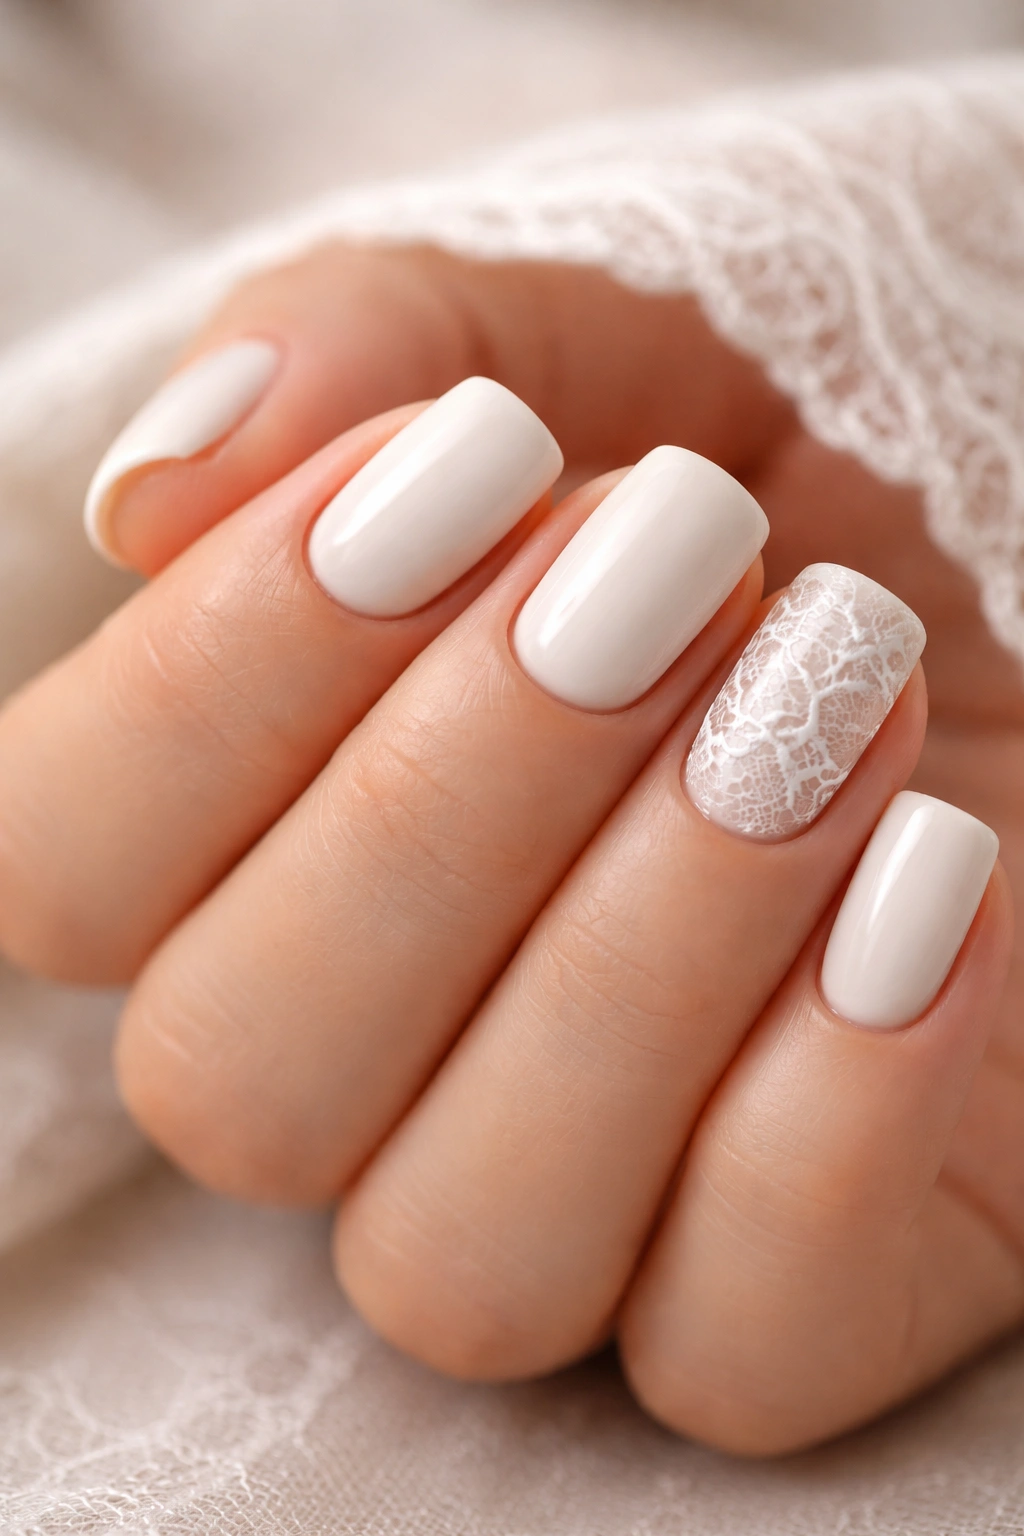
Soft white—not bright white, but a creamy, warm white—provides a clean canvas for delicate lace details. Fine lace patterns, applied to one or two accent nails or scattered across all nails in a subtle pattern, create femininity without excessive girlishness. The white itself reads modern and clean, and the lace adds texture and detail.
Lace patterns on nails require either exceptional freehand skill, thin lace stickers, or a stamping plate designed for lace. Using premade tools ensures the lace pattern remains crisp and even. The white base provides enough contrast that delicate lace details remain visible and distinct.
Lace Application Methods
For best results, use nail lace stickers or stamped lace patterns rather than freehand. Apply soft white base in two coats with complete coverage. Position lace stickers or apply stamped lace pattern while the final base coat is tacky. Once cured, apply topcoat over everything. The topcoat seals the lace firmly in place, making it incredibly durable.
Soft white, being a light color, might seem like it would show wear easily. However, white’s reflective quality and the texture of the lace pattern mask minor imperfections beautifully. The manicure maintains its polished appearance throughout the wear cycle because wear patterns blend into the white and lace texture.
15. Warm Honey with Metallic Tips
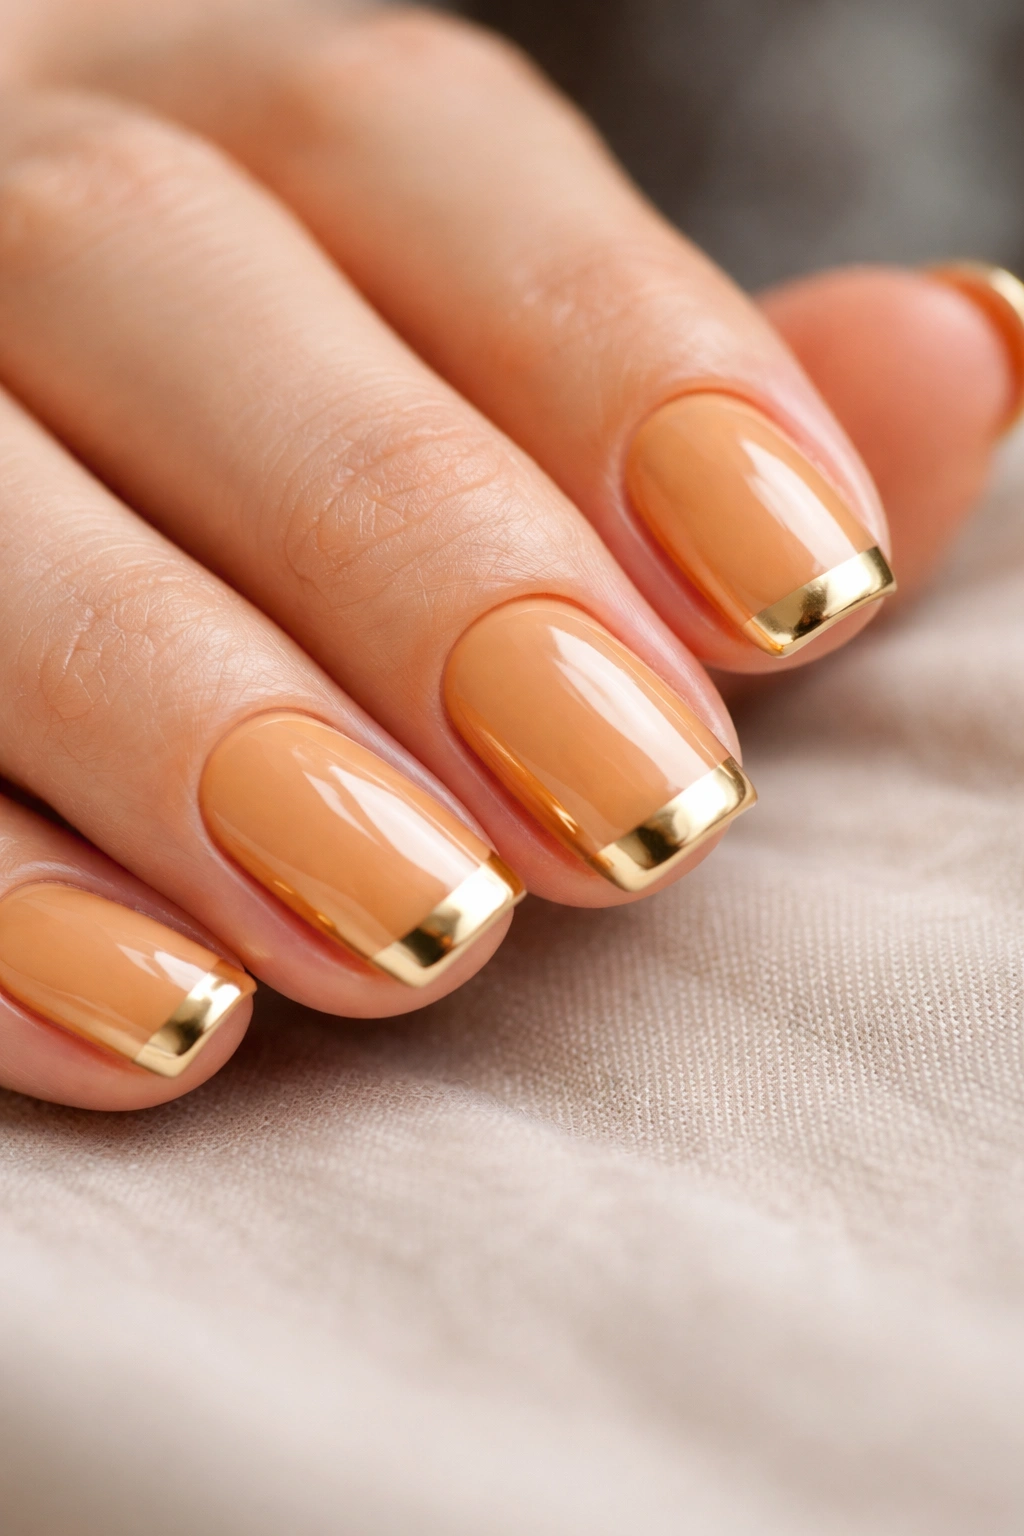
Warm honey—a golden-toned amber or light brown—with metallic gold or champagne tips creates a refined, warm look. The honey base covers most of the nail, and the metallic tip creates definition and subtle contrast. This design works beautifully on short squoval nails because the tip definition makes the nails appear slightly longer while remaining practical.
Metallic tips are durable because they sit on the visible free edge, the most durable part of the nail. The honey base is forgiving with wear, and the metallic maintains its shine throughout the cycle. This is a design that photograph beautifully while remaining completely practical.
Creating the Tip Effect
Apply warm honey in two full coats, ensuring complete coverage. Use a thin file or carefully position thin tape to create a tip line. Apply metallic gold or champagne color to the free edge area. Remove tape and cure. The result is a clean ombré effect transitioning from honey to metallic.
The metallic polish sits on the most protected part of the nail, which is why tip designs last well. The honey base remains soft and warm beneath, creating a cohesive look. Seal with a glossy topcoat, ensuring the metallic shine is properly sealed and protected.
Finishing thought on chip resistance: All fifteen of these designs succeed not through luck but through understanding how color, finish, and placement affect perceived durability. Solid colors with forgiving saturation hide wear better than pale shades. Patterned designs obscure chips within their visual complexity. Finishes like matte and pearl scatter light in ways that disguise imperfections. When you select a design based on these principles rather than trend alone, you’re building a manicure designed to last.
The Real Secret to Keeping Gel Nails Chip-Free
The designs matter, but application and care determine whether you actually achieve chip-free nails. Every single design above requires perfect sealing at the free edge. This is the detail that separates manicures that chip within days from ones that last the full two-week cycle.
Your nail technician should extend topcoat just slightly beyond the nail edge and seal the underside of the free edge thoroughly. This cap prevents peeling and chipping at the most vulnerable zone. When you’re inspecting the manicure in the first few days, check specifically for this seal. If it’s incomplete, ask for the topcoat to be reapplied to ensure proper protection.
Your behavior matters equally. Avoid extended exposure to water immediately after application—wait at least six hours before showering. Wear gloves when washing dishes or doing housework. Use your fingertips rather than nails to open things. These aren’t suggestions; they’re the difference between a manicure that lasts and one that doesn’t.
Final Thoughts
Short squoval gel nails are fundamentally practical, and choosing designs that honor that practicality while adding personality is the goal. These fifteen options work because they combine durability, aesthetic appeal, and wearability. Whether you gravitate toward the understated elegance of solid sage green, the sophisticated detail of burgundy with gold leaf, or the modern charm of geometric dusty rose, each design will deliver a chip-free manicure when applied correctly.
The satisfaction of a manicure that remains pristine for the full two-week cycle is worth the effort of choosing strategically. Your short squoval nails are already doing the structural work. Let these designs protect and enhance them.
