

Short squoval acrylic nails have become the go-to choice for anyone wanting a modern, polished look that doesn’t sacrifice nail shape or style. The squoval shape—a hybrid between a square and an oval—strikes the perfect balance: it’s more conservative and practical than a long almond or coffin nail, yet more interesting and contemporary than a straight square. Add vibrant, eye-catching colors to the mix, and you’ve got a manicure that turns heads while remaining sophisticated enough for work, date nights, and everyday wear.
The beauty of bright acrylics lies in their versatility. A neon pink reads playful and confident. A sunny yellow brings instant joy. A turquoise blue feels both beachy and bold. Short squoval nails are the ideal canvas for these statement shades because the shape keeps them grounded and elegant—the brightness becomes a choice rather than a gimmick. Whether you’re drawn to pastels with punch, true neons, metallics with attitude, or color-blocking designs, the short squoval format makes bold color feel intentional and wearable.
If you’ve been scrolling through nail inspo and feeling stuck between safe and adventurous, these fifteen bright squoval designs will show you that you don’t have to choose. Each one proves that short nails can be just as expressive, creative, and stunning as their longer cousins. Let’s dive into designs you can bring straight to your next nail appointment—or use as a jumping-off point for your own creative vision.
1. Neon Pink With White French Tips
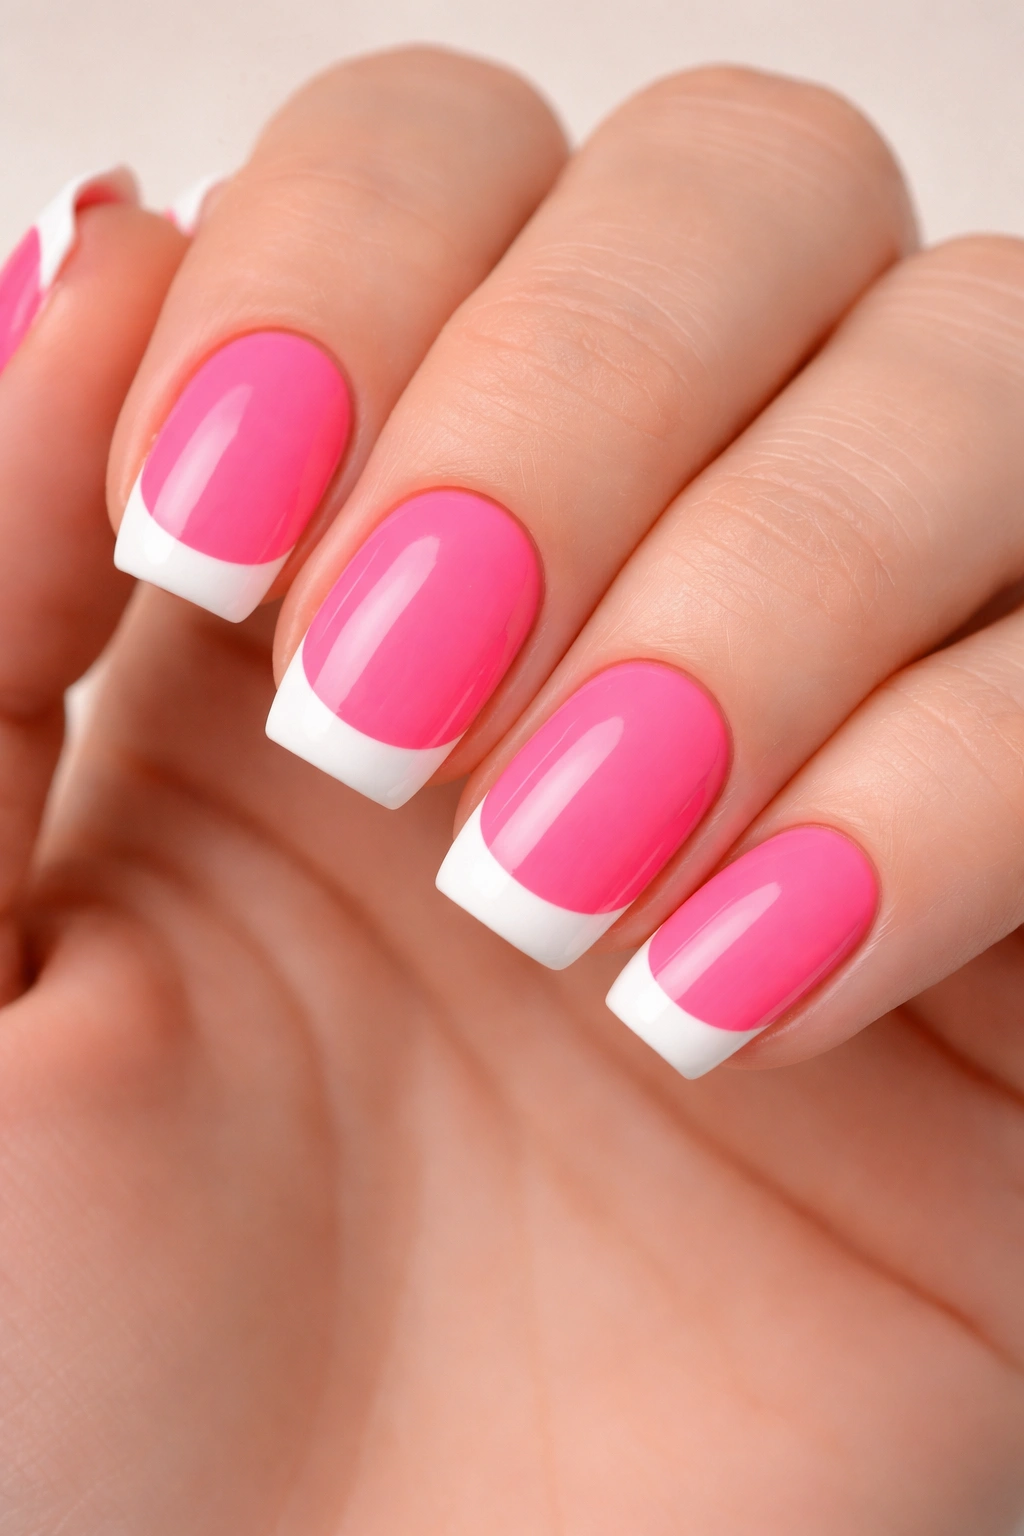
There’s a reason neon pink is a modern classic: it’s instantly recognizable, unapologetically bold, and flatters nearly every skin tone. Pairing it with clean white French tips adds sophistication and visual interest without competing with the main event—that gorgeous hot pink base.
Why This Combination Works
Neon pink can feel overwhelming on longer nails, but the short squoval shape keeps it looking intentional and polished rather than over-the-top. White tips create a fresh contrast that makes the pink even more vibrant while adding a touch of refinement. The combination reads modern and fun without sacrificing elegance.
Execution and Styling Notes
- Apply a solid neon pink base across the entire nail, keeping the color opaque and even
- Use a thin white acrylic or gel to create a crisp French tip line—keep it slightly thicker than a traditional manicure tip for impact
- Seal with a high-shine top coat to make both colors pop
- This design stays current whether you’re heading to brunch, the office, or a casual night out
- The neon-and-white combo pairs beautifully with neutral outfits, letting your nails become the statement piece
Pro tip: Ask your nail technician to slightly round the white tip edge rather than making it perfectly straight—it softens the look and feels more contemporary than a harsh line.
2. Bright Coral With Holographic Accent
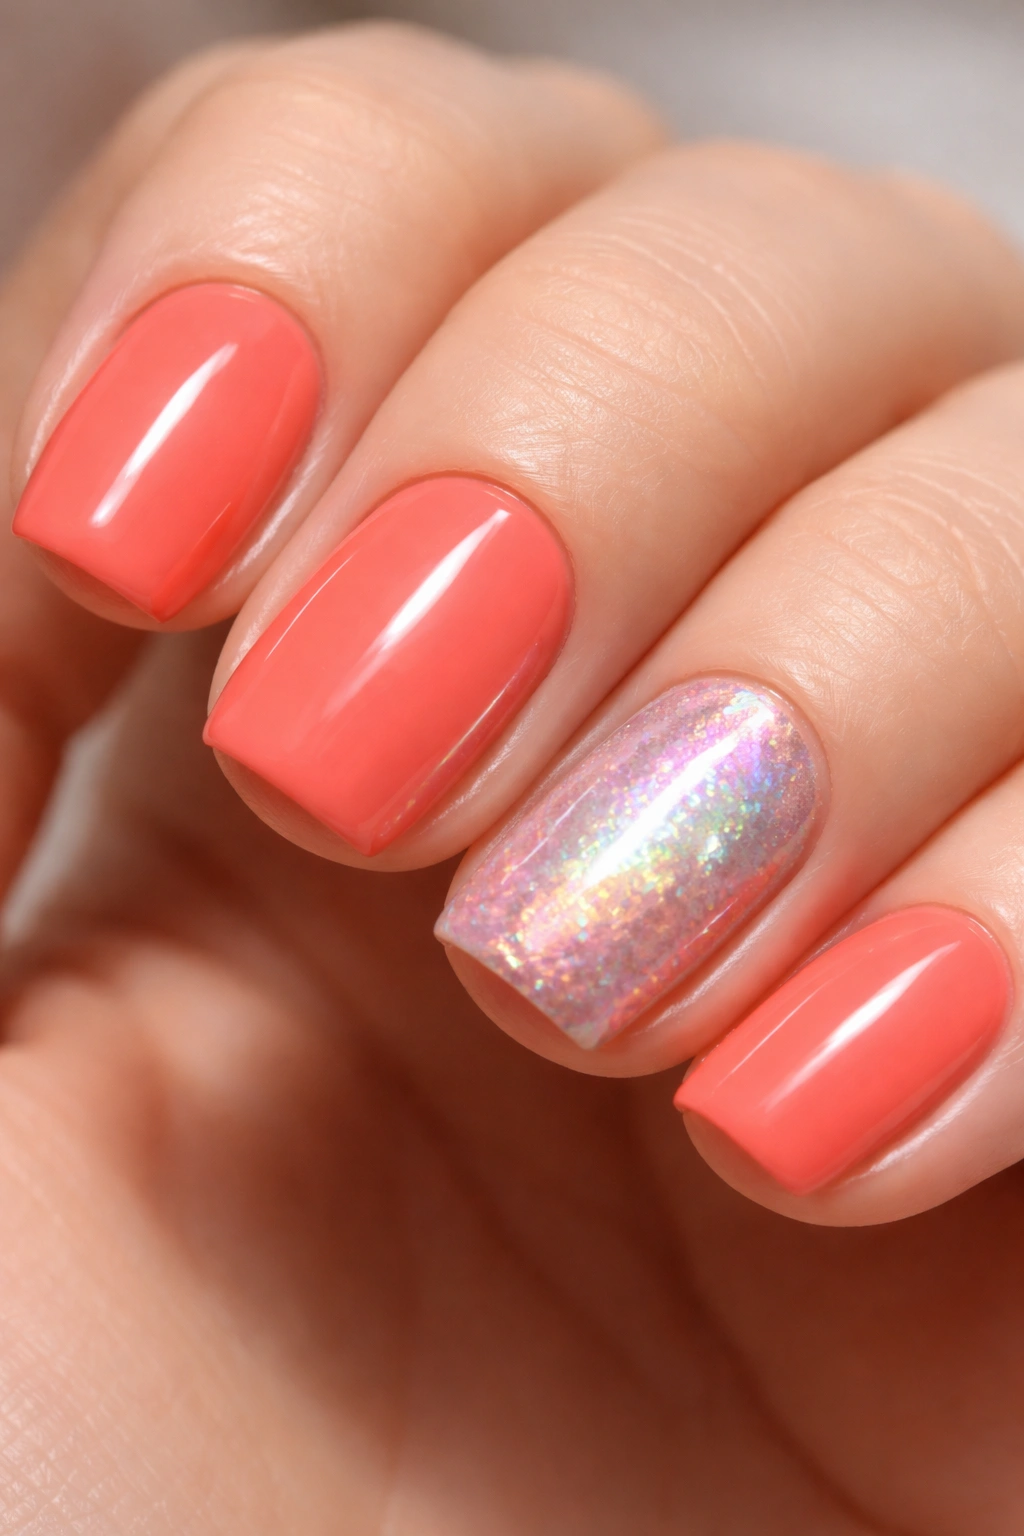
Coral occupies a sweet spot between warm and cool, fun and professional. When you add holographic accents—tiny glittering details or a holographic powder dusted onto one accent nail—the design becomes something special without crossing into costume territory.
The Magic of Warm Brights
Coral acrylic flatters a wider range of complexions than you might expect, and it reads as both summery and seasonally versatile. The short squoval shape makes coral feel like a choice you made for confidence, not because you’re chasing a trend. Holographic details catch light and draw the eye without shouting.
How to Achieve This Look
- Paint all five nails a warm, true coral—aim for a shade with orange undertones rather than pink-leaning coral
- On your accent nail (typically the ring finger), apply a layer of holographic powder or flakes while the base is still slightly tacky
- Seal everything with a glossy top coat to make the holographic elements shimmer
- The holographic shifts colors in different lighting, making people lean in to look closer
- Coral pairs exceptionally well with gold jewelry and bronze eyeshadow
Worth knowing: Holographic effects look most dramatic in natural light and under UV or LED lighting, but they’re visible indoors too—you’re not sacrificing impact for subtlety.
3. Electric Lime Green With Black Geometric Lines
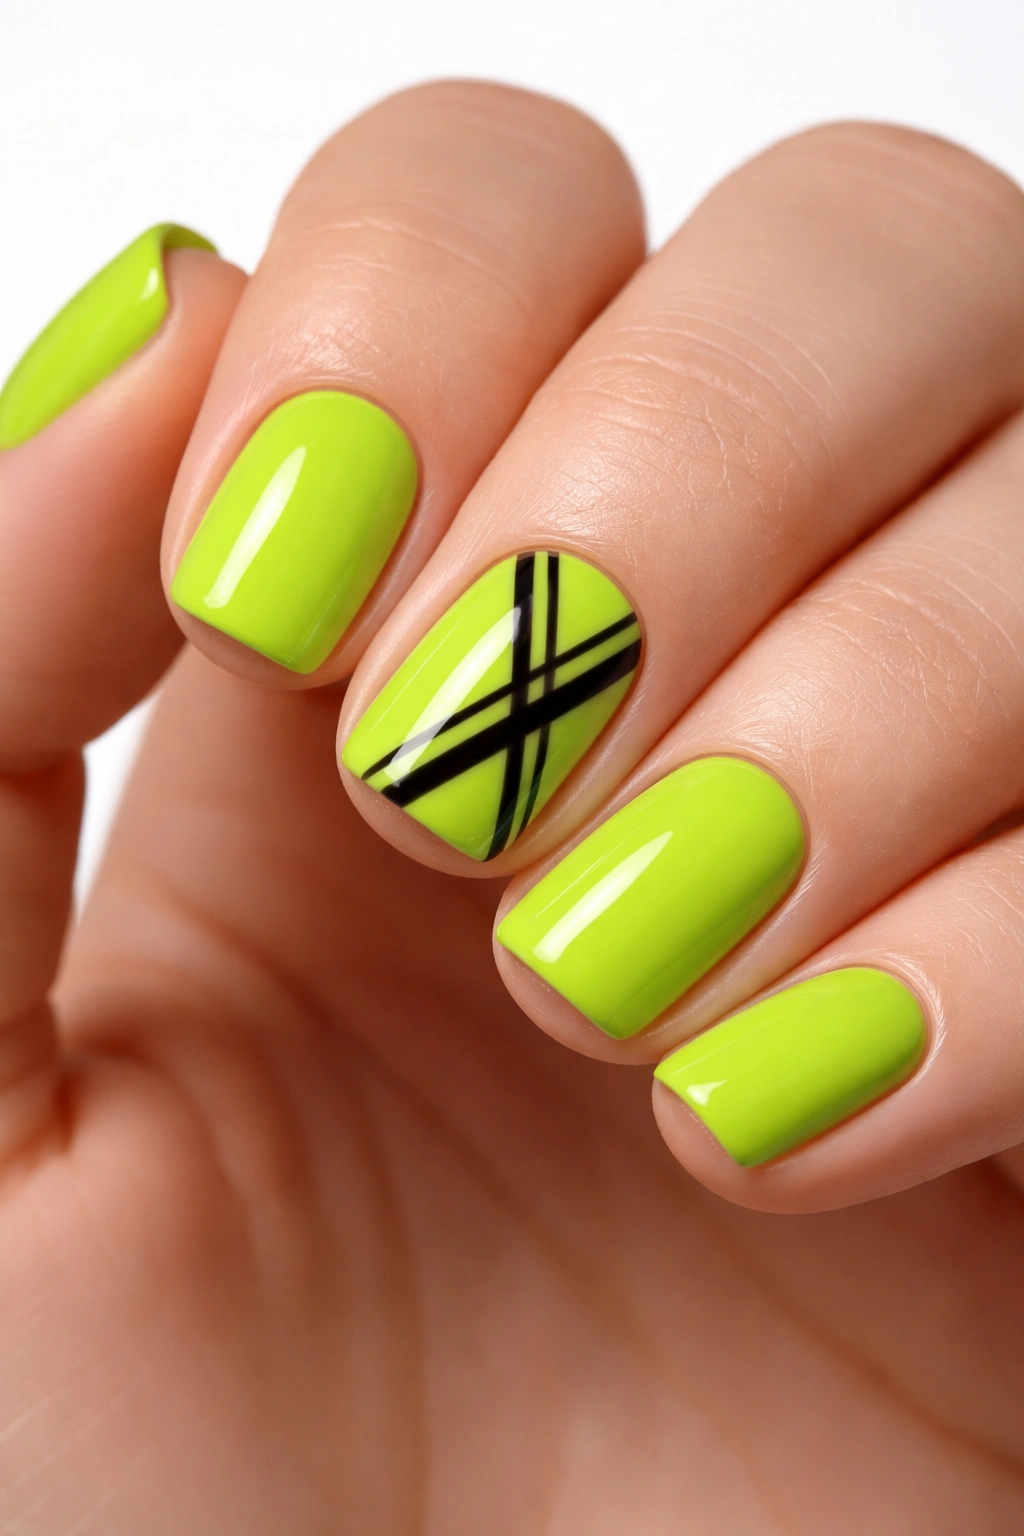
Electric lime green is fearless. It’s the color that makes a statement before you even open your mouth. When you add precise black geometric lines—triangles, stripes, or angular shapes—you transform raw boldness into intentional art.
Geometry Adds Sophistication
While electric lime on its own can feel costume-like on very long nails, the short squoval shape grounds it immediately. Add geometric precision through black line work, and suddenly it’s not just bright—it’s designed. The contrast between lime and black creates visual drama without requiring additional colors.
Design Details to Consider
- Use a thin black liner or gel brush to create clean, precise lines—wavy or imperfect lines will read as mistakes rather than style choices
- Popular geometric patterns include: triangular corners, diagonal stripes, asymmetrical line work across the nail, or a blocked-out shape on one accent nail
- Keep the geometry to 1-2 nails maximum to avoid overwhelming the design
- Electric lime demands confidence, but the geometric element proves you’re being intentional
- Pair with all-black or neutral clothing to let your nails be the bold statement
Insider note: Seal black lines with a matte top coat if you want them to feel graphic and sharp, or use gloss if you prefer the contrast between shiny lime and semi-matte black lines.
4. Sunshine Yellow With Tiny White Daisies
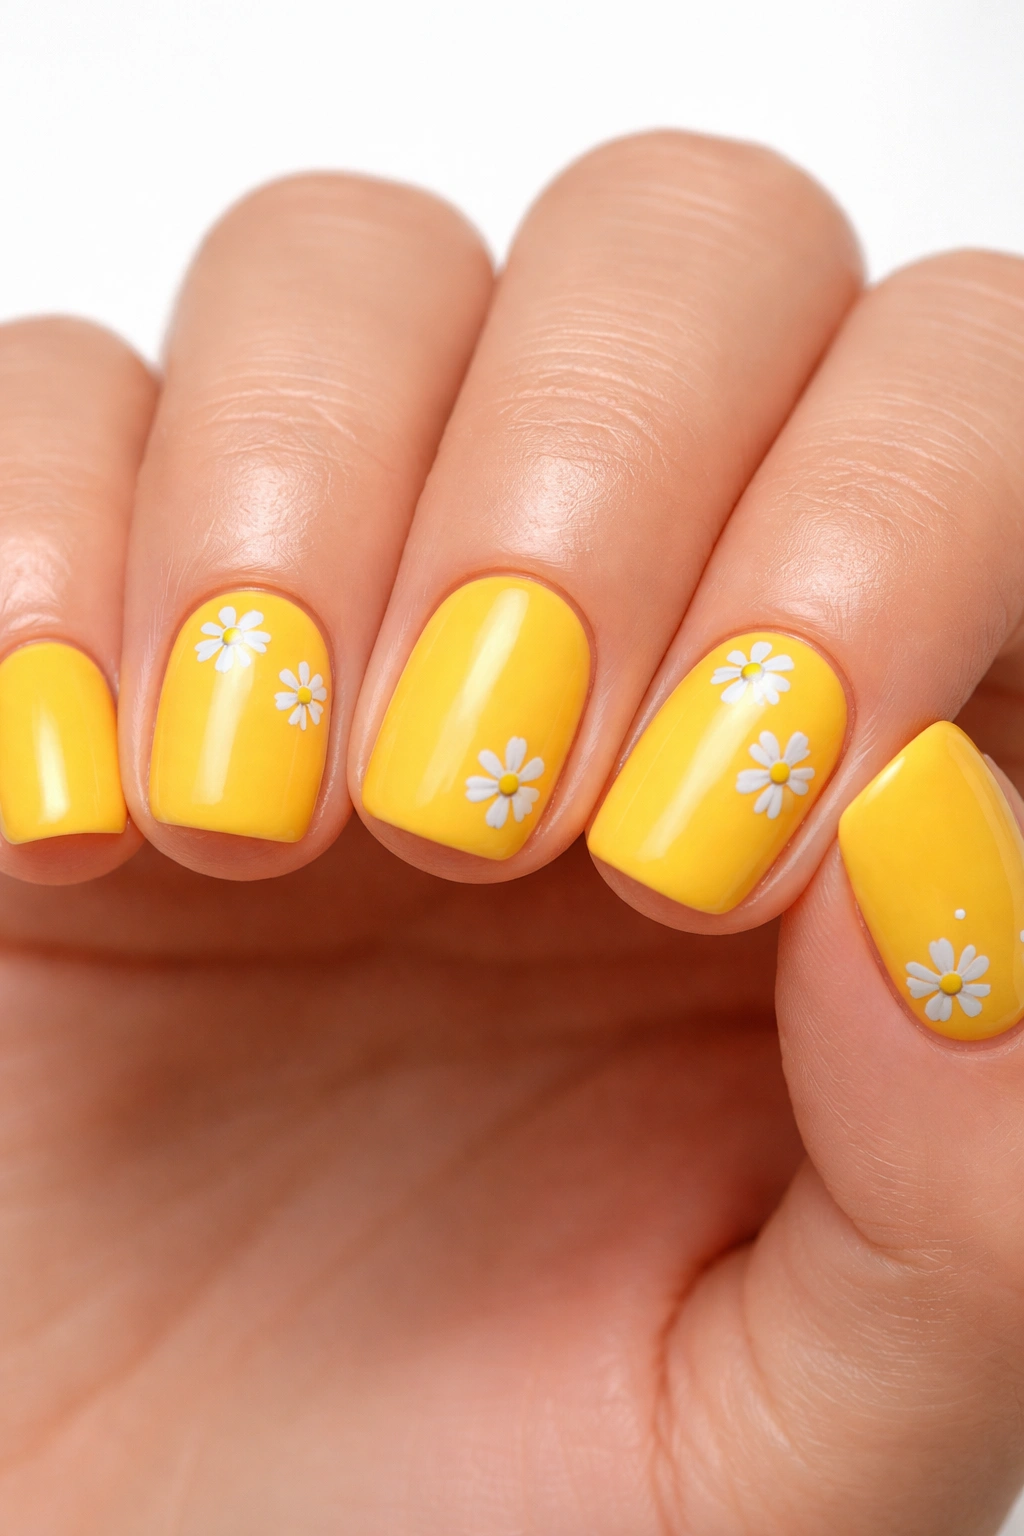
Sunshine yellow brings actual joy. There’s neuroscience behind it—bright yellow stimulates happiness and optimism. When you layer tiny hand-painted white daisies across the nails, you create a design that’s cheerful without being childish.
Why Floral Details Elevate Bright Colors
A solid sunshine yellow might feel too intense on short nails, but introducing a delicate pattern gives your brain permission to see the design as playful rather than aggressive. Tiny daisies—just a simple white circle with a few petals—feel sweet and intentional without requiring advanced nail art skills.
Creating the Floral Look
- Start with two coats of a warm, true sunshine yellow—make sure it’s opaque and covers evenly
- Using white acrylic paint or gel and a thin detail brush, paint tiny white circles to form the daisy centers
- Add 4-6 simple petals around each circle using quick, confident brush strokes
- Space daisies randomly across 3-4 nails, leaving at least one nail solid yellow for balance
- This design pairs beautifully with white gold jewelry and has spring-to-fall staying power
- The daisies can be as simple or detailed as your comfort level allows
Pro tip: If hand-painting feels intimidating, ask if your technician can use daisy nail stickers or stamping plates—the effect is identical and takes the pressure off perfection.
5. Hot Magenta With Silver Chrome Ombré
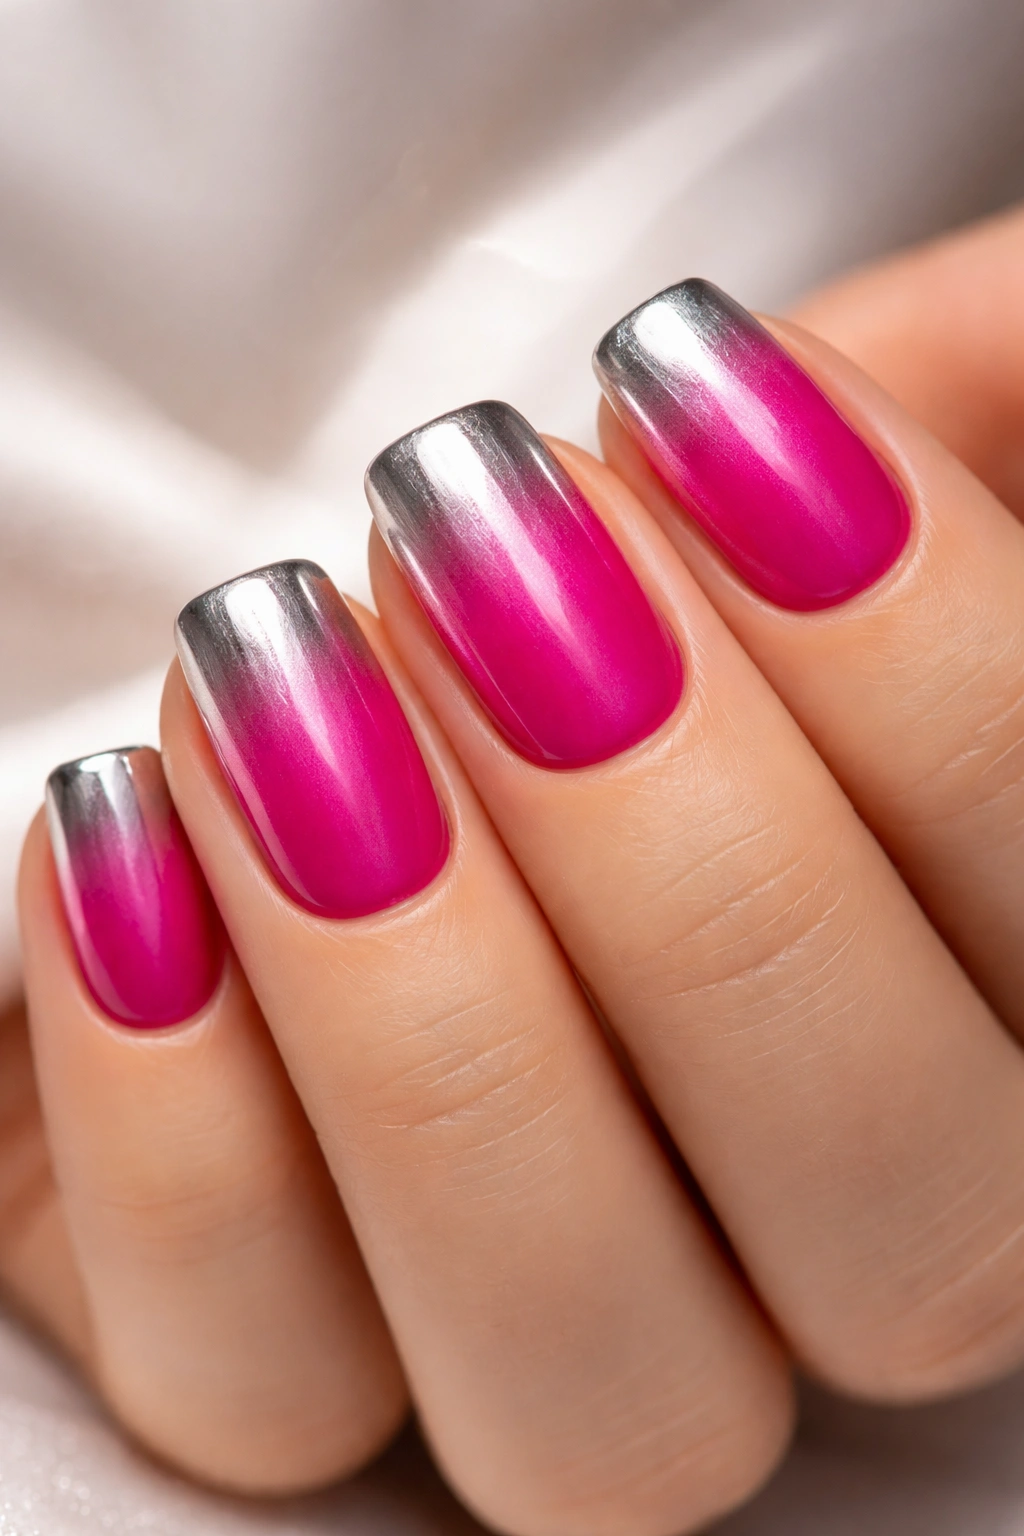
Hot magenta is pure confidence. It’s saturated, it’s bold, and it doesn’t apologize. When you layer a silver chrome ombré effect—where the chrome fades from intense on the tip to subtle at the cuticle—you create dimension and modernity that transforms the design from simple to editorial.
Chrome as a Game-Changer
Chrome powders are a different beast from glitter or holographic effects—they create a mirror-like finish that catches light in a distinctly futuristic way. When applied as an ombré that fades across the nail, chrome adds luxury and depth without introducing competing colors.
Achieving the Chrome Ombré Effect
- Apply hot magenta as your base color—two coats minimum for opacity
- While the second coat is still slightly tacky, use a dry brush or applicator to gently tap chrome powder onto the nail tip
- Gradually decrease pressure toward the cuticle so the chrome fades rather than stopping abruptly
- Seal with a glossy top coat—the chrome will catch light beautifully when sealed
- This design reads expensive and modern without being costume-y
- Hot magenta with silver chrome is stunning paired with black clothing or jewel tones
Worth knowing: Chrome powder is incredibly pigmented—a little goes a very long way. It’s easy to apply too much, so start light and add more if needed.
6. Turquoise Blue With Gold Foil Accents
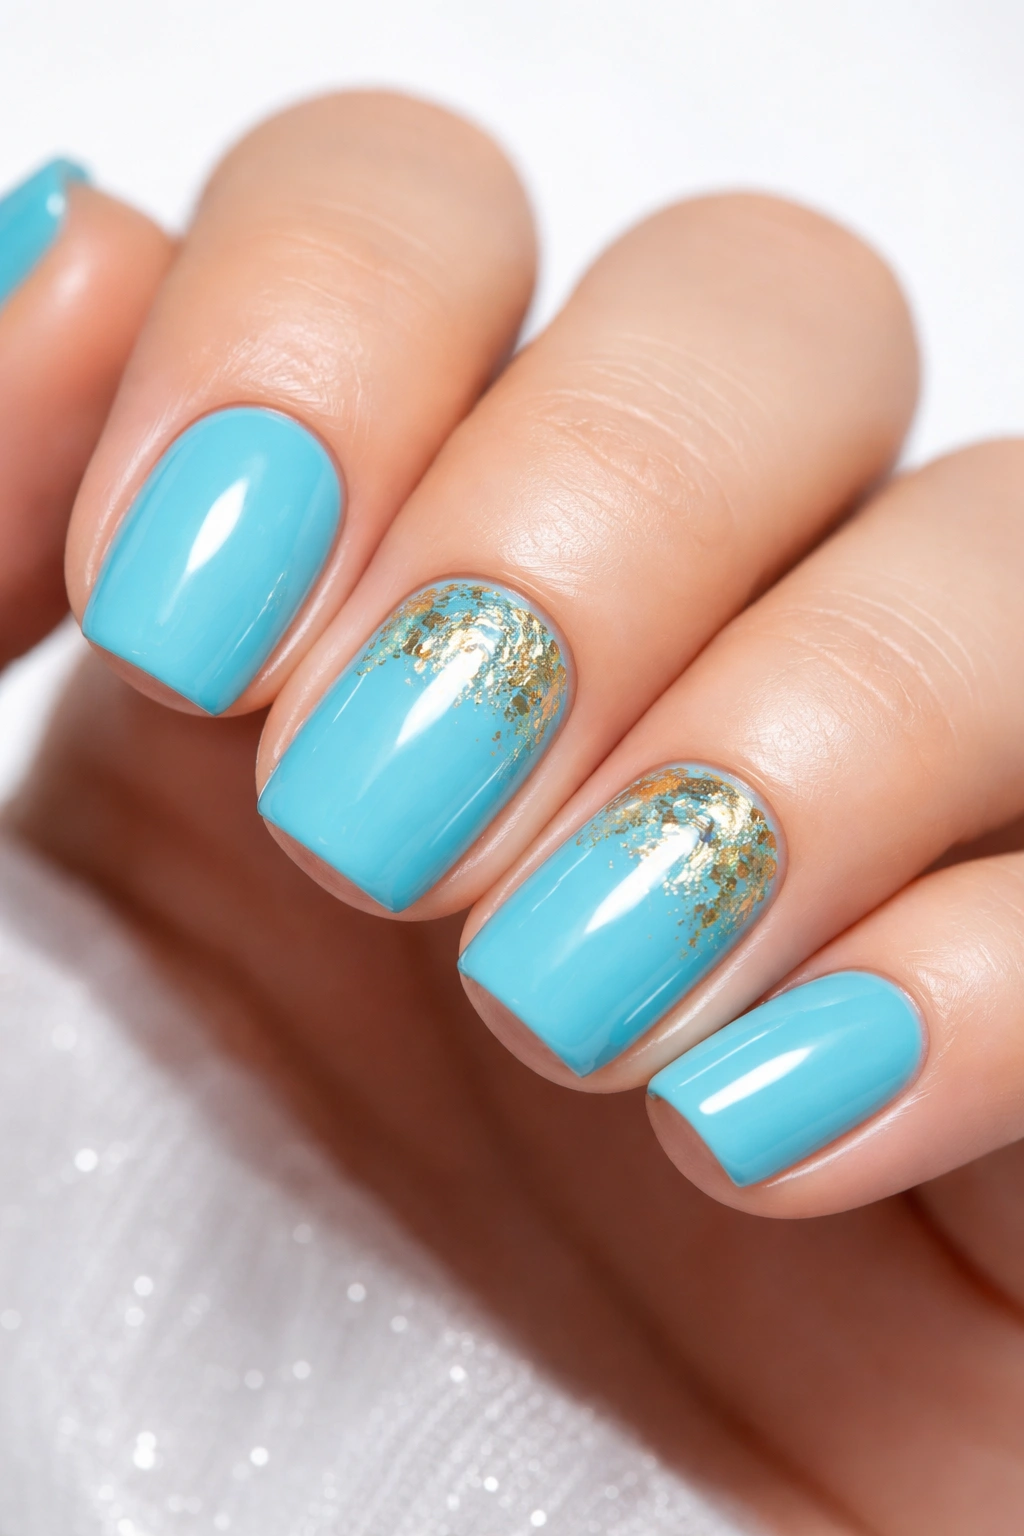
Turquoise blue sits at the intersection of calming and energizing. It’s sophisticated enough for professional settings yet playful enough for creative industries and casual wear. Gold foil accents catch light and add luxury without overwhelming the design.
The Psychology of Turquoise
Turquoise is associated with both water (calming) and tropical brightness (energizing). On short squoval nails, this color reads as intentionally chosen rather than trendy. Gold foil—random flecks or strategically placed geometric shapes—adds shimmer and visual interest that makes the design feel elevated.
Creating Gold Foil Details
- Paint all nails a clear, true turquoise—aim for a shade that leans blue rather than green
- While the base is still slightly tacky, tear or crumble gold foil into small pieces
- Press foil pieces onto 2-3 accent nails, focusing them on the nail tips or corners
- Seal everything with a shiny top coat to embed the foil and create a smooth finish
- Turquoise with gold is timelessly elegant and pairs with warm-toned jewelry beautifully
- The foil creates an effect that’s eye-catching but not glittery
Pro tip: Foil adheres best when pressed firmly into still-tacky acrylic—ask your technician to time it perfectly so the foil sets securely.
7. Bright Peach With Ombré Fade to Nude
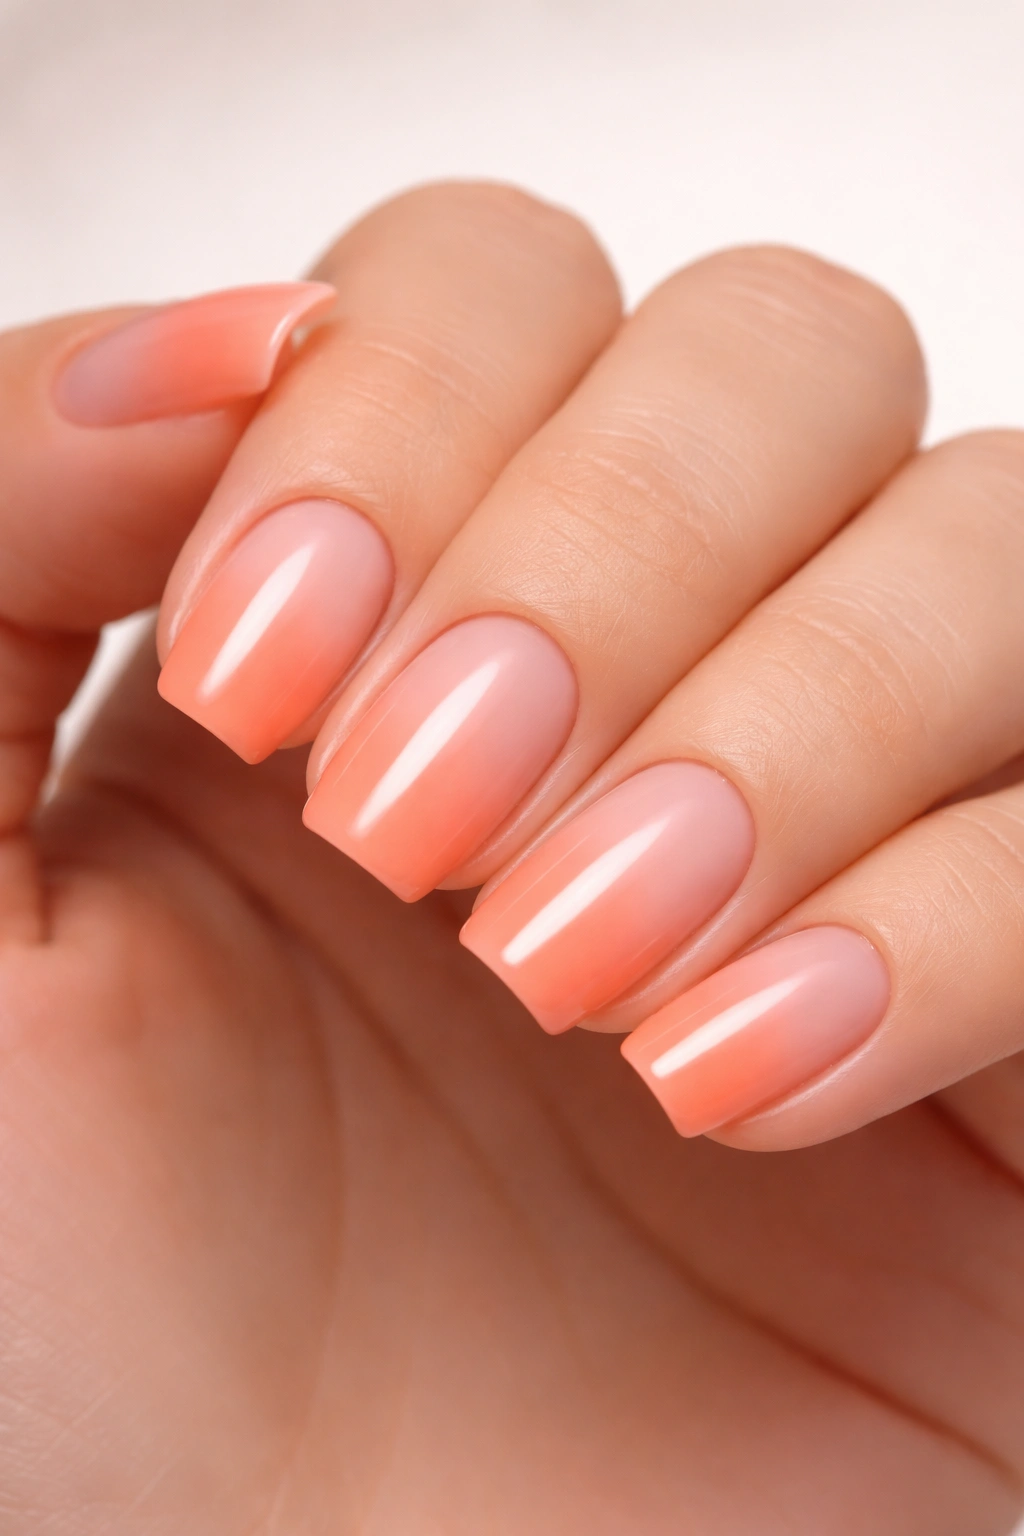
Peach is the bright color for people who love boldness but want a softer entry point. An ombré fade from peachy-bright to nude or nude-pink creates a gradient effect that’s visually interesting and incredibly flattering across different skin tones.
Ombré as a Transitional Technique
Rather than committing to an intense color all across the nail, an ombré fade lets you experience maximum brightness at the tip where light catches it most dramatically, while the cuticle area stays more neutral. This makes the design feel sophisticated rather than loud.
Building the Ombré Effect
- Apply a nude or pale pink base that matches your skin tone, covering the cuticle area and the nail bed toward the middle
- Blend or transition to a brighter peach shade at the nail tip using layering or an ombré sponge technique
- The transition should be gradual and blended, not a sharp line between two colors
- Seal with a glossy top coat to make the gradient smooth and cohesive
- This design pairs beautifully with rose gold jewelry and warm-toned outfits
- Peach ombré reads elegant rather than trendy, so it ages gracefully
Worth knowing: Ombré designs often require an extra top coat layer to smooth any texture created during blending—ask your technician about their process.
8. Hot Pink With Rhinestone Accent Line
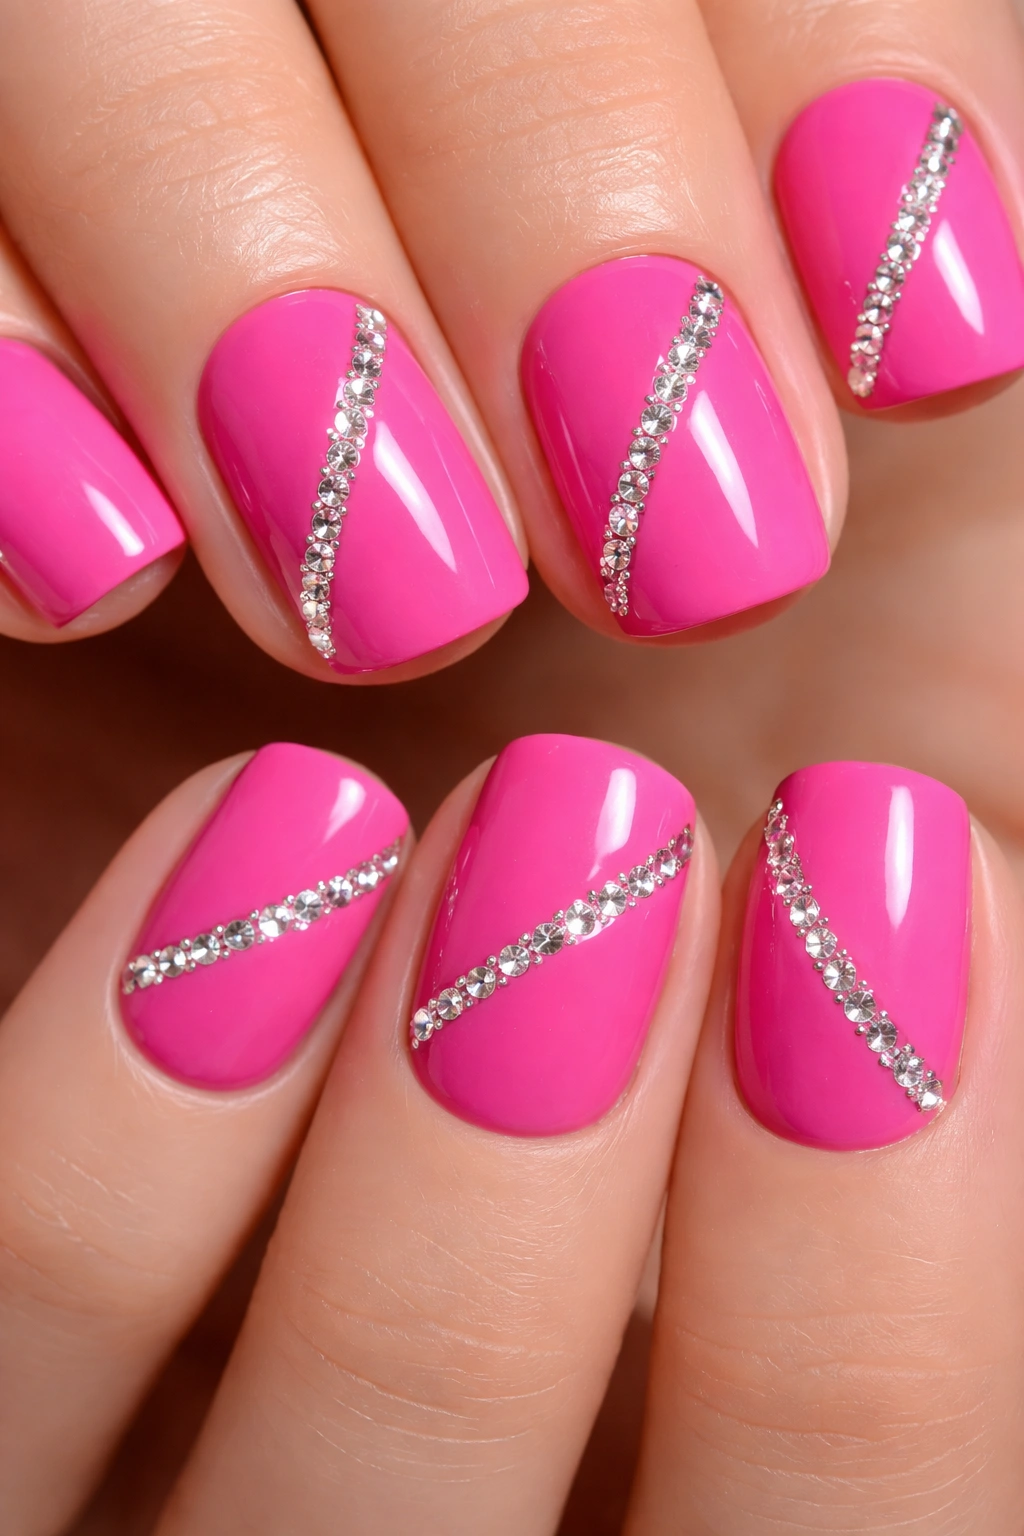
Hot pink is a confidence builder. It’s bold enough to feel special but warm enough not to feel alien against your skin. Adding a single line of rhinestones—perhaps along the diagonal or across the cuticle area—introduces glamour and catches light constantly.
Rhinestones as Subtle Luxury
Rather than covering the entire nail with rhinestones (which can feel costume-y), a single accent line of crystals reads as intentional luxury. The hot pink provides the statement; the rhinestones provide the shine and sophistication.
Placing Rhinestones for Maximum Impact
- Apply hot pink as your base color across all five nails
- Using nail glue or gel, carefully apply a line of medium-sized rhinestones along one edge—diagonal from bottom-left to top-right reads modern, while a horizontal line across the cuticle area reads elegant
- Space stones evenly and press firmly so they don’t catch and pop off
- Seal carefully with top coat, making sure it covers around but not over the rhinestones
- Hot pink with rhinestones reads party-ready but sophisticated, perfect for date nights or celebrations
- The contrast between matte pink and shiny stones is visually striking
Pro tip: Hot pink + rhinestones is one of those combinations that photographs beautifully, so this design is excellent if you love sharing your nails on social media.
9. Neon Orange With Minimalist Black Dots
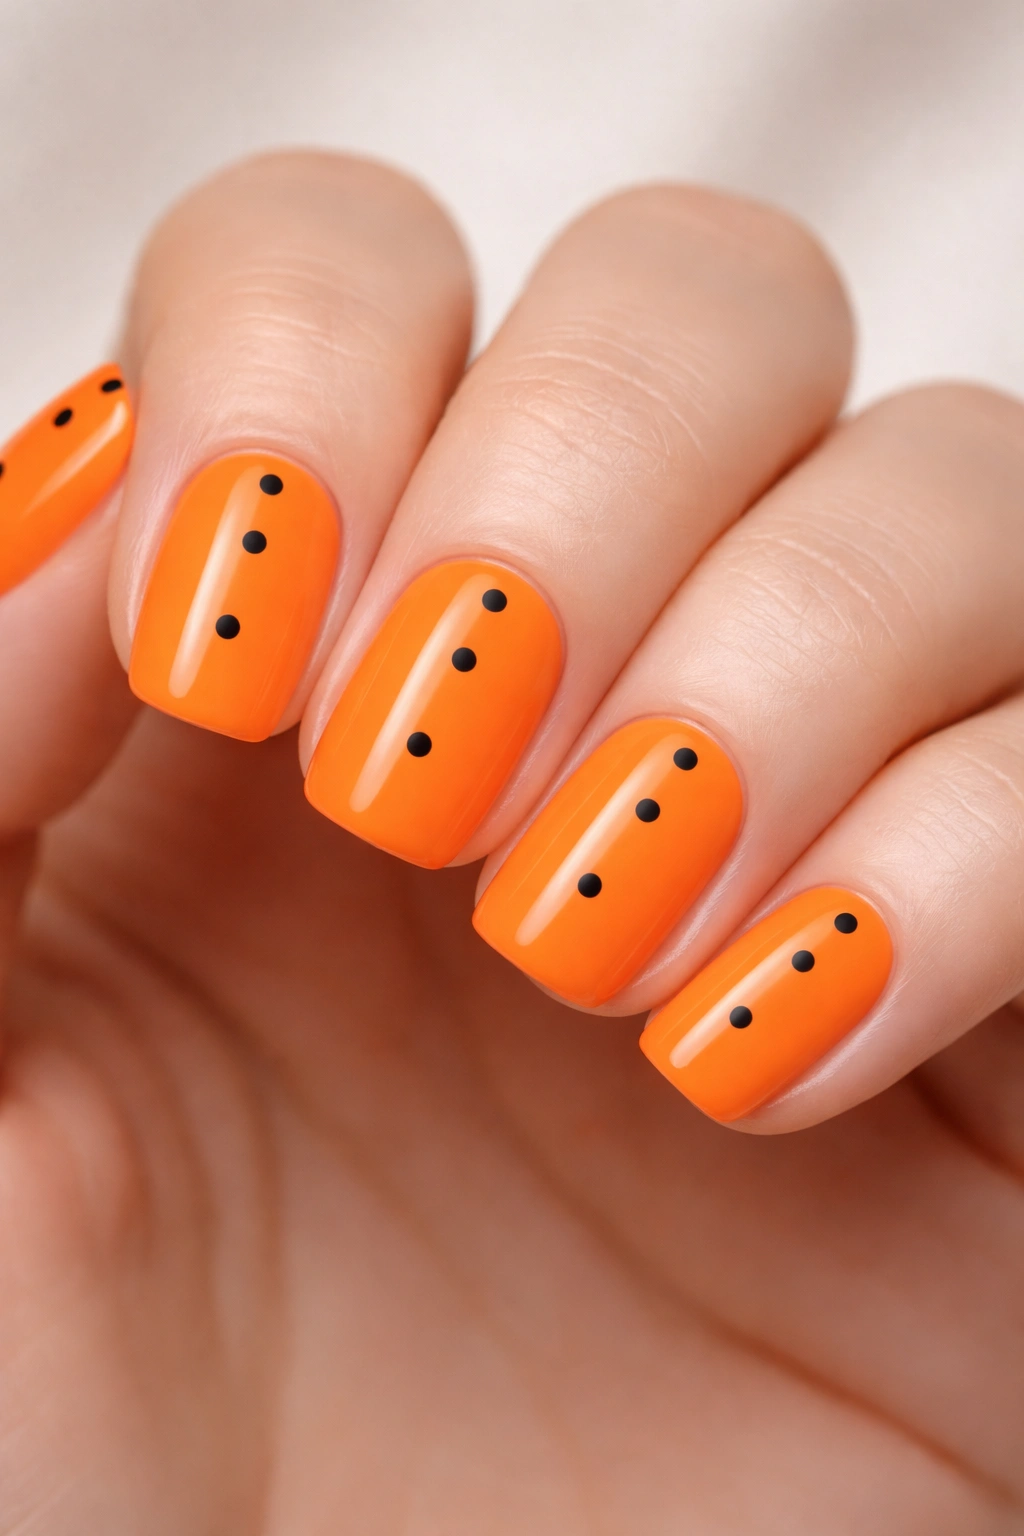
Neon orange is criminally underrated. It’s less polarizing than neon pink or green, warmer than neon yellow, and incredibly flattering on darker skin tones. Minimal black dots create a playful pattern that feels more fashion-forward than cute.
Minimalism Elevates Neon
A solid neon orange might feel intense on short nails, but introducing a simple geometric pattern—evenly spaced black dots—creates visual rhythm and sophistication. The dots make the design intentional rather than just bright.
Executing the Dot Pattern
- Apply neon orange as your base, using two coats for opacity and vibrancy
- Using a thin black liner brush or a dotting tool, create evenly spaced black dots across each nail
- Space dots in a grid pattern, or scatter them more randomly for a contemporary feel
- Keep dots uniformly sized—aim for dots about 2-3mm in diameter
- Seal with a glossy top coat to make both the orange and the black pop
- This design pairs beautifully with gold jewelry and warm-toned clothing
- Neon orange reads modern and fashion-forward, not costume-like
Worth knowing: Black dots on neon orange have the highest contrast ratio possible, making them visible from across a room—you want people to notice this design.
10. Bright Lime With White Negative Space
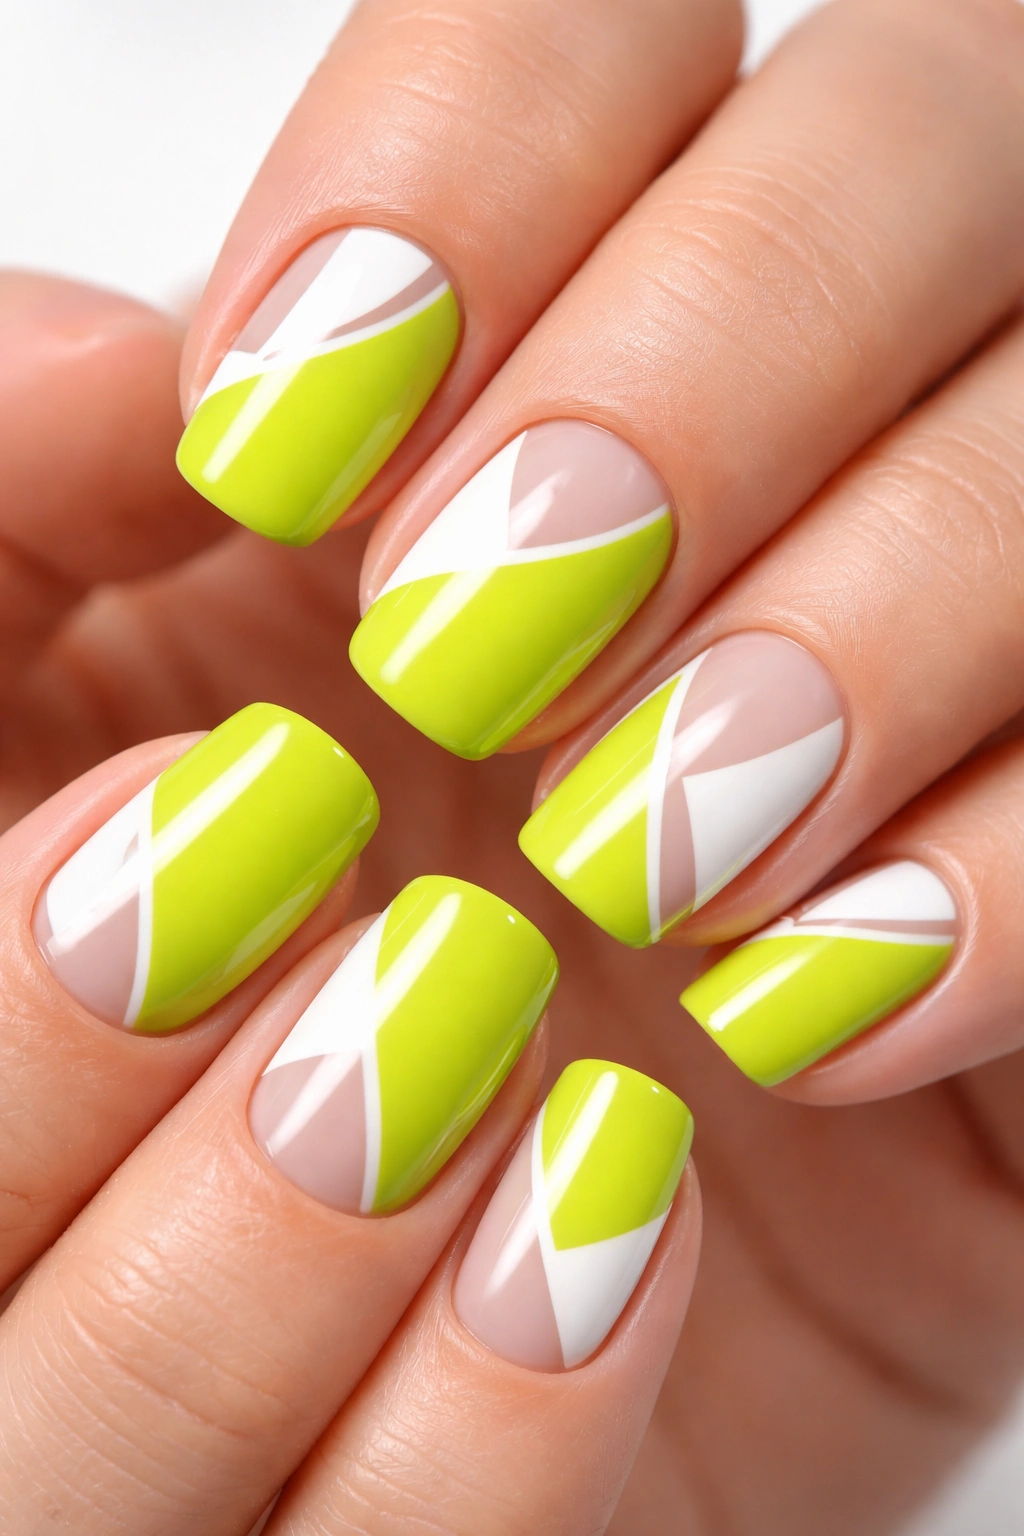
Negative space designs—where you intentionally leave gaps or shapes unpainted—create visual interest through what’s not there. Bright lime with white (or nude) negative space creates a striking modern effect that reads editorial and intentional.
Negative Space as Sophisticated Design
Negative space feels more contemporary than most other nail art techniques because it requires planning and precision. Rather than adding elements, you’re strategically removing them, which reads as designer-level thinking.
Creating Negative Space Patterns
- Apply bright lime green as your base across all five nails
- Using a thin brush and white acrylic or by carefully peeling away accent tips, create geometric shapes: triangles at the tips, stripes running vertically, or angular shapes on one accent nail
- The negative space can reveal your nail or a white layer beneath—either way, the contrast is striking
- Popular negative space patterns include: geometric corners, asymmetrical lines, or moon-shaped cutouts at the cuticle
- Seal everything carefully to ensure clean, sharp edges on your negative space shapes
- This design pairs with minimalist fashion and reads very current
Pro tip: Use painter’s tape to mask off geometric shapes before applying lime, creating perfectly sharp lines—remove the tape before sealing for crisp results.
11. Coral Orange With Rainbow Confetti
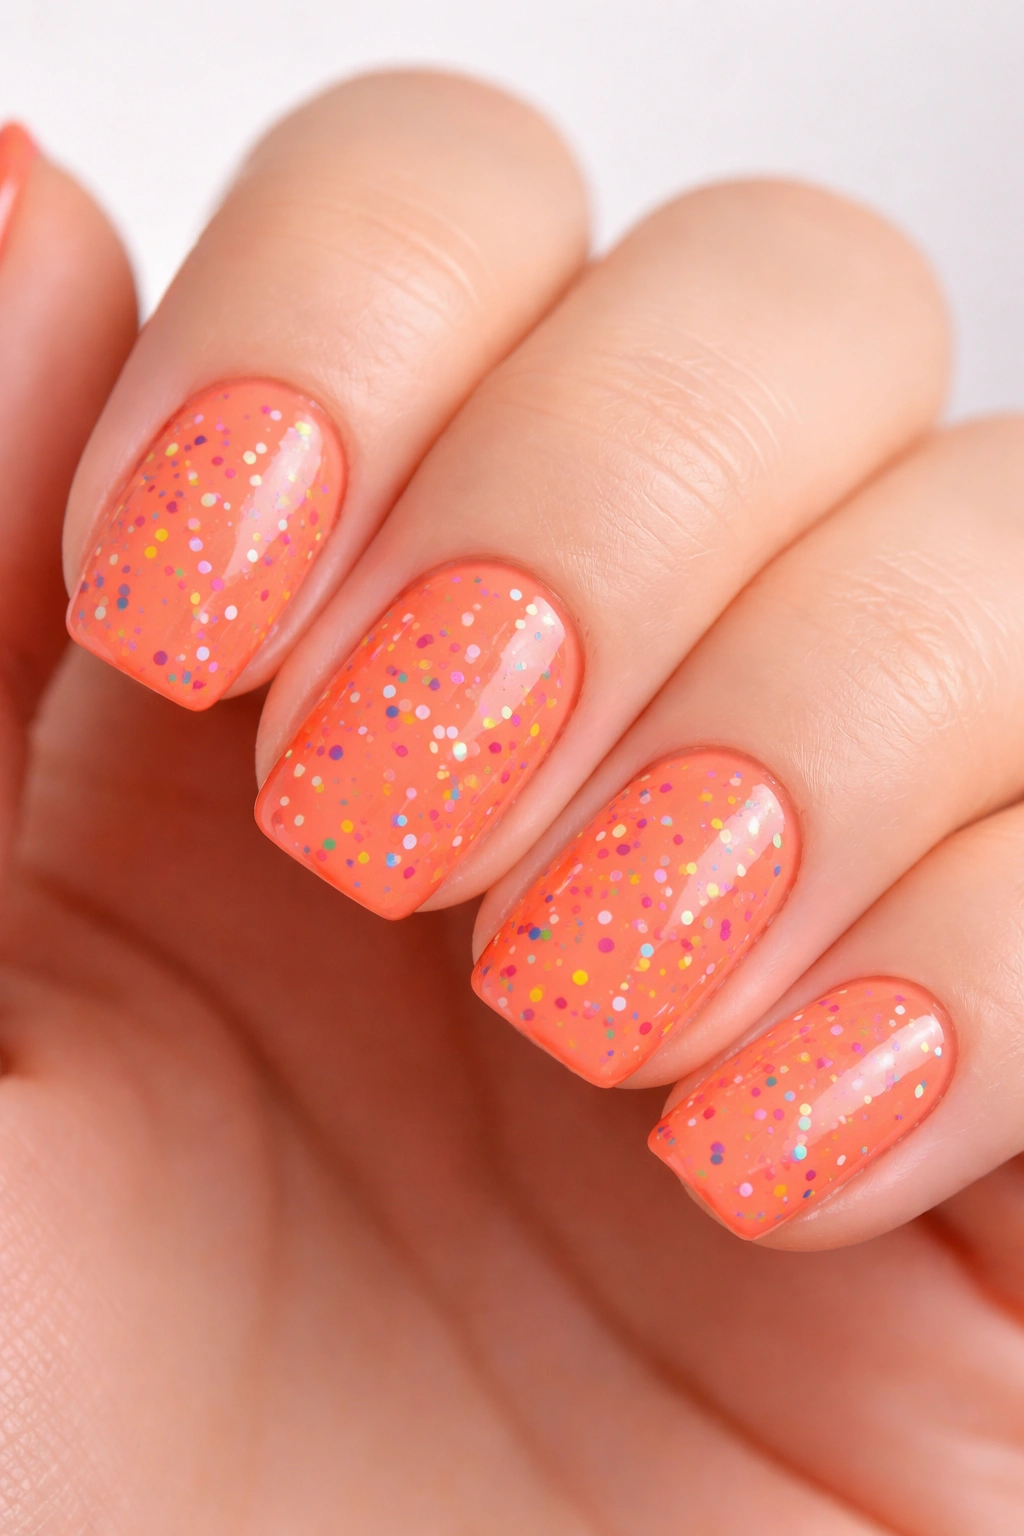
Coral orange is warm and inviting. When you add rainbow confetti—tiny flecks of multiple colors scattered across the nail—you create a design that’s bright without being matchy or over-themed. It reads fun and optimistic rather than childish.
Confetti as Controlled Playfulness
Rainbow elements can easily feel theme-park-ish, but confetti scattered on a solid coral base reads as celebratory without being costume-like. The solid base grounds the color, while the confetti adds joy and complexity.
Adding Rainbow Confetti Details
- Paint all five nails a warm coral orange—two coats minimum for solid coverage
- Using a thin brush or a dotting tool, add tiny dots of various colors: bright pink, yellow, turquoise, purple, and lime
- Space the confetti randomly across the nails rather than organizing it in a pattern
- Keep the dots small (about 2-3mm) so they read as accent details rather than overwhelming the base
- Seal with glossy top coat to make all colors pop
- Coral with rainbow confetti reads happy and confident, perfect for celebrations or anyone who loves color
- This design works year-round and pairs beautifully with colorful clothing or jewelry
Worth knowing: Choose confetti colors that contrast with the coral base—pastels on coral will blend rather than pop, so go for true, saturated colors.
12. Electric Purple With Silver Glitter Gradient
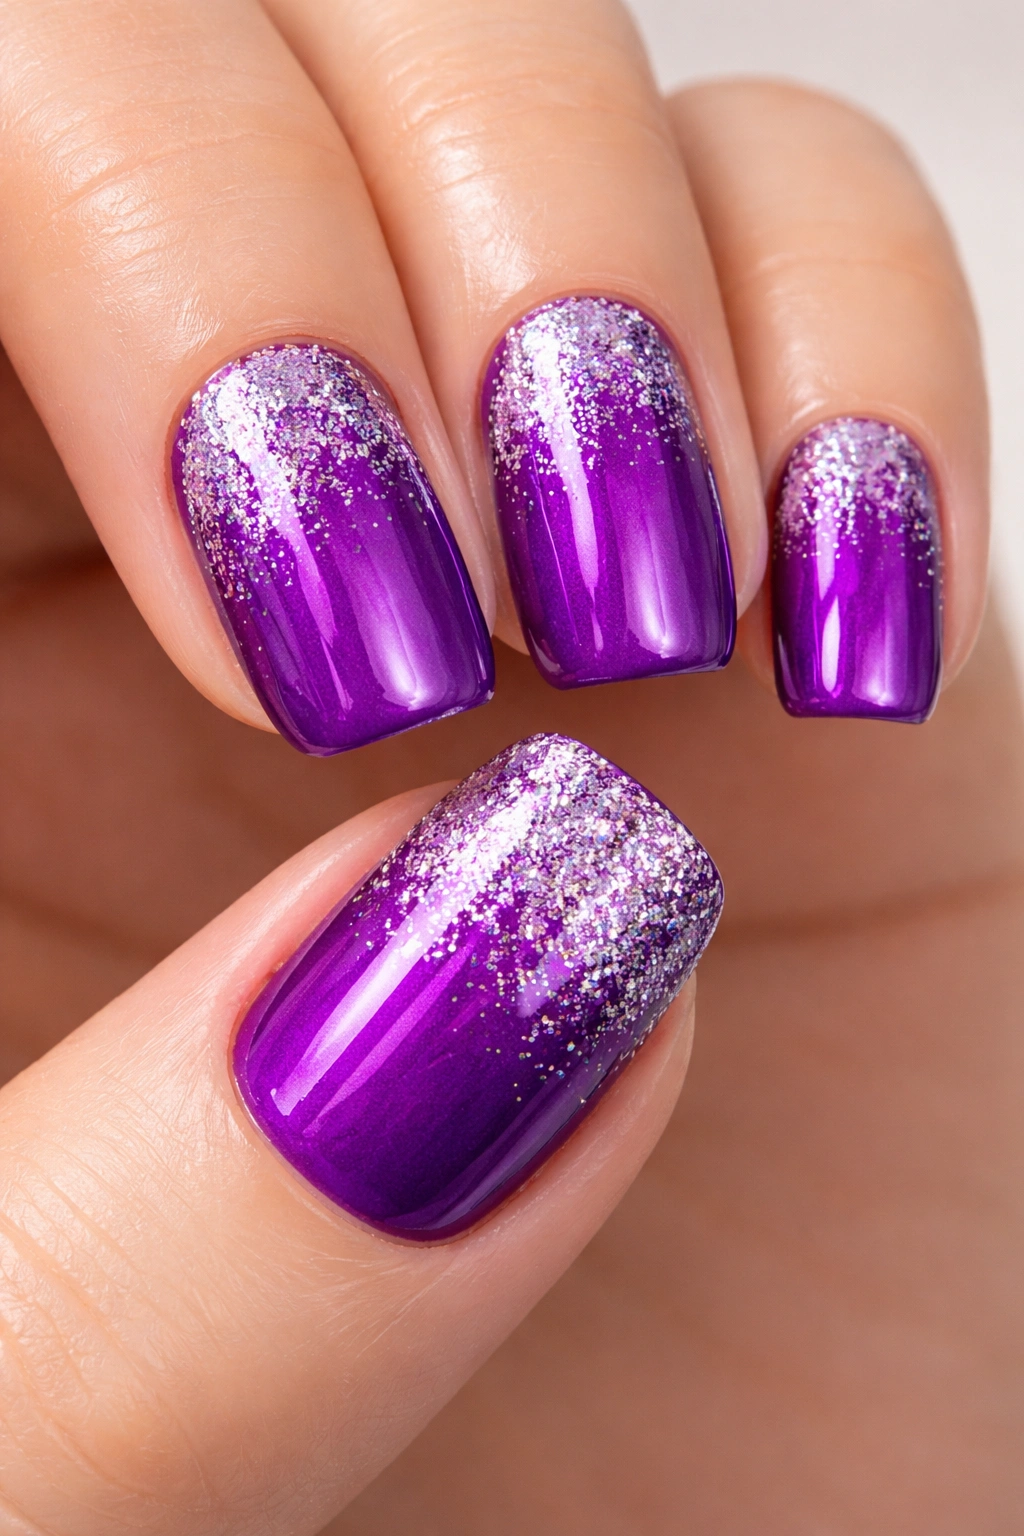
Electric purple is dramatic, mysterious, and infinitely cool. It’s the color choice of people who aren’t afraid to be noticed. When you layer a silver glitter gradient—where glitter intensifies from the cuticle to the tip—you add glamour and movement without sacrificing the elegance of the base color.
Purple as a Bold Yet Sophisticated Choice
Purple sits in that rare space between bold and elegant. It reads creative and confident without feeling aggressive. A silver glitter gradient adds depth and visual movement while complementing the purple beautifully.
Building the Glitter Gradient
- Apply electric purple as your base across all five nails, using two coats for vibrant opacity
- While the second coat is still slightly tacky, apply silver glitter to the nail tips—use a denser application here
- As you move toward the cuticle, use progressively less glitter so it fades and transitions naturally
- The gradient should be subtle and blended, not a hard line between glittered and non-glittered areas
- Seal with a shiny top coat to smooth the glitter and integrate it into the design
- Electric purple with silver reads sophisticated and modern, perfect for creative professionals or evening wear
- This combination photographs beautifully and catches light dramatically
Pro tip: Use fine silver glitter rather than chunky—fine glitter creates a more refined, elegant effect that reads luxury rather than craft-store.
13. Bright Fuchsia With White Marble Veining
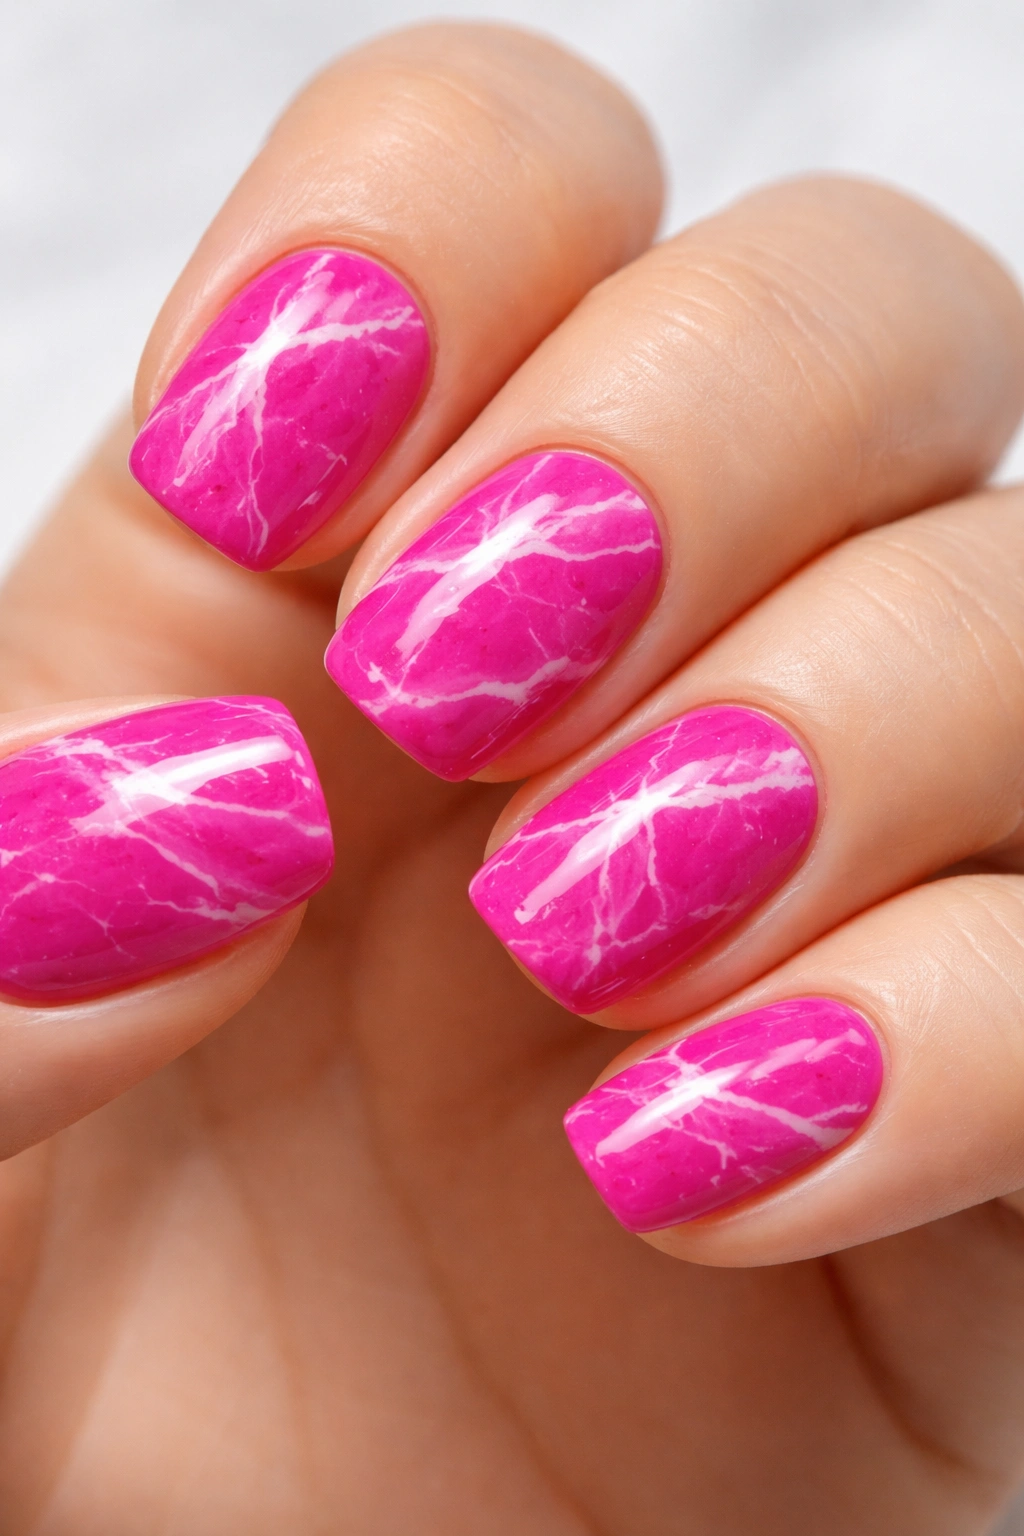
Bright fuchsia is unapologetically bold. It demands attention and confidence. White marble veining—delicate white lines that look like natural stone patterns—adds an unexpected elegant contrast that transforms the design from straightforward-bold to sophisticated-bold.
Marble Veining as Unexpected Luxury
Marble patterns are classic and elegant on their own, but pairing them with bright fuchsia creates cognitive dissonance in the best way: the design is simultaneously bold and refined. It reads as fashion-forward thinking rather than a safe choice.
Creating Marble Veining Details
- Paint all nails bright fuchsia for your base—use two coats for full opacity
- Using white acrylic paint or gel and a very thin brush, create irregular white veining patterns across the nails
- Veining should be organic and flowing, not perfectly straight—let lines branch and merge naturally
- Apply veining to all five nails or accent nails—consistency creates visual cohesion
- Seal with glossy top coat to make the white lines crisp against the fuchsia
- This design pairs beautifully with luxury aesthetics and pairs well with any outfit
- Fuchsia with marble reads both modern and timeless
Worth knowing: Marble veining requires a steady hand—if you’re nervous about hand-painted details, ask if your technician offers marble stamping plates as an alternative.
14. Sunny Yellow With Ombré to Clear
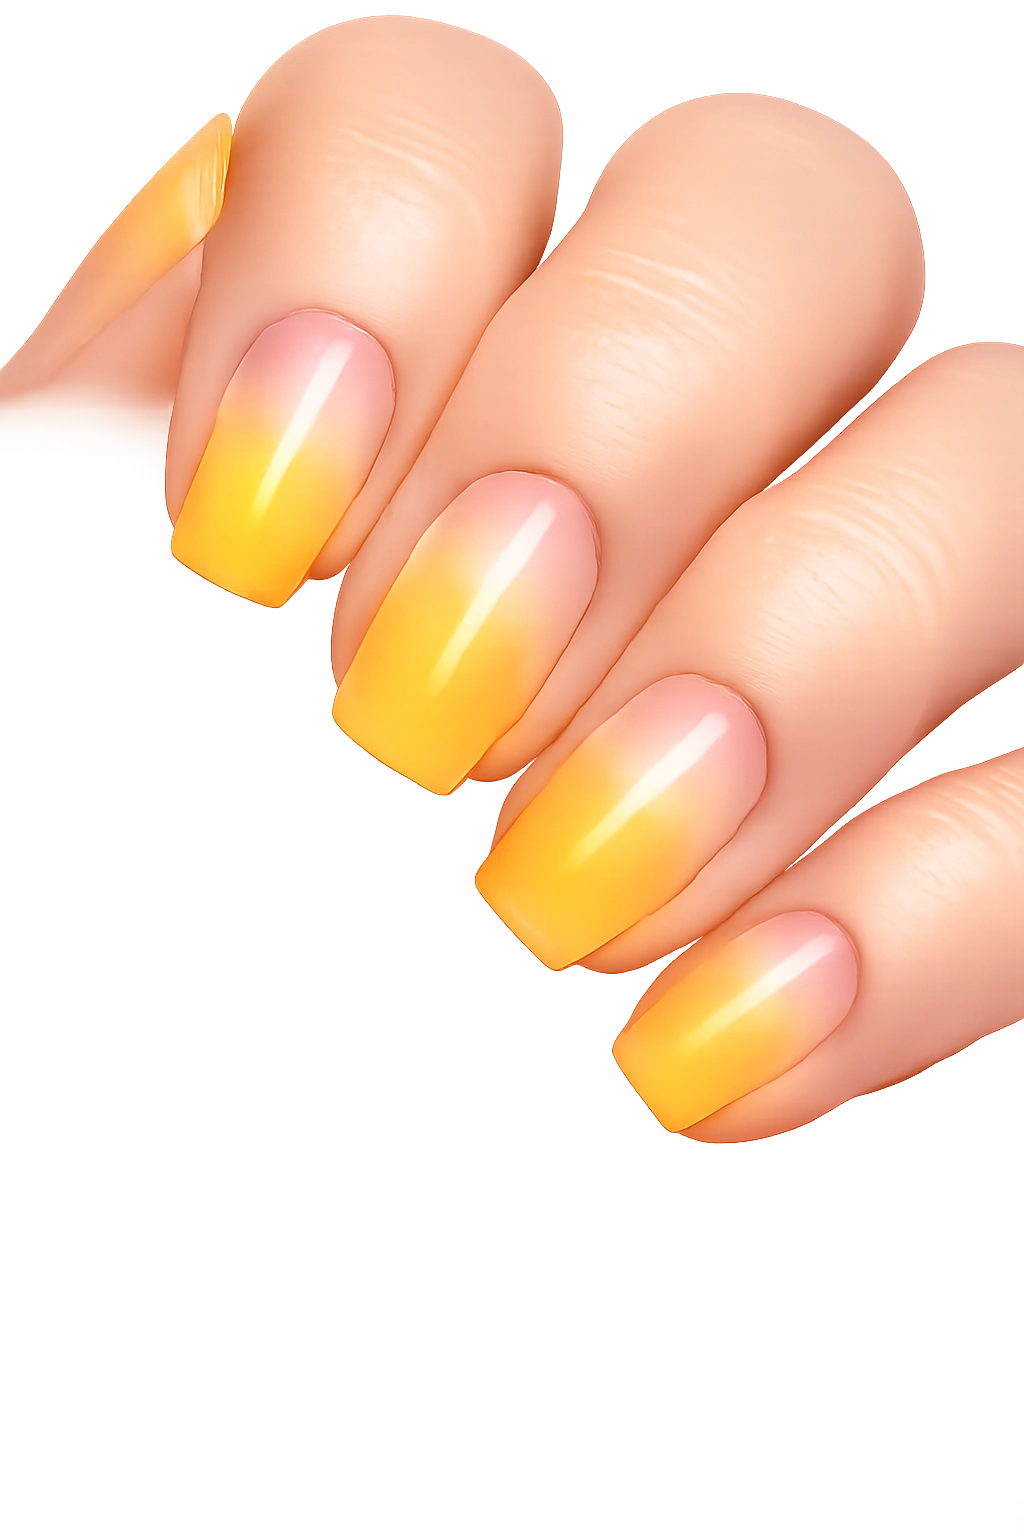
Sunshine yellow is pure happiness. An ombré fade from opaque sunny yellow to clear or nude reads as modern, sophisticated, and decidedly not costume-like. The transparency creates an almost holographic quality.
Transparency as a Design Element
Rather than fighting the brightness of yellow, leaning into it through a fade-to-clear technique makes the design feel intentional. The transparency also means the design adapts to different lighting—it’s opaque and bright in daylight and more subtle indoors.
Achieving the Clear Ombré Fade
- Apply opaque sunshine yellow to the nail tip and upper nail bed—this is your color zone
- Apply a clear or nude acrylic in the middle zone as a transition
- Blend the yellow and clear so the transition is gradual rather than having a harsh line
- The cuticle area should be nearly clear or very pale, showing mostly your natural nail
- Seal with glossy top coat to create a smooth, integrated finish
- This design reads modern and editorial, perfect for minimalists who love color
- Sunshine yellow to clear works year-round and photographs beautifully
Pro tip: Use a French manicure as your base reference—think of this as a reverse French where color fades toward the cuticle rather than concentrating at the tip.
15. Hot Pink With Holographic Tips

Hot pink is the ultimate confidence color. It’s warm, it’s bold, and it reads as a deliberate fashion choice. Holographic tips—where the nail tip shimmers with rainbow iridescence—add futuristic sparkle that makes the design feel special and elevated.
Holographic Tips as the Ultimate Finish
Holographic effects are inherently modern and eye-catching. When applied just to the tips rather than the full nail, they create accent interest without overwhelming the base color. The result reads both bold and refined.
Applying Holographic Tips
- Paint all five nails hot pink using two coats for vibrant, opaque coverage
- On the outer third of each nail (the tip area), apply holographic powder or a holographic top coat while the pink is slightly tacky
- Press the holographic product firmly into the acrylic so it adheres securely
- Use a glossy top coat to seal and smooth, making the holographic shimmer seamless
- Holographic tips catch light constantly and shift colors depending on the angle and lighting
- This design reads bold but intentional, perfect for anyone who loves making a statement
- Hot pink with holographic is perfect for special occasions or everyday confidence-boosting wear
Worth knowing: Holographic effects are most dramatic in natural daylight and under bright indoor lighting—the shimmer is still visible in dimmer settings but feels more subtle.
Final Thoughts
Bright, bold color doesn’t have to mean sacrificing sophistication or wearability. The short squoval shape is specifically designed to ground vibrant hues, keeping them feeling intentional and polished rather than extreme or costume-like. Whether you choose a clean neon with geometric accents, a warm tropical shade with foil, or an ombré fade that adds softness to brightness, the key is matching the design to your personal style and confidence level.
The beauty of acrylic nails is their flexibility—you can change designs every few weeks if you want, experimenting with different shades and patterns until you find your signature look. Start with designs that excite you, and don’t be afraid to ask your technician for their input on execution. A skilled nail artist can elevate even a simple bright color into something editorial and special through technique, seal quality, and attention to detail.
Bright short squoval nails send a message: you’re confident, you pay attention to details, and you’re not afraid to bring joy and color into the world. That’s always in style.
