

Pink is one of those shades that works for literally every occasion — whether you’re heading to the office, meeting friends for brunch, or getting ready for a night out. Coffin nails, with their elongated shape and tapered sides, have a way of making even simple designs look polished and deliberately chosen. The combination of coffin-shaped nails and pink polish creates an instant vibe that’s feminine without being saccharine, bold without being over-the-top, and versatile enough to match your entire wardrobe rotation.
The thing that makes pink coffin nails so appealing is how forgiving the style is. Medium-length coffin nails hit that sweet spot — long enough to make a statement and show off nail art, but short enough that they’re practical for everyday life. You’re not constantly snagging them on things, and they’re easier to maintain than ultra-long nails. Plus, pink comes in so many variations that you can find a shade that’s genuinely you — from barely-there blush tones to hot fuchsia, dusty mauve to bubblegum pop.
If you’ve been scrolling through Pinterest and wondering what you’d actually wear if you committed to pink coffin nails, here’s the good news: you have way more options than you might think. Each of these designs works with medium-length coffin nails and takes the simple idea of pink polish in genuinely different directions. Some lean minimal and elegant, others go full glam, and a few sit right in the middle. Whatever your style, there’s something here that’ll make you want to book that nail appointment.
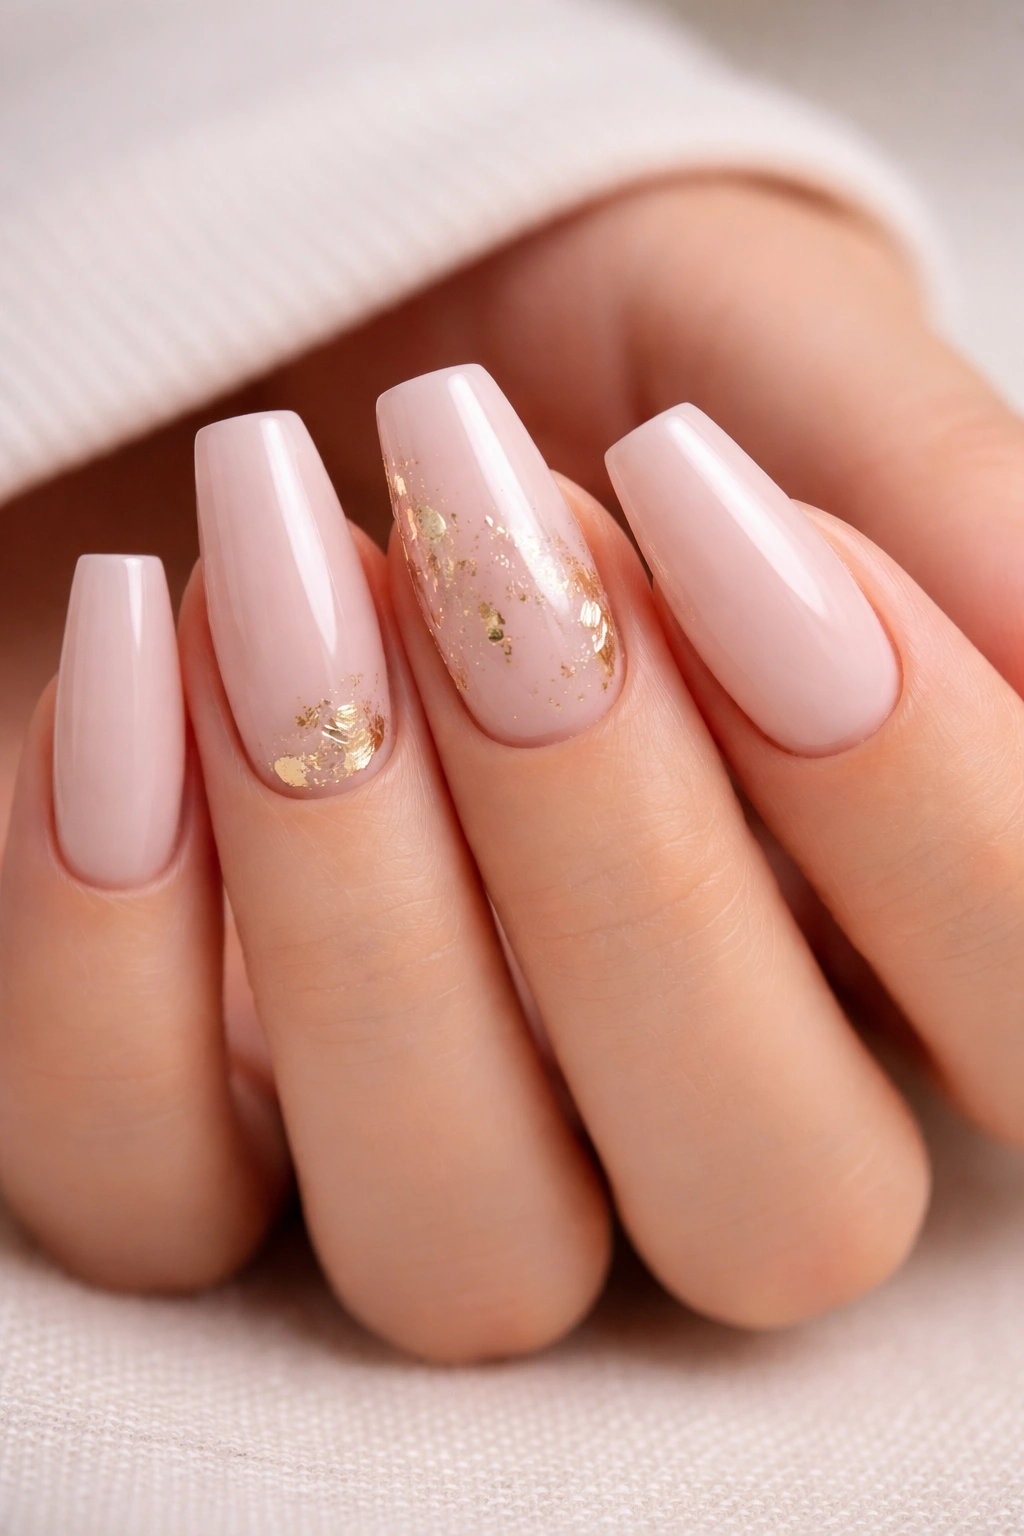
1. Soft Blush with Delicate Gold Leaf Accents
This design is the definition of understated elegance. Start with a creamy, pale pink — think ballet slipper or champagne pink — across all five nails. The softness of the color is key here; you want something that reads more neutral than statement-making.
Why This Works for Medium Coffins
The pale pink base gives you a clean canvas that elongates the nail bed, making medium-length coffin nails look even more refined. When you layer in gold leaf accents, they catch the light without overwhelming the overall look. The contrast between the muted pink and the warm metallic creates sophistication that works from a boardroom to a wedding reception. It’s the kind of design that people compliment without quite knowing why — it just feels expensive.
How to Execute It Perfectly
- Use a light, neutral pink with a slight warm undertone — avoid anything too cool or ashy
- Apply two thin coats to ensure even coverage, then seal with a glossy top coat
- Place small pieces of gold leaf randomly across two or three nails, pressing gently with a dry brush
- The gold doesn’t need to cover much area; even tiny scattered pieces create impact
- Finish with a clear protective top coat to seal the leaf in place and keep it from flaking off
Pro tip: Buy gold leaf in sheets rather than as pre-cut flakes — you’ll have more control and can tear pieces to exactly the size you want.
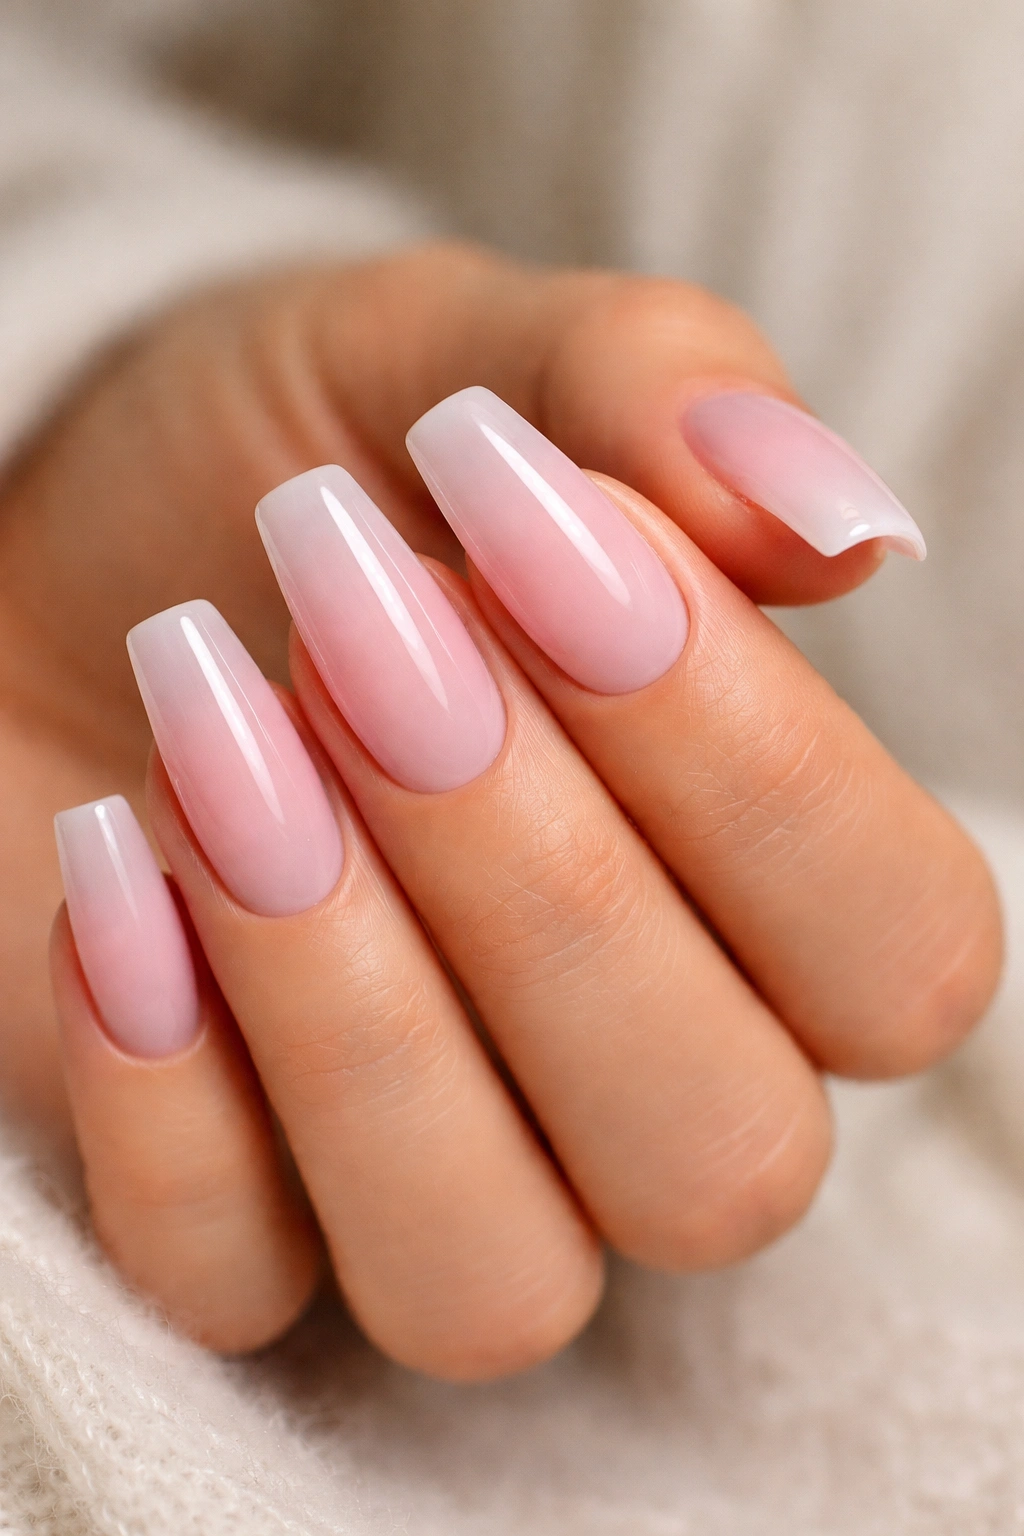
2. Gradient Ombré from Blush to Mauve
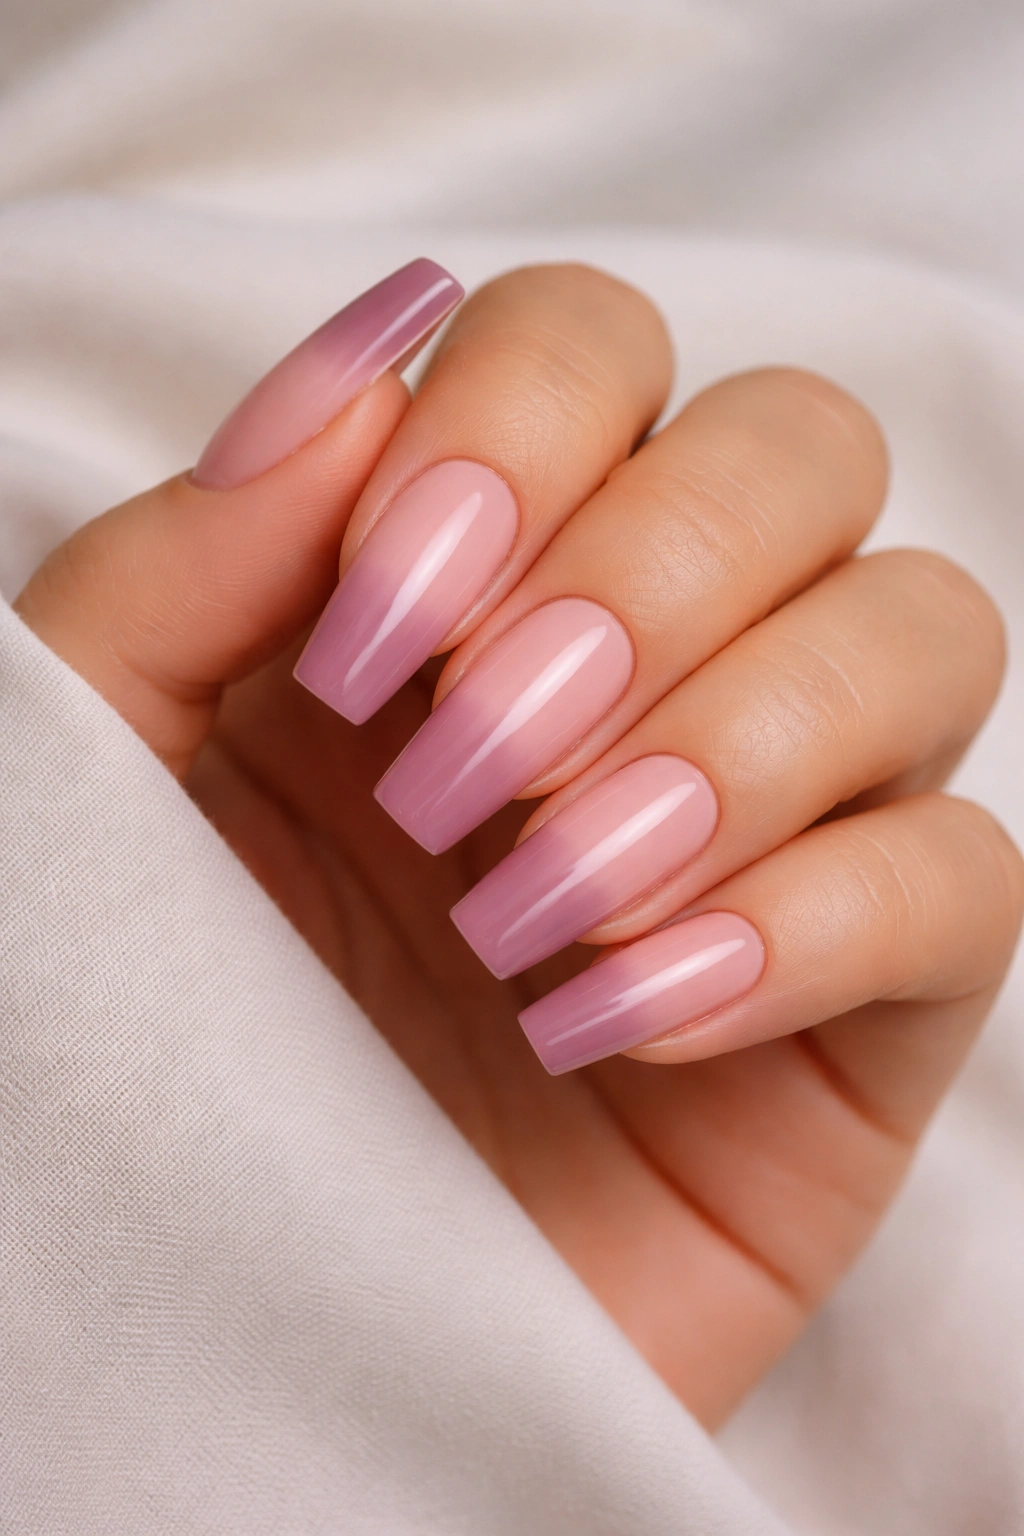
Ombré nails create an instant gradient effect that draws the eye up the length of your coffin nails. This version uses two complementary pinks — a soft blush on the nail bed that gradually transitions to a deeper mauve at the tip.
Why This Design Stands Out
The gradient effect creates the illusion of even more length and elegance than medium coffins already provide. Because both colors stay in the pink family, the look feels cohesive and intentional rather than clashing. The darker mauve at the tips also makes the coffin shape itself more visually distinct. It’s modern without being trendy, and it photographs beautifully.
The Technique Breakdown
- Paint all nails with the lightest blush shade first and let dry completely
- Using a makeup sponge, dab the deeper mauve shade onto the sponge, concentrating it more heavily on one side
- Press the sponge vertically onto your nail tips, overlapping with the blush shade in the middle
- Blend the colors where they meet by gently dabbing (not wiping) with a clean, damp sponge
- Use a thin brush and the lighter shade to clean up any harsh edges around the nail sides
- Seal everything with a high-shine top coat to make the gradient pop
Worth knowing: The key to a smooth blend is patience — let the first color dry before adding the second, and use a light touch with the sponge rather than pressing hard.
3. Classic Pink with White Coffin Outline
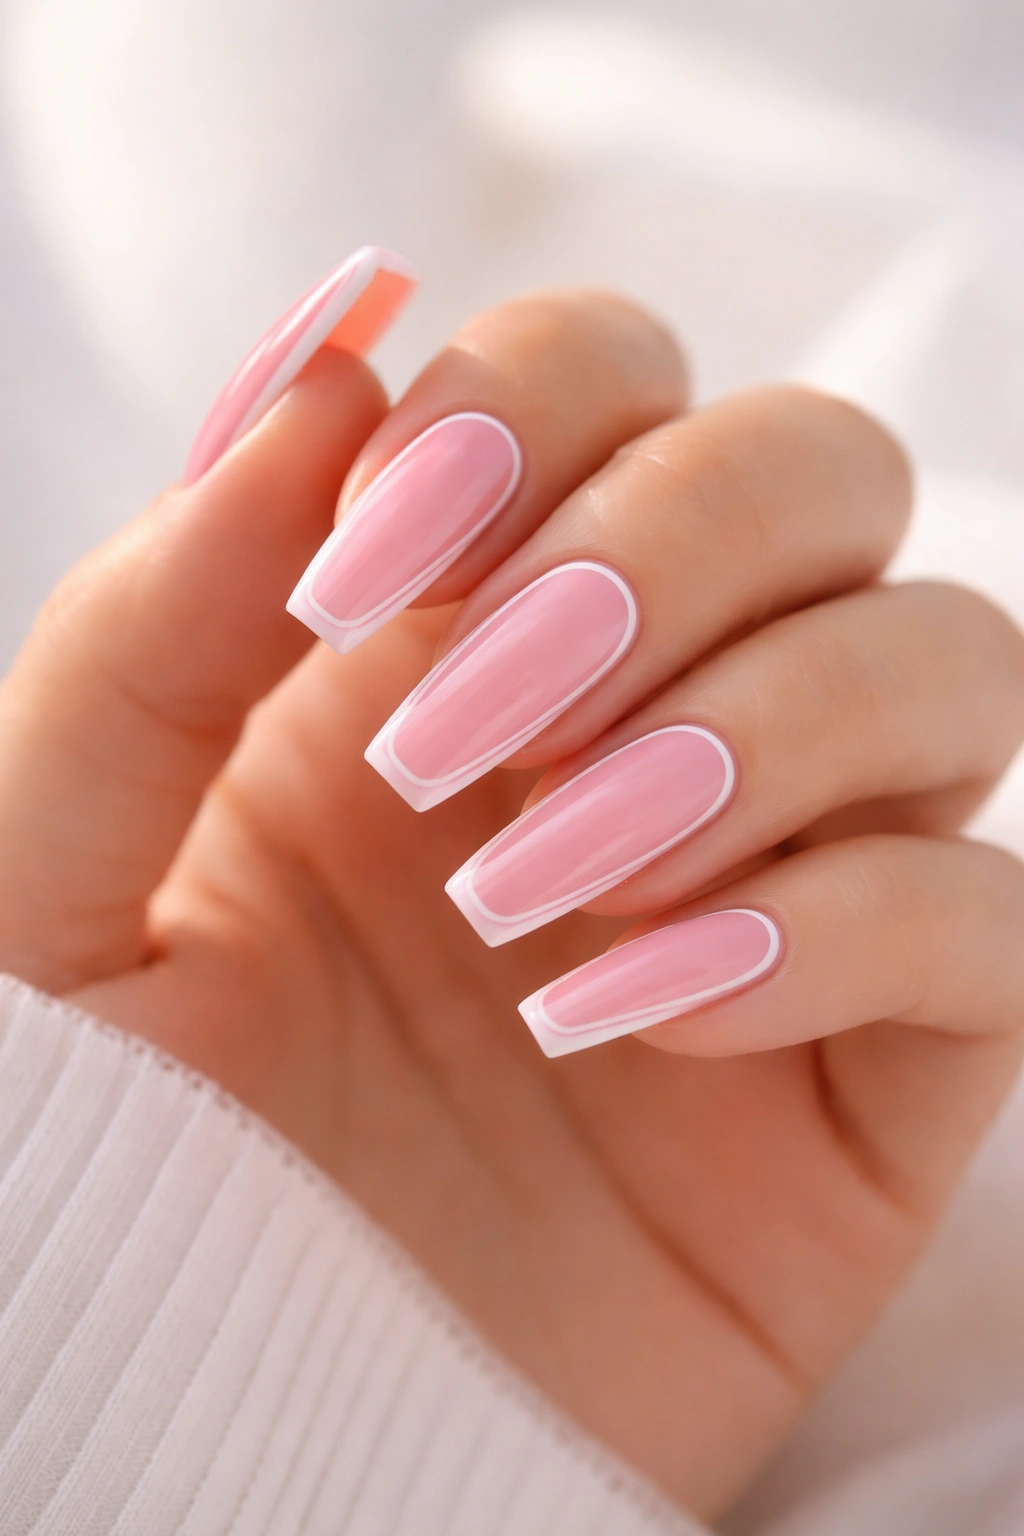
This design is bold, geometric, and instantly recognizable. The entire nail stays your chosen pink shade, but you add a thin white line that traces the distinctive coffin shape — highlighting the sharp, tapered edges.
Why This Design Works
White outlining naturally emphasizes the coffin shape of your nails, which is exactly what you want if you’re wearing this particular style. There’s something very intentional and modern about using a negative-space outline to define your nail shape. On medium-length coffins, this creates a crisp, almost architectural feel. It’s simple enough to wear every day but striking enough to be your signature look.
Step-by-Step Application
- Paint two coats of your chosen pink and let dry completely
- Using a thin nail art brush or a striping brush, draw a white line down one side of the nail, following the natural edge line
- Draw another white line down the other side, maintaining an even thickness
- Add a thin white line across the very tip of the coffin to complete the outline
- Keep lines clean and straight by using a steady hand and resting your brush hand on the table for stability
- Finish with clear top coat for protection and a polished appearance
Insider tip: If hand-painting feels shaky, you can use thin white striping tape instead of polish — it gives a cleaner edge and is more forgiving.
4. Dusty Rose with Translucent Glitter Gradient
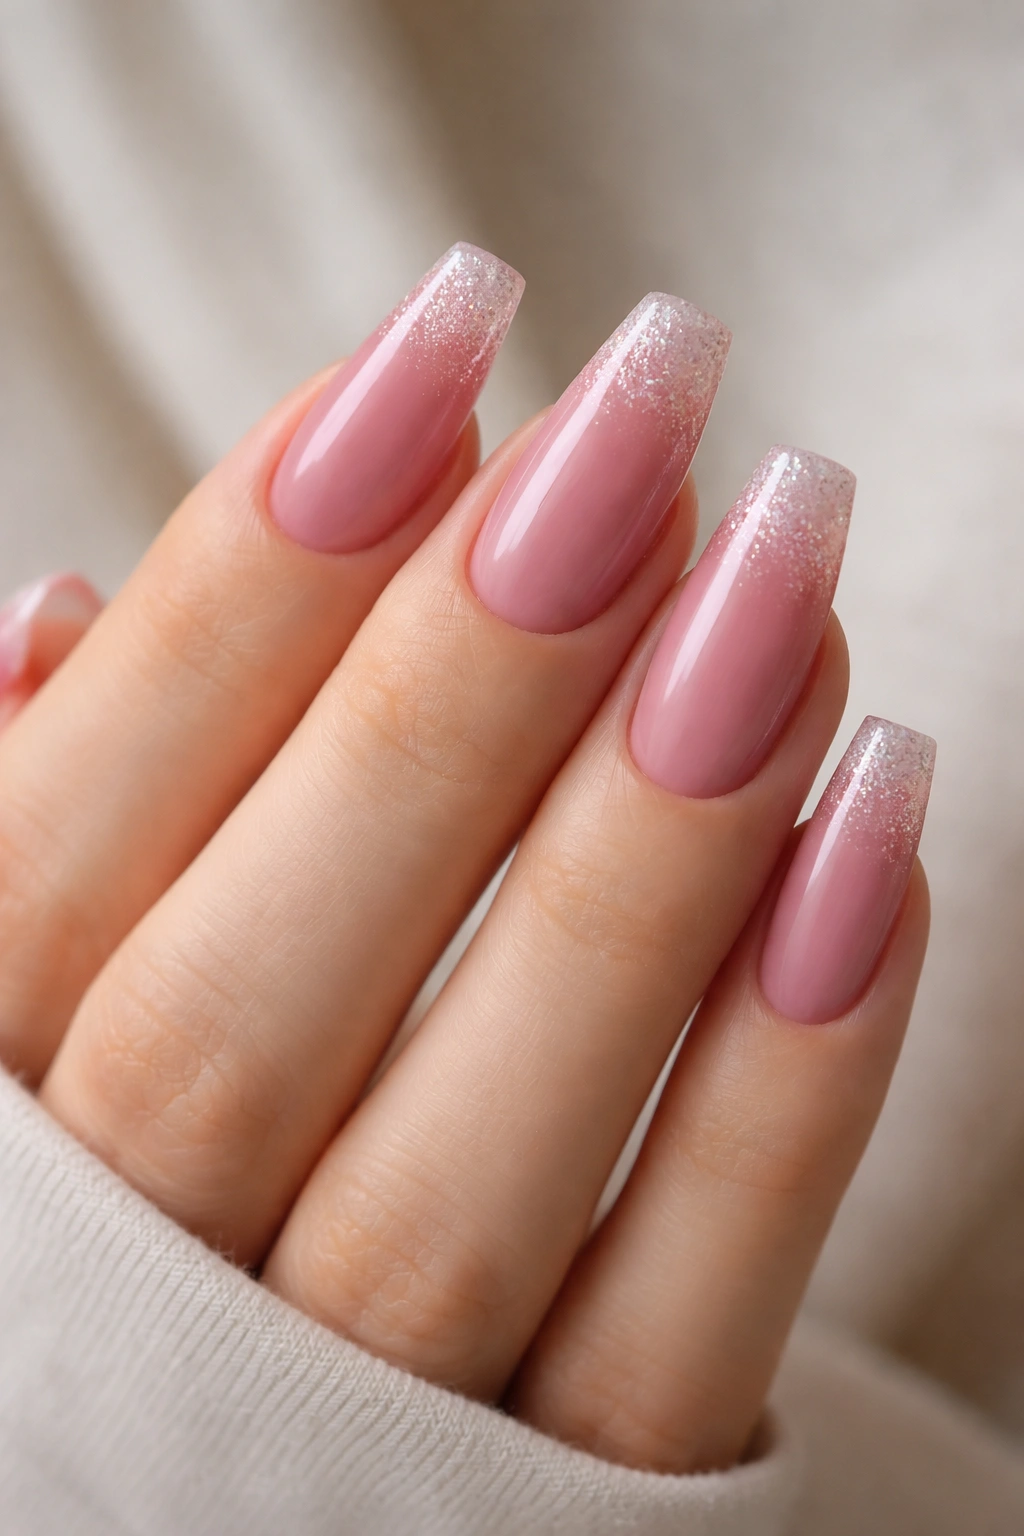
Dusty rose is that muted, sophisticated pink that leans slightly mauve and feels inherently calming. Pair it with a subtle translucent glitter gradient that starts barely-there at the base and builds toward the tips.
What Makes This Beautiful
The dusty rose base is flattering to almost every skin tone, and it creates a soft, romantic aesthetic. Translucent glitter (rather than opaque confetti glitter) catches the light without looking costume-y. The gradient effect of the glitter — concentrated more heavily toward the tips — draws attention to the coffin shape and creates beautiful movement when light hits your nails.
The Layering Process
- Apply two coats of dusty rose and let cure or dry completely
- Using a sponge, apply a small amount of translucent glitter polish to the tip area, starting about one-quarter of the way down from the tip
- Gently dab and blend upward toward the middle of the nail, creating a fade effect
- The glitter should be barely visible at the nail base and most concentrated at the tip
- For extra sparkle, do a second layer of glitter focused on just the very tip
- Seal with a thick, clear top coat to smooth the texture and add shine
Real talk: Translucent glitter can be gritty, so don’t skip the final top coat — it makes the difference between glitter that feels bumpy and glitter that feels like part of the polish.
5. Bubblegum Pink with Tiny Rhinestone Accents
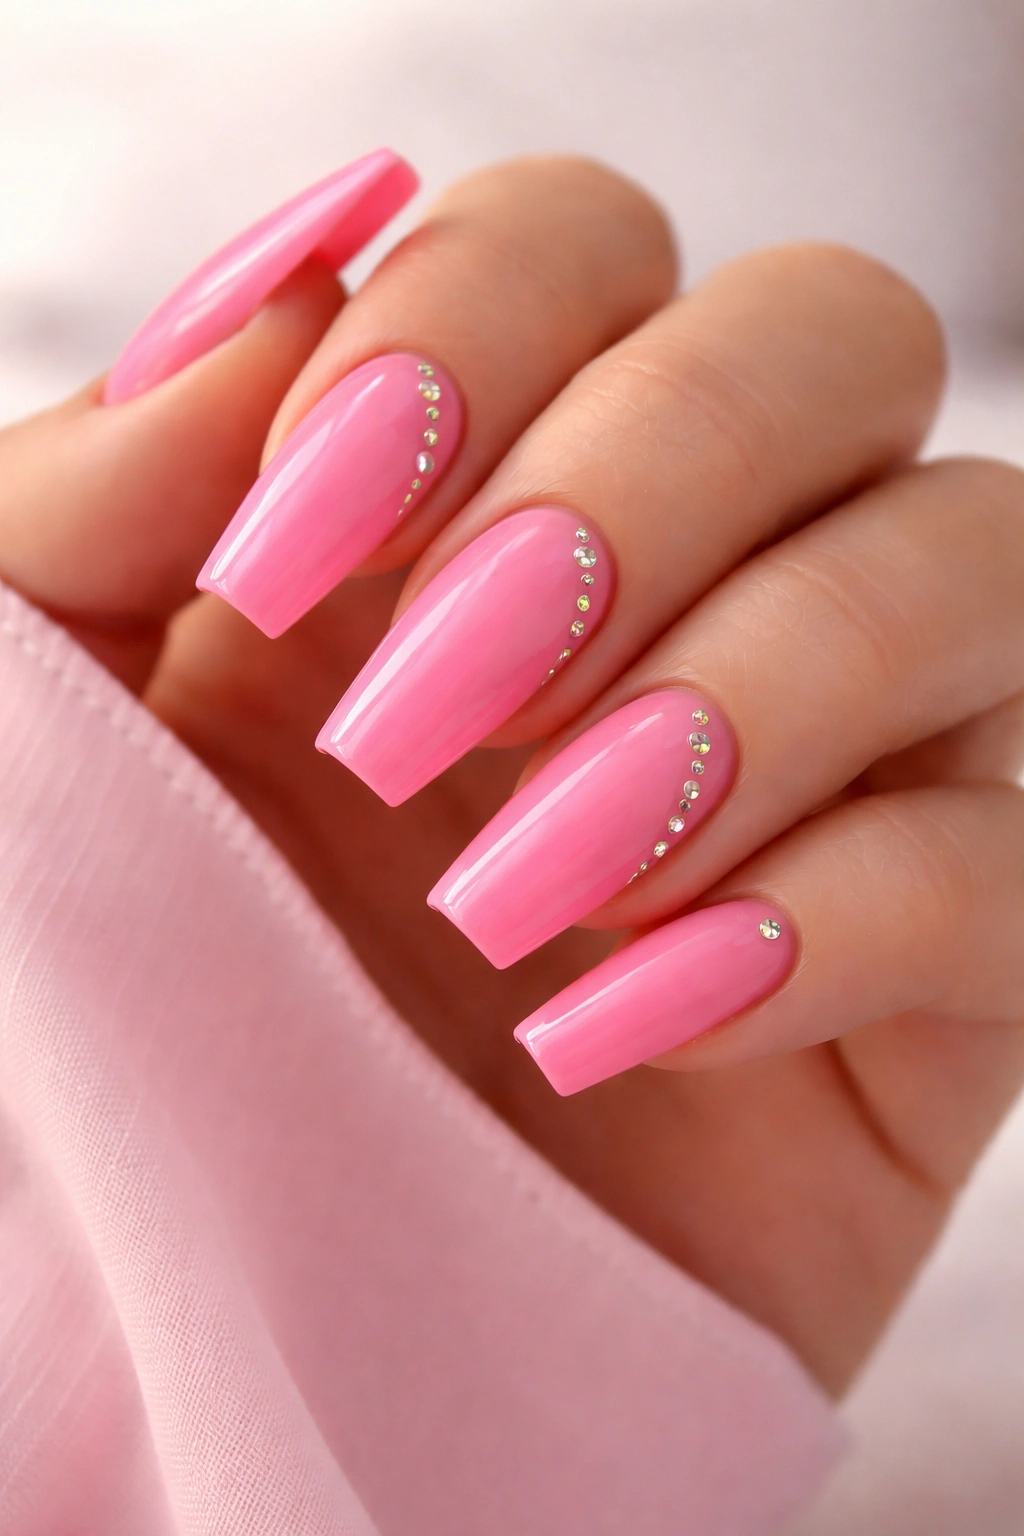
Go bold with a true bubblegum or hot pink that’s impossible to miss. Keep the color solid on most nails but add a strategic scatter of tiny rhinestones to create focal points and luxury detail.
Why This Design Commands Attention
A true bubblegum pink is confident and playful — it says you’re not afraid to wear color. Medium coffin nails in this shade look modern and intentional. The rhinestone accents prevent the design from feeling one-note; they create visual interest and catch light throughout the day. It’s the kind of mani you wear when you want to feel great about your nails.
Application and Placement
- Choose a bright, true pink with good pigmentation and apply two coats
- Seal with a clear top coat so you have a smooth base for rhinestone application
- Using a rhinestone picker tool or the sticky end of a toothpick, place small rhinestones in a diagonal line down one nail
- Add a small cluster of rhinestones at the tip of another nail
- Space them strategically so the eye moves across your hand naturally
- Use nail glue or sticky top coat to adhere each stone firmly
- Seal everything with a final layer of clear top coat to protect the stones
Pro tip: Less is more with rhinestones — three to five per hand is more elegant than covering every nail. Let the pink shine, and use stones as accent details.
6. Milky Pink Base with Negative Space Geometric Patterns
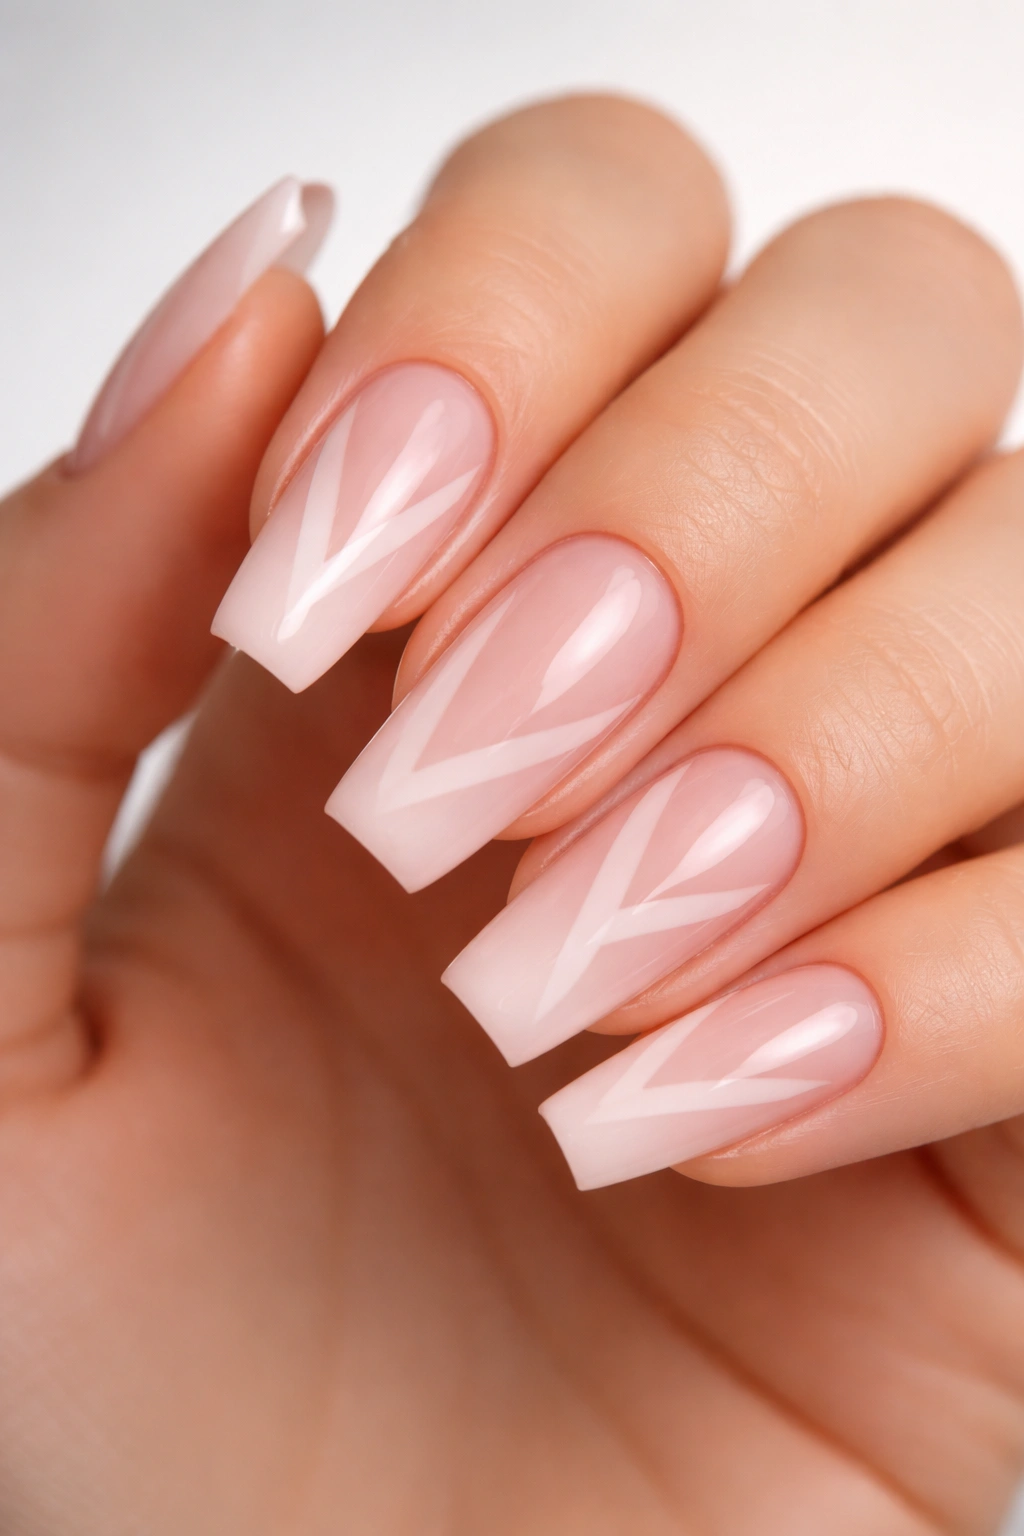
This design uses a soft, milky pink as the background and leaves portions of your nail bare to create geometric shapes — triangles, stripes, or abstract patterns that expose the natural nail underneath.
Why Negative Space Works Here
Negative space design feels very current and artistic. On medium coffin nails, it creates visual balance because part of the nail is covered and part is left bare. The coffin shape becomes even more striking because you’re interrupting the solid color with intentional gaps. It reads as more sophisticated than a solid mani and more interesting than a simple design.
Creating Clean Negative Space
- Paint two coats of milky pink and let dry completely
- Decide on your pattern: vertical stripes, diagonal blocks, a geometric shape across the tip, or scattered triangles
- Use thin striping tape to mask off the areas you want to leave bare
- Press the tape down firmly so polish doesn’t seep underneath
- Apply your top coat, then carefully remove the tape while still slightly wet for clean edges
- If edges are imperfect, use a thin brush and your pink polish to clean them up
- Finish with clear top coat
Worth knowing: The natural nail showing through is part of the design, so keep your cuticles clean and nail beds healthy — they’re now visible design elements.
7. Ballet Pink with Hand-Painted Tiny Florals
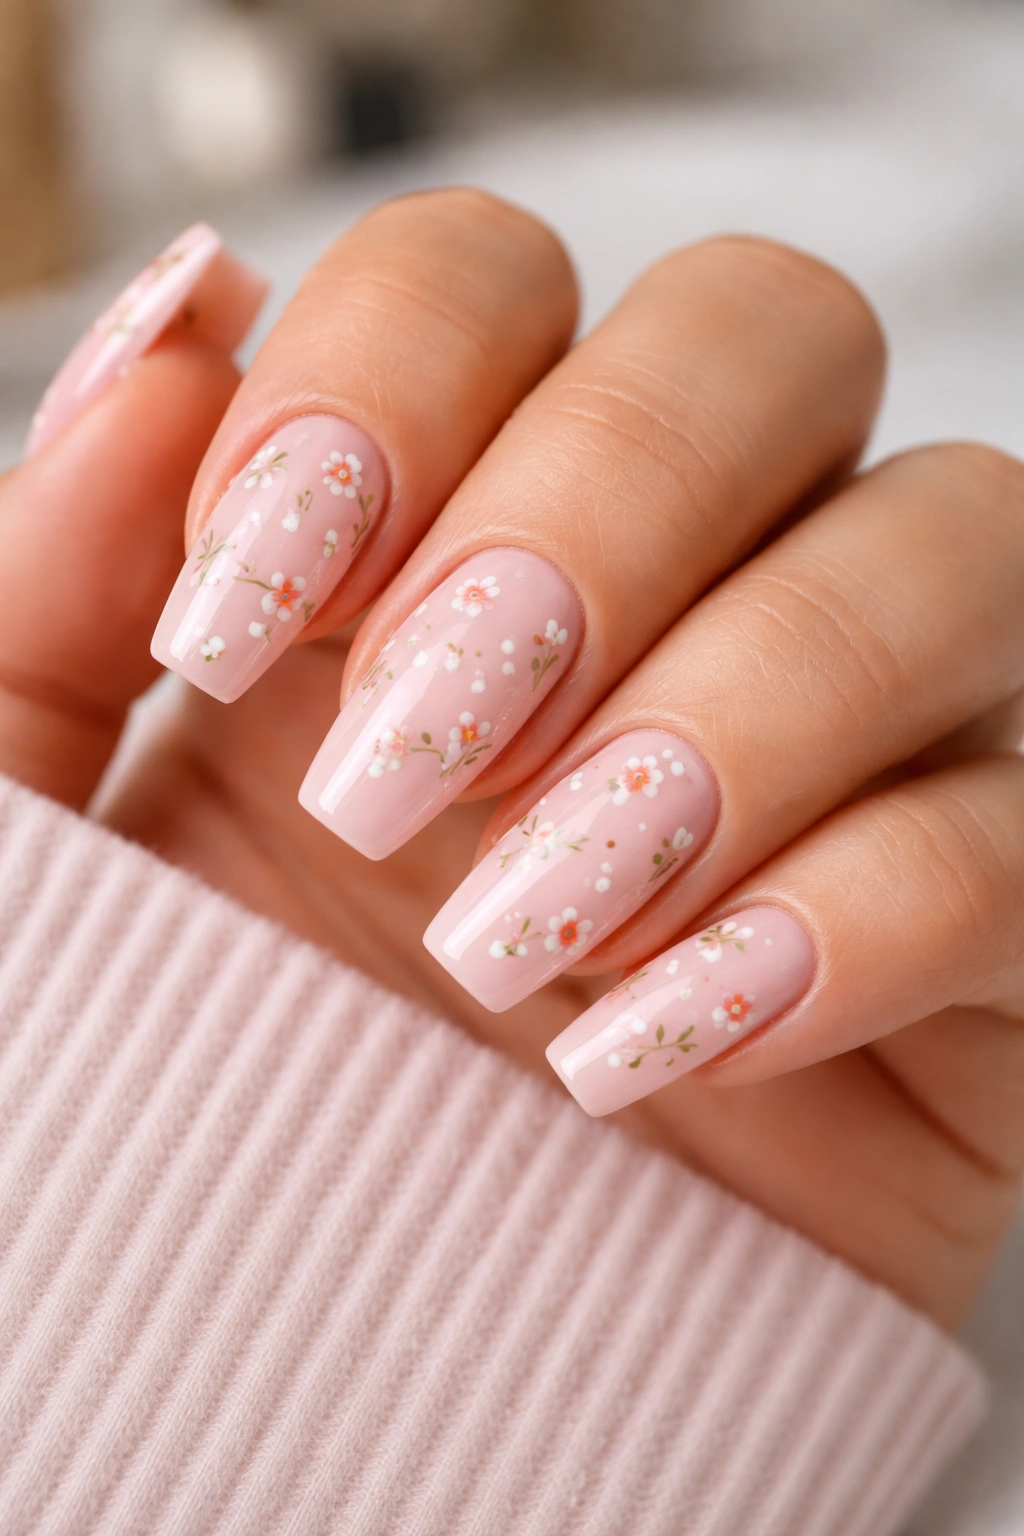
Move into softer, more artistic territory with a gentle ballet pink base and tiny hand-painted flowers scattered across the nails. These aren’t realistic flowers — just simple blooms made from a few brushstrokes of white, coral, and green.
Why This Design Feels Special
Hand-painted florals instantly elevate a simple manicure because they require skill and attention to detail. Even if they’re tiny and imperfect, there’s something charming about the handmade quality. Ballet pink is the perfect backdrop because it’s neutral enough not to compete with the flowers. On medium coffins, this design creates an elegant, almost feminine energy without being over-decorated.
Simple Floral Painting Technique
- Start with two coats of ballet pink as your base
- Using a very thin brush and white polish, paint simple five-petal flowers — just dots arranged in a circle
- Add a small dot of yellow or coral in the center of each flower
- Paint thin green stems and tiny leaf shapes using a bright or sage green
- Keep flowers small and scattered — fewer, larger flowers feel more intentional than densely packed tiny ones
- Flowers should be concentrated on maybe three nails, leaving two completely solid
- Seal with clear top coat to protect your artwork
Insider note: Practice on a piece of paper first — florals are forgiving because they’re naturally imperfect, so even shaky brushwork looks authentic and charming.
8. Hot Pink with Matte Finish and Glossy Accent Nail
Here’s a texture play: go full hot pink across four nails with a modern matte finish, then make one accent nail the same hot pink but with a high-gloss, shiny finish. The contrast between matte and glossy creates sophisticated visual interest.
What Makes This Minimalist Approach Work
Matte nails have a velvety, modern aesthetic that feels very deliberate and curated. By using only one accent nail in glossy, you’re drawing the eye to one specific point while keeping the overall look clean. This design is minimal but not boring — the texture contrast does all the heavy lifting. It works in professional settings and casual contexts equally well.
Achieving Perfect Matte and Glossy
- Paint all five nails with hot pink, two coats
- On four nails, apply a matte top coat instead of glossy — this transforms the finish from shiny to velvety
- On your accent nail (traditionally the ring finger), apply a regular glossy clear top coat
- The glossy nail will pop visually because of the contrast with the matte nails around it
- Matte finishes are more prone to smudging, so be extra careful during the first 24 hours
- If matte nails start to look dull after a week, a fresh coat of matte top coat refreshes them
Real talk: Matte finishes can feel a bit delicate in person, but they’re stunning in photos and feel luxurious to touch.
9. Dusty Mauve-Pink with Chrome Powder Accents
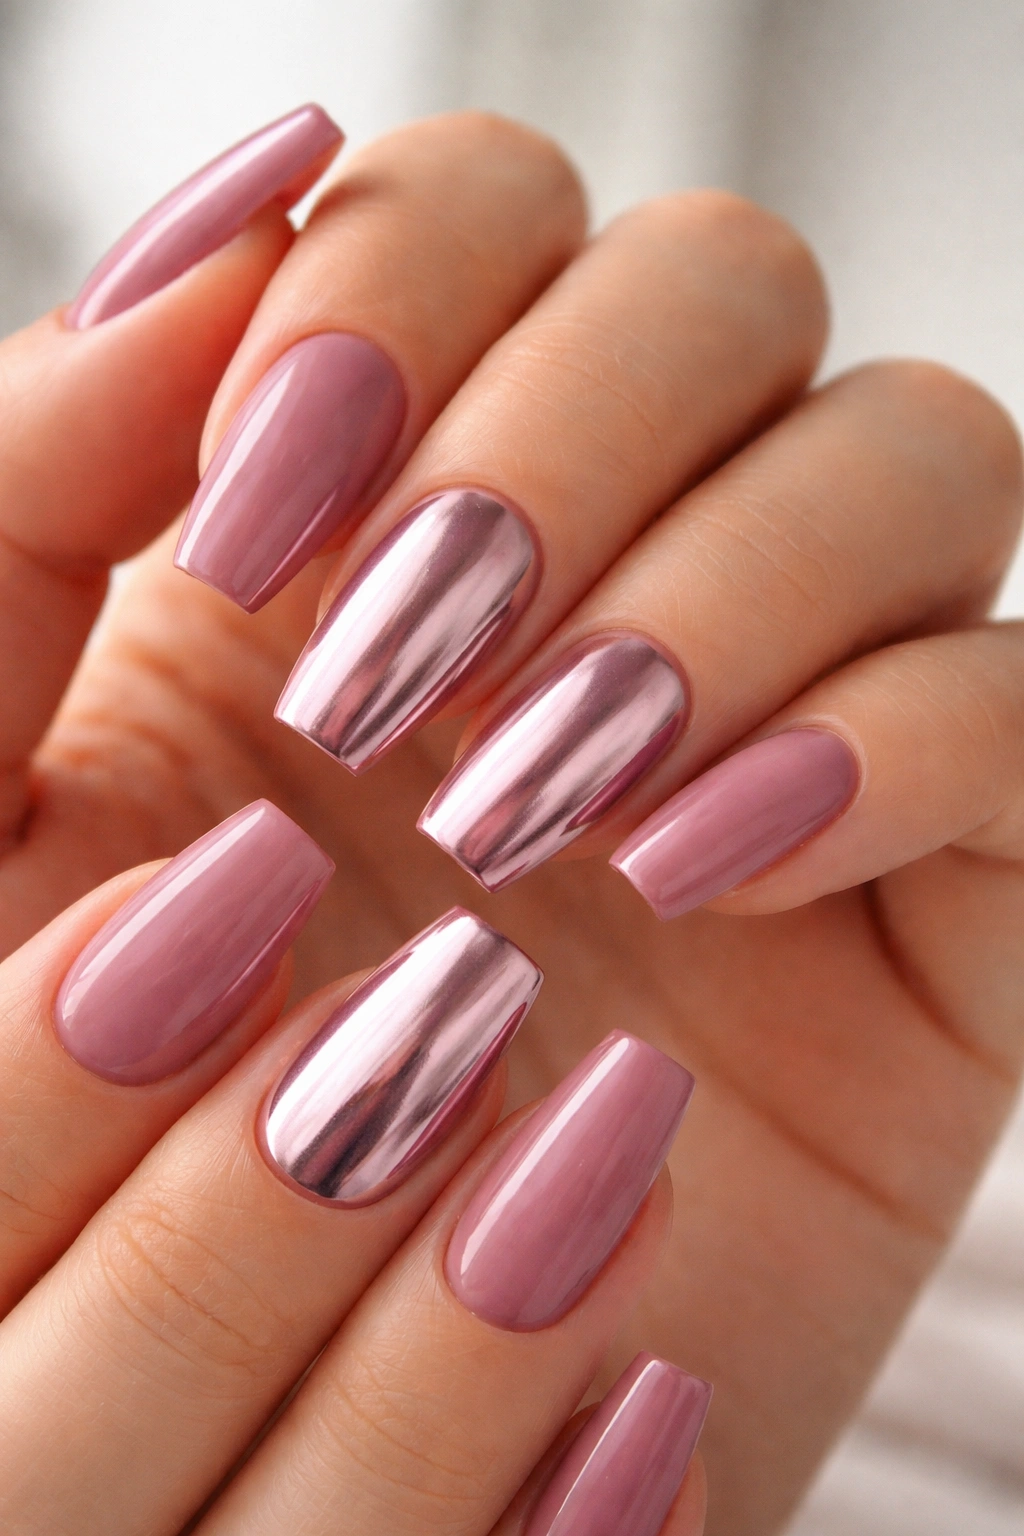
Dusty mauve-pink is that cool-toned pink that leans purple, creating an almost ethereal quality. Layer in chrome powder on select nails to create a metallic mirror finish that feels high-fashion and unexpected.
Why Chrome Transforms the Design
Chrome powder creates an almost holographic effect that’s impossible to ignore. On medium coffin nails, it feels editorial and modern. The cool mauve-pink base keeps the chrome from feeling too heavy or costume-y. This is the design you wear when you want nails that are genuinely conversation-starting.
Applying Chrome Powder Successfully
- Paint two coats of dusty mauve-pink and apply a slightly tacky top coat (chrome requires texture to adhere)
- Using a velvet applicator or makeup sponge, rub chrome powder gently onto select nails — typically two or three per hand
- Work in the direction of growth and use very light pressure; chrome powder is potent and a little goes a long way
- You can do full nails or just accent areas like the tips or sides
- Seal immediately with a glossy top coat, pressing gently so you don’t disturb the chrome
- Chrome nails are delicate, so avoid excessive hand washing for the first 24 hours
Pro tip: Chrome powder comes in different colors (silver, gold, rose gold, holographic) — rose gold or holographic chrome over dusty mauve-pink creates an almost iridescent effect.
10. Pale Pink with Ombré to Clear at the Tip
This is the essence of minimalist elegance. Start with a pale pink that covers the entire nail, then create a gradient that fades to completely clear at the very tip of the coffin.
Why This Design Is Secretly Brilliant
The ombré-to-clear effect is subtle but creates beautiful dimension and a sense of length. Because the tip fades rather than stopping abruptly, the coffin shape feels softer and more blended. It’s the kind of design that reads as “effortless” even though it requires technique. This mani works in every setting — professional, casual, formal — because it’s just pink with an interesting finish.
Creating the Fade
- Paint one or two coats of pale pink as your base — this should cover the entire nail
- Using a makeup sponge, dab a clear glossy top coat onto the sponge and apply it concentrated at the nail tip
- Gently dab and blend upward toward the middle of the nail, creating a gradual fade
- By the middle of your nail, it should be mostly pink with just a hint of the clear beginning to show
- The very tip should be almost completely transparent, showing just a whisper of pink
- Do a final layer of clear top coat over the entire nail to smooth any texture from the sponge dabbing
Worth knowing: This design looks best when your nails are very clean and the natural nail underneath is pale and healthy — avoid this design if your nails are stained or yellowed.
Final Thoughts
Pink coffin nails give you the best of both worlds — a shape that’s modern and striking, paired with a color that’s endlessly versatile. What works for you depends entirely on your style: if you love minimal, elegant design, the blush with gold leaf or the pale pink ombré will feel like you. If you’re someone who likes making a statement, the bubblegum with rhinestones or the hot pink matte-glossy combo will absolutely deliver. Medium length hits that perfect balance where designs are visible and show-stopping without feeling over-the-top for real life.
The most important thing is choosing a design you’ll actually want to wear and maintain. These aren’t styles that lose their appeal after a week — they’re designed to feel fresh and relevant whether you’re in month one or month three of loving coffin nails. Pick the one that makes you smile when you imagine it on your hands, book your appointment with confidence, and enjoy having nails that genuinely feel like you.
