

Pink and gold nails are having a major moment, and honestly, there’s no sign of this combination slowing down anytime soon. There’s something almost magical about the way these two shades complement each other—the soft femininity of pink meets the glamorous warmth of gold, creating a look that feels both elegant and luxurious without trying too hard. Whether you’re getting ready for a special occasion or just want your everyday mani to feel a little more polished, pink and gold delivers that perfect balance of sophistication and subtle sparkle that works with virtually any outfit or aesthetic.
The beauty of this color pairing is its incredible versatility. You’re not locked into one specific style or vibe—pink and gold work just as well on someone who prefers minimal, understated nail art as they do on someone who loves drama, dimension, and embellishment. From delicate line work to bold glitter statements, from romantic florals to modern geometric designs, this combination adapts to your personality and mood. The warm undertones in gold naturally enhance the richness of pink, making both shades look their absolute best.
If you’ve been scrolling through nail inspiration and keep coming back to pink and gold combinations but aren’t sure where to start, you’re in exactly the right place. I’ve pulled together ten of the most wearable, stunning pink and gold nail ideas that range from simple enough to DIY at home to more intricate designs worth booking a salon appointment for. Each one works across different nail shapes, lengths, and occasions—so whether you’re a short-nail girlie, an almond-shape devotee, or someone who rocks long coffins, there’s something here for you.
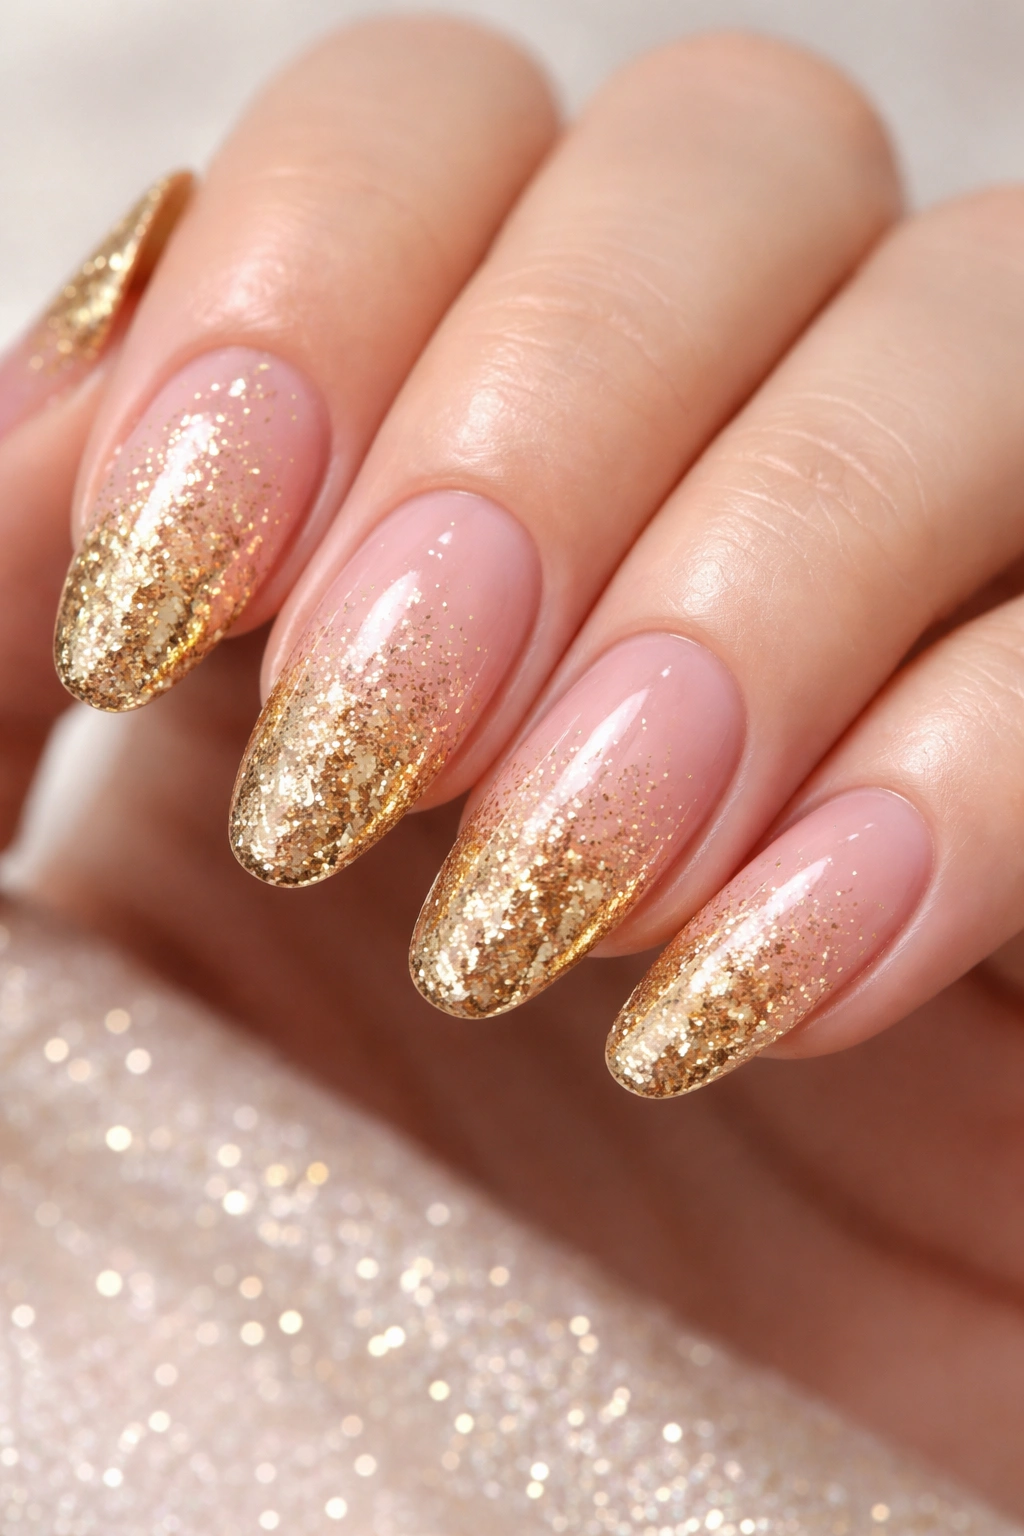
1. Gold Glitter Gradient on Pink Base
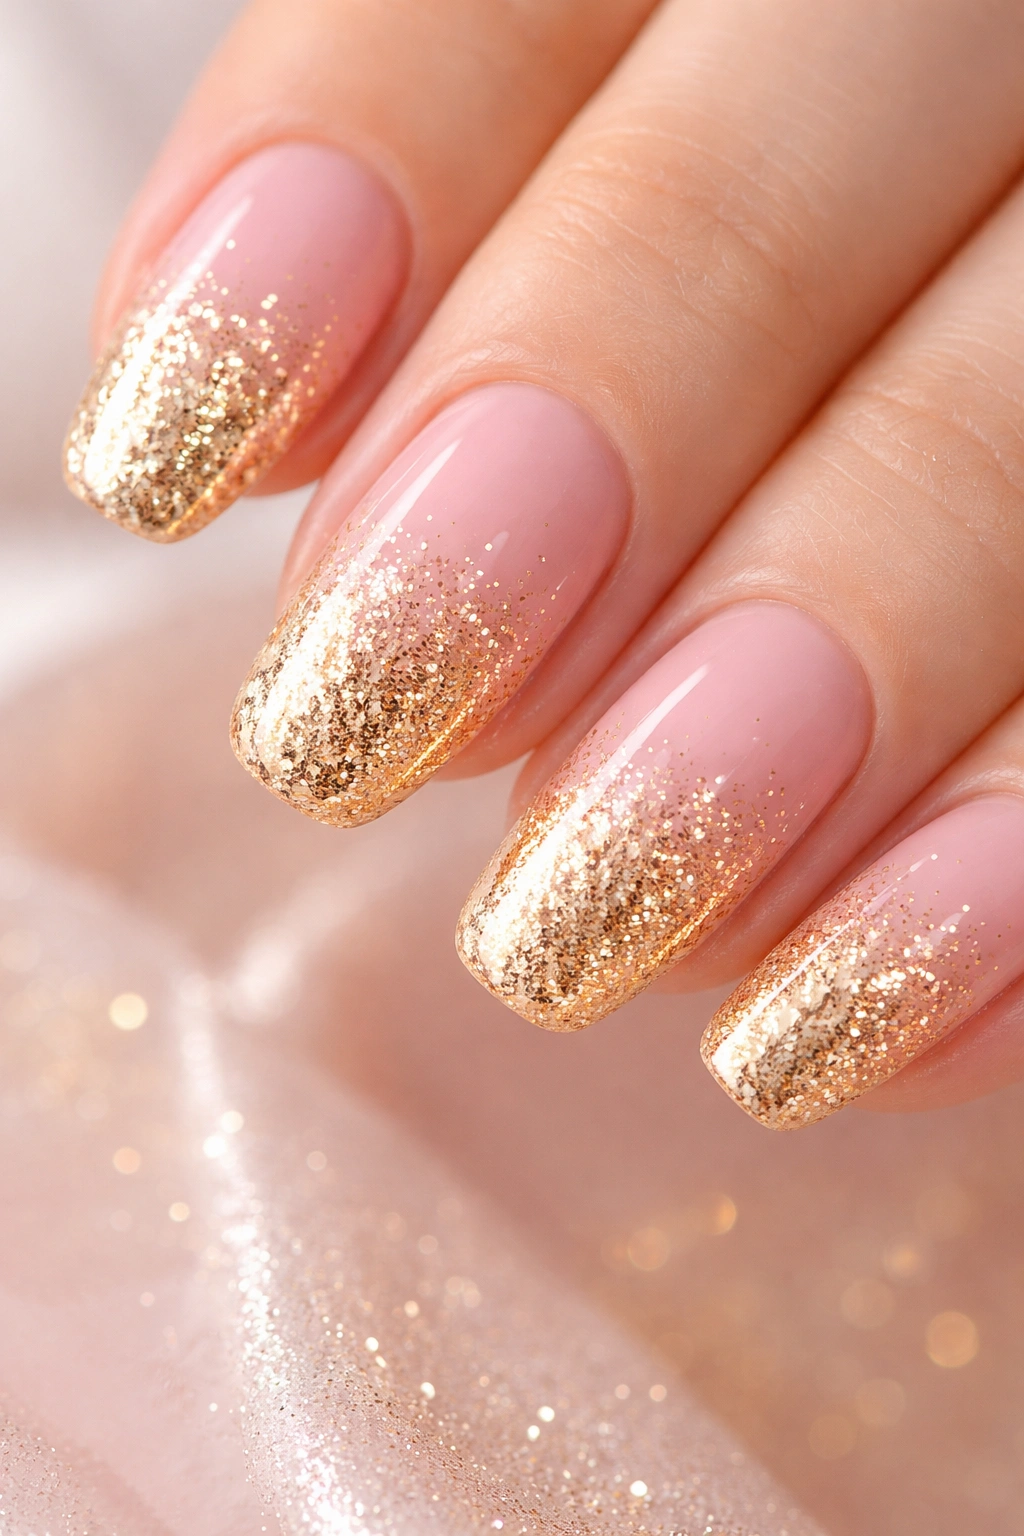
This is the design you go for when you want impact without overwhelming complexity. The concept is beautifully simple: start with a solid pink base (soft blush, strawberry, or even a deeper rose work equally well), then gradually blend gold glitter from the tips back toward the middle of the nail, creating a gradient effect that catches light from every angle.
Why This Design Works So Well
The gradient transition is where the magic happens. Instead of a harsh line between the pink and glitter, the gradual blend creates movement and depth that makes your nails look longer and more elegant. The way the gold intensifies toward the tips gives you that luxe, high-shine finish without making the entire nail feel heavy or overwhelming. It’s the kind of look that photographs beautifully but also feels comfortable to wear day to day.
How to Achieve This Look
- Start with two coats of your chosen pink polish, allowing each coat to dry completely before moving forward
- Apply gold glitter polish to a makeup sponge, dabbing it directly onto the tip area of each nail
- Blend the glitter inward using a gentle pressing motion (not a swirling motion, which can disturb the base color)
- Build the gradient gradually by applying more glitter closer to the tips and less toward the middle
- Seal everything with a high-shine glossy topcoat to smooth out the texture and create that mirror-like finish
Pro tip: Use fine gold glitter rather than chunky pieces for a more refined, wearable gradient. If you’re doing this at home, a makeup sponge gives you way better control than trying to paint the glitter on directly.
2. Pink and Gold Ombré with Soft Transition
An ombré is similar to a gradient, but it involves blending two distinct colors together rather than intensifying one color into glitter. In this case, you’re literally blending pink and gold polish together on the nail, creating a seamless transition where the two shades meet in the middle.
The Art of the Ombré Blend
What makes an ombré feel luxurious rather than muddy is all about the blend quality and the specific shades you choose. You want a soft, cool-toned pink (think blush, rose, or nude-pink) and a warm, rich gold that complement each other naturally. The blending should be so smooth that it’s almost impossible to pinpoint exactly where one color stops and the other starts. This creates an almost watercolor effect that feels soft and sophisticated.
Application Tips for Perfect Results
- Paint pink on one half of the nail, gold on the other half, leaving a small overlap area in the middle
- Use a clean, dry blending brush to gently sweep through the overlap area where the colors meet
- Make multiple gentle passes rather than aggressive swipes—you’re feathering the colors together, not dragging one over the other
- Work quickly before the polish dries, and use a top coat to seal and smooth the final result
3. Gold Foil Accents on Solid Pink
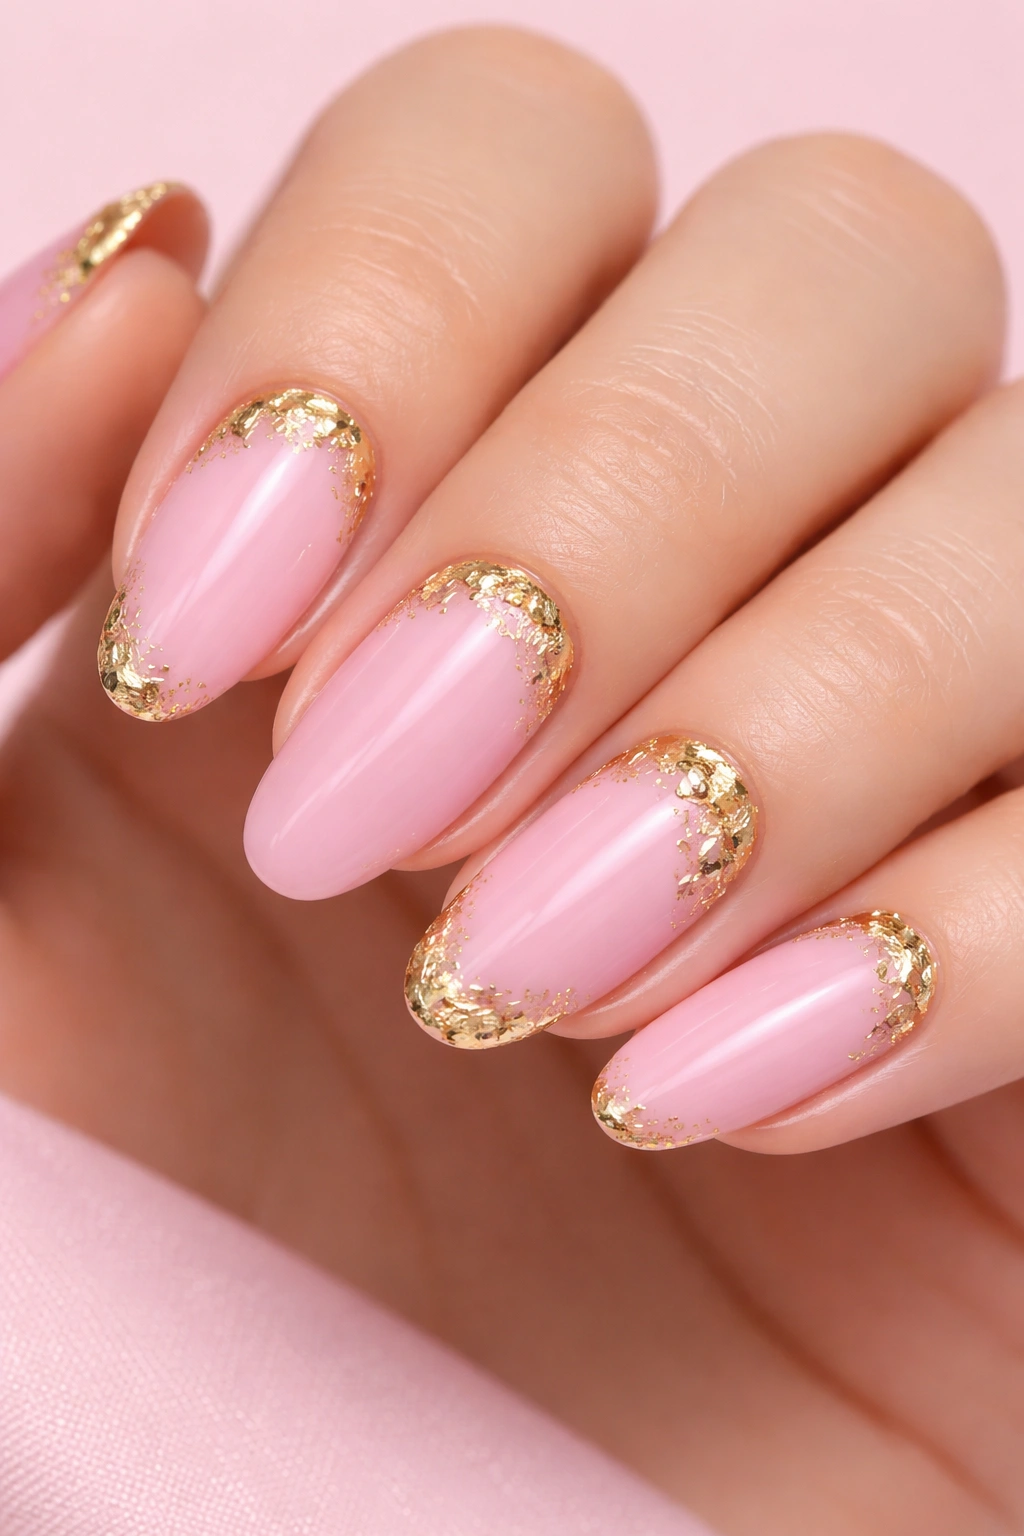
Sometimes the most striking designs are the simplest ones. With this approach, you’re keeping the majority of your nail solid pink and using gold foil as the accent detail. The foil creates texture, dimension, and that instantaneous glam factor without requiring intricate nail art skills.
Where to Place the Gold Foil
The placement of foil accents makes all the difference between a cohesive design and one that feels random. Popular options include placing foil along the tips of your nails (like a modern take on French tips), creating small accent patches on one or two statement nails, or positioning foil around the cuticle area for a subtle crown-like effect. Some people love a scattered, organic foil placement that looks almost like gold flecks were naturally embedded in the nail.
Getting Salon-Quality Foil Application
- Apply a sticky base coat (many gel systems have a special foil-adhesion base) to your pink polish
- Tear small pieces of gold foil and press them firmly onto the tacky surface
- Press foil down for several seconds to ensure proper adhesion
- Seal the entire nail with a layer of topcoat to protect the foil and create a smooth surface
Worth noting: The quality of your foil matters significantly. Cheap foil can peel or lose its shine, while professional-grade foil stays vibrant and adhered for the full lifespan of your manicure.
4. Pink and Gold French Tips with Modern Twist
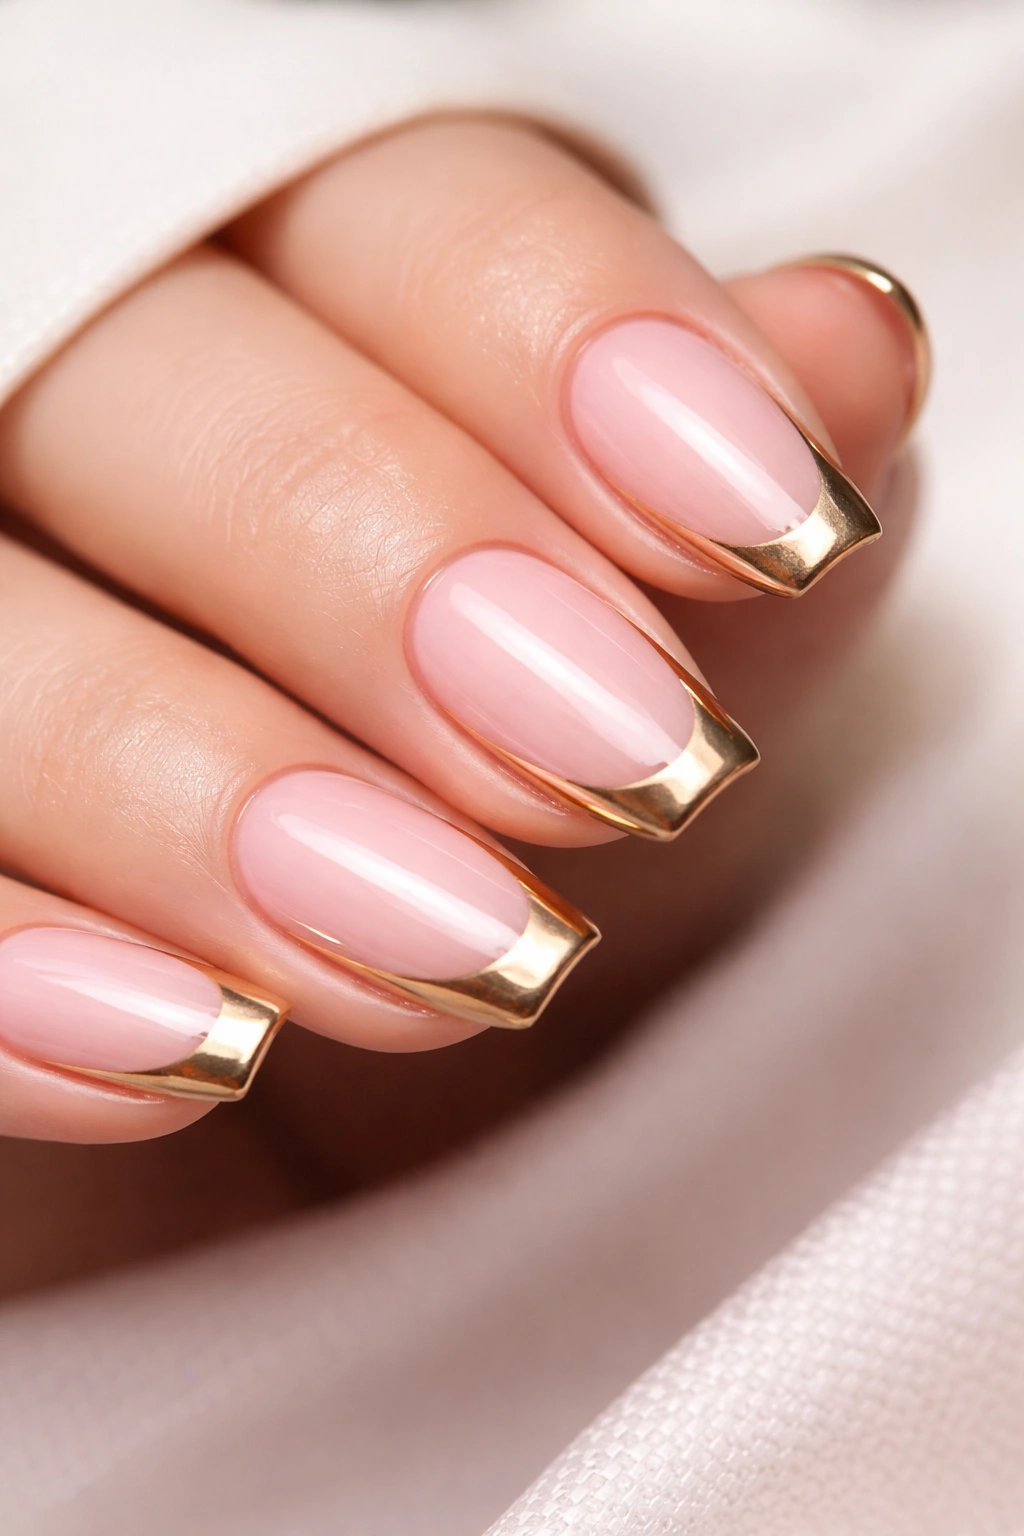
French manicures have been a classic for decades, but adding gold to the tips gives this timeless design an instant upgrade. Instead of the traditional white tips, you’re incorporating gold for a look that feels both elegant and contemporary.
Why French Tips Never Go Out of Style
There’s a reason French manicures remain a perennial favorite—they’re clean, versatile, and instantly elevate your appearance. The horizontal line across the tip of your nail naturally makes fingers look longer and hands appear more refined. Adding gold to this classic creates a warmth and luxury that plain white simply can’t match. It works with any outfit, any occasion, and any aesthetic.
Creating the Perfect Gold French Tip
- Paint your entire nail in soft pink (your base color)
- Using a thin liner brush or striping pen, paint a fine line just below where you want your tips to begin, which helps define where the gold should start
- Fill the tip area with gold polish, creating a clean line that follows the shape of your nail
- Alternatively, use a striping tape to mask off the tip area for perfectly straight lines
- Finish with a glossy topcoat to blend the colors and create a seamless appearance
5. Metallic Gold Leaf Design on Pink Base
Gold leaf application is a bit more advanced, but the result is absolutely stunning—and honestly, not as complicated as it sounds. This technique involves applying actual gold leaf fragments to your nail, creating a high-impact, dimensional look that catches light beautifully.
The Appeal of Gold Leaf Nails
Gold leaf doesn’t look like regular nail art polish—it has a completely different finish and movement. The leaf fragments create layers and depth, and they catch light in organic, unpredictable ways that make your nails look expensive and custom. The texture also adds interest, making these nails genuinely fun to look at up close while still maintaining an overall polished appearance.
How Nail Professionals Apply Gold Leaf
- Apply two coats of your pink base color with a glossy finish
- Use a specialized sticky base (or ask your nail tech about their preferred adhesion method)
- Tear small pieces of gold leaf and press them firmly onto the sticky surface, overlapping them slightly
- Layer the leaf until you’ve achieved your desired coverage and effect
- Seal everything with a thick layer of topcoat to protect the leaf and smooth the surface
6. Pink with Gold Geometric Patterns

If you love clean lines and modern design, geometric nail art using gold accents on a pink base is your answer. Think triangles, diamonds, abstract linear patterns, or color-blocked designs that feel editorial and intentional.
Why Geometric Designs Feel So Sophisticated
There’s something inherently elegant about geometry. Precise lines, balanced proportions, and structured patterns communicate intentionality and sophistication. When you pair geometric gold designs with a soft pink base, you create visual contrast—the softness of the pink balances the sharpness of the lines, creating a design that’s both modern and wearable.
Creating Geometric Nail Art at Home
- Start with your pink base color and let it dry completely
- Use a thin-tipped liner brush or nail art pen to draw your chosen geometric pattern in gold
- Work slowly and confidently—shaky lines are harder to fix than you’d think
- Use a steady hand and brace your working hand against a table or your leg for stability
- For perfectly straight lines, use striping tape as a guide and remove it gently before the polish dries
7. Blush Pink and Rose Gold Chrome Finish
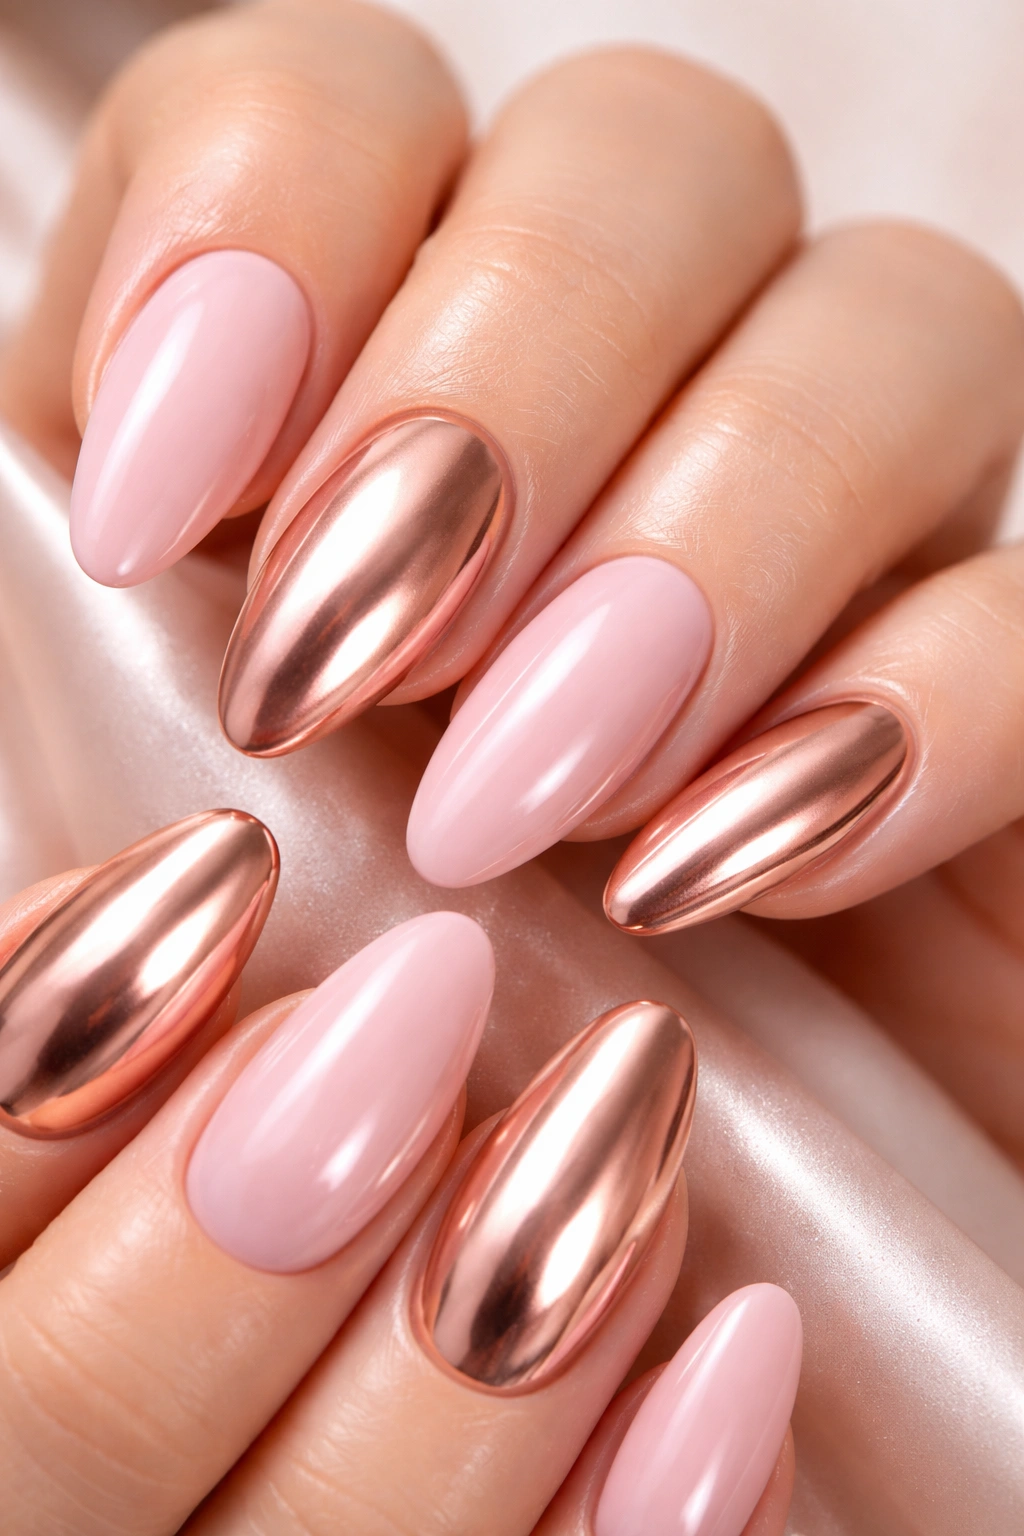
Chrome finishes represent another level of nail luxury. A chrome application creates a mirror-like, metallic finish that’s almost holographic. Rose gold chrome is slightly warmer and softer than yellow gold chrome, making it perfect when you want metallic drama without yellow undertones.
Understanding Chrome Nail Finishes
A true chrome finish requires specialized chrome powder that’s applied over a sticky base coat. It’s not something you can easily replicate with regular polish, which is why most people get chrome nails done professionally. The result, however, is absolutely worth it—the finish is so reflective and dimensional that your nails almost look three-dimensional.
Making Chrome Nails Work for You
- Pair your chrome with softer base colors rather than going full chrome on all nails for a more wearable look
- Rose gold or champagne chrome works beautifully when you use blush pink as your base color
- The contrast between the glossy, soft pink and the ultra-reflective chrome creates visual depth
- Chrome nails look especially striking on longer nail shapes (almond, coffin, or stiletto) where the reflective surface has more space to play with light
8. Floral Gold Details on Pink Base
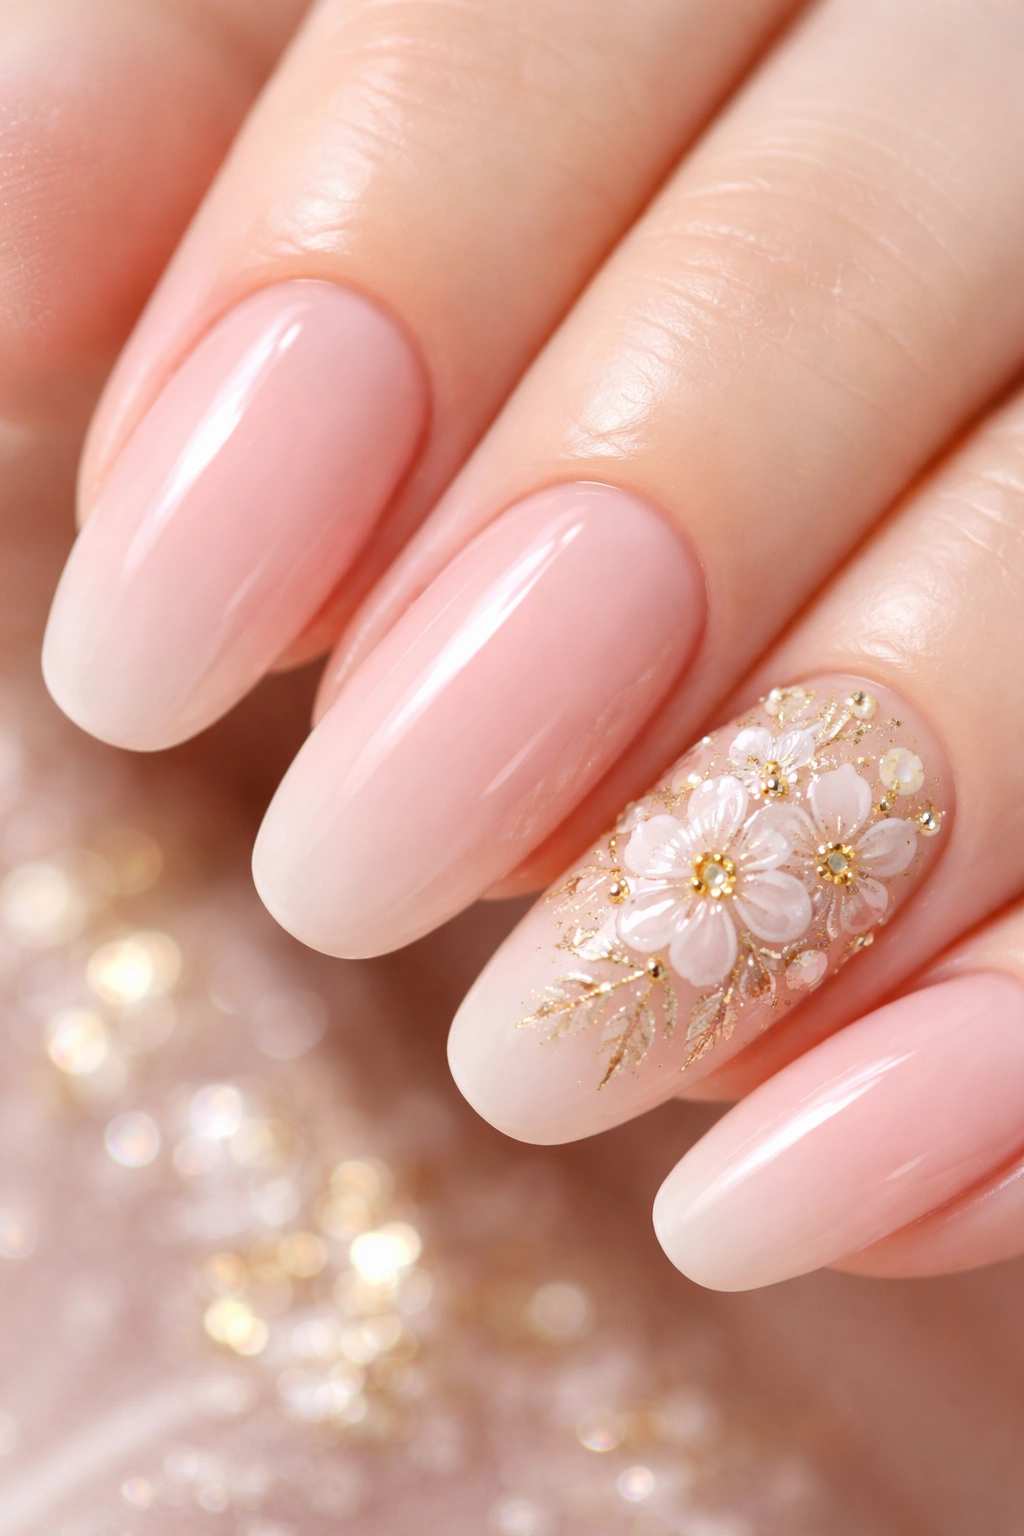
For those who love romantic, feminine nail designs, pairing delicate flowers with gold accents creates something truly special. The gold elements—whether they’re tiny centers, stem details, or outlining—elevate simple florals into something more polished and luxe.
Bringing Florals to Life with Gold Accents
Hand-painted flowers on nails are an art form. The most successful floral designs keep the flowers relatively small and detailed rather than trying to cover the entire nail. Adding gold details—like making the flower center a tiny gold dot, outlining petals with thin gold lines, or using gold leaf as flower stamens—instantly makes the design feel more sophisticated and jewelry-like.
Floral Design Inspiration and Execution
- Cherry blossoms, daisies, and roses are popular choices because they’re recognizable but not overly complicated to paint
- Paint your flowers in lighter shades of pink or white against your darker pink base for contrast and visibility
- Add gold details last, after your flowers are completely dry
- Keep most nails simple (solid pink) and feature detailed florals on just one or two accent nails
- The restraint makes the design more elegant rather than feeling busy or overwhelming
9. Marble Pink with Gold Veining
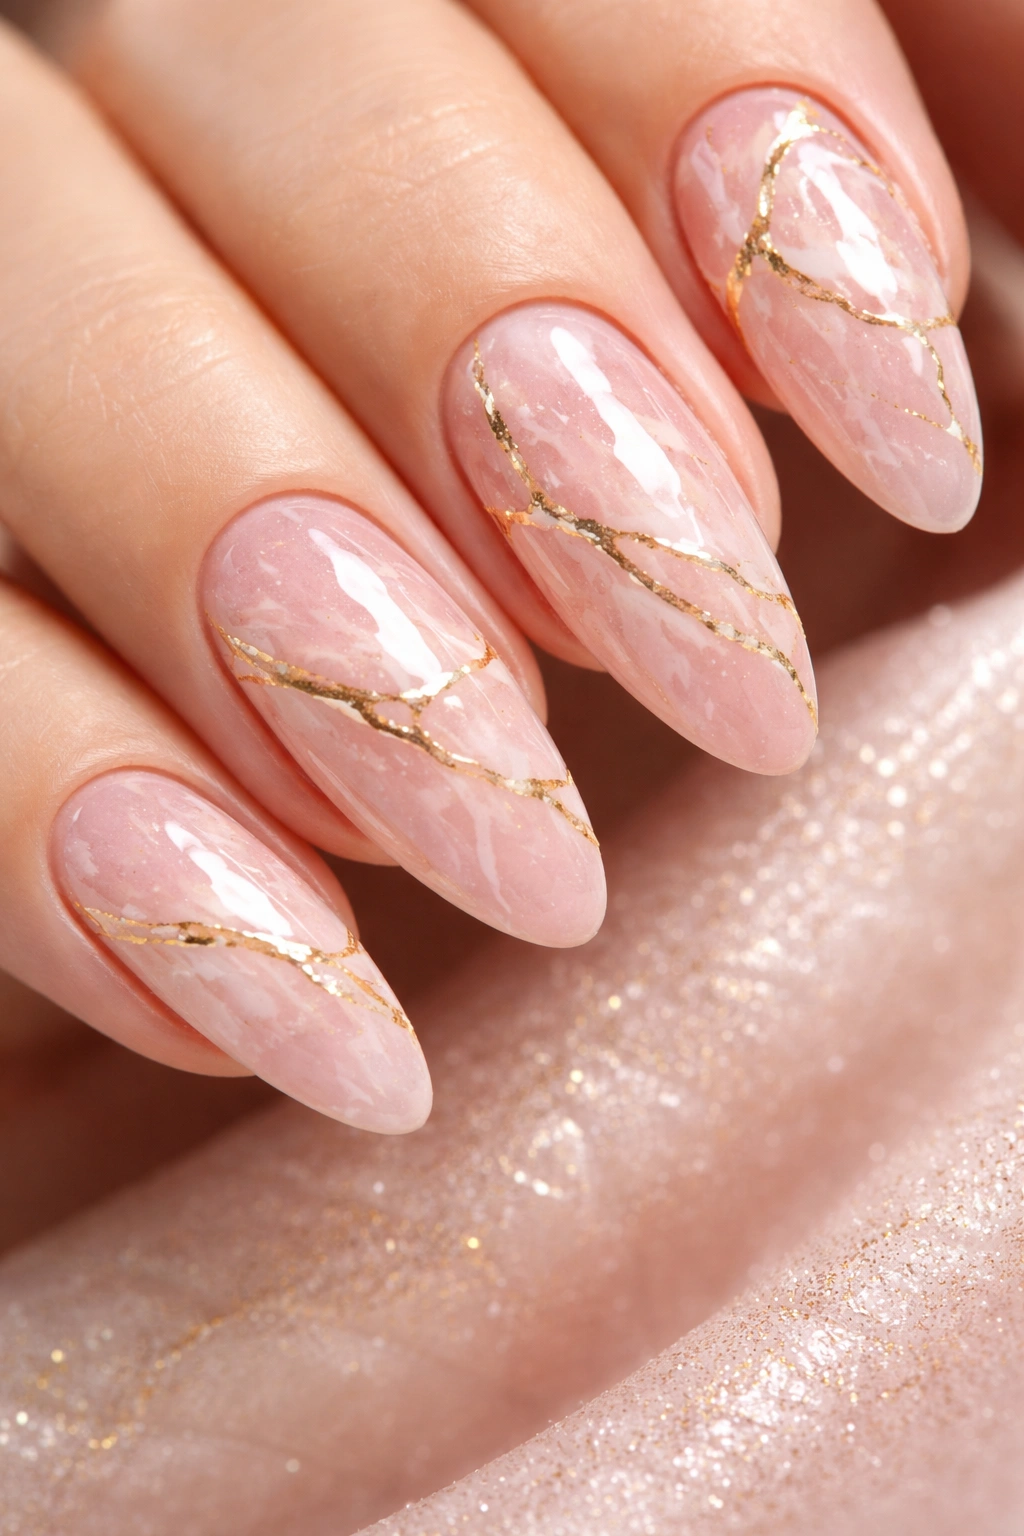
Marble nail designs create texture and sophistication through a paint-and-water technique or specialized marble tools. Adding gold veining (thin gold lines that mimic actual marble cracks) elevates this look from trendy to timeless.
The Marble Aesthetic Explained
Marble has always represented luxury and elegance—think marble countertops, marble tile, marble sculpture. Translating this into nail art gives you that inherent sophistication. The organic swirls and patterns of marble never look the same twice, making each nail feel custom and one-of-a-kind.
Creating Marble Effect with Gold Accents
- Create your marble base using either a water-marbling technique or by swirling different shades of pink together on the nail
- Let the marble base dry completely before adding gold details
- Use a thin gold liner to draw delicate lines that mimic marble veining or cracks
- The gold lines should feel organic and somewhat random rather than perfectly geometric
- Seal with a glossy topcoat to smooth out any texture and enhance the mirror-like marble appearance
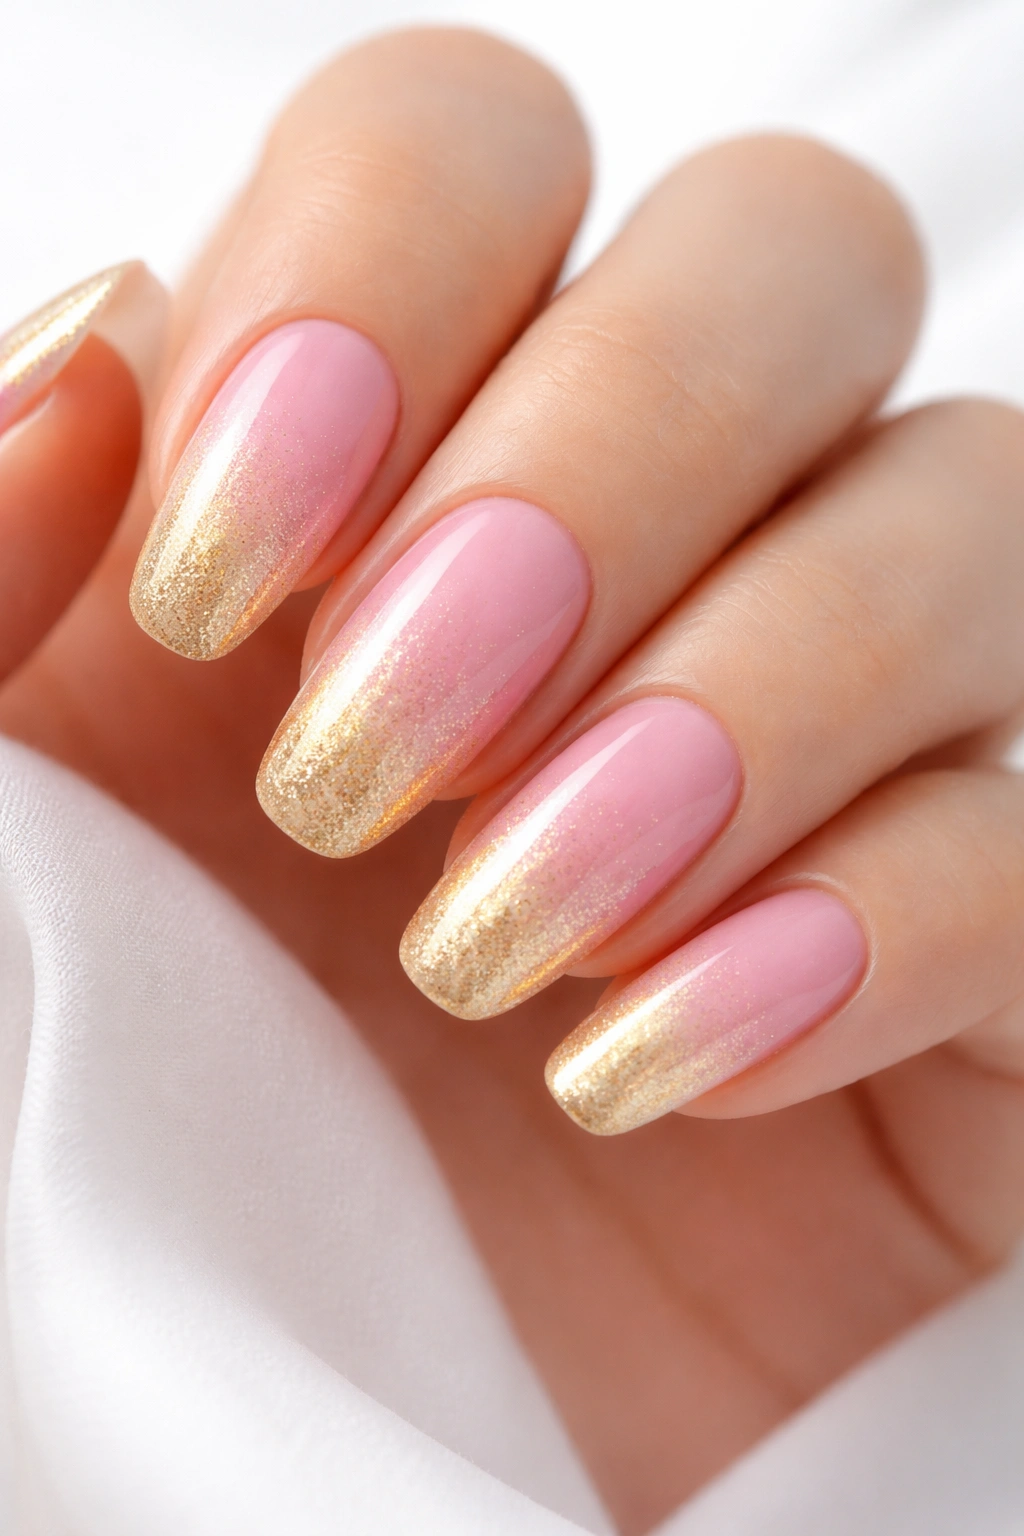
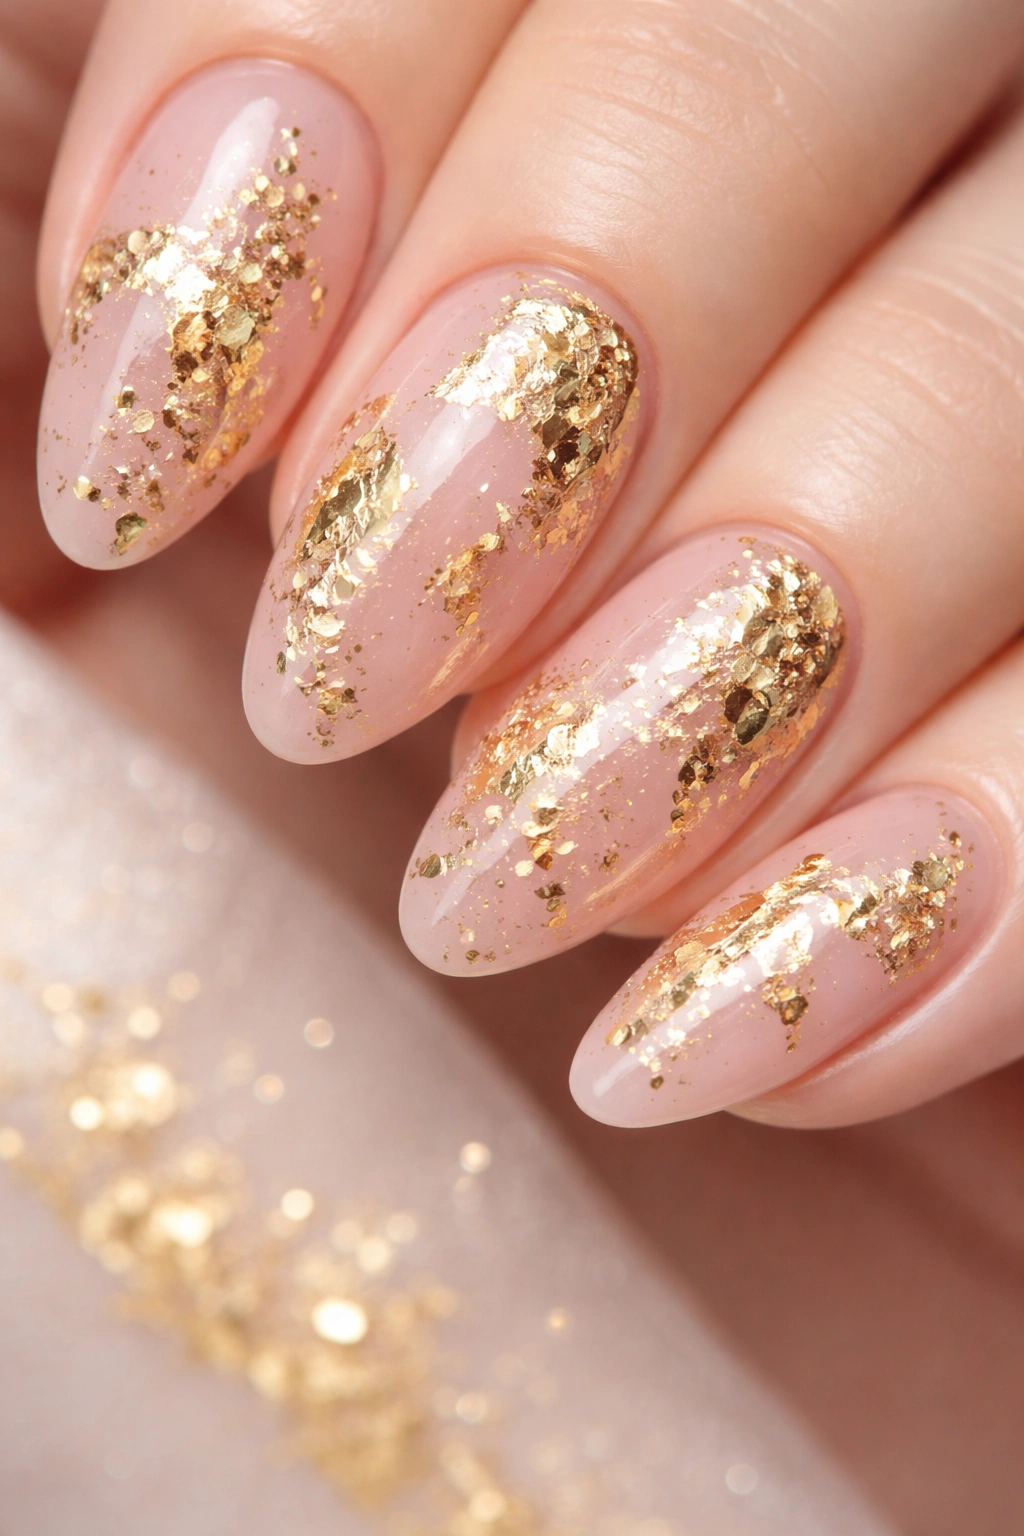
10. Gold Glitter Fade to Pink
This final design is like the reverse of the first one—you’re starting with intense gold glitter and gradually fading it out toward a solid pink base. It creates movement and visual interest while maintaining that elegant pink and gold vibe.
The Power of Fading and Transition
Fade designs are inherently flattering because they create an optical illusion of length and elegance. By concentrating the glitter near the tip and letting it fade as you move toward the base, you’re drawing the eye along the length of your nail. This makes fingers appear longer and the overall look more refined.
Building Your Glitter Fade
- Start with a solid pink base and let it dry completely
- Apply thick, concentrated gold glitter polish to the tip of the nail
- Using a clean makeup sponge or blending brush, gradually tap and blend the glitter as you move toward the middle of the nail
- Press rather than swipe to avoid disturbing the base polish
- Continue building the fade by applying less and less glitter as you move toward the cuticle
- The final result should show dense glitter at the tip, medium glitter in the middle, and barely any at the base
Final Thoughts

Pink and gold nails represent that sweet spot where elegance meets approachability—they look expensive and luxe while remaining completely wearable for everyday life. Whether you’re drawn to the simplicity of foil accents, the drama of chrome finishes, or the artistry of hand-painted details, there’s absolutely a pink and gold design that matches your style and skill level.
The best part about this color combination is how universally flattering it is. Pink and gold work beautifully across all skin tones, complement virtually any outfit in your wardrobe, and transition seamlessly from casual to formal occasions. You’re not locked into wearing them for one specific season or event—these are truly versatile nails that work year-round.
If you’re new to pink and gold nail designs, start with something simple like a glitter gradient or gold foil accents. Once you’re comfortable with the pairing, you can experiment with more complex techniques like marbling or intricate florals. And if you’re not confident in your own nail art skills, don’t hesitate to bring these ideas to your nail technician. Any skilled nail professional can execute these designs beautifully, and having a consultation about what you’re envisioning ensures you’ll love the final result. Your nails deserve to make you feel polished, confident, and genuinely gorgeous.
