

Black almond nail ideas have a way of looking expensive without trying too hard. The shape does half the work. The black polish does the rest. Put them together and you get a manicure that feels sharp, clean, and a little bit dangerous in the best possible way.
Black is one of those shades that changes personality fast. Gloss makes it read like lacquer. Matte turns it into velvet. Add a tiny line of gold, a chrome edge, or a sheer nude base underneath, and the whole set shifts again. That’s why black almond nails can look polished on short nails, long nails, fair skin, deep skin, warm undertones, cool undertones — the finish and the contrast do the heavy lifting.
That matters. A lot.
The almond shape helps, too. It softens the darkness, so the manicure doesn’t feel blunt or blocky, and it gives the fingers that longer, slimmer look people keep trying to fake with rings and hand poses. Some designs lean sleek and minimal. Others go full glam. The good ones know where to stop, which is honestly the hardest part with black.
1. High-Gloss Jet Black Almonds
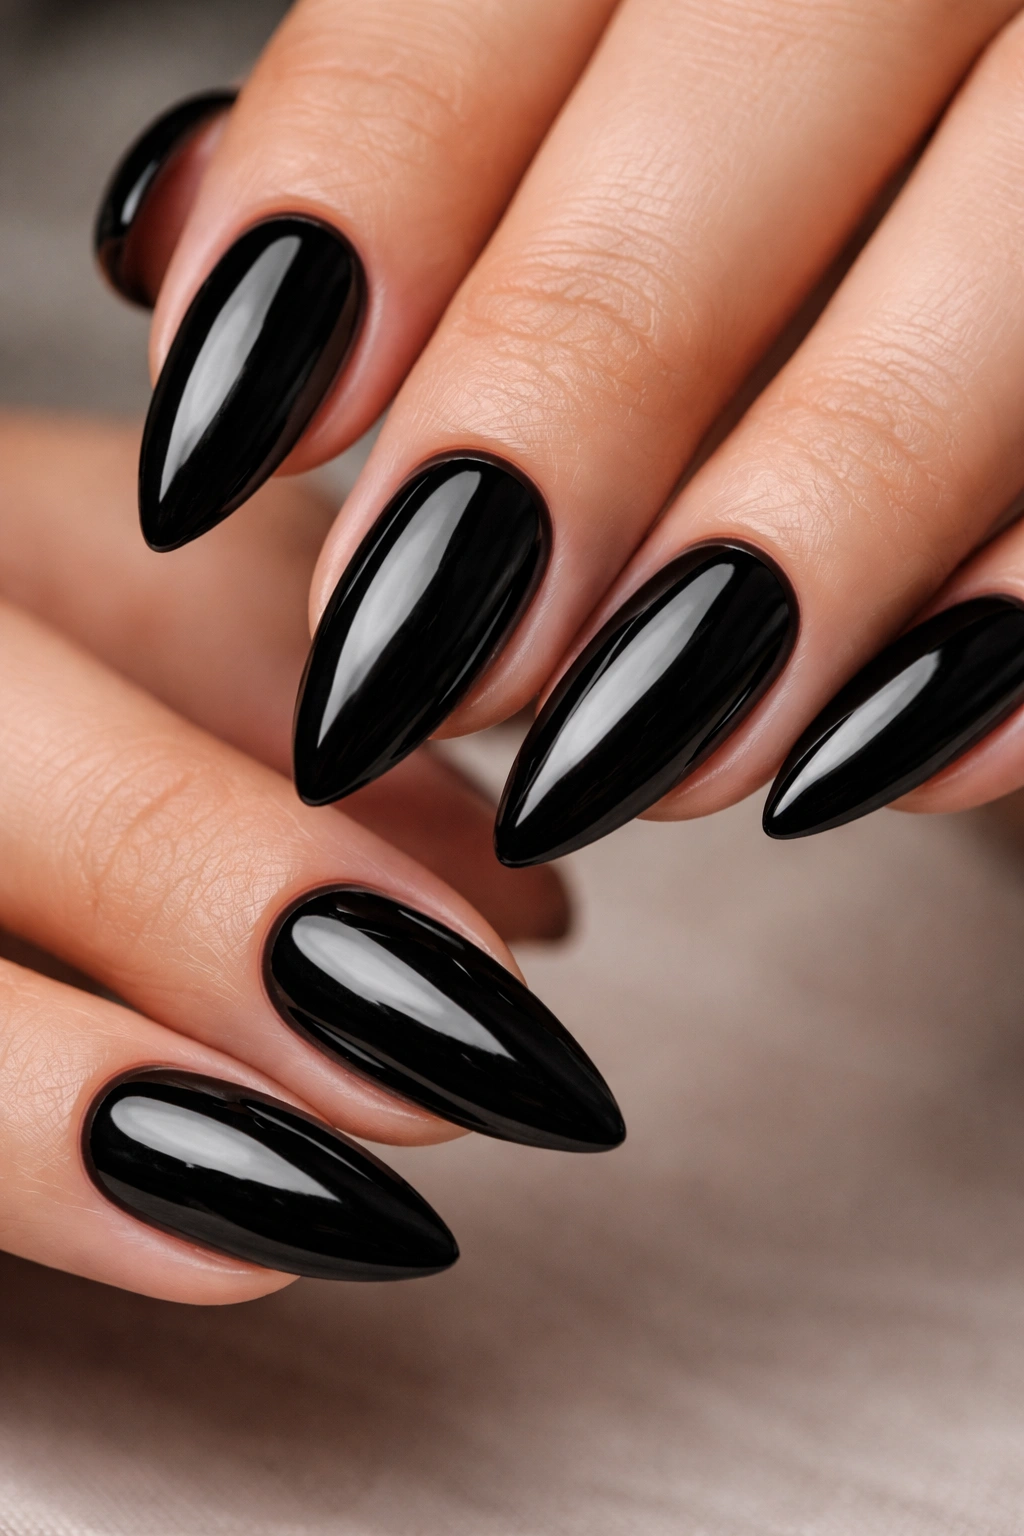
A pure jet-black manicure is still one of the cleanest black almond nail ideas, and I’ll die on that hill. No accents. No fuss. Just a mirror-shiny finish over a tidy almond shape, which is exactly why it works so well on every skin tone. On deep skin, it looks inky and rich. On fair skin, the contrast is crisp. On olive and medium tones, the shine keeps it from going flat.
What makes this set work is the finish, not the color alone. A glossy top coat has to be glassy, not greasy, or the nails can look dull in a weird, patchy way. I like this style best on medium-length almonds, because the taper keeps the black from feeling heavy. Short almonds look neat and practical. Longer ones read a little more dramatic.
One small detail changes everything: keep the sidewalls clean. Black polish shows mistakes fast. Fast enough to be annoying.
2. Matte Black With Glossy French Tips

Why does a matte black base with shiny tips look so good? Because the eye catches the difference right away. The matte finish absorbs light, and the glossy tip gives the nail a sharp edge without adding a lot of extra color. It’s subtle, but not invisible. That’s a nice place to be.
Why the Contrast Works
This design is especially good if you like black nails but want something a little less heavy than a full glossy set. The tip can be thin and clean, or slightly wider if you want the almond point to feel more obvious. On deeper skin, the contrast reads elegant and modern. On lighter skin, it gives the nails a bolder outline.
A thin glossy tip also flatters shorter nails because it draws the eye outward. Keep the base truly matte, though. If the base has even a little shine, the whole point of the design gets muddy.
- Ask for a velvet-matte black base.
- Keep the French line narrow if your nails are short.
- Use a high-shine top coat only on the tip.
- Aim for a smooth crescent, not a thick stripe.
Best tip: The thinner the glossy line, the sharper the manicure looks.
3. Velvet Cat-Eye Black Almond Nails
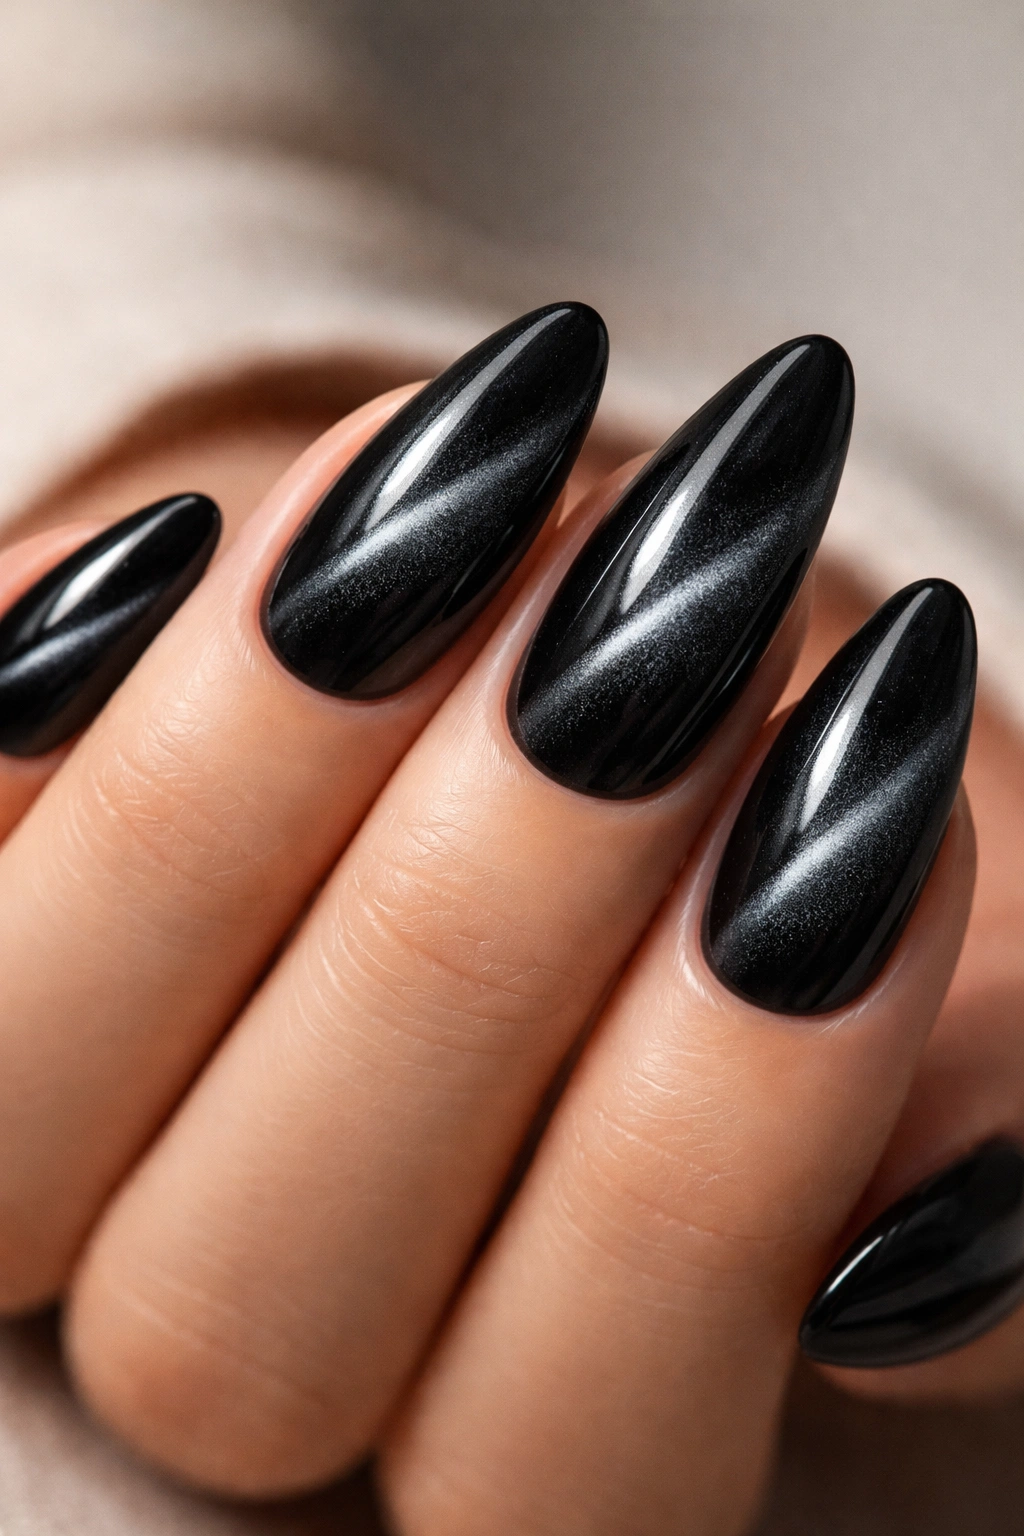
There’s something hypnotic about a cat-eye black manicure. The magnetic stripe catches the light in a soft, moving line, almost like crushed silk folded under a lamp. On almond nails, that shimmer curves along the shape in a way that feels expensive without being loud.
Where the Magnetic Stripe Should Sit
A lot of cat-eye sets look better when the bright line sits a little off-center instead of dead in the middle. That gives the nail more movement. If you want the design to feel softer on fair skin, ask for a smoky gray-black base with a narrow cat-eye line. On medium and deep skin, the contrast can be stronger, and the nails still won’t look busy.
- Place the magnetic line diagonally for a slimmer look.
- Keep the shimmer tight near the center for a sleek finish.
- Ask for a charcoal-black base if you want less contrast.
- Use one accent nail if you want a quieter set.
This one is a favorite of mine when the goal is drama without glitter fallout. It holds up beautifully in short or medium lengths.
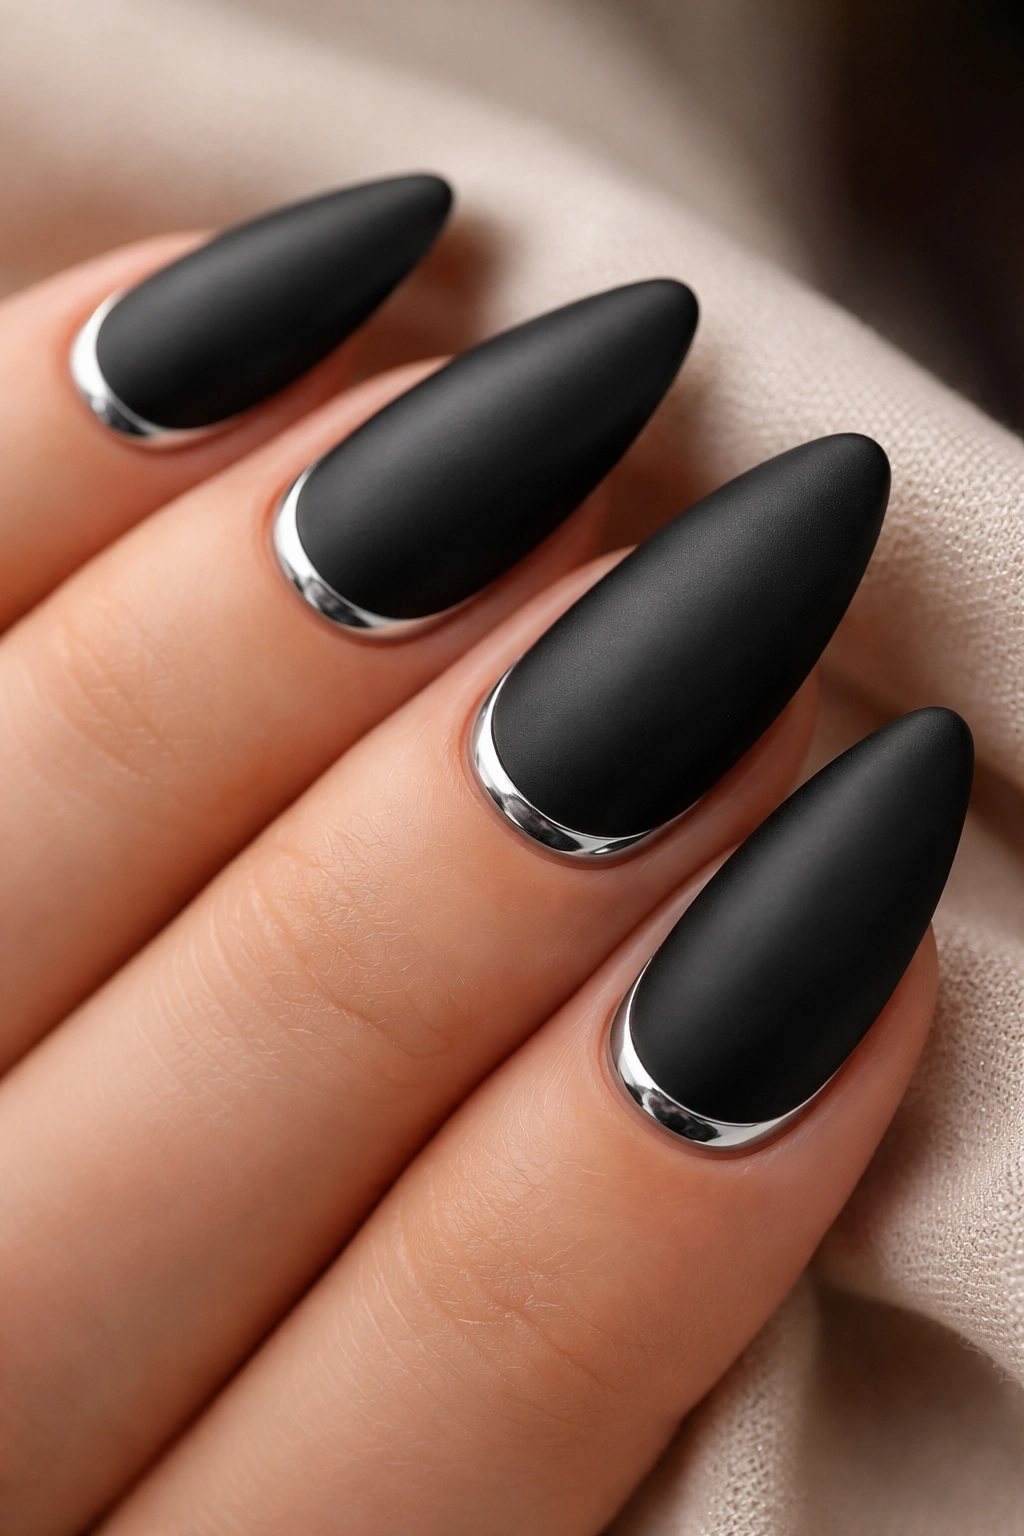
4. Black Chrome Almond Nails
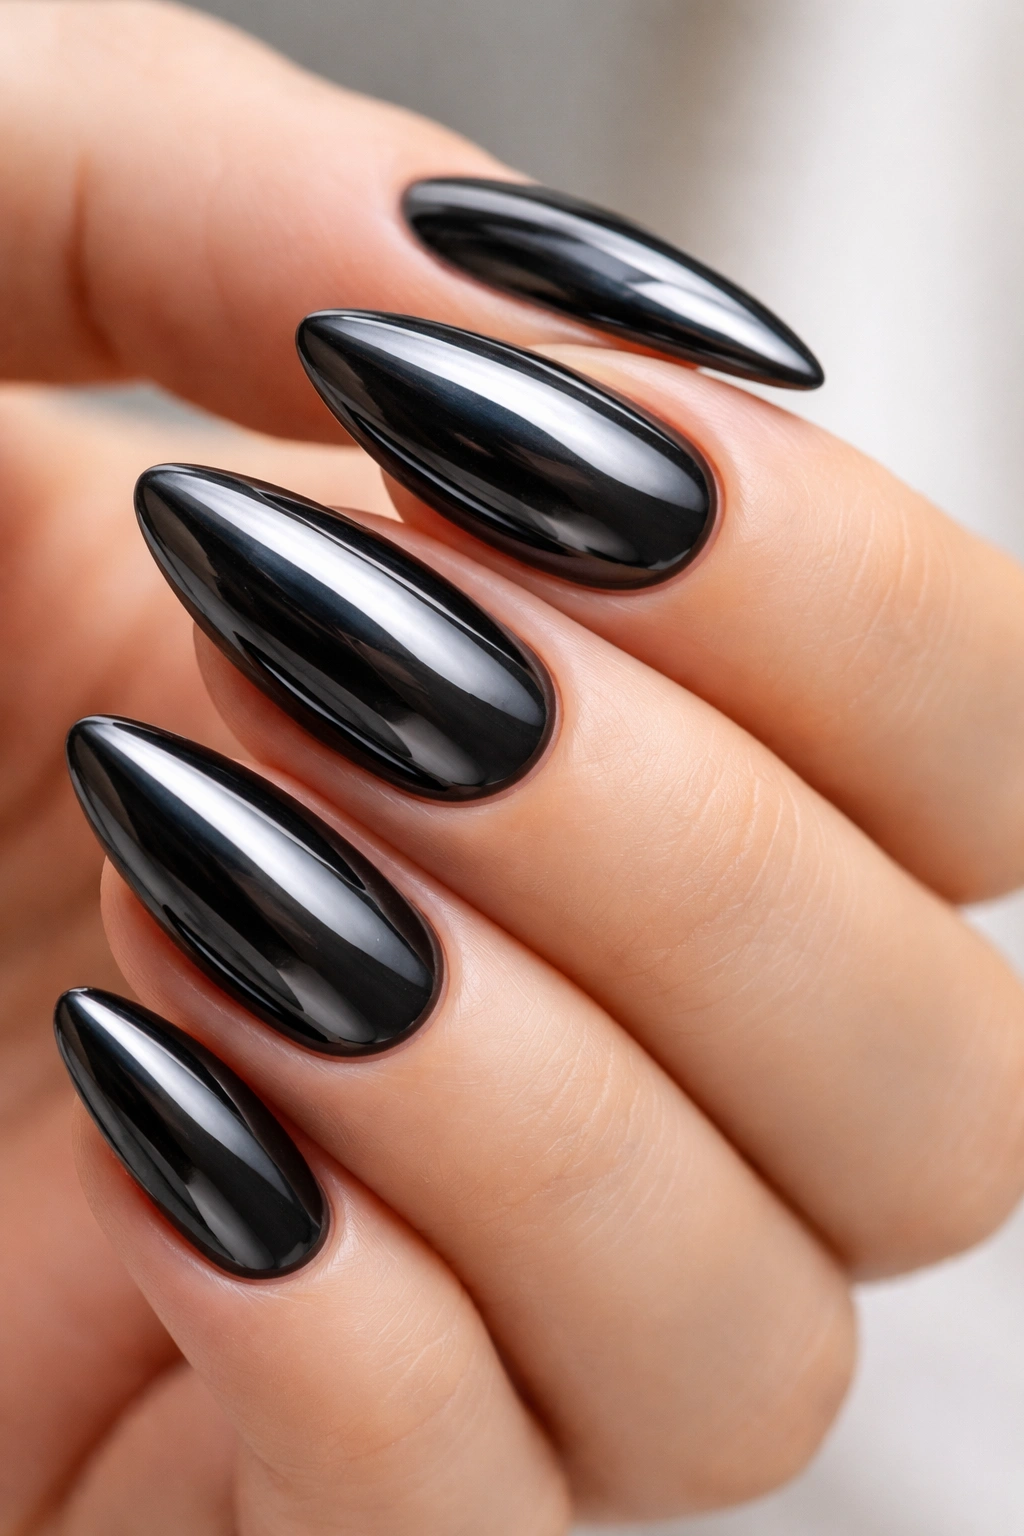
Black chrome is for people who want their nails to look like polished metal without going full mirror-silver. It’s dark, reflective, and a little bit cold in the best way. The almond shape makes that finish feel smoother, because the tapered tip keeps the shine from looking blocky.
I especially like black chrome on deeper skin because the metallic sheen sits on top of the color instead of fighting it. On fair skin, it gives a sharper edge. On olive or warm skin, pair it with gold jewelry if you want the whole look to feel warmer. That little detail matters more than people think.
The trick is keeping the chrome layer thin. Too much powder can make the surface look chalky instead of sleek. A clean, sealed chrome finish should look like it was poured onto the nail, not dusted on carelessly. If the nail artist buffs it well and seals the free edge, the shine stays cleaner for longer.
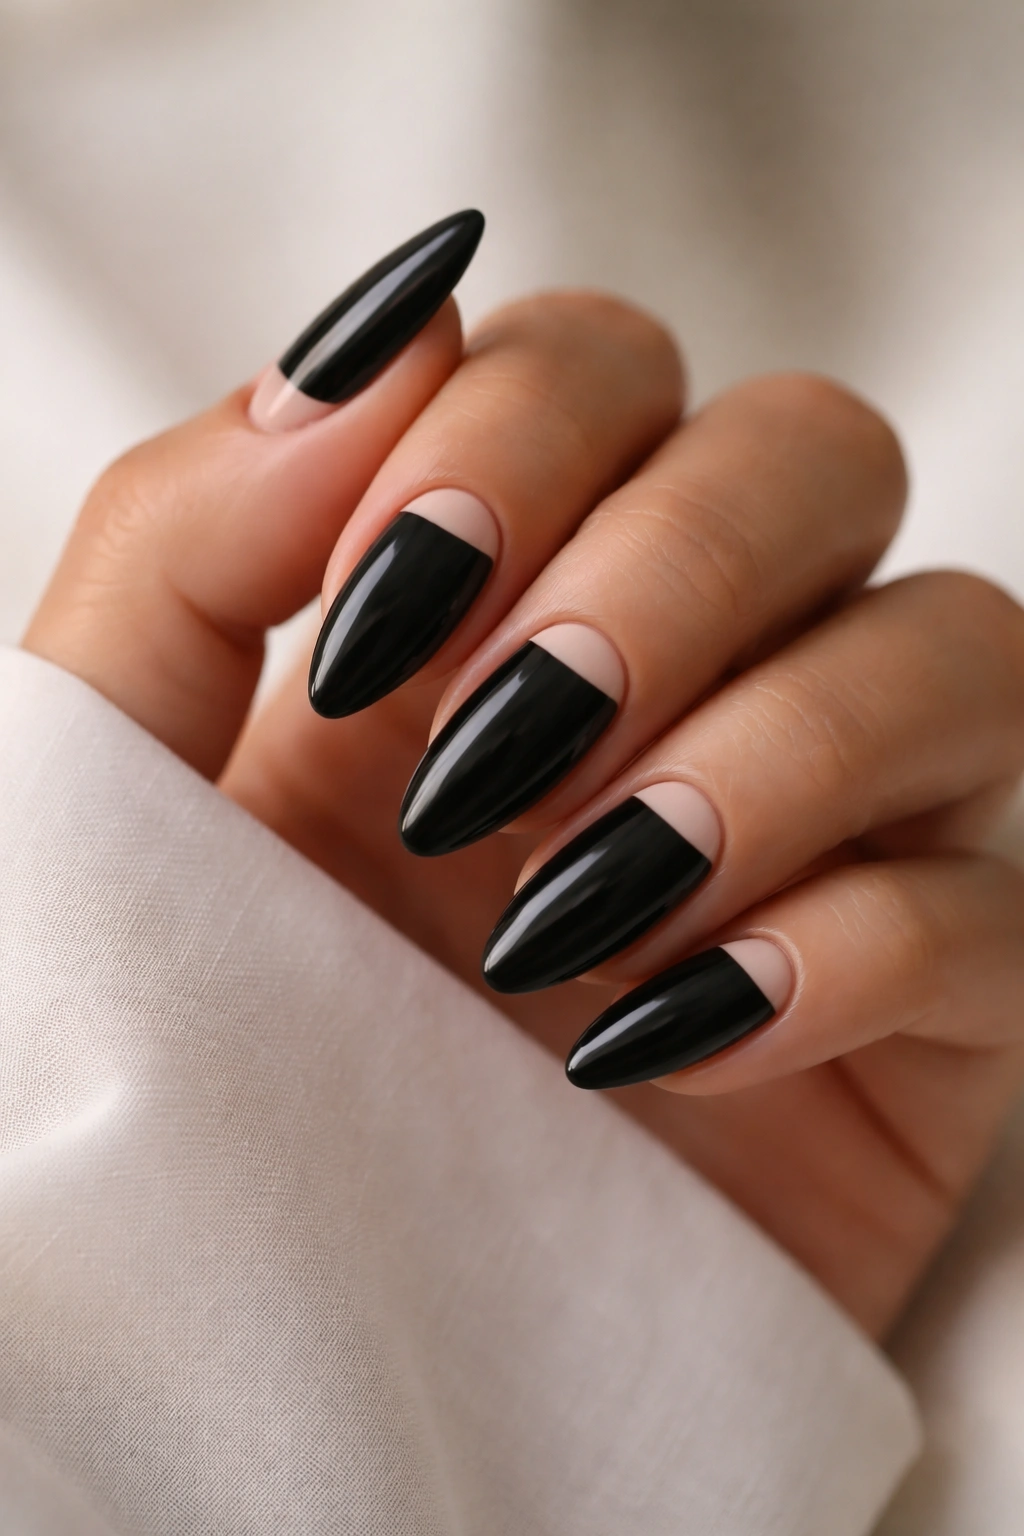
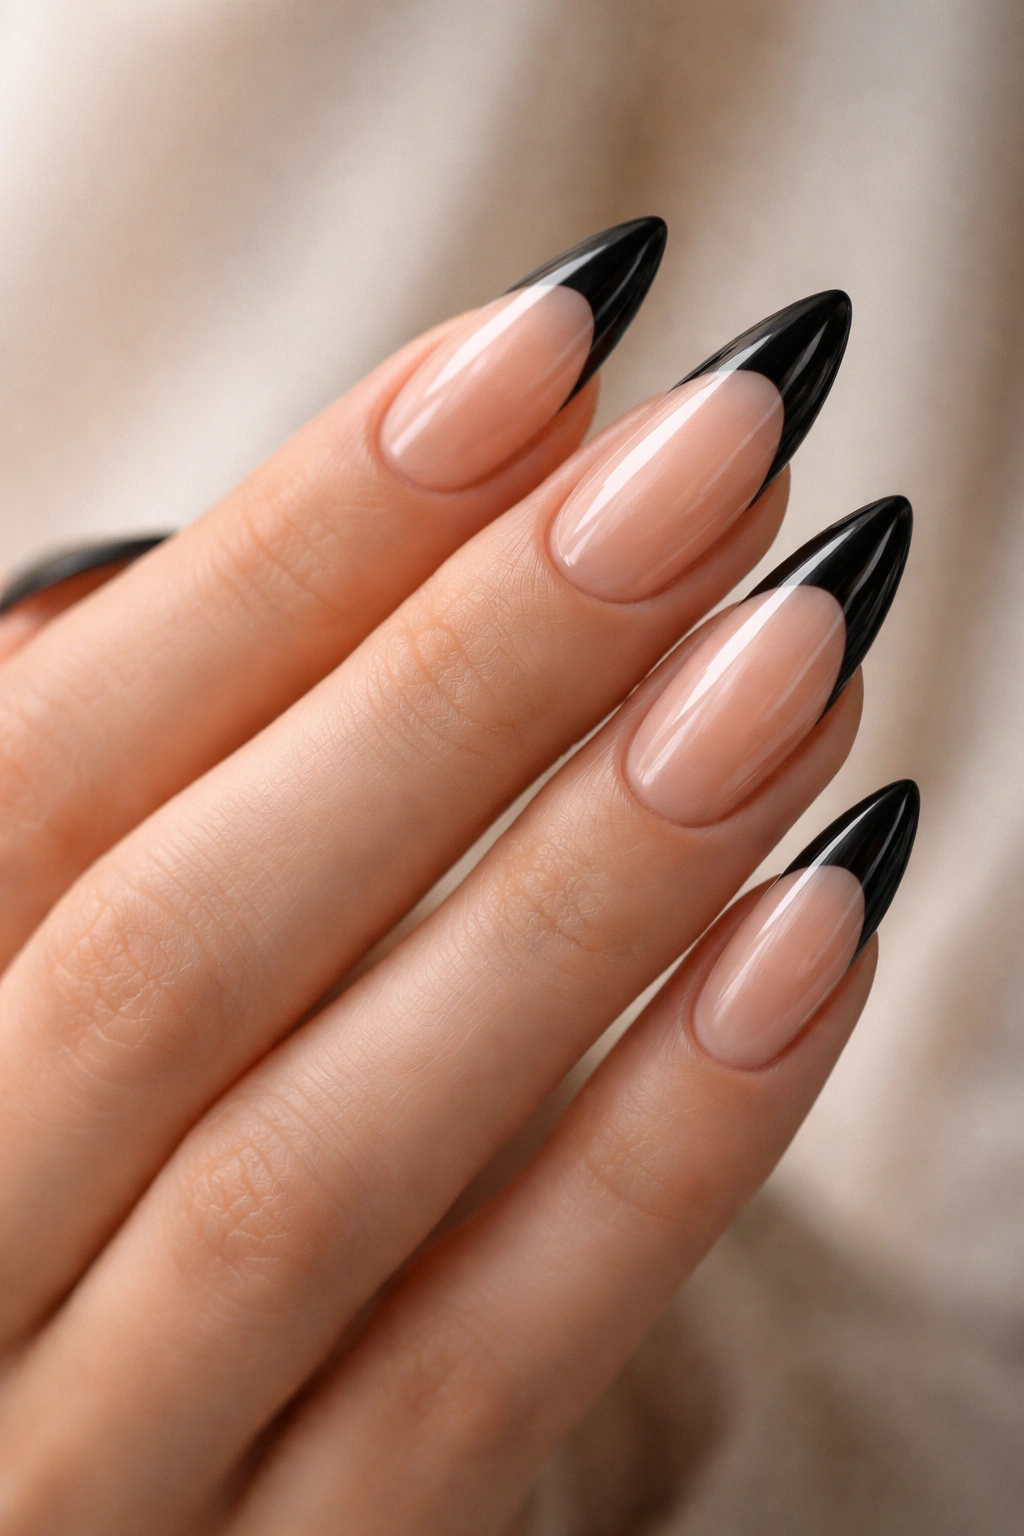
5. Black French Tips on a Milky Nude Base

This is the manicure I’d pick for someone who wants black nails but still needs the set to feel light. A milky nude base lets the black tips stand out without covering the whole nail in darkness. On almond nails, the curve of the tip follows the natural shape and makes the fingers look long and neat.
The nice part is how easy this is to wear across skin tones. On fair skin, the milky base softens the contrast. On medium and olive skin, the black tips sharpen the outline without looking harsh. On deep skin, the nude base can be adjusted to your undertone so it doesn’t look washed out. That part is worth asking for, by the way. A beige that looks great on one person can look chalky on another.
If you want the design to feel current without getting fussy, keep the tip thin. Thick black French tips can look heavy fast. Thin ones feel cleaner. More refined, too.
6. Micro French Lines on Sheer Almond Nails
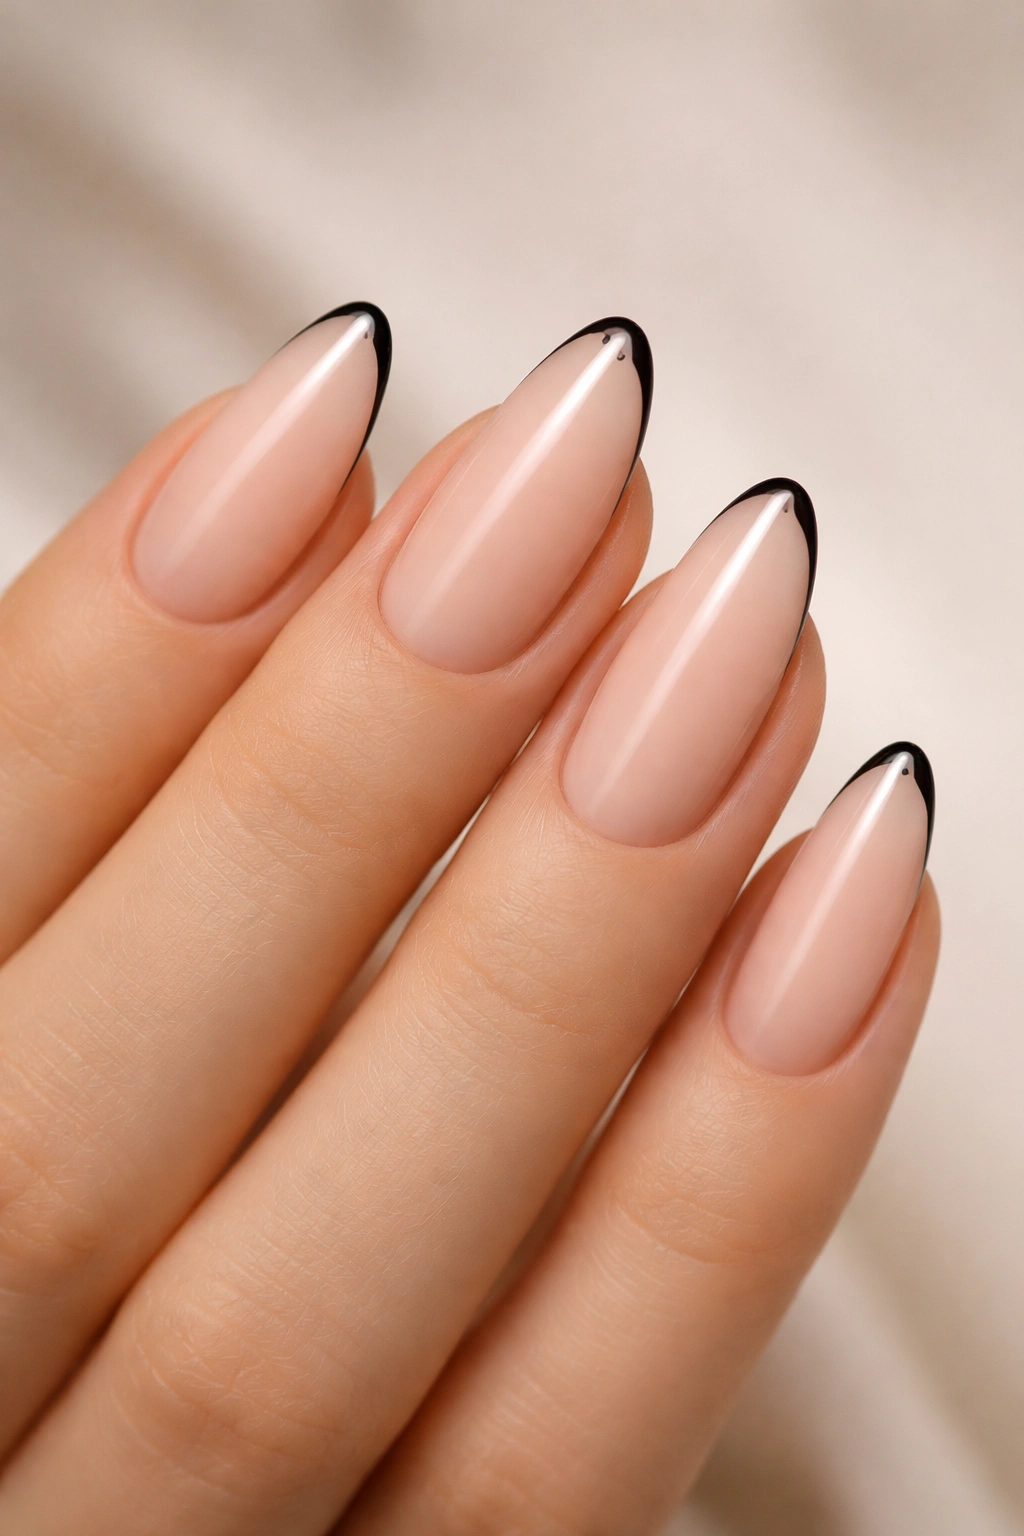
Tiny black tips can look sharper than a full black manicure. Strange, but true. The reason is scale. A micro French line gives you the dark edge without covering the whole nail, so the almond shape stays airy and the finger line looks longer.
This is one of my favorite black almond nail ideas for people who want something minimal but not plain. It works especially well if your nail beds are naturally narrow, because the thin line doesn’t crowd the nail. On lighter skin, the black line creates a crisp outline. On deeper skin, it reads like a fine ink stroke. Very clean. Very deliberate.
A sheer pink or beige base keeps the design from feeling harsh. If you want a little more contrast, ask for a soft milky base instead. The beauty here is restraint. You only need a line that’s a couple of millimeters thick.
7. Black Nails With Gold Foil Flakes
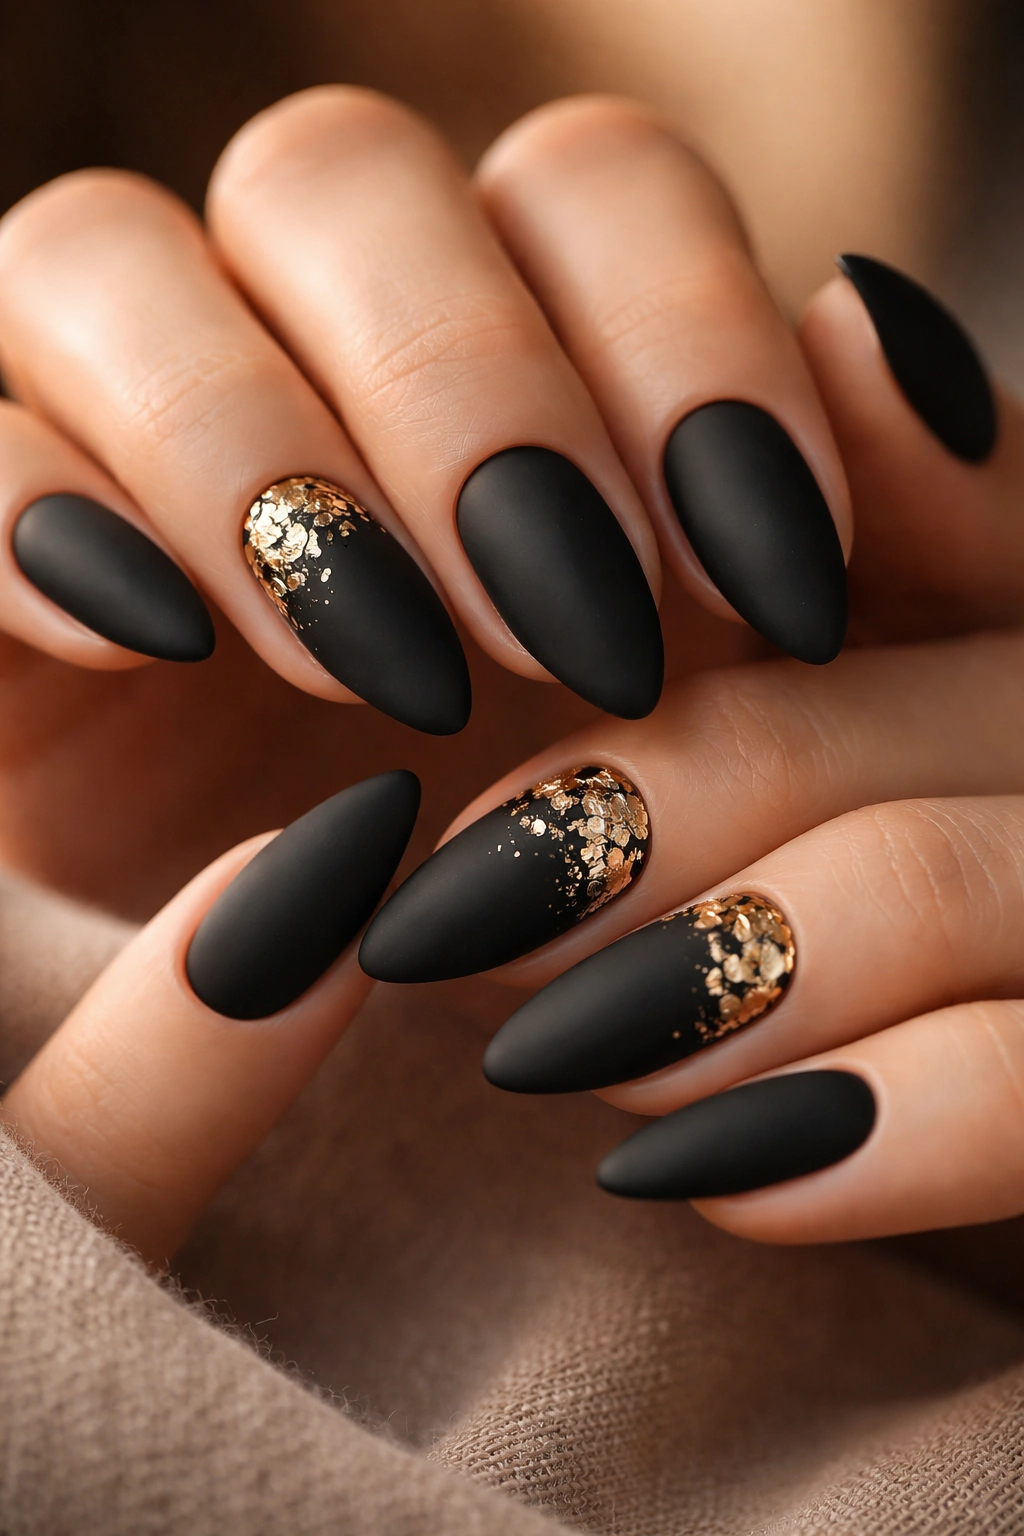
Gold foil and black polish are a strong pair because the warmth of the foil keeps the black from feeling flat. It’s a classic look, but it still works because the finish has texture. Foil catches the eye in little broken pieces, so the manicure feels richer than a simple glitter top coat.
What Makes It Different
I like gold foil best when it’s placed near the cuticle or scattered in small patches across two accent nails. Covering every nail can make the set look busy. A few pieces are enough. On warm undertones and deeper skin, gold on black can look especially lush. On cooler skin, it softens the black and gives it a warmer note.
- Use irregular foil pieces, not neat squares.
- Place the foil on a fully cured black base.
- Seal it well so the edges stay smooth.
- Keep one or two nails plain if you want balance.
If you wear gold rings, this set ties everything together fast. Almost too fast.
8. Black Almond Nails With Silver Chrome Accents
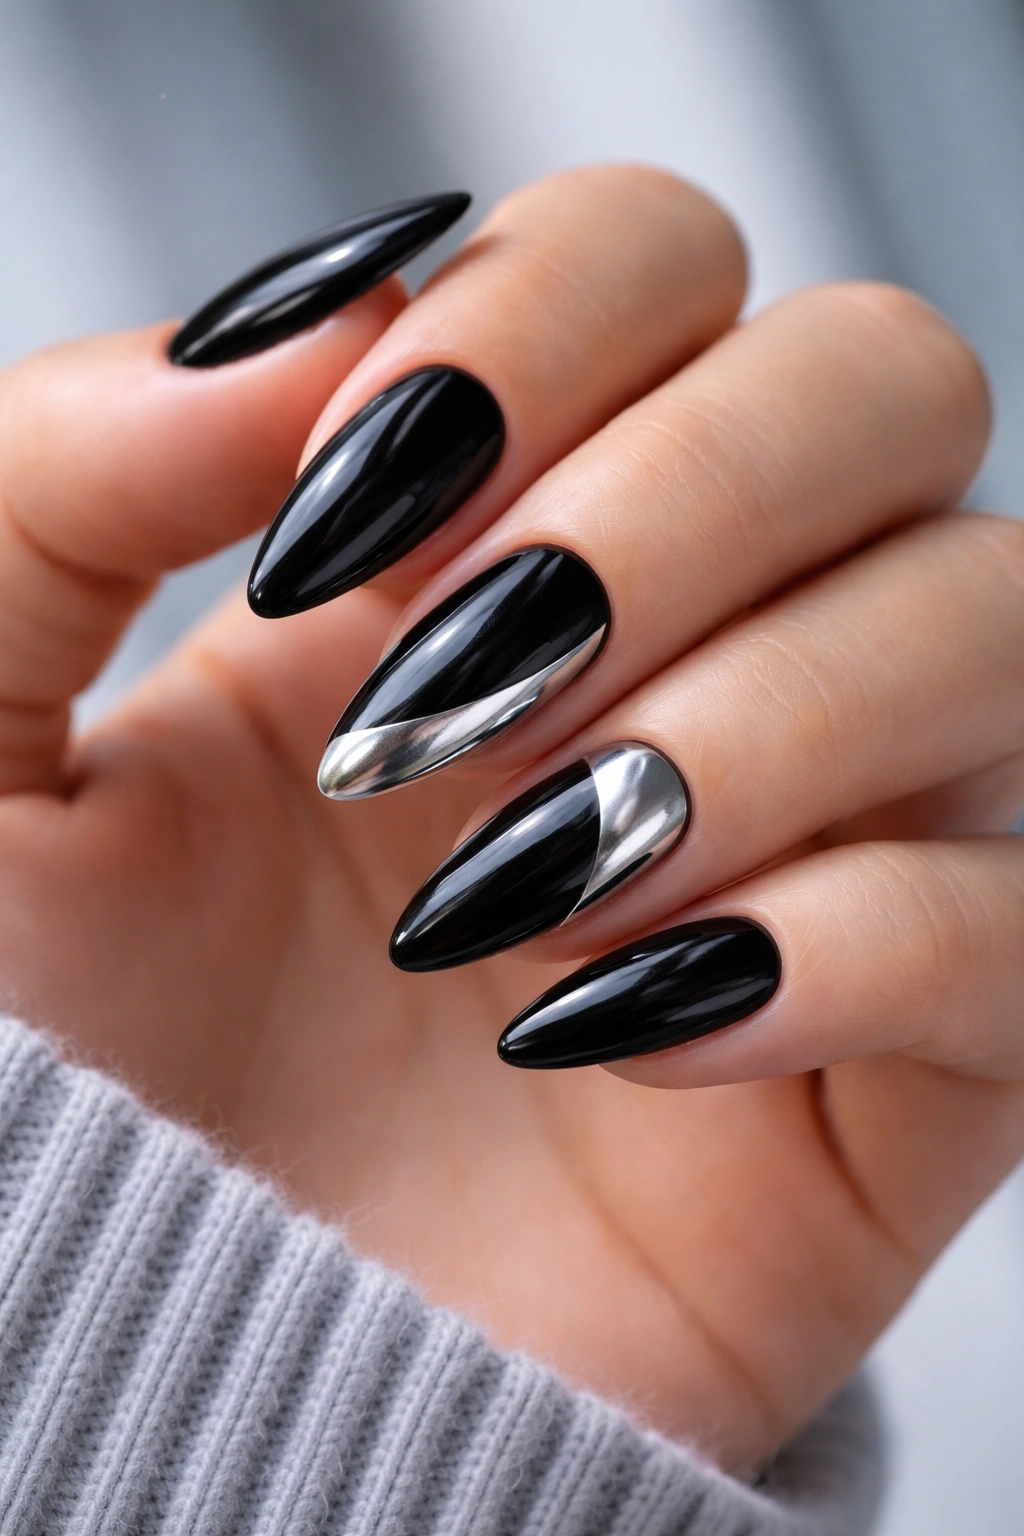
Silver on black feels cooler and cleaner than gold, and that’s the whole point here. A black base with silver chrome accents gives you a sharper, more modern finish. It’s less warm, less soft, and more graphic. Good in a blunt way.
I’d reach for this if your jewelry leans silver or white gold, or if your skin has cool undertones and gold tends to feel a little too yellow. On fair skin, the silver accents pop hard. On medium skin, they give the set some shine without overwhelming the hand. On deep skin, the look turns sleek and reflective instead of flashy.
The best version usually keeps the silver in one place: a line, a half-moon, a thin swirl, or a chrome accent on just two nails. If every nail competes, the manicure gets noisy. Give the black room to breathe. It’s doing enough already.
9. Black Marble Swirls Over a Sheer Base
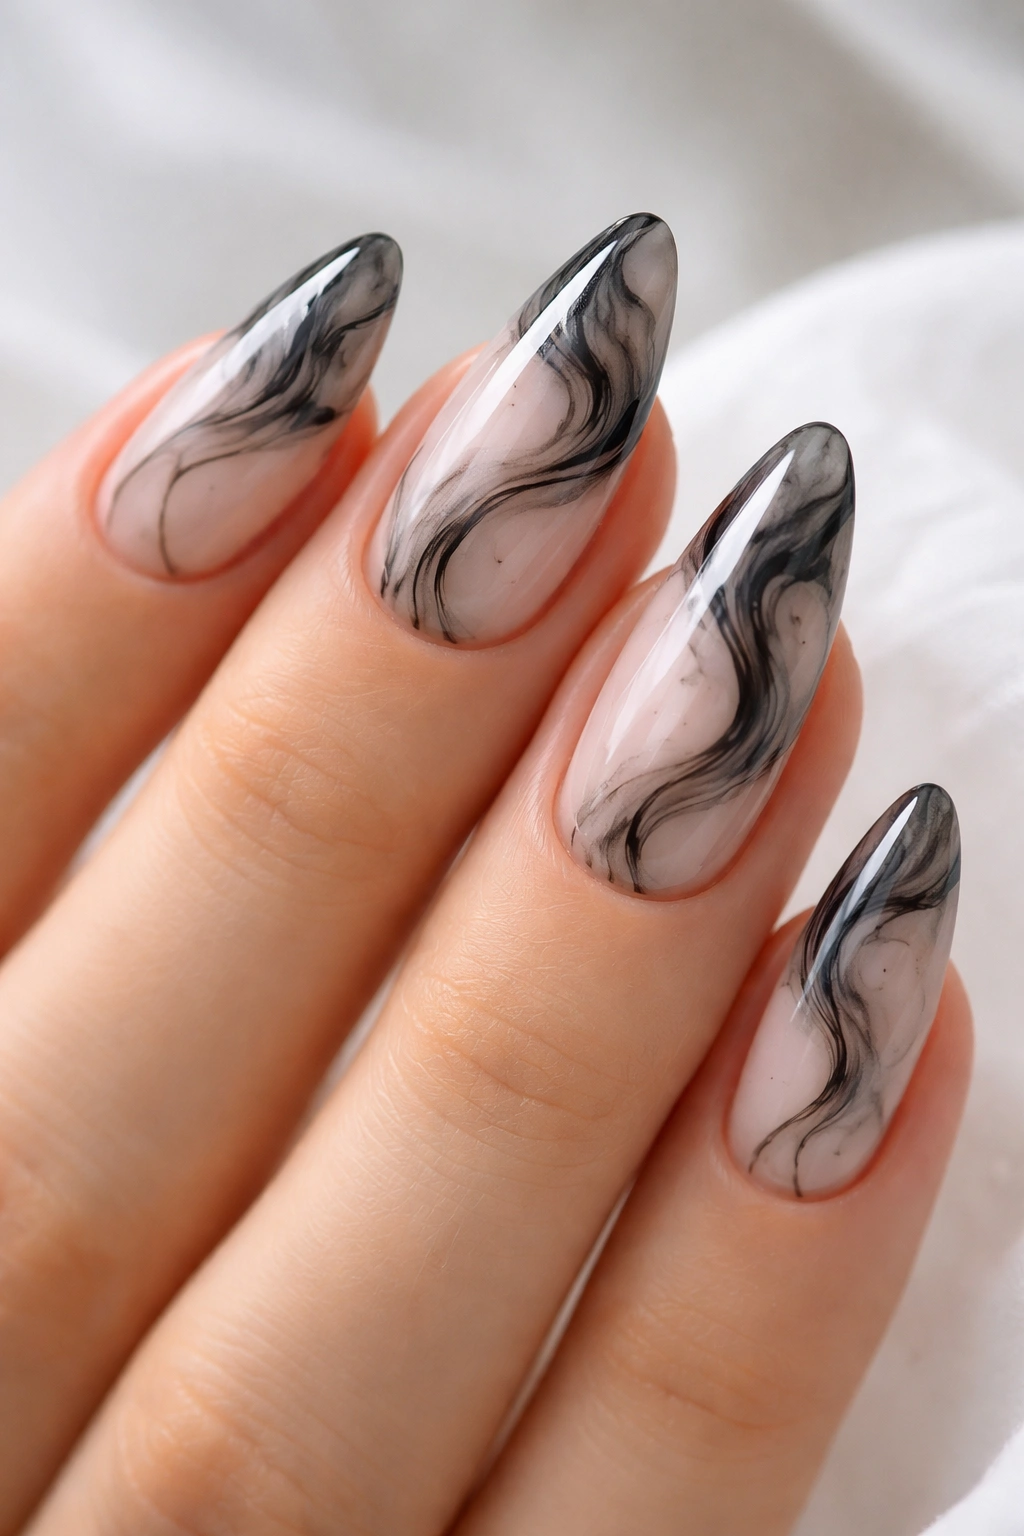
Why does black marble feel softer than plain black? Because the white or gray veining breaks up the darkness and gives your eye something to follow. It’s still black. It just moves a little. That movement looks especially nice on almond nails because the shape already has a natural curve.
How to Keep the Veining Thin
The best marble sets don’t look like heavy stone countertops. They look like smoke trapped under glass. Use a sheer nude or milky base, then add thin black swirls and a little gray or charcoal to blur the edges. On fair skin, this keeps the design from looking too stark. On medium and deep skin, the contrast can be stronger, but the sheer base keeps it balanced.
- Ask for thin veining, not thick slabs of color.
- Keep the swirls uneven.
- Leave a little negative space.
- Seal with a glossy top coat.
If the swirls are too heavy, the nail loses that airy feel. Thin is better here.
10. Negative-Space Black Swoops
A good negative-space manicure makes the almond shape look even cleaner than it already is. Black swoops, curves, and arcs leave sections of the natural nail open, which creates a lighter look without losing the black polish. It’s one of those designs that looks more expensive than it is because the space between the lines does half the work.
This style flatters all skin tones because it lets the base peek through instead of covering everything. On fair skin, the open areas keep the black from feeling too hard. On deep skin, the contrast reads crisp and architectural. On olive or tan skin, the open shape can follow the finger line in a way that feels neat without being stiff.
I like this design with thin black brushstrokes near the cuticle and sidewalls. It gives the impression of movement. Not clutter. Just movement. If you want to keep it wearable, let two nails stay mostly bare and make the rest carry the design.
11. Black Aura Nails With a Soft Pink Center
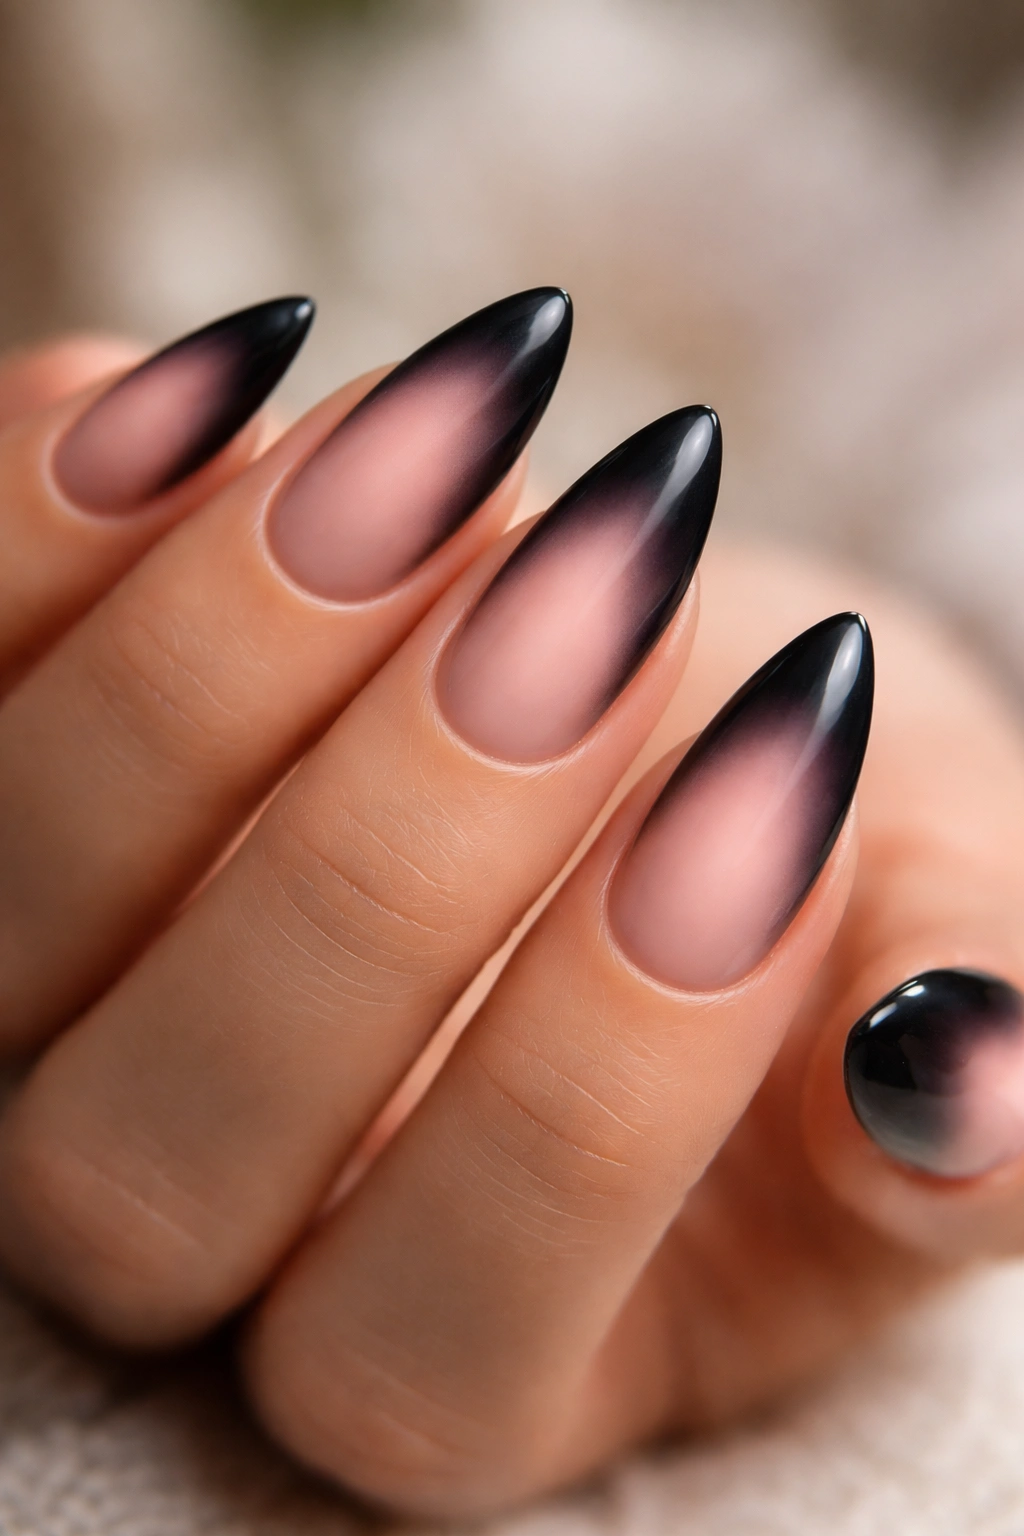
Could black nails feel soft? Yes, if the center glow is handled well. Aura nails use a darker edge and a lighter core, so the black frames the color instead of swallowing it. A soft pink center gives the design a hazy, floating look that works on almond shapes especially well.
If you’ve got fair skin, the pink core keeps the black from feeling severe. On medium and warm skin, a blush or peach center can warm the whole manicure. On deeper skin, a dusty rose or mauve center often reads more clearly than a very pale pink. That’s the part people miss. The center color has to show up against your skin, not disappear into it.
A sponge or airbrush usually gives the softest fade. Keep the dark ring close to the edge of the nail, not halfway up the plate. The point is glow, not striped color blocking. Softness here is a design choice, not an accident.
12. Checkerboard Accent Nails in Black and White
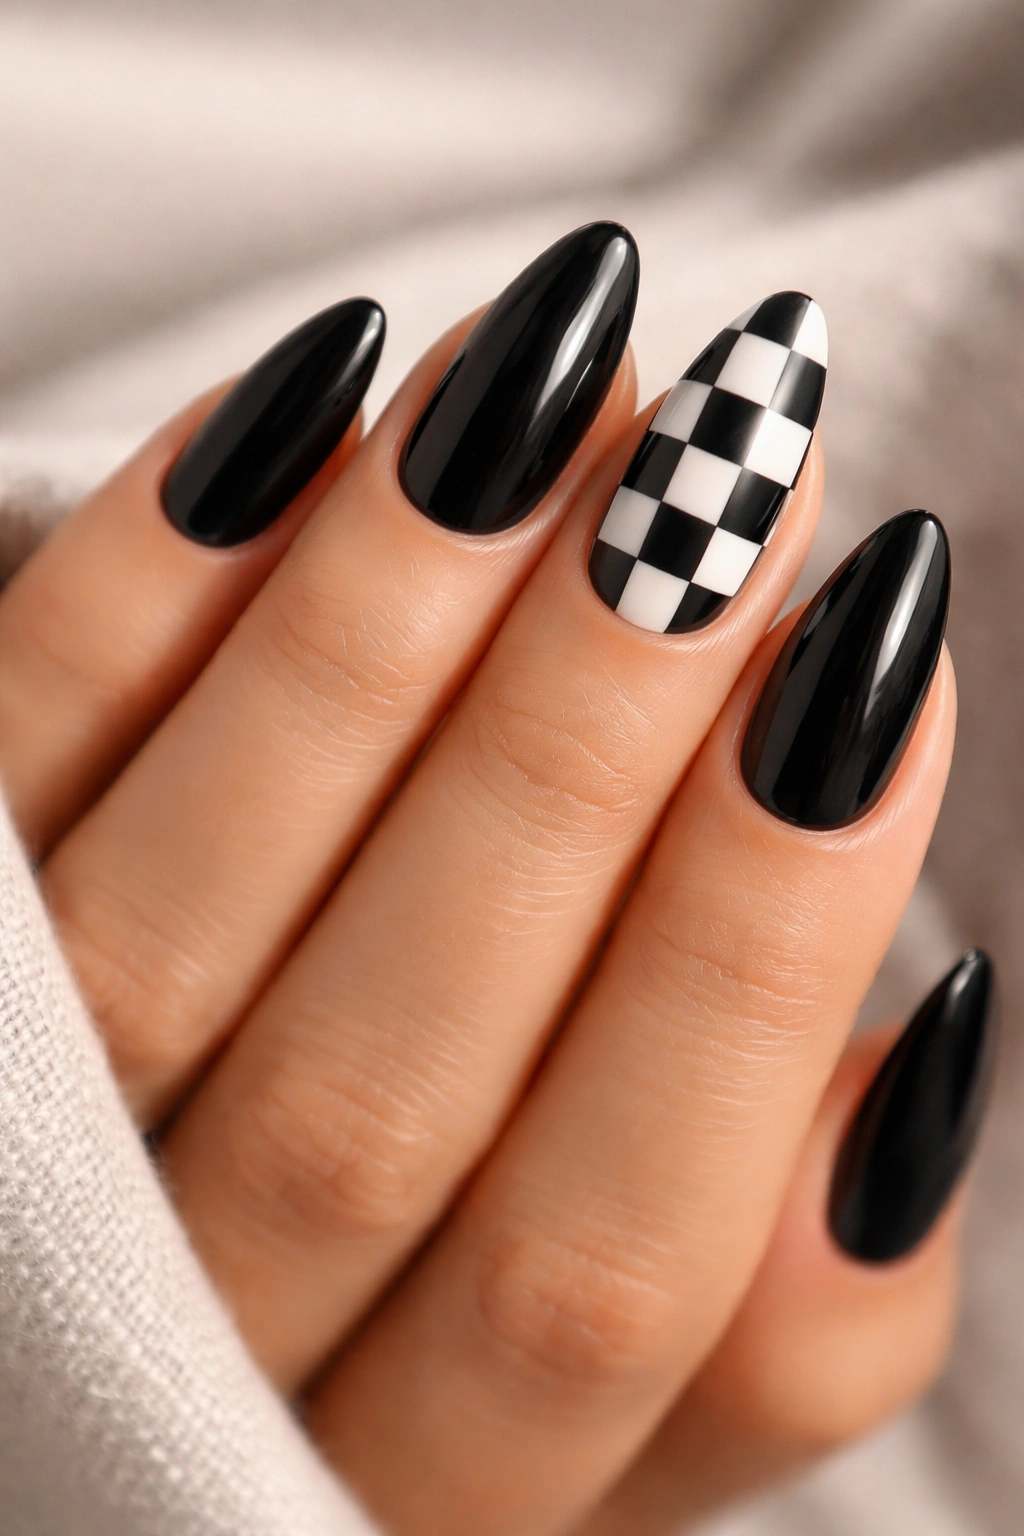
Checkerboard can look playful, but it doesn’t have to look childish. Keep it to one or two accent nails, and it suddenly reads sharp instead of loud. Black and white together are blunt in a good way. No guessing. No softness. Just clean contrast.
On almond nails, a checkerboard accent works best when the squares follow the curve of the nail instead of forcing a straight edge across it. That keeps the design from feeling stiff. If your skin is deep, the white squares jump out fast, so a smaller check pattern can look better. On fair skin, larger checks make the design easier to read. On medium skin, either size works as long as the spacing is even.
I’d pair this with plain black nails on the rest of the hand. It keeps the manicure from becoming a costume. One checkerboard nail on each hand is usually enough. Honestly, sometimes even one is enough.
13. Black Almond Nails With Tiny Rhinestones
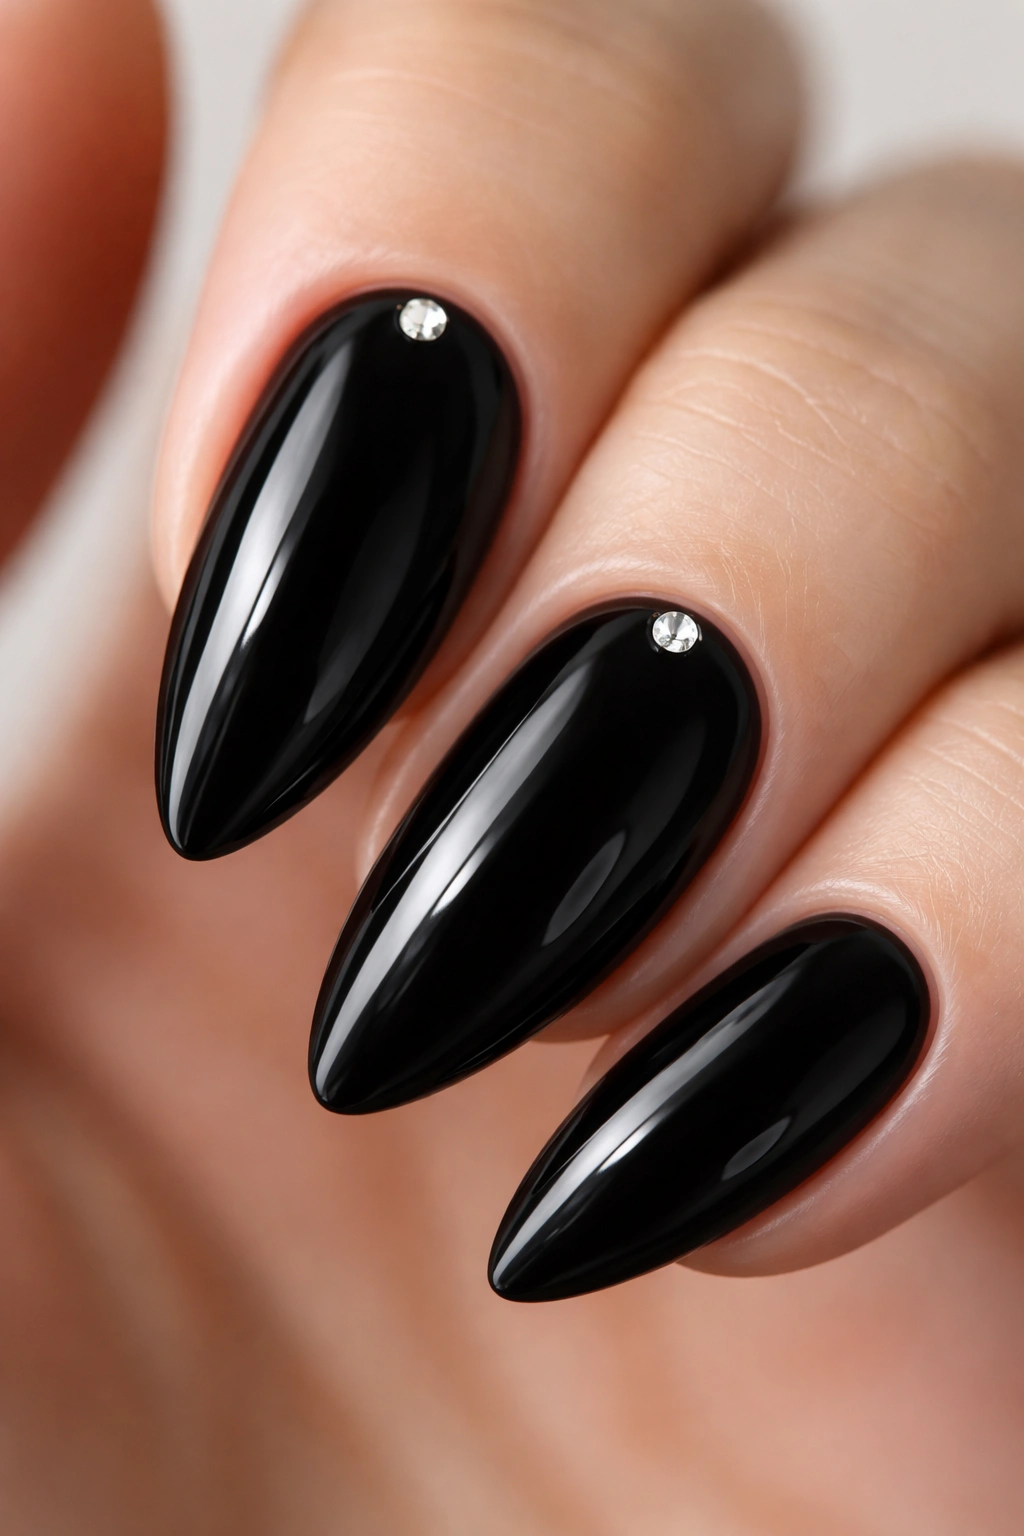
A few rhinestones on a black base can save a manicure from looking flat. The shine of the stones gives the nail a focal point, and because the base is black, you don’t need many. One stone near the cuticle. Maybe two in a small curve. Done.
Where One Stone Does the Job
The smartest placements are the ones that look intentional, not crowded. A single clear crystal near the base of the almond point can lengthen the nail visually. A small cluster on the ring finger can make the whole set feel finished. If you like silver jewelry, use clear stones with silver settings. If your skin is deep, the contrast feels crisp and bright. On lighter skin, a tiny crystal can keep the black from looking too flat.
- Use flat-back stones so they sit low.
- Keep the design to one or two nails.
- Place stones away from the free edge if you type a lot.
- Seal around the stone, not over the top.
This is not the design for people who want zero maintenance. Stones catch on sweaters. That’s life.
14. Black Tortoiseshell Tips

Tortoiseshell with black is one of those pairings that looks richer than it has any right to. The amber, brown, and smoky black layers make the manicure feel dimensional, and the almond shape gives those softened swirls a nice long runway.
I like this best as a tip design or accent nail design, not a full set on every finger. Too much tortoiseshell can get busy fast. On warm skin tones, the brown and amber parts pick up warmth naturally. On deeper skin, the dark pieces blend beautifully while the lighter flecks give depth. On fair skin, the contrast makes the pattern easier to see.
The key is not making the pattern too perfect. Real tortoiseshell has blobs, streaks, and smoky edges. If everything is symmetrical, it loses the point. A sheer caramel base under the black patches usually gives the best result.
15. Black Glaze Over a Sheer Nude Base

A black glazed manicure gives you the cool shine of a lacquered finish without going full opaque. The sheer nude base softens the darkness, and the black shimmer or glaze on top creates a smoky effect that moves when your hand turns. It’s a little moody. A little glossy. Easy to stare at, which is kind of the point.
This look can be adjusted for skin tone by changing the nude base. On fair skin, a rosy nude keeps things soft. On olive and medium tones, a beige that matches your undertone prevents the base from looking gray. On deeper skin, a richer nude or caramel base keeps the black glow floating instead of sinking into the nail.
The black layer should stay translucent. If it turns opaque, the whole glazed effect disappears. Think smoke over glass, not paint over paper. That difference is what makes the manicure feel light instead of heavy.
16. Black And Red Almond Nails
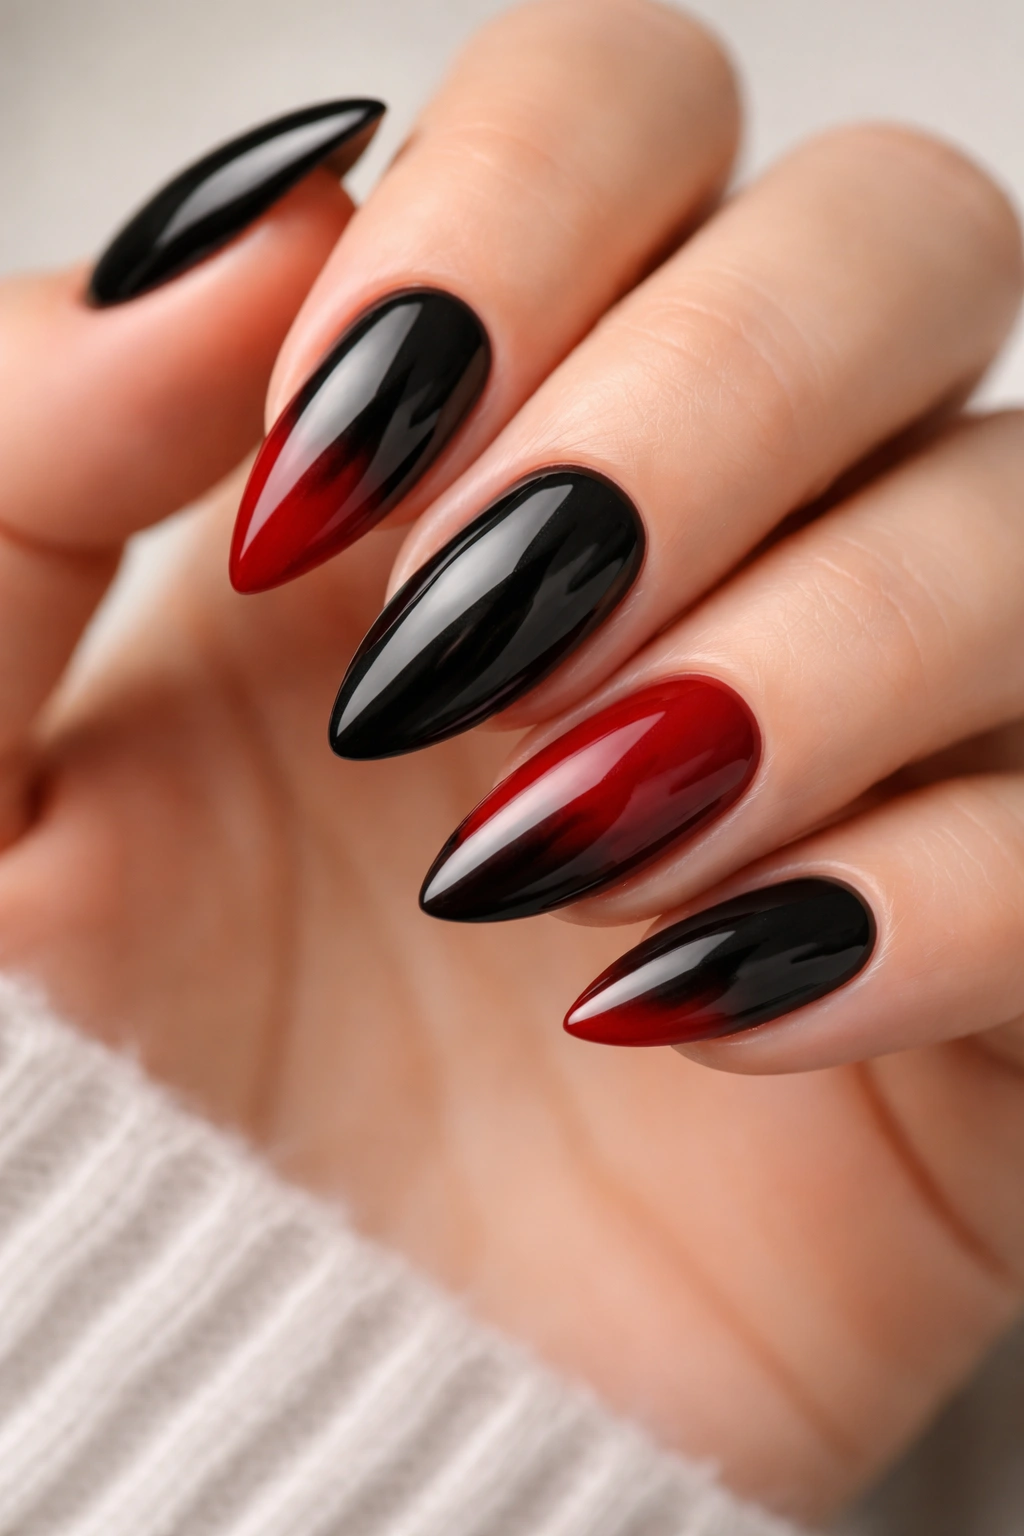
Why does black plus red always feel so bold? Because the colors sit at opposite emotional ends of the same mood. Black calms the design down. Red brings the heat. Together they make a manicure that looks confident without needing extra glitter or gems.
I like this combo best with deep cherry, oxblood, or clean crimson rather than a neon red. Those shades sit better against black polish and they age more gracefully on the hand. On fair skin, the red pops hard. On medium skin, the mix feels rich and saturated. On deep skin, the red can read almost jewel-toned next to the black, which is one of my favorite looks in this whole list.
You can split the colors, use red tips, or do one black nail for every red one. Just keep the placement deliberate. Random color blocking can look messy fast. Controlled contrast. That’s the sweet spot.
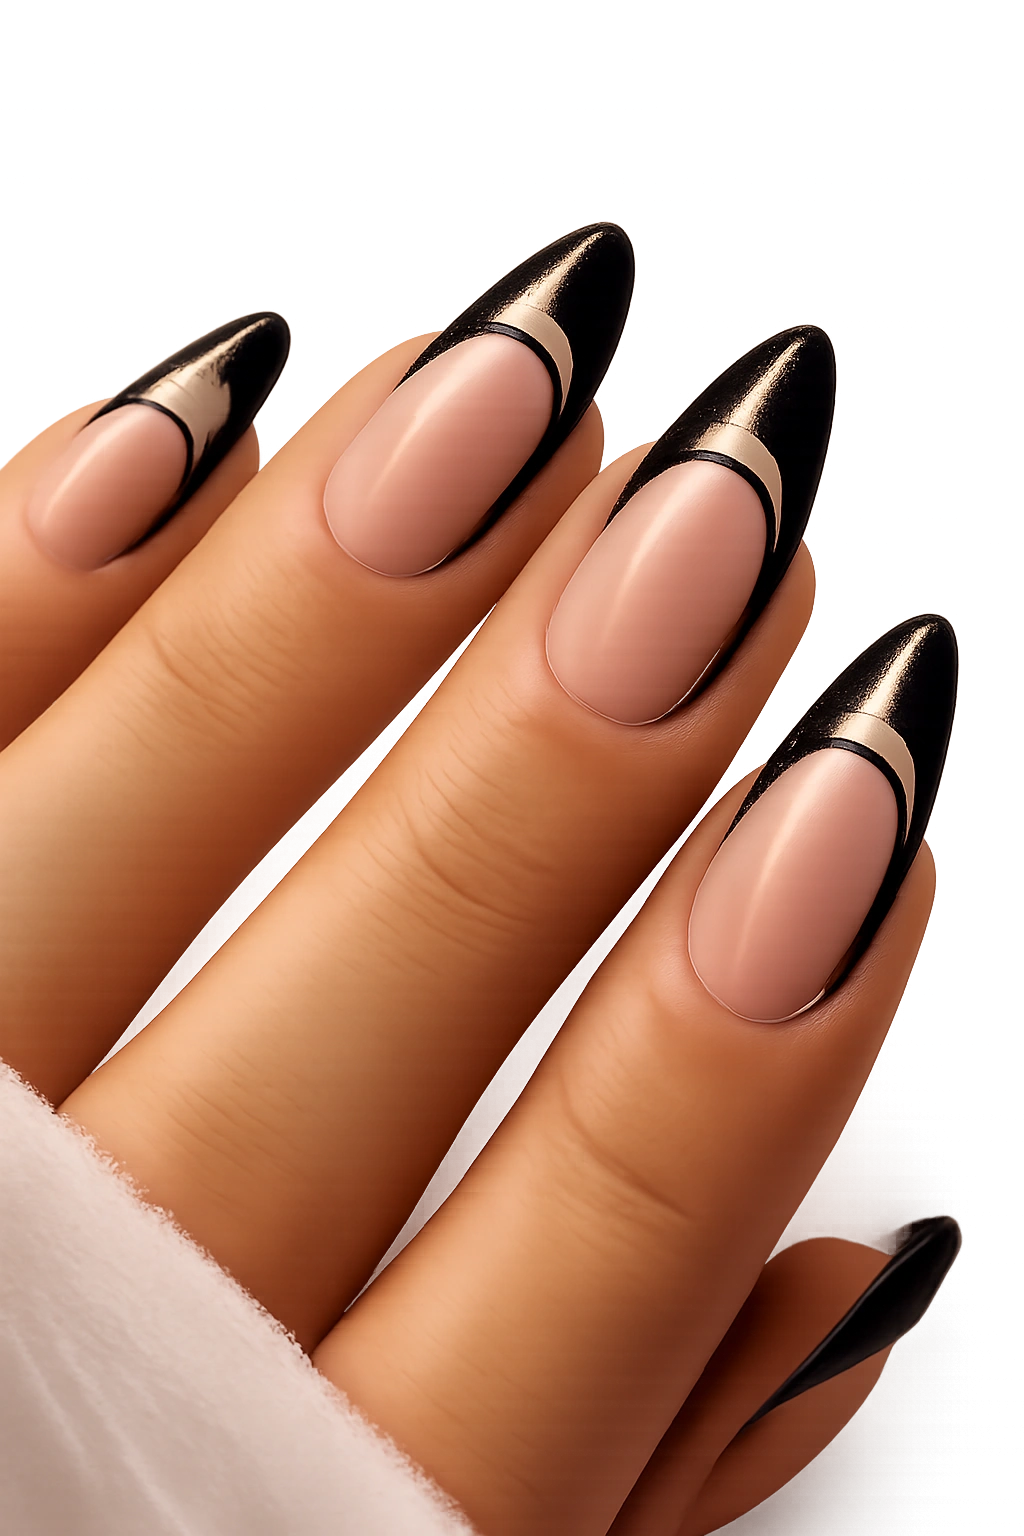
17. Matte Black With Chrome Cuticle Cuffs
Matte black nails already feel clean. Add a chrome cuff at the cuticle, and the whole design sharpens into something more graphic. The metallic line sits at the base of the nail like jewelry built right into the manicure, which is a nice trick when you want detail without clutter.
How to Place the Cuff
The chrome line should be thin and even. Too thick, and it looks like a half-moon gone wrong. Too high, and it starts fighting the black base. The sweet spot is a narrow curve hugging the cuticle line. On deeper skin, silver chrome reads bright and clean. On fair skin, the matte black makes the cuff stand out fast. On warm or olive skin, the contrast can feel cool and polished.
- Keep the cuff narrow.
- Leave a tiny gap at the skin.
- Use matte sealing on the black only.
- Keep the rest of the nail free of extra detail.
This one looks especially good on medium to long almonds, where the curve has space to breathe.
18. Lace-Inspired Black Line Art
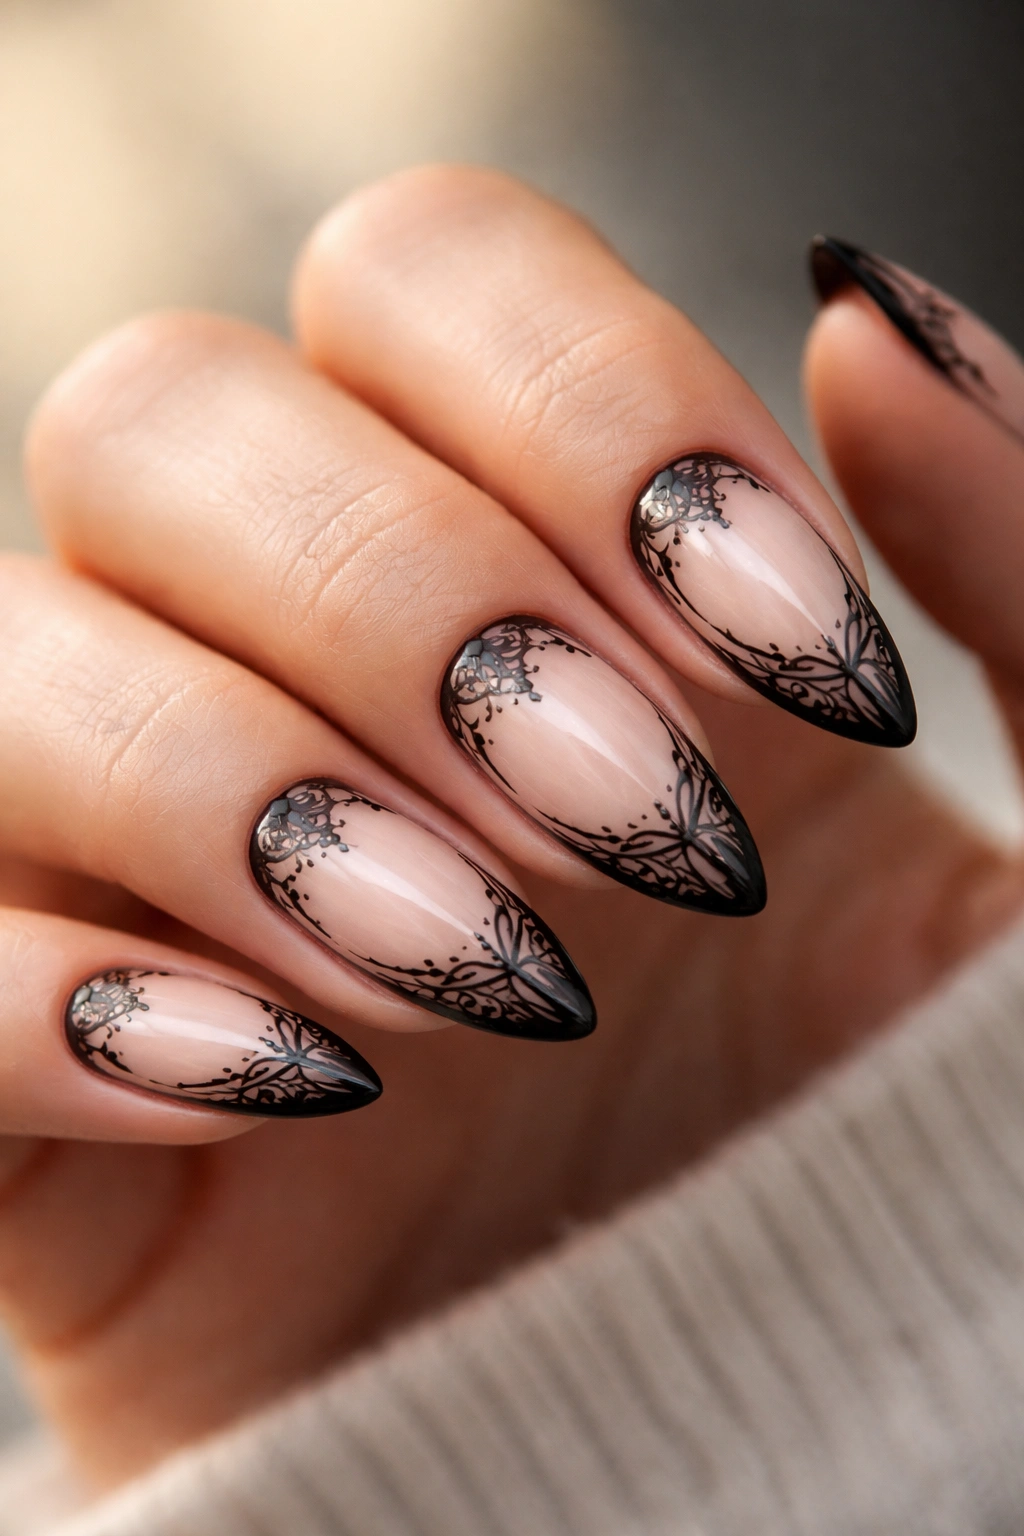
Unlike full floral nail art, lace line work stays airy. That’s why it fits almond nails so well. The design follows the shape without swallowing it, and the fine black lines add texture without making the manicure feel crowded.
I’d call this one delicate, but not sweet. There’s a bit of edge to it. The best versions use a sheer nude base with black arches, tiny loops, or mesh-like patterns near the tip or cuticle. On lighter skin, the design reads as crisp filigree. On deeper skin, the black lines stand out clearly if the base has enough opacity. On medium skin, a warm nude base usually looks best because it keeps the contrast balanced.
A very thin brush matters here. Thick lace lines turn clumsy fast. If you want the manicure to last in your head longer than it lasts on your nails, keep the pattern sparse and let empty space do some of the work.
19. Starry Black Almond Nails
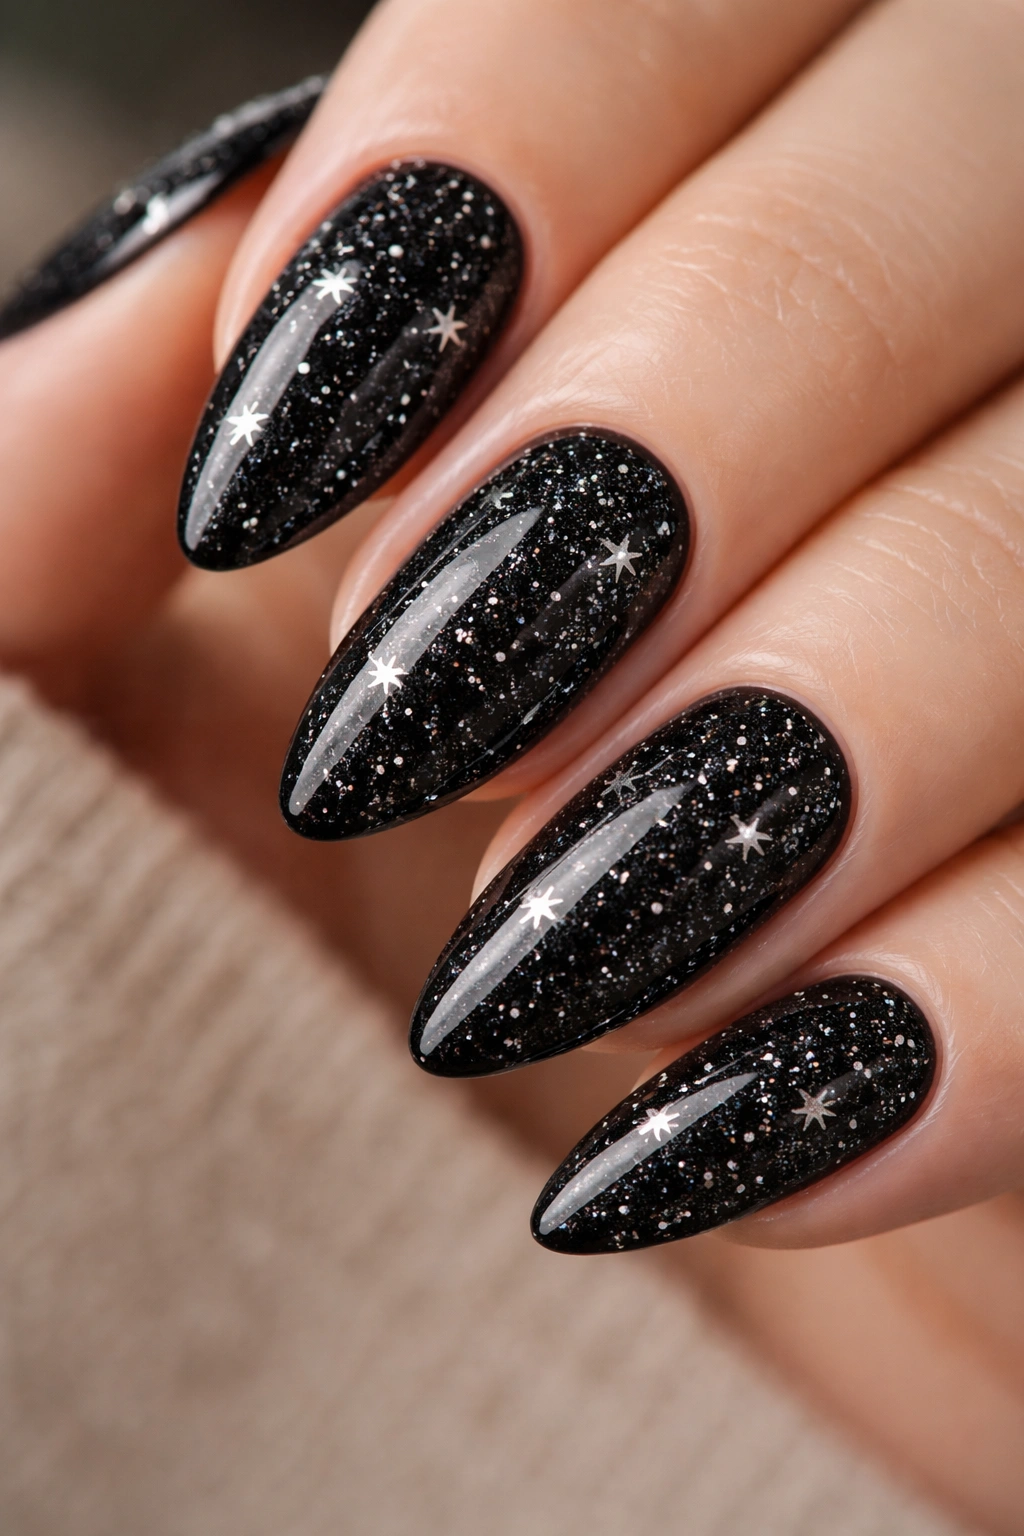
A black base sprinkled with tiny silver specks can look like a night sky, if you keep the sparkles small. Big glitter chunks ruin the effect. Tiny dots, fine shimmer, and one or two micro stars are enough. On almond nails, the shape makes the design feel more elegant than playful.
What Makes the Sparkle Believable
The best starry sets have a little randomness. Not every nail needs the same speck pattern. Some nails can stay almost plain. Others can hold a tiny cluster of silver near the tip or just off-center. On fair skin, the contrast reads crisp. On deep skin, the specks can look like they’re floating on top of the black instead of sitting inside it.
- Use fine silver glitter, not chunky flakes.
- Add one or two tiny star decals if you want a literal night-sky effect.
- Keep the base fully black for the deepest contrast.
- Seal well so the glitter doesn’t feel rough.
This is one of those designs that looks better close up than it does from across the room. Which, honestly, is a good sign.
20. Half-Moon Black Manicure
A half-moon manicure leaves the crescent at the base of the nail lighter or bare while the rest goes black. On almond nails, that shape makes the cuticle area feel clean and intentional. It also gives the manicure a little breathing room, which helps a dark shade like black feel less heavy.
This design is especially good if you like retro details but do not want something costume-y. A soft nude or clear crescent at the base keeps the nail looking neat. On fair skin, the crescent breaks up the darkness nicely. On deeper skin, the shape creates a bright outline that catches the eye fast. On medium skin, the half-moon can be matched close to the undertone so the set stays balanced.
I’d keep the crescent slim. A huge half-moon can make the nail look chopped in half, which is not the move here. Small and clean wins.
21. Black Ombre Fade On Nude Bases
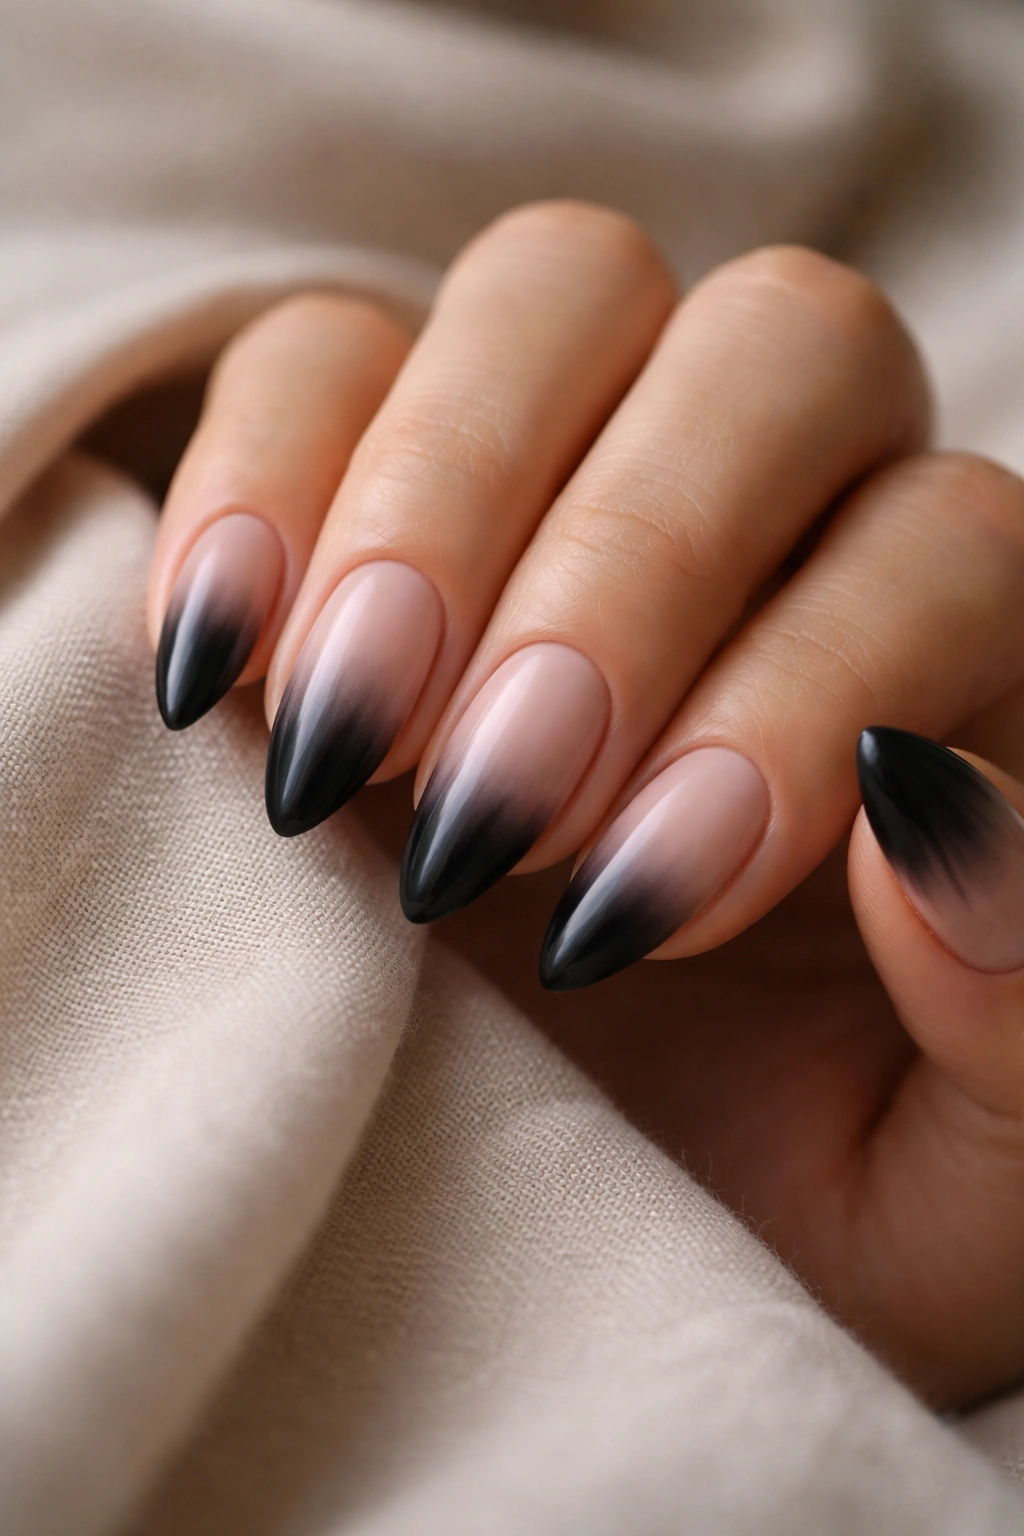
Does black ombre sound heavy? It can be, if the fade is too blunt. Done well, though, it turns into one of the softest black almond nail ideas on the list. The nude base keeps the manicure open, and the black fades in from the tip or sidewall instead of taking over the whole nail.
The important part is choosing a nude that matches your undertone. A cool pink-nude can look washed out on warm skin. A peach nude can look odd on very cool skin. That’s why a good nude base matters more here than people realize. On deep skin, a caramel or mocha base often gives the fade the cleanest look. On fair skin, a rosy nude usually keeps the transition smooth.
The fade should be gradual. If you can see a hard line, the illusion is gone. Sponge it. Airbrush it. Blend it until the edge disappears into mist.
22. Abstract Black Swirls On Sheer Almonds
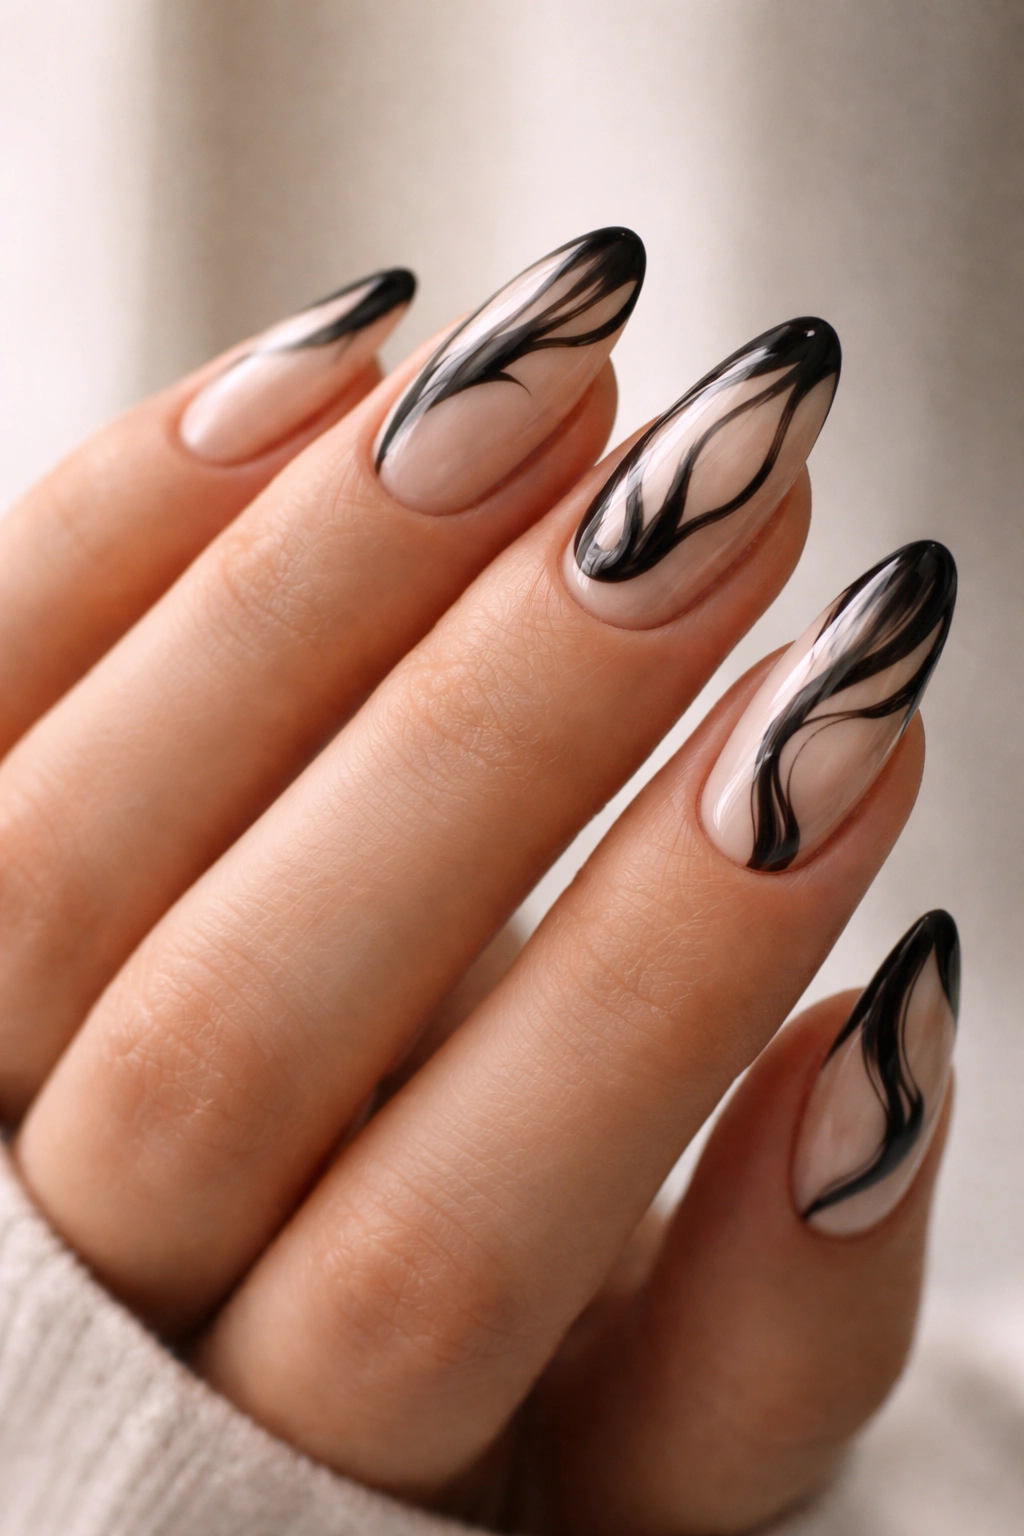
A few loose black swirls can do more than a whole set of tiny details. That’s the charm of abstract nail art. It feels less precious, more alive. On almond nails, the curves of the shape give the swirls a nice path to follow, which helps the design look intentional instead of random.
I prefer this over crowded line art when I want black nails that still feel soft. The swirls can be thick on one nail and thin on the next, which keeps the set from getting too matched. On fair skin, the sheer base keeps the black from looking too harsh. On medium and deep skin, the swirls can be bolder because the skin already gives the hand a rich backdrop.
A tiny brush is your friend here. So is restraint. Leave some nails almost bare. Let the design drift. It looks better that way.
23. Clear Jelly Nails With Black Tips
Unlike a solid black set, this one leaves the center open. That’s the whole appeal. Clear jelly nails with black tips feel lighter on the hand, but they still give you the drama of a dark manicure. On almond nails, the black tip follows the curve cleanly and the transparent center stretches the look of the nail.
This is one of the better choices if you like black but want your nails to feel a little less dense. It works well on all skin tones because the clear center removes some of the contrast pressure. The black tip does the visual work, while the open middle keeps the design from looking too heavy. If you’ve got shorter fingers or shorter nail beds, this one can be flattering fast.
A smoky clear base with a black edge looks cleaner than a plain clear nail with black slapped on top. Ask for a smooth, jelly-like finish. Not cloudy. Not dusty. Just clear with intent.
24. Split-Finish Black Almond Nails
A manicure with one side matte and the other side glossy can look oddly luxurious, even though it’s a simple idea. The contrast gives the black polish more dimension than a single finish ever could. On almond nails, the split finish follows the taper and makes the shape look even more refined.
Matte, Gloss, and Texture
You can do this a few ways. Half the nail matte, half glossy. A glossy stripe down the center. A matte base with shiny diagonal panels. The cleanest versions keep the split simple and let the finish difference do the talking. On deep skin, the texture shift reads rich. On fair skin, the contrast feels crisp. On medium skin, either side can work as long as the lines stay neat.
- Keep the split line straight or gently curved.
- Use one finish as the main look.
- Save the other finish for a strip, panel, or tip.
- Avoid too many textures on the same nail.
This is a strong choice if you like black nails but want something people notice when the light hits them.
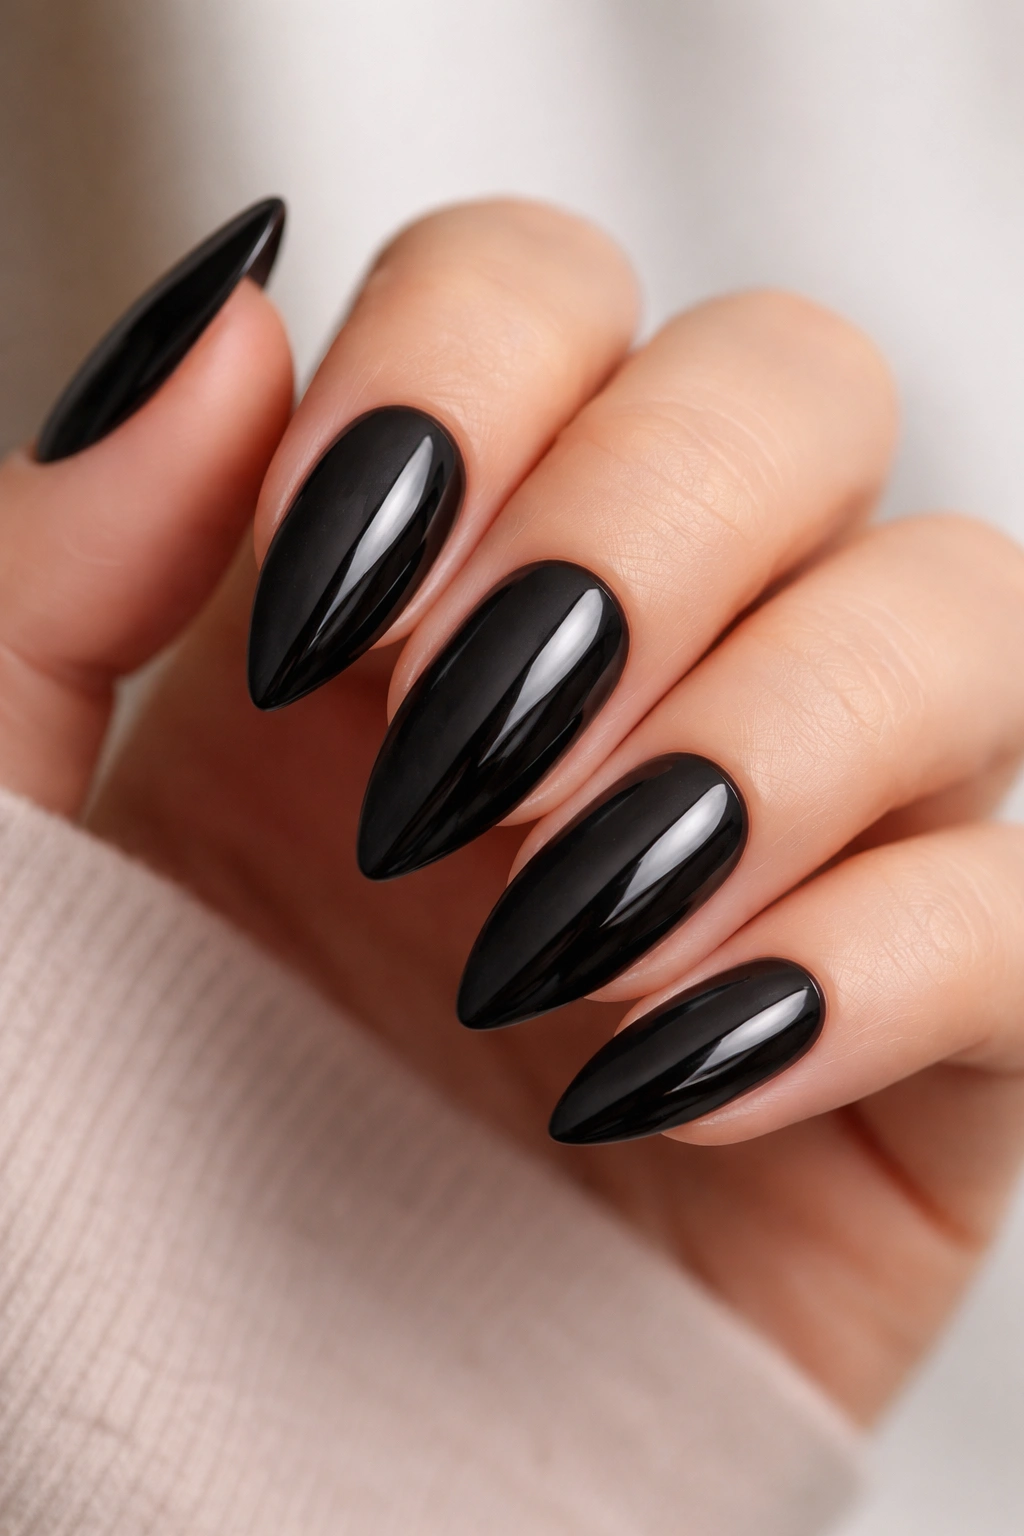
25. The Clean All-Black Set

When I want one black almond manicure that works with everything, I come back to the plain all-black set. It’s the most direct option, and there’s a reason it keeps surviving every trend cycle. No pattern to date it. No extra detail to argue with. Just a smooth black finish and a shape that makes the hand look longer and cleaner.
If your skin is fair, the contrast can feel bold and graphic. If your skin is medium or olive, the black tends to look polished without much effort. If your skin is deep, a rich jet black can look almost seamless in a way that feels elegant rather than heavy. The real secret is the upkeep: crisp edges, even thickness, and a top coat that still shines after a few days.
Sometimes the simplest black almond nail idea is the one that wins. Not because it’s safe. Because it’s clear.
