

Emerald green on almond nails has a way of looking polished even when the design is stripped down to the bare minimum. The color carries the mood; the shape keeps it soft. Put the two together and you get a manicure that can read sleek, moody, dressy, or even a little playful depending on the finish.
The strongest emerald green almond nail ideas do not lean on clutter. A glossy dark green can look sharp on its own, while matte takes the same shade in a quieter, almost velvet direction. Add a thin gold line, a chrome flash, or a tiny crystal near the cuticle and the whole manicure changes speed fast.
Almond nails help because they stretch the hand visually and give a saturated shade room to breathe. The taper keeps the color from feeling blunt. A too-thick tip can make the nail look short and heavy; a soft point keeps everything clean.
Some versions are office-friendly. Some are pure drama. The cleanest place to start is the simplest one, because it shows what the green can do before the extras show up.
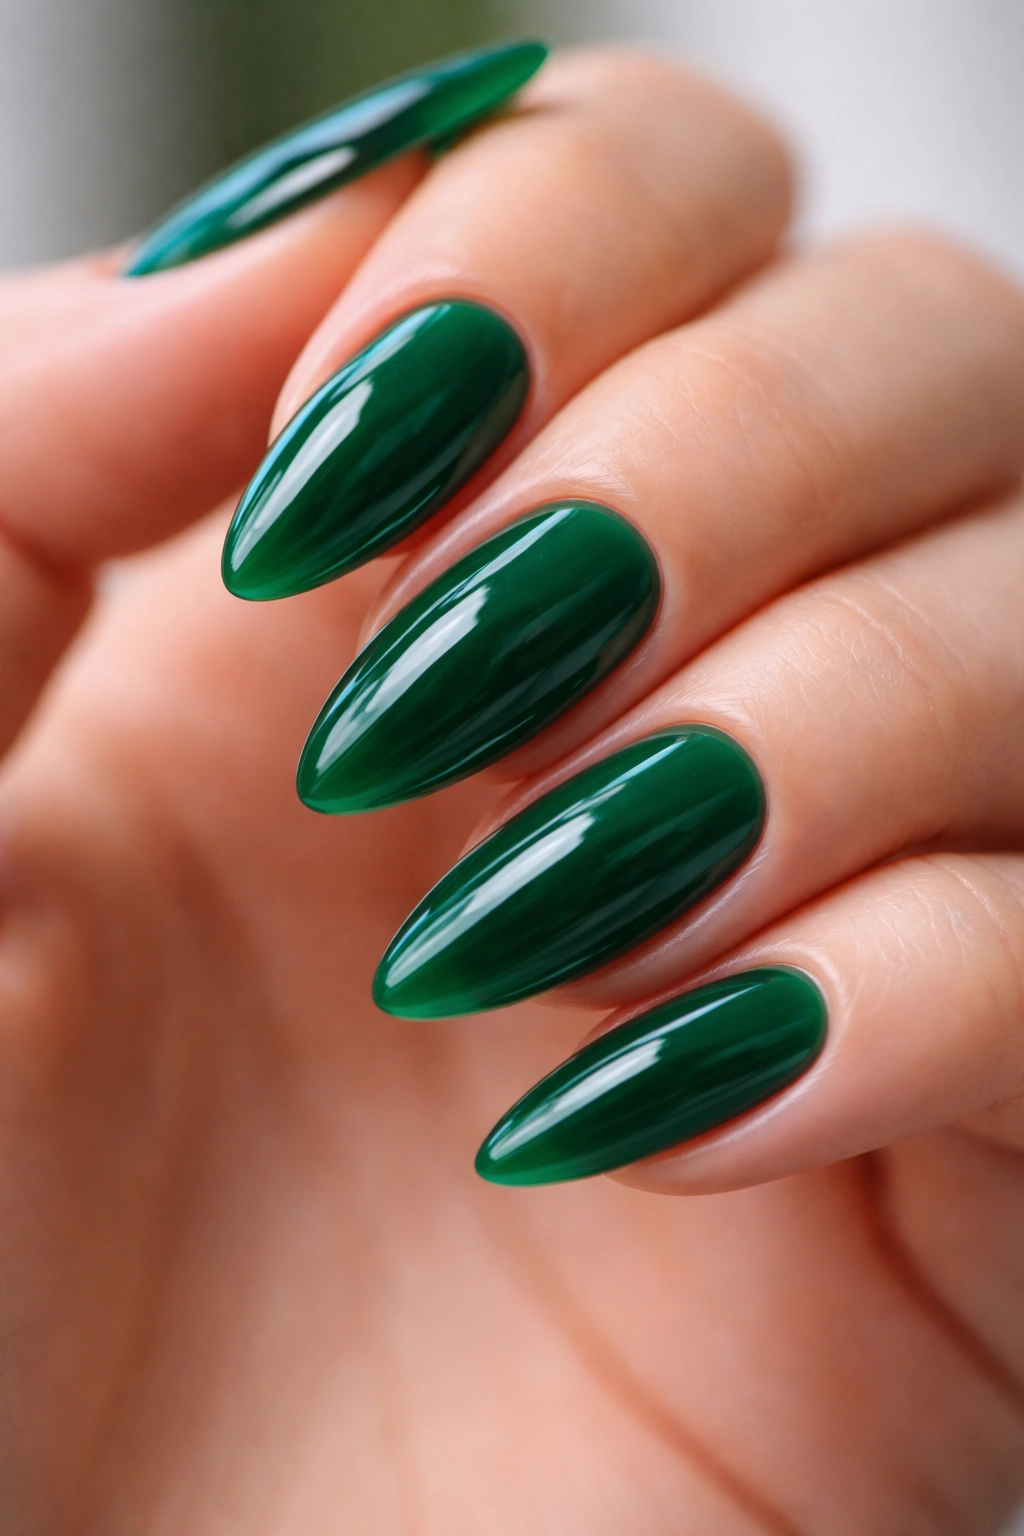
1. Glossy Emerald Almond Nails
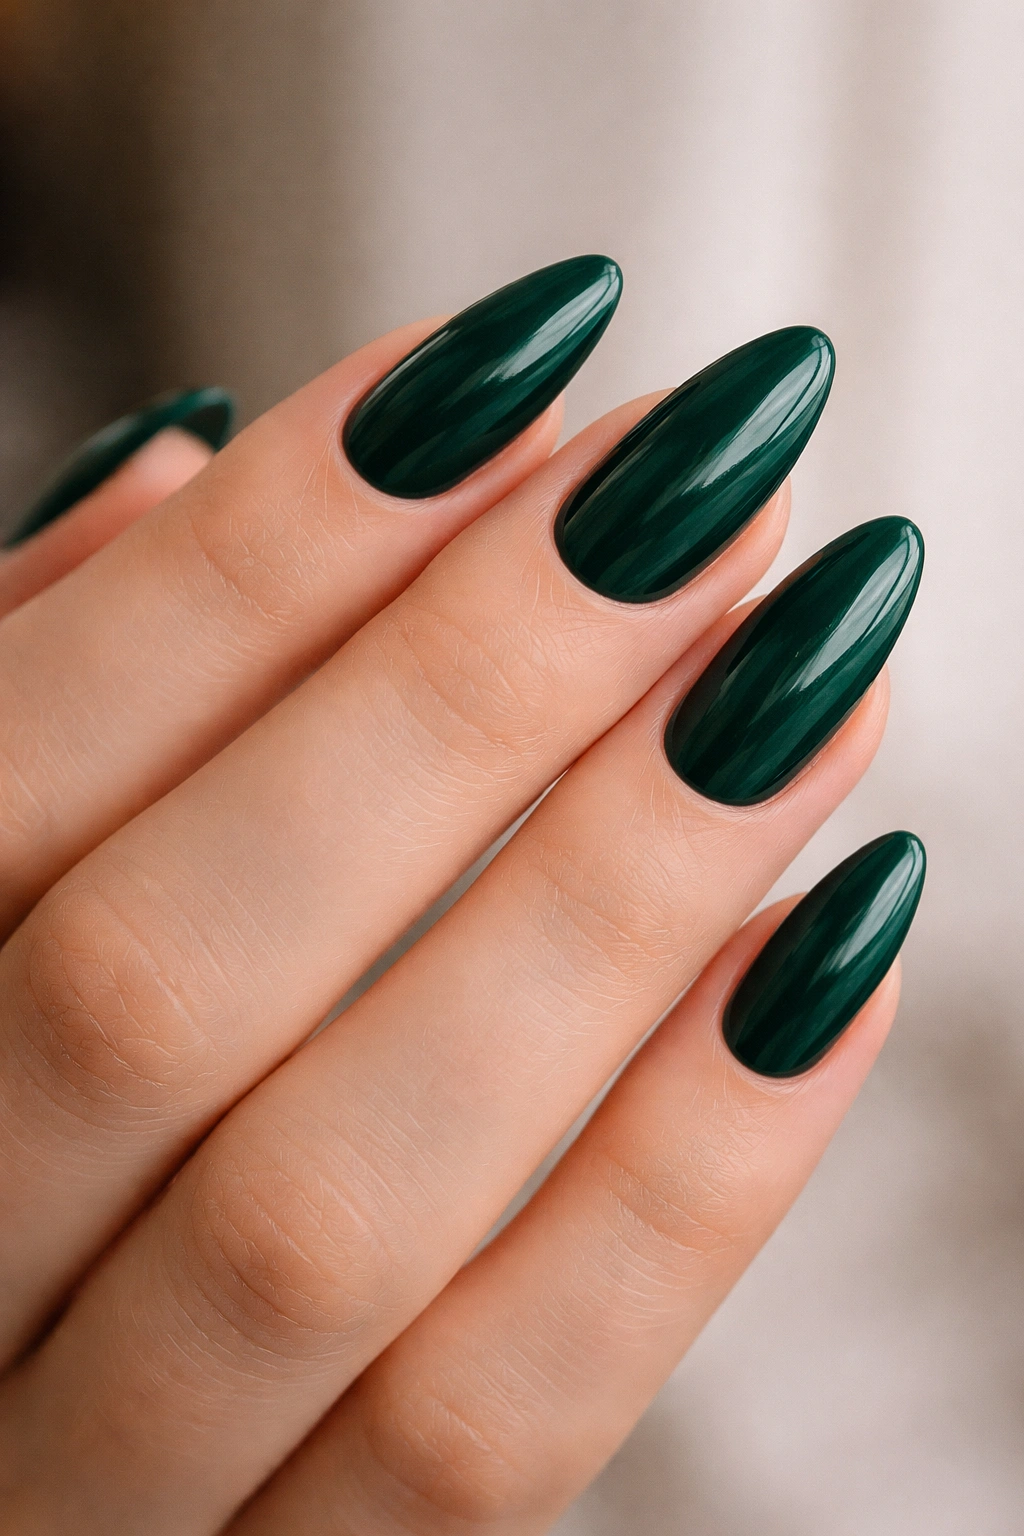
A single rich emerald shade on a smooth almond nail is the easiest place to win. There’s no art to hide behind, which is exactly why it works so well. The shape does the quiet heavy lifting, and the glossy finish makes the color look deeper than it does in a bottle.
Keep the length medium if you want the manicure to feel balanced. On very long nails, a dark green can drift into costume territory if the point is too sharp. A soft almond tip and two thin color coats usually give the most polished result, especially when the polish is a cream finish rather than a jelly.
A good base coat matters here. Deep greens can stain, and they also show ridges if the nail plate isn’t smoothed first. If your nails have any texture, a ridge-filling base coat under the color will save you from that lumpy, uneven look that always seems more obvious in dark shades.
Simple wins here.
If you want one design that reads expensive without trying too hard, this is the one.
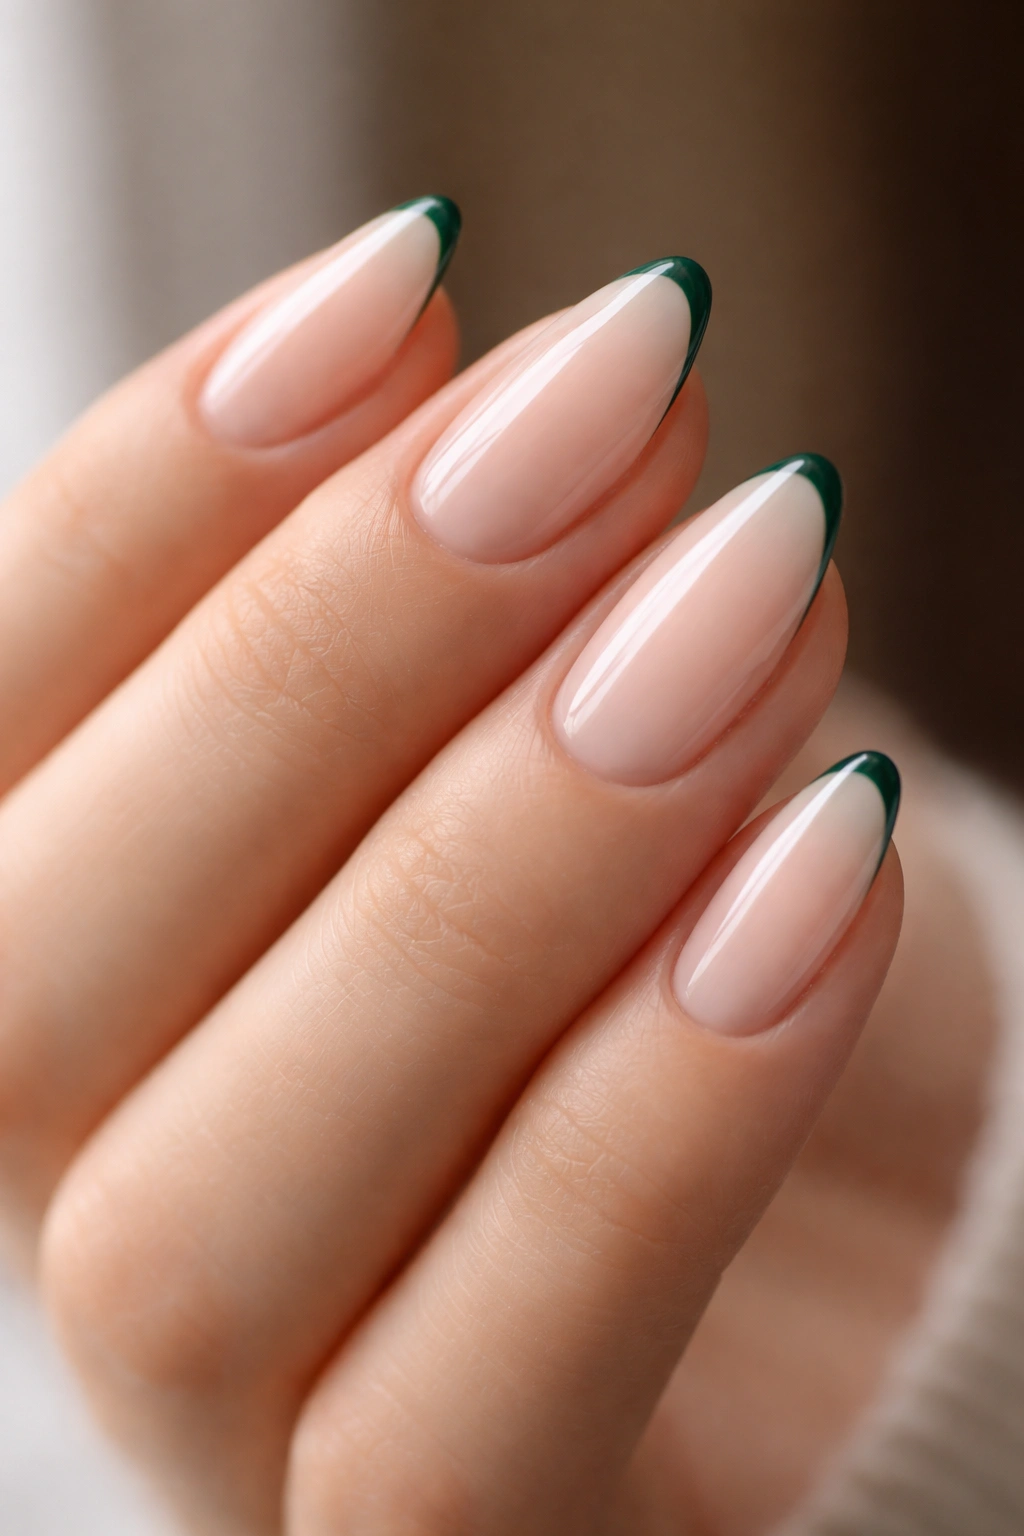
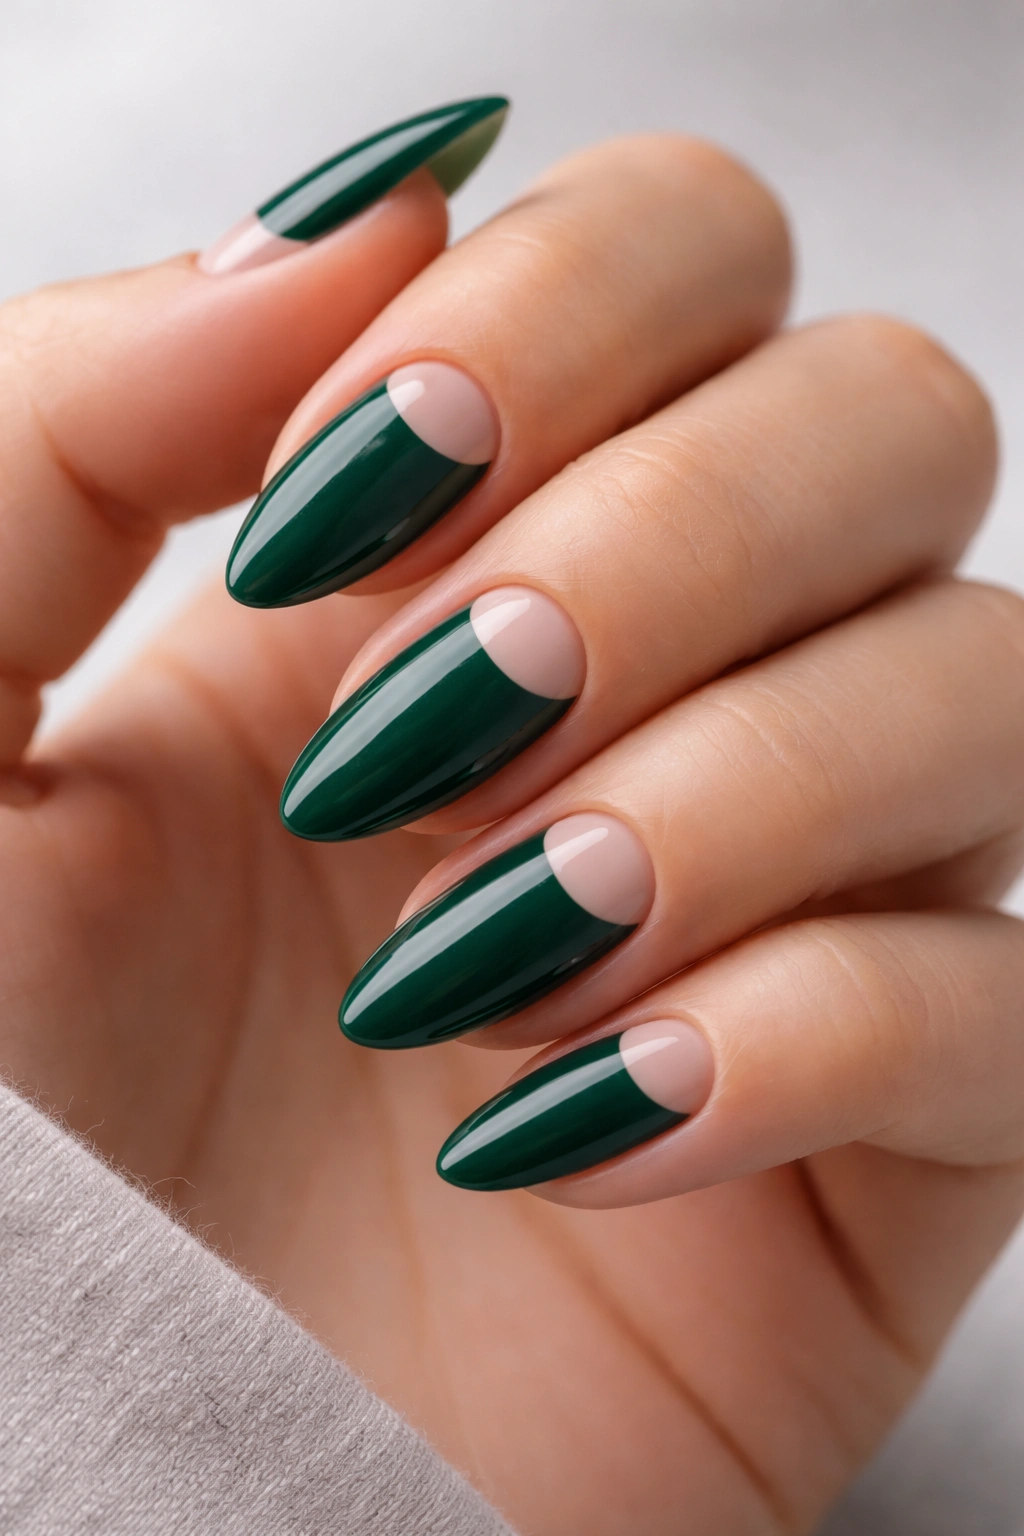
2. Emerald French Tips on a Nude Base
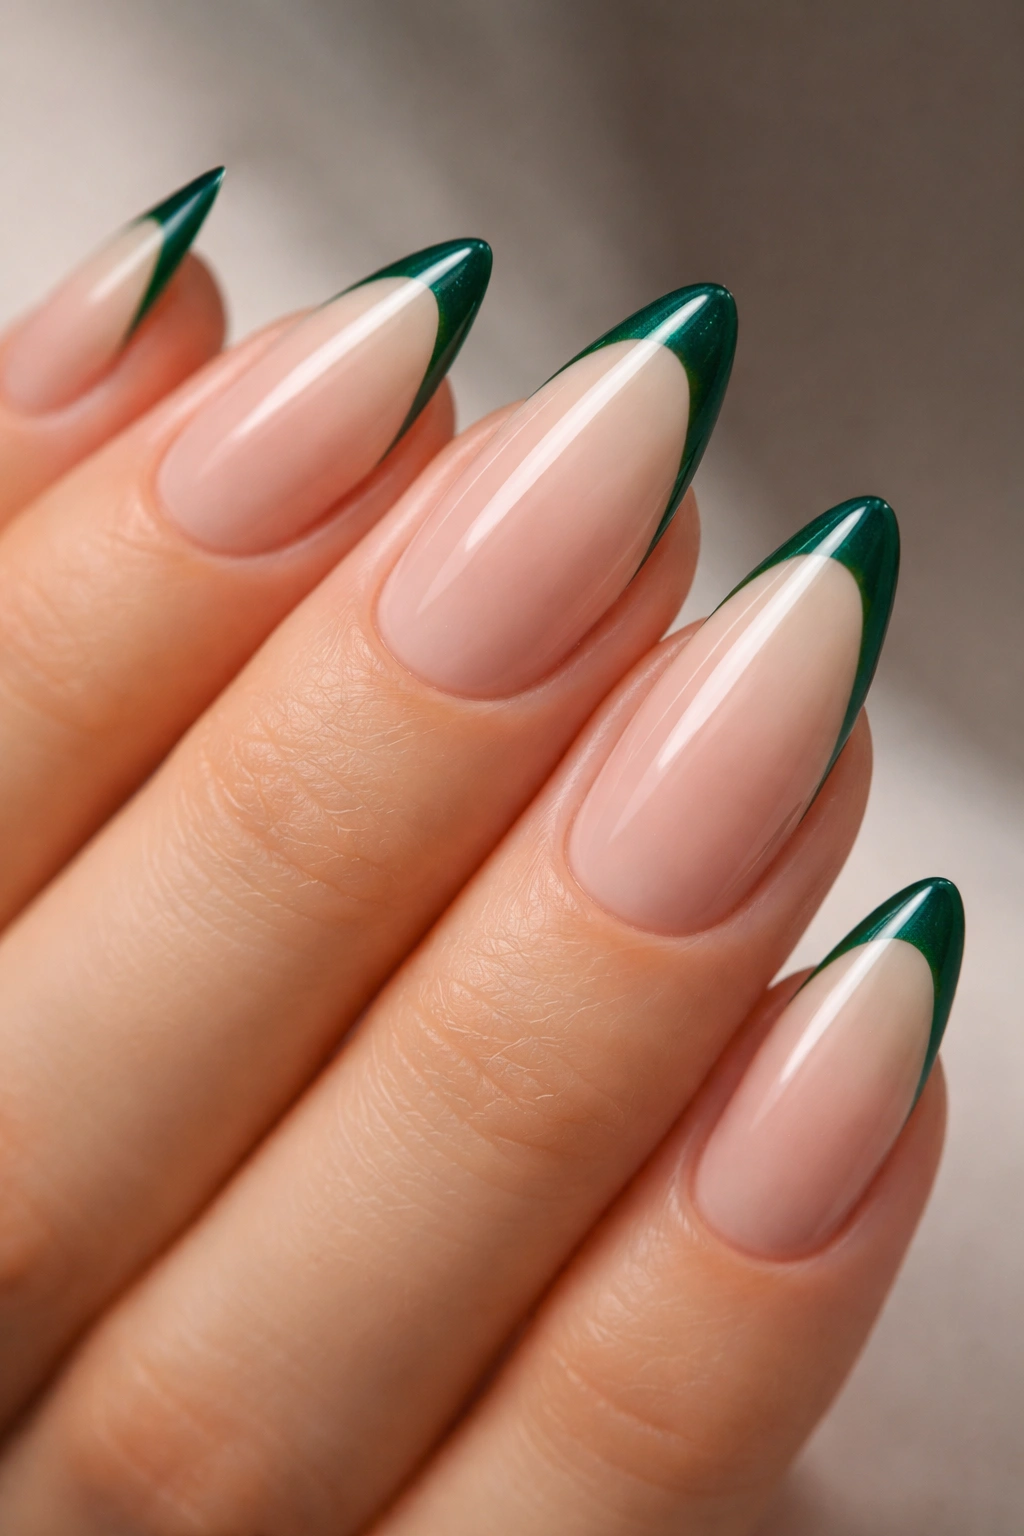
Want emerald without committing the whole nail to it? French tips solve that quickly. The nude base keeps things light, and the green lands like a clean line of color instead of a heavy block.
Why the Thin Tip Works
A thin tip works because almond nails already have a natural taper. A 2 to 4 mm emerald edge follows that curve instead of fighting it, so the nail looks longer and neater. If the tip gets too thick, the manicure starts to look square at the end, and that ruins the whole almond effect.
I like this look best on medium-length nails with a sheer pink or beige base. A milky nude can be pretty too, but sheer bases make the green look sharper. If the polish formula is streaky, build the tip in two passes rather than trying to cover it all at once.
- Best for shorter and medium almond shapes
- Works well with a warm beige or cool pink base
- Looks cleaner when the green tip is slightly curved, not straight across
- Finish with a high-shine top coat so the edge stays crisp
Keep the tip thin. A skinny line of emerald looks intentional; a thick one just looks busy.
3. Matte Emerald Velvet Nails
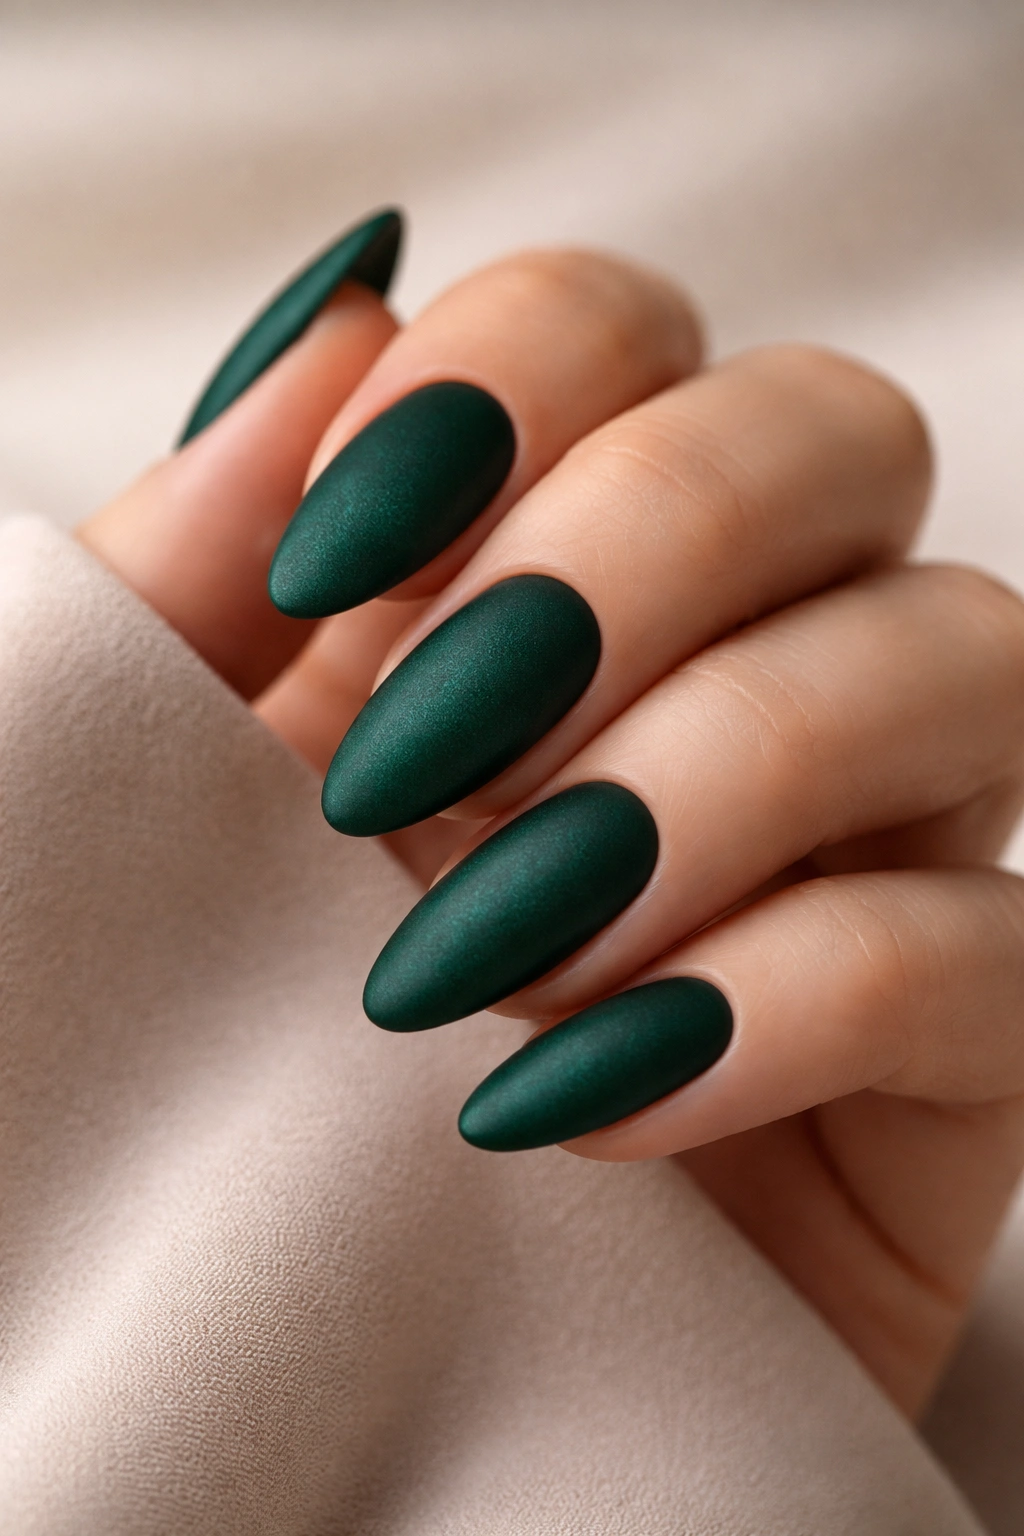
Matte emerald changes the whole mood. The same color that looks lush and glossy suddenly turns quieter, deeper, and a little more serious once you remove the shine. On almond nails, that velvet finish can be especially good because the shape already feels soft at the edges.
But matte is fussy. It shows every bump, scratch, and patch of dust that a glossy top coat would blur out. If the nail surface is rough, the finish will shout about it. That means prep matters more here than it does with shine: smooth the nail plate, clean up the sidewalls, and apply polish in thin, even layers.
I’d reach for matte emerald when the outfit already has texture—wool, satin, leather, something with a little depth. The nail doesn’t need to do all the talking. A matte top coat over a dark green cream gives a finish that looks almost like crushed velvet in low light, and that’s the whole appeal.
Gorgeous, but controlled.
That balance is what makes matte emerald worth wearing.
4. Emerald Nails With Gold Foil Accents
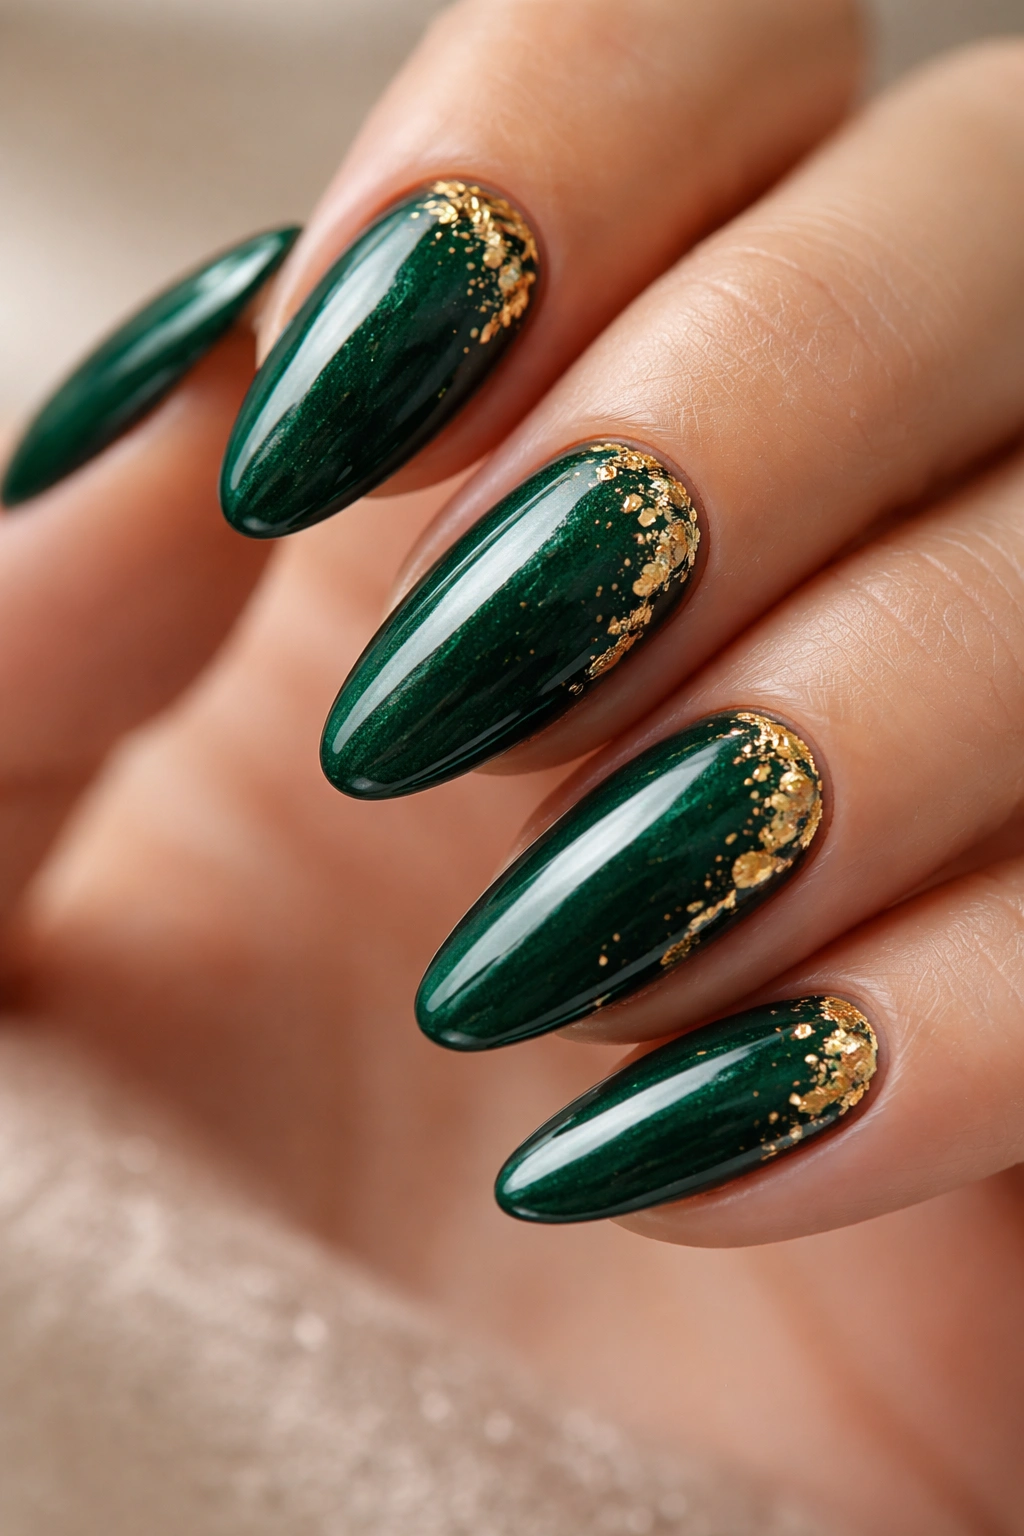
A plain emerald manicure can feel too neat if you want a little more movement. Gold foil fixes that fast. The trick is not to scatter it everywhere like confetti. A few shards placed with intention look richer than a full glitter bomb.
I like foil near the cuticle or tucked along one side of the almond shape. That keeps the center of the nail clean and lets the green stay dominant. If you use oversized foil pieces, they can snag at the edges, so tear them smaller than you think you need. Tiny irregular flakes look more natural anyway.
You can also keep the foil to one or two accent nails and leave the others solid emerald. That gives the manicure breathing room, which matters with a color this saturated. Gold against green has a built-in jewel effect, but too much of it starts to look costume-y. Less is the better move.
Seal the foil with two layers of top coat if the pieces are raised at all. Otherwise they’ll catch on sweaters, hair, and anything else that brushes past your hands.
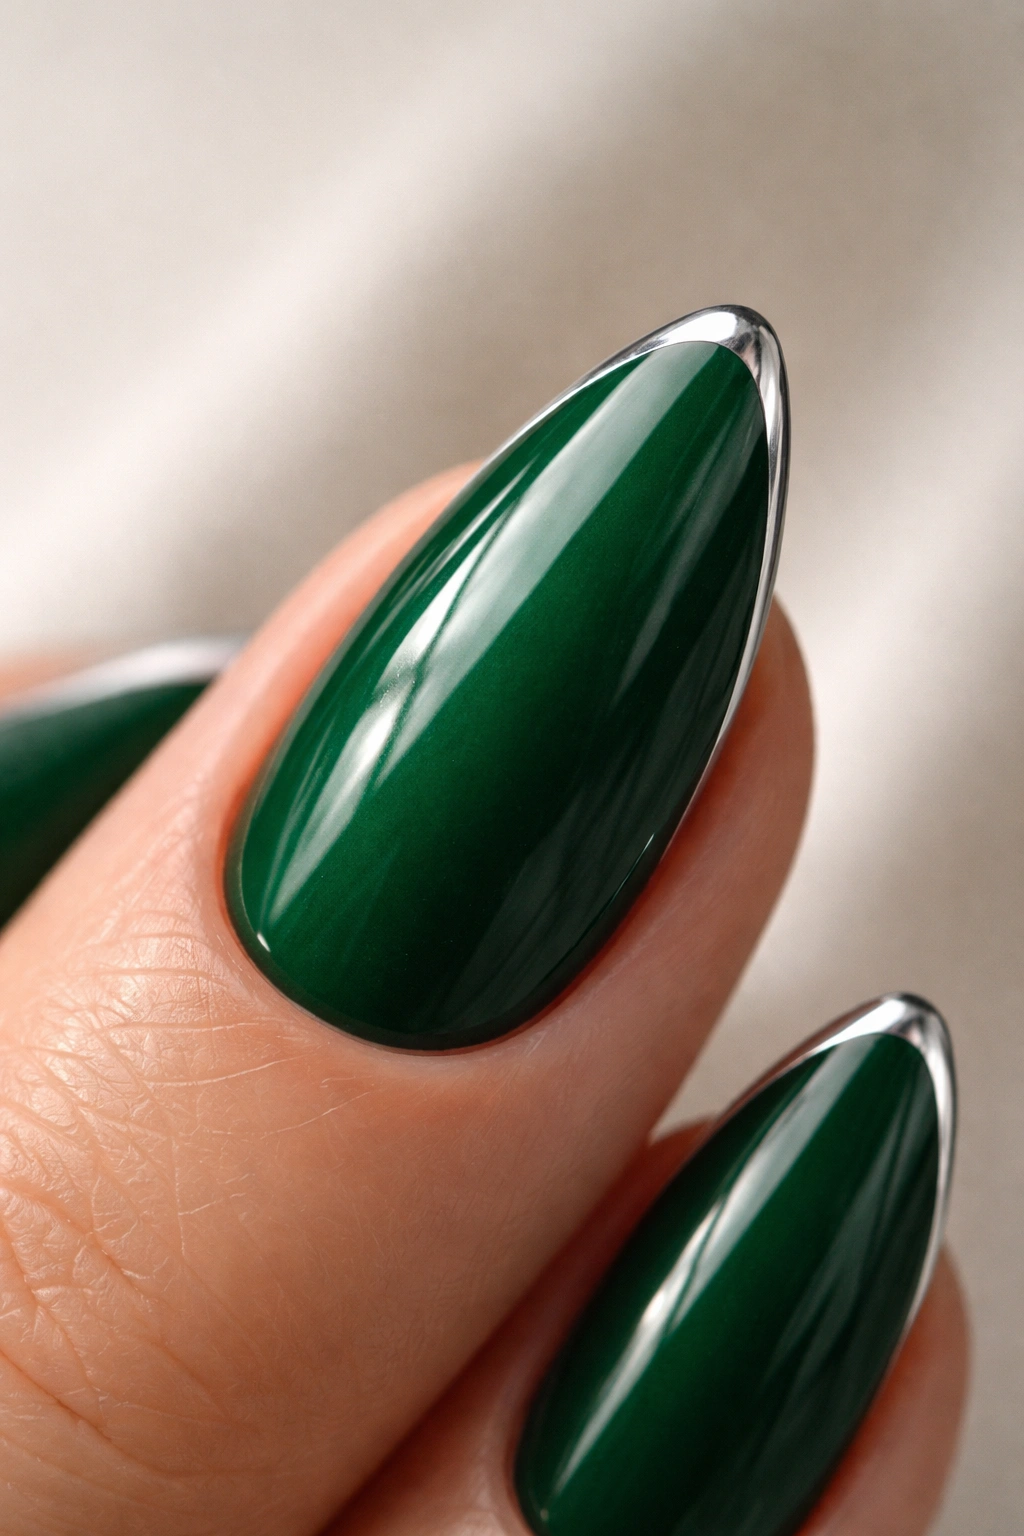
5. Emerald Chrome Almond Nails
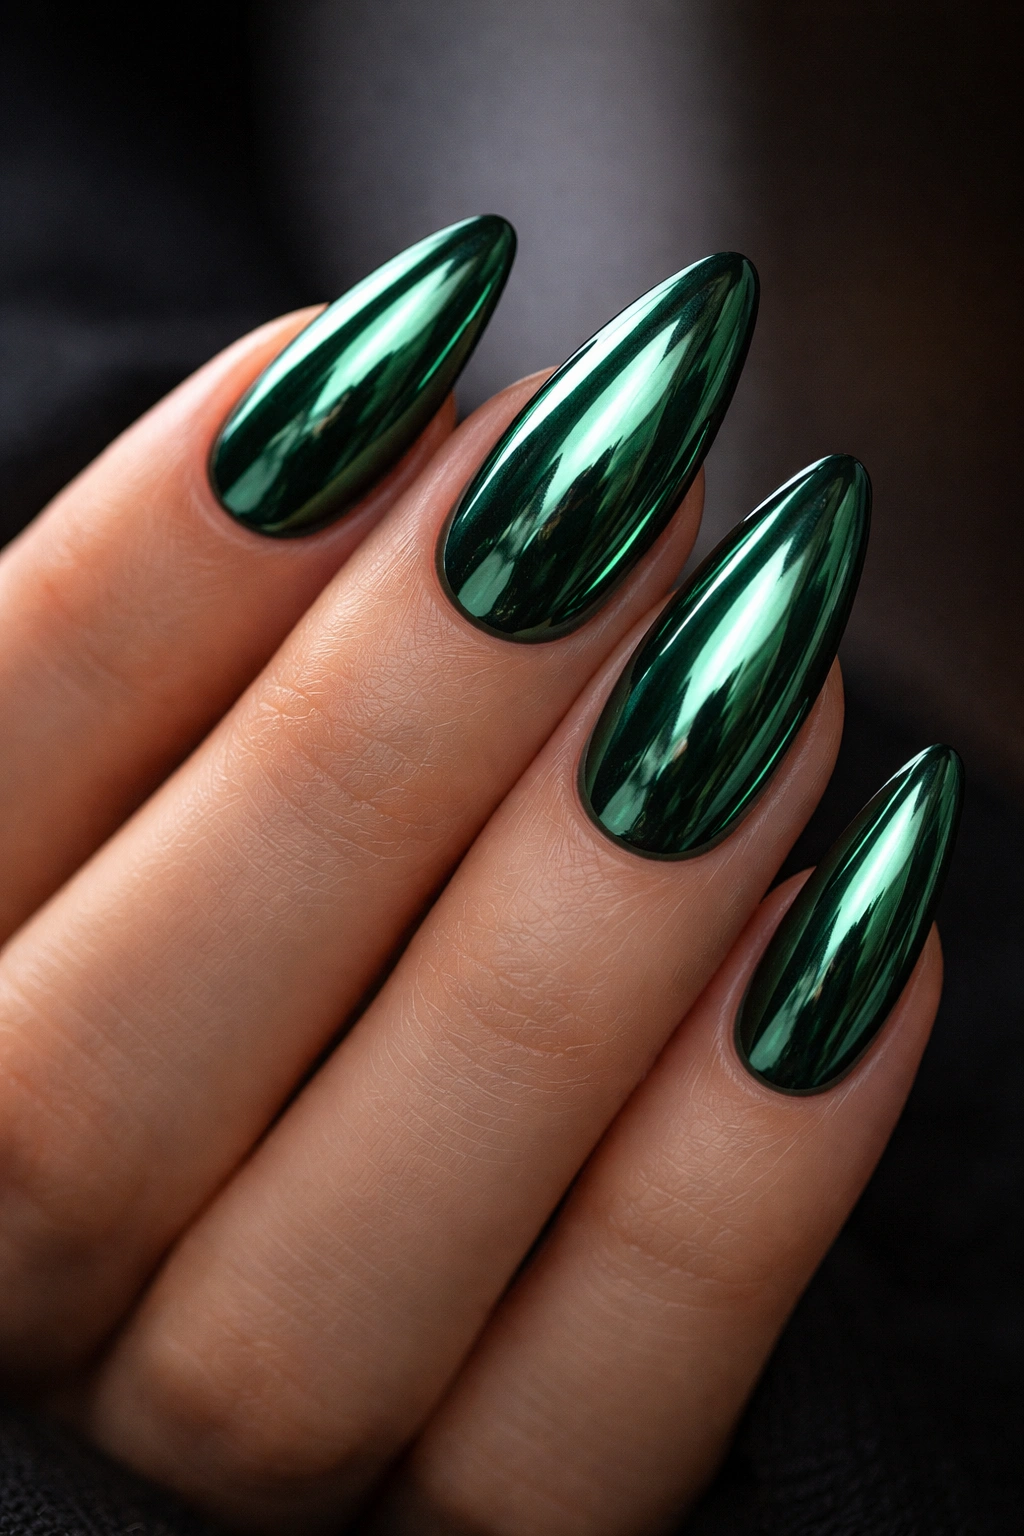
Emerald chrome is not subtle, and that is the point. The mirror finish takes the green and throws light back at you, so the nail looks almost metallic from every angle. On almond nails, that reflective surface makes the taper look even sleeker.
Chrome works best over a smooth dark base. If the base color is patchy or the nail has ridges, the powder will magnify every flaw. A no-wipe top coat is the usual route, then the chrome pigment is rubbed in gently until the surface turns reflective. The edges need to be sealed well, or the shine chips off faster than you’d like.
I prefer emerald chrome on medium to long almond nails, where the curve has enough room to show off. Shorter nails can wear it too, but the look gets punchier and less fluid. If you want the manicure to feel a little softer, ask for a chrome finish that stays deeper and less mirror-bright.
Strong. Clean. Slightly futuristic.
That’s the whole charm.
6. Emerald Marble Swirls
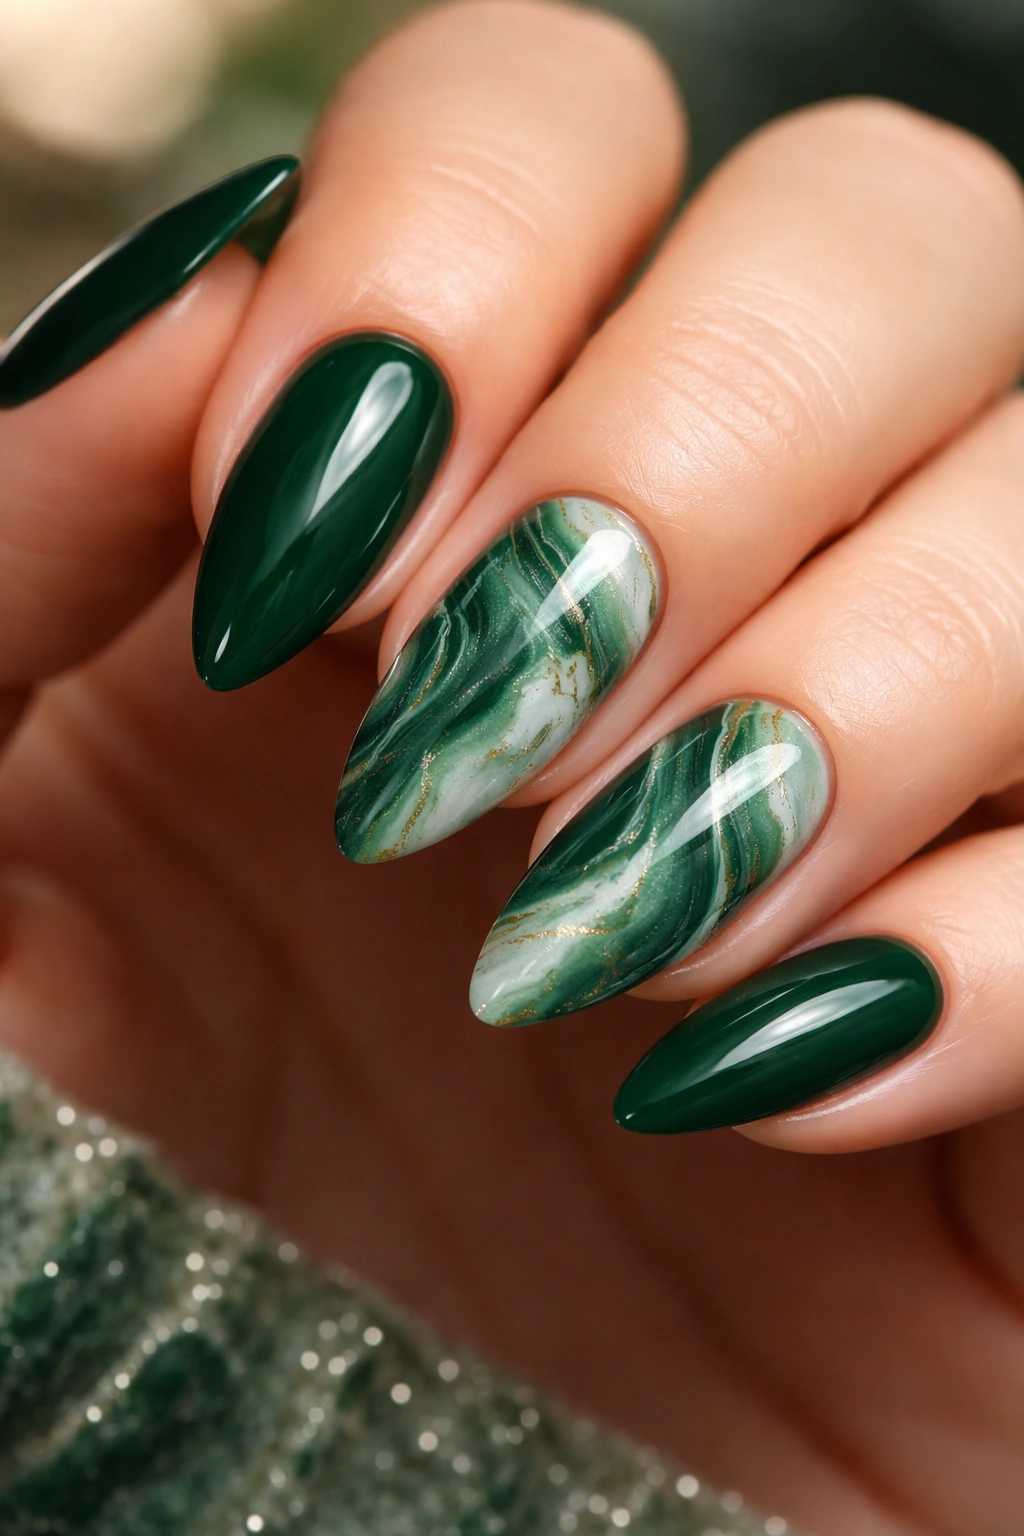
Marble nails work because the green never sits alone. It gets broken up by white, moss, smoke, or a little black veining, and that gives the manicure a stone-like depth you can’t get from a flat color. On almond nails, the soft shape helps the swirls look fluid instead of busy.
The best emerald marble designs keep the veining thin. If the lines are too chunky, the nail turns muddy fast. A fine liner brush and a light hand go a long way here, especially if the base is still a little wet when you pull the color through. That soft drag creates the vein effect without making the design look overworked.
I like marble on one or two accent nails with solid emerald everywhere else. It keeps the set from feeling crowded. If you want the marble to read more polished and less artsy, stick to white and deep green only. Add too many colors and the whole thing starts to lose focus.
Marble is one of those styles that looks expensive because it has movement. The eye keeps wandering across it.
7. Cat-Eye Emerald Almond Nails
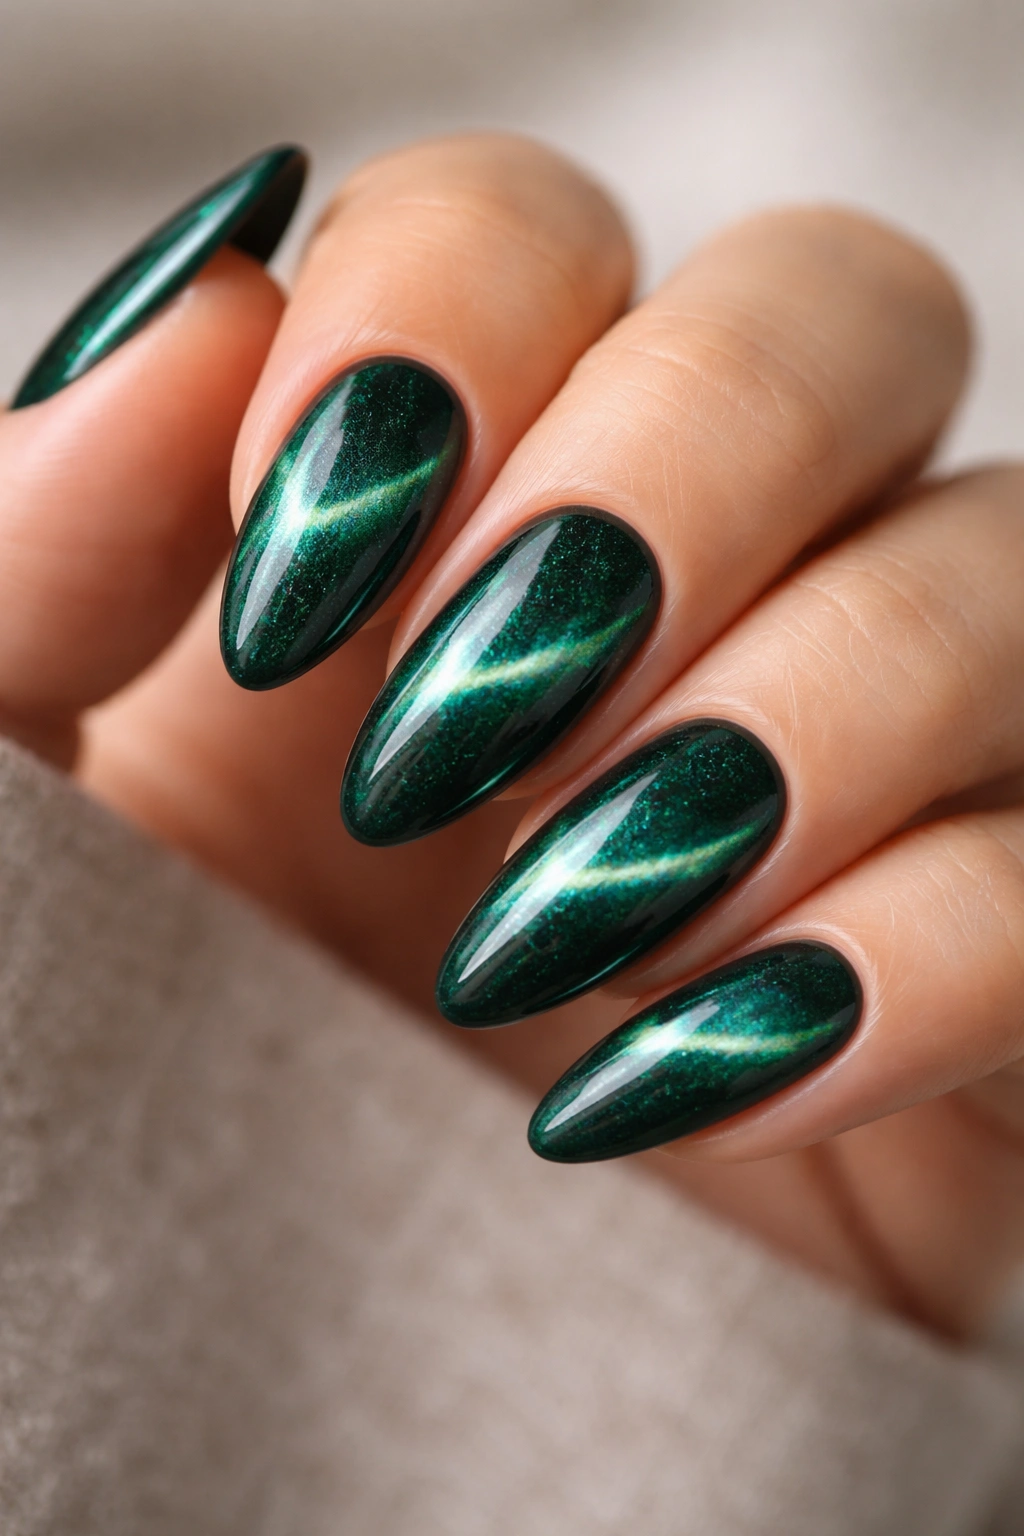
Why does cat-eye green look different from flat shimmer? Because the magnetic pigment gives the polish a line of light that moves when your hand moves. That shifting band makes emerald feel deeper, almost like a gemstone under glass.
The polish itself does most of the work, but placement matters. Hold the magnet close—usually a few millimeters above the nail—before the polish cures, and shape the shimmer where you want it to sit. A centered line gives a classic jewel look. A diagonal line makes the nail look slimmer. A curve near the cuticle softens the effect.
How to Place the Magnet
- Center the shimmer for a straight, gemstone-style glow
- Pull it diagonally if you want the nail to look longer
- Park it near the cuticle for a softer, halo-like effect
- Work one nail at a time, because the pigment shifts fast
Use a deep emerald base if you want the shimmer to look rich instead of flashy. Light green cat-eye can be pretty, but it reads much less refined on almond nails. Darker wins here, every time.
8. Tortoiseshell and Emerald Mix
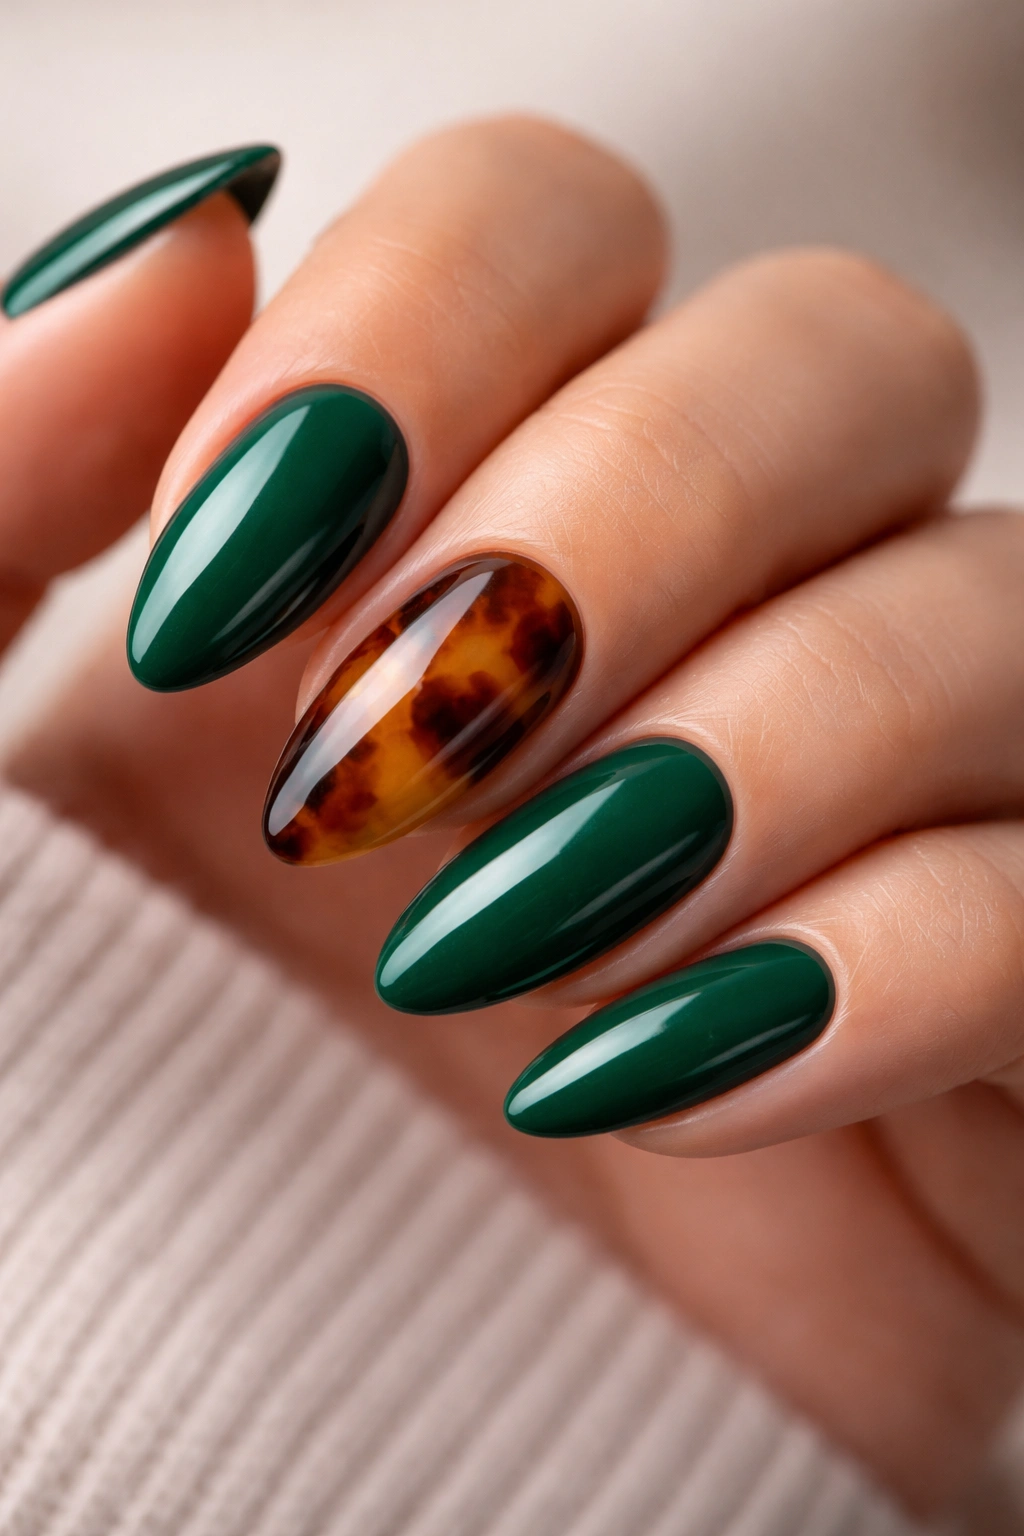
A tortoiseshell accent next to emerald can look like an old leather bag or a polished vintage clasp. That’s a compliment. The warmth of amber and caramel brings the green down a notch, which keeps the manicure from feeling too cool or too formal.
This combo works best when the tortoiseshell stays on one or two nails only. The rest can be solid emerald, or emerald with tiny gold details. The contrast is what gives it personality. If every nail tries to be tortoiseshell, the set gets heavy fast and the shape loses some of its clean line.
The trick is to keep the tortie layer semi-sheer. Start with a warm nude or honey base, then float in brown and black patches with a thin brush so the layers blur together a bit. The result should look mottled, not painted in blocks.
- Pair tortoiseshell with deep emerald, not bright green
- Use amber and chocolate tones rather than bright orange
- Keep the tortie to accent nails for balance
- Add a thin glossy top coat so the surface stays glassy
This is a good pick if you like color, but you still want the manicure to feel grown-up.
9. Micro French Emerald Tips
Micro French tips are the easiest way to make emerald feel crisp. The line is so thin that the nail still reads clean and airy, but the color gives it enough personality to avoid looking plain. On almond nails, that little edge of green can be enough.
A 1 to 2 mm tip is the sweet spot. Wider than that, and the tip starts to take over the nail. Narrower than that, and you lose the contrast. The whole idea is precision. A steady hand helps, though a fine striping brush can do most of the work if the polish isn’t too thick.
This look is especially good on shorter almond shapes. It keeps the nail looking neat without sacrificing the lengthening effect. A sheer neutral base works best, though a milky pink base can soften the result if you want something less stark.
I’d wear this when I want green nails that still behave. It’s office-safe, but not boring. That’s a rare combination.
10. Emerald Ombré Almond Nails
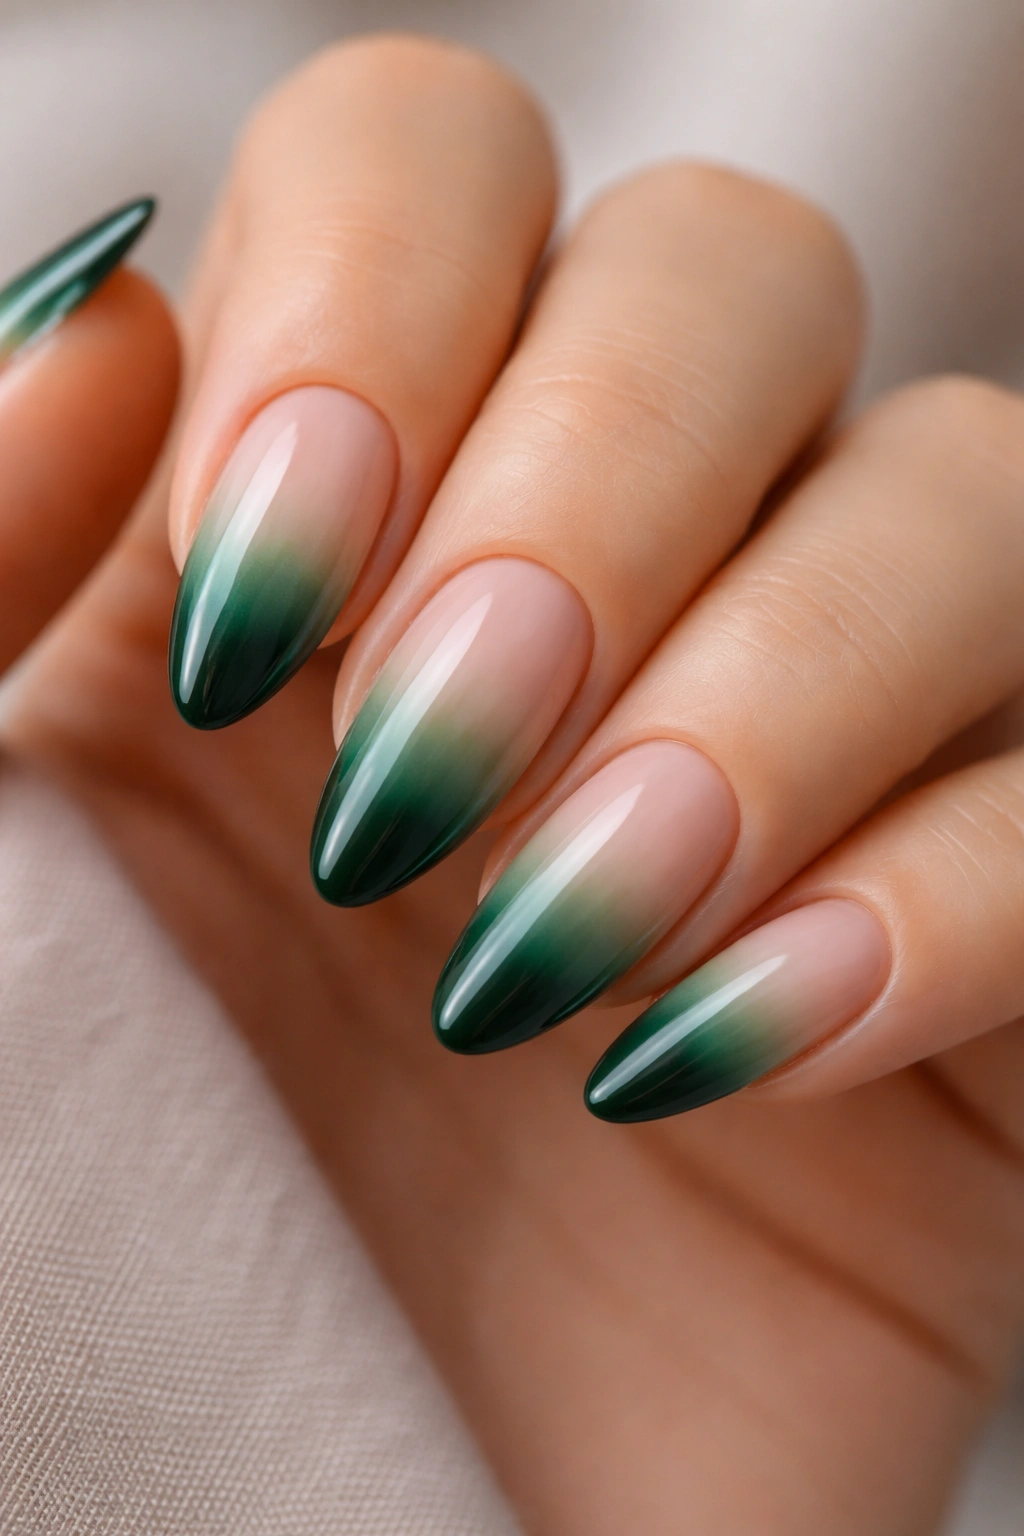
A nude-to-emerald fade looks more polished than a hard color block. The transition gives the green room to build, which keeps the manicure from feeling too dark at the base. Almond nails are a good shape for ombré because the taper helps the fade look intentional.
Start with a sheer pink, beige, or milky nude near the cuticle, then build the emerald toward the tip. If you’re using a sponge, tap in the color in light layers instead of one heavy pass. That keeps the blend soft instead of blotchy. Airbrush gives a smoother result, but careful sponging can still look clean if you work patiently.
The best ombré line usually sits in the middle third of the nail. Too low, and the nail feels busy at the base. Too high, and the green doesn’t have enough visual space to show off. You want a fade, not a stripe.
This design is nice when you want something softer than full coverage but richer than a French tip. It sits in the middle, which is often where the prettiest ideas live.
11. Botanical Line Art on Emerald Nails
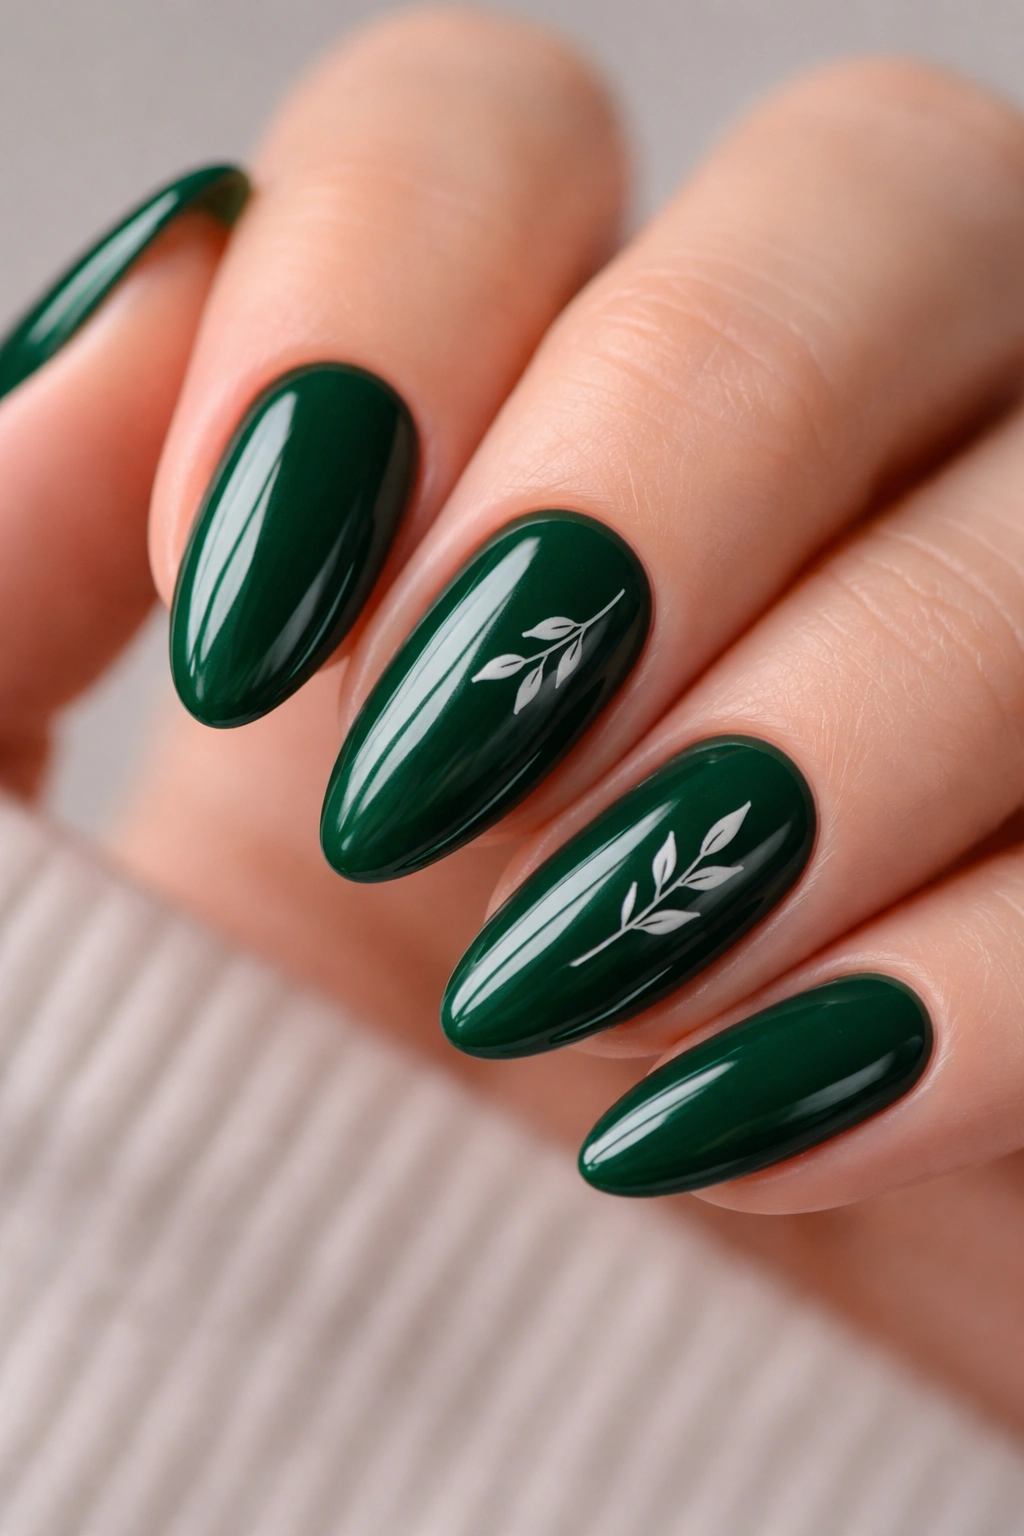
Why do tiny leaves and vines look right on emerald? Because the base color already gives the manicure a botanical feel. Add a few thin white or gold lines, and you get contrast without fighting the shade.
This style works best when the art stays minimal. One leaf stem on the ring finger, a small vine on the middle finger, maybe a single branch curling along the side of the nail. That’s enough. If the lines get too thick or too many, the design stops feeling delicate and starts feeling crowded.
Where the Leaves Should Sit
- Along one sidewall to keep the almond shape visible
- Near the cuticle if you want the art to feel lighter
- On one or two accent nails only, so the set stays clean
- With a thin liner brush and a tiny dotting tool for the leaf joints
Gold line art reads warmer and dressier. White looks fresher and a little sharper. I tend to prefer white on very dark emerald and gold on softer, slightly muted greens.
The whole point is restraint. You want a small trace of nature, not a full mural.
12. Rhinestone Cuticle Accents
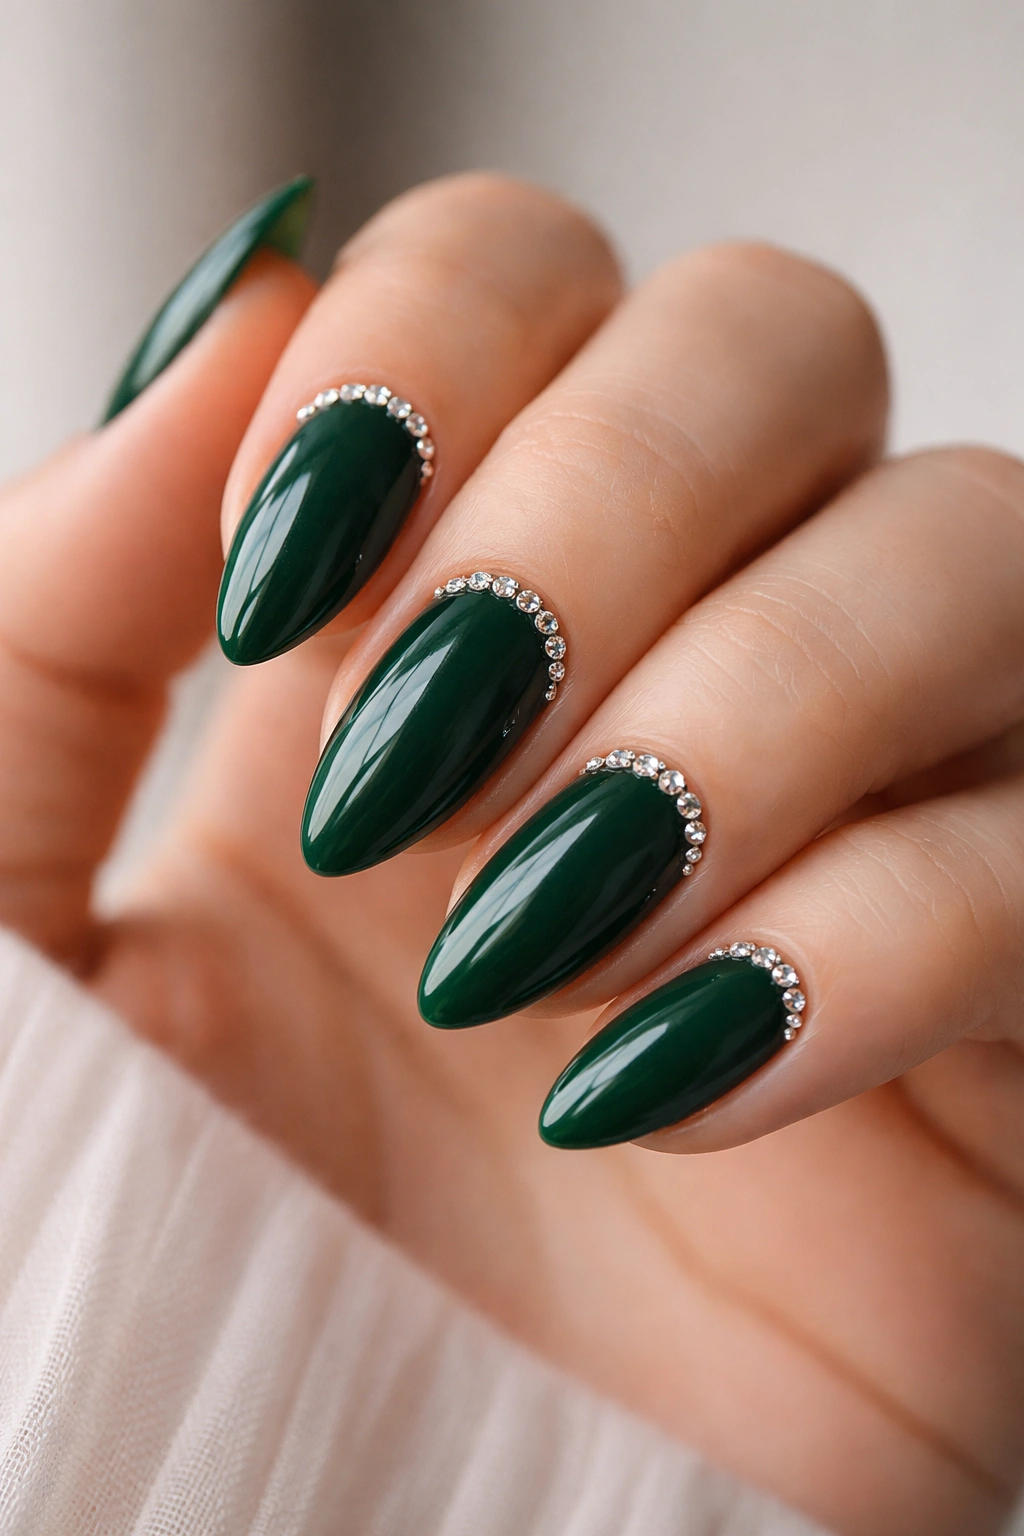
A few crystals at the cuticle go farther than a whole bed of bling. On emerald almond nails, tiny rhinestones can act like jewelry without making the manicure look heavy. That matters when the base color already has so much presence.
I’d keep the stones small—around 1.5 to 2 mm—and place them in a neat curve or tiny cluster near the base of the nail. One stone on each accent finger is enough if you want a softer look. If you want more sparkle, use three stones in a tapered line that follows the almond shape.
Flat-back crystals set in gel tend to hold better than anything glued on top. If the stones sit too high, they catch on fabric and lift faster. Seal the edges carefully, but don’t drown them in top coat or the facets go dull.
- Use clear stones for a clean finish
- Try emerald-toned stones if you want tone-on-tone sparkle
- Keep one larger crystal only for accent nails
- Leave at least one plain nail in the set so the sparkle has space
This is the manicure version of a good pair of earrings: small, precise, and noticeable in the right way.
13. Half-Moon Negative Space Nails
Leaving part of the nail bare is what makes emerald look richer, not emptier. The half-moon shape near the cuticle follows the curve of an almond nail so naturally that the design feels built in rather than added on.
This look can go two ways. You can leave the moon bare and paint the rest emerald, or reverse it and place the green at the base with a nude tip. Both work, though the first version feels a little cleaner. The second has more drama, especially if the line dividing the two colors is razor sharp.
A fine detail brush helps here, because the cuticle line needs to stay neat. Any wobble shows up fast in a design this simple. The upside is that you don’t need much else. A glossy top coat and clean edges are enough.
I like half-moon designs when I want color, but not too much color. The empty space gives the eye a place to rest, and that makes the emerald feel even deeper when you do see it.
14. Emerald Plaid Almond Nails
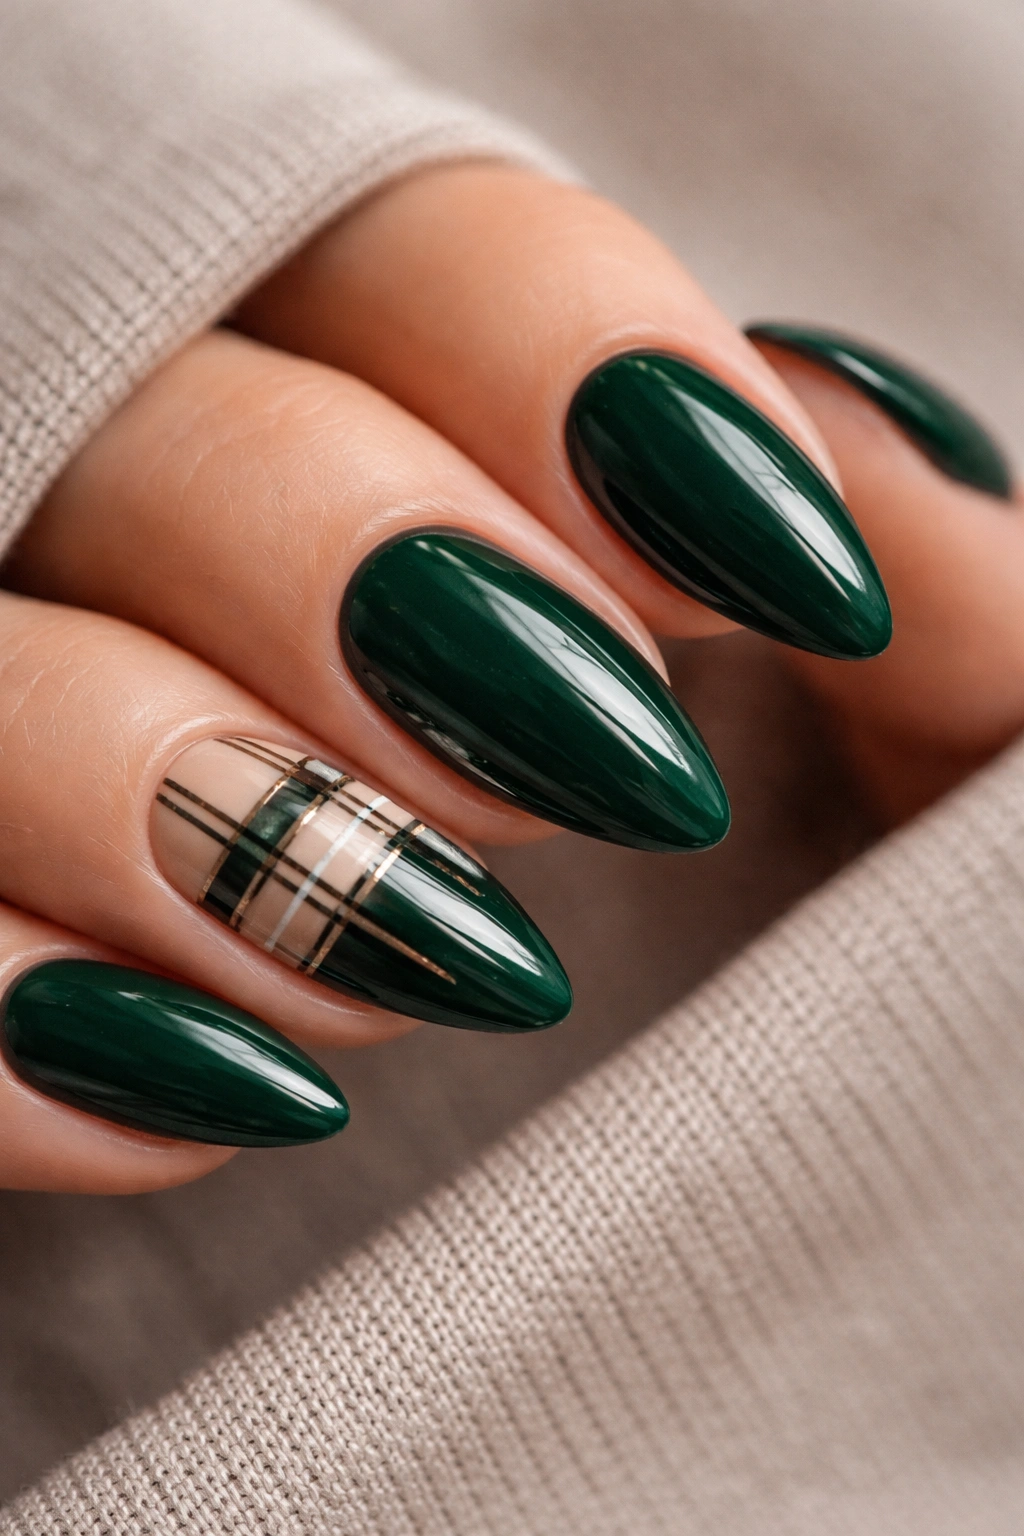
Plaid on emerald nails sounds loud until you shrink it down. Then it turns into a smart little accent that feels closer to tailoring than costume. The trick is to keep the pattern thin and use it sparingly.
This works best on one or two nails, not the whole set. A deep emerald base with black, cream, and a fine line of gold makes the plaid feel rich instead of busy. Thin intersecting lines matter here. If the stripes get too wide, the design loses its crispness and starts to look homemade in the wrong way.
- Keep the plaid to accent nails only
- Use a striping brush for lines under 1 mm
- Pair it with solid emerald nails to hold the set together
- Choose black or navy for definition, then soften with cream or gold
It helps to think of this design as a fabric print, not a pattern challenge. The best version looks like it could have come from the cuff of a tailored coat. The almond shape gives it enough softness that it never feels harsh.
15. Abstract Black and Emerald Swirls
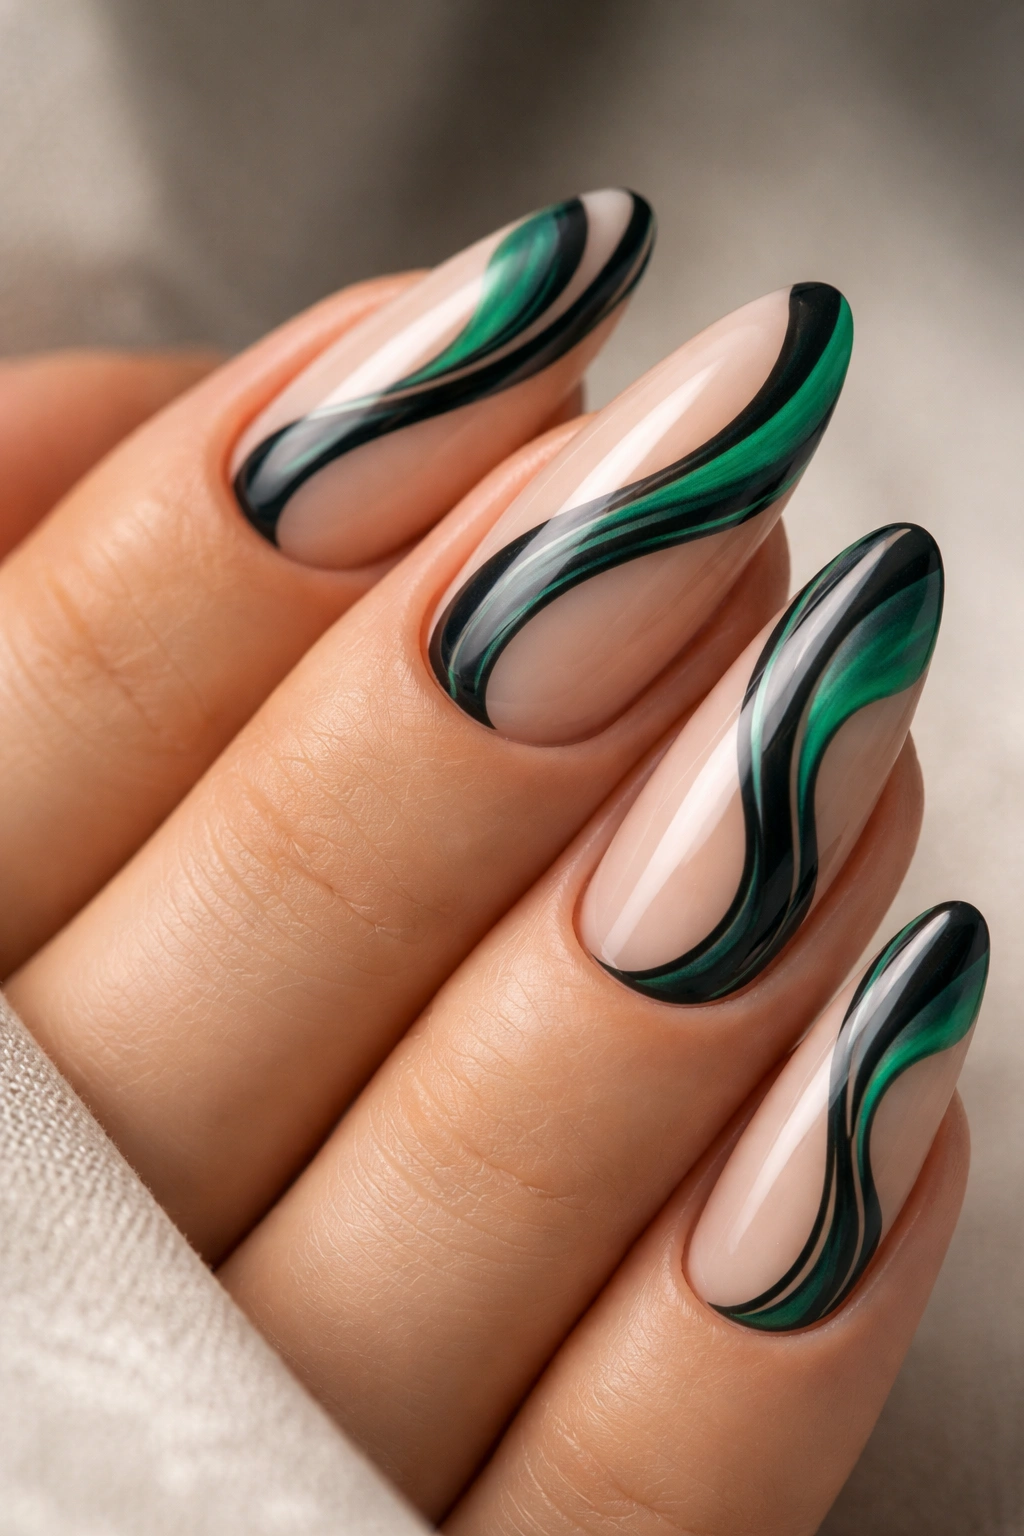
Black swirls are the fastest way to make emerald feel graphic. The combination has a little edge, but it still reads polished if you leave enough negative space. That balance matters, because all-over swirls can turn muddy if the lines are too thick or too many.
Start with a clear or nude base, then layer emerald and black in loose curves. The lines should move, not march. Some nails can have one bold ribbon across the center; others can have two thinner swipes that barely touch the sides. The variety is part of the appeal.
I’d keep this style to two or three nails in a set, with the rest either solid emerald or a sheer neutral. A full hand of swirls can get busy fast, and almond nails already have enough shape to make a small design feel complete. A tiny white line mixed into one swirl can also break up the darkness if the set starts leaning too heavy.
This is the manicure for people who like their green with a little attitude.
16. Emerald Glitter Accent Nails
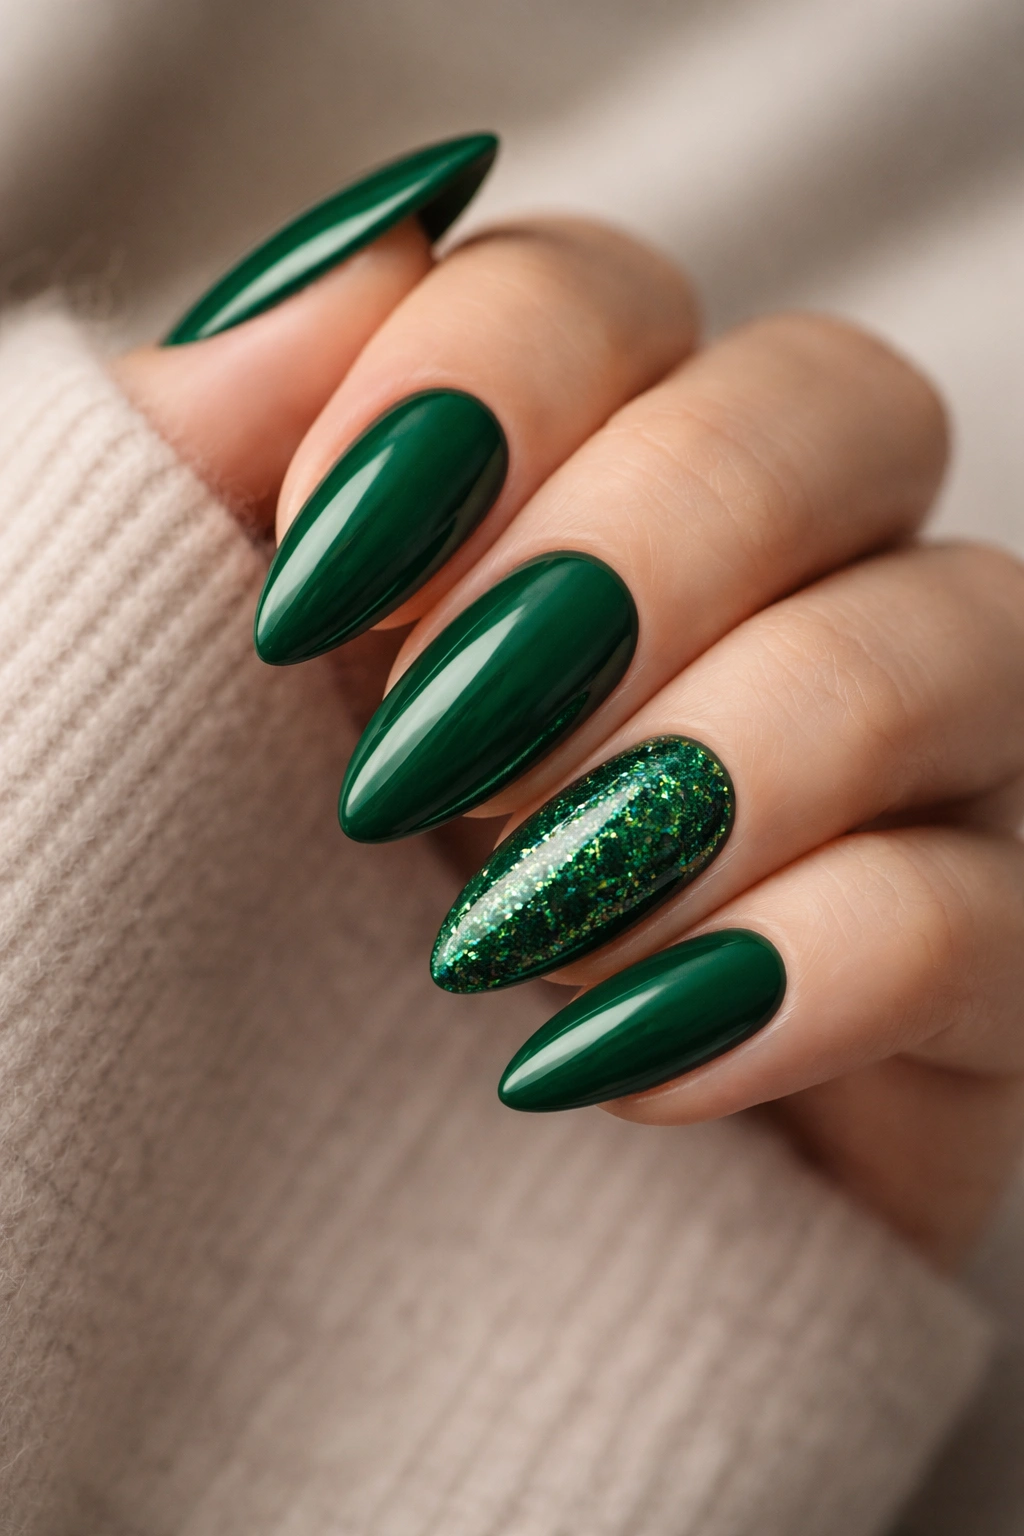
Unlike a full glitter set, one accent nail keeps the shimmer under control. That’s the whole reason this design works. You still get the sparkle, but the emerald stays in charge instead of being buried under shine.
A fine emerald glitter on the ring finger is the classic move, but a denser glitter accent can work if the other nails stay solid and glossy. You can also fade the glitter from the cuticle up, which gives the set some movement without making it feel like party makeup for the hands.
I prefer glitter that matches the base tone closely. Too much contrast, and it starts looking pasted on. A deep green glitter over a deep green base keeps the look unified, while a mix of fine and chunky particles gives more texture. If the nails are long, the glitter can sit across the full nail. On shorter almond shapes, a half-glitter accent often looks cleaner.
One sparkly nail is enough. Really. The rest of the manicure can stay calm and let that one finger do its job.
17. Jelly Emerald Almond Nails
Jelly green looks like stained glass. That translucent depth is what makes it so good on almond nails, because the curved shape and see-through color both feel soft at the same time. The result is playful, but not childish.
The key is layering. A jelly polish usually needs two to three thin coats to get the right color payoff while still letting light pass through. If you pile it on too thick, it loses the whole effect and just turns opaque and heavy. A glossy top coat deepens the glassy look even more.
This style is especially nice if you want emerald without the intensity of a cream polish. It still reads green, but with more air in it. That makes it useful for shorter almond nails too, where a solid dark shade can sometimes feel dense. You can wear it plain or add a tiny gold detail near the cuticle if you want a little more interest.
The finish is light, squishy, and almost candy-like. Not in a sugary way. More like polished glass.
18. Reptile-Texture Emerald Nails

Want something a little bolder than shimmer? Reptile texture gives emerald a sharp, almost leather-like edge. Snakeskin stamping, hand-painted scale hints, or embossed gel all push the manicure into a more dramatic place.
The best version is controlled. One or two accent nails are usually enough, especially if the pattern is detailed. A deep emerald base with black or olive scale marks can look striking, but if the scales are too large, the nail starts to feel crowded. Almond shape helps here because the curve softens the harder pattern.
How to Keep It Tasteful
- Keep the reptile print to one or two nails
- Use a dark base so the texture reads as design, not costume
- Choose a gloss finish if you want a sleek look
- Try matte if you want something that feels more like embossed fabric
The nice thing about reptile texture is that it works with both subtle and loud wardrobes. A tiny print on one nail can be enough. A full set with restrained scale detail can look much sharper than people expect.
19. Emerald and Silver Chrome Details
Silver trim sharpens emerald in a way gold never does. Gold warms the color; silver cools it down and makes the manicure feel cleaner, almost cleaner than it has any right to be. If your style leans crisp, this is a strong choice.
The silver can show up as a thin chrome French edge, a narrow side stripe, or a small half-moon at the base of the nail. You do not need much. In fact, too much silver flattens the contrast and steals the job from the green. A single metallic line is usually enough to make the whole set look planned.
This design is especially good when the emerald base is dark and saturated. A pale green with silver can work, but it loses some of the jewel-box feel. Darker green plus silver gives that hard-edged shine that feels sleek on almond nails.
- Use silver chrome on one or two accent nails
- Keep the line thin and deliberate
- Pair it with a glossy emerald base for the cleanest effect
- Let the rest of the nails stay solid so the contrast lands
It’s a cool look. Sharp, not cold.
20. Celestial Emerald Almond Nails
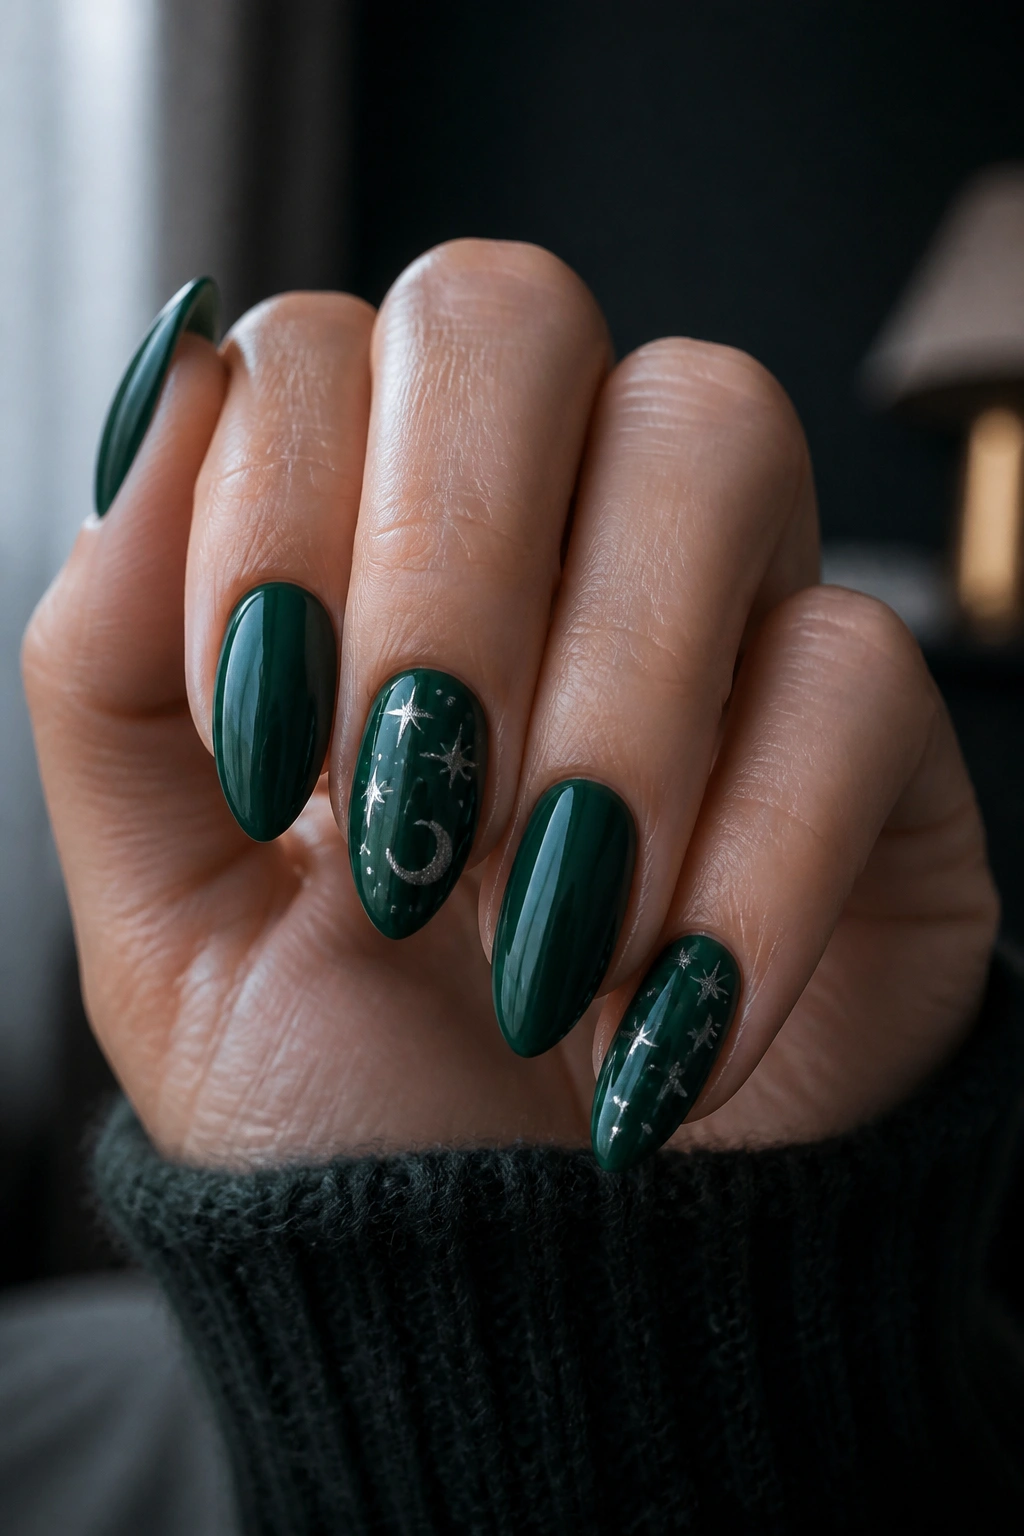
Celestial details keep emerald from feeling too serious. Tiny stars, moons, and dot clusters break up the dark base without crowding it, and they work especially well on almond nails because the shape already feels a little elegant.
I like this look with one or two accent nails carrying the most detail, while the rest stay solid emerald. If you want the stars to feel delicate, keep them tiny—pinhead size or smaller. A few silver dots, one crescent moon, and a thin constellation line can do more than a full sky full of symbols ever could.
A matte-and-gloss mix can be nice here. Matte emerald on most nails with a glossy celestial accent gives the set texture without adding extra colors. Or you can keep everything glossy and let the silver or white art stand out against the deep green.
The main thing is not to overfill the nail. Space matters. A little open room makes the stars feel brighter and the emerald feel deeper. If you want one look that still feels special without being fussy, this is the one I’d pick.
