

Almond nails and tiny stars belong together. The tapered sidewalls give celestial nail art room to breathe, and the soft point at the tip makes even the smallest star feel deliberate instead of fussy.
I like this shape for celestial sets because it gives you two lanes to work with: the middle of the nail for a moon, comet, or glitter wash, and the edges for dots, constellations, or a skinny French line. Shorter almonds can carry the look too, but the art needs to stay lean. Once the details get chunky, the nail starts to look crowded.
The best star almond nail ideas usually do one of two things. They either lean delicate — sheer nude, white stars, a few silver dots — or they go all in with navy, chrome, plum, and a little sparkle that looks like a night sky. Both paths work. The mistake is trying to cram every celestial motif onto one hand, because moons, stars, glitter, and clouds can start arguing with one another.
A good set should read clean from across a room and still look interesting up close. That’s the sweet spot. Start with the softer looks, then work toward the bolder ones when you want more drama.
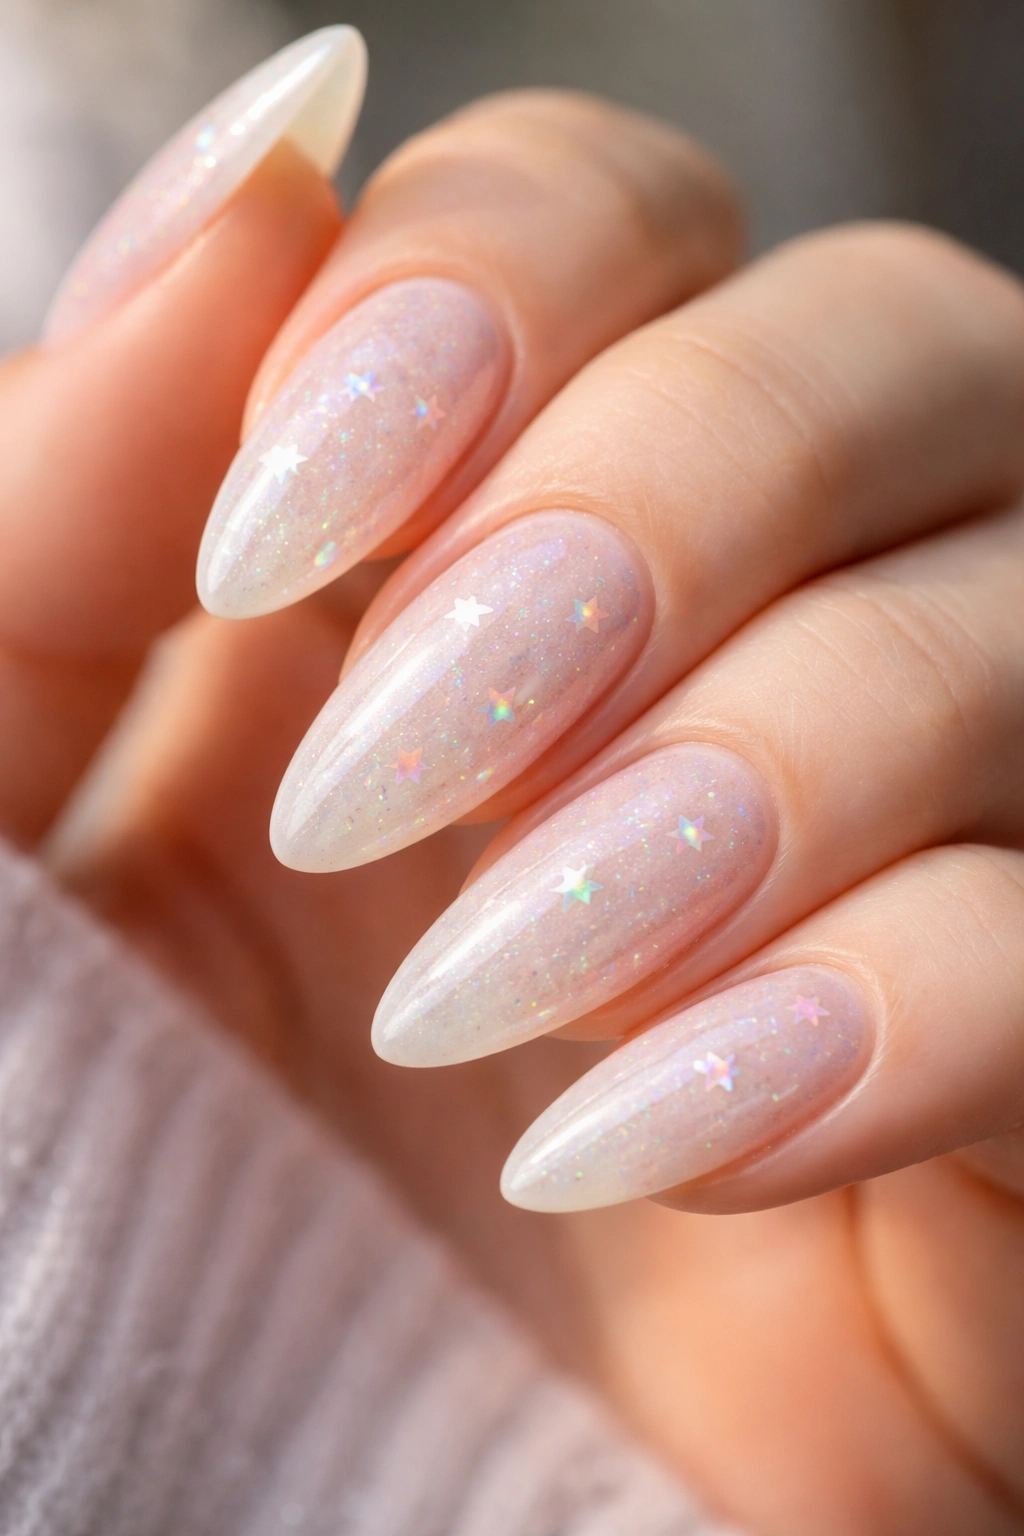
1. Sheer Nude Almond Nails With Tiny White Stars
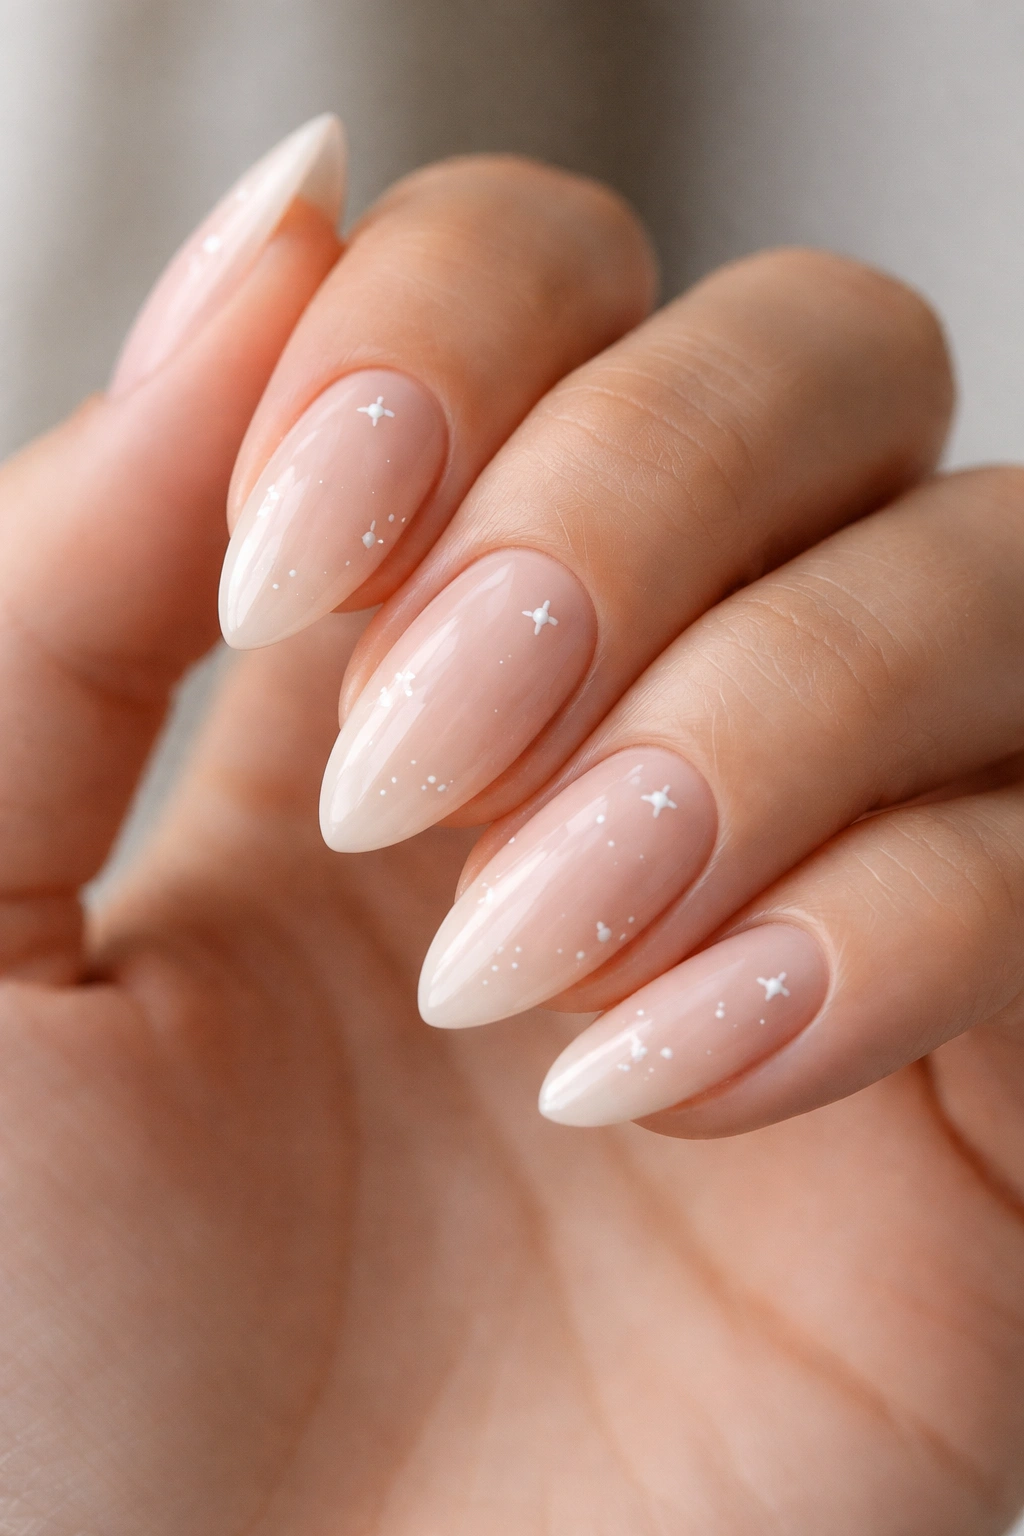
The smallest celestial sets are often the ones people notice first. A sheer nude or milky pink base gives the almond shape a clean runway, and a few micro white stars keep the look light instead of crowded.
Why the tiny-star approach works on almond nails
Almond nails already have a graceful line, so they don’t need heavy art to feel finished. Tiny stars work here because they echo the shape without fighting it. You get a polished set that still has personality.
I’d keep the stars sparse and uneven on purpose. Put one near the cuticle on the middle finger, a pair of tiny ones near the free edge on the ring finger, and maybe a single dot cluster on the thumb. That little bit of randomness makes the design feel hand-painted, not stamped out.
Best detail to ask for: a fine liner brush and a soft white gel that sits crisp against the nude base. If the stars are thicker than a sesame seed, the design starts to lose that airy feel.
- Sheer pink, beige, or milky nude base
- Tiny white or soft ivory stars
- One or two micro dots per nail
- Glossy topcoat for a clean finish
Tip: keep the stars small enough that you can still see the almond curve through them.
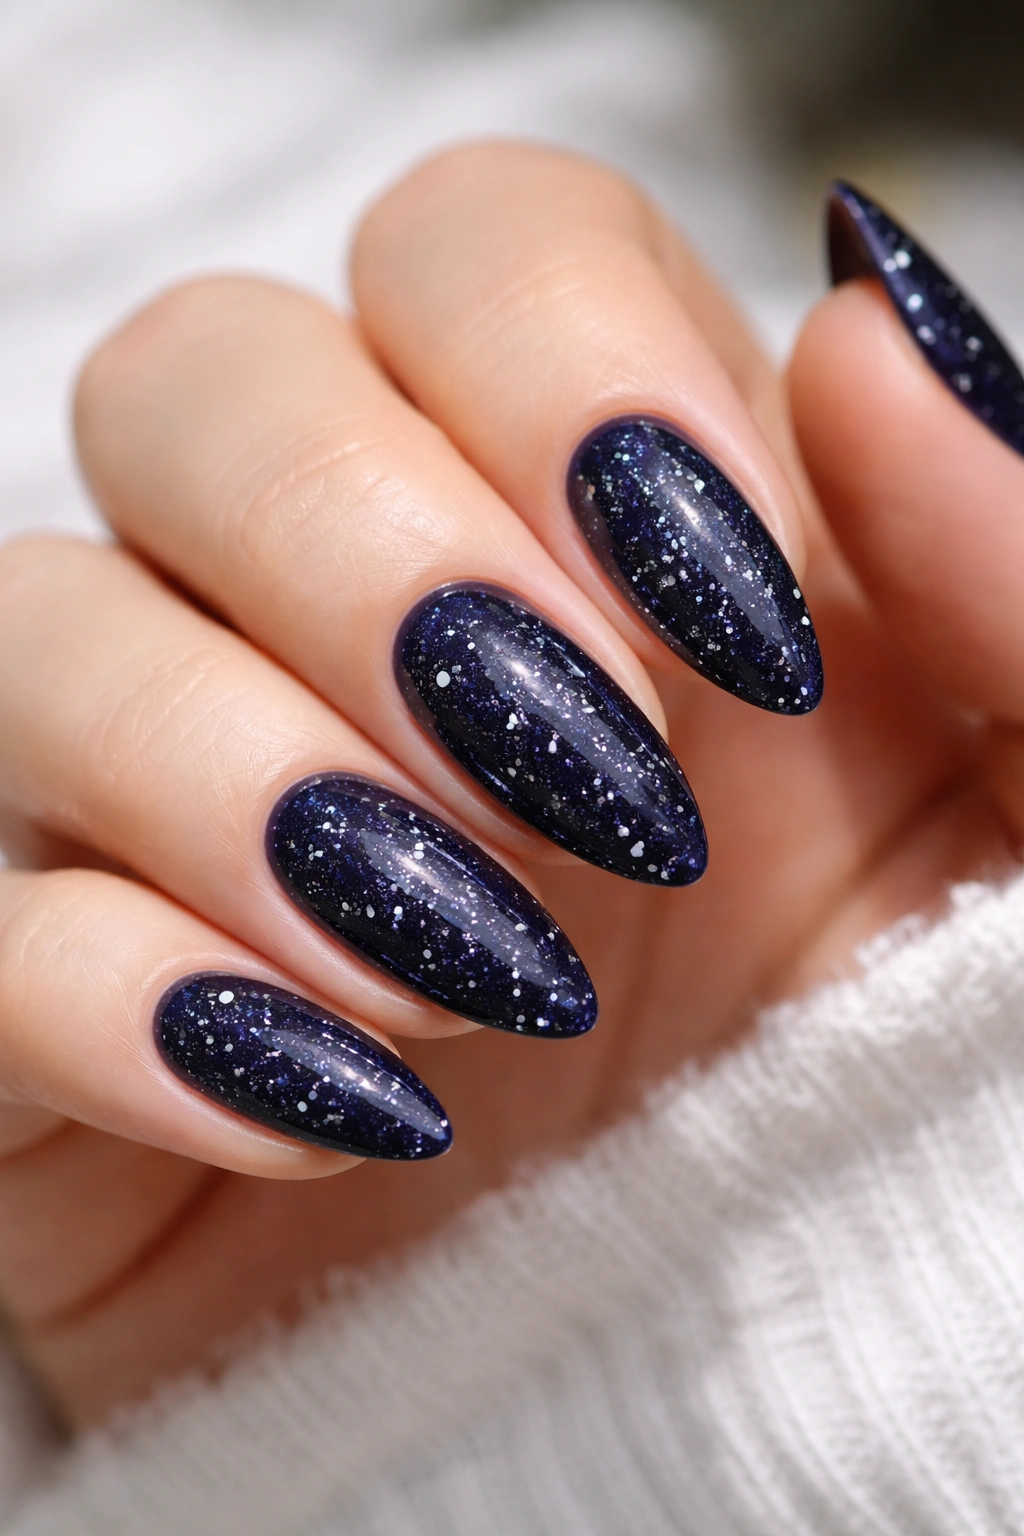
2. Midnight Navy Almond Nails With Constellation Lines
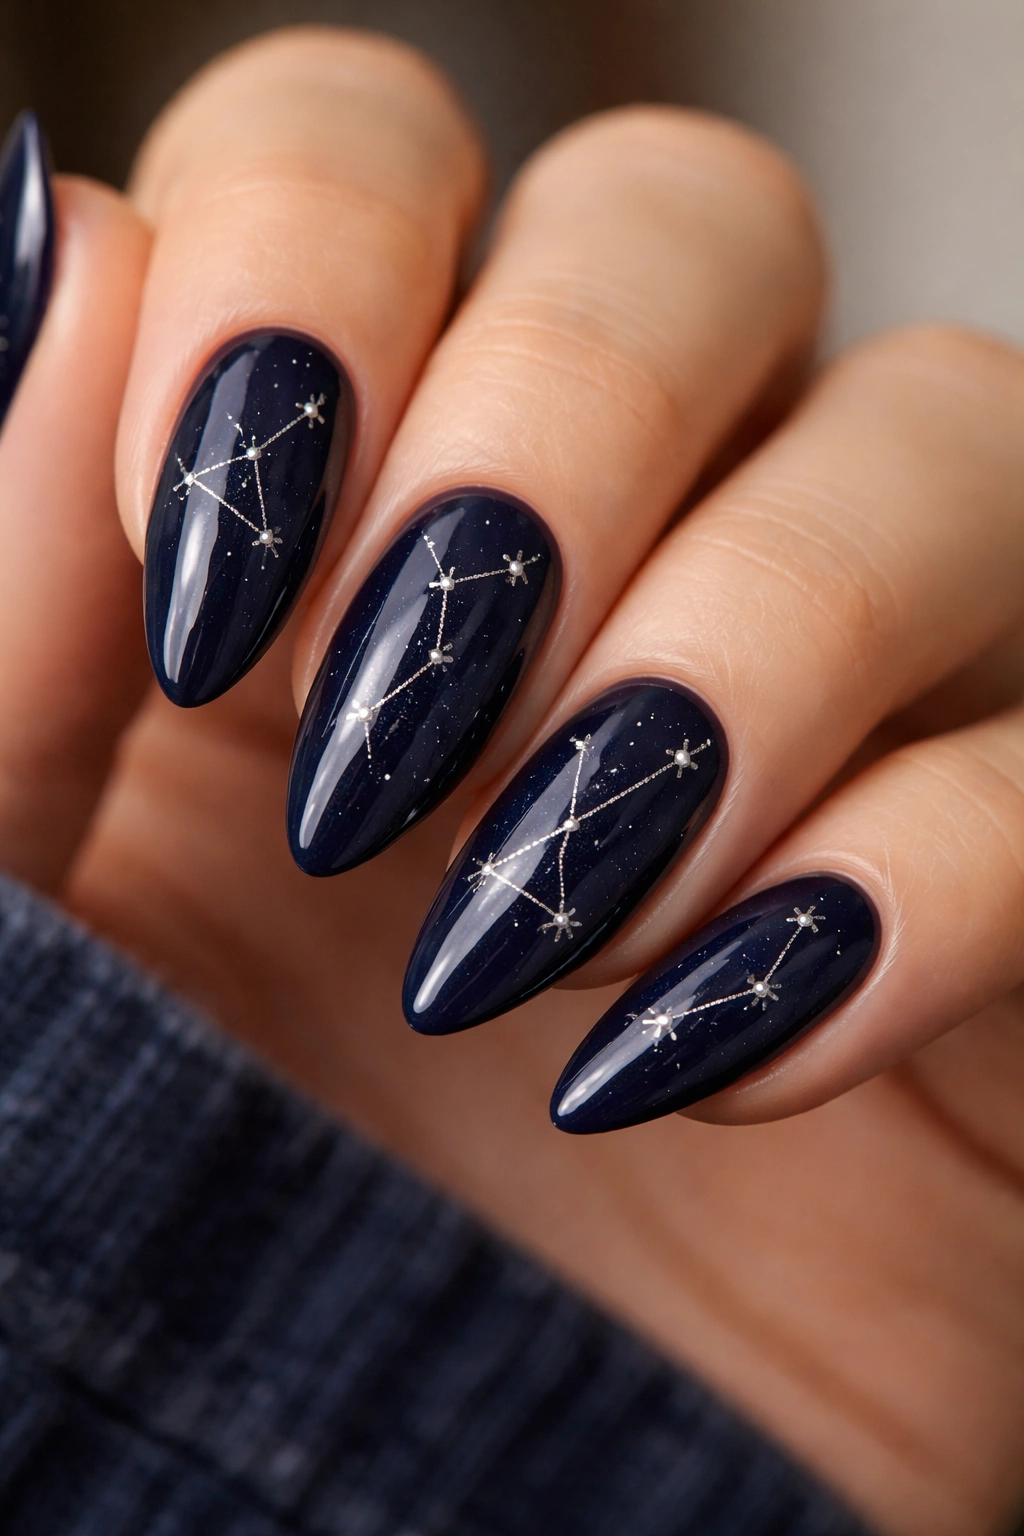
If you want star almond nails that look sharp from across a room, navy is the easiest place to start. It has the depth of black, but it feels a little softer and a lot more wearable when you add silver constellations.
The trick is restraint. Use a deep navy cream or jelly base, then connect three to five tiny dots with thin silver lines. Don’t map out an entire sky on every nail. One full constellation nail, two accent nails with partial lines, and the rest kept plain is enough. More than that and the hand starts looking busy.
A glossy topcoat makes the silver lines pop, but the base still needs to stay smooth. If the polish is streaky, the whole idea falls apart. I’d also keep the line work narrow — a 5 mm liner brush is easier to control than a thicker art brush when you’re drawing those delicate points.
The color combination is the point here. Navy gives you the depth, silver gives you the crisp edge, and the almond shape keeps everything elongated instead of heavy.
3. Milky French Tips With Silver Starbursts
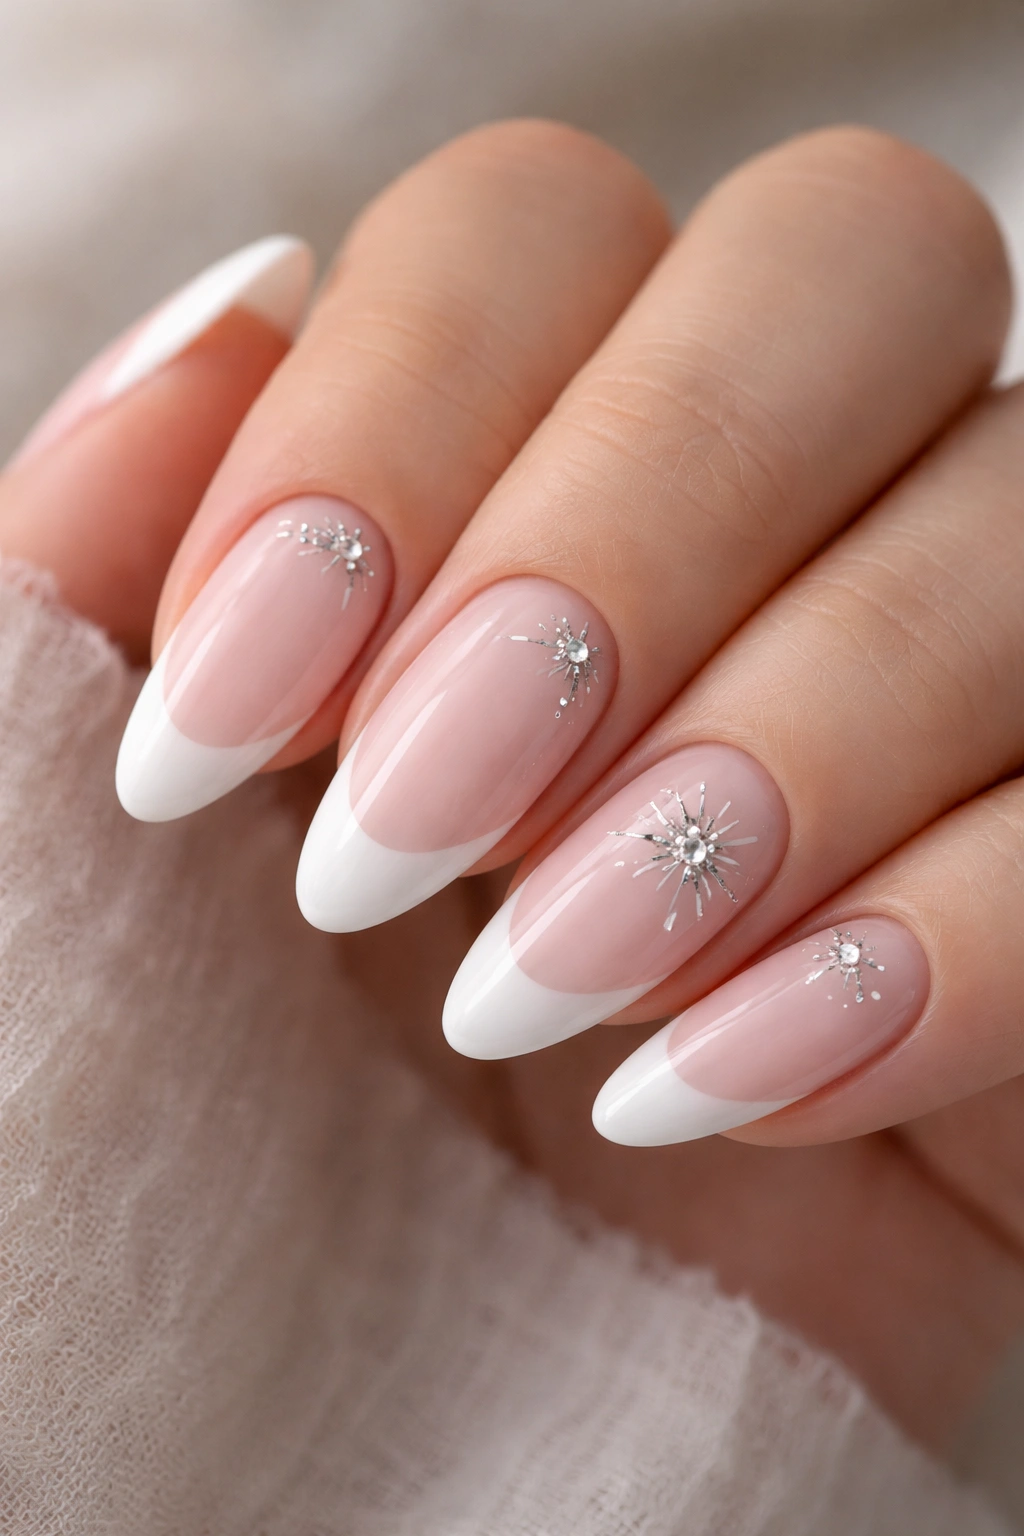
What happens when a French manicure gets a little stargazer energy? You end up with one of the easiest celestial looks to wear, especially on almond nails. The French tip gives structure. The stars give it some life.
A milky pink or sheer blush base keeps the whole set soft, while the white tip can stay thin and slightly curved. Then add silver starbursts near the sidewall or just above the smile line. Not every nail needs the same placement. A full starburst on one ring finger and tiny spark marks on two others is enough.
How to wear it
If your nails are medium length, keep the French band narrow — around 2 to 3 millimeters — so the almond shape still shows. On longer almonds, you can stretch the tip a little more, but don’t let it swallow the nail bed. That’s the part that makes the design look elegant instead of blunt.
This set works well if you want celestial nails that still feel clean. The French line keeps it neat. The stars keep it from feeling ordinary.
4. Chrome Almond Nails With Crescent Moons
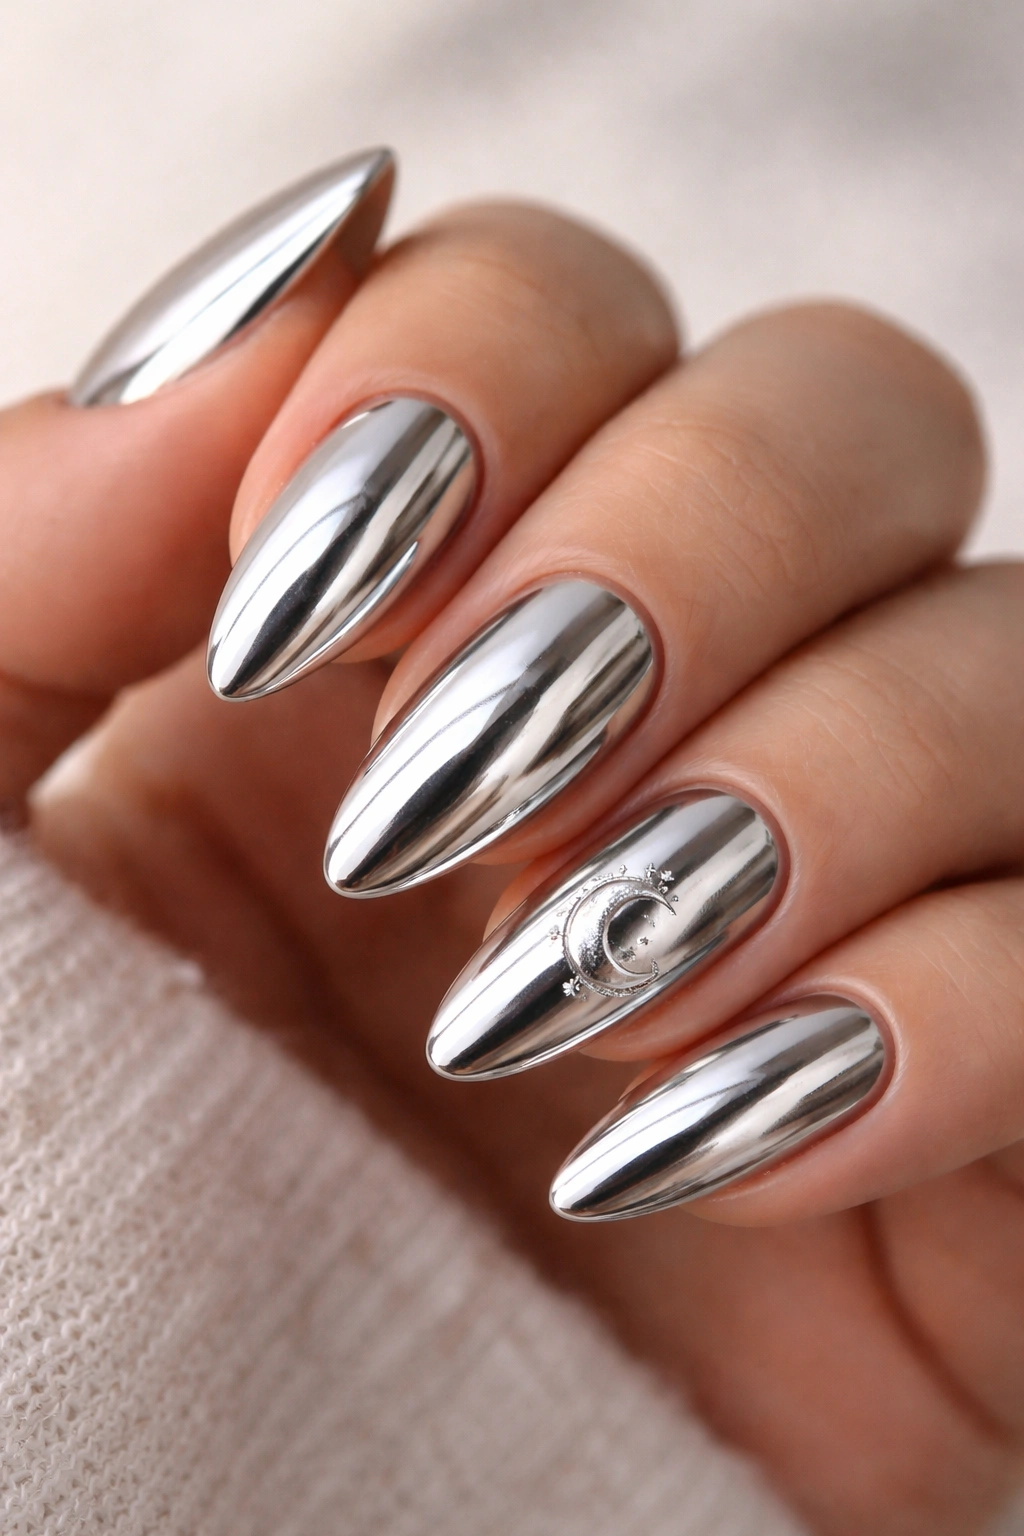
I keep coming back to chrome when a celestial set needs edge. A mirror finish on almond nails makes crescent moons look sharper, and the shine changes the whole mood from sweet to sleek.
Silver chrome is the obvious choice, but pearl chrome and pale gold chrome both work if you want something softer. Start with a neutral base — sheer beige, gray, or blush — then rub chrome powder over a cured no-wipe topcoat. Add crescent moons on one or two accent nails only. If every nail gets the same symbol, the set starts to feel crowded fast.
- Use chrome over a smooth, fully cured surface
- Place crescents near the center or lower third of the nail
- Keep the other nails plain or add tiny dot clusters
- Seal with a thin topcoat so the mirror effect stays even
Chrome and crescent moons work because they read like jewelry. The almond shape already has that long, tapered line, so the moon looks like it belongs there. Too much glitter on top, though, and the set loses that clean edge. Pick one bright finish and stick with it.
5. Plum Galaxy Almond Nails With Glitter Smoke
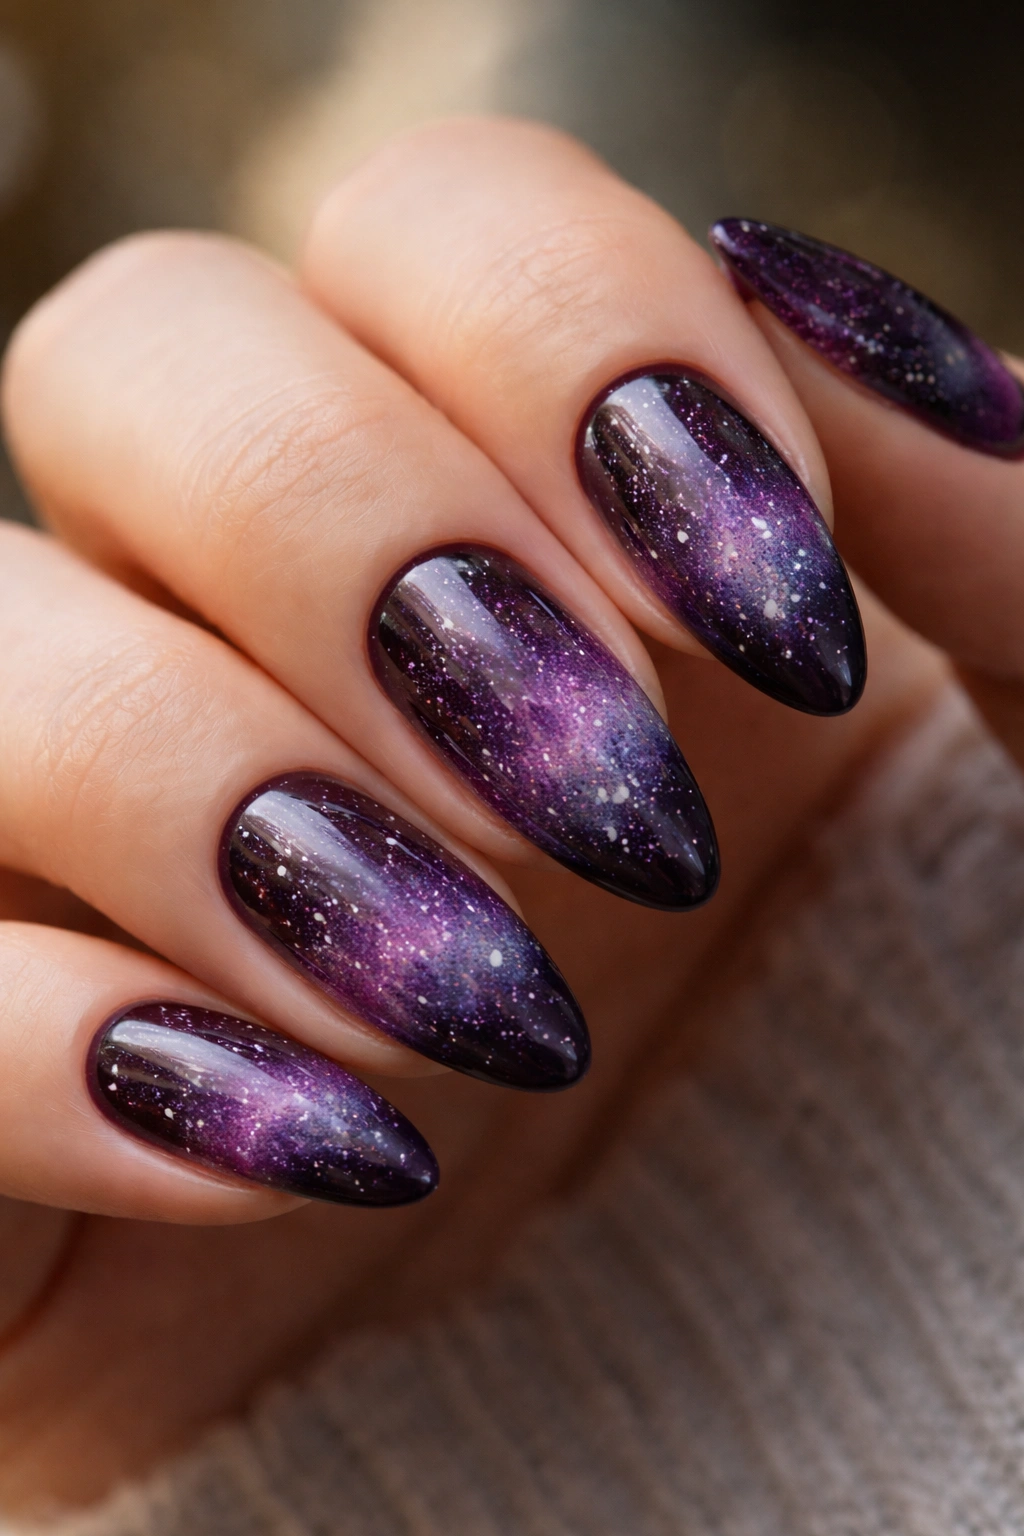
If the softer looks are constellations, this one is the sky itself. Plum galaxy almond nails lean deeper, richer, and a little moodier, which is exactly why they work so well when you want celestial nails with more presence.
A good version starts with a plum or eggplant base, then layers in black or deep indigo near the tips. The transition should feel smoky, not muddy. I like a thin sponge blend for this — two light passes, not one heavy swipe — because it keeps the color from turning flat. Then add micro glitter in violet, silver, or blue and let it settle in uneven patches.
The stars here should be tiny. Think pinpricks, not decals. A few hand-painted white dots near the free edge are enough to suggest a night sky without turning the design into a cartoon. A glossy topcoat helps the shimmer move when the hand turns, which matters a lot on almond nails because the shape already guides the eye along the length.
This is the set for someone who likes nail art that feels a little dramatic. It looks especially good on medium-to-long almonds, where the gradient has room to spread out.
6. Negative-Space Almond Nails With Cuticle Stars

Unlike full-coverage sets, this one uses bare space as part of the design. That’s why it works so well on almond nails. The shape already gives you a clean silhouette, and negative space keeps the look airy instead of packed with polish.
A sheer blush or clear builder base is the right starting point. Then place tiny stars near the cuticle, one or two on each hand, with a thin trail of dots running toward the center of the nail. Leave the middle and tip mostly bare. It sounds minimal, but the empty space is doing a lot of work here.
This style is also forgiving when your nails grow out. A solid-color set can start looking tired after two weeks; negative space keeps its shape longer because the design never relied on full coverage in the first place. That makes it a smart choice if you want celestial nails that stay neat between salon visits.
If you like clean manicures, this is one of the easiest star almond nail ideas to live with. The stars feel intentional, and the bare nail keeps everything fresh.
7. Sunset Ombre Almond Nails With Shooting Stars

Why do sunset ombre star nails work so well on almond tips? Because the shape naturally pulls the eye along the gradient. That long taper gives peach, coral, pink, and lilac room to blend without getting muddy at the center.
Start with a soft nude base, then sponge on a warm-to-cool fade. I’d keep the first layer sheer and add color in thin passes so the blend stays soft. Once the ombre is smooth, add a few silver shooting stars — short diagonal strokes with a tiny tail are enough. One per nail is plenty. If you add too many, the design loses its flow.
How to keep the gradient soft
Use a makeup sponge or a thin ombre brush and tap gently near the blend line. Heavy pressure leaves harsh edges, and that is the last thing this look needs. Let each layer sit for a few seconds before adding the next one so the colors don’t drag into a brown mess.
A glossy topcoat gives the set that glassy finish, but a satin topcoat can work too if you want the color shift to feel softer. Either way, the stars should stay bright enough to break up the gradient.
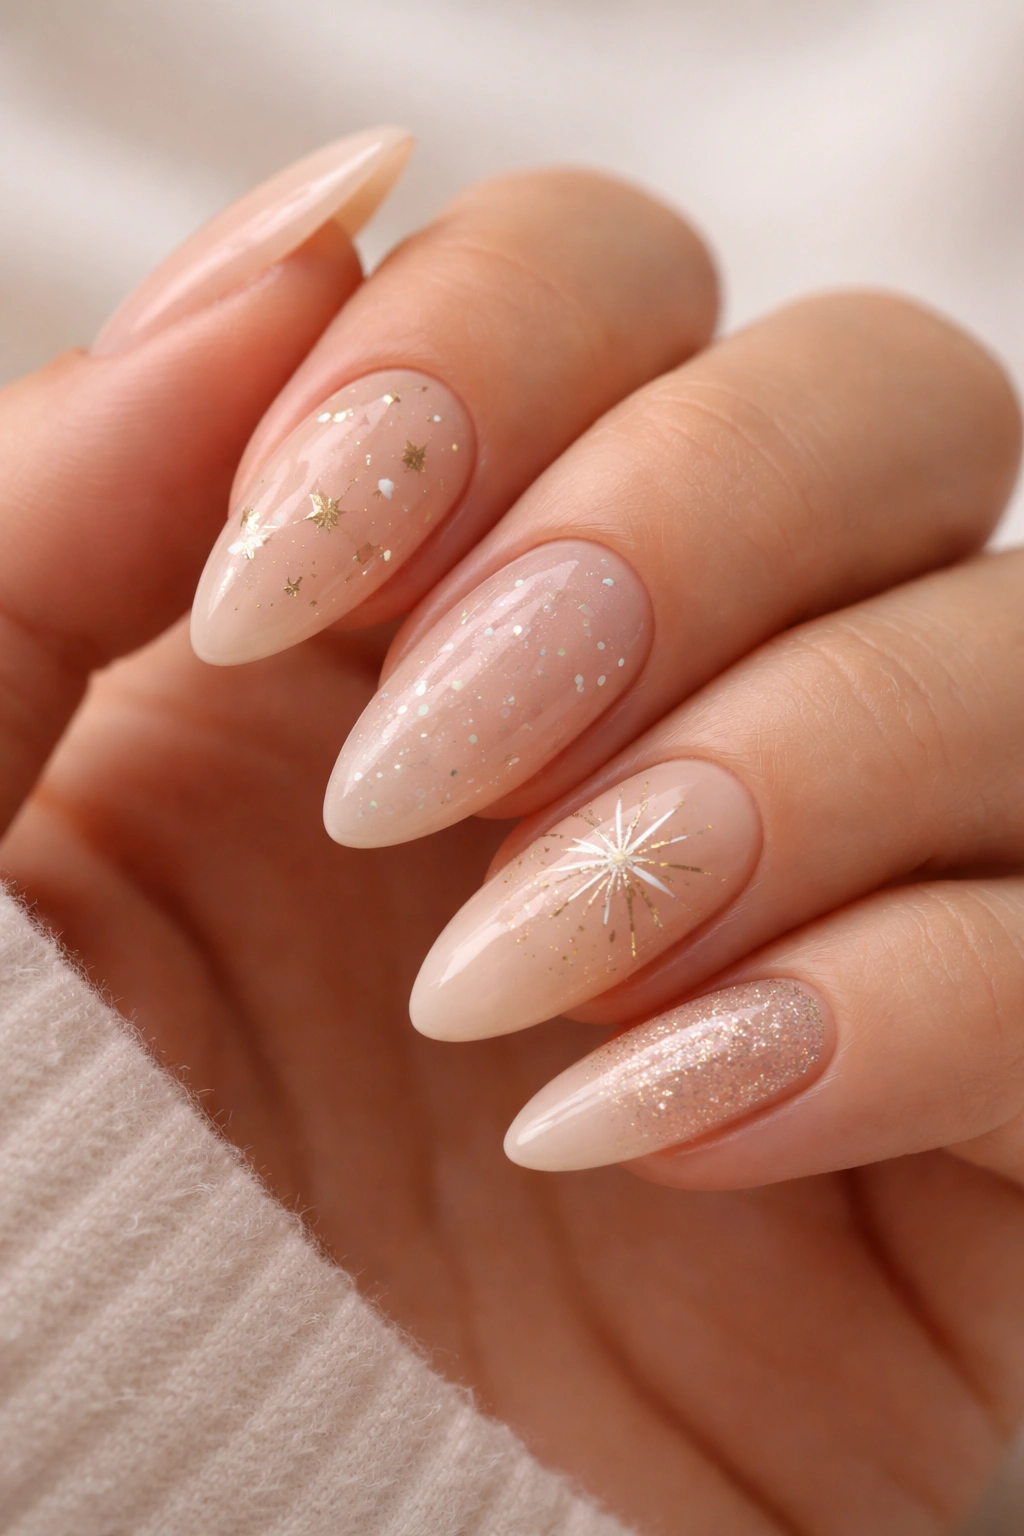
8. Gold Foil Almond Nails With Celestial Confetti
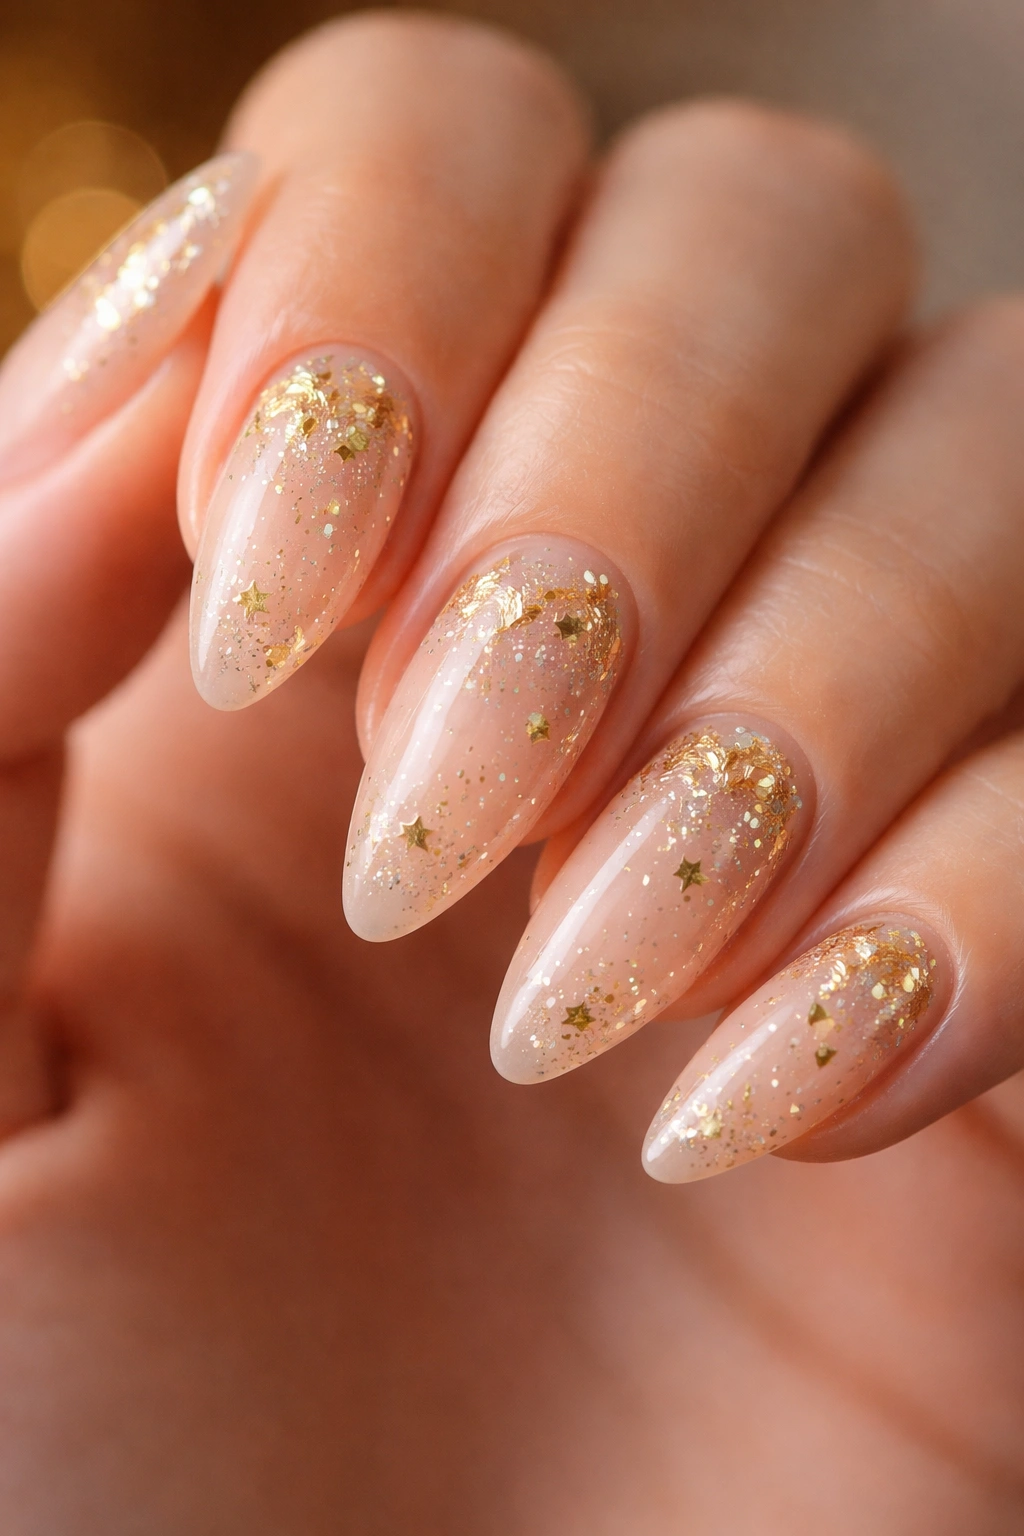
Gold foil can make star almond nails look finished even before you add the stars. It brings a warm, jewel-like feel that works especially well on nude, beige, or soft brown bases.
The best version doesn’t cover the whole nail. That’s the trap. Use the foil in clusters, almost like broken light, and let the rest of the nail stay calm. Then add tiny gold stars or metallic specks around the foil so the set reads as celestial rather than just shimmery. A few foils near the cuticle look rich. A few at the tip feel brighter. Both can work.
This is the kind of set that pairs nicely with rings because the foil has that jewelry look to it. It also wears well on almond nails since the long shape gives the foil room to settle without looking chipped or random.
If you’re doing this at home, put the foil on while the layer underneath is still slightly tacky. Press it down with a silicone tool, not your fingertip. Fingertips snag the foil and leave rough edges.
The whole look depends on spacing. Too much foil, and the stars disappear. Too little, and it feels unfinished.
9. Magnetic Cat-Eye Almond Nails With Floating Stars
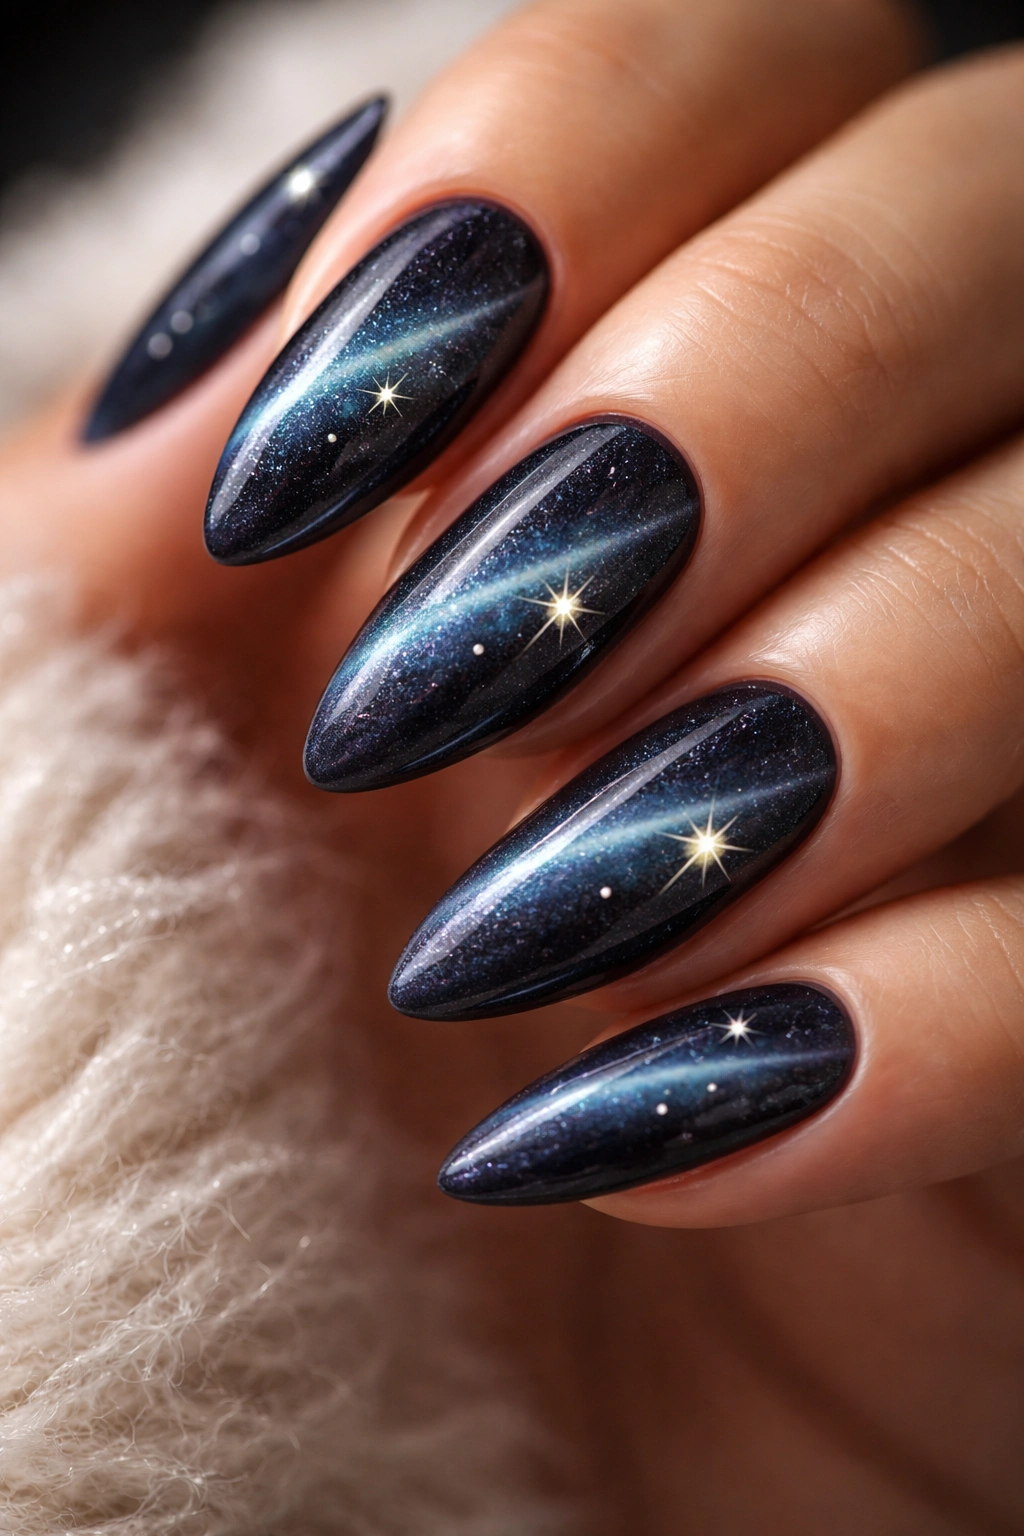
Magnetic cat-eye gel gives celestial nails depth that plain glitter can’t fake. The shimmer line moves when the hand tilts, which makes it a natural match for almond nails and their long, tapered curve.
Where the magnet goes
Hold the magnet along the side of the nail or just above the center for about 5 to 7 seconds before curing. That shifts the magnetic particles into a sharp line instead of a cloudy blur. If you want a comet-like effect, pull the shimmer diagonally toward the free edge. If you want a moonlit look, keep the line centered and soft.
How to place the stars
- Add one small star decal after the magnet line is set
- Keep decals away from the brightest shimmer streak
- Use deep blue, emerald, plum, or black cat-eye gel
- Seal with a thin topcoat so the line stays crisp
The main thing to watch is crowding. Cat-eye polish already has motion in it. If you bury it under too many stars, the effect gets muddy. One or two floating stars per hand is enough to make the whole set read as celestial.
10. Black Almond Nails With Moon-Phase Tips
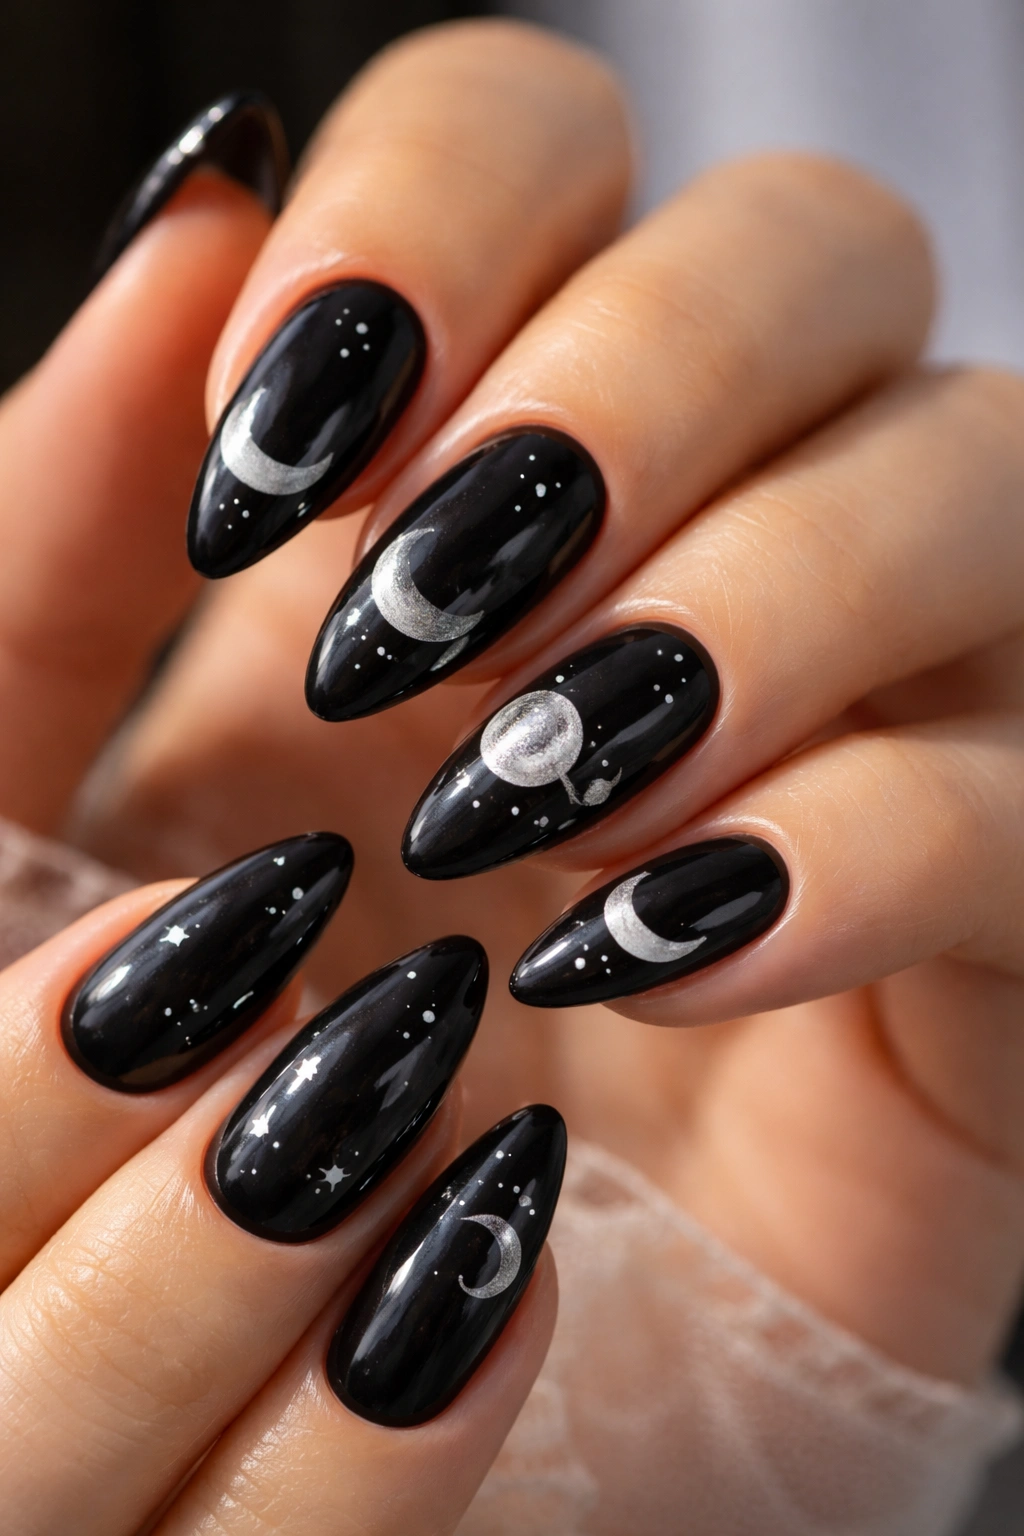
Black almond nails can feel too severe if the surface is flat. Add moon phases, and the whole set changes character. It stops looking heavy and starts looking deliberate.
A glossy black base gives you the deepest backdrop, but matte black works too if you want the moon art to stand out more. Paint the moon phases in white, silver, or pale cream along the tips or down one side of the nail. You can run the phases from full moon to crescent across the hand, or keep each nail focused on a single phase. Both versions read cleanly on almond nails.
- Glossy black with matte moon art for contrast
- Matte black with glossy white moons for a softer effect
- Tiny stars only on the accent nails
- Thin placement near the tip to keep the shape long
I like this set because it has structure. The moon phases make the black feel intentional, not severe. And since the almond shape narrows at the tip, the moons sit nicely along the curve instead of fighting it. If you want something bold but not loud, this is the one to keep in your pocket.
11. Opal Almond Nails With Iridescent Star Decals
Opal almond nails are the soft-spoken cousin of full galaxy designs. They give you shimmer, but the shimmer stays gentle — pink, blue, green, and pearl all shifting under the same pale base.
A milky opal finish works best when the polish is semi-sheer. If the base gets too opaque, you lose the gemstone feel and the whole set turns chalky. Add iridescent star decals after the second coat so they sit inside the depth of the polish instead of floating on top like stickers. Tiny silver specks or crushed opal flakes can sit around the stars, but keep them sparse.
This is a good option if you want celestial nails that still feel soft in daylight. The almond shape helps because the light moves along the tip, and the opal finish catches that movement without needing heavy contrast. It’s one of those looks that feels different every time you turn your hand.
A glossy topcoat is the right finish here. Matte steals the glow, and that glow is the whole point. Keep the stars small, keep the base sheer, and let the color shift do the talking.
12. Navy Glitter Almond Nails With Tiny Dots Of Light
Glitter makes a sky. Stars give it a map. Navy glitter almond nails sit right in the middle of those two ideas, which is why they feel richer than a plain sparkle set.
Use a deep navy base with fine glitter — the kind that looks almost like dust, not chunky flakes. Then add tiny dots of light in white or silver. Those dots can sit near the cuticle, scatter along one side of the nail, or gather into a small cluster on the ring finger. Keep the placement uneven. A perfect pattern reads stiff, and celestial nails should feel a little loose.
How to keep glitter from taking over
Stick to fine glitter only. Big pieces fight the almond shape and make the nail look wider than it is. A thin glitter layer near the center or tip is enough to suggest a star field. If you want more shine, add it through a glossy topcoat rather than packing on more sparkle.
This look suits someone who likes dark nails but doesn’t want them to feel flat. The dots stop the glitter from turning into a blur, and the navy base keeps the set grounded.
13. Soft Lilac Almond Nails With Cloudy Star Trails
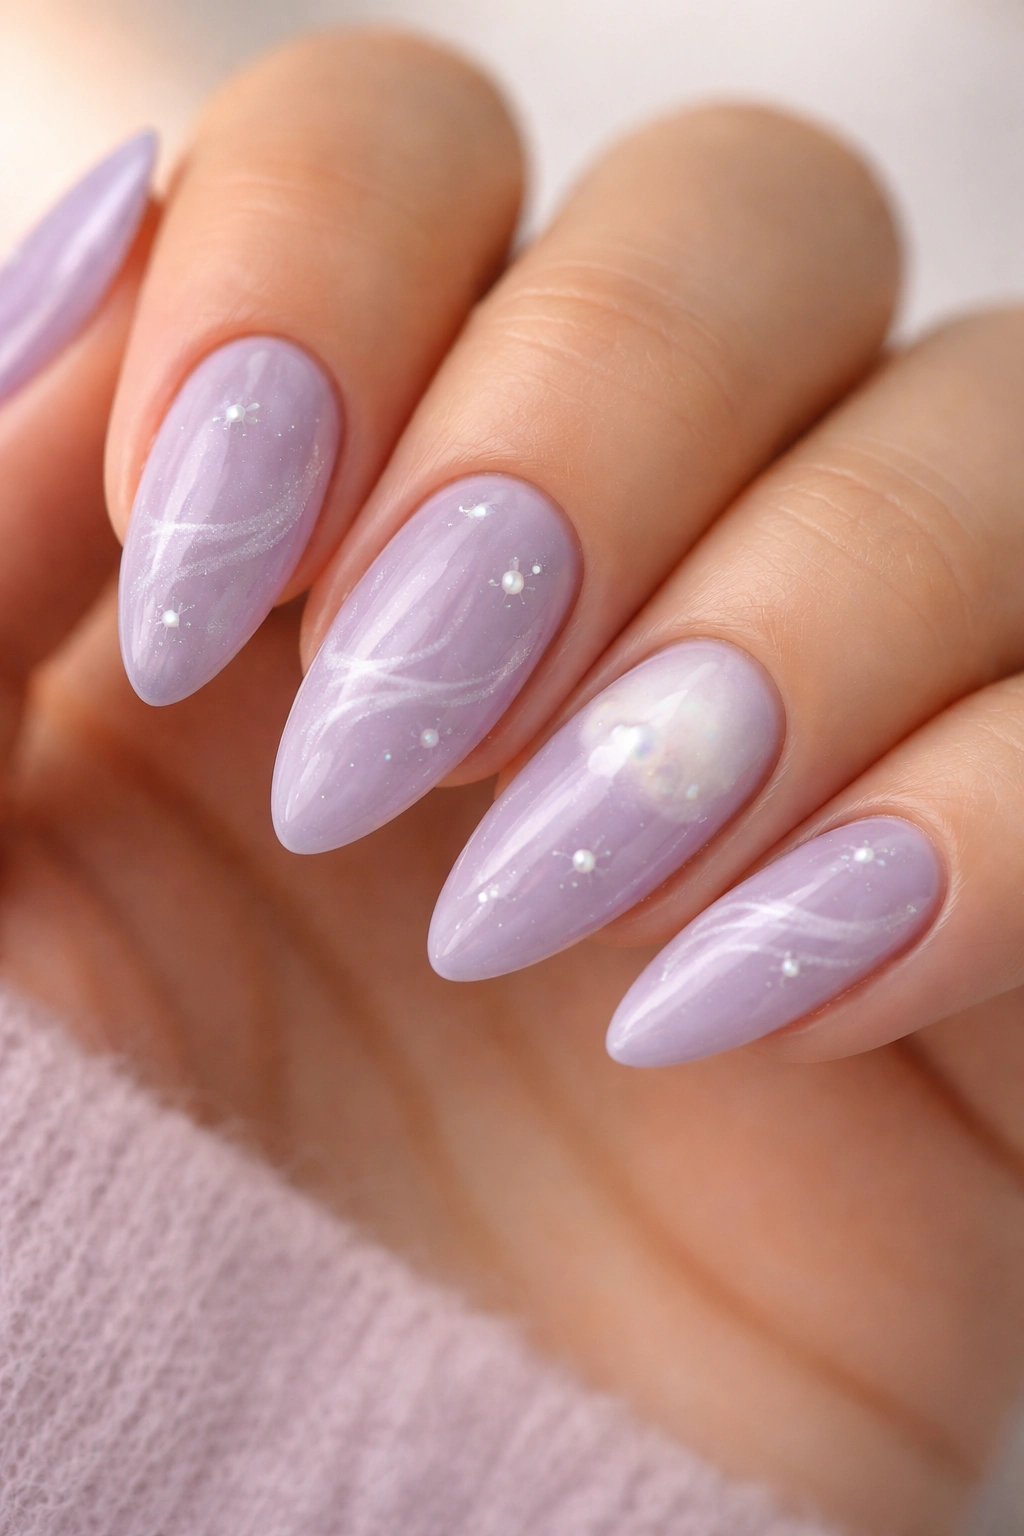
Why does lilac work so well for celestial almond nails? Because it sits between playful and quiet. It has color, but it doesn’t shout, and that makes it a nice backdrop for white stars and silver wisps.
Choose a dusty lavender rather than a bright purple. That matters. Bright lilac can tilt toward bubblegum fast, while a muted shade keeps the set soft and grown-up. Add wispy star trails with a thin silver brush, then tuck in a few white stars and dots so the design feels like it’s drifting rather than marching in straight lines.
How to stop lilac from looking too sweet
Keep the finish glossy and the art fine. Thick outlines make the set look childish, and chunky stickers do the same thing. A sheer lilac base with pale silver stars feels calmer and more refined. If you want extra depth, add one pearly accent nail with a soft cloud-like blend near the cuticle.
This is one of those star almond nail ideas that works when you want a little color but still want the set to stay light. It’s pretty, yes, but more than that, it’s easy to wear.
14. Mix-and-Match Celestial Accent Almond Nails
Picture this: you can’t choose between moons, stars, glitter, and plain space. Good. Don’t. A mix-and-match celestial set is often the smartest way to wear almond nails because it gives each detail room to breathe.
The key is keeping the palette tight. Use one base family — nude, blush, navy, or lilac — and then let each nail tell a different part of the story. One thumb can carry a crescent moon. One index finger can hold a tiny constellation. The middle finger can stay sheer with a few silver dots. The ring finger can get a starburst, and the pinky can wear a fine glitter trail.
- Thumb: crescent moon
- Index: scattered stars
- Middle: sheer base with dots
- Ring: one larger starburst
- Pinky: fine glitter fade
That sounds busy on paper, but it works because the ingredients stay consistent. Same base tone. Same metal color. Same level of detail. The variety comes from the motif, not from random decoration. That’s the part people often miss when they try a mixed celestial set at home.
This is the best option if you want personality without repeating the same art on every nail. It feels curated, not chaotic.
15. Soft Nude Almond Nails With One Statement Star
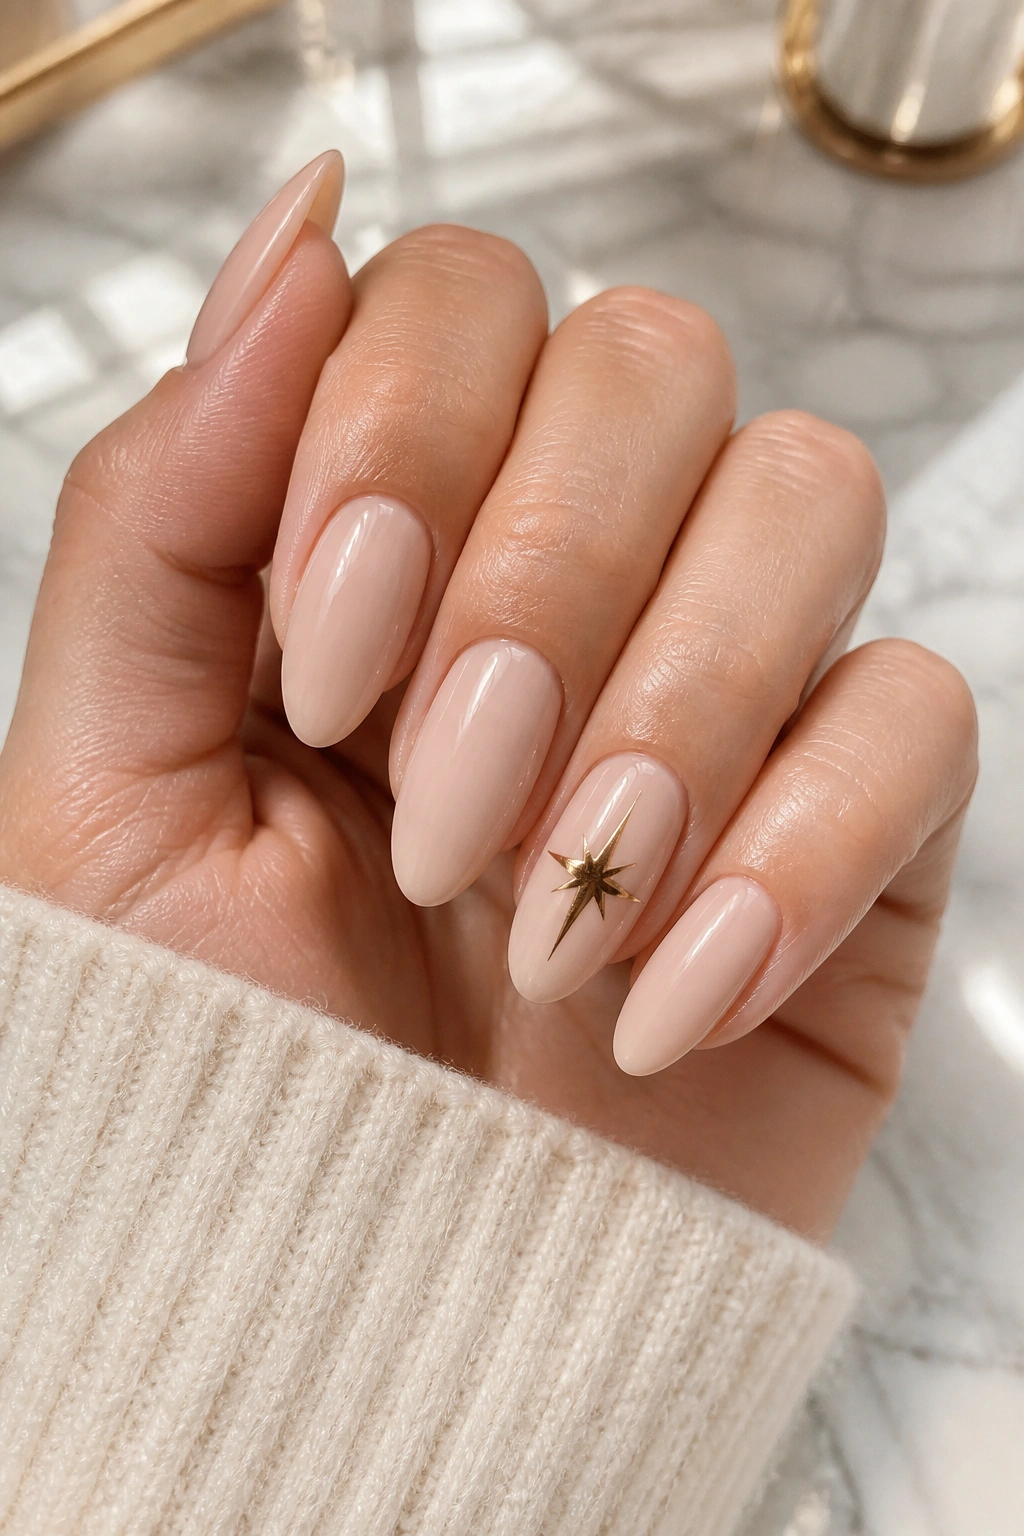
The cleanest celestial almond nail idea may be the one with just one oversized star. Less can be louder here. A soft nude base gives the almond shape a polished line, and a single star on the ring finger or middle finger turns the whole set into something memorable.
The star itself can be white, black, silver, or gold, but it should be crisp and slightly larger than the tiny detail stars used in the earlier looks. Not huge — just enough to read as a focal point. Keep the rest of the nails almost bare, maybe with a whisper of shimmer or one tiny dot near the cuticle. That tiny bit of restraint is what makes the statement star work.
This is the look I’d pick for someone who likes clean nails but wants one point of interest. It plays well with almond nails because the shape is already elegant, so one sharp motif doesn’t feel out of place. It looks neat at a desk, sharp in photos, and calm enough that you won’t get bored with it after a day.
A single star on a satin nude base says enough. Everything else can stay quiet.
