

Short oval nails have a way of looking finished even when the rest of the outfit is doing the bare minimum. Add rhinestones, and the whole thing changes. Not in a loud, nightclub way either. More like a clean flash at the edge of a handwritten note, the kind of detail that catches your eye because it’s placed well, not because it’s shouting.
That’s why short oval nails with rhinestones keep working, season after season and trend cycle after trend cycle. The oval shape softens the hand. The shorter length keeps the look practical. The stones bring in that tiny bit of shine that makes people look twice. Done badly, though, rhinestones can tip into clutter fast. Too many, too big, too random, and the manicure starts looking busy instead of polished.
The sweet spot is placement. One stone at the cuticle. A slim trail on one side. A tiny cluster near the tip. Those small choices matter more than most people think. On short oval nails, there’s not much canvas, so every crystal has to earn its place. That constraint is exactly what makes the style interesting.
1. Single-Crystal Cuticle Accent
A single crystal near the cuticle is one of the cleanest ways to wear rhinestones on short oval nails. It gives you that little spark without taking over the whole nail, and it works especially well if you like a manicure that looks neat from across the room and a bit more detailed up close.
Why It Works So Well
The cuticle area is naturally one of the first places people’s eyes land. A lone stone there acts like a tiny anchor point, especially on a nude, milky pink, or sheer beige base. Because the nail is short, the design stays elegant instead of feeling crowded.
You also get a practical bonus. The stone sits away from the free edge, so it’s less likely to catch on clothing or hair. That matters more on short nails than people admit. If you use your hands a lot, this is the design that survives real life.
Best Base Colors
- Soft pink sheer polish for a fresh, clean look
- Beige-nude for a skin-matching finish
- Pale peach if you want a warmer tone
- Milky white if you like a soft, glossy surface
Tip: Choose one small crystal rather than a chunky gem. On a short oval nail, size matters more than sparkle.
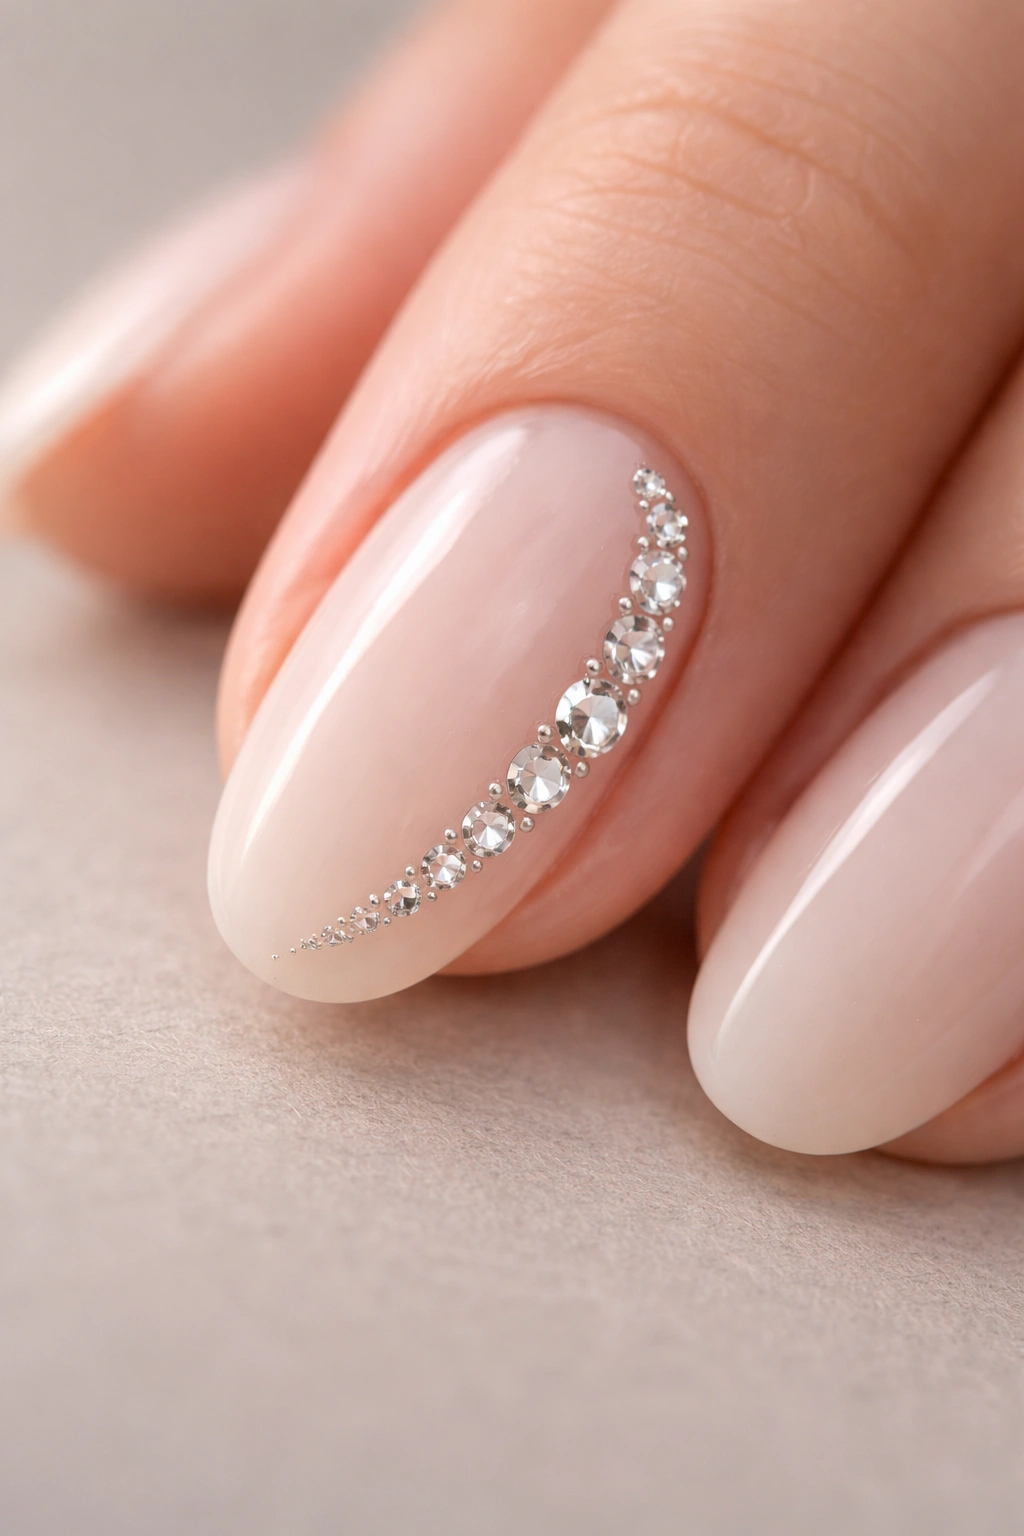
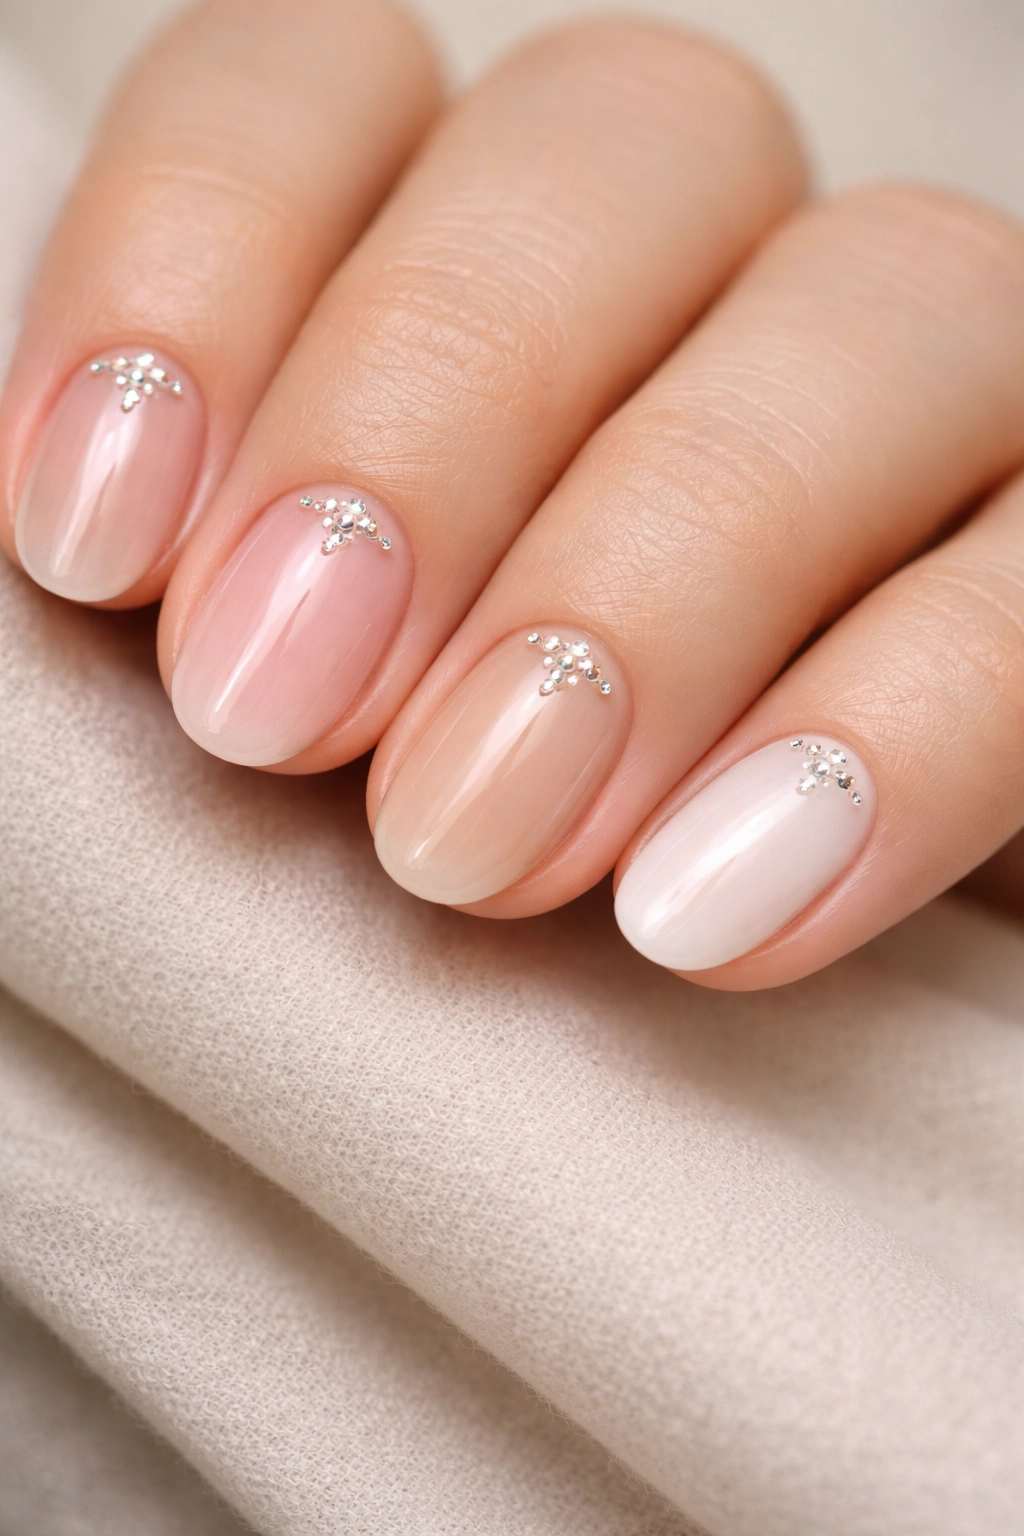
2. Tiny Rhinestone Moon at the Base
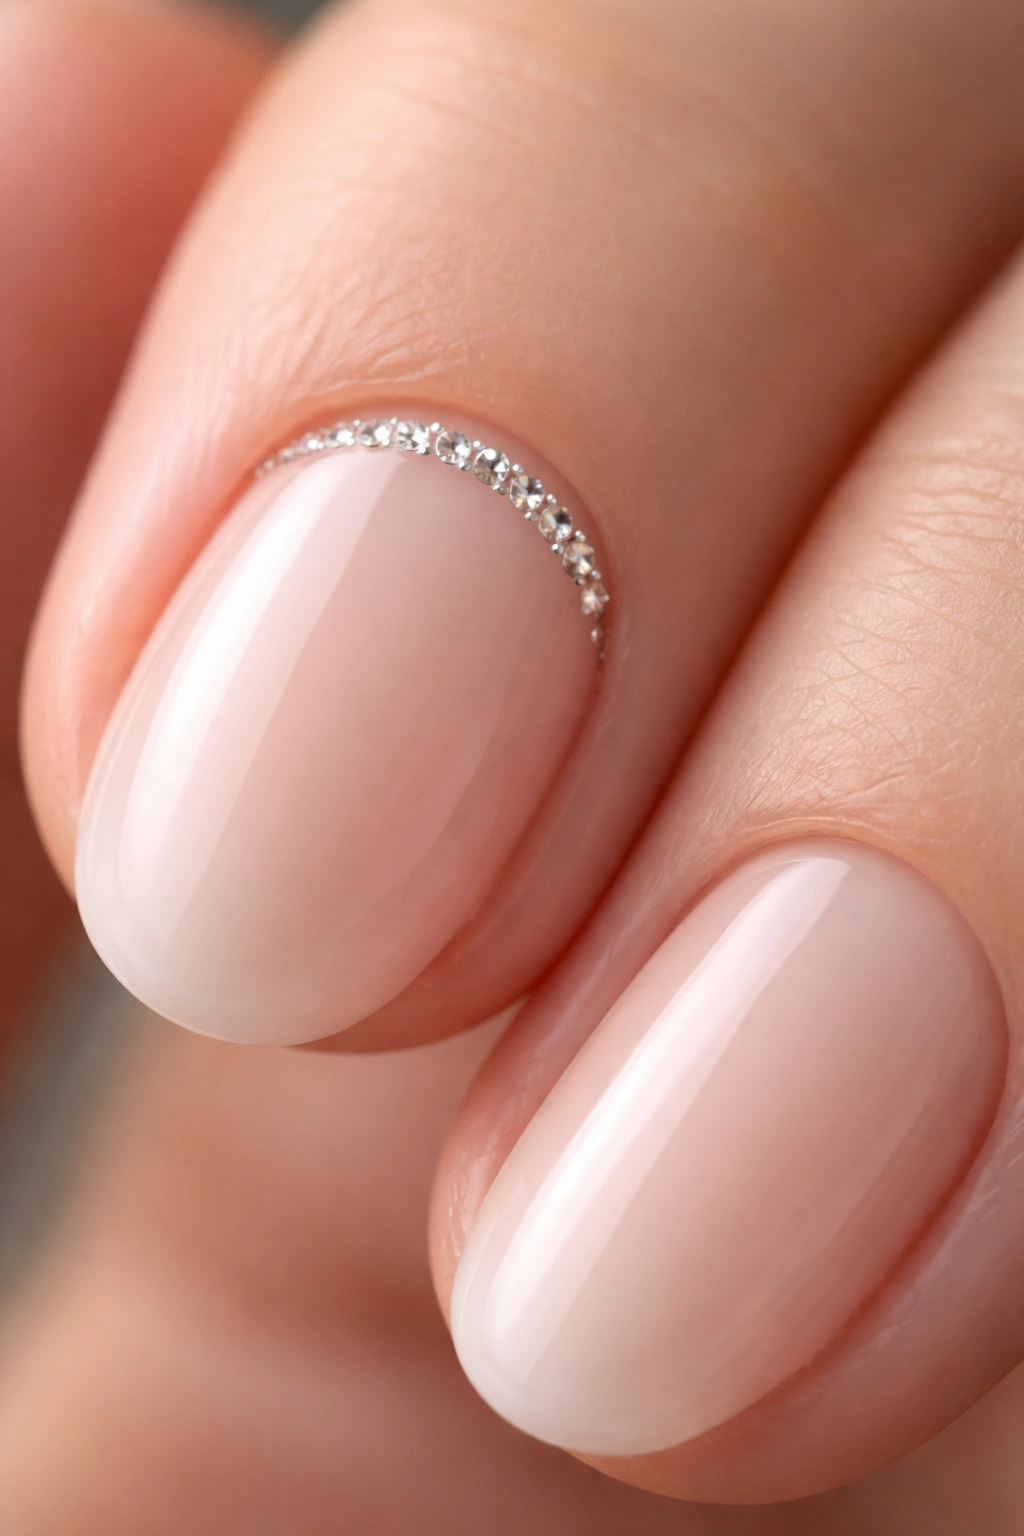
A slim crescent of stones at the base of the nail gives a manicure a little more shape. It’s still restrained, but it has more movement than a single crystal. If the first style feels too minimal for you, this is usually the next best step.
The moon shape works because it follows the curve of the cuticle line. That creates a sense of balance, and balance is half the battle with short nails. The design looks intentional even when the rest of the nail is plain.
What Makes It Different
Unlike a full crystal border, this look leaves plenty of negative space. That keeps the nail breathable instead of heavy. On short oval nails, you want the rhinestones to frame the nail, not fight it.
This is also a smart choice if you like a slightly dressier manicure for events, dinners, or photos. It reads more decorated than a single stone, but it still feels wearable with jeans and a sweater.
How to Wear It
- Keep the stones tiny and uniform
- Use clear or champagne crystals for the softest effect
- Pair it with a glossy nude base
- Ask for the arc to sit just above the cuticle, not touching the skin
3. Side-Swept Crystal Line
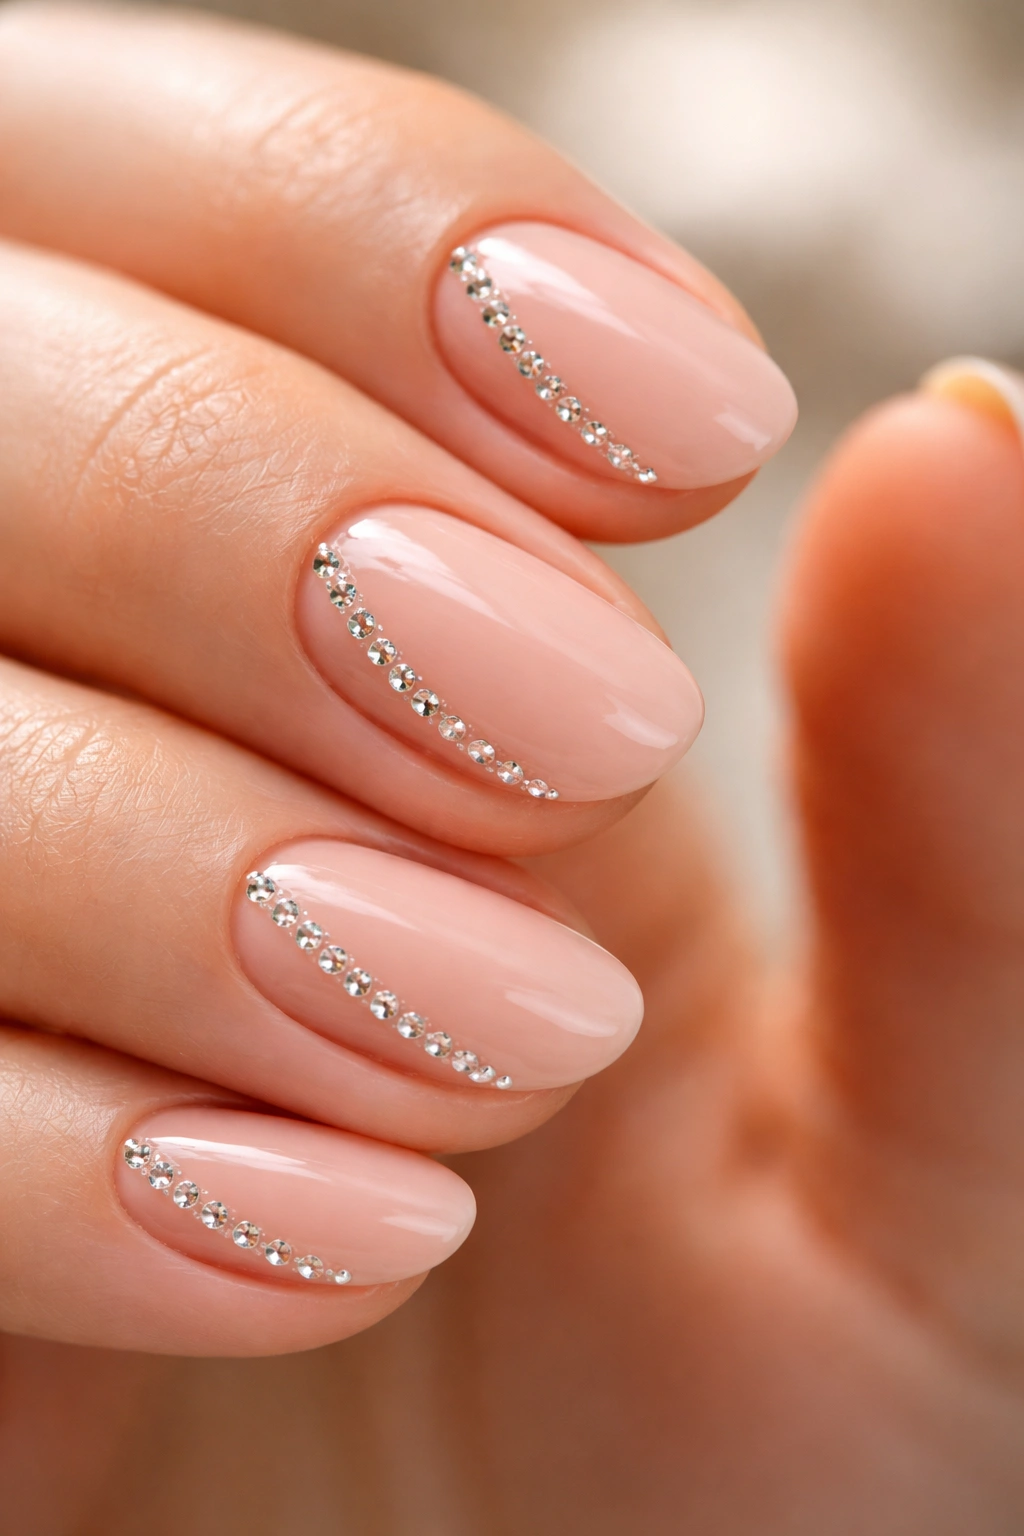
A side-swept line of rhinestones is where short oval nails start looking a little more styled. The diagonal placement gives the illusion of length, which is always useful on shorter nails. It also breaks up the symmetry in a way that feels modern without trying too hard.
I like this design because it has motion. Your eye follows the line, and that slight movement keeps the manicure from feeling static. It’s one of those details that looks expensive even when the materials are simple.
The Shape Trick
On an oval nail, the soft curve already does some visual work. A diagonal crystal trail adds another direction, and the combination is what makes the manicure look stronger. Straight-across placement can feel stiff here. Diagonal placement is easier on the eye.
A side-swept line works especially well on one accent nail per hand if you want to keep things subtle. Or you can repeat it on every nail and keep the stones tiny enough that the result stays tidy.
Good Color Pairings
- Clear stones on soft pink polish
- Silver crystals on taupe
- Champagne stones on beige
- AB stones only if the base is very plain
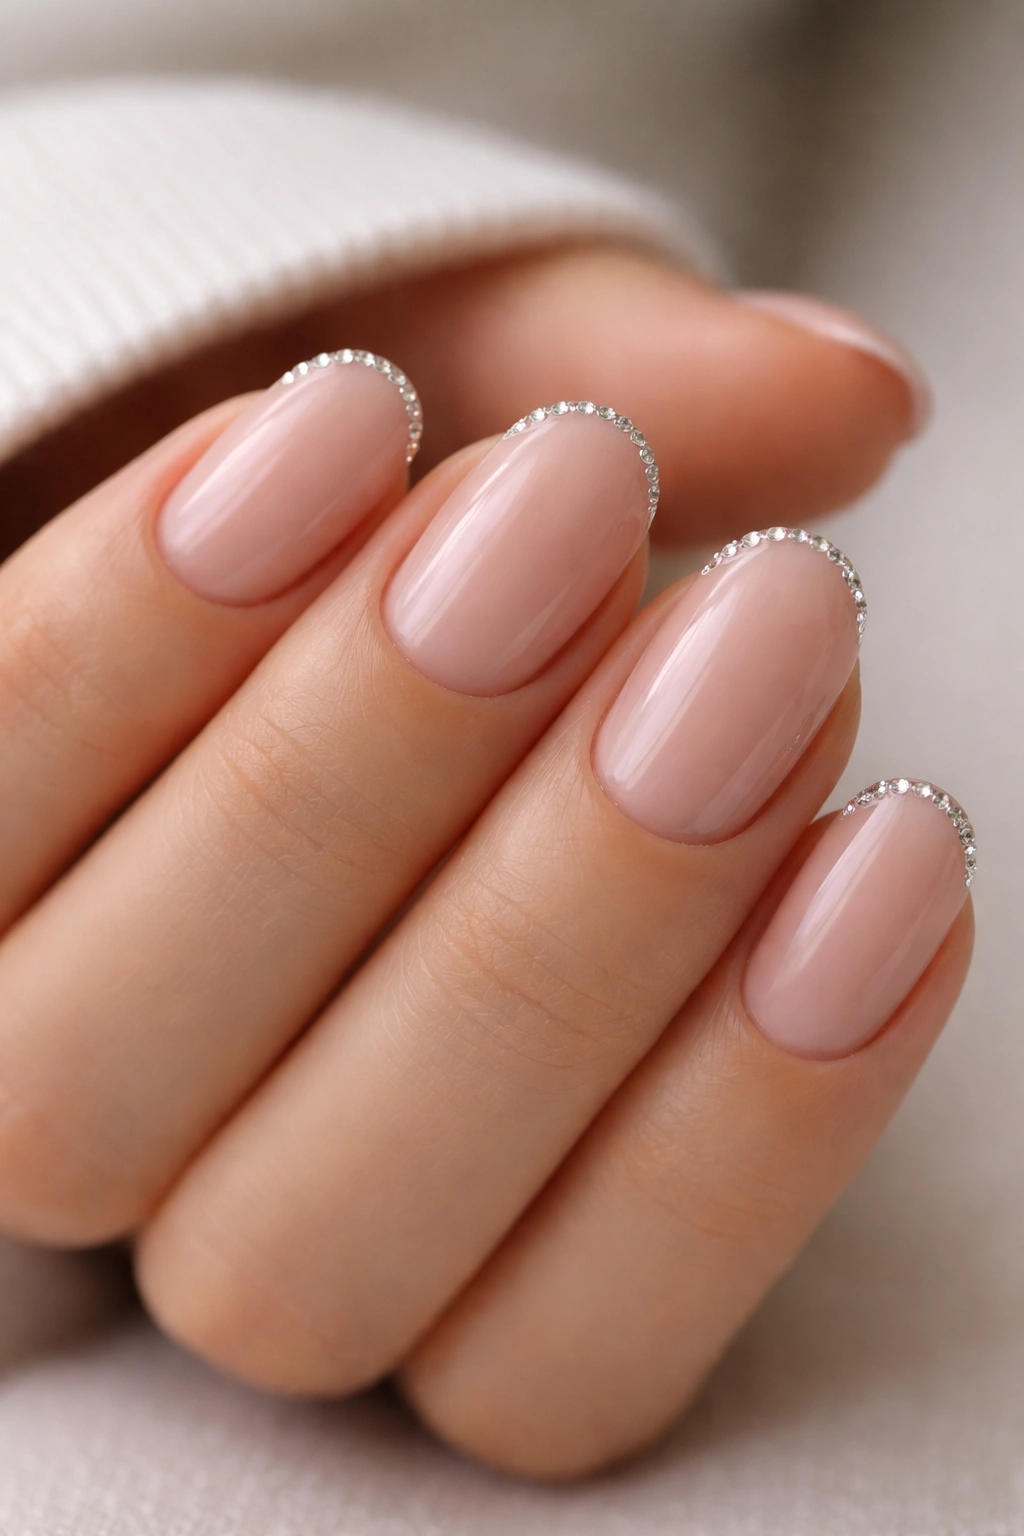
4. Minimal French Tips with Rhinestone Edges
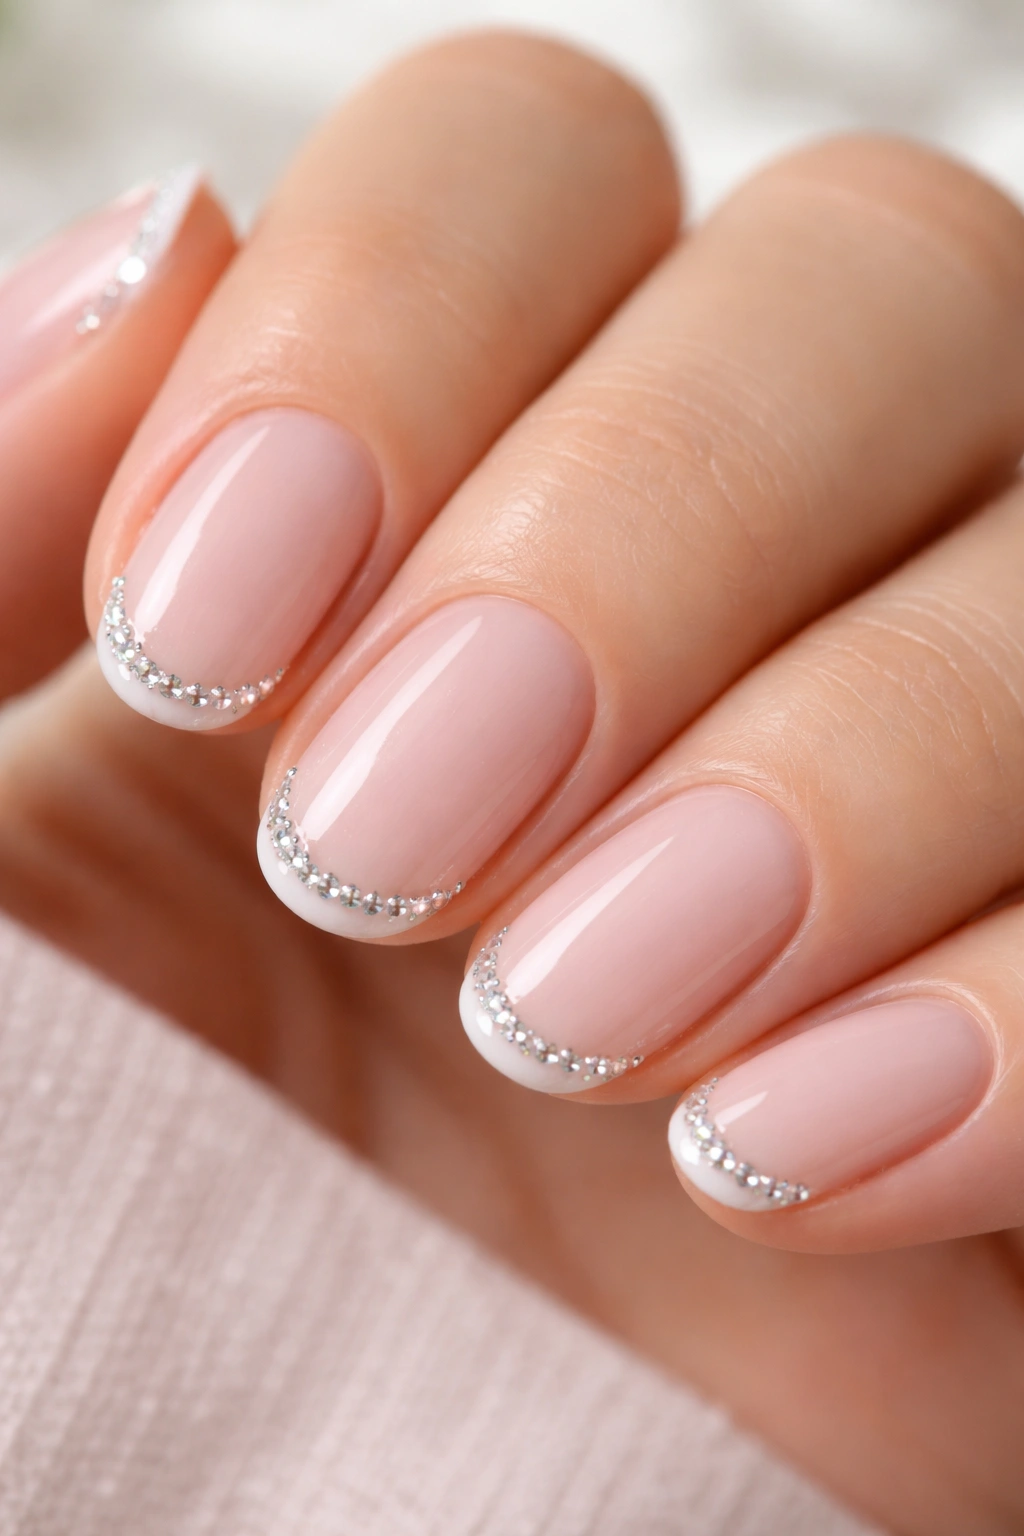
A French tip with rhinestones can go in two directions: tasteful or overdone. On short oval nails, the tasteful version wins almost every time. Keep the white tip thin, keep the stones tiny, and let the shape do its job.
The appeal here is classic structure with a little shine at the edge. The manicure feels familiar, but the rhinestones keep it from looking predictable. If you like polished nails that still have a bit of personality, this is a strong choice.
Where to Place the Stones
The safest placement is just below the tip line or right where the white meets the base. That keeps the design sharp and prevents the stones from making the tip look bulky.
You do not need a full stone border. In fact, that’s usually too much for short nails. A few evenly spaced crystals, or a single accent stone on each ring finger, gives the French look a cleaner finish.
Best For
- Weddings
- Office wear with a little sparkle
- People who like classic nails but get bored easily
- Short nails that need a slight visual lift
5. One Accent Nail with a Crystal Cluster
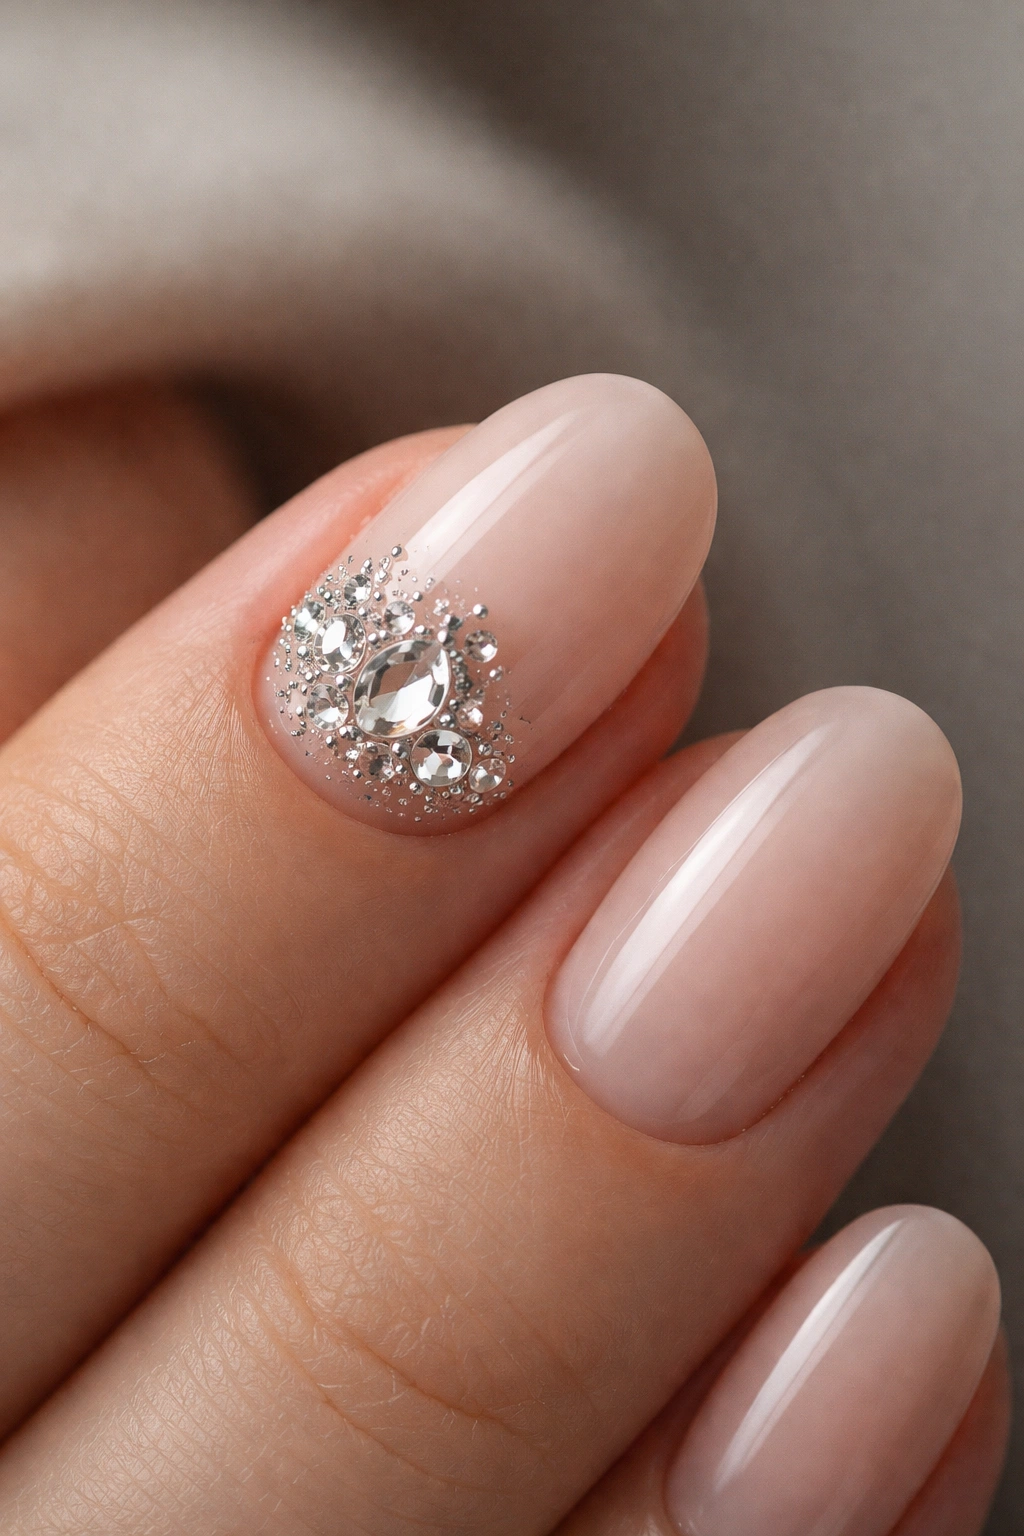
Sometimes restraint means choosing one nail to do the talking. A crystal cluster on the ring finger or middle finger gives short oval nails a focal point without turning the whole set into a decorated parade. It’s a simple idea, but it works because it respects the shape of the hand.
The rest of the nails can stay plain, glossy, or softly tinted. That contrast makes the accent nail pop even more. And because the cluster is concentrated in one spot, the overall look stays balanced.
What the Cluster Should Look Like
A good cluster has variation in size, but not chaos. Think one slightly larger center stone surrounded by two or three tiny crystals. That creates a little texture without making the nail top-heavy.
The best clusters sit closer to the cuticle or off to one side. Centered clusters can work too, but they often feel stronger and a bit more formal. Side placement feels softer and a little easier to wear.
A Useful Rule
- One accent nail per hand is enough for most people
- Keep the other nails plain or nearly plain
- Use small stones if the nail bed is narrow
- Skip large gems unless you want a special-occasion look
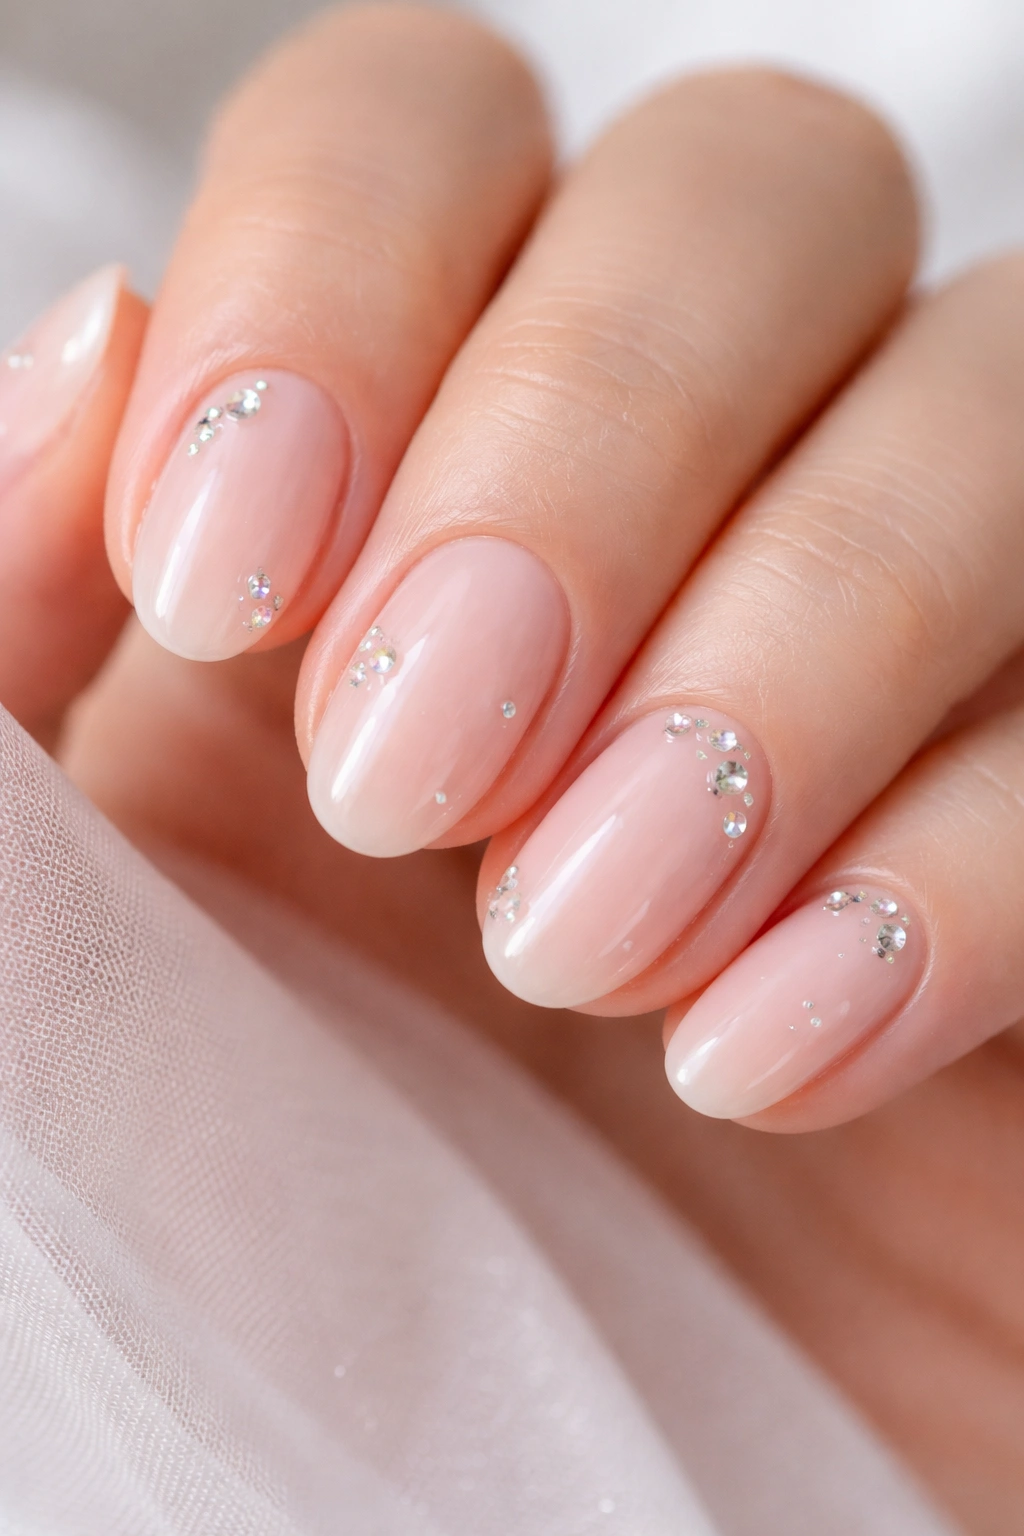
6. Milky Nude Nails with Scattered Sparkle
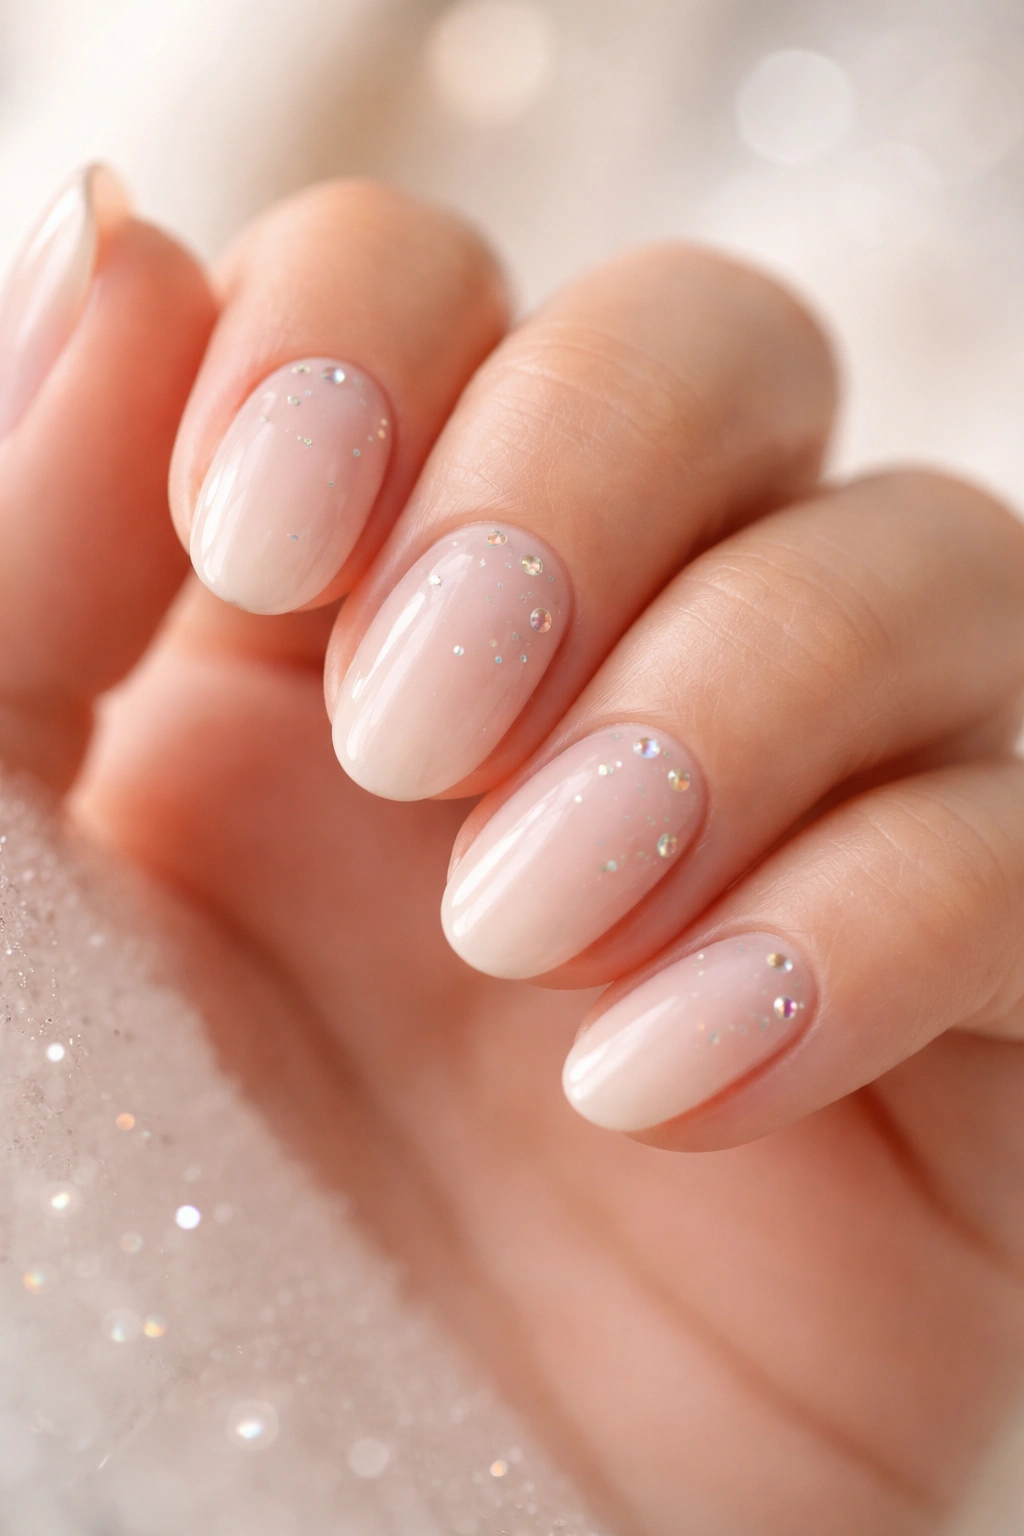
Scattered rhinestones on a milky nude base have a softer, more romantic feel than the sharper placement styles. The stones are placed loosely, but not randomly. That distinction matters. Random placement looks messy. Light scattering looks airy.
This design is especially good on short oval nails because the shape already feels gentle. Add a translucent base and a few crystals, and the whole manicure starts to look like polished glass with tiny bits of light floating across it. That sounds fancier than it is, but the effect is honestly lovely.
How to Keep It From Looking Messy
The trick is spacing. Leave enough room between stones so each one has its own job. If everything is crowded into the center of the nail, the design loses that soft, scattered feel.
Use clear, pale pink, or soft opal-toned stones if you want the easiest version to wear. Mixed shapes can work too, but only if the rest of the manicure stays quiet. A sheer base keeps the stones from competing with color.
Best Situations for This Look
- Weekend wear
- Date nights
- Bridal events
- Anyone who likes sparkle but hates heavy nail art
7. Glitter Base with Micro Rhinestones
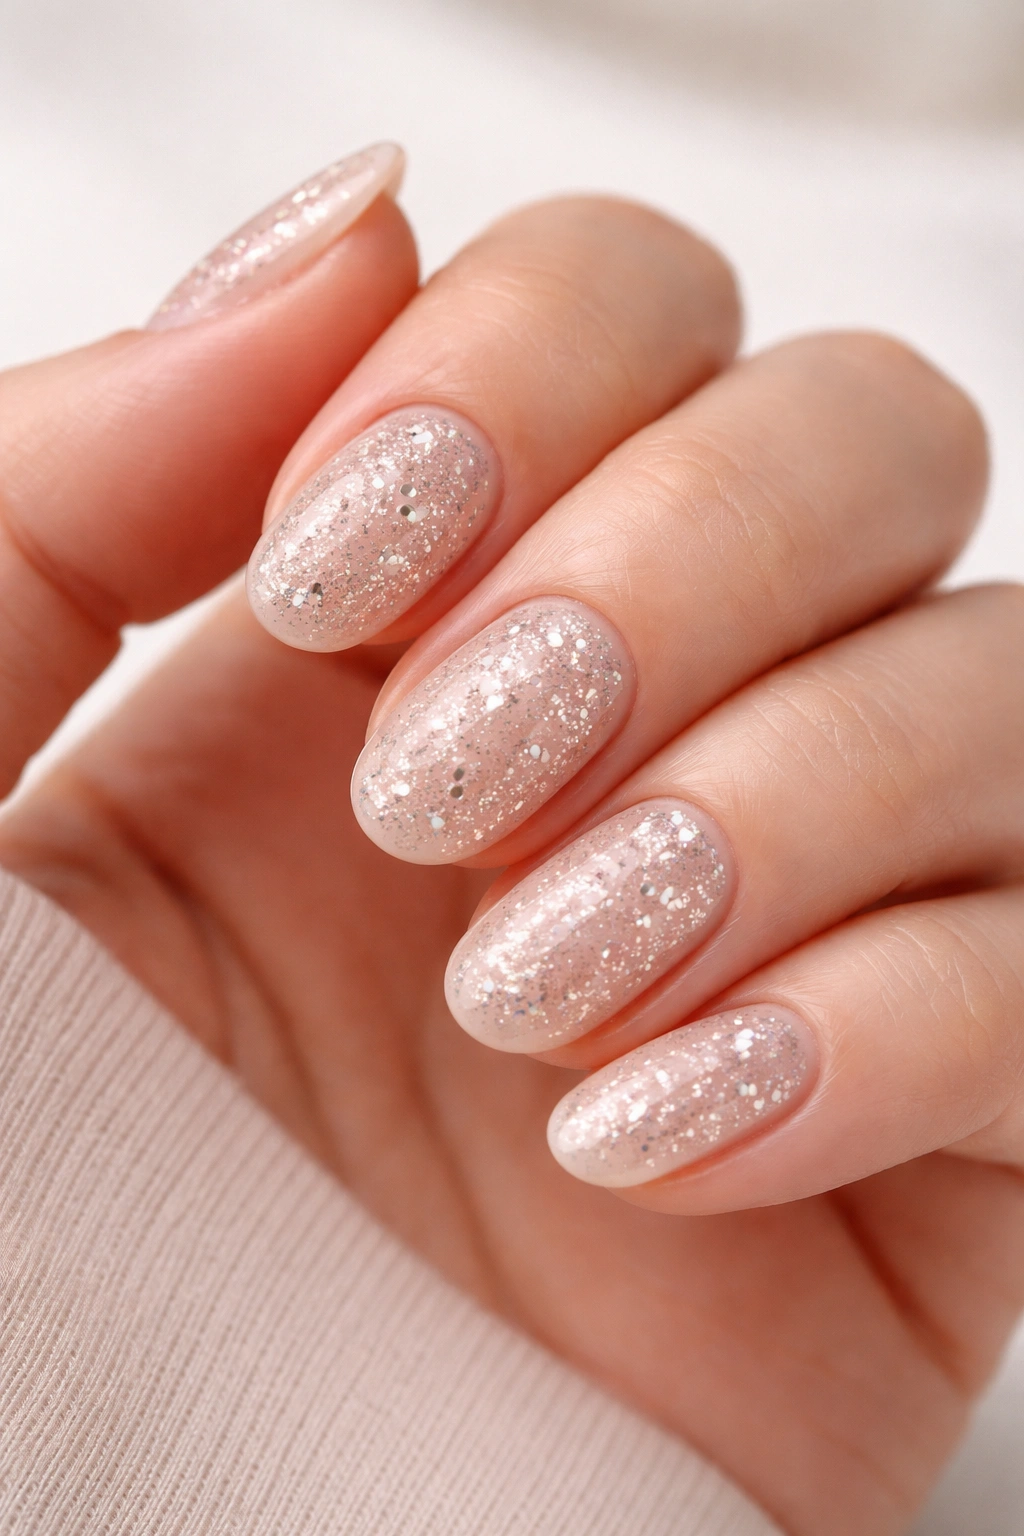
Glitter and rhinestones can be a dangerous pairing if both elements are loud. On short oval nails, though, a fine glitter base with tiny micro stones can look surprisingly refined. The key is scale. If the glitter is fine and the stones are small, the manicure reads as textured instead of overloaded.
I prefer this look when the base color is soft pink, nude, or champagne. Chunky glitter changes the mood fast and can make the nails look busier than they really are. Fine shimmer sits closer to the nail and plays better with the short length.
Why Micro Stones Matter
Big rhinestones can overpower a short oval nail. Micro stones, on the other hand, feel like part of the surface. They give the manicure sparkle at close range without making the nail feel weighted down.
This is a good option if you like light-catching nails but still want them to feel wearable during everyday tasks. There’s less snag risk, too. That sounds small, but it matters once you’ve worn stone-heavy nails long enough to regret them.
Good Pairings
- Champagne shimmer base with clear micro stones
- Pale rose glitter with silver stones
- Nude shimmer with tiny AB accents
- Sheer white with a single stone on each nail
8. Gem-Tipped Oval Nails
Gem-tipped nails place the rhinestones near the free edge instead of the cuticle, which gives the manicure a slightly more decorative feel. On short oval nails, this works best when the tip line stays narrow and the stones are tiny. Too much bulk at the edge can make the nail look shorter, and nobody wants that.
The strength of this design is the way it frames the oval shape. The eye lands on the tip, then follows the curve back toward the center. It’s a neat little trick, and it gives the nails a finished look even when the base color is very simple.
What to Watch For
Because the stones sit where the nail takes the most wear, secure application matters here. A weak topcoat or sloppy adhesive placement will show fast. This is one of those styles where clean prep is more important than the sparkle itself.
Keep the base sheer or neutral if you want the tips to stand out. A bold color can compete with the stones and make the whole thing feel heavier than intended.
Best With
- Soft beige polish
- Pale pink polish
- Clear or silver crystals
- A slim white tip underneath, if you want a French-inspired version
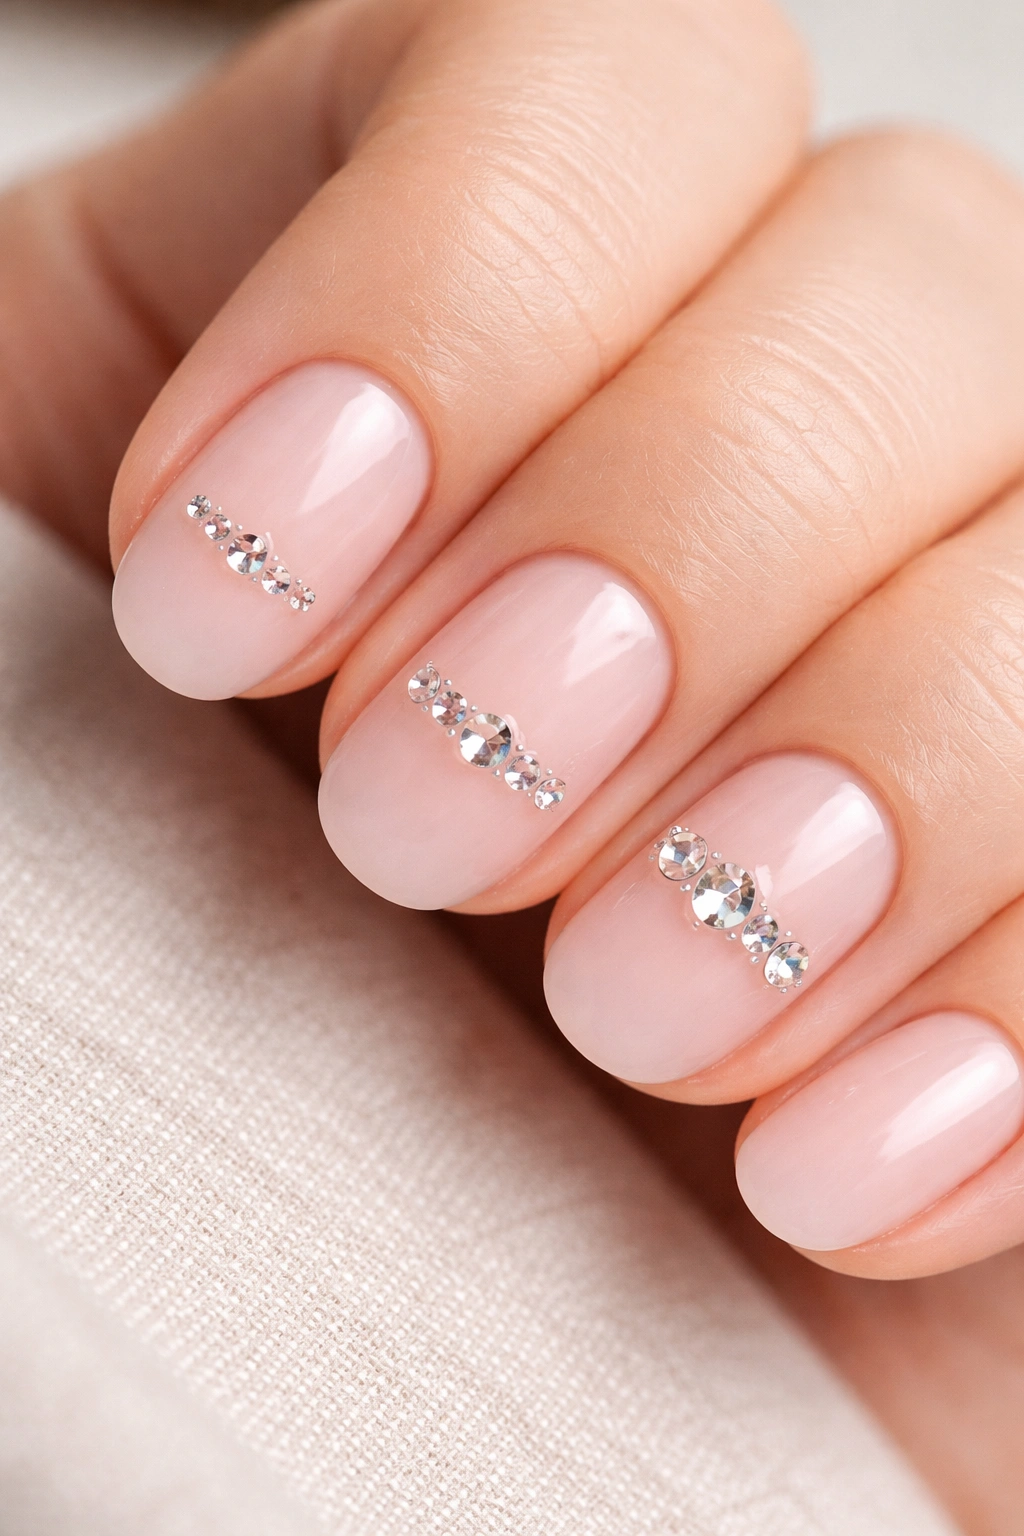
9. Mixed-Size Crystal Trail
A mixed-size crystal trail gives short oval nails a little more drama, but it still stays controlled if the placement is thoughtful. The idea is to start with one larger stone and taper down into smaller ones, almost like a tiny comet across the nail.
That tapering effect is what keeps the design from feeling clunky. When the stones shrink as the line moves, the nail looks longer and a bit more delicate. It’s one of the better choices if you want your nails to feel dressed up without going full glam.
Why It’s Better Than Uniform Stones
Uniform stones can look flat. Mixed sizes add a sense of motion and make the design feel hand-placed instead of stamped on. That matters more than people think, especially on smaller nails where there’s less room to create visual interest.
A trail also gives you room to play with direction. Curved trails feel softer. Slightly angled trails feel sharper. Straight trails are the most formal, and honestly, a little stricter than most short oval nails need.
Practical Advice
- Use one medium stone and three to five smaller ones per nail
- Keep the trail to one side or diagonally across the center
- Avoid placing the largest stone at the very tip
- Match stone color to the base for a calmer finish
10. Full-Set Sparkle with Negative Space
A full-set sparkle manicure can still work on short oval nails if you leave enough negative space. That’s the part people often miss. You do not need to cover every nail from cuticle to tip. A few well-placed crystals on each nail, with plenty of bare or sheer polish showing through, gives you the shine without the heaviness.
This look has a nice balance between polished and playful. It’s the most visibly decorated option here, but because the nail length is short and the oval shape is soft, it doesn’t tip into excess as easily as it would on longer nails.
Why Negative Space Saves It
Bare space keeps the eye resting. Without it, the rhinestones can feel dense. With it, each stone gets room to stand out. That breathing room is especially important if you’re using multiple stones on every nail.
I’d keep the base sheer pink, milky white, or very light nude. Dark bases can work, but they make the stones look more dramatic and less airy. Sometimes that’s the goal. Sometimes it is not.
How to Make It Wearable
- Use stones in 1 to 2 sizes only
- Leave at least half the nail mostly clean
- Keep the same placement rhythm across the hand
- Finish with a glossy topcoat to smooth the surface
Choosing the Right Rhinestone Size for Short Oval Nails
Size is where short oval nails either shine or get overwhelmed. Tiny stones look neat. Medium stones can work if they’re placed carefully. Large gems usually need more nail surface than a short oval shape can comfortably give them.
A good rule is to keep the stones proportional to the width of the nail bed. If the stones touch the sidewalls or sit too close to the free edge, the manicure starts feeling crowded. And crowded is the enemy here.
A Simple Size Guide
- Tiny stones: Best for everyday wear and cuticle accents
- Small stones: Good for trails, French edges, and clusters
- Medium stones: Fine for one accent nail or special occasions
- Large stones: Use sparingly, if at all, on short nails
Best Base Colors for a Clean Rhinestone Look
The base color does a lot of the heavy lifting. Clear and sheer pink bases give you the most flexibility because they let the stones stand out without turning the nail into a busy surface. Nude bases are a close second, especially if you want the manicure to blend with your skin tone.
Cool-toned nudes pair well with silver stones. Warm beige works better with champagne or gold accents. Milky white gives the cleanest contrast if you want the sparkle to read immediately. Dark bases can look striking, but they need more care. Every speck of dust, every uneven stone, every crooked line shows faster on a dark background.
Easy Pairings That Always Make Sense
- Sheer pink + clear stones for soft shine
- Nude beige + champagne stones for warmth
- Milky white + silver stones for crisp contrast
- Taupe + clear stones for a slightly moodier finish
How to Keep Rhinestones On Without Ruining the Finish
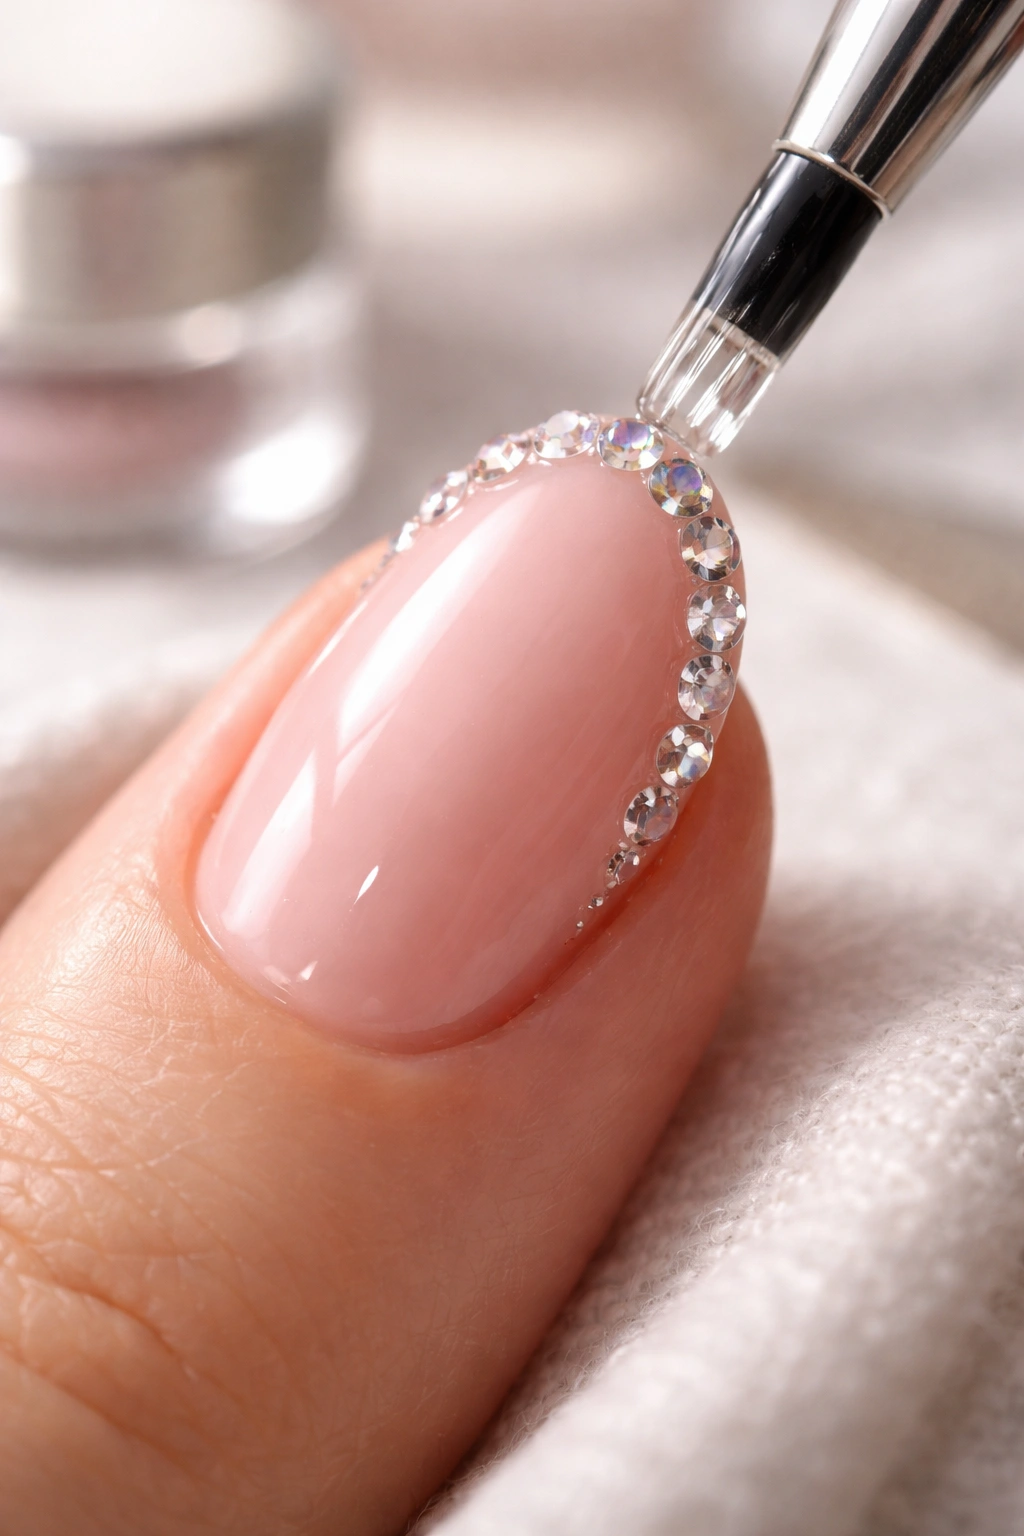
Good placement is only half the job. If the stones lift after a couple of days, the whole look falls apart. A sturdy base coat, proper adhesive, and a sealed top edge make a bigger difference than most people expect.
The nail should be clean and dry before anything goes on. Oils are sneaky. They sit on the surface and make stones slide before the adhesive sets. Press each stone into place with a wax pencil or a dotting tool, then seal around the edges carefully so you do not drown the sparkle under too much product.
Mistakes I’d Avoid
- Using too much glue, which makes the surface lumpy
- Placing stones too close to the edge of the nail
- Skipping the topcoat around the stone base
- Choosing oversized crystals for very short nails
Final Thoughts

Short oval nails with rhinestones work because they balance softness and shine. The shape keeps the manicure easy to wear, and the stones add enough detail to make it feel styled. That combination is hard to mess up when the placement is thoughtful.
The best looks here are the ones that know when to stop. One crystal. A slim trail. A tiny cluster. That restraint is what gives the style its appeal.
And honestly, that’s the part I like most. The manicure does not need to shout to be noticed. It only needs one well-placed sparkle.
